Spring6启示录
OCP开闭原则
- 什么是开闭原则?
- 在软件开发过程中应当对扩展开放,对修改关闭。
- 也就是说如果在进行功能扩展的时候,添加额外的类是没有问题的,但因为功能扩展而修改之前运行正常的程序,这是不被允许的。因为一旦修改了之前运行正常的程序,就会导致项目整体要进行整体的全方位编译,测试,打包,部署等一系列过程,这是相当麻烦的。所以我们在编写程序的时候一定要遵循OCP原则,降低程序的耦合度,提高程序的扩展力。
- OCP原则是七大开发原则中最基本的一个原则:开闭原则,OCP原则是核心,是最基本的,其他六个原则都是为了这个原则服务的。
- 在扩展功能的时候修改了原来的代码,那么这个设计是失败的,违背了OCP开闭原则。
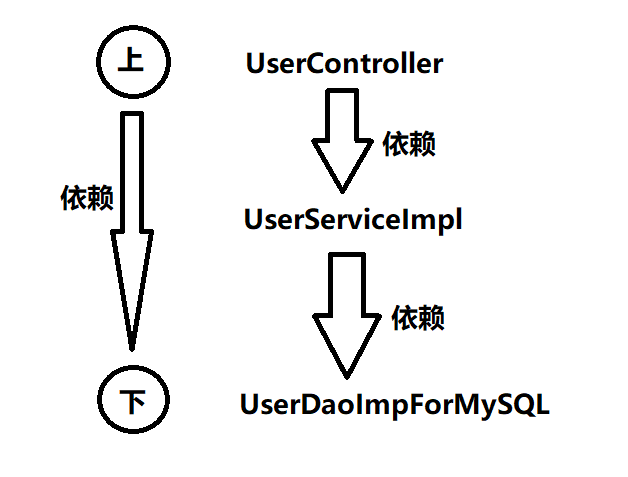
- 很明显可以看出,“上层”依赖“下层”,表示层依赖业务逻辑层,业务逻辑层依赖持久化层,这样会导致“下层”只要改动,“上层”必然会受到牵连(跟着也会改),这样以来也就违背了另一个软件开发原则:依赖倒置原则。
DIP依赖倒置原则
-
依赖倒置原则(Dependence Inversion Principle),简称DIP,主要倡导面向抽象编程,面向接口编程,不要面向具体编程,让“上层”不再依赖“下层”【表现层不在依赖业务逻辑层,业务逻辑层不在依赖持久化层】,“下层”代码改动了“上层”的代码不会受到牵连,这样可以大大降低程序的耦合度,耦合度降低了,扩展能力就增强了,同时代码的复用性也会增强。(软件的其打开法院则都是在为解耦合服务的)。
-
为什么叫做“依赖倒置”原则?
- 程序的正常运行顺应的人们的思维,本来应该依赖的是具体的实现。而依赖倒置原则描述的是应该依赖“接口”,从“依赖实现”倒置成“依赖接口”,倒过来了,所以叫做依赖倒置。
-
这里的代码已经面向接口编程了呀:
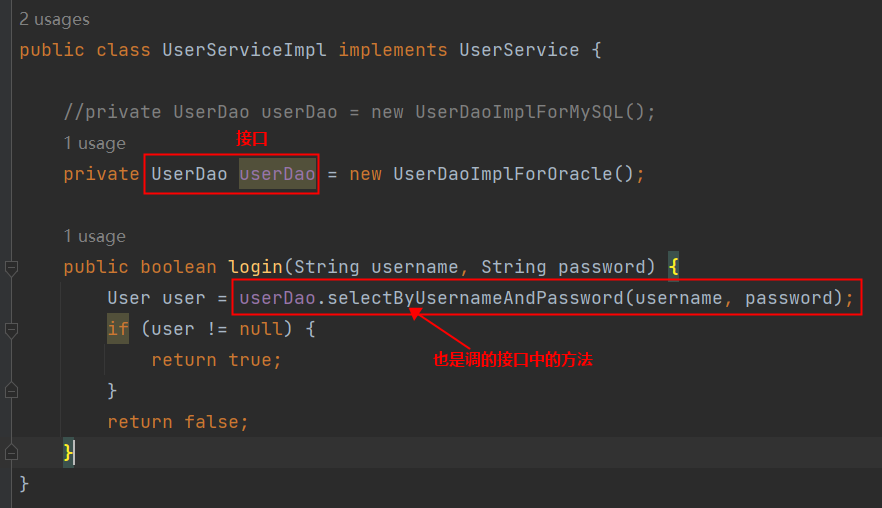
确实已经面向接口编程了,但对象的创建是:new UserDaoImplForOracle()显然并没有完全面向接口编程,还是使用到了具体的接口实现类。什么叫做完全面向接口编程?什么叫做完全符合依赖倒置原则呢?请看以下代码:

如果代码是这样编写的,才算是完全面向接口编程,才符合依赖倒置原则。那你可能会问,这样userDao是null,在执行的时候就会出现空指针异常呀。你说的有道理,确实是这样的,所以我们要解决这个问题。解决空指针异常的问题,其实就是解决两个核心的问题:
- 第一个问题:谁来负责对象的创建。【也就是说谁来:new UserDaoImplForOracle()/new UserDaoImplForMySQL()】
- 第二个问题:谁来负责把创建的对象赋到这个属性上。【也就是说谁来把上面创建的对象赋给userDao属性】
如果我们把以上两个核心问题解决了,就可以做到既符合OCP开闭原则,又符合依赖倒置原则。很荣幸的通知你:Spring框架可以做到。
在Spring框架中,它可以帮助我们new对象,并且它还可以将new出来的对象赋到属性上。换句话说,Spring框架可以帮助我们创建对象,并且可以帮助我们维护对象和对象之间的关系。比如:

Spring可以new出来UserDaoImplForMySQL对象,也可以new出来UserDaoImplForOracle对象,并且还可以让new出来的dao对象和service对象产生关系(产生关系其实本质上就是给属性赋值)。
很显然,这种方式是将对象的创建权/管理权交出去了,不再使用硬编码的方式了。同时也把对象关系的管理权交出去了,也不再使用硬编码的方式了。像这种把对象的创建权交出去,把对象关系的管理权交出去,被称为控制反转。 -
为什么叫做“控制反转”?
- 因为控制权本来在自己手上,把控制权反转给了Spring框架,所以叫做控制反转。
-
什么是控制反转?
- 控制反转(Inversion of Control,缩写为IoC),是面向对象编程中的一种设计思想,可以用来降低代码之间的耦合度,符合依赖倒置原则。
- 控制反转的核心是:将对象的创建权交出去,将对象和对象之间关系的管理权交出去,由第三方容器来负责创建与维护。【这个第三方容器可以是Spring】
- 控制反转常见的实现方式:依赖注入(Dependency Injection,简称DI),通常依赖注入包括以下两种方式:
- set注入:通过执行set方法给属性赋值。【如果是这样我们也可以自己写一个测试程序给set调用set方法给属性赋值,把控制权限交给我们写的测试程序,实现控制反转思想,为什么还要学习Spring,因为Spring帮你写好了,你省事了啊,Spring不仅能实现依赖注入,Spring还有其AOP等他强大的功能啊】
- 构造注入:执行构造方法给属性赋值。
- 什么是依赖注入?
- 依赖:A对象和B对象的关系。
- 注入:是一种手段,通过这种手段可以让A对象和B对象产生关系。
- 依赖注入:A对象和B对象之间的关系靠注入手段来维护。
-
而Spring框架就是一个实现了IoC思想的框架。
-
注意术语:
- OCP:开闭原则
- DIP:依赖倒置原则
- IoC:控制反转(一种思想,一种新的设计模式)
- DI:依赖注入(控制反转的具体实现方式)
Spring概述
-
Spring是一个开源框架,它由Rod Johnson创建。它是为了解决企业应用开发的复杂性而创建的。从简单性、可测试性和松耦合的角度而言,任何Java应用都可以从Spring中受益。
- Spring是一个轻量级的控制反转(IoC)和面向切面(AOP)的容器框架。
- Spring最初的出现是为了解决EJB臃肿的设计,以及难以测试等问题。
- Spring为简化开发而生,让程序员只需关注核心业务的实现,尽可能的不再关注非业务逻辑代码(事务控制,安全日志等)。
-
Spring的8大模块:Spring5版本之后是8个模块。在Spring5中新增了WebFlux模块。

- Spring Core模块
- 这是Spring框架最基础的部分,它提供了依赖注入(DependencyInjection)特征来实现容器对Bean的管理。核心容器的主要组件是 BeanFactory,BeanFactory是工厂模式的一个实现,是任何Spring应用的核心。它使用IoC将应用配置和依赖从实际的应用代码中分离出来。
- Spring Context模块
- 如果说核心模块中的BeanFactory使Spring成为容器的话,那么上下文模块就是Spring成为框架的原因。
- 这个模块扩展了BeanFactory,增加了对国际化(I18N)消息、事件传播、验证的支持。另外提供了许多企业服务,例如电子邮件、JNDI访问、EJB集成、远程以及时序调度(scheduling)服务。也包括了对模版框架例如Velocity和FreeMarker集成的支持
- Spring AOP模块
- Spring在它的AOP模块中提供了对面向切面编程的丰富支持,Spring AOP 模块为基于 Spring 的应用程序中的对象提供了事务管理服务。通过使用 Spring AOP,不用依赖组件,就可以将声明性事务管理集成到应用程序中,可以自定义拦截器、切点、日志等操作。
- Spring DAO模块
- 提供了一个JDBC的抽象层和异常层次结构,消除了烦琐的JDBC编码和数据库厂商特有的错误代码解析,用于简化JDBC。
- Spring ORM模块
- Spring提供了ORM模块。Spring并不试图实现它自己的ORM解决方案,而是为几种流行的ORM框架提供了集成方案,包括Hibernate、JDO和iBATIS SQL映射,这些都遵从 Spring 的通用事务和 DAO 异常层次结构。
- Spring Web MVC模块
- Spring为构建Web应用提供了一个功能全面的MVC框架。虽然Spring可以很容易地与其它MVC框架集成,例如Struts,但Spring的MVC框架使用IoC对控制逻辑和业务对象提供了完全的分离。
- Spring WebFlux模块
- Spring Framework 中包含的原始 Web 框架 Spring Web MVC 是专门为 Servlet API 和 Servlet 容器构建的。反应式堆栈 Web 框架 Spring WebFlux 是在 5.0 版的后期添加的。它是完全非阻塞的,支持反应式流(Reactive Stream)背压,并在Netty,Undertow和Servlet 3.1+容器等服务器上运行。
- Spring Web模块
- Web 上下文模块建立在应用程序上下文模块之上,为基于 Web 的应用程序提供了上下文,提供了Spring和其它Web框架的集成,比如Struts、WebWork。还提供了一些面向服务支持,例如:实现文件上传的multipart请求。
- Spring Core模块
-
Spring的特点:
- 轻量
- 从大小与开销两方面而言Spring都是轻量的。完整的Spring框架可以在一个大小只有1MB多的JAR文件里发布。并且Spring所需的处理开销也是微不足道的。
- Spring是非侵入式的:Spring应用中的对象不依赖于Spring的特定类。【侵入式:需要依赖别人的。非侵入式:不依赖别人的】
- 控制反转
- Spring通过一种称作控制反转(IoC)的技术促进了松耦合。当应用了IoC,一个对象依赖的其它对象会通过被动的方式传递进来,而不是这个对象自己创建或者查找依赖对象。你可以认为IoC与JNDI相反——不是对象从容器中查找依赖,而是容器在对象初始化时不等对象请求就主动将依赖传递给它。
- 面向切面
- Spring提供了面向切面编程的丰富支持,允许通过分离应用的业务逻辑与系统级服务(例如审计(auditing)和事务(transaction)管理)进行内聚性的开发。应用对象只实现它们应该做的——完成业务逻辑——仅此而已。它们并不负责(甚至是意识)其它的系统级关注点,例如日志或事务支持。
- 容器
- Spring包含并管理应用对象的配置和生命周期,在这个意义上它是一种容器,你可以配置你的每个bean如何被创建——基于一个可配置原型(prototype),你的bean可以创建一个单独的实例或者每次需要时都生成一个新的实例——以及它们是如何相互关联的。然而,Spring不应该被混同于传统的重量级的EJB容器,它们经常是庞大与笨重的,难以使用。
- 框架
- Spring可以将简单的组件配置、组合成为复杂的应用。在Spring中,应用对象被声明式地组合,典型地是在一个XML文件里。Spring也提供了很多基础功能(事务管理、持久化框架集成等等),将应用逻辑的开发留给了你。
- 所有Spring的这些特征使你能够编写更干净、更可管理、并且更易于测试的代码。它们也为Spring中的各种模块提供了基础支持。
- 轻量
Spring入门程序
-
第一步:添加Spring context的依赖,pom.xml配置如下:
<dependency>
    <groupId>org.springframework</groupId>
    <artifactId>spring-context</artifactId>
    <version>6.0.6</version>
</dependency>
注意:打包方式是:jar。
当引入spring-context依赖之后,Maven工具会关联其他依赖:
- spring-aop:面向切面编程。
- spring-beans:IoC核心。
- spring-core:Spring的核心工具包
- Spring-jcl:Spring的日志包
- spring-expression:spring表达式包
[外链图片转存失败,源站可能有防盗链机制,建议将图片保存下来直接上传(img-ASK7b0Ah-1686488658490)(C:\Users\XueYingHao\AppData\Roaming\Typora\typora-user-images\image-20230428195611167.png)]
-
第二步:添加junit依赖,pom.xml配置文件如下:
<dependency> <groupId>junit</groupId> <artifactId>junit</artifactId> <version>4.13.2</version> <scope>test</scope> </dependency> -
第三步:定义Bean:User
package com.powernode.spring6.bean; public class User { } -
第四步:编写spring的配置文件:spring.xml。该文件暂时放在类的根路径下。[spring的配置文件名字随意,位置随意]

上图使用idea工具自带的spring配置文件的模板进行创建.
在spring配置文件中进行Bean配置:
<?xml version="1.0" encoding="UTF-8"?> <beans xmlns="http://www.springframework.org/schema/beans" xmlns:xsi="http://www.w3.org/2001/XMLSchema-instance" xsi:schemaLocation="http://www.springframework.org/schema/beans http://www.springframework.org/schema/beans/spring-beans.xsd"> <!-- 在spring的配置文件中使用bean标签配置bean. bean标签有两个属性: id属性:代表对象的唯一标识,可以看作是一个人的身份证号 class属性:用来规定要创建的java对象的类名,这个类名必须是全限定类名. --> <bean id="userBean" class="com.powernode.spring6.bean.User"></bean> </beans> -
第五步:写测试程序
@Test
public void testFirstSpringCode () {
    // 第一步:获取Spring容器对象
    // ApplicationContext翻译为应用上下文。
    // ApplicationContext是一个接口。
    // ApplicationContext下面有很多实现类
    // 其中一个实现类叫做:ClassPathXmlApplicationContext
    // ClassPathXmlApplicationContext 专门从类路径当中加载spring配置文件的一个spring上下文对象
    // 这行代码只要一执行,就相当于启动了Spring容器,初始化Spring容器上下文,解析类路径下的"spring.xml"文件,并且实例化“spring.xml”文件中,配置的所有bean
    // 可以配置多个参数,哪个Spring配置文件在前,就先实例化哪个配置文件中配置的bean
    ApplicationContext applicationContext = new ClassPathXmlApplicationContext("spring6.xml","spring.xml","xml/beans.xml");
}
第一个Spring程序详细剖析
<bean id="userBean" class="com.powernode.spring6.bean.User"/>
-
bean标签的id属性可以重复吗?
- 不可以重复.
-
Spring底层是怎样创建对象的?
-
Spring底层通过调用无参数构造方法来创建对象的,所以要想让spring管理对象,必须保证无参数的构造方法存在.[无参数构造方法不存在会报错]
-
什么叫做Spring管理对象,Spring是怎样管理对象的?
Spring通过一个叫做IoC(Inversion of Control,控制反转)的机制来管理对象。在传统的程序设计中,我们习惯于由程序代码直接控制各个对象的创建和依赖关系的建立。而在Spring中,将对象之间的相互依赖关系交给Spring容器来管理,由Spring容器负责控制对象的创建和组装。
在Spring中,IoC的实现方式是通过依赖注入(Dependency Injection,DI)来实现的。简单来说,就是在对象创建时,自动将其所依赖的其他对象注入到该对象中。这样,在整个应用程序中,对象与对象之间就不再直接耦合,而是通过Spring容器来进行解耦,使得程序变得更加灵活、可扩展、易于维护。
Spring提供了多种方式来实现依赖注入,包括构造函数注入、Setter方法注入、接口注入等。开发者只需要在配置文件中指定对象之间的依赖关系,Spring就会在运行时自动完成对象创建和依赖关系的注入。
-
-
Spring创建对象的原理?伪代码?
// dom4j解析Spring的配置文件(例如spring.xml),从中获取bean标签的class的属性值,从而获取全限定类名[如果获取的类名不存在,则会报错] // 通过反射机制调用无参数构造方法创建对象 Class clazz = Class.forName("com.powernode.spring6.bean.User"); Object obj = clazz.newInstance(); -
Spring把创建好的对象存储到了一个什么样的容器当中了呐?
key(spring配置文件中bean标签的id属性值)[String] value(spring配置文件中bean标签中"class属性值"类型的对象)[Objext] “userBean” User对象 “vipBean” Vip对象 “studentBean” Student对象 这个容器相当于Map<String,Object> map,调用BeanFactory对象的getBean(String beanId)方法,就相当于调用map.get(“BeanId”).
-
-
spring的配置文件名可以是随意的.从下面代码也可以看出spring配置文件的文件名可以是随意的.
ApplicationContext applicationContext = new ClassPathXmlApplicationContext("beans.xml");//不管spring配置文件的文件名是什么,只需要配置到ClassPathXmlApplicationContext参数中即可。所以spring配置文件的文件名是随意的。- 一个applicationContext是一个容器,里面的东西是通用的。
-
spring的配置文件可以有多个.
-
比如我们在入门程序中配置了spring.xml,还可以在配置一个beans.xml配置文件.
package com.powernode.spring6.test; import org.junit.Test; import org.springframework.context.ApplicationContext; import org.springframework.context.support.ClassPathXmlApplicationContext; public class Spring6Test { @Test public void testFirst(){ // 初始化Spring容器上下文(解析beans.xml文件,创建所有的bean对象) ApplicationContext applicationContext = new ClassPathXmlApplicationContext("beans.xml","spring.xml"); // 根据id获取bean对象 Object userBean = applicationContext.getBean("userBean"); Object vipBean = applicationContext.getBean("vipBean"); System.out.println(userBean); System.out.println(vipBean); } } -
如果有多个配置文件:可以使用ClassPathXmlApplicationContext重载的构造方法:
- ClassPathXmlApplicationContext(String… configLocations):这个是可变长参数,有多个配置文件可以一起当作这个方法的实参.通过多个配置文件共同初始化一个Spring容器.
- ClassPathXmlApplicationContext(String configLocation):通过一个配置文件初始化spring容器.
-
为什么获取通过xml初始化Spring容器的构造器叫做ClassPathXmlApplicationContext?
- ClassPath翻译为类路径,因为spring的配置文件都是xml文件,所以"ClassPathXml"翻译为类路径中的xml文件,所以就是从类路径开始查找spring的配置文件.
-
还有一种方式是从绝对路径中加载spring的配置文件,使用的构造器是FileSystemXmlApplicationContext构造器,这种方式使用较少.[因为绝对路径移植性差],他也有类似于ClassPathXmlApplicationContext构造器相似的两种构造方法,
- FileSystemXmlApplicationContext(String configLocation)
- FileSystemXmlApplicationContext(String… configLocation)
-
-
在配置文件中配置的Bean不一定是自定义的,也可以是JDK中自带的类.例如:java.util.Date.
<?xml version="1.0" encoding="UTF-8"?>
<beans xmlns="http://www.springframework.org/schema/beans"
       xmlns:xsi="http://www.w3.org/2001/XMLSchema-instance"
       xsi:schemaLocation="http://www.springframework.org/schema/beans http://www.springframework.org/schema/beans/spring-beans.xsd">
	<!--配置一个JDK中自带的类-->
    <bean id="dateBean" class="java.util.Date"/>
</beans>
@Test public void testDateBean() { //初始化Spring容器, ApplicationContext applicationContext = new ClassPathXmlApplicationContext("spring.xml"); //获取Bean因为调用Object getBean(String name),只能返回Object类型的数据,如果想要返回特定类型的数据,那么就需要强制类型转换, Object dateBean1 = applicationContext.getBean("dateBean"); // 如果不想强制类型转换可以调用: // T getBean(String name, Class<T> requiredType)方法,第二个参数传如需要转换成的类型 Date dateBean = applicationContext.getBean("dateBean", Date.class); SimpleDateFormat sdf = new SimpleDateFormat("yyyy-MM-dd HH-mm-ss SSS"); String format = sdf.format(dateBean); System.out.println(format); } -
getBean()方法调用时,如果指定的id不存在会怎样?
- 抛出异常,报错
-
getBean()方法返回的类型是Object,如果访问子类的特有属性和方法时,还需要向下转型,有其它办法可以解决这个问题吗?[常用的方法]
- T getBean(String name, Class requiredType),第二个参数返回指定的类型
- Object getBean(String name)
-
ApplicationContext的超级父接口是BeanFactory
@Test
public void testBeanFactory () {
    /**
     * ApplicationContext接口的超级父接口是:BeanFactory(翻译为Bean工厂,就是能够生产Bean对象的一个工厂对象)
     * BeanFactory是IoC容器的顶级父接口。
     * Spring的IoC容器底层实际上使用了:工厂模式。
     * Spring底层是怎样实现的:XML解析+工厂模式+反射机制
     */
    ApplicationContext applicationContext = new ClassPathXmlApplicationContext("spring.xml");
    // 注意:不是在调用getBean方法的时候才会创建对象,上面这句代码执行的时候就会创建对象。而且每一次调用getBean方法获取的都是同一个对象
    User userBean = applicationContext.getBean("userBean", User.class);
    User userBean1 = applicationContext.getBean("userBean", User.class);
    System.out.println(userBean);
    System.out.println(userBean1);
}
Spring6启用Log4j2日志框架
-
从Spring5之后,Spring框架支持集成的日志框架是Log4j2.如何启用日志框架:启用方式如下:
-
第一步:引入Log4j2的依赖
<!--log4j2的依赖--> <dependency> <groupId>org.apache.logging.log4j</groupId> <artifactId>log4j-core</artifactId> <version>2.19.0</version> </dependency> <dependency> <groupId>org.apache.logging.log4j</groupId> <artifactId>log4j-slf4j2-impl</artifactId> <version>2.19.0</version> </dependency> -
第二步:在类的根路径下提供log4j2.xml配置文件(文件名固定为:log4j2.xml,文件必须放到类根路径下。)
<?xml version="1.0" encoding="UTF-8"?> <configuration> <loggers> <!-- level指定日志级别,从低到高的优先级: ALL < TRACE < DEBUG < INFO < WARN < ERROR < FATAL < OFF ALL日志级别最低,输出的信息最丰富 --> <root level="DEBUG"> <appender-ref ref="spring6log"/> </root> </loggers> <appenders> <!--输出日志信息到控制台--> <console name="spring6log" target="SYSTEM_OUT"> <!--控制日志输出的格式--> <PatternLayout pattern="%d{yyyy-MM-dd HH:mm:ss SSS} [%t] %-3level %logger{1024} - %msg%n"/> </console> </appenders> </configuration> -
第三步:使用日志框架
Logger logger = LoggerFactory.getLogger(FirstSpringTest.class);
logger.info("我是一条日志消息");
-
-
@Test public void testLog() { //自己怎样使用log4j2记录日志呐? //创建日志记录器对象:通过“LoggerFactory.getLogger(要给哪个类记录日志.class);” //如果获取的FirstSpringTest类的日志记录器对象,也就是说FirstSpringTest类的代码执行记录日志的语句,就会输出相关日志信息 Logger logger = LoggerFactory.getLogger(FirstSpringTest.class); //记录日志:根据不同的日志级别来输出日志 logger.info("dasdasdad"); } //运行结果: //2023-04-28 21:34:53 886 [main] INFO com.powernode.spring6.bean.test.FirstSpringTest - dasdasdad /* 因为:LoggerFactory.getLogger(这里)是com.powernode.spring6.bean.test.FirstSpringTest类型的数据,所以在记录日志的时候会输出"com.powernode.spring6.bean.test.FirstSpringTest"类型. */ -
spring中本来就集成了log4j日志框架.我们只需要开启就可以使用.
Spring对IoC的实现
控制反转
- 控制反转是一种思想。
- 控制反转是为了降低程序的耦合度,提高程序的扩展力,达到符合OCP和DIP原则。
- 控制反转反转的是什么?
- 将对象的创建权力交出去,交给第三方容器负责。
- 将对象和对象之间关系的维护权交出去,交给第三方容器负责。
- 控制反转这种思想的实现方案:依赖注入(DI)。
依赖注入
- 依赖注入实现了控制反转的思想。
- Spring通过依赖注入的方式完成对Bean的管理。
- Bean的管理就是:Bean对象的创建,以及Bean对象中属性的赋值(Bean对象之间关系的维护)。
- 依赖注入
- 依赖:对象和对象之间的关联关系(依赖关系)。
- 注入:是一种数据传递行为,通过注入行为来让对象和对象之间产生关系。
- 依赖注入常见的实现方式包括两种:
- 第一种:set注入
- 第二种:构造注入
set注入
-
set注入,基于set方法实现的,底层会通过反射机制调用调用属性对应的set方法然后给属性赋值。这种方式要求属性必须对外提供set方法。
-
一个JavaBean其实本质上是一个Java对象,为了使得这个Java对象满足要求,在编写其对应的类(JavaBean Class)的时候,该类需要满足几点要求:可序列化、空参构造器、getter和setter方法、toString方法。
-
set注入实现过程
-
创建Bean类
package com.powernode.spring6.dao;
public interface UserDao {
    void save();
}
//实现类
package com.powernode.spring6.dao.impl;

import com.powernode.spring6.dao.UserDao;

import org.slf4j.Logger;
import org.slf4j.LoggerFactory;
public class UserDaoImpl implements UserDao {
    private static final Logger logger = LoggerFactory.getLogger(UserDaoImpl.class);
    @Override
    public void save() {
        logger.info("正在保存用户信息!");
    }
}
package com.powernode.spring6.service; public interface UserService { void saveUserService(); } //实现类 package com.powernode.spring6.service.impl; import com.powernode.spring6.dao.UserDao; import com.powernode.spring6.service.UserService; import org.slf4j.Logger; import org.slf4j.LoggerFactory; public class UserServiceImpl implements UserService { //为UserServiceImpl类定义的日志记录器 private static final Logger logger = LoggerFactory.getLogger(UserServiceImpl.class); //完全抽象,面向接口编程,层与层之间用接口进行衔接 private UserDao userDao; //set注入必须有set方法 public void setUserDao(UserDao userDao) { this.userDao = userDao; } @Override public void saveUserService() { //通过接口调用实现类中的方法,调用方法的时候显然userDao为null,让spring通过set注入的方式为我们赋值 userDao.save(); } } -
新建配置文件:
<?xml version="1.0" encoding="UTF-8"?> <beans xmlns="http://www.springframework.org/schema/beans" xmlns:xsi="http://www.w3.org/2001/XMLSchema-instance" xsi:schemaLocation="http://www.springframework.org/schema/beans http://www.springframework.org/schema/beans/spring-beans.xsd"> <bean id="userDaoBean" class="com.powernode.spring6.dao.impl.UserDaoImpl"></bean> <!--name="bieMing"用于给bean起别名,也可以通过这种方式获取Bean对象applicationContext.getBean("bieMing");--> <bean id="userServiceBean" class="com.powernode.spring6.service.impl.UserServiceImpl" name="bieMing"> <!--实际上name属性值再此处的语义是:JavaBean的属性的名字:这种情况仅仅指的是符合javaBean规范的类的属性名 如果不符合JavaBean规范这里实际上写的是set方法的方法名,去掉set首字母小写(其实首字母大小写都无所谓),【bean的set方法set后面的第一个字母大写只是规范,name属性值第一个字母小写也只是规范】,不遵循规范也可以运行。 对于spring框架来说,无论是JavaBean的set方法的方法名去掉set后面的第一个字母,还是name属性的属性值的第一个字母,大小写都无所谓,都是可以调用成功的 这里不同于MyBatis,MyBatis找set方法的时候不仅首字母大小写可以不区分,后面每个字母都可以不区分大小写,--> <!--想让spring调用“谋”个类的set方法实现set注入,就需要在spring配置文件中“谋”个Bean配置的“bean”标签中添加“property”标签,property翻译为属性,set注入就是为了给属性赋值。“property”标签有两个属性: 1.name属性:属性值为“谋”个Bean中“set”方法去掉set,首字母小写,这个属性值与set方法关联,告诉spring调用哪个set方法完成set注入给我们的属性赋值,按照JavaBean规范来这里写的就是属性名。 2.ref属性:属性值一般是另外的一个bean的id值,就是指定注入“哪一个”个对象--> <property name="userDao" ref="userDaoBean"></property> </bean> </beans> -
其实各种框架找set方法也好找get方法也好都是只有第一个字母不区分大小写,在MyBatis中因为数据库中的字段名是不区分大小写的,所以在MyBatis中找set方法的时候JavaBean中set方法去掉set后面所有字母都不区分大小写。【如果要是遵循规范,找set方法也好找get方法也好,都是属性名】
-
新建测试程序:
@Test
public void m001 () {
    // 启动并初始化spring容器,在这行代码执行之后,spring容器已经完成了注入
    ApplicationContext applicationContext = new ClassPathXmlApplicationContext("spring6.xml");
	//通过容器获取容器中的“UserServiceImpl”对象
    UserServiceImpl userServiceBean = applicationContext.getBean("userServiceBean", UserServiceImpl.class);
    //调用“UserServiceImpl”对象的saveUserService()方法
    userServiceBean.saveUserService();
}
-
-
set注入实现原理:
- spring通过property属性的name属性值获取属性的名字(或者说:找到set方法去掉set之后并且忽略首字母大小写的哪个set方法)
- 通过反射机制调用set方法,给属性赋值。
- property标签的name是属性名。
- property标签的ref是要注入的bean对象的id。(通过ref属性来完成bean的装配,这是bean最简单的一种装配方式。装配指的是:创建系统组件之间关联的动作,装配是一个动作)
-
对应规则
JavaBean的set方法的方法名 property标签的name属性的 setUserDao userDao setUserDao UserDao setuserDao userDao setuserDao UserDao 总结:首字母大小写都无所谓,但是后面的字母必须板板正正一摸一样。
总结:set注入的核心实现原理:通过反射机制调用set方法来给属性赋值,让两个对象之间产生关系。所以set注入必须提供set方法。
-
set方法是通过调用set方法完成注入的,构造注入是通过调用构造方法完成注入的,被调用的方法在A类中,就在A类的bean标签中写子标签或者属性完成注入。【前提是set个构造方法必须是公共的public的,否则spring访问不到,就会抛出异常】
构造注入
<?xml version="1.0" encoding="UTF-8"?>
<beans xmlns="http://www.springframework.org/schema/beans"
       xmlns:xsi="http://www.w3.org/2001/XMLSchema-instance"
       xsi:schemaLocation="http://www.springframework.org/schema/beans http://www.springframework.org/schema/beans/spring-beans.xsd">
    <bean id="userDaoBean" class="com.powernode.spring6.dao.impl.UserDaoImpl"></bean>
    <bean id="vipDaoBean" class="com.powernode.spring6.dao.impl.VipDaoImpl"></bean>
    <bean id="userServiceBean" class="com.powernode.spring6.service.impl.UserServiceImpl">
        <!--根据构造方法形式参数的下标进行注入的,下标从0开始,以1递增
		  index用来指定为构造方法中第几个参数赋值:index=0,代表构造方法中第一个参数-->
        <!--spring知道构造方法的参数类型和参数个数,所以即使有构造方法的重载,这个条件也能唯一确定一个构造方法的-->
        <constructor-arg index="0" ref="userDaoBean"></constructor-arg>
        <constructor-arg index="1" ref="vipDaoBean"></constructor-arg>

        <!--根据构造方法的形式参数的名字进行注入的,
		   name属性值就是构造方法的形式参数名,严格区分大小写,userDao和vipDao都是构造方法的属性名
		   ref用来指定注入的bean的id-->
        <!--spring只知道参数的名字和参数的类型,如果有构造方法重载,并且参数的名字和类型都一致,只是顺序不一样,哪个方法定义的靠前就调用哪个构造方法-->
        <constructor-arg name="userDao" ref="userDaoBean"></constructor-arg>
        <constructor-arg name="vipDao" ref="vipDaoBean"></constructor-arg>

        <!--让spring自己根据参数类型类型进行寻找使用的是“哪一个”构造方法进行注入的
		因为spring只知道构造方法的两个参数类型,如果有构造方法重载,并且参数个数和类型都一样,只是顺序不一样,哪个构造方法定义的靠前就调用哪个构造方法-->
        <constructor-arg ref="vipDaoBean"></constructor-arg>
        <constructor-arg ref="userDaoBean"></constructor-arg>
    </bean>
</beans>
核心原理:通过调用构造方法来给属性赋值。
总结:通过构造方法进行注入的时候
- 可以通过构造方法的“参数的下标”确定一个构造方法
- 可以通过构造方法的“参数名”进行注入
- 也可以不指定下标和参数名,可以类型自动推断。
只要配置文件提供的参数能与构造方法匹配的上,如果匹配上多个那么“某”个构造方法定义的靠上就调用“谋”个构造方法。
spring在装配这方面做的还是比较健壮的。
set注入专题
set注入之内部Bean和外部Bean
<?xml version="1.0" encoding="UTF-8"?>
<beans xmlns="http://www.springframework.org/schema/beans"
       xmlns:xsi="http://www.w3.org/2001/XMLSchema-instance"
       xsi:schemaLocation="http://www.springframework.org/schema/beans http://www.springframework.org/schema/beans/spring-beans.xsd">
    <!--定义外部Bean,配置外部Bean就是在bean标签外部配置的bean,注入的时候通过ref属性直接指向这个bean的标签的id属性值-->
    <bean id="beanId0" class="全限定类名"></bean>
    <bean id="beanId1" class="全限定类名">
        <!--注入外部Bean-->
        <property name="属性名(set方法去掉set首字母小写)" ref="beanId0"></property>
    </bean>
    <bean id="beanId2" class="全限定类名">
        <property name="属性名(set方法去掉set首字母小写)">
            <!--在property标签中嵌套bean标签就是:注入内部Bean-->
            <bean class="全限定类名"></bean>
        </property>
    </bean>
</beans>
分别使用set和构造两种注入方式完成简单类型的注入:
- 什么是简单类型的数据?
- 所有的基本数据类型,以及基本数据类型的包装类型。
- 凡是枚举类型都是简单类型。
- CharSequence是简单类型,String实现了CharSequence接口,所以String是简单类型。
- Number是简单类型,Integer/Byte…等只要是数字都是简单数据类型。
- Date:在实际开发中一般不把Date当作是简单类型的数据,因为Date类型的数据采用value属性进行注入的时候必须遵守Date类型重写的toString方法这个格式才能注入成功,我们一般采用ref进行注入,吧Date当作是复杂类型的数据进行注入。
- Temporal
- URI
- URL
- Locale
- Class
- 如果注入的是简单类型的数据的话,使用构造注入的时候,不指定构造方法形式参数的下标和形式参数的名字的时候,默认按照配置文件中给定的参数顺序依次赋值给构造方法的参数(不能进行类型自动匹配,复杂类型才能进行类型自动匹配)
- 使用set注入:要求必须有对应的set方法
public void setName(String name) {
    this.name = name;
}
public void setPassword(String password) {
    this.password = password;
}
public void setAge(int age) {
    this.age = age;
}
<bean id="userBean" class="com.powernode.spring6.bean.User">
    <!--注入简单类型的数据使用value属性-->
    <property name="属性名(set方法去掉set首字母小写)" value="属性值"></property>
    <property name="age" value="33"></property>
    <property name="password" value="123456"></property>
</bean>
- 使用构造注入的方式:要求必须有构造方法
public User(String name, String password, int age) {
    this.name = name;
    this.password = password;
    this.age = age;
}
<!--spring配置文件-->
<bean id="userBean2" class="com.powernode.spring6.bean.User">
 <!--让spring自己匹配参数的类型,这三个参数必须有两个是String类型的,一个是int类型的,参数的顺序必须与构造方法的参数顺序一致-->
    <constructor-arg value="张三"></constructor-arg><!--第一个参数是String类型的-->
    <constructor-arg value="张三"></constructor-arg><!--第一个参数是String类型的-->
    <!--如果像这种int类型的属性,我们称为简单类型,这种简单类型在注入的时候要使用value属性,不能使用ref-->
    <constructor-arg value="123"></constructor-arg><!--第一个参数是int类型的-->
</bean>
<!--set注入-->
...
<property name="age">
    <!--如果给简单类型赋值,使用value属性或value标签。而不是ref。-->
    <value>33</value>
</property>
...
<!--构造注入-->
......
<constructor-arg>
    <value>张三</value>
</constructor-arg>
......
总结:
-
给简单类型的数据注入使用
- bean标签的value属性
- value子标签
-
给复杂类型的数据注入使用
- bean标签的ref属性(外部Bean)
- ref子标签的bean属性(外部Bean)
- bean子标签(内部Bean)【只规定class属性即可不用规定】
-
如果把Date当作简单类型使用value注入的话,日期字符串格式不能随便写。格式必须符合Date的toString()方法的格式。显然这就比较鸡肋了。如果我们提供一个这样的日期字符串:2010-10-11,在这里是无法赋值给Date类型的属性的。
级联属性赋值(了解)
<?xml version="1.0" encoding="UTF-8"?>
<beans xmlns="http://www.springframework.org/schema/beans"
       xmlns:xsi="http://www.w3.org/2001/XMLSchema-instance"
       xsi:schemaLocation="http://www.springframework.org/schema/beans http://www.springframework.org/schema/beans/spring-beans.xsd">
    <!--使用级联属性赋值需要注意两点:
		1.必须先使用A对象和B对象关联起来,然后再用A对象给B对象的属性赋值
    -->
    <bean id="studentBean" class="com.powernode.spring6.bean.Student">
        <property name="name">
            <value>张三</value>
        </property>
        <property name="clazz">
            <ref bean="clazzBean"></ref>
        </property>
        <!--级联赋值:这种方式使用较少,可读性差,因为在spring容器中都是单例的Student对象只有一个,Clazz对象也只有一个-->
        <!--给Student的Clazz赋值就相当于直接赋给了Clazz对象,这两个是同一个对象,跟直接在Clazz对象上直接赋值是一个效果,所以这种级联赋值使用的比较少-->
        <!--级联赋值必须提供get方法,getClazz(),-->
        <property name="clazz.name" value="高三6班"></property>
    </bean>
    <bean id="clazzBean" class="com.powernode.spring6.bean.Clazz">
        <!--<property name="name" value="高三1班"></property>-->
    </bean>
</beans>
注入数组
-
数组中的元素是简单类型的数据:
<bean id="yuQian" class="com.powernode.spring6.bean.QianDaoYe"> <!--name属性值是Bean中的属性名或者Bean中的set方法去掉set之后首字母小写的单词--> <property name="aiHaos"> <!--如果注入的数据是一个数组类型的数据,需要在property标签中嵌套array标签,spring会解析array标签中的数据,将其封装成一个数组,传递给set方法完成依赖注入--> <array> <!--如果数组中的元素数简单类型的数据,那么需要在array标签中嵌套value标签--> <!--在value标签中写数组中的元素--> <value>抽烟</value> <value>喝酒</value> <value>烫头</value> </array> </property> </bean> -
数组中的元素是复杂类型的数据时候:
public class Animal {
    private String name;
    public void setName(String name) {
        this.name = name;
    }
    @Override
    public String toString() {
        return "Animal{" +
                "name='" + name + '\'' +
                '}';
    }
}
import java.util.Arrays; public class QianDaoYe { private Animal[] animals; public void setAnimals(Animal[] animals) { this.animals = animals; } @Override public String toString() { return "QianDaoYe{" + "animals=" + Arrays.toString(animals) + '}'; } }<bean id="yuQian" class="com.powernode.spring6.bean.QianDaoYe"> <property name="animals"> <array> <!--使用内部Bean的方式给数组元素注入复杂类型类型数据--> <!--以下是两个JavaBean,在内存中占用两份不同的内存空间--> <!--以下是两个JavaBean就是数组中的两个复杂类型元素--> <bean class="com.powernode.spring6.bean.Animal"> <!--数组中复杂类型的元素含有一个简单类型的属性,使用value属性进行注入--> <property name="name" value="猫咪"></property> </bean> <bean class="com.powernode.spring6.bean.Animal"> <!--复杂类型的元素含有一个简单类型的属性,采用嵌套value标签的方式进行注入--> <property name="name"> <value>狗仔</value> </property> </bean> </array> </property> </bean> ..... <!--如果使用外部JavaBean则array标签中套的是<ref>标签,配合bean属性--> <array> <ref bean="BeanId1"></ref> <ref bean="BeanId2"></ref> <ref bean="BeanId3"></ref> </array> ..... <!--使用构造注入--> ... <bean id="qyBean" class="com.powernode.spring6.bean.QianDaoYe"> <!--给构造方法的第0个参数赋值--> <constructor-arg index="0"> <array> <!--参数的类型是一个负责类型的数组--> <ref bean="BeanId1"></ref> <ref bean="BeanId2"></ref> <ref bean="BeanId3"></ref> </array> </constructor-arg> </bean> ... -
总结:
- 复杂数据类型就是用bean标签(外部或者内部都可以)或者ref标签+bean属性
- 简单数据类型就是用嵌套value标签或者value属性
注入集合(以set注入的方式来演示)
package com.powernode.spring6.domain;

import java.util.List;
import java.util.Map;
import java.util.Properties;
import java.util.Set;
public class Person {
    private List<String> names;
    private Set<String> addrs;
    private Map<Integer,String> phones;
    private Properties properties;
    public void setPhones(Map<Integer, String> phones) {
        this.phones = phones;
    }
    public void setProperties(Properties properties) {
        this.properties = properties;
    }
    public void setNames(List<String> names) {
        this.names = names;
    }

    public void setAddrs(Set<String> addrs) {
        this.addrs = addrs;
    }
    @Override
    public String toString() {
        return "Person{" +
                "names=" + names +
                ", addrs=" + addrs +
                ", phones=" + phones +
                ", properties=" + properties +
                '}';
    }
}
<!--JavaBean,一个Java对象-->
<bean id="personBean" class="com.powernode.spring6.domain.Person">
	<!--让spring通过set注入的方式完成依赖注入:注入是一种数据传递的行为,通过注入使A对象和B对象产生关系-->
    <!--names是要注入的属性名-->
    <property name="names">
        <!--注入的数据是list集合,有序可重复-->
        <list>
            <!--集合中的每一个元素的简单类型中的String类型,所以使用value标签-->
            <value>张三</value>
            <value>李四</value>
            <value>王五</value>
            <value>赵六</value>
            <value>张三</value>
        </list>
    </property>
    <!--addrs是属性名,要给addrs这个属性注入数据-->
    <property name="addrs">
        <!--注入的数据是set集合-->
        <set>
            <!--集合中的每一个元素的简单类型中的String类型,所以使用value标签-->
            <value>朝阳区</value>
            <value>朝阳区</value>
            <value>海淀区</value>
            <value>大兴区</value>
            <value>昌平区</value>
        </set>
    </property>
    <!--properties是属性名,要给properties这个属性注入数据-->
    <property name="properties">
        <!--注入的数据是一个Properties集合类型的数据,spring会解析这个标签中的数据封装成一个Priperties集合,传递给set方法,完成依赖注入-->
        <props>
            <prop key="driver">com.mysql.cj.jdbc.Driver</prop>
            <prop key="url">jdbc:mysql://localhost:3306.spring6</prop>
        </props>
    </property>
    <!--phones是属性名,要给phones这个属性注入数据-->
    <property name="phones">
        <!--注入的数据是一个Map集合类型的数据,spring会解析这一个map标签中的数据封装成一个map集合(底层是HashMap集合),传递给set方法,完成依赖注入-->
        <map>
            <!--如果注入的key和value都是简单类型使用如下配置标签-->
            <entry key="1" value="110"></entry>
            <entry key="2" value="120"></entry>
            <entry key="3" value="119"></entry>
            <!--如果注入的key和value都不是简单类型使用如下配置标签-->
            <!--这里的value属性也可以使用value子标签代替-->
            <!--<entry key-ref="BeanId" value-ref="BeanId"></entry>-->
        </map>
    </property>
</bean>
set注入完成注入NULL和空字符串
private String name;
private int age;
<bean id="catBean" class="com.powernode.spring6.domain.Cat">
    <!--不给属性注入值,属性的默认值就是null-->
    <property name="name" value="tom"></property>
    <!--这不是注入null,这是注入一个“null”字符串-->
    <property name="name" value="null"></property>
    <!--这种方式是手动注入null-->
    <property name="name">
        <null></null>
    </property>
    <!--注入空字符串-->
    <property name="name" value=""></property> <!--方式1-->
    <property name="name"> <!--方式2-->
        <value></value>
    </property>
    <property name="age" value="3"></property>
</bean>
注入的值中含有特殊符号
-
XML中有5个特殊字符,分别是:<、>、'、"、&.
-
两种解决方案:
<!--第一种方案:使用实体符号代替,常用实体符号对照表如下--> <property name="name" value="2 < 3"></property> <!--使用XML语法的CDATA区--> <!--<![CDATA[在这里的字符串XML解析器不会解析,只会把这里当作是普通的字符串]]>--> <!--使用CDATA时,不能使用value属性,只能使用value标签。--> <property name="name"> <value><![CDATA[2 < 3]]></value> </property> -
特殊字符 实体符号 < & lt; > & gt; ’ & apos; " & quot; & & amp;
基于p命名空间注入
-
目的:简化配置
-
使用“p命名空间”注入的前提条件包括两个:
-
在XML头部信息中添加“p命名空间”的配置信息:
xmlns:p="http://www.springframework.org/schema/p" -
"p命名空间"注入是基于setter方法的,所以需要对应的属性提供setter方法。
-
-
实际上基于p命名空间的注入是对set注入的简化。底层还是调用的set方法。
-
实现案例:
public class Customer {
    private String name;
    private int age;

    public void setName(String name) {
        this.name = name;
    }

    public void setAge(int age) {
        this.age = age;
    }

    @Override
    public String toString() {
        return "Customer{" +
                "name='" + name + '\'' +
                ", age=" + age +
                '}';
    }
}
<?xml version="1.0" encoding="UTF-8"?> <beans xmlns="http://www.springframework.org/schema/beans" xmlns:p="http://www.springframework.org/schema/p" xmlns:xsi="http://www.w3.org/2001/XMLSchema-instance" xsi:schemaLocation="http://www.springframework.org/schema/beans http://www.springframework.org/schema/beans/spring-beans.xsd"> <bean id="customerBean" class="com.powernode.spring6.beans.Customer" p:name="zhangsan" p:age="20"/> <!--使用p命名空间进行注入:语法结构如下: p:这里是使用set注入的时候property标签的name属性的属性值 如果要是非简单类型的数据就是:p:name-ref="要注入的数据的beanId" --> </beans>-
xmlns : 用于引入命名空间,引入命名空间之后就可以引入命名空间下的schema约束文档,引入约束文档之后就可以使用约束文档中定义的xml标签或者属性,语法结构如下:
-
xmlns=“命名空间”,为了区分不同命名空间中定义的相同的xml标签,可以给命名空间起一个别名。语法格式如下:
- xmlns:别名=“命名空间”
-
比如:
<!--引入的命名空间是:http://www.springframework.org/schema/p,叫做p命名空间-->
<!--命名空间的别名是:p-->
xmlns:p="http://www.springframework.org/schema/p"
-
-
基于c命名空间注入
-
基于p命名空间的注入是用来简化set注入的。p是property标签的首字母。底层调用set方法。
基于c命名空间的注入是用来简化构造注入的。c是constructor标签的首字母。底层调用构造方法。
-
使用c命名空间的两个前提条件
-
需要在xml配置文件头部添加信息:
<!--命名空间的别名是:c--> <!--命名空间是:http://www.springframework.org/schema/c --> xmlns:c="http://www.springframework.org/schema/c" -
需要提供构造方法:
public class People {
    private String name;
    private int age;
    private boolean sex;
    //c命名空间是简化构造方法的
    //c命名空间注入办法是基于构造方法的
    public People(String name, int age, boolean sex) {
        this.name = name;
        this.age = age;
        this.sex = sex;
    }

    @Override
    public String toString() {
        return "People{" +
                "name='" + name + '\'' +
                ", age=" + age +
                ", sex=" + sex +
                '}';
    }
}
<?xml version="1.0" encoding="UTF-8"?> <beans xmlns="http://www.springframework.org/schema/beans" xmlns:c="http://www.springframework.org/schema/c" xmlns:xsi="http://www.w3.org/2001/XMLSchema-instance" xsi:schemaLocation="http://www.springframework.org/schema/beans http://www.springframework.org/schema/beans/spring-beans.xsd"> <!--第一种方式基于下标的方式:c:_几,就代表构造方法中的第几个参数。 c:_几-ref="注入的数据的标识"如果注入的不是简单类型,使用这种方式--> <bean id="peopleBean1" class="com.powernode.spring6.domain.People" c:_0="xueyinghao" c:_1="23" c:_2="true"></bean> <!--第二种方式基于构造方法形式参数名字的方式--> <!--如果注入的不是简单类型:c:形式参数名-ref="注入的数据标识"--> <bean id="peopleBean2" class="com.powernode.spring6.domain.People" c:name="xueyinghao" c:age="28" c:sex="true"></bean> </beans>
-
-
不管是p命名空间还是c命名空间,注入的时候都可以注入简单类型以及非简单类型。
util命名空间
-
作用:使用util命名空间可以让配置复用。
-
使用util命名空间的前提是:在spring配置文件头部添加配置信息。如下:

-
<?xml version="1.0" encoding="UTF-8"?> <beans xmlns="http://www.springframework.org/schema/beans" xmlns:util="http://www.springframework.org/schema/util" xmlns:xsi="http://www.w3.org/2001/XMLSchema-instance" xsi:schemaLocation="http://www.springframework.org/schema/beans http://www.springframework.org/schema/beans/spring-beans.xsd http://www.springframework.org/schema/util http://www.springframework.org/schema/util/spring-util.xsd"> <!--使用util命名空间中的属性和标签。--> <util:properties id="p"> <prop key="name">zhangsan</prop> <prop key="age">26</prop> <prop key="sex">true</prop> </util:properties> <bean id="animalBean" class="com.powernode.spring6.domain.Animal"> <property name="config" ref="p"> </property> </bean> </beans>-
首先引入命名空间:命名空间的别名是:util
xmlns:util="http://www.springframework.org/schema/util" <!--然后在schemaLocation属性中引入约束文档,这一步p和c命名空间注入都没有--> http://www.springframework.org/schema/util http://www.springframework.org/schema/util/spring-util.xsd -
解释util命名空间中的properties标签:
-
再spring配置文件中,bean标签底层是一个bean对象,properties标签底层是一个Properties对象。所以引用Properties对象的时候也是通过Properties对象的id属性值。Properties标签也可以通过getBean获取。
<util:properties id="myProperties">
    <prop key="name">薛英豪</prop>
    <prop key="wife">王云霞</prop>
</util:properties>
@Test public void test14 () { ApplicationContext applicationContext = new ClassPathXmlApplicationContext("spring01.xml"); Properties myProperties = applicationContext.getBean("myProperties", Properties.class); System.out.println(myProperties); }运行结果:
[外链图片转存失败,源站可能有防盗链机制,建议将图片保存下来直接上传(img-2a2l8VqZ-1686488658493)(C:\Users\XueYingHao\AppData\Roaming\Typora\typora-user-images\image-20230527144454515.png)]
-
-
-
在spring配置文件中不仅可以定义自定义的类的引用,还可以定义jdk内置的对象的引用。
-
比如String类型的对象的引用:
spring配置文件:
<bean id="myString" class="java.lang.String"> <constructor-arg value="Hello World!!!"></constructor-arg> </bean>- 在此示例中,我们创建了一个ID为
myString的bean,其类为java.lang.String。我们使用构造函数注入将字符串Hello World!传递给该bean。
要在其他bean中引用此字符串对象,您可以使用
ref属性来引用该bean的ID。例如:<bean id="myOtherBean" class="com.example.MyClass"> <property name="myStringProperty" ref="myString"/> </bean>在此示例中,我们创建了另一个名为
myOtherBean的bean,并将其属性myStringProperty设置为myStringbean的引用。当Spring容器初始化时,它将自动解析这些依赖关系并将所需的bean注入到每个bean中。 - 在此示例中,我们创建了一个ID为
-
基于xml的自动装配
根据名称自动装配(属性的名称)【autowire=“byName”】
<!--给bean标签添加:autowire="byName" 属性,表示根据名字完成自动装配,
autowire译为:自动装配    byName译为:按名称;-->
<bean id="personBean" class="com.powernode.spring6.pojo.Person" autowire="byName"></bean>
<!--自动装配也是基于set方式实现的-->
<!--这里的id属性值就是set方法的方法名去掉set首字母小写-->
<!--根据名字进行自动准装配的时候,被注入的对象的bean的id不能随便写,
这里的bean的id就是使用set注入的时候property标签的name属性的属性值-->
<bean id="animal" name="animal" class="com.powernode.spring6.pojo.Dog">
    <property name="name" value="大狗子"></property>
</bean>
- Spring还可以完成自动化的注入,自动化注入又被称为自动装配。它可以根据名字进行自动装配,也可以根据类型进行自动装配。
- 找方法从运行类型开始向父类的方向寻找,找属性从编译类型开始向父类的方向寻找。
- 只要bean标签的name属性和id属性有一个属性值是另一个bean的属性名,并且可以通过byName自动装配。
根据类型自动装配【autowire=“byType”】
public class AccountDao {
    public void insert(){
        System.out.println("正在保存账户信息");
    }
}
public class AccountService {
    private AccountDao accountDao;
    public void setAccountDao(AccountDao accountDao) {
        this.accountDao = accountDao;
    }
    public void save(){
        accountDao.insert();
    }
}
<!--byType表示根据类型自动装配:需要再bean标签上加上“autowire="byType"”-->
<bean id="accountService" class="com.powernode.spring6.service.AccountService" autowire="byType"/>
<!--因为AccountService类的accountDao属性是AccountDao类型的,所以只需要提供一个AccountDao类型的bean,spring就会帮助我们自动完成注入-->
<bean class="com.powernode.spring6.dao.AccountDao"/>
-
通过类型自动注入也是基于set方法完成的。
-
可以看到无论是byName还是byType,在装配的时候都是基于set方法的。所以set方法是必须要提供的。
-
如果byType,根据类型装配时,如果配置文件中有两个类型一样的bean会出现什么问题呢?
<bean id="accountService" class="com.powernode.spring6.service.AccountService" autowire="byType"/>
<!--两个相同类型的bean-->
<bean id="x" class="com.powernode.spring6.dao.AccountDao"/>
<bean id="y" class="com.powernode.spring6.dao.AccountDao"/>
测试结果说明了,当byType进行自动装配的时候,配置文件中某种类型的Bean必须是唯一的,不能出现多个。
如果一个类中有两个相同类型的属性,就之能注入第一个,根据类型注入最重要的是根据类型来区分不同的注入的数据的,只要能区分开亏可以完成注入。
Spring引入外部属性配置文件
-
我们都知道编写数据源的时候是需要连接数据库的信息的,例如:driver url username password等信息。这些信息可以单独写到一个属性配置文件中吗,这样用户修改起来会更加的方便。当然可以。
-
第一步:写一个数据源类,提供相关属性。
import javax.sql.DataSource; import java.io.PrintWriter; import java.sql.Connection; import java.sql.SQLException; import java.sql.SQLFeatureNotSupportedException; import java.util.logging.Logger; public class MyDataSource implements DataSource { @Override public String toString() { return "MyDataSource{" + "driver='" + driver + '\'' + ", url='" + url + '\'' + ", username='" + username + '\'' + ", password='" + password + '\'' + '}'; } private String driver; private String url; private String username; private String password; public void setDriver(String driver) { this.driver = driver; } public void setUrl(String url) { this.url = url; } public void setUsername(String username) { this.username = username; } public void setPassword(String password) { this.password = password; } //...... } -
第二步:在类路径下新建jdbc.properties文件,并配置信息。
driver=com.mysql.cj.jdbc.Driver url=jdbc:mysql://localhost:3306/spring username=root password=root123 -
第三步:在spring配置文件中引入context命名空间以及context命名空间下的schema约束文档。
<?xml version="1.0" encoding="UTF-8"?> <beans xmlns="http://www.springframework.org/schema/beans" xmlns:xsi="http://www.w3.org/2001/XMLSchema-instance" xmlns:context="http://www.springframework.org/schema/context" xsi:schemaLocation="http://www.springframework.org/schema/beans http://www.springframework.org/schema/beans/spring-beans.xsd http://www.springframework.org/schema/context http://www.springframework.org/schema/context/spring-context.xsd"> </beans>-
引入context命名空间:并且给该命名空间起别名为:context
xmlns:context="http://www.springframework.org/schema/context" -
引入该命名空间下的schema约束文档,引入约束文档之后才能使用该约束文档定义的标签和属性。
-
-
第四步:在spring中配置使用jdbc.properties文件。
<!--使用的时候首先得通过context命名空间中的property-placehlder标签引入属性配置文件-->
<!--location默认从类的根路径下寻找属性配置文件-->
<context:property-placeholder location="jdbc.properties"/>

<bean id="dataSource" class="com.powernode.spring6.beans.MyDataSource">
    <!--使用格式:
		属性配置文件中的数据都是:key=value 格式的数据
		通过“${key}”这样的语法就可以取到“key=value”中的这个value-->
    <property name="driver" value="${driver}"/>
    <property name="url" value="${url}"/>
    <property name="username" value="${username}"/>
    <property name="password" value="${password}"/>
</bean>
Bean的作用域
singleton
-
默认情况下,Spring的IoC容器创建的Bean对象是单例的。来测试一下:
public class SpringBean {
}
<?xml version="1.0" encoding="UTF-8"?> <beans xmlns="http://www.springframework.org/schema/beans" xmlns:xsi="http://www.w3.org/2001/XMLSchema-instance" xsi:schemaLocation="http://www.springframework.org/schema/beans http://www.springframework.org/schema/beans/spring-beans.xsd"> <!-- scope属性用于指定bean的作用域,目前来说有一下两种属性值: 1.singleton:单例的,spring容器中只有一个bean对象,(不配置scope属性,默认就是单例的) 2.prototype:多例的。 其实scope属性有多个值: 例如:request:表示一次请求中一个bean对象 session:表示一次会话中一个bean对象 但是request和session要求项目必须是一个web应用,你的项目至少要引入一个web框架才能设置这两个值 --> <bean id="sb" class="com.powernode.spring6.beans.SpringBean" /> </beans>//测试代码 @Test public void testScope(){ //单例的bean,再这行代码执行的时候创建的对象 /* 1.spring默认情况下是如何管理这个bean的? 默认情况下bean是单例的(singleton:单例) 再spring初始化上下文的时候实例化。 每一次调用getBean的时候,都返回同一个单例的对象。 2.当将bean的scope属性设置为property: bean是多例的。 spring初始化上下文的时候,并不会初始化这个prototype的bean。如果一个spring配置文件中有singleton的bean也有prototype的bean,singleton的bean还是会被初始化的。 每一次调用getBean()方法的时候,实例化一个新的该Bean对象。 prototype译为原型 */ ApplicationContext applicationContext = new ClassPathXmlApplicationContext("spring-scope.xml"); SpringBean sb1 = applicationContext.getBean("sb", SpringBean.class); System.out.println(sb1); SpringBean sb2 = applicationContext.getBean("sb", SpringBean.class); System.out.println(sb2); }运行结果

通过测试得知:Spring的IoC容器中,默认情况下,Bean对象是单例的。
GoF之工厂模式
- 设计模式:一种可以被重复利用的解决方案。
- GoF(Gang of Four):中文名—>四人组
- 《Design Patterns: Elements of Reusable Object-Oriented Software》(即《设计模式》一书),1995年由 Erich Gamma、Richard Helm、Ralph Johnson 和 John Vlissides 合著。这几位作者常被称为"四人组(Gang of Four)"。
- 该书中描述了23中设计模式。我们平常所说的设计模式就是这23中设计模式
- 不过除了GoF23中设计模式之外还有其他的设计模式,比如:JavaEE的设计模式(DAO模式、MVC模式)
- GoF23中设计模式可以分为三大类
- 创建型:解决对象的创建问题
- 单例模式
- 工厂方法模式
- 抽象工厂模式
- 建造者模式
- 原型模式
- 结构型:一些类或者对象组合在一起的经典结构
- 代理模式
- 装饰模式
- 适配器模式
- 组合模式
- 享元模式
- 外观模式
- 桥接模式
- 行为型:解决类或对象之间的交互问题
- 策略模式
- 模板方法模式
- 责任链模式
- 观察者模式
- 迭代子模式
- 命令模式
- 备忘录模式
- 状态模式
- 访问者模式
- 中介者模式
- 解释器模式
- 创建型:解决对象的创建问题
- 工厂模式是解决对象创建问题的,所以工厂模式属于创建型设计模式。这里为什么学习工厂模式呢?这是因为Spring框架底层使用了大量的工厂模式。
工厂模式的三种形态
- 简单工厂模式(Simple Factory):不属于23中设计模式之一。简单工厂模式又叫做:静态工厂方法模式。简单工厂模式是工厂方法模式的一种特殊实现。
- 工厂方法模式(Factory Method):是23中设计模式之一
- 抽象工厂模式(Abstract Factory):是23中设计模式之一
简单工厂模式
-
简单工厂模式的角色包括三个:
- 抽象产品角色
- 具体产品角色
- 工厂类角色
-
简单工厂模式的优点:
- 客户端程序不需要关心对象的创建细节,需要那个对象直接向工厂索要即可,初步实现了责任分离。客户端只负责“消费”,工厂负责“生产”。生产和消费分离。
-
简单工厂模式的缺点
- 工厂类几种了所有产品的创造逻辑,形成了一个无所不知的全能类,有人把它叫做上帝类。显然工厂类非常关键,一旦出现问题,整个系统瘫痪。
- 不符合OCP开闭原则,在进行系统扩展的时候,需要修改工厂类。
-
Spring的BeanFactory就是用了简单工厂模式。
-
示例代码:
//首先,我们需要定义一个接口(Product):
//抽象产品角色
public interface Product {
    void use();
}
//然后,我们可以创建一些实现该接口的具体产品类:
//具体产品角色
public class ConcreteProduct1 implements Product {
    @Override
    public void use() {
        System.out.println("使用具体产品1");
    }
}

public class ConcreteProduct2 implements Product {
    @Override
    public void use() {
        System.out.println("使用具体产品2");
    }
}
//接下来,我们需要创建一个工厂类(Factory),根据传递给它的参数返回不同的具体产品对象:工厂类角色
public class Factory {
    //这个工厂类中有一个工厂方法,这个工厂方法是静态的,所以叫做静态工厂方法模式
    //缺点:每次新增一个具体产品,都需要修改这个方法,违背了OCP开闭原则,怎样解决这一缺点?使用工厂方法模式,一个具体产品对应一个工厂类
    public static Product createProduct(String type) {
        if (type.equals("Product1")) {
            return new ConcreteProduct1();
        } else if (type.equals("Product2")) {
            return new ConcreteProduct2();
        } else {
            throw new IllegalArgumentException("未知的产品类型");
        }
    }
}
//最后,我们可以使用工厂类来获取具体产品对象:
public static void main(String[] args) {
    //用户端只需要调用工厂类的工厂方法就可以获取到需要的具体产品对象,并不需要关心对象的创建细节,实际开发的过程中新建一个对象并不是new一行代码这么简单。再简单工厂模式中这件事情需要交给专业的工厂方法去做,达到了初步的职能分工。
    Product product1 = Factory.createProduct("Product1");
    product1.use();

    Product product2 = Factory.createProduct("Product2");
    product2.use();
}
工厂方法模式
-
工厂方法模式既保留了简单工厂模式的优点,同时又解决了简单工厂模式的缺点。
-
工厂方法模式的角色包括:
- 抽象工厂角色
- 具体工厂角色
- 抽象产品角色
- 具体产品角色
-
示例代码:
//抽象产品角色 public interface Product { void use(); } //具体产品角色 public class ConcreteProduct1 implements Product { @Override public void use() { System.out.println("使用具体产品1"); } } public class ConcreteProduct2 implements Product { @Override public void use() { System.out.println("使用具体产品2"); } } //接下来,我们需要创建一个抽象工厂类(Factory),包含一个抽象方法用于创建产品对象: //抽象工厂角色 public abstract class Factory { public abstract Product createProduct(); } //我们还可以创建一些具体工厂类,这些类实现了抽象工厂类并返回不同的具体产品对象,一个产品对应一个工厂 public class ConcreteFactory1 extends Factory { @Override public Product createProduct() { return new ConcreteProduct1(); } } public class ConcreteFactory2 extends Factory { @Override public Product createProduct() { return new ConcreteProduct2(); } } //最后,我们可以使用具体工厂类来获取具体产品对象: public static void main(String[] args) { Factory factory1 = new ConcreteFactory1(); Product product1 = factory1.createProduct(); product1.use(); Factory factory2 = new ConcreteFactory2(); Product product2 = factory2.createProduct(); product2.use(); } -
需要添加新的产品的时候,只需要新建一个产品类实现Product接口,再创建一个产品对象的工厂类实现Factory接口即可,不用修改源代码,符合OCP开发原则。
-
工厂方法模式优点:
- 一个调用者想创建一个对象只需要知道其名称就可以了,不需要知道对象的创建细节。
- 扩展性高:如果想增加一个产品,只要扩展一个具体工厂类一个具体产品类就可以。
- 屏蔽了产品的具体实现:用户只需要关心产品的接口。
-
工厂方法模式的缺点:
每次增加一个产品时,都需要增加一个具体类和对象实现工厂,使得系统中类的个数成倍增加,在一定程度上增加了系统的复杂度,同时也增加了系统具体类的依赖。这并不是什么好事。
Bean的实例化方式
- Spring为Bean提供了多种实例化方式,常用的通常包括4种方式。(也就是说在Spring中为Bean对象的创建准备了多种方案,目的是:更加灵活)
- 通过构造方法实例化
- 通过静态工厂实例化(静态工厂又叫做静态工厂方法模式或简单工厂模式)
- 通过factory-bean实例化
- 通过FactoryBean接口实例化
通过构造方法实例化Bean
-
我们之前一直使用的就是这种方式。默认情况下,会调用Bean的无参数构造方法。
-
实现过程
public class User {
    public User() {
        System.out.println("User类的无参数构造方法执行。");
    }
}
<?xml version="1.0" encoding="UTF-8"?> <beans xmlns="http://www.springframework.org/schema/beans" xmlns:xsi="http://www.w3.org/2001/XMLSchema-instance" xsi:schemaLocation="http://www.springframework.org/schema/beans http://www.springframework.org/schema/beans/spring-beans.xsd"> <bean id="userBean" class="com.powernode.spring6.bean.User"/> </beans>public void testConstructor(){ ApplicationContext applicationContext = new ClassPathXmlApplicationContext("spring.xml"); User user = applicationContext.getBean("userBean", User.class); System.out.println(user); }
通过简单工厂模式实例化Bean
-
简单工厂又叫做:静态工厂模式或者静态工厂方法模式。
-
工厂方法模式又叫做:实例工厂模式。
-
实现过程
//定义一个Bean
//在这里省略了抽象产品角色
public class Vip {
}
//编写简单工厂模式/静态工厂模式中的工厂类
public class VipFactory {
    public static Vip get(){
        return new Vip();
    }
}
<!--再Spring配置文件中指定创建该Bean的方法 告诉Spring调用哪个类的哪个静态方法获取到该Bean对象 factory-method这个属性规定了调用工厂类的什么方法 --> <bean id="vipBean" class="com.powernode.spring6.bean.VipFactory" factory-method="get"/> <!--这个get是真真正正的方法名,没有那种去掉get或者set首字母小写的那种要求--> <!--Spring会调用VipFactory类的get静态方法获取某个类型的对象(至于到底是那个类型这得看这个get方法的返回值是什么类型的)-->
通过factory-bean实例化
-
这种方式本质上是:通过工厂方法进行实例化。
-
工厂方法模式又称为实例工厂模式。
-
实现过程
//定义一个Bean,具体产品类,这里省略了抽象产品类
public class Order {
}
//定义具体工厂类,这里省略了抽象工厂类
public class OrderFactory {
    public Order get(){
        return new Order();
    }
}
第三步:在Spring配置文件中指定factory-bean以及factory-method
<!--首先将具体工厂类纳入Spring的管理,先实例化出来工厂对象--> <bean id="orderFactory" class="com.powernode.spring6.bean.OrderFactory"/> <!-- factory-bean:告诉Spring调用哪个工厂类中的方法获取Bean对象 factory-method:告诉Spring调用哪个实例方法来获取Bean对象 可以通过id属性值orderBean进行访问。 --> <!--这句话是告诉Spring调用哪个类的那个方法来获取Bean对象--> <bean id="orderBean" factory-bean="orderFactory" factory-method="get"/>- 如果标签的class属性指定了一个类的全限定名,则Spring容器将实例化该类,并将其注册为一个Bean。
- 如果标签的class属性没有指定,而是使用了factory-bean和factory-method属性,则Spring容器会调用指定的工厂方法来创建Bean实例,而不是直接实例化该类。
通过FactoryBean实例化
-
以上的第三种方式中,factory-bean是我们自己定义的。factory-method也是我们自己定义的。
-
再Spring中,当我们编写的类直接实现FactoryBean,factory-bean和factory-method都不需要再指定了。
-
factory-bean会自动指向实现FactoryBean接口的类,
factory-method会自动指向getObject()方法
-
实现过程
第一步:定义一个Bean
public class Person {}第二步:定义一个Bean,实现FactoryBean接口
public class PersonFactoryBean implements FactoryBean<Person> {

    @Override
    public Person getObject() throws Exception {
        return new Person();
    }
    @Override
    public Class<?> getObjectType() {
        return null;
    }
    @Override
    public boolean isSingleton() {
        // true表示单例
        // false表示原型
        return true;
    }
}
第三步:在Spring配置文件中配置FactoryBean
<!--因为PersonFactoryBean实现了FactoryBean接口,Spring会自动调用PersonFactoryBean类的getObject方法类获取Bean对象-->
<!--在spring的配置文件中写上这句话代表:spring会自动调用PersonFactoryBean类的无参数构造方法创建该类对象,然后调用该类的getObject方法-->
<bean id="personBean" class="com.powernode.spring6.bean.PersonFactoryBean"/>
测试程序
@Test
public void testFactoryBean(){
    ApplicationContext applicationContext = new ClassPathXmlApplicationContext("spring.xml");
    Person personBean = applicationContext.getBean("personBean", Person.class);
    System.out.println(personBean);

    Person personBean2 = applicationContext.getBean("personBean", Person.class);
    System.out.println(personBean2);
}
FactoryBean在Spring中是一个接口。被称为“工厂Bean”。“工厂Bean”是一种特殊的Bean。所有的“工厂Bean”都是用来协助Spring框架来创建其他Bean对象的。
BeanFactory和FactoryBean的区别
-
BeanFactory是Spring IoC容器的顶级对象,BeanFactory被翻译为“Bean工厂”,再Spring IoC容器中“Bean工厂”负责创建Bean对象。
-
FactoryBean:他是一个Bean,是一个能够辅助Spring实例化其他Bean对象的一个Bean:
-
再Spring中Bean分为两类:
- 第一类:普通Bean
- 第二类:工厂Bean(工厂Bean也是一种Bean,只不过这种Bean比较特殊,它可以辅助Spring实例化其他Bean对象)
-
BeanFactory是一个工厂。
FactoryBean是一个特殊的Bean。
-
BeanFactory是Spring容器的基础组件,提供了核心的Bean管理和装配功能;而FactoryBean则是在BeanFactory的基础上进行扩展,为我们提供了更加灵活和高级的Bean管理和创建方式。【FactoryBean就相当于在BeanFactory的基础之上有加了一层,我们可以在加的这一层之内可以对实例化Bean的前前后后做一些操作】
注入自定义Date
-
我们前面说过,java.util.Date在Spring中被当做简单类型,简单类型在注入的时候可以直接使用value属性或value标签来完成。但我们之前已经测试过了,对于Date类型来说,采用value属性或value标签赋值的时候,对日期字符串的格式要求非常严格,必须是这种格式的:Mon Oct 10 14:30:26 CST 2022。其他格式是不会被识别的。
-
通过FactoryBean来完成在创建Date类型的对象的前前后后做一些操作,来构构建一个特定的日期类型。
-
编写DateFactoryBean实现FactoryBean接口:
public class DateFactoryBean implements FactoryBean<Date> {

    // 定义属性接收日期字符串
    private String date;

    // 通过构造方法给日期字符串属性赋值【构造注入】
    public DateFactoryBean(String date) {
        this.date = date;
    }

    @Override
    public Date getObject() throws Exception {
        //这个日期的格式可以我们自定义,在对象的创建前后做了这么一些操作
        SimpleDateFormat sdf = new SimpleDateFormat("yyyy-MM-dd");
        return sdf.parse(this.date);
    }

    @Override
    public Class<?> getObjectType() {
        return null;
    }
}
<!--spring会调用DateFactoryBean类的DateFactoryBean(String date)构造方法完成依赖注入以及DateFactoryBean对象的创建--> <!--有了DateFactoryBean对象之后spring接着会调用DateFactoryBean对象的getObject方法获取特定类型的对象,在spring容器中key就是dateBean,value就是这个特定类型的对象--> <bean id="dateBean" class="com.powernode.spring6.bean.DateFactoryBean"> <constructor-arg name="date" value="1999-10-11"/> </bean> <bean id="studentBean" class="com.powernode.spring6.bean.Student"> <property name="birth" ref="dateBean"/> </bean>
Bean的生命周期
什么是Bean的生命周期
- Spring其实就是一个管理Bean对象的工厂。它负责对象的创建,对象的销毁等。
- 所谓的生命周期就是:对象从创建开始到最终销毁的整个过程。
为什么要知道Bean的生命周期
- 生命周期的本质是:在哪个时间节点上调用了哪个类的哪个方法。
- 我们需要充分的了解在这个生命线上,都有哪些特殊的时间节点。
- 只有我们知道了特殊的时间节点都在哪,到时我们才可以确定代码写到哪。
- 我们可能需要在某个特殊的时间点上执行一段特定的代码,这段代码就可以放到这个节点上。当生命线走到这里的时候,自然会被调用。
Bean的生命周期之5步
-
第一步:实例化Bean
-
第二步:Bean属性赋值
-
第三步:初始化Bean
-
第四步:使用Bean
-
第五步:销毁Bean
[外链图片转存失败,源站可能有防盗链机制,建议将图片保存下来直接上传(img-vmJU6bSn-1686488658495)(C:\Users\XueYingHao\AppData\Roaming\Typora\typora-user-images\image-20230507095140784.png)]
实验过程:
首先写一个Bean类
package com.powernode.spring6.bean;

public class Student {

    public Student () {
        System.out.println("第一步:实例化,Student类的无参数构造方法执行了!");
    }
    private String name;

    public void setName(String name) {
        System.out.println("第二步:给属性赋值");
        this.name = name;
    }
	// 可以看到使用构造方法给属性赋值的时候,执行完第一步,肯定立马开始执行第二步,因为第二步给属性赋值就在构造方法当中,所以本案例采用set注入的方式给属性赋值,并观察赋值动作实在什么时候完成的
    public Student(String name) {
        System.out.println("第一步:实例化Bean");
        System.out.println("第二步:给属性赋值");
        this.name = name;
    }

    public void init() {
        System.out.println("第三步:初始化Bean");
    }

    public void destroy () {
        System.out.println("第五步:销毁Bean");
    }

    @Override
    public String toString() {
        return "Student{" +
                "name='" + name + '\'' +
                '}';
    }
}
写xml配置文件:
<!--这是在Spring配置文件中配置的一个Bean-->
<!--init-method指向的方法是在初始化Bean的时候Spring自动调用并执行的方法-->
<!--destroy-method指向的方法是在Bean的生命周期的销毁Bean的时候被Spring自动调用的并执行的方法-->
<bean id="stu" class="com.powernode.spring6.bean.Student" init-method="init" destroy-method="destroy">
    <!--这里采用set注入的方式观察Spring中Bean的生命周期,以及执行流程-->
    <property name="name" value="薛英豪"></property>
</bean>
测试程序:
public void test004 () {
    ApplicationContext applicationContext = new ClassPathXmlApplicationContext("spring6.xml");
    Object stu = applicationContext.getBean("stu");
    System.out.println("第四步:使用Bean " + stu);
    ClassPathXmlApplicationContext cpxac = (ClassPathXmlApplicationContext)applicationContext;
    cpxac.close();
}
执行结果:
[外链图片转存失败,源站可能有防盗链机制,建议将图片保存下来直接上传(img-BK4L0wkA-1686488658495)(C:\Users\XueYingHao\AppData\Roaming\Typora\typora-user-images\image-20230505180931774.png)]
-
需要注意的:
- 只有正常关闭Spring容器的时候,bean的销毁方法才会被调用。
- ClassPathXmlApplicationContext类才有close方法
- 配置文件中bean标签中init-method指定初始化方法,destroy-method指定销毁方法。
Bean的生命周期之7步
-
在以上的5步中,第三步是初始化Bean,如果还想在初始化前和初始化后添加代码,可以加入“Bean后处理器”
-
"Bean后处理器"是指Spring Framework中的一种特殊类型的处理器,它在IoC容器创建完所有Bean实例之后对这些实例进行处理。
-
为什么叫做“Bean后处理器”?这个处理器被称为"Bean后处理器",是因为它处理的是IoC容器中已经创建好的Bean实例。它可以在这些Bean实例初始化前后执行额外的处理逻辑,比如修改属性值、验证Bean状态等。因此,它很常用于扩展Spring框架的功能,增加应用程序的灵活性和可维护性。
-
Bean的生命周期被分为7步分别是:
- 实例化Bean
- 给属性赋值(set或构造注入都可以)
- “Bean后处理器”的Before方法执行
- 初始化Bean
- “Bean后处理器”的After方法执行
- 使用Bean
- 销毁Bean
-
Bean后处理器 的实现步骤
public class MyBeanPostProcessor implements BeanPostProcessor {

    public Object postProcessBeforeInitialization(Object bean, String beanName) throws BeansException {
        // 在Bean初始化之前进行一些预处理操作
        System.out.println("Before initialization of bean " + beanName);
        return bean;
    }

    public Object postProcessAfterInitialization(Object bean, String beanName) throws BeansException {
        // 在Bean初始化之后进行一些后处理操作
        System.out.println("After initialization of bean " + beanName);
        return bean;
    }
}
在spring配置文件中配置“Bean后处理器”:
<!--配置Bean后处理器。这个后处理器将作用于当前配置文件中所有的bean。-->
<bean class="com.powernode.spring6.bean.MyBeanPostProcessor"/>
一定要注意:在spring配置文件中配置的Bean后处理器将作用于当前配置文件中所有的Bean。
如果加上Bean后处理器的话,Bean的生命周期就是7步了:
[外链图片转存失败,源站可能有防盗链机制,建议将图片保存下来直接上传(img-0pBMlpW5-1686488658495)(C:\Users\XueYingHao\AppData\Roaming\Typora\typora-user-images\image-20230507095234551.png)]
Bean的生命周期之10步【了解】
-
[外链图片转存失败,源站可能有防盗链机制,建议将图片保存下来直接上传(img-aji0QxPo-1686488658496)(C:\Users\XueYingHao\AppData\Roaming\Typora\typora-user-images\image-20230507095408037.png)]
-
Spring Aware 接口是一个特殊的接口,它可以被 Spring IoC 容器识别和处理。当一个 Bean 实现了 Spring Aware 接口时,Spring IoC 容器会自动调用该 Bean 的相关方法,并将 Spring IoC 容器本身作为参数传递进去,从而让该 Bean 能够感知到 Spring IoC 容器的存在。
-
Spring Aware 接口可以让 Bean 感知到 Spring IoC 容器的存在,并能够与其进行交互,使得开发者能够更方便地使用 Spring 框架提供的各种功能和服务。
-
Aware 相关接口中的常用接口:BeanNameAware、BeanClassLoaderAware、BeanFactoryAware【在Bean后处理器的After方法执行之前执行】
- BeanNameAware:当Bean实现了BeanNameAware,Spring会将Bean的名字传递给当前Bean,BeanNameAware翻译为Bean名字感知,让当前的Bean感知到Bean的名字的存在。
- Bean实现了BeanClassLoderAware,spring会将Bean的类加载器传递给Bean
- Bean实现了BeanFactoryAware,spring会将Bean工厂对象传递给Bean。
-
InitializingBean接口【在Bean后处理器的After方法执行之后执行】
- InitializingBean 是 Spring 框架中的一个接口,它需要在 Bean 属性设置完成后执行一些特定的初始化操作。当 Spring IOC 容器实例化 Bean 后,会自动检测 Bean 是否实现了 InitializingBean 接口,如果检测到实现了该接口,则调用其 afterPropertiesSet() 方法,以便执行特定的初始化操作。
- 在 afterPropertiesSet() 方法中,开发人员可以编写代码来执行任何必需的初始化逻辑,例如连接数据库、建立网络连接等。这样,在应用程序运行时,Spring 将负责确保所有依赖关系都已经被正确初始化,并且 Bean 的状态正确地配置,从而避免了可能出现的错误或异常。
-
DisposableBean:【在Bean销毁之前执行】
- 在Spring中,DisposableBean接口是一个回调接口,用于在Bean被销毁时执行特定的清理操作。当一个Bean实现了DisposableBean接口时,在该Bean被销毁前,Spring容器会自动调用其destroy()方法。
Bean的作用域不同管理方式不同
- Spring 根据Bean的作用域来选择管理方式。
- spring容器只对singleton的Bean进行完整的生命周期管理。
- 而对于 prototype 作用域的 Bean,Spring 只负责创建、初始化完毕,当容器创建了 Bean 的实例后,Bean 的实例就交给客户端代码管理,Spring 容器将不再跟踪其生命周期。
自己new的对象如何让Spring管理
某个java对象是我们自己new的,然后我们希望这个对象被Spring容器管理
需要使用DefaultListableBeanFactory这个类
Person person = new Person();
System.out.println(person);
DefaultListableBeanFactory factory = new DefaultListableBeanFactory();
//调用registerSingleton方法将自己new的类纳入Spring容器的管理,第一个参数是Bean的id,第二个参数是我们自己new的对象
factory.registerSingleton("personBean",person);
//从容器中获取Bean
Object personBean = factory.getBean("personBean");
System.out.println(personBean);
Bean的循环依赖问题
什么是Bean的循环依赖
-
A对象中有B属性,B对象中有A属性,这就是循环依赖,我依赖你,你也依赖我。
-
比如丈夫类Husband、妻子类Wife,Husband中有Wife引用,Wife中有Husband的引用.
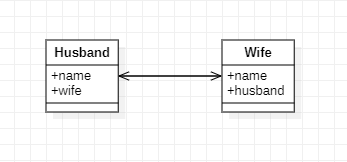
-
代码如下:
//丈夫类
public class Husband {
    private String name;
    private Wife wife;//丈夫类中有妻子
}
//妻子类
public class Wife {
    private String name;
    private Husband husband;//妻子类中有丈夫
}
singleton下的set注入产生的循环依赖
测试一下在singleton+setter的模式下产生的循环依赖,Spring是否能够解决?
public class Husband {
    private String name;
    private Wife wife;

    public void setName(String name) {
        this.name = name;
    }

    public String getName() {
        return name;
    }

    public void setWife(Wife wife) {
        this.wife = wife;
    }

    // toString()方法重写时需要注意:不能直接输出wife,输出wife.getName()。要不然会出现递归导致的栈内存溢出错误。
    @Override
    public String toString() {
        return "Husband{" +
                "name='" + name + '\'' +
                ", wife=" + wife.getName() +
                '}';
    }
}
public class Wife {
    private String name;
    private Husband husband;

    public void setName(String name) {
        this.name = name;
    }

    public String getName() {
        return name;
    }

    public void setHusband(Husband husband) {
        this.husband = husband;
    }

    // toString()方法重写时需要注意:不能直接输出husband,输出husband.getName()。要不然会出现递归导致的栈内存溢出错误。
    @Override
    public String toString() {
        return "Wife{" +
                "name='" + name + '\'' +
                ", husband=" + husband.getName() +
                '}';
    }
}
<?xml version="1.0" encoding="UTF-8"?>
<beans xmlns="http://www.springframework.org/schema/beans"
       xmlns:xsi="http://www.w3.org/2001/XMLSchema-instance"
       xsi:schemaLocation="http://www.springframework.org/schema/beans http://www.springframework.org/schema/beans/spring-beans.xsd">
<!--Singleton表示在整个Spring容器中是单例的,独一无二的对象-->
<!--singleton+setter模式下,为什么循环依赖不会出现问题?
	主要原因是因为Spring对Bean的管理分为两个阶段:
		第一个阶段:在spring容器加载的时候,实例化Bean,只要其中任意一个Bean实例化之后,马上进行"曝光"[不等属性赋值就暴光]
		第二个阶段:Bean曝光之后再对属性进行赋值(调用set方法)
	核心解决方案是:实例化对象和对象的属性赋值分为两个阶段.
	注意:只有scope是singleton的情况下,Bean才会采取提前曝光的措施。
-->
    <bean id="husbandBean" class="com.powernode.spring6.bean.Husband" scope="singleton">
        <property name="name" value="张三"/>
        <property name="wife" ref="wifeBean"/>
    </bean>
    <bean id="wifeBean" class="com.powernode.spring6.bean.Wife" scope="singleton">
        <property name="name" value="小花"/>
        <property name="husband" ref="husbandBean"/>
    </bean>
</beans>
通过测试得知:在singleton + set注入的情况下,循环依赖是没有问题的。Spring可以解决这个问题。
问题?那要是构造注入的话,实例化和属性赋值不都在同一个方法中吗?怎么办?spring能解决循环依赖的问题吗?
当然不能,spring会抛出异常。
prototype下的set注入产生的循环依赖
我们再来测试一下:prototype+set注入的方式下,循环依赖会不会出现问题?
<?xml version="1.0" encoding="UTF-8"?>
<beans xmlns="http://www.springframework.org/schema/beans"
       xmlns:xsi="http://www.w3.org/2001/XMLSchema-instance"
       xsi:schemaLocation="http://www.springframework.org/schema/beans http://www.springframework.org/schema/beans/spring-beans.xsd">
<!--prototype+setter模式下的循环依赖,存在问题会抛出异常
BeanCurrentlyInCreationType 当前Bean正处于创建中异常
注意:当两个Bean的scope都是prototype的时候才会出现异常,如果其中一个是singleton的,就不会出现异常。-->
    <bean id="husbandBean" class="com.powernode.spring6.bean.Husband" scope="prototype">
        <property name="name" value="张三"/>
        <property name="wife" ref="wifeBean"/>
    </bean>
    <bean id="wifeBean" class="com.powernode.spring6.bean.Wife" scope="prototype">
        <property name="name" value="小花"/>
        <property name="husband" ref="husbandBean"/>
    </bean>
</beans>
执行测试程序:发生了异常,异常信息如下:
Caused by: org.springframework.beans.factory.BeanCurrentlyInCreationException: Error creating bean with name 'husbandBean': Requested bean is currently in creation: Is there an unresolvable circular reference?
	at org.springframework.beans.factory.support.AbstractBeanFactory.doGetBean(AbstractBeanFactory.java:265)
	at org.springframework.beans.factory.support.AbstractBeanFactory.getBean(AbstractBeanFactory.java:199)
	at org.springframework.beans.factory.support.BeanDefinitionValueResolver.resolveReference(BeanDefinitionValueResolver.java:325)
	... 44 more
翻译为:创建名为“husbandBean”的bean时出错:请求的bean当前正在创建中:是否存在无法解析的循环引用?
通过测试得知,当循环依赖的所有Bean的scope="prototype"的时候,产生的循环依赖,Spring是无法解决的,会出现BeanCurrentlyInCreationException异常。
为什么两个Bean都是prototype时会出错呢?

以上两个Bean,如果其中一个是singleton,另一个是prototype,是没有问题的。【可以理解为singleton单例这个Bean是递归的出口】
singleton下的构造注入产生的循环依赖
-
我们再来测试一下singleton + 构造注入的方式下,spring是否能够解决这种循环依赖。
-
实验过程
public class Husband {
    private String name;
    private Wife wife;

    public Husband(String name, Wife wife) {
        this.name = name;
        this.wife = wife;
    }
    public String getName() {
        return name;
    }

    @Override
    public String toString() {
        return "Husband{" +
                "name='" + name + '\'' +
                ", wife=" + wife +
                '}';
    }
}
public class Wife { private String name; private Husband husband; public Wife(String name, Husband husband) { this.name = name; this.husband = husband; } public String getName() { return name; } @Override public String toString() { return "Wife{" + "name='" + name + '\'' + ", husband=" + husband + '}'; } }<?xml version="1.0" encoding="UTF-8"?> <beans xmlns="http://www.springframework.org/schema/beans" xmlns:xsi="http://www.w3.org/2001/XMLSchema-instance" xsi:schemaLocation="http://www.springframework.org/schema/beans http://www.springframework.org/schema/beans/spring-beans.xsd"> <bean id="hBean" class="com.powernode.spring6.bean2.Husband" scope="singleton"> <constructor-arg name="name" value="张三"/> <constructor-arg name="wife" ref="wBean"/> </bean> <bean id="wBean" class="com.powernode.spring6.bean2.Wife" scope="singleton"> <constructor-arg name="name" value="小花"/> <constructor-arg name="husband" ref="hBean"/> </bean> </beans> -
运行结果抛出了异常,和上一个测试结果相同,都是提示产生了循环依赖,并且Spring是无法解决这种循环依赖的。
- 主要原因是:因为构造注入会导致实例化对象的过程和对象属性赋值的过程没有分开,必须一起完成导致的。
-
spring只可以解决一种循环依赖的问题:setter+singleton
Spring解决循环依赖的机理
-
Spring为什么能解决setter+singleton模式下的循环依赖问题?
-
根本原因在于:这种方式可以做到将“实例化Bean”和“给Bean的属性赋值”这两个动作分开去完成。
-
实例化Bean的时候调用无参数构造方法完成。此时可以先不给属性赋值,可以提前将该Bean对象“曝光”给外界。
-
给Bean属性赋值的时候:调用setter方法来完成。
-
spring将两个步骤可以完全分离开去完成,并且这两个步骤不在同一个时间点上完成。
-
Bean都是单例的,我们可以先把所有的单例Bean实例化出来,放到一个集合当中(我们称之为缓存),往集合中放的这个过程我们称之为“曝光”。所有的单例Bean全部实例化完成之后spring再慢慢调用setter方法给属性赋值。这样spring就解决了单例模式下的循环依赖问题。
-
源码分析:
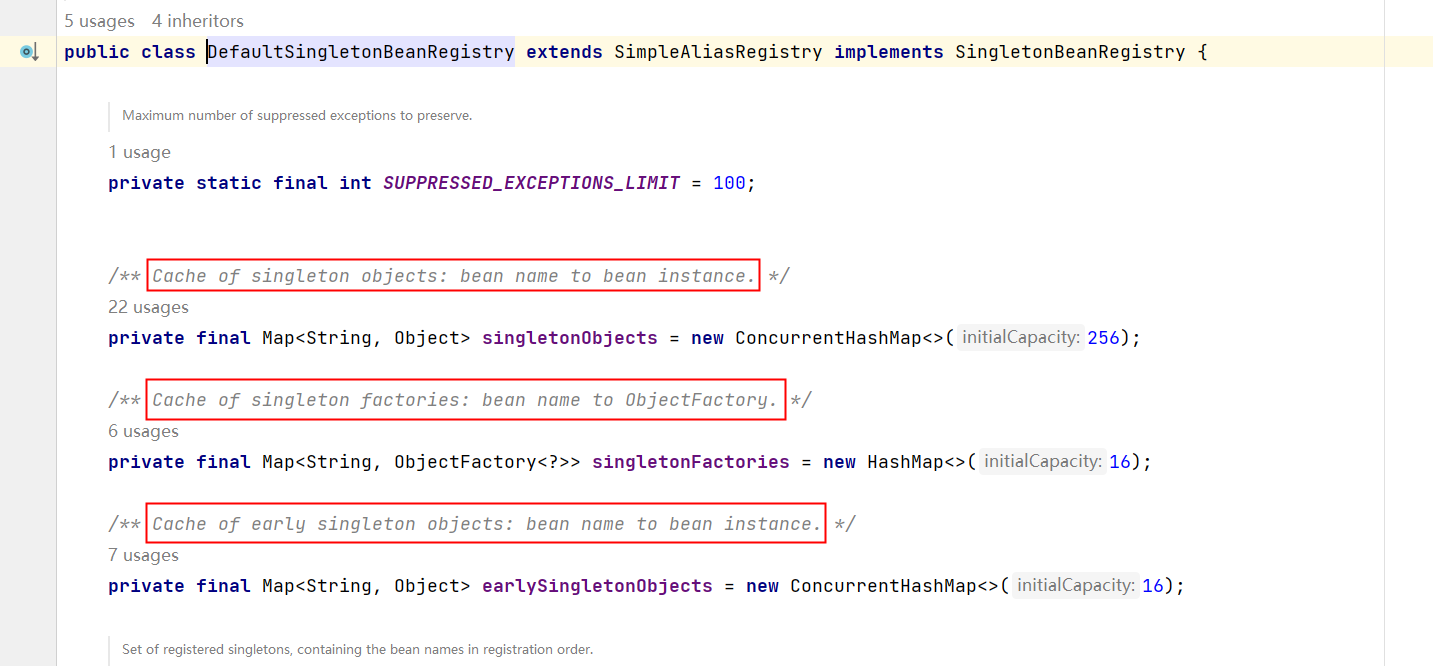
- 在Spring框架中,DefaultSingletonBeanRegistry类是一个单例bean注册机,它是用于管理所有的单例bean的。当我们向容器注册一个单例bean时,DefaultSingletonBeanRegistry将会保存该bean,并且在以后的请求中返回这个bean实例。
- 上图类中包含三个重要的属性:
- *Cache of singleton objects: bean name to bean instance.* 单例对象的缓存:key存储bean名称,value存储Bean对象【一级缓存】
- *Cache of early singleton objects: bean name to bean instance.* 早期单例对象的缓存:key存储bean名称,value存储早期的Bean对象【二级缓存】
- *Cache of singleton factories: bean name to ObjectFactory.* 单例工厂缓存:key存储bean名称,value存储该Bean对应的ObjectFactory对象【三级缓存】
- 这三个缓存其实本质上是三个Map集合。
-
我们再来看,在该类中有这样一个方法addSingletonFactory(),这个方法的作用是:将创建Bean对象的ObjectFactory对象提前曝光。
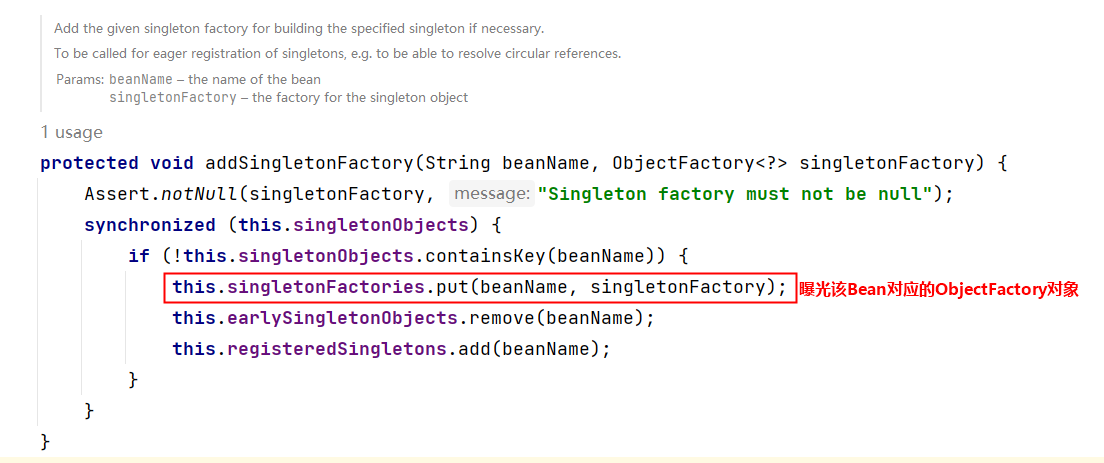
再看下面源码:
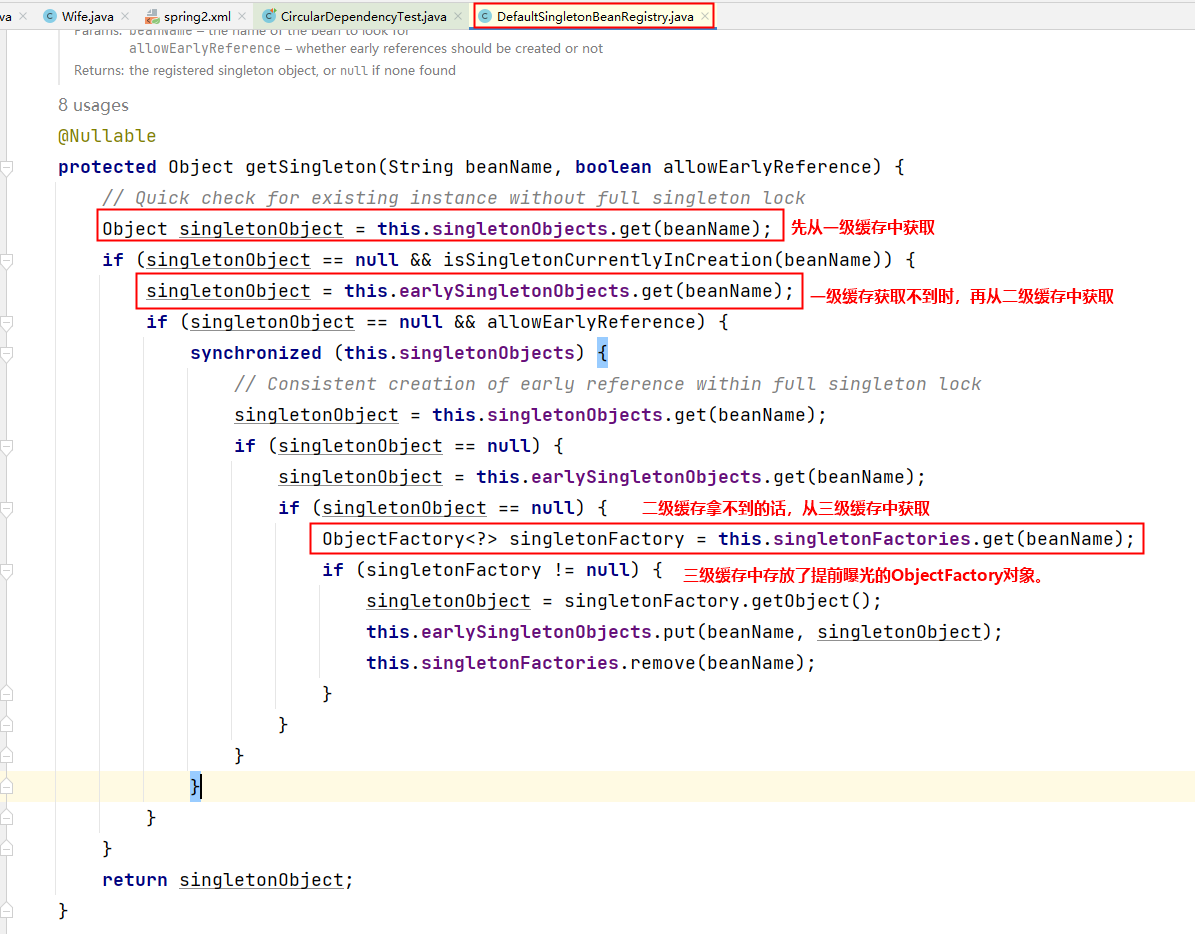
从源码中可以看到,spring会先从一级缓存中获取Bean,如果获取不到,则从二级缓存中获取Bean,如果二级缓存还是获取不到,则从三级缓存中获取之前曝光的ObjectFactory对象,通过ObjectFactory对象获取Bean实例,这样就解决了循环依赖的问题。
-
总结:spring只能解决setter方法注入单例bean之间的循环依赖问题。ClassA依赖ClassB,ClassB又依赖CassA,形成以来闭环Spring在创建ClassA对象后,不需要等给属性赋值,直接将其曝光到bean缓存当中。在解析ClassA的属性时,又发现依赖于ClassB,再次去获取ClassB,当解析ClassB的属性时,又发现需要ClassA的属性,但此时的ClassA已经被提前曝光加入了正在创建的bean的缓存中,则无需创建新的的ClassA的实例,直接从缓存中获取即可。从而解决循环依赖问题。
回顾反射机制
分析方法四要素
-
我们先来看一下,不使用反射机制调用一个方法需要几个要素的参与。
-
有这样一个类:
package com.powernode.reflect;

/**
 * @author 动力节点
 * @version 1.0
 * @className SystemService
 * @since 1.0
 **/
public class SystemService {

    public void logout(){
        System.out.println("退出系统");
    }

    public boolean login(String username, String password){
        if ("admin".equals(username) && "admin123".equals(password)) {
            return true;
        }
        return false;
    }
}
编写程序调用方法:
package com.powernode.reflect;

/**
 * @author 动力节点
 * @version 1.0
 * @className ReflectTest01
 * @since 1.0
 **/
public class ReflectTest01 {
    public static void main(String[] args) {

        // 创建对象
        SystemService systemService = new SystemService();

        // 调用方法并接收方法的返回值
        boolean success = systemService.login("admin", "admin123");

        System.out.println(success ? "登录成功" : "登录失败");
    }
}
调用一个方法,一般涉及到4个要素:
- 调用哪个对象的(systemService)
- 哪个方法(login)
- 传什么参数(“admin”, “admin123”)
- 返回什么值(success)
获取Method
-
要使用反射机制调用一个方法,首先你要获取到这个方法。
-
要获取到这个方法首先要获取到这个类。
-
在反射机制中Method实例代表一个方法,那么怎么获取Method实例呐?
-
有这样一个类:
package com.powernode.reflect;

/**
 * @author 动力节点
 * @version 1.0
 * @className SystemService
 * @since 1.0
 **/
public class SystemService {

    public void logout(){
        System.out.println("退出系统");
    }

    public boolean login(String username, String password){
        if ("admin".equals(username) && "admin123".equals(password)) {
            return true;
        }
        return false;
    }

    public boolean login(String password){
        if("110".equals(password)){
            return true;
        }
        return false;
    }
}
我们如何获取到 logout()、login(String,String)、login(String) 这三个方法呢?
要获取方法Method,首先你需要获取这个类Class。
获取Class的代码:
Class clazz = Class.forName("com.powernode.reflect.SystemService");当拿到Class之后,调用getDeclaredMethod()方法可以获取到方法。
假如你要获取这个方法:login(String username, String password)
Method loginMethod = clazz.getDeclaredMethod("login", String.class, String.class);
//第一个参数:方法的名字
//第二个参数:方法的形式参数列表都是什么类型的数据
假如你要获取到这个方法:login(String password)
Method loginMethod = clazz.getDeclaredMethod("login", String.class);获取一个方法,需要告诉Java程序,你要获取的方法的名字是什么,这个方法上每个形参的类型是什么。这样Java程序才能给你拿到对应的方法。
这样的设计也非常合理,因为在同一个类当中,方法是支持重载的,也就是说方法名可以一样,但参数列表一定是不一样的,所以获取一个方法需要提供方法名以及每个形参的类型。
假设有这样一个方法:
public void setAge(int age){
    this.age = age;
}
你要获取这个方法的话,代码应该这样写:
Method setAgeMethod = clazz.getDeclaredMethod("setAge", int.class);其中setAge是方法名,int.class是形参的类型。
如果要获取上面的logout方法,代码应该这样写:
Method logoutMethod = clazz.getDeclaredMethod("logout");因为这个方法形式参数的个数是0个。所以只需要提供方法名就行了。
假设你知道属性名
-
假设有这样一个类:
package com.powernode.reflect; /** * @author 动力节点 * @version 1.0 * @className User * @since 1.0 **/ public class User { private String name; private int age; public String getName() { return name; } public void setName(String name) { this.name = name; } public int getAge() { return age; } public void setAge(int age) { this.age = age; } @Override public String toString() { return "User{" + "name='" + name + '\'' + ", age=" + age + '}'; } } -
你知道以下这几条信息:
- 类名是:com.powernode.reflect.User
- 该类中有String类型的name属性和int类型的age属性。
- 另外你也知道该类的设计符合javabean规范。(也就是说属性私有化,对外提供setter和getter方法)
-
你如何通过反射机制给User对象的name属性赋值zhangsan,给age属性赋值20岁。
package com.powernode.reflect; import java.lang.reflect.Method; /** * @author 动力节点 * @version 1.0 * @className UserTest * @since 1.0 **/ public class UserTest { public static void main(String[] args) throws Exception{ // 已知类名 String className = "com.powernode.reflect.User"; // 已知属性名 String propertyName = "age"; // 通过反射机制给User对象的age属性赋值20岁 Class<?> clazz = Class.forName(className); Object obj = clazz.newInstance(); // 创建对象 // 根据属性名获取setter方法名 String setMethodName = "set" + propertyName.toUpperCase().charAt(0) + propertyName.substring(1); // 获取Method Method setMethod = clazz.getDeclaredMethod(setMethodName, int.class); // 调用Method setMethod.invoke(obj, 20); System.out.println(obj); } } -
运行结果:

Spring框架到底有什么用
使用非注解的方式,简单演示一下
实体类代码
public class MyEntity {
    // 实体类定义省略...
}
持久化层代码
public class MyRepository {
    public void save(MyEntity entity) {
        // 保存MyEntity对象到数据库中
    }
}
业务逻辑层
public class MyService {

    private MyRepository myRepository;

    public MyService() {
        ApplicationContext context = new ClassPathXmlApplicationContext("applicationContext.xml");
    }

    public void doSomething() {
        // 使用MyRepository进行数据访问操作
        myRepository.save(new MyEntity());
    }
}
applicationContext.xml
<?xml version="1.0" encoding="UTF-8"?>
<beans xmlns="http://www.springframework.org/schema/beans"
       xmlns:xsi="http://www.w3.org/2001/XMLSchema-instance"
       xsi:schemaLocation="
          http://www.springframework.org/schema/beans
          http://www.springframework.org/schema/beans/spring-beans-3.0.xsd">
    <!--根据名字进行自动注入-->
    <bean id="myService" class="com.example.MyService" autowire="byName"/>

    <bean id="myRepository" class="com.example.MyRepository"/>

</beans>
表示层代码就先不写了,表示层调用业务逻辑层,和业务逻辑层调用持久化层的代码是一样的.
Spring IoC注解式开发
回顾注解
-
注解的存在是为了简化xml的配置。spring6倡导全注解式开发。
-
注解怎样定义?注解中的属性怎样定义?
package com.powernode.annotation; import java.lang.annotation.ElementType; import java.lang.annotation.Retention; import java.lang.annotation.RetentionPolicy; import java.lang.annotation.Target; @Target(value = {ElementType.TYPE}) @Retention(value = RetentionPolicy.RUNTIME) public @interface Component { String value(); }- 以上是自定义了一个注解:Component
- 该注解上包括两个元注解:Target注解和Retention注解。
- Target用来设置Component注解可以出现的位置,上述示例表示Component注解智能出现在类和接口上。
- Retention注解用来设置Component注解的保持性策略,以上表示Component注解可以被反射机制读取。
- String value();是Component注解中的一个属性,该属性类型是String,属性名是value。
-
怎么使用注解:
package com.powernode.bean; import com.powernode.annotation.Component; @Component(value = "userBean") public class User { }-
用法简单,语法格式。@注解类型名(属性名=属性值,属性名=属性值,属性名=属性值…)
-
userBean为什么用双引号括起来,因为value属性是String类型的,字符串。
-
另外如果属性名是value,则在使用的时候可以省略属性名,例如:
package com.powernode.bean;

import com.powernode.annotation.Component;

//@Component(value = "userBean")
@Component("userBean")
public class User {
}
-
-
通过反射机制怎样读取注解?
准备两个Bean,一个上面有Component注解一个上面没有Component注解。
package com.powernode.bean;

import com.powernode.annotation.Component;

@Component("userBean")
public class User {
}
package com.powernode.bean; public class Vip { } -
假设我们现在只知道包名:com.powernode.bean。至于这个包下有多少个Bean我们不知道。哪些Bean上有注解,哪些Bean上没有注解,这些我们都不知道,如何通过程序全自动化判断。
package com.powernode.test; import com.powernode.annotation.Component; import java.io.File; import java.net.URL; import java.util.Arrays; import java.util.Enumeration; import java.util.HashMap; import java.util.Map; /** * @author 动力节点 * @version 1.0 * @className Test * @since 1.0 **/ public class Test { public static void main(String[] args) throws Exception { // 存放Bean的Map集合。key存储beanId。value存储Bean。 Map<String,Object> beanMap = new HashMap<>(); String packageName = "com.powernode.bean"; String path = packageName.replaceAll("\\.", "/"); URL url = ClassLoader.getSystemClassLoader().getResource(path); File file = new File(url.getPath()); File[] files = file.listFiles(); Arrays.stream(files).forEach(f -> { String className = packageName + "." + f.getName().split("\\.")[0]; try { Class<?> clazz = Class.forName(className); if (clazz.isAnnotationPresent(Component.class)) { Component component = clazz.getAnnotation(Component.class); String beanId = component.value(); Object bean = clazz.newInstance(); beanMap.put(beanId, bean); } } catch (Exception e) { e.printStackTrace(); } }); System.out.println(beanMap); } } -
运行结果:

声明Bean的注解
-
负责声明Bean的注解常见的包括四个:
- @Component
- @Controller
- @Service
- @Reposotory
-
源码如下:
package com.powernode.annotation;

import java.lang.annotation.ElementType;
import java.lang.annotation.Retention;
import java.lang.annotation.RetentionPolicy;
import java.lang.annotation.Target;

@Target(value = {ElementType.TYPE})
@Retention(value = RetentionPolicy.RUNTIME)
public @interface Component {
    String value();
}
package org.springframework.stereotype; import java.lang.annotation.Documented; import java.lang.annotation.ElementType; import java.lang.annotation.Retention; import java.lang.annotation.RetentionPolicy; import java.lang.annotation.Target; import org.springframework.core.annotation.AliasFor; @Target({ElementType.TYPE}) @Retention(RetentionPolicy.RUNTIME) @Documented @Component public @interface Controller { @AliasFor( annotation = Component.class ) String value() default ""; }package org.springframework.stereotype; import java.lang.annotation.Documented; import java.lang.annotation.ElementType; import java.lang.annotation.Retention; import java.lang.annotation.RetentionPolicy; import java.lang.annotation.Target; import org.springframework.core.annotation.AliasFor; @Target({ElementType.TYPE}) @Retention(RetentionPolicy.RUNTIME) @Documented @Component public @interface Service { @AliasFor( annotation = Component.class ) String value() default ""; }package org.springframework.stereotype; import java.lang.annotation.Documented; import java.lang.annotation.ElementType; import java.lang.annotation.Retention; import java.lang.annotation.RetentionPolicy; import java.lang.annotation.Target; import org.springframework.core.annotation.AliasFor; @Target({ElementType.TYPE}) @Retention(RetentionPolicy.RUNTIME) @Documented @Component public @interface Repository { @AliasFor( annotation = Component.class ) String value() default ""; } -
通过源码可以看到,@Controller、@Service、@Repository这三个注解都是@Component注解的别名。也就是说着四个注解功能都一样用哪个都可以。
-
为了增强程序的可读性,建议:
- 表示层(控制器类)使用:Controller
- 业务逻辑层(service)使用:Service
- 持久化层(dao层)使用:Repository
-
这四个注解他们都是只有一个value属性,value属性用来指定bean的id,也就是bean的名字。
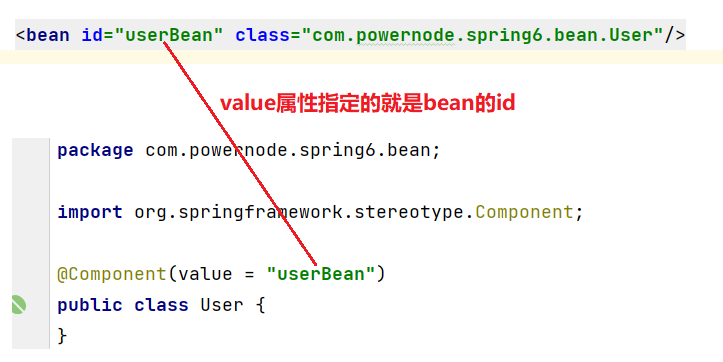
Spring注解的使用
- 使用上述注解的步骤:
- 第一步:加入aop依赖。
- 第二步:在配置文件中添加context命名空间。
- 第三步:在配置文件中指定要扫描的包;
- 第四步:在Bean类上使用注解。
第一步:加入aop依赖。
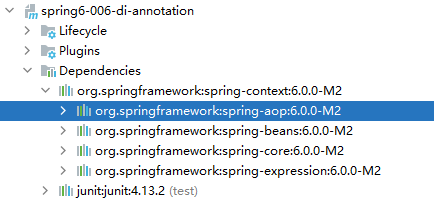
我们可以看到当加入spring-context依赖之后,会关联加入aop的依赖。所以这一步不用做。
第二步:在配置文件中添加context命名空间
<?xml version="1.0" encoding="UTF-8"?>
<beans xmlns="http://www.springframework.org/schema/beans"
       xmlns:xsi="http://www.w3.org/2001/XMLSchema-instance"
       xmlns:context="http://www.springframework.org/schema/context"
       xsi:schemaLocation="http://www.springframework.org/schema/beans http://www.springframework.org/schema/beans/spring-beans.xsd
                           http://www.springframework.org/schema/context http://www.springframework.org/schema/context/spring-context.xsd">

</beans>
第三步:在配置文件中指定要扫描的包
<?xml version="1.0" encoding="UTF-8"?>
<beans xmlns="http://www.springframework.org/schema/beans"
       xmlns:xsi="http://www.w3.org/2001/XMLSchema-instance"
       xmlns:context="http://www.springframework.org/schema/context"
       xsi:schemaLocation="http://www.springframework.org/schema/beans http://www.springframework.org/schema/beans/spring-beans.xsd
                           http://www.springframework.org/schema/context http://www.springframework.org/schema/context/spring-context.xsd">
    <context:component-scan base-package="com.powernode.spring6.bean"/>
</beans>
第四步:在Bean类上使用注解
package com.powernode.spring6.bean;

import org.springframework.stereotype.Component;
//如果注解的属性是value,value是可以省略的
//@Component(value = "userBean")
@Component("userBean")
public class User {
}
编写测试程序:
package com.powernode.spring6.test;

import com.powernode.spring6.bean.User;
import org.junit.Test;
import org.springframework.context.ApplicationContext;
import org.springframework.context.support.ClassPathXmlApplicationContext;

public class AnnotationTest {
    @Test
    public void testBean(){
        ApplicationContext applicationContext = new ClassPathXmlApplicationContext("spring.xml");
        User userBean = applicationContext.getBean("userBean", User.class);
        System.out.println(userBean);
    }
}
执行结果:

如果把value属性彻底去掉,spring会被Bean自动取名吗?
会的。并且默认名字的规律是:Bean类名首字母小写即可。
package com.powernode.spring6.bean;

import org.springframework.stereotype.Component;
//也就是说,这个BankDao的bean的名字为:bankDao
@Component
public class BankDao {
}
测试程序:
package com.powernode.spring6.test;

import com.powernode.spring6.bean.BankDao;
import org.junit.Test;
import org.springframework.context.ApplicationContext;
import org.springframework.context.support.ClassPathXmlApplicationContext;

public class AnnotationTest {
    @Test
    public void testBean(){
        ApplicationContext applicationContext = new ClassPathXmlApplicationContext("spring.xml");
        BankDao bankDao = applicationContext.getBean("bankDao", BankDao.class);
        System.out.println(bankDao);
    }
}
执行结果:

如果有多个包怎么办
-
有两种解决方案:
-
第一种:在配置文件中指定多个包,用逗号隔开。
<!--使用两个component-scan标签,每一个component-scan标签指定一个包--> <context:component-scan base-package="com.powernode2"></context:component-scan> <context:component-scan base-package="com.powernode"></context:component-scan> <!--使用一个component-scan标签,在base-package属性值中写多个包名,包名和包名之间使用逗号分割--> <context:component-scan base-package="com.powernode2,com.powernode"></context:component-scan> -
第二种:指定多个包的共同父包。
<!--com包是:com.powernode包和com.powernode2包共同的父包-->
<context:component-scan base-package="com"></context:component-scan>
-
选择性实例化Bean
-
需求:假设在某个包下有很多Bean,有的Bean上标注了Component,有的标注了Controller,有的标注了Service,有的标注了Repository,现在由于某种特殊业务的需要,只允许其中所有的Controller参与Bean管理,其他的都不实例化。这应该怎么办呢?
-
测试的Bean代码
package com.powernode.spring6.bean3;

import org.springframework.stereotype.Component;
import org.springframework.stereotype.Controller;
import org.springframework.stereotype.Repository;
import org.springframework.stereotype.Service;

@Component
public class A {
    public A() {
        System.out.println("A的无参数构造方法执行");
    }
}

@Controller
class B {
    public B() {
        System.out.println("B的无参数构造方法执行");
    }
}

@Service
class C {
    public C() {
        System.out.println("C的无参数构造方法执行");
    }
}

@Repository
class D {
    public D() {
        System.out.println("D的无参数构造方法执行");
    }
}

@Controller
class E {
    public E() {
        System.out.println("E的无参数构造方法执行");
    }
}

@Controller
class F {
    public F() {
        System.out.println("F的无参数构造方法执行");
    }
}
spring配置文件
<?xml version="1.0" encoding="UTF-8"?> <beans xmlns="http://www.springframework.org/schema/beans" xmlns:xsi="http://www.w3.org/2001/XMLSchema-instance" xmlns:context="http://www.springframework.org/schema/context" xsi:schemaLocation="http://www.springframework.org/schema/beans http://www.springframework.org/schema/beans/spring-beans.xsd http://www.springframework.org/schema/context http://www.springframework.org/schema/context/spring-context.xsd"> <context:component-scan base-package="com.powernode.spring6.bean3" use-default-filters="false"> <context:include-filter type="annotation" expression="org.springframework.stereotype.Controller"/> </context:component-scan> </beans>- use-default-filters="false"表示:不在使用spring默认实例化规则,即使有Component、Controller、Service、Repository这些注解标注也不再实例化。
- use-default-filters=“true” 表示:使用spring默认的规则,只要有Component、Controller、Service、Repository中的任意一个注解标注,则进行实例化。
- <context:include-filter type=“annotation” expression=“org.springframework.stereotype.Controller”/> 表示只有Controller进行实例化。
-
也可以将use-default-filters设置为true(不写就是true),并且采用exclude-filter方式排出哪些注解标注的Bean不参与实例化:
<context:component-scan base-package="com.powernode.spring6.bean3">
  <context:exclude-filter type="annotation" expression="org.springframework.stereotype.Repository"/>
  <context:exclude-filter type="annotation" expression="org.springframework.stereotype.Service"/>
  <context:exclude-filter type="annotation" expression="org.springframework.stereotype.Controller"/>
</context:component-scan>
运行结果:

负责注入的注解
@Component、@Controller、@Service、@Repository这四个注解都是用来声明Bean的,声明后这些Bean将被实例化。接下来我们看一下如何给Bean的属性赋值。需要用到这些注解:
- @Value
- @Autowired
- @Qualifier
- @Resource
@Value
-
当属性的类型是简单类型时,可以使用@Value注解进行注入。
package com.powernode.spring6.bean4; import org.springframework.beans.factory.annotation.Value; import org.springframework.stereotype.Component; @Component public class User { @Value(value = "zhangsan") private String name; @Value("20") private int age; @Override public String toString() { return "User{" + "name='" + name + '\'' + ", age=" + age + '}'; } } -
开启包扫描
<?xml version="1.0" encoding="UTF-8"?> <beans xmlns="http://www.springframework.org/schema/beans" xmlns:xsi="http://www.w3.org/2001/XMLSchema-instance" xmlns:context="http://www.springframework.org/schema/context" xsi:schemaLocation="http://www.springframework.org/schema/beans http://www.springframework.org/schema/beans/spring-beans.xsd http://www.springframework.org/schema/context http://www.springframework.org/schema/context/spring-context.xsd"> <context:component-scan base-package="com.powernode.spring6.bean4"/> </beans> -
测试程序:
@Test public void testValue(){ ApplicationContext applicationContext = new ClassPathXmlApplicationContext("spring-injection.xml"); Object user = applicationContext.getBean("user"); System.out.println(user); } -
执行结果:

-
通过以上代码可以发现,我们并没有给属性提供setter方法,但是仍然可以完成属性赋值。【使用注解的方式开发可以不提供setter方法】
-
如果提供了setter方法,并且在setter方法上加上@Value注解,可以完成注入吗?尝试一下:
package com.powernode.spring6.bean4; import org.springframework.beans.factory.annotation.Value; import org.springframework.stereotype.Component; @Component public class User { private String name; private int age; @Value("李四") public void setName(String name) { this.name = name; } @Value("30") public void setAge(int age) { this.age = age; } @Override public String toString() { return "User{" + "name='" + name + '\'' + ", age=" + age + '}'; } } -
执行结果:

-
通过测试得知:@Value注解是可以直接使用在属性上的,也可以直接使用在setter方法上,为了简化代码,以后我们一般不提供setter方法,直接在属性上使用@Value注解完成属性赋值。
-
接下来测试能否通过构造方法进行注入?
package com.powernode.spring6.bean4; import org.springframework.beans.factory.annotation.Value; import org.springframework.stereotype.Component; @Component public class User { private String name; private int age; public User(@Value("隔壁老王") String name, @Value("33") int age) { this.name = name; this.age = age; } @Override public String toString() { return "User{" + "name='" + name + '\'' + ", age=" + age + '}'; } } -
运行结果:

-
总结:@Value可以出现在以下三个地方完成简单类型的属性注入
- @Value直接出现在属性上。【不调用set方法也不调用构造方法】
- @Value出现在setter方法上。【set注入】
- @Value出现在构造方法的形式参数上。【构造注入】
@Autowired与@Qualifier
-
@Autowired注解可以用来注入非简单类型。被翻译为:自动连线、或自动装配。
-
单独使用:@Autowired注解,默认根据类型自动装配。【byType】缺点在整个容器中只允许有一个该类型的对象,才可以使用根据类型自动装配。【一个ApplicationContext是一个容器】
-
看一下@Autowired源码:
package org.springframework.beans.factory.annotation; import java.lang.annotation.Documented; import java.lang.annotation.ElementType; import java.lang.annotation.Retention; import java.lang.annotation.RetentionPolicy; import java.lang.annotation.Target; @Target({ElementType.CONSTRUCTOR, ElementType.METHOD, ElementType.PARAMETER, ElementType.FIELD, ElementType.ANNOTATION_TYPE}) @Retention(RetentionPolicy.RUNTIME) @Documented public @interface Autowired { boolean required() default true; }-
在 Spring 中,
@Autowired注解用于自动装配 Bean。required属性表示是否必须有对应的 Bean 存在,它的默认值为true,即如果找不到对应的 Bean,则会抛出 NoSuchBeanDefinitionException 异常。当
required属性取值为false时,如果找不到对应的 Bean,则会将该属性标记为null,而不是抛出异常。这意味着如果需要注入的 Bean 是可选的,或者可能不存在(例如,根据配置文件的条件进行选择),则可以将required的取值设为false。需要注意的是,如果在依赖注入过程中发现了多个符合要求的 Bean,则会引发 NoUniqueBeanDefinitionException 异常。此时,如果将
required属性设置为false,则会将该属性标记为null,并且仍然会引发 NoUniqueBeanDefinitionException 异常。因此,应该尽量避免出现多个符合要求的 Bean。 -
第一处:该注解可以标注在哪里?
- 构造方法上
- 方法上
- 形式参数上
- 属性上
- 注解上
-
第二处:该注解有一个required属性,默认值是true,表示在注入的时候要求被注入的Bean必须是存在的,如果不存在则报错。如果required属性设置为false,表示注入的Bean存在或者不存在都没关系,存在的话就注入,不存在的话,也不报错。
-
-
我们先在属性上使用@Autowired注解:
package com.powernode.spring6.dao;

public interface UserDao {
    void insert();
}
package com.powernode.spring6.dao; import org.springframework.stereotype.Repository; @Repository //纳入bean管理 public class UserDaoForMySQL implements UserDao{ @Override public void insert() { System.out.println("正在向mysql数据库插入User数据"); } }package com.powernode.spring6.service; import com.powernode.spring6.dao.UserDao; import org.springframework.beans.factory.annotation.Autowired; import org.springframework.stereotype.Service; @Service // 纳入bean管理 public class UserService { @Autowired // 在属性上注入 private UserDao userDao; // 没有提供构造方法和setter方法。 public void save(){ userDao.insert(); } }<?xml version="1.0" encoding="UTF-8"?> <beans xmlns="http://www.springframework.org/schema/beans" xmlns:xsi="http://www.w3.org/2001/XMLSchema-instance" xmlns:context="http://www.springframework.org/schema/context" xsi:schemaLocation="http://www.springframework.org/schema/beans http://www.springframework.org/schema/beans/spring-beans.xsd http://www.springframework.org/schema/context http://www.springframework.org/schema/context/spring-context.xsd"> <context:component-scan base-package="com.powernode.spring6.dao,com.powernode.spring6.service"/> </beans>@Test public void testAutowired(){ ApplicationContext applicationContext = new ClassPathXmlApplicationContext("spring-injection.xml"); UserService userService = applicationContext.getBean("userService", UserService.class); userService.save(); }
以上构造方法和setter方法都没有提供,经过测试,仍然可以注入成功。
-
接下来,再来测试一下@Autowired注解出现在setter方法上:
package com.powernode.spring6.service; import com.powernode.spring6.dao.UserDao; import org.springframework.beans.factory.annotation.Autowired; import org.springframework.stereotype.Service; @Service public class UserService { private UserDao userDao; @Autowired public void setUserDao(UserDao userDao) { this.userDao = userDao; } public void save(){ userDao.insert(); } } -
执行结果:

-
我们再来看看能不能出现在构造方法上:
package com.powernode.spring6.service;

import com.powernode.spring6.dao.UserDao;
import org.springframework.beans.factory.annotation.Autowired;
import org.springframework.stereotype.Service;

@Service
public class UserService {

    private UserDao userDao;

    @Autowired
    public UserService(UserDao userDao) {
        this.userDao = userDao;
    }

    public void save(){
        userDao.insert();
    }
}
执行结果:

-
再来看看,这个注解能不能只标注在构造方法的形参上:
package com.powernode.spring6.service;

import com.powernode.spring6.dao.UserDao;
import org.springframework.beans.factory.annotation.Autowired;
import org.springframework.stereotype.Service;

@Service
public class UserService {

    private UserDao userDao;

    public UserService(@Autowired UserDao userDao) {
        this.userDao = userDao;
    }

    public void save(){
        userDao.insert();
    }
}
执行结果:

-
还有更劲爆的,当有参数的构造方法只有一个时,@Autowired注解可以省略。
package com.powernode.spring6.service;

import com.powernode.spring6.dao.UserDao;
import org.springframework.stereotype.Service;

@Service
public class UserService {

    private UserDao userDao;

    public UserService(UserDao userDao) {
        this.userDao = userDao;
    }

    public void save(){
        userDao.insert();
    }
}
执行结果:

-
当然,如果有多个构造方法,@Autowired肯定是不能省略的。
package com.powernode.spring6.service;

import com.powernode.spring6.dao.UserDao;
import org.springframework.stereotype.Service;

@Service
public class UserService {

    private UserDao userDao;

    public UserService(UserDao userDao) {
        this.userDao = userDao;
    }

    public UserService(){

    }

    public void save(){
        userDao.insert();
    }
}
执行结果:

-
总结@Autowired可以出现在哪些位置【切记,根据类型自动注入的时候只看spring容器中被注入的类型的对象是否唯一】
- 属性上【不调用setter方法也不调用构造方法】
- setter方法上【set注入】
- 构造方法上【构造注入,当只有一个构造方法的时候,@Autowired可以省略】
- 构造方法的形式参数上【都是构造注入】
- 注解上【配合@Qualifier(value=“”)注解完成根据名称的自动装配】
-
@Autowired注解默认是byType进行注入的,也就是说根据类型注入的,如果以上程序中,UserDao接口还有另外一个实现类,会出现问题吗?
UserDaoForOracle,接口另一个实现类
package com.powernode.spring6.dao; import org.springframework.stereotype.Repository; @Repository //纳入bean管理 public class UserDaoForOracle implements UserDao{ @Override public void insert() { System.out.println("正在向Oracle数据库插入User数据"); } } -
当你写完这个新的实现类之后,此时IDEA工具已经提示错误信息了:
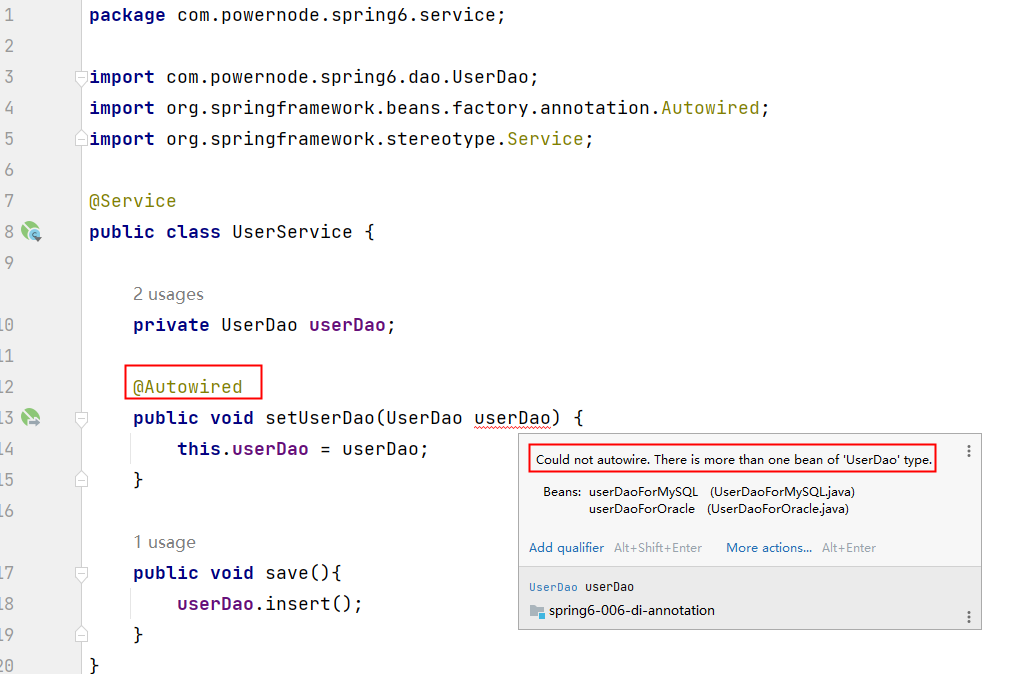
- 错误信息说:不能装配,UserDao这个Bean的属性大于1
- 怎么解决这个问题呐?当然要byName,根据名称进行自动装配了。
-
@Autowired注解和@Qualifier注解联合起来才可以根据名称进行装配,在@Qualifier注解中指定Bean名称。
-
@Qualifier源码
@Target({ElementType.FIELD, ElementType.METHOD, ElementType.PARAMETER, ElementType.TYPE, ElementType.ANNOTATION_TYPE}) @Retention(RetentionPolicy.RUNTIME) @Inherited @Documented public @interface Qualifier { String value() default ""; }- @Qualifier可以出现的位置
- 属性上
- 方法上
- 形式参数上
- 类上
- 注解上
- @Qualifier可以出现的位置
-
根据名称自动装配的实现
package com.powernode.spring6.dao;

import org.springframework.stereotype.Repository;

@Repository // 这里没有给bean起名,默认名字是:userDaoForOracle
public class UserDaoForOracle implements UserDao{
    @Override
    public void insert() {
        System.out.println("正在向Oracle数据库插入User数据");
    }
}
package com.powernode.spring6.service; import com.powernode.spring6.dao.UserDao; import org.springframework.beans.factory.annotation.Autowired; import org.springframework.beans.factory.annotation.Qualifier; import org.springframework.stereotype.Service; @Service public class UserService { private UserDao userDao; @Autowired @Qualifier("userDaoForOracle") // 这个是bean的名字。 public void setUserDao(UserDao userDao) { this.userDao = userDao; } public void save(){ userDao.insert(); } }运行结果:

-
总结:
- @Autowired注解可以出现在:属性上、构造方法上、构造方法的参数上、setter方法上。【宗旨:spring容器中只有一个被注入类型的实例】
- 当带参数的构造方法只有一个,@Autowired注解可以省略。
- @Autowired注解默认根据类型注入。如果要根据名称注入的话,需要配合@Qualifier注解一起使用。
@Resource
-
@Resource注解也可以完成非简单类型注入。那么他和@Autowired注解有什么区别?
- @Resource注解是jdk扩展包中的,也就是说属于JDK的一部分。所以该注解是标准注解,更加具有通用性。
- @Autowired是spring框架自己的。
- @Resource注解默认根据名称装配byName【@Resource注解的name属性就是名称,根据name属性值进行装配】,未指定@Resource注解的name属性时,使用属性名作为name。通过name找不到的话自动启动通过类型自动装配。
- @Autowired注解默认根据类型自动装配,如果想根据名称自动装配,需要配合@Qualifier注解一起使用。
- @Resouce注解使用在属性上,setter方法上。
- @Autowired注解使用在属性上、方法上、构造方法上、构造方法的参数上。
-
@Resource注解属于JDK扩展包,所以不在JDK当中,需要额外引入以下依赖:【如果是JDK8的话不需要额外引入依赖。高于JDK11或低于JDK8需要引入以下依赖。】
-
如果你是Spring6+版本请使用这个依赖
<dependency> <groupId>jakarta.annotation</groupId> <artifactId>jakarta.annotation-api</artifactId> <version>2.1.1</version> </dependency>- 一定要注意:如果你用Spring6,要知道Spring6不再支持JavaEE,它支持的是JakartaEE9。(Oracle把JavaEE贡献给Apache了,Apache把JavaEE的名字改成JakartaEE了,大家之前所接触的所有的 javax.* 包名统一修改为 jakarta.*包名了。)
-
如果你是spring5-版本请使用这个依赖
<dependency>
  <groupId>javax.annotation</groupId>
  <artifactId>javax.annotation-api</artifactId>
  <version>1.3.2</version>
</dependency>
-
-
@Resource注解的源码如下:
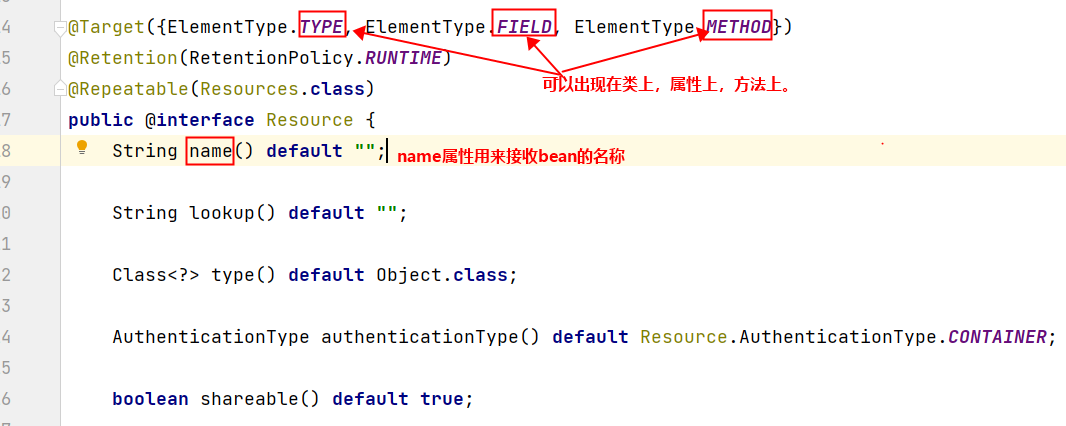
-
测试一下:
给这个UserDaoForOracle起名xyz
package com.powernode.spring6.dao;

import org.springframework.stereotype.Repository;

@Repository("xyz")
public class UserDaoForOracle implements UserDao{
    @Override
    public void insert() {
        System.out.println("正在向Oracle数据库插入User数据");
    }
}
在UserService中使用Resource注解根据name注入
package com.powernode.spring6.service;

import com.powernode.spring6.dao.UserDao;
import jakarta.annotation.Resource;
import org.springframework.stereotype.Service;

@Service
public class UserService {

    @Resource(name = "xyz")
    private UserDao userDao;

    public void save(){
        userDao.insert();
    }
}
执行测试程序:

-
我们把UserDaoForOracle的名字xyz修改为userDao,让这个Bean的名字和UserService类中的UserDao属性名一致:
package com.powernode.spring6.dao;

import org.springframework.stereotype.Repository;

@Repository("userDao")
public class UserDaoForOracle implements UserDao{
    @Override
    public void insert() {
        System.out.println("正在向Oracle数据库插入User数据");
    }
}
UserService类中Resource注解并没有指定name
package com.powernode.spring6.service;

import com.powernode.spring6.dao.UserDao;
import jakarta.annotation.Resource;
import org.springframework.stereotype.Service;

@Service
public class UserService {

    @Resource
    private UserDao userDao;

    public void save(){
        userDao.insert();
    }
}
执行结果:

通过测试得知,当@Resource注解使用时没有指定name的时候,还是根据name进行查找,这个name是属性名。
-
接下来把UserService类中的属性名修改一下:
UserService的属性名修改为userDao2
package com.powernode.spring6.service;

import com.powernode.spring6.dao.UserDao;
import jakarta.annotation.Resource;
import org.springframework.stereotype.Service;

@Service
public class UserService {

    @Resource //这次根据“userDao2”名称进行自动装配
    private UserDao userDao2;

    public void save(){
        userDao2.insert();
    }
}
运行结果:

根据异常信息得知:显然当通过name找不到的时候,自然会启动byType进行注入。以上的错误是因为UserDao接口下有两个实现类导致的。所以根据类型注入就会报错。
-
我们再来看@Resource注解使用在setter方法上可以吗?
UserService添加setter方法并使用注解标注
package com.powernode.spring6.service;

import com.powernode.spring6.dao.UserDao;
import jakarta.annotation.Resource;
import org.springframework.stereotype.Service;

@Service
public class UserService {

    private UserDao userDao;

    @Resource
    public void setUserDao(UserDao userDao) {
        this.userDao = userDao;
    }

    public void save(){
        userDao.insert();
    }
}
注意这个setter方法的方法名,setUserDao去掉set之后,将首字母变小写userDao,userDao就是name
运行结果:

-
当然,也可以指定name:
package com.powernode.spring6.service;

import com.powernode.spring6.dao.UserDao;
import jakarta.annotation.Resource;
import org.springframework.stereotype.Service;

@Service
public class UserService {

    private UserDao userDao;

    @Resource(name = "userDaoForMySQL")
    public void setUserDao(UserDao userDao) {
        this.userDao = userDao;
    }

    public void save(){
        userDao.insert();
    }
}
执行结果:

-
一句话总结@Resource注解:默认byName注入,没有指定name时把属性名当做name,根据name找不到时,才会byType注入。byType注入时,某种类型的Bean只能有一个。
全注解式开发
-
所谓的全注解开发就是不再使用spring配置文件了。写一个配置类来代替配置文件。
-
配置类代替spring配置文件
package com.powernode.spring6.config; import org.springframework.context.annotation.ComponentScan; import org.springframework.context.annotation.ComponentScans; import org.springframework.context.annotation.Configuration; @Configuration @ComponentScan({"com.powernode.spring6.dao", "com.powernode.spring6.service"}) public class Spring6Configuration { } -
编写测试程序:不再new ClassPathXmlApplicationContext()对象了。
@Test public void testNoXml(){ ApplicationContext applicationContext = new AnnotationConfigApplicationContext(Spring6Configuration.class); UserService userService = applicationContext.getBean("userService", UserService.class); userService.save(); } -
执行结果:

vice类中的UserDao属性名一致:**
package com.powernode.spring6.dao;

import org.springframework.stereotype.Repository;

@Repository("userDao")
public class UserDaoForOracle implements UserDao{
    @Override
    public void insert() {
        System.out.println("正在向Oracle数据库插入User数据");
    }
}
UserService类中Resource注解并没有指定name
package com.powernode.spring6.service;

import com.powernode.spring6.dao.UserDao;
import jakarta.annotation.Resource;
import org.springframework.stereotype.Service;

@Service
public class UserService {

    @Resource
    private UserDao userDao;

    public void save(){
        userDao.insert();
    }
}
执行结果:
[外链图片转存中…(img-12I1FQYC-1686488658508)]
通过测试得知,当@Resource注解使用时没有指定name的时候,还是根据name进行查找,这个name是属性名。
-
接下来把UserService类中的属性名修改一下:
UserService的属性名修改为userDao2
package com.powernode.spring6.service;

import com.powernode.spring6.dao.UserDao;
import jakarta.annotation.Resource;
import org.springframework.stereotype.Service;

@Service
public class UserService {

    @Resource //这次根据“userDao2”名称进行自动装配
    private UserDao userDao2;

    public void save(){
        userDao2.insert();
    }
}
运行结果:
[外链图片转存中…(img-JWPsYfDv-1686488658509)]
根据异常信息得知:显然当通过name找不到的时候,自然会启动byType进行注入。以上的错误是因为UserDao接口下有两个实现类导致的。所以根据类型注入就会报错。
-
我们再来看@Resource注解使用在setter方法上可以吗?
UserService添加setter方法并使用注解标注
package com.powernode.spring6.service;

import com.powernode.spring6.dao.UserDao;
import jakarta.annotation.Resource;
import org.springframework.stereotype.Service;

@Service
public class UserService {

    private UserDao userDao;

    @Resource
    public void setUserDao(UserDao userDao) {
        this.userDao = userDao;
    }

    public void save(){
        userDao.insert();
    }
}
注意这个setter方法的方法名,setUserDao去掉set之后,将首字母变小写userDao,userDao就是name
运行结果:
[外链图片转存中…(img-ThKXmwuS-1686488658509)]
-
当然,也可以指定name:
package com.powernode.spring6.service;

import com.powernode.spring6.dao.UserDao;
import jakarta.annotation.Resource;
import org.springframework.stereotype.Service;

@Service
public class UserService {

    private UserDao userDao;

    @Resource(name = "userDaoForMySQL")
    public void setUserDao(UserDao userDao) {
        this.userDao = userDao;
    }

    public void save(){
        userDao.insert();
    }
}
执行结果:
[外链图片转存中…(img-yfB2plO1-1686488658510)]
-
一句话总结@Resource注解:默认byName注入,没有指定name时把属性名当做name,根据name找不到时,才会byType注入。byType注入时,某种类型的Bean只能有一个。
全注解式开发
-
所谓的全注解开发就是不再使用spring配置文件了。写一个配置类来代替配置文件。
-
配置类代替spring配置文件
package com.powernode.spring6.config; import org.springframework.context.annotation.ComponentScan; import org.springframework.context.annotation.ComponentScans; import org.springframework.context.annotation.Configuration; @Configuration @ComponentScan({"com.powernode.spring6.dao", "com.powernode.spring6.service"}) public class Spring6Configuration { } -
编写测试程序:不再new ClassPathXmlApplicationContext()对象了。
@Test public void testNoXml(){ ApplicationContext applicationContext = new AnnotationConfigApplicationContext(Spring6Configuration.class); UserService userService = applicationContext.getBean("userService", UserService.class); userService.save(); } -
执行结果:
[外链图片转存中…(img-O1Tz1ftv-1686488658510)]


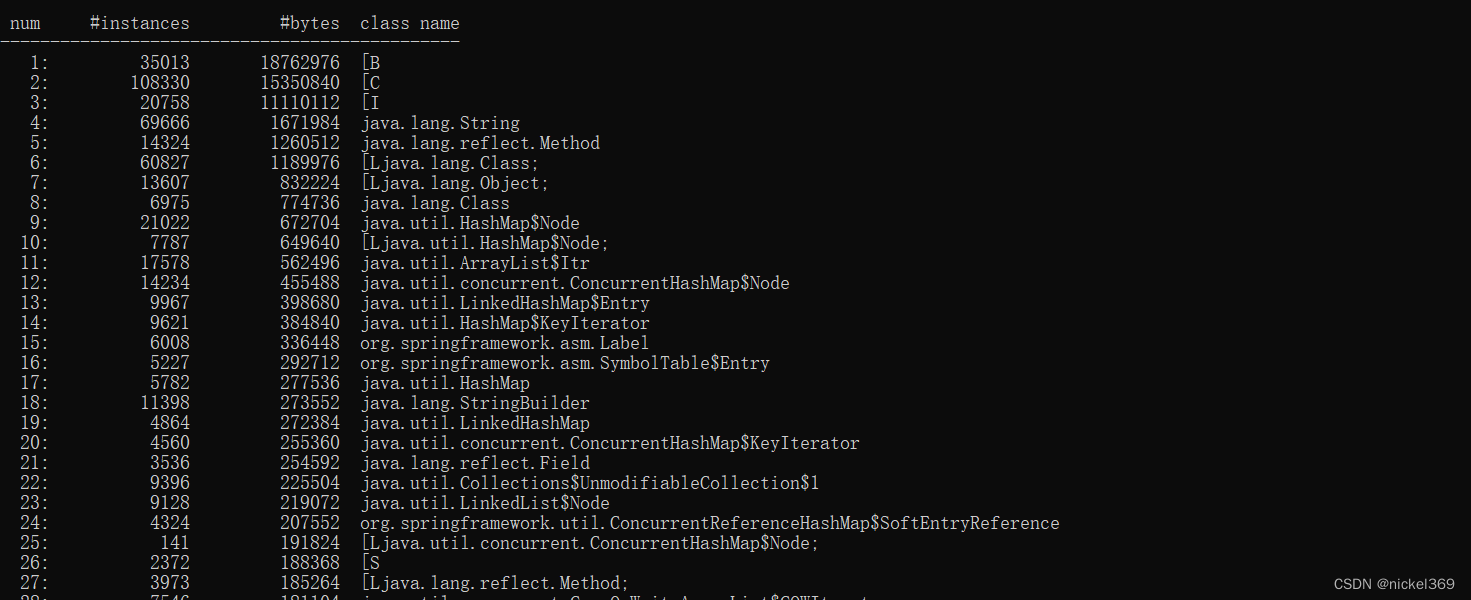


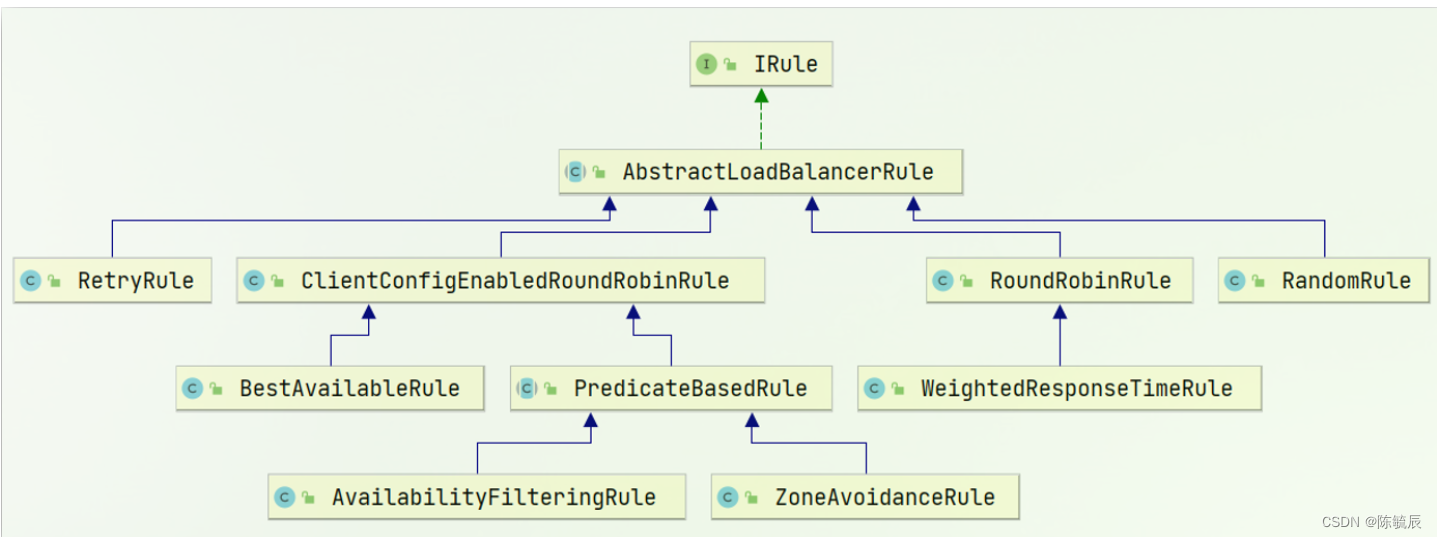



![[LsSDK][tool] ls_syscfg_gui2.1 and ls_syscfg_debug1.0](https://img-blog.csdnimg.cn/100e4e4b6b884fe69128a0f85af1ab2a.gif#pic_center)
