1. 说明:
在unity二维游戏开发中,有一种精灵类的玩家角色,通过一系列动作的静态图片可以合成该精灵的某一个动作。在QML当中也有一个控件可以实现这种精灵类动画的制作,主要使用到三个控件:Sprite和SpriteSequence和AnimatedSprite。
案例效果展示:
精灵动画
2. 基本属性介绍:
2.1 SpriteSequence:
currentSprite : string(当前精灵动画的名称)
goalSprite : string(目标精灵动画)
interpolate : bool(是否开启插值运算,默认为true,开启后可能会造成重影)
running : bool(是否执行动画,默认为true)
sprites : list<Sprite>(精灵动画集合)
2.2 Sprite
name: (指定当前动画的名称)
source: (指定精灵图片源)
frameX: (当前动画起始帧的x坐标)
frameY: (当前动画起始帧的y坐标)
frameCount: (指定当前动画需要帧数,如果有多帧,会以frameWidth和frameHeight的步长依次从左到右,从上到下滑动取出图片素材中对应宽高的图像作为当前帧)
frameWidth: (每一帧图像的宽度)
frameHeight: (每一帧图像的高度)
frameDuration: (每一帧的持续时间,时间到达后过渡到下一帧)
to: {"still":1, "blink":0.1, "floating":0}(设置过渡到下一个精灵动画的名称和对应权重(概率))
2.3 AnimatedSprite
如果在一系列的帧图片中没有系列动作之间的切换(比如跑步 --> 走路),仅仅只是每一帧图片之间的顺序播放,这种简单的过渡,使用AnimatedSprite这一个控件即可完成。
width: 一般和精灵图像宽度相同
height: 一般和精灵图像高度相同
source: (指定精灵图片源)
frameX: (当前动画起始帧的x坐标)
frameY: (当前动画起始帧的y坐标)
frameCount: (该动画需要的总帧数-->会从第一帧开始循环滑动,找到frameCount个图像帧进行播放)
frameSync: (帧同步)
frameWidth: (图像帧宽度,一般和高度相同)
frameHeight: (图像帧高度,一般和宽度相同)
loops: (指定循环播放的次数)
3. 使用案例:
3.1 使用Sprite和SpriteSequence:
import QtQuick 2.2

Item {
    width: 320; height: 480
    Rectangle{
        id:bg
        anchors.fill: parent
        color: Qt.rgba(0,0,0,0.7)
    }

    MouseArea {
        onClicked: anim.start();
        anchors.fill: parent
    }
    SequentialAnimation {
        id: anim
        ScriptAction {
            script: image.goalSprite = "falling"; //在此处指定后,动画会无视过渡权重,以最短的路径从第一个sprite动画开始,一直到达目标动画
        }
        NumberAnimation {
            target: image
            property: "y"
            to: 480
            duration: 12000
        }
        ScriptAction {
            script: {
                image.goalSprite = ""
                image.jumpTo("still");//jumpTo()函数会让动画立即直接跳转到目标动画,中间不会再执行其它动画
            }
        }
        PropertyAction {
            target: image
            property: "y"
            value: 0
        }
    }
    SpriteSequence {
        id: image;
        width: 256; height: 256//尺寸大小应和精灵尺寸保持一致
        anchors.horizontalCenter: parent.horizontalCenter
        interpolate: false//如果设置为true,则每帧之间进行更新时会进行插值运算,可能会造成变换重影
        goalSprite: ""

        //静止站立
        Sprite{
            name: "still"; //指定当前动画的名称
            source: "BearSheet.png"
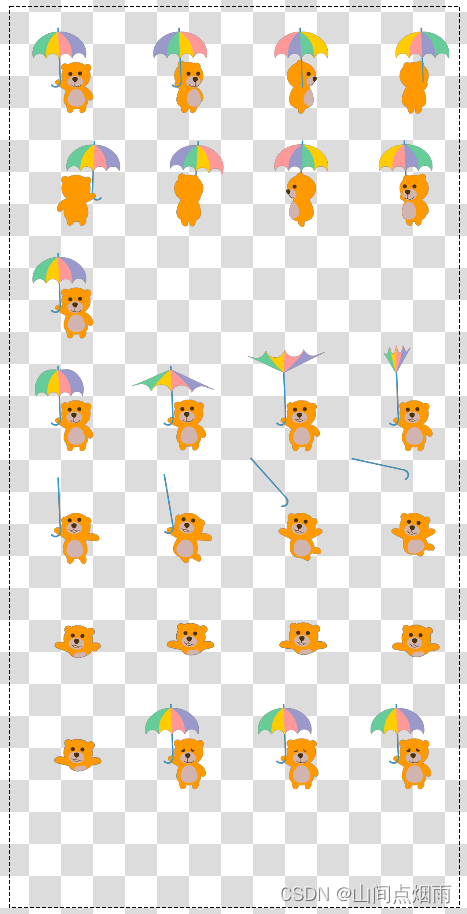
            frameCount: 1; //指定当前动画需要帧数,如果有多帧,会以frameWidth和frameHeight的步长依次从左到右,从上到下滑动取出图片素材中对应宽高的图像作为当前帧
            frameWidth: 256;
            frameHeight: 256
            frameDuration: 100//每一帧的持续时间,时间到达后过渡到下一帧
            to: {"still":1, "blink":0.1, "floating":0}//设置过渡到下一个精灵动画的名称和对应权重(概率)
        }
        //眨眼
        Sprite{
            name: "blink"; source: "BearSheet.png"
            frameCount: 3; frameX: 256; frameY: 1536
            frameWidth: 256; frameHeight: 256
            frameDuration: 100
            to: {"still":1}
        }
        //撑伞旋转
        Sprite{
            name: "floating"; source: "BearSheet.png"
            frameCount: 9; frameX: 0; frameY: 0
            frameWidth: 256; frameHeight: 256
            frameDuration: 160
            to: {"still":0, "flailing":1}
        }
        //丢伞伸展
        Sprite{
            name: "flailing"; source: "BearSheet.png"
            frameCount: 8; frameX: 0; frameY: 768
            frameWidth: 256; frameHeight: 256
            frameDuration: 160
            to: {"falling":1}
        }
        //伸展漂浮
        Sprite{
            name: "falling"; source: "BearSheet.png"
            frameCount: 5; frameY: 1280
            frameWidth: 256; frameHeight: 256
            frameDuration: 160
            to: {"falling":1}
        }
    }
}
其中用到的精灵素材图像BearSheet.png如下图所示:
3.2 使用AnimatedSprite:
import QtQuick 2.2

Item {
    width: 320; height: 480

    AnimatedSprite {
        id: sprite;
        anchors.centerIn: parent
        width: 170; height: 170
        source: "speaker.png"
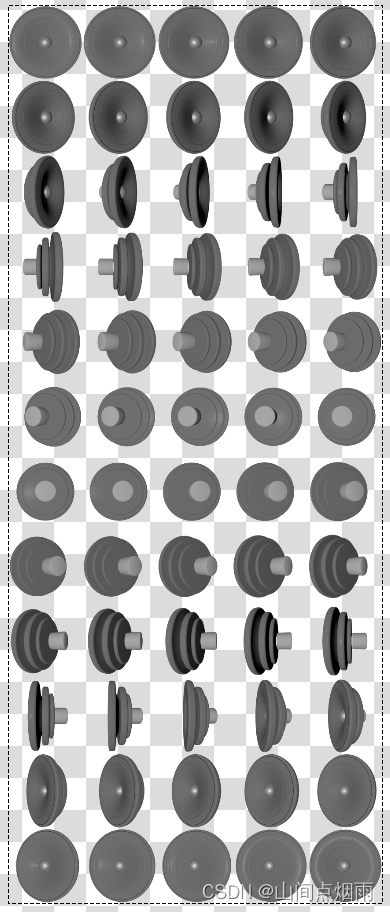
        frameCount: 60;
        frameSync: true
        frameWidth: 170;
        frameHeight: 170
        loops: 2
    }

    MouseArea {
        anchors.fill: parent
        acceptedButtons: Qt.LeftButton | Qt.RightButton
        onClicked: {
            if (!sprite.running) sprite.start();
            if (!sprite.paused) sprite.pause();
            if ( mouse.button == Qt.LeftButton ) {
                sprite.advance(1);
            } else {
                sprite.advance(-1);
            }
        }
        onWheel: {
            if(wheel.angleDelta.y > 0){
                sprite.advance(1)
            }if(wheel.angleDelta.y < 0){
                sprite.advance(-1)
            }
        }
    }
}
其中使用到的素材图像speaker.png如下图所示:



![[CKA]考试之节点维护-指定 node 节点不可用](https://img-blog.csdnimg.cn/39c84673f18745abbae48287e3b79b32.png)
