前言:本文在Netty 服务端已经实现NioServerSocketChannel 管道的初始化并且绑定了端口后,继续对客户端accept&read事件如何处理进行探究;
1 对客户端accept&read事件的触发:
从之前的ServerBootstrap 的bind 方法中似乎并没有发现类似于Nio 中 selector.select(); 去轮询事件的代码;显然事件轮询肯定存在,如果没有在main 线程中去轮询事件,它也只能交由其他线程去处理;在netty 中看到最多的就是NioEventLoop 去执行任务,而在之前NioServerSocketChannel 初始化的时候也确实有NioEventLoop 去execute执行任务,那么execute 方法都做了什么呢;
2 NioEventLoop 的execute 任务执行:
2.1 NioEventLoop task 任务的执行:
当NioEventLoopGroup 中使用execute 提交任务,实际是向NioEventLoop 获取到一个NioEventLoop,然后封装为一个task 任务进行:SingleThreadEventExecutor 类中execute 方法:
private void execute(Runnable task, boolean immediate) {
    boolean inEventLoop = this.inEventLoop();
    // 封装task 任务
    this.addTask(task);
    if (!inEventLoop) {
// 如果非nio 线程则,启动一个新的的线程  执行任务
        this.startThread();
        if (this.isShutdown()) {
            boolean reject = false;

            try {
                if (this.removeTask(task)) {
                    reject = true;
                }
            } catch (UnsupportedOperationException var6) {
            }

            if (reject) {
                reject();
            }
        }
    }

    if (!this.addTaskWakesUp && immediate) {
        this.wakeup(inEventLoop);
    }

}
关键点2.2 最终进入到NioEventLoop 类中的run 方法:run 方法中会来处理nio 事件,普通任务
protected void run() {
    int selectCnt = 0;

    while(true) {
        while(true) {
            while(true) {
                try {
                    int strategy;
                    try {
                        strategy = this.selectStrategy.calculateStrategy(this.selectNowSupplier, this.hasTasks());
                        switch (strategy) {
                            case -3:
                            case -1:
                                long curDeadlineNanos = this.nextScheduledTaskDeadlineNanos();
                                if (curDeadlineNanos == -1L) {
                                    curDeadlineNanos = Long.MAX_VALUE;
                                }

                                this.nextWakeupNanos.set(curDeadlineNanos);

                                try {
                                    if (!this.hasTasks()) {
                                        strategy = this.select(curDeadlineNanos);
                                    }
                                    break;
                                } finally {
                                    this.nextWakeupNanos.lazySet(-1L);
                                }
                            case -2:
                                continue;
                        }
                    } catch (IOException var38) {
                        this.rebuildSelector0();
                        selectCnt = 0;
                        handleLoopException(var38);
                        continue;
                    }

                    ++selectCnt;
                    this.cancelledKeys = 0;
                    this.needsToSelectAgain = false;
                    int ioRatio = this.ioRatio;
                    boolean ranTasks;
                    if (ioRatio == 100) {
                        try {
                            if (strategy > 0) {
                                this.processSelectedKeys();
                            }
                        } finally {
                            ranTasks = this.runAllTasks();
                        }
                    } else if (strategy > 0) {
                        long ioStartTime = System.nanoTime();
                        boolean var26 = false;

                        try {
                            var26 = true;
                            this.processSelectedKeys();
                            var26 = false;
                        } finally {
                            if (var26) {
                                long ioTime = System.nanoTime() - ioStartTime;
                                this.runAllTasks(ioTime * (long)(100 - ioRatio) / (long)ioRatio);
                            }
                        }

                        long ioTime = System.nanoTime() - ioStartTime;
                        ranTasks = this.runAllTasks(ioTime * (long)(100 - ioRatio) / (long)ioRatio);
                    } else {
                        ranTasks = this.runAllTasks(0L);
                    }

                    if (!ranTasks && strategy <= 0) {
                        if (this.unexpectedSelectorWakeup(selectCnt)) {
                            selectCnt = 0;
                        }
                        break;
                    }

                    if (selectCnt > 3 && logger.isDebugEnabled()) {
                        logger.debug("Selector.select() returned prematurely {} times in a row for Selector {}.", selectCnt - 1, this.selector);
                    }

                    selectCnt = 0;
                } catch (CancelledKeyException var39) {
                    if (logger.isDebugEnabled()) {
                        logger.debug(CancelledKeyException.class.getSimpleName() + " raised by a Selector {} - JDK bug?", this.selector, var39);
                    }
                } catch (Throwable var40) {
                    handleLoopException(var40);
                }
                break;
            }

            try {
                if (this.isShuttingDown()) {
                    this.closeAll();
                    if (this.confirmShutdown()) {
                        return;
                    }
                }
            } catch (Throwable var34) {
                handleLoopException(var34);
            }
        }
    }
}
可以看到方法是比较长的,这个方法里不仅轮询处理了普通任务,而且轮询处理io 事件,并且还处理Select 的空轮训问题;
关键点2.2.1 事件或者/任务的获取:
strategy = this.selectStrategy.calculateStrategy(this.selectNowSupplier, this.hasTasks());
calculateStrategy 方法的调用:
public int calculateStrategy(IntSupplier selectSupplier, boolean hasTasks) throws Exception {
        return hasTasks ? selectSupplier.get() : -1;
    }
代码比较简单 如果没有任务处理 this.hasTasks() 返回false ,则次判断会返回-1 ,如果有任务处理则返回 selectSupplier.get() 值;所以只需要看selectSupplier.get() 的方法做了什么工作:
在NioEventLoop 类中对get 方法进行了实现,其中this.selectNow() 会立即去寻找channel 管道中的注册事件,并返回事件的个数:
private final IntSupplier selectNowSupplier = new IntSupplier() {
    public int get() throws Exception {
        return NioEventLoop.this.selectNow();
    }
};
从代码中可以看出,显然run 中死循环的方法,优先关注的是channel 管道中的io 事件;如果没有任务则直接返回-1 ,如果有任务也要先去拿到channel 中事件发生的数量,如果没有事件发生则返回0,否则返回发生事件的个数;
2.2.2 switch 分支的判断,可以看到只有当返回-1 ,-3的时候,有逻辑处理:
 switch (strategy) {
 	 case -3:
     case -1:
         long curDeadlineNanos = this.nextScheduledTaskDeadlineNanos();
         if (curDeadlineNanos == -1L) {
             curDeadlineNanos = Long.MAX_VALUE;
         }

         this.nextWakeupNanos.set(curDeadlineNanos);

         try {
             if (!this.hasTasks()) {
                 strategy = this.select(curDeadlineNanos);
             }
             break;
         } finally {
             this.nextWakeupNanos.lazySet(-1L);
         }
     case -2:
         continue;
 }
关键点在于 strategy = this.select(curDeadlineNanos) 如果此时没有认为,则会阻塞curDeadlineNanos 时间尝试去取的任务;
关键点2.2.3 普通任务和io 任务的执行:
if (ioRatio == 100) {
  try {
        if (strategy > 0) {
            this.processSelectedKeys();
        }
    } finally {
        ranTasks = this.runAllTasks();
    }
} else if (strategy > 0) {
    long ioStartTime = System.nanoTime();
    boolean var26 = false;

    try {
        var26 = true;
        this.processSelectedKeys();
        var26 = false;
    } finally {
        if (var26) {
            long ioTime = System.nanoTime() - ioStartTime;
            this.runAllTasks(ioTime * (long)(100 - ioRatio) / (long)ioRatio);
        }
    }

    long ioTime = System.nanoTime() - ioStartTime;
    ranTasks = this.runAllTasks(ioTime * (long)(100 - ioRatio) / (long)ioRatio);
} else {
    ranTasks = this.runAllTasks(0L);
}
这里有几个点简单做下解释:
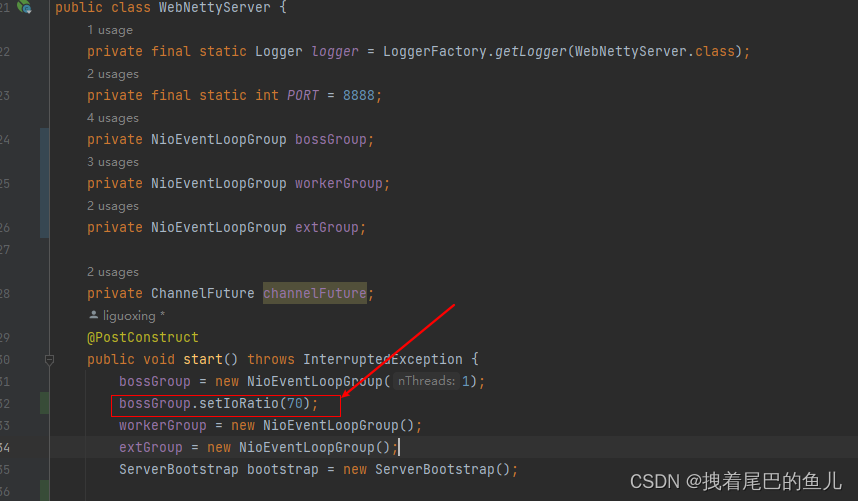
- ioRatio: io 时间处理的占比,默认值 50,也就意味着一半时间处理io 时间,一半时间处理普通任务;可以在 new NioEventLoopGroup 对其进行设置:
- this.processSelectedKeys(); 用来处理io 任务,this.runAllTasks(); 用来处理普通任务;
- 处理普通任务时间占比计算方式如下:10s(io 执行的时间) *(100- 50(ioRatio))/ 50 = 10s
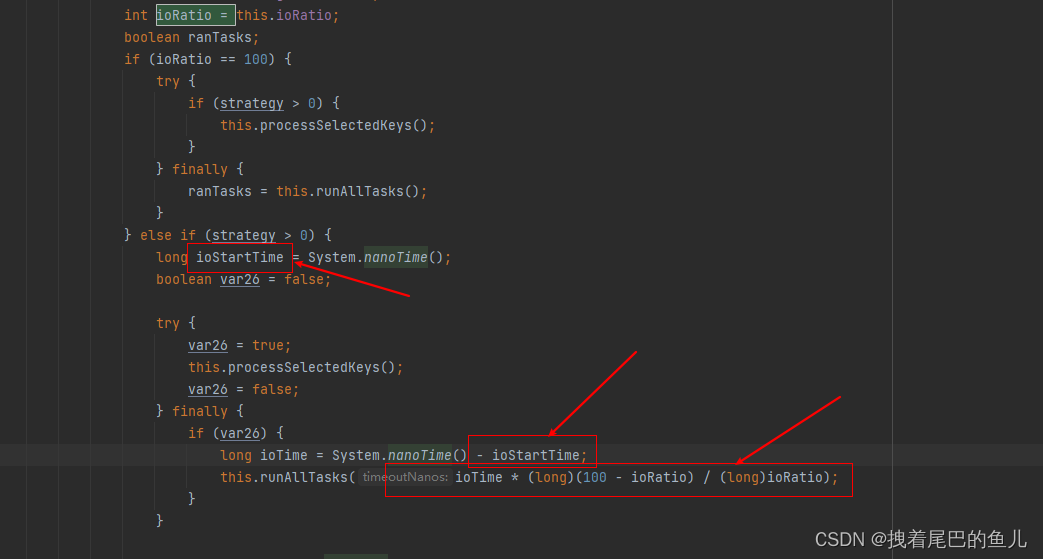
- ioRatio 设定为100 时 会先去执行io 任务,然后在去执行全部的普通任务,所以100 反而会降低 io 任务的处理;
关键点2.2.4 selector 的重建,解决空轮训 :
空轮训问题:在linux 底层当执行 selector.select(); 即时没有事件发生也会返回,而不会进行阻塞,由于轮询都放在死循环中,所以就会一直空轮训,当发生空轮训时 ,短时间内selectCnt 就会变得很大;
this.unexpectedSelectorWakeup(selectCnt)
空轮训的处理:SELECTOR_AUTO_REBUILD_THRESHOLD 的默认值是512,也即以为这当没有任务可以去执行,并且此时改值达到512 ,就会进入 this.rebuildSelector() 重新构建selector:
private boolean unexpectedSelectorWakeup(int selectCnt) {
    if (Thread.interrupted()) {
        if (logger.isDebugEnabled()) {
            logger.debug("Selector.select() returned prematurely because Thread.currentThread().interrupt() was called. Use NioEventLoop.shutdownGracefully() to shutdown the NioEventLoop.");
        }

        return true;
    } else if (SELECTOR_AUTO_REBUILD_THRESHOLD > 0 && selectCnt >= SELECTOR_AUTO_REBUILD_THRESHOLD) {
        logger.warn("Selector.select() returned prematurely {} times in a row; rebuilding Selector {}.", selectCnt, this.selector);
        this.rebuildSelector();
        return true;
    } else {
        return false;
    }
}
重新构建selector 不在进行展开,会new 出新的Selector 并把原有selector 事件注册到新的selector 上;
到这里为止,已经看到事件的轮询,任务的执行,已netty 对于Selector 空轮训的处理;
3 netty 中io 事件的处理:his.processSelectedKeys(); 处理nio 事件:
3.1 事件的处理:
private void processSelectedKey(SelectionKey k, AbstractNioChannel ch) {
    AbstractNioChannel.NioUnsafe unsafe = ch.unsafe();
    if (!k.isValid()) {
        NioEventLoop eventLoop;
        try {
            eventLoop = ch.eventLoop();
        } catch (Throwable var6) {
            return;
        }

        if (eventLoop == this) {
            unsafe.close(unsafe.voidPromise());
        }

    } else {
        try {
            int readyOps = k.readyOps();
            if ((readyOps & 8) != 0) {
                int ops = k.interestOps();
                ops &= -9;
                k.interestOps(ops);
                unsafe.finishConnect();
            }

            if ((readyOps & 4) != 0) {
                ch.unsafe().forceFlush();
            }

            if ((readyOps & 17) != 0 || readyOps == 0) {
				// 处理accept 和read 事件
                unsafe.read();
            }
        } catch (CancelledKeyException var7) {
            unsafe.close(unsafe.voidPromise());
        }

    }
}
关键点在与下面代码:处理accept 和read 事件
if ((readyOps & 17) != 0 || readyOps == 0) {
   // 处理accept 和read 事件
    unsafe.read();
}
3.2 unsafe.read(); 方法处理 accept 和read 事件:
private final class NioMessageUnsafe extends AbstractNioChannel.AbstractNioUnsafe {
    private final List<Object> readBuf;

    private NioMessageUnsafe() {
        super(AbstractNioMessageChannel.this);
        this.readBuf = new ArrayList();
    }

    public void read() {
        assert AbstractNioMessageChannel.this.eventLoop().inEventLoop();

        ChannelConfig config = AbstractNioMessageChannel.this.config();
        ChannelPipeline pipeline = AbstractNioMessageChannel.this.pipeline();
        RecvByteBufAllocator.Handle allocHandle = AbstractNioMessageChannel.this.unsafe().recvBufAllocHandle();
        allocHandle.reset(config);
        boolean closed = false;
        Throwable exception = null;

        try {
            int localRead;
            try {
                do {
                    localRead = AbstractNioMessageChannel.this.doReadMessages(this.readBuf);
                    if (localRead == 0) {
                        break;
                    }

                    if (localRead < 0) {
                        closed = true;
                        break;
                    }

                    allocHandle.incMessagesRead(localRead);
                } while(allocHandle.continueReading());
            } catch (Throwable var11) {
                exception = var11;
            }

            localRead = this.readBuf.size();

            for(int i = 0; i < localRead; ++i) {
                AbstractNioMessageChannel.this.readPending = false;
                pipeline.fireChannelRead(this.readBuf.get(i));
            }

            this.readBuf.clear();
            allocHandle.readComplete();
            pipeline.fireChannelReadComplete();
            if (exception != null) {
                closed = AbstractNioMessageChannel.this.closeOnReadError(exception);
                pipeline.fireExceptionCaught(exception);
            }

            if (closed) {
                AbstractNioMessageChannel.this.inputShutdown = true;
                if (AbstractNioMessageChannel.this.isOpen()) {
                    this.close(this.voidPromise());
                }
            }
        } finally {
            if (!AbstractNioMessageChannel.this.readPending && !config.isAutoRead()) {
                this.removeReadOp();
            }

        }

    }
}
关键点3.2.1 AbstractNioMessageChannel.this.doReadMessages(this.readBuf); SocketChannel 对象 的创建:
protected int doReadMessages(List<Object> buf) throws Exception {
    SocketChannel ch = SocketUtils.accept(this.javaChannel());

    try {
        if (ch != null) {
            buf.add(new NioSocketChannel(this, ch));
            return 1;
        }
    } catch (Throwable var6) {
        logger.warn("Failed to create a new channel from an accepted socket.", var6);

        try {
            ch.close();
        } catch (Throwable var5) {
            logger.warn("Failed to close a socket.", var5);
        }
    }

    return 0;
}
- 改方法获取原生的ServerSocketChannel并创建SocketChannel 对象;
- 通过new NioSocketChannel(this, ch)对SocketChannel 对象 设置io 流的非阻塞,对fNioServerSocketChannel读写属性的配置,默认Pipeline设置;
- 将新建的 SocketChannel 的对象作为消息放入到List readBuf 中;
关键点3.2.2 对于新建SocketChannel 的占位事件注册:
for 循环通过调用链调用每个pipeline的fireChannelRead 方法并将消息当做参数进行传递;

pipeline.fireChannelRead(this.readBuf.get(i));进入ServerBootstrap 中ServerBootstrapAcceptor 的channelRead 方法:对传递过来的msg(NioServerSocketChannel) 进行handler 以及其他属性的设置后,通过childGroup 进行register:
public void channelRead(ChannelHandlerContext ctx, Object msg) {
    final Channel child = (Channel)msg;
    child.pipeline().addLast(new ChannelHandler[]{this.childHandler});
    AbstractBootstrap.setChannelOptions(child, this.childOptions, ServerBootstrap.logger);
    AbstractBootstrap.setAttributes(child, this.childAttrs);

    try {
        this.childGroup.register(child).addListener(new ChannelFutureListener() {
            public void operationComplete(ChannelFuture future) throws Exception {
                if (!future.isSuccess()) {
                    ServerBootstrap.ServerBootstrapAcceptor.forceClose(child, future.cause());
                }

            }
        });
    } catch (Throwable var5) {
        forceClose(child, var5);
    }

}
3.2.3 进入 MultithreadEventLoopGroup 中的register 方法将NioServerSocketChannel 完成注册:
public ChannelFuture register(Channel channel) {
    return this.next().register(channel);
}
进入到AbstractChannel register方法:
public final void register(EventLoop eventLoop, final ChannelPromise promise) {
    ObjectUtil.checkNotNull(eventLoop, "eventLoop");
    if (AbstractChannel.this.isRegistered()) {
        promise.setFailure(new IllegalStateException("registered to an event loop already"));
    } else if (!AbstractChannel.this.isCompatible(eventLoop)) {
        promise.setFailure(new IllegalStateException("incompatible event loop type: " + eventLoop.getClass().getName()));
    } else {
        AbstractChannel.this.eventLoop = eventLoop;
        if (eventLoop.inEventLoop()) {
            this.register0(promise);
        } else {
            try {
                eventLoop.execute(new Runnable() {
                    public void run() {
                        AbstractUnsafe.this.register0(promise);
                    }
                });
            } catch (Throwable var4) {
                AbstractChannel.logger.warn("Force-closing a channel whose registration task was not accepted by an event loop: {}", AbstractChannel.this, var4);
                this.closeForcibly();
                AbstractChannel.this.closeFuture.setClosed();
                this.safeSetFailure(promise, var4);
            }
        }

    }
}
因为此时的线程 是:

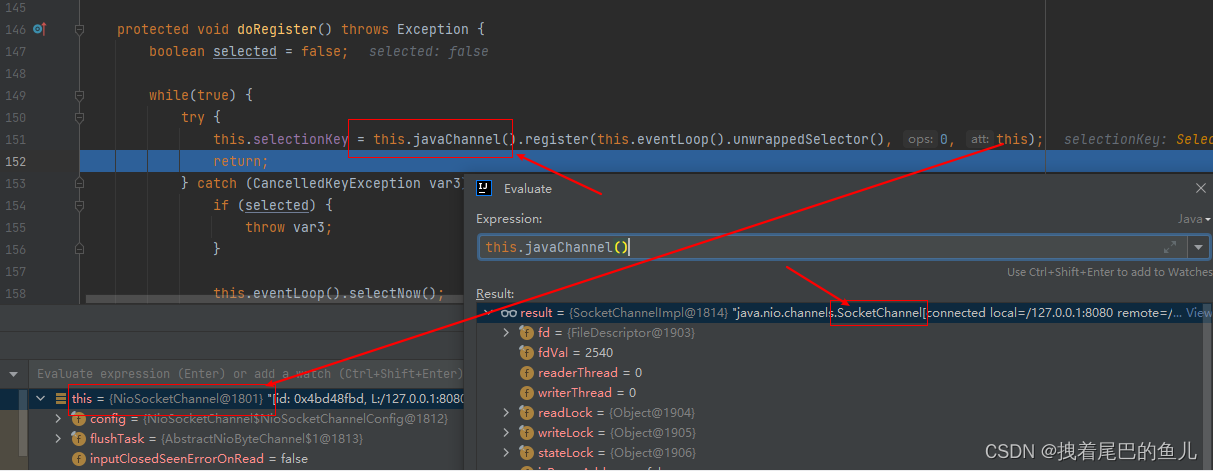
所以进入else 通过workGroup 中的NioEventLoop 进行任务的提交:关键点 在AbstractChannel 类中通过AbstractChannel.this.doRegister(); 方法完成对SocketChannel 的注册并且进行感兴趣事件的占位;
关键点3.2.4 自己业务类中handler 的添加:
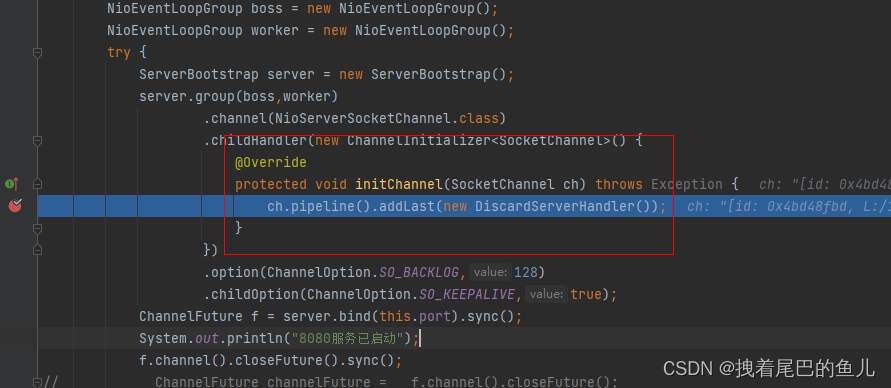
在注册完成之后通过AbstractChannel.this.pipeline.invokeHandlerAddedIfNeeded(); 完成对新的SocketChannel 进行初始化方法的调用,进入自己业务中的ChannelInitializer 的initChannel 方法:进行handler 的添加;
关键点3.2.5 对SocketChannel 读事件的注册:
AbstractChannel.this.pipeline.fireChannelActive();进入到AbstractNioChannel 中doBeginRead 方法完成读事件的注册;这样就将新建的SocketChannel 在处理任务的worker 事件处理组中完成了读事件的注册;
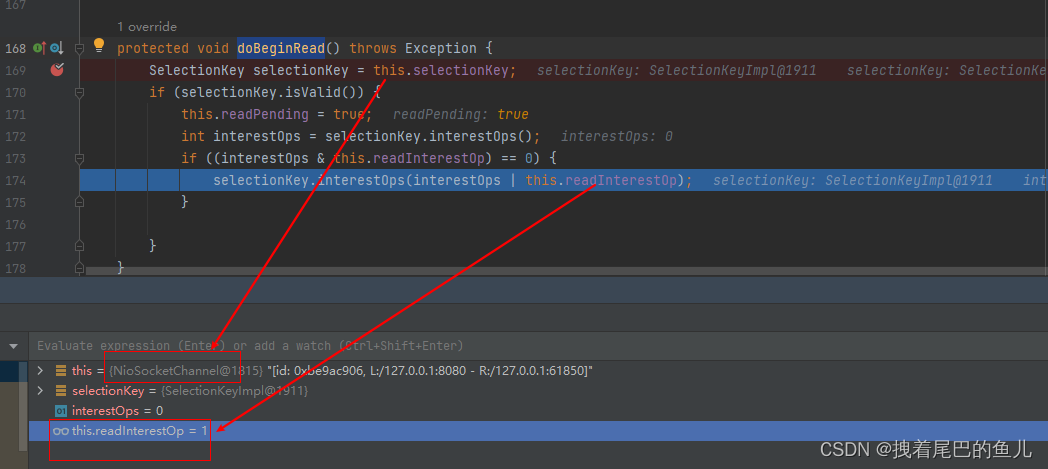
到现在为止,netty 中已经在boss NioEventLoopGroup 中完成了对accept 事件的处理;并创建出了 新的SocketChannel 并注册了读事件,并且注册到 worker NioEventLoopGroup 中的一个NioEventLoop的selector 上;这样 worker NioEventLoopGroup 终于可以处理来自客户端的读事件了;
3.2.6 worker NioEventLoopGroup 对于客户端写入数据的处理:
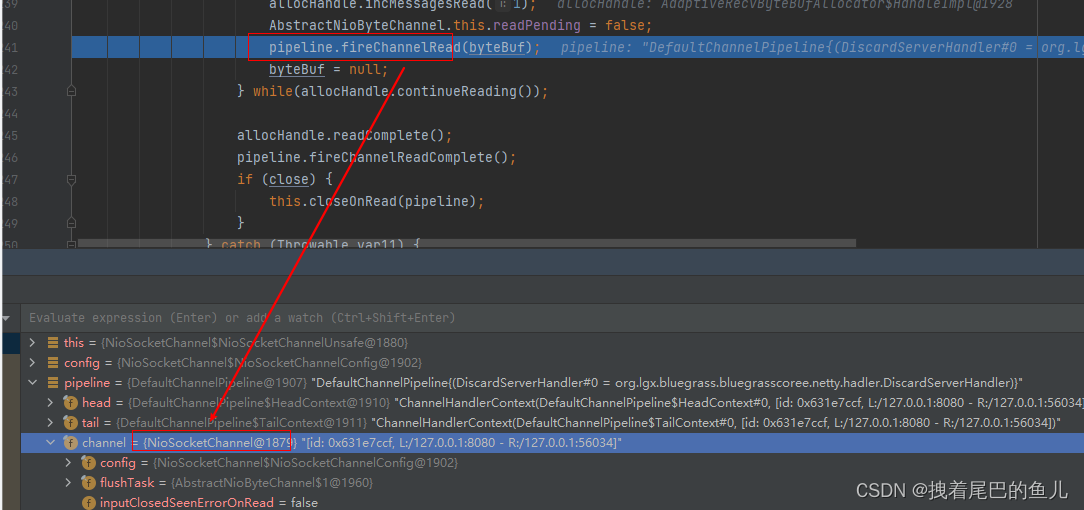
在客户端进行写数据后,进入到服务端的:NioEventLoop 中的processSelectedKey 方法然后读取事件:随后进入到AbstractNioByteChannel 中的read 方法得到客户端的数据并调用pipeline.fireChannelRead(byteBuf)方法依次调用服务端的hadler 处理器;
public final void read() {
    ChannelConfig config = AbstractNioByteChannel.this.config();
    if (AbstractNioByteChannel.this.shouldBreakReadReady(config)) {
        AbstractNioByteChannel.this.clearReadPending();
    } else {
        ChannelPipeline pipeline = AbstractNioByteChannel.this.pipeline();
        ByteBufAllocator allocator = config.getAllocator();
        RecvByteBufAllocator.Handle allocHandle = this.recvBufAllocHandle();
        allocHandle.reset(config);
        ByteBuf byteBuf = null;
        boolean close = false;

        try {
            do {
                byteBuf = allocHandle.allocate(allocator);
                allocHandle.lastBytesRead(AbstractNioByteChannel.this.doReadBytes(byteBuf));
                if (allocHandle.lastBytesRead() <= 0) {
                    byteBuf.release();
                    byteBuf = null;
                    close = allocHandle.lastBytesRead() < 0;
                    if (close) {
                        AbstractNioByteChannel.this.readPending = false;
                    }
                    break;
                }

                allocHandle.incMessagesRead(1);
                AbstractNioByteChannel.this.readPending = false;
                pipeline.fireChannelRead(byteBuf);
                byteBuf = null;
            } while(allocHandle.continueReading());

            allocHandle.readComplete();
            pipeline.fireChannelReadComplete();
            if (close) {
                this.closeOnRead(pipeline);
            }
        } catch (Throwable var11) {
            this.handleReadException(pipeline, byteBuf, var11, close, allocHandle);
        } finally {
            if (!AbstractNioByteChannel.this.readPending && !config.isAutoRead()) {
                this.removeReadOp();
            }

        }

    }
}
关键代码在于 pipeline.fireChannelRead(byteBuf);会依次调用服务端inbound的hadler 处理器
至此netty 中 实现客户端accept&read事件处理;
4 总结:
- boos 的NioEventLoopGroup 对来自于客户端的accept 的事件进行了处理;
- 并且创建了SocketChannel 对象完成初始化之后,在其Pipeline 增加了本身业务的handler;
- 然后在worker 的NioEventLoopGroup 选择一个NioEventLoop 进行占位事件的注册;
- 当SocketChannel channel 初始化完成之后 ,完成对客户端读事件的注册,这样在worker 的NioEventLoopGroup 就实现了对于客户端 读事件的处理,而boos 的NioEventLoopGroup 只专注于对客户端accept 事件的处理;

