14讲P326-327
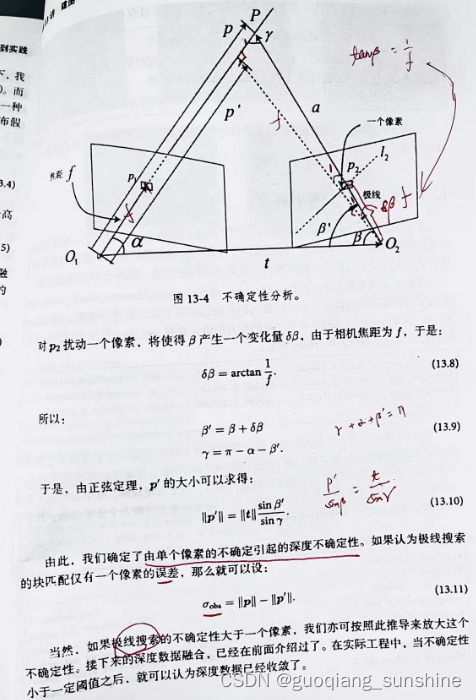

函数实现一个深度滤波器,用于计算图像中某个像素点的深度值。算法步骤的含义和含义:
- 将当前帧的像素点和参考帧的像素点通过三角化计算深度。
- 将参考帧到当前帧的变换矩阵 T_C_R 转换为当前帧到参考帧的变换矩阵 T_R_C。
- 将参考帧像素点 pt_ref 和当前帧像素点 pt_curr 转换为对应的相机坐标系下的方向向量 f_ref 和 f_curr。
- 对 f_ref 和 f_curr 进行归一化。
- 根据三角化得到的深度值,计算出参考帧中对应点的位置 p,当前帧中对应点的位置 t。
- 根据 p 和 t 计算出深度值 depth_estimation。
- 计算不确定性,即深度值的方差 depth_cov2。
- 高斯融合,将当前深度值和方差与之前的值进行融合,得到新的深度值和方差。
其中,步骤 1-5 是计算深度值的过程,步骤 6-8 是深度滤波器的过程。具体的公式推导见代码中的注释。
数学推导:
假设当前帧中的像素点为 p c u r = ( u c u r , v c u r ) p_{cur}=(u_{cur},v_{cur}) pcur=(ucur,vcur),参考帧中的像素点为 p r e f = ( u r e f , v r e f ) p_{ref}=(u_{ref},v_{ref}) pref=(uref,vref),它们对应的深度分别为 d c u r d_{cur} dcur 和 d r e f d_{ref} dref,则它们的相机坐标系下的坐标可以分别表示为:
p c u r c a m = [ u c u r v c u r 1 ] d c u r − 1 p r e f c a m = [ u r e f v r e f 1 ] d r e f − 1 p_{cur}^{cam}=\begin{bmatrix}u_{cur}\\v_{cur}\\1\end{bmatrix}d_{cur}^{-1} \quad p_{ref}^{cam}=\begin{bmatrix}u_{ref}\\v_{ref}\\1\end{bmatrix}d_{ref}^{-1} pcurcam= ucurvcur1 dcur−1prefcam= urefvref1 dref−1
其中, p c u r c a m p_{cur}^{cam} pcurcam 和 p r e f c a m p_{ref}^{cam} prefcam 分别表示当前帧和参考帧中对应点在相机坐标系下的坐标。
根据双目视觉中的几何关系,我们可以得到以下公式:
p c u r c a m = K [ I ∣ 0 ] [ R ∣ t ] p r e f c a m p_{cur}^{cam}=K[I|0][R|t]p_{ref}^{cam} pcurcam=K[I∣0][R∣t]prefcam
其中, K K K 表示相机内参矩阵, I I I 表示单位矩阵, R R R 和 t t t 分别表示参考帧到当前帧的旋转矩阵和平移向量。将其展开可得:
[ u c u r v c u r 1 ] d c u r − 1 = K [ R ∣ t ] [ R T t 0 T 1 ] K − 1 [ u r e f v r e f 1 ] d r e f − 1 \begin{bmatrix}u_{cur}\\v_{cur}\\1\end{bmatrix}d_{cur}^{-1}=K[R|t]\begin{bmatrix}R^T&t\\0^T&1\end{bmatrix}K^{-1}\begin{bmatrix}u_{ref}\\v_{ref}\\1\end{bmatrix}d_{ref}^{-1} ucurvcur1 dcur−1=K[R∣t][RT0Tt1]K−1 urefvref1 dref−1
移项并化简得:
d c u r [ u c u r v c u r 1 ] = K [ R ∣ t ] [ u r e f v r e f 1 ] d_{cur}\begin{bmatrix}u_{cur}\\v_{cur}\\1\end{bmatrix}=K[R|t]\begin{bmatrix}u_{ref}\\v_{ref}\\1\end{bmatrix} dcur ucurvcur1 =K[R∣t] urefvref1
令 f c u r = K − 1 [ u c u r v c u r 1 ] f_{cur}=K^{-1}\begin{bmatrix}u_{cur}\\v_{cur}\\1\end{bmatrix} fcur=K−1 ucurvcur1 和 f r e f = K − 1 [ u r e f v r e f 1 ] f_{ref}=K^{-1}\begin{bmatrix}u_{ref}\\v_{ref}\\1\end{bmatrix} fref=K−1 urefvref1 ,则上式可以表示为:
d c u r ( f c u r ) = R f r e f + t d_{cur}(f_{cur})=Rf_{ref}+t dcur(fcur)=Rfref+t
两边同时除以 ∥ f c u r ∥ \|f_{cur}\| ∥fcur∥,得到:
d c u r f c u r ∥ f c u r ∥ = R f r e f ∥ f c u r ∥ + t ∥ f c u r ∥ d_{cur}\frac{f_{cur}}{\|f_{cur}\|}=R\frac{f_{ref}}{\|f_{cur}\|}+\frac{t}{\|f_{cur}\|} dcur∥fcur∥fcur=R∥fcur∥fref+∥fcur∥t
令 f 2 = R f r e f ∥ f c u r ∥ f_2=R\frac{f_{ref}}{\|f_{cur}\|} f2=R∥fcur∥fref 和 t 2 = t ∥ f c u r ∥ t_2=\frac{t}{\|f_{cur}\|} t2=∥fcur∥t,则上式可以表示为:
d c u r f 1 = f 2 + t 2 d_{cur}f_1=f_2+t_2 dcurf1=f2+t2
其中, f 1 = f c u r ∥ f c u r ∥ f_1=\frac{f_{cur}}{\|f_{cur}\|} f1=∥fcur∥fcur。这个公式表明了当前帧中对应点的深度值可以通过参考帧中对应点的深度值、参考帧到当前帧的旋转矩阵和平移向量来计算。
我们可以将上式表示为矩阵形式:
[ f 1 T f 2 T ] [ d c u r d r e f ] = [ f 1 T t 2 f 2 T t 2 ] \begin{bmatrix}f_1^T\\f_2^T\end{bmatrix}\begin{bmatrix}d_{cur}\\d_{ref}\end{bmatrix}=\begin{bmatrix}f_1^Tt_2\\f_2^Tt_2\end{bmatrix} [f1Tf2T][dcurdref]=[f1Tt2f2Tt2]
其中, [ f 1 T f 2 T ] \begin{bmatrix}f_1^T\\f_2^T\end{bmatrix} [f1Tf2T] 和 [ f 1 T t 2 f 2 T t 2 ] \begin{bmatrix}f_1^Tt_2\\f_2^Tt_2\end{bmatrix} [f1Tt2f2Tt2] 可以通过参考帧到当前帧的变换矩阵 T R C T_R^C TRC 来计算。
因此,我们可以通过解这个线性方程组来计算深度值。具体地,我们可以使用高斯消元法或者 SVD 分解来求解这个方程组。在实际实现中,通常使用 SVD 分解来求解这个方程组。
代码实现:
void updateDepthFilter(
    const Vector2d &pt_ref,             // 参考帧像素点
    const Vector2d &pt_curr,            // 当前帧像素点
    const SE3d &T_C_R,                  // 参考帧到当前帧的变换矩阵
    const Vector2d &epipolar_direction, // 极线方向
    Mat &depth,                         // 存储深度值
    Mat &depth_cov2) {                  // 存储深度值不确定性的平方

    // 将 T_C_R 转换为当前帧到参考帧的变换矩阵 T_R_C
    SE3d T_R_C = T_C_R.inverse();

    // 将参考帧和当前帧的像素点转换为相机坐标系下的方向向量
    Vector3d f_ref = px2cam(pt_ref);
    f_ref.normalize();
    Vector3d f_curr = px2cam(pt_curr);
    f_curr.normalize();

    // 根据三角化计算深度
    Vector3d t = T_R_C.translation();
    Vector3d f2 = T_R_C.so3() * f_curr;
    f2.normalize();
    Vector2d b = Vector2d(t.dot(f_ref), t.dot(f2));
    Matrix2d A;
    A(0, 0) = f_ref.dot(f_ref);
    A(0, 1) = -f_ref.dot(f2);
    A(1, 0) = -A(0, 1);
    A(1, 1) = -f2.dot(f2);
    Vector2d ans = A.inverse() * b;
    Vector3d xm = ans[0] * f_ref;           // ref 侧的结果
    Vector3d xn = t + ans[1] * f2;          // cur 结果
    Vector3d p_esti = (xm + xn) / 2.0;      // P 的位置,取两者的平均
    double depth_estimation = p_esti.norm();   // 深度值

    // 计算不确定性(以一个像素为误差)
    Vector3d p = f_ref * depth_estimation;
    Vector3d a = p - t;
    double t_norm = t.norm();
    double a_norm = a.norm();
    double alpha = acos(f_ref.dot(t) / t_norm);
    double beta = acos(-a.dot(t) / (a_norm * t_norm));
    Vector3d f_curr_prime = px2cam(pt_curr + epipolar_direction);
    f_curr_prime.normalize();
    double beta_prime = acos(f_curr_prime.dot(-t) / t_norm);
    double gamma = M_PI - alpha - beta_prime;
    double p_prime = t_norm * sin(beta_prime) / sin(gamma);
    double d_cov = p_prime - depth_estimation;
    double d_cov2 = d_cov * d_cov;

    // 高斯融合
    double mu = depth.ptr<double>(int(pt_ref(1, 0)))[int(pt_ref(0, 0))];
    double sigma2 = depth_cov2.ptr<double>(int(pt_ref(1, 0)))[int(pt_ref(0, 0))];

    double mu_fuse = (d_cov2 * mu + sigma2 * depth_estimation) / (sigma2 + d_cov2);
    double sigma_fuse2 = (sigma2 * d_cov2) / (sigma2 + d_cov2);

    depth.ptr<double>(int(pt_ref(1, 0)))[int(pt_ref(0, 0))] = mu_fuse;
    depth_cov2.ptr<double>(int(pt_ref(1, 0)))[int(pt_ref(0, 0))] = sigma_fuse2;

    return true;
}
整个代码实现:
#include <iostream>
#include <vector>
#include <fstream>

using namespace std;

#include <boost/timer.hpp>

// for sophus
#include <sophus/se3.hpp>

using Sophus::SE3d;

// for eigen
#include <Eigen/Core>
#include <Eigen/Geometry>

using namespace Eigen;

#include <opencv2/core/core.hpp>
#include <opencv2/highgui/highgui.hpp>
#include <opencv2/imgproc/imgproc.hpp>

using namespace cv;

/**********************************************
* 本程序演示了单目相机在已知轨迹下的稠密深度估计
* 使用极线搜索 + NCC 匹配的方式,与书本的 12.2 节对应
* 请注意本程序并不完美,你完全可以改进它——我其实在故意暴露一些问题(这是借口)。
***********************************************/

// ------------------------------------------------------------------
// parameters
const int boarder = 20;         // 边缘宽度
const int width = 640;          // 图像宽度
const int height = 480;         // 图像高度
const double fx = 481.2f;       // 相机内参
const double fy = -480.0f;
const double cx = 319.5f;
const double cy = 239.5f;
const int ncc_window_size = 3;    // NCC 取的窗口半宽度
const int ncc_area = (2 * ncc_window_size + 1) * (2 * ncc_window_size + 1); // NCC窗口面积
const double min_cov = 0.1;     // 收敛判定:最小方差
const double max_cov = 10;      // 发散判定:最大方差

// ------------------------------------------------------------------
// 重要的函数
/// 从 REMODE 数据集读取数据
bool readDatasetFiles(
    const string &path,
    vector<string> &color_image_files,
    vector<SE3d> &poses,
    cv::Mat &ref_depth
);

/**
 * 根据新的图像更新深度估计
 * @param ref           参考图像
 * @param curr          当前图像
 * @param T_C_R         参考图像到当前图像的位姿
 * @param depth         深度
 * @param depth_cov     深度方差
 * @return              是否成功
 */
void update(
    const Mat &ref,
    const Mat &curr,
    const SE3d &T_C_R,
    Mat &depth,
    Mat &depth_cov2
);

/**
 * 极线搜索
 * @param ref           参考图像
 * @param curr          当前图像
 * @param T_C_R         位姿
 * @param pt_ref        参考图像中点的位置
 * @param depth_mu      深度均值
 * @param depth_cov     深度方差
 * @param pt_curr       当前点
 * @param epipolar_direction  极线方向
 * @return              是否成功
 */
bool epipolarSearch(
    const Mat &ref,
    const Mat &curr,
    const SE3d &T_C_R,
    const Vector2d &pt_ref,
    const double &depth_mu,
    const double &depth_cov,
    Vector2d &pt_curr,
    Vector2d &epipolar_direction
);

/**
 * 更新深度滤波器
 * @param pt_ref    参考图像点
 * @param pt_curr   当前图像点
 * @param T_C_R     位姿
 * @param epipolar_direction 极线方向
 * @param depth     深度均值
 * @param depth_cov2    深度方向
 * @return          是否成功
 */
bool updateDepthFilter(
    const Vector2d &pt_ref,
    const Vector2d &pt_curr,
    const SE3d &T_C_R,
    const Vector2d &epipolar_direction,
    Mat &depth,
    Mat &depth_cov2
);

/**
 * 计算 NCC 评分
 * @param ref       参考图像
 * @param curr      当前图像
 * @param pt_ref    参考点
 * @param pt_curr   当前点
 * @return          NCC评分
 */
double NCC(const Mat &ref, const Mat &curr, const Vector2d &pt_ref, const Vector2d &pt_curr);

// 双线性灰度插值
inline double getBilinearInterpolatedValue(const Mat &img, const Vector2d &pt) {
    uchar *d = &img.data[int(pt(1, 0)) * img.step + int(pt(0, 0))];
    double xx = pt(0, 0) - floor(pt(0, 0));
    double yy = pt(1, 0) - floor(pt(1, 0));
    return ((1 - xx) * (1 - yy) * double(d[0]) +
            xx * (1 - yy) * double(d[1]) +
            (1 - xx) * yy * double(d[img.step]) +
            xx * yy * double(d[img.step + 1])) / 255.0;
}

// ------------------------------------------------------------------
// 一些小工具
// 显示估计的深度图
void plotDepth(const Mat &depth_truth, const Mat &depth_estimate);

// 像素到相机坐标系
inline Vector3d px2cam(const Vector2d px) {
    return Vector3d(
        (px(0, 0) - cx) / fx,
        (px(1, 0) - cy) / fy,
        1
    );
}

// 相机坐标系到像素
inline Vector2d cam2px(const Vector3d p_cam) {
    return Vector2d(
        p_cam(0, 0) * fx / p_cam(2, 0) + cx,
        p_cam(1, 0) * fy / p_cam(2, 0) + cy
    );
}

// 检测一个点是否在图像边框内
inline bool inside(const Vector2d &pt) {
    return pt(0, 0) >= boarder && pt(1, 0) >= boarder
           && pt(0, 0) + boarder < width && pt(1, 0) + boarder <= height;
}

// 显示极线匹配
void showEpipolarMatch(const Mat &ref, const Mat &curr, const Vector2d &px_ref, const Vector2d &px_curr);

// 显示极线
void showEpipolarLine(const Mat &ref, const Mat &curr, const Vector2d &px_ref, const Vector2d &px_min_curr,
                      const Vector2d &px_max_curr);

/// 评测深度估计
void evaludateDepth(const Mat &depth_truth, const Mat &depth_estimate);
// ------------------------------------------------------------------


int main(int argc, char **argv) {
    if (argc != 2) {
        cout << "Usage: dense_mapping path_to_test_dataset" << endl;
        return -1;
    }

    // 从数据集读取数据
    vector<string> color_image_files;
    vector<SE3d> poses_TWC;
    Mat ref_depth;
    bool ret = readDatasetFiles(argv[1], color_image_files, poses_TWC, ref_depth);
    if (ret == false) {
        cout << "Reading image files failed!" << endl;
        return -1;
    }
    cout << "read total " << color_image_files.size() << " files." << endl;

    // 第一张图
    Mat ref = imread(color_image_files[0], 0);                // gray-scale image
    SE3d pose_ref_TWC = poses_TWC[0];
    double init_depth = 3.0;    // 深度初始值
    double init_cov2 = 3.0;     // 方差初始值
    Mat depth(height, width, CV_64F, init_depth);             // 深度图
    Mat depth_cov2(height, width, CV_64F, init_cov2);         // 深度图方差

    for (int index = 1; index < color_image_files.size(); index++) {
        cout << "*** loop " << index << " ***" << endl;
        Mat curr = imread(color_image_files[index], 0);
        if (curr.data == nullptr) continue;
        SE3d pose_curr_TWC = poses_TWC[index];
        SE3d pose_T_C_R = pose_curr_TWC.inverse() * pose_ref_TWC;   // 坐标转换关系: T_C_W * T_W_R = T_C_R
        update(ref, curr, pose_T_C_R, depth, depth_cov2);
        evaludateDepth(ref_depth, depth);
        plotDepth(ref_depth, depth);
        imshow("image", curr);
        waitKey(0);
    }

    cout << "estimation returns, saving depth map ..." << endl;
    imwrite("depth.png", depth);
    cout << "done." << endl;

    return 0;
}

bool readDatasetFiles(
    const string &path,
    vector<string> &color_image_files,
    std::vector<SE3d> &poses,
    cv::Mat &ref_depth) {
    ifstream fin(path + "/first_200_frames_traj_over_table_input_sequence.txt");
    if (!fin) return false;

    while (!fin.eof()) {
        // 数据格式:图像文件名 tx, ty, tz, qx, qy, qz, qw ,注意是 TWC 而非 TCW
        string image;
        fin >> image;
        double data[7];
        for (double &d:data) fin >> d;

        color_image_files.push_back(path + string("/images/") + image);
        poses.push_back(
            SE3d(Quaterniond(data[6], data[3], data[4], data[5]),
                 Vector3d(data[0], data[1], data[2]))
        );
        if (!fin.good()) break;
    }
    fin.close();

    // load reference depth
    fin.open(path + "/depthmaps/scene_000.depth");
    ref_depth = cv::Mat(height, width, CV_64F);
    if (!fin) return false;
    for (int y = 0; y < height; y++)
        for (int x = 0; x < width; x++) {
            double depth = 0;
            fin >> depth;
            ref_depth.ptr<double>(y)[x] = depth / 100.0;
        }

    return true;
}

// 对整个深度图进行更新
void update(const Mat &ref, const Mat &curr, const SE3d &T_C_R, Mat &depth, Mat &depth_cov2) {
    for (int x = boarder; x < width - boarder; x++)
        for (int y = boarder; y < height - boarder; y++) {
            // 遍历每个像素
            if (depth_cov2.ptr<double>(y)[x] < min_cov || depth_cov2.ptr<double>(y)[x] > max_cov) // 深度已收敛或发散
                continue;
            // 在极线上搜索 (x,y) 的匹配
            Vector2d pt_curr;
            Vector2d epipolar_direction;
            bool ret = epipolarSearch(
                ref,
                curr,
                T_C_R,
                Vector2d(x, y),
                depth.ptr<double>(y)[x],
                sqrt(depth_cov2.ptr<double>(y)[x]),
                pt_curr,
                epipolar_direction
            );

            if (ret == false) // 匹配失败
                continue;

            // 取消该注释以显示匹配
            // showEpipolarMatch(ref, curr, Vector2d(x, y), pt_curr);

            // 匹配成功,更新深度图
            updateDepthFilter(Vector2d(x, y), pt_curr, T_C_R, epipolar_direction, depth, depth_cov2);
        }
}

// 极线搜索
// 方法见书 12.2 12.3 两节
bool epipolarSearch(
    const Mat &ref, const Mat &curr,
    const SE3d &T_C_R, const Vector2d &pt_ref,
    const double &depth_mu, const double &depth_cov,
    Vector2d &pt_curr, Vector2d &epipolar_direction) {
    Vector3d f_ref = px2cam(pt_ref);
    f_ref.normalize();
    Vector3d P_ref = f_ref * depth_mu;    // 参考帧的 P 向量

    Vector2d px_mean_curr = cam2px(T_C_R * P_ref); // 按深度均值投影的像素
    double d_min = depth_mu - 3 * depth_cov, d_max = depth_mu + 3 * depth_cov;
    if (d_min < 0.1) d_min = 0.1;
    Vector2d px_min_curr = cam2px(T_C_R * (f_ref * d_min));    // 按最小深度投影的像素
    Vector2d px_max_curr = cam2px(T_C_R * (f_ref * d_max));    // 按最大深度投影的像素

    Vector2d epipolar_line = px_max_curr - px_min_curr;    // 极线(线段形式)
    epipolar_direction = epipolar_line;        // 极线方向
    epipolar_direction.normalize();
    double half_length = 0.5 * epipolar_line.norm();    // 极线线段的半长度
    if (half_length > 100) half_length = 100;   // 我们不希望搜索太多东西

    // 取消此句注释以显示极线(线段)
     //showEpipolarLine( ref, curr, pt_ref, px_min_curr, px_max_curr );

    // 在极线上搜索,以深度均值点为中心,左右各取半长度
    double best_ncc = -1.0;
    Vector2d best_px_curr;
    for (double l = -half_length; l <= half_length; l += 0.7) { // l+=sqrt(2)
        Vector2d px_curr = px_mean_curr + l * epipolar_direction;  // 待匹配点
        if (!inside(px_curr))
            continue;
        // 计算待匹配点与参考帧的 NCC
        double ncc = NCC(ref, curr, pt_ref, px_curr);
        if (ncc > best_ncc) {
            best_ncc = ncc;
            best_px_curr = px_curr;
        }
    }
    if (best_ncc < 0.85f)      // 只相信 NCC 很高的匹配
        return false;
    pt_curr = best_px_curr;
    return true;
}

double NCC(
    const Mat &ref, const Mat &curr,
    const Vector2d &pt_ref, const Vector2d &pt_curr) {
    // 零均值-归一化互相关
    // 先算均值
    double mean_ref = 0, mean_curr = 0;
    vector<double> values_ref, values_curr; // 参考帧和当前帧的均值
    for (int x = -ncc_window_size; x <= ncc_window_size; x++)
        for (int y = -ncc_window_size; y <= ncc_window_size; y++) {
            double value_ref = double(ref.ptr<uchar>(int(y + pt_ref(1, 0)))[int(x + pt_ref(0, 0))]) / 255.0;
            mean_ref += value_ref;

            double value_curr = getBilinearInterpolatedValue(curr, pt_curr + Vector2d(x, y));
            mean_curr += value_curr;

            values_ref.push_back(value_ref);
            values_curr.push_back(value_curr);
        }

    mean_ref /= ncc_area;
    mean_curr /= ncc_area;

    // 计算 Zero mean NCC
    double numerator = 0, demoniator1 = 0, demoniator2 = 0;
    for (int i = 0; i < values_ref.size(); i++) {
        double n = (values_ref[i] - mean_ref) * (values_curr[i] - mean_curr);
        numerator += n;
        demoniator1 += (values_ref[i] - mean_ref) * (values_ref[i] - mean_ref);
        demoniator2 += (values_curr[i] - mean_curr) * (values_curr[i] - mean_curr);
    }
    return numerator / sqrt(demoniator1 * demoniator2 + 1e-10);   // 防止分母出现零
}

bool updateDepthFilter(
    const Vector2d &pt_ref,
    const Vector2d &pt_curr,
    const SE3d &T_C_R,
    const Vector2d &epipolar_direction,
    Mat &depth,
    Mat &depth_cov2) {
    // 不知道这段还有没有人看
    // 用三角化计算深度
    SE3d T_R_C = T_C_R.inverse();
    Vector3d f_ref = px2cam(pt_ref);
    f_ref.normalize();
    Vector3d f_curr = px2cam(pt_curr);
    f_curr.normalize();

    // 方程
    // d_ref * f_ref = d_cur * ( R_RC * f_cur ) + t_RC
    // f2 = R_RC * f_cur
    // 转化成下面这个矩阵方程组
    // => [ f_ref^T f_ref, -f_ref^T f2 ] [d_ref]   [f_ref^T t]
    //    [ f_2^T f_ref, -f2^T f2      ] [d_cur] = [f2^T t   ]
    Vector3d t = T_R_C.translation();
    Vector3d f2 = T_R_C.so3() * f_curr;
    Vector2d b = Vector2d(t.dot(f_ref), t.dot(f2));
    Matrix2d A;
    A(0, 0) = f_ref.dot(f_ref);
    A(0, 1) = -f_ref.dot(f2);
    A(1, 0) = -A(0, 1);
    A(1, 1) = -f2.dot(f2);
    Vector2d ans = A.inverse() * b;
    Vector3d xm = ans[0] * f_ref;           // ref 侧的结果
    Vector3d xn = t + ans[1] * f2;          // cur 结果
    Vector3d p_esti = (xm + xn) / 2.0;      // P的位置,取两者的平均
    double depth_estimation = p_esti.norm();   // 深度值

    // 计算不确定性(以一个像素为误差)
    Vector3d p = f_ref * depth_estimation;
    Vector3d a = p - t;
    double t_norm = t.norm();
    double a_norm = a.norm();
    double alpha = acos(f_ref.dot(t) / t_norm);
    double beta = acos(-a.dot(t) / (a_norm * t_norm));
    Vector3d f_curr_prime = px2cam(pt_curr + epipolar_direction);
    f_curr_prime.normalize();
    double beta_prime = acos(f_curr_prime.dot(-t) / t_norm);
    double gamma = M_PI - alpha - beta_prime;
    double p_prime = t_norm * sin(beta_prime) / sin(gamma);
    double d_cov = p_prime - depth_estimation;
    double d_cov2 = d_cov * d_cov;

    // 高斯融合
    double mu = depth.ptr<double>(int(pt_ref(1, 0)))[int(pt_ref(0, 0))];
    double sigma2 = depth_cov2.ptr<double>(int(pt_ref(1, 0)))[int(pt_ref(0, 0))];

    double mu_fuse = (d_cov2 * mu + sigma2 * depth_estimation) / (sigma2 + d_cov2);
    double sigma_fuse2 = (sigma2 * d_cov2) / (sigma2 + d_cov2);

    depth.ptr<double>(int(pt_ref(1, 0)))[int(pt_ref(0, 0))] = mu_fuse;
    depth_cov2.ptr<double>(int(pt_ref(1, 0)))[int(pt_ref(0, 0))] = sigma_fuse2;

    return true;
}
/*
这个函数实现了一个深度滤波器,用于计算图像中某个像素点的深度值。下面是每个步骤的含义和相关的公式推导:

1. 将当前帧的像素点和参考帧的像素点通过三角化计算深度。

2. 将参考帧到当前帧的变换矩阵 T_C_R 转换为当前帧到参考帧的变换矩阵 T_R_C。

3. 将参考帧像素点 pt_ref 和当前帧像素点 pt_curr 转换为对应的相机坐标系下的方向向量 f_ref 和 f_curr。

4. 对 f_ref 和 f_curr 进行归一化。

5. 根据三角化得到的深度值,计算出参考帧中对应点的位置 p,以及当前帧中对应点的位置 t。

6. 根据 p 和 t 计算出两个方向向量 xm 和 xn,分别是参考帧中对应点和当前帧中对应点到相机中心的向量。

7. 将 xm 和 xn 取平均得到 P 的位置 p_esti。

8. 计算 P 的深度值 depth_estimation,即 p_esti 的模长。

9. 计算深度值的不确定性 d_cov2,以一个像素为误差。

10. 将计算得到的深度值和不确定性与之前存储的深度值和不确定性进行高斯融合,得到新的深度值和不确定性。

11. 将新的深度值和不确定性存储到 depth 和 depth_cov2 中。
*/
bool updateDepthFilter2(
        const Vector2d &pt_ref,             // 参考帧像素点
        const Vector2d &pt_curr,            // 当前帧像素点
        const SE3d &T_C_R,                  // 参考帧到当前帧的变换矩阵
        const Vector2d &epipolar_direction, // 极线方向
        Mat &depth,                         // 存储深度值
        Mat &depth_cov2) {                  // 存储深度值不确定性的平方

    // 将 T_C_R 转换为当前帧到参考帧的变换矩阵 T_R_C
    SE3d T_R_C = T_C_R.inverse();

    // 将参考帧和当前帧的像素点转换为相机坐标系下的方向向量
    Vector3d f_ref = px2cam(pt_ref);
    f_ref.normalize();
    Vector3d f_curr = px2cam(pt_curr);
    f_curr.normalize();

    // 根据三角化计算深度
    Vector3d t = T_R_C.translation();
    Vector3d f2 = T_R_C.so3() * f_curr;
    f2.normalize();
    Vector2d b = Vector2d(t.dot(f_ref), t.dot(f2));
    Matrix2d A;
    A(0, 0) = f_ref.dot(f_ref);
    A(0, 1) = -f_ref.dot(f2);
    A(1, 0) = -A(0, 1);
    A(1, 1) = -f2.dot(f2);
    Vector2d ans = A.inverse() * b;
    Vector3d xm = ans[0] * f_ref;           // ref 侧的结果
    Vector3d xn = t + ans[1] * f2;          // cur 结果
    Vector3d p_esti = (xm + xn) / 2.0;      // P 的位置,取两者的平均
    double depth_estimation = p_esti.norm();   // 深度值

    // 计算不确定性(以一个像素为误差)
    Vector3d p = f_ref * depth_estimation;
    Vector3d a = p - t;
    double t_norm = t.norm();
    double a_norm = a.norm();
    double alpha = acos(f_ref.dot(t) / t_norm);
    double beta = acos(-a.dot(t) / (a_norm * t_norm));
    Vector3d f_curr_prime = px2cam(pt_curr + epipolar_direction);
    f_curr_prime.normalize();
    double beta_prime = acos(f_curr_prime.dot(-t) / t_norm);
    double gamma = M_PI - alpha - beta_prime;
    double p_prime = t_norm * sin(beta_prime) / sin(gamma);
    double d_cov = p_prime - depth_estimation; //观测的均值 /mu_obs
    double d_cov2 = d_cov * d_cov; // 观测的不确定度/sigma^2_obs

    // 高斯融合
    double mu = depth.ptr<double>(int(pt_ref(1, 0)))[int(pt_ref(0, 0))];
    double sigma2 = depth_cov2.ptr<double>(int(pt_ref(1, 0)))[int(pt_ref(0, 0))];

    double mu_fuse = (d_cov2 * mu + sigma2 * depth_estimation) / (sigma2 + d_cov2);
    double sigma_fuse2 = (sigma2 * d_cov2) / (sigma2 + d_cov2);

    depth.ptr<double>(int(pt_ref(1, 0)))[int(pt_ref(0, 0))] = mu_fuse;
    depth_cov2.ptr<double>(int(pt_ref(1, 0)))[int(pt_ref(0, 0))] = sigma_fuse2;

    return true;
}

// 后面这些太简单我就不注释了(其实是因为懒)
void plotDepth(const Mat &depth_truth, const Mat &depth_estimate) {
    imshow("depth_truth", depth_truth * 0.4);
    imshow("depth_estimate", depth_estimate * 0.4);
    imshow("depth_error", depth_truth - depth_estimate);
    waitKey(1);
}

void evaludateDepth(const Mat &depth_truth, const Mat &depth_estimate) {
    double ave_depth_error = 0;     // 平均误差
    double ave_depth_error_sq = 0;      // 平方误差
    int cnt_depth_data = 0;
    for (int y = boarder; y < depth_truth.rows - boarder; y++)
        for (int x = boarder; x < depth_truth.cols - boarder; x++) {
            double error = depth_truth.ptr<double>(y)[x] - depth_estimate.ptr<double>(y)[x];
            ave_depth_error += error;
            ave_depth_error_sq += error * error;
            cnt_depth_data++;
        }
    ave_depth_error /= cnt_depth_data;
    ave_depth_error_sq /= cnt_depth_data;

    cout << "Average squared error = " << ave_depth_error_sq << ", average error: " << ave_depth_error << endl;
}

void showEpipolarMatch(const Mat &ref, const Mat &curr, const Vector2d &px_ref, const Vector2d &px_curr) {
    Mat ref_show, curr_show;
    cv::cvtColor(ref, ref_show, CV_GRAY2BGR);
    cv::cvtColor(curr, curr_show, CV_GRAY2BGR);

    cv::circle(ref_show, cv::Point2f(px_ref(0, 0), px_ref(1, 0)), 5, cv::Scalar(0, 0, 250), 2);
    cv::circle(curr_show, cv::Point2f(px_curr(0, 0), px_curr(1, 0)), 5, cv::Scalar(0, 0, 250), 2);

    imshow("ref", ref_show);
    imshow("curr", curr_show);
    waitKey(1);
}

void showEpipolarLine(const Mat &ref, const Mat &curr, const Vector2d &px_ref, const Vector2d &px_min_curr,
                      const Vector2d &px_max_curr) {

    Mat ref_show, curr_show;
    cv::cvtColor(ref, ref_show, CV_GRAY2BGR);
    cv::cvtColor(curr, curr_show, CV_GRAY2BGR);

    cv::circle(ref_show, cv::Point2f(px_ref(0, 0), px_ref(1, 0)), 5, cv::Scalar(0, 255, 0), 2);
    cv::circle(curr_show, cv::Point2f(px_min_curr(0, 0), px_min_curr(1, 0)), 5, cv::Scalar(0, 255, 0), 2);
    cv::circle(curr_show, cv::Point2f(px_max_curr(0, 0), px_max_curr(1, 0)), 5, cv::Scalar(0, 255, 0), 2);
    cv::line(curr_show, Point2f(px_min_curr(0, 0), px_min_curr(1, 0)), Point2f(px_max_curr(0, 0), px_max_curr(1, 0)),
             Scalar(0, 255, 0), 1);

    imshow("ref", ref_show);
    imshow("curr", curr_show);
    waitKey(1);
}
