前言:在对ServerBootstrap 进行属性赋值之后,通过bind 方法完成端口的绑定,并开始在NioEventLoop中进行轮询进行事件的处理;本文主要探究ServersocketChannel 在netty 中是如何完成注册,以及端口的绑定
1 Nio selector 多路复用模型:
为了更好的探究netty 的channel 的注册和端口的绑定,先来回顾下Nio selector 的事件注册以及端口绑定步骤以及netty 步骤的对应:
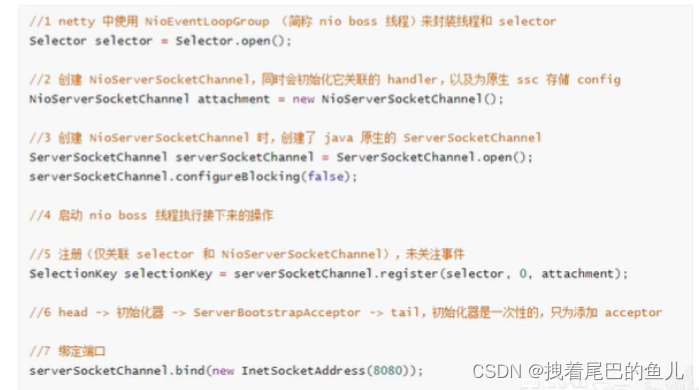
可以看到在 nio 中的步骤,在netty 也都是有的;然后对以上步骤的关键点在netty 中实现进行探究;
2 跟踪bind 方法: server.bind(this.port).sync()
2.1 AbstractBootstrap 类 server.bind(this.port):
AbstractBootstrap bind 完成端口的绑定和监听
public ChannelFuture bind(int inetPort) {
    return this.bind(new InetSocketAddress(inetPort));
}
使用new InetSocketAddress(inetPort) 构建要监听的端口,然后通过bind 方法进行绑定
AbstractBootstrap 的bind 方法:
public ChannelFuture bind(SocketAddress localAddress) {
	// 验证父类事件处理 的EventLoopGroup 和NioServerSocketChannel 工厂类是否赋值
    this.validate();
    // 端口的绑定和启动
    return this.doBind((SocketAddress)ObjectUtil.checkNotNull(localAddress, "localAddress"));
}
关键点 :2.2 进入 AbstractBootstrap doBind:在这里开始真正进行channel 管道的初始化,注册占位事件,完成端口的绑定
private ChannelFuture doBind(final SocketAddress localAddress) {
// 初始化NioServerSocketChannel 对象并赋值 regFuture
    final ChannelFuture regFuture = this.initAndRegister();
// 得到NioServerSocketChannel  channel 对象
    final Channel channel = regFuture.channel();
    if (regFuture.cause() != null) {
        return regFuture;
    } else if (regFuture.isDone()) {
// 通道初始化完成
        ChannelPromise promise = channel.newPromise();
// 地址绑定
        doBind0(regFuture, channel, localAddress, promise);
        return promise;
    } else {
        final PendingRegistrationPromise promise = new PendingRegistrationPromise(channel);
        regFuture.addListener(new ChannelFutureListener() {
            public void operationComplete(ChannelFuture future) throws Exception {
                Throwable cause = future.cause();
                if (cause != null) {
                    promise.setFailure(cause);
                } else {
                    promise.registered();
                    AbstractBootstrap.doBind0(regFuture, channel, localAddress, promise);
                }

            }
        });
        return promise;
    }
}
关键点 :2.2.1 this.initAndRegister():NioServerSocketChannel 对象的初始化,以及channel 管道的占位事件注册:
AbstractBootstrap 类中 initAndRegister 方法
final ChannelFuture initAndRegister() {
    Channel channel = null;

    try {
//  调用NioServerSocketChannel 无参构造方法 初始化 NioServerSocketChannel 对象
        channel = this.channelFactory.newChannel();
// NioServerSocketChannel 对象初始化
        this.init(channel);
    } catch (Throwable var3) {
        if (channel != null) {
            channel.unsafe().closeForcibly();
            return (new DefaultChannelPromise(channel, GlobalEventExecutor.INSTANCE)).setFailure(var3);
        }

        return (new DefaultChannelPromise(new FailedChannel(), GlobalEventExecutor.INSTANCE)).setFailure(var3);
    }
// 从父类group 中的EventLoopGroup 选出一个EventLoop 并注册到channel 管道上
    ChannelFuture regFuture = this.config().group().register(channel);
    if (regFuture.cause() != null) {
// 注册失败 关闭ServerSocketChannel  通道
        if (channel.isRegistered()) {
            channel.close();
        } else {
            channel.unsafe().closeForcibly();
        }
    }
// 返回注册的结果, 由于是异步的方法 返回regFuture
    return regFuture;
}
关键点 2.2.1.1 this.channelFactory.newChannel() 的方法:NioServerSocketChannel 以及jdk 原生的ServerSocketChannel 对象创建:
(1) this.channelFactory.newChannel() 通过反射机制调用NioServerSocketChannel 的鬼样子方法中,进行jdk 原生的ServerSocketChannel 对象创建:
// 获取 WindowsSelectorProvider 的实例对象
private static final SelectorProvider DEFAULT_SELECTOR_PROVIDER = SelectorProvider.provider();
public NioServerSocketChannel() {
    this(newSocket(DEFAULT_SELECTOR_PROVIDER));
}

private static java.nio.channels.ServerSocketChannel newSocket(SelectorProvider provider) {
    try {
    	// 返回ServerSocketChannelImpl 的实例对象
        return provider.openServerSocketChannel();
    } catch (IOException var2) {
        throw new ChannelException("Failed to open a server socket.", var2);
    }
}
this(newSocket(DEFAULT_SELECTOR_PROVIDER));
NioServerSocketChannel 的this 方法:
public NioServerSocketChannel(java.nio.channels.ServerSocketChannel channel) {
// 父类方法对ServerSocketChannel  对象设置属性
    super((Channel)null, channel, 16);
// ServerSocketChannel   的config 对象进行初始化
//   private final ServerSocketChannelConfig config;
    this.config = new NioServerSocketChannelConfig(this, this.javaChannel().socket());
}
super((Channel)null, channel, 16) 调用 AbstractNioMessageChannel:这里可以看到把感兴趣的事件accept 16 作为参数进行了传递
// parent 为null ,ch 为ServerSocketChannel channel 对象,
// readInterestOp为int OP_ACCEPT = 1 << 4; 对应客户端连接服务器事件
protected AbstractNioMessageChannel(Channel parent, SelectableChannel ch, int readInterestOp) {
    super(parent, ch, readInterestOp);
}
关键点(2)继续进父类的调用:AbstractNioChannel: 对java 原生的ServerSocketChannel 的channel 管道的非阻塞属性进行了设置
private static final InternalLogger logger = InternalLoggerFactory.getInstance(AbstractNioChannel.class);
private final SelectableChannel ch;
protected final int readInterestOp;
volatile SelectionKey selectionKey;
boolean readPending;
private final Runnable clearReadPendingRunnable = new Runnable() {
    public void run() {
        AbstractNioChannel.this.clearReadPending0();
    }
};
private ChannelPromise connectPromise;
private ScheduledFuture<?> connectTimeoutFuture;
private SocketAddress requestedRemoteAddress;

protected AbstractNioChannel(Channel parent, SelectableChannel ch, int readInterestOp) {
    super(parent);
//  将ServerSocketChannel 对象进行赋值
    this.ch = ch;
// 感兴趣的事件 进行赋值 16 final int OP_ACCEPT = 1 << 4; 对应客户端连接服务器事件
    this.readInterestOp = readInterestOp;

    try {
		// 设置管道非阻塞
        ch.configureBlocking(false);
    } catch (IOException var7) {
        try {
            ch.close();
        } catch (IOException var6) {
            logger.warn("Failed to close a partially initialized socket.", var6);
        }

        throw new ChannelException("Failed to enter non-blocking mode.", var7);
    }
}
关键点(3) super(parent); 调用父类:AbstractChannel:这里对java 原生的ServerSocketChannel 的pipeline 进行双向链表的初始化,以便后续加入对accept事件handler 的加入;
private static final InternalLogger logger = InternalLoggerFactory.getInstance(AbstractChannel.class);
private final Channel parent;
private final ChannelId id;
private final Channel.Unsafe unsafe;
private final DefaultChannelPipeline pipeline;
private final VoidChannelPromise unsafeVoidPromise = new VoidChannelPromise(this, false);
private final CloseFuture closeFuture = new CloseFuture(this);
private volatile SocketAddress localAddress;
private volatile SocketAddress remoteAddress;
private volatile EventLoop eventLoop;
private volatile boolean registered;
private boolean closeInitiated;
private Throwable initialCloseCause;
private boolean strValActive;
private String strVal;

protected AbstractChannel(Channel parent) {
// parent 为null
    this.parent = parent;
// chanel 通道设置id
    this.id = this.newId();
// chanel 通过设置文件描述
    this.unsafe = this.newUnsafe();
// 当前通道初始 pipeline
    this.pipeline = this.newChannelPipeline();
}
this.newChannelPipeline():
protected DefaultChannelPipeline newChannelPipeline() {
    return new DefaultChannelPipeline(this);
}
DefaultChannelPipeline 类中对pipeline 完成初始化:
static final InternalLogger logger = InternalLoggerFactory.getInstance(DefaultChannelPipeline.class);
private static final String HEAD_NAME = generateName0(HeadContext.class);
private static final String TAIL_NAME = generateName0(TailContext.class);
private static final FastThreadLocal<Map<Class<?>, String>> nameCaches = new FastThreadLocal<Map<Class<?>, String>>() {
    protected Map<Class<?>, String> initialValue() {
        return new WeakHashMap();
    }
};
private static final AtomicReferenceFieldUpdater<DefaultChannelPipeline, MessageSizeEstimator.Handle> ESTIMATOR = AtomicReferenceFieldUpdater.newUpdater(DefaultChannelPipeline.class, MessageSizeEstimator.Handle.class, "estimatorHandle");
final AbstractChannelHandlerContext head;
final AbstractChannelHandlerContext tail;
private final Channel channel;
private final ChannelFuture succeededFuture;
private final VoidChannelPromise voidPromise;
private final boolean touch = ResourceLeakDetector.isEnabled();
private Map<EventExecutorGroup, EventExecutor> childExecutors;
private volatile MessageSizeEstimator.Handle estimatorHandle;
private boolean firstRegistration = true;
private PendingHandlerCallback pendingHandlerCallbackHead;
private boolean registered;
// channel 为 NioServerSocketChannel对象
protected DefaultChannelPipeline(Channel channel) {
// chanel 赋值
    this.channel = (Channel)ObjectUtil.checkNotNull(channel, "channel");
    this.succeededFuture = new SucceededChannelFuture(channel, (EventExecutor)null);
// 管道初始化异常 异常原因 promise
    this.voidPromise = new VoidChannelPromise(channel, true);
// pipeline 双向链表设置
    this.tail = new TailContext(this);
    this.head = new HeadContext(this);
    this.head.next = this.tail;
    this.tail.prev = this.head;
}
(4)NioServerSocketChannel 的config 初始化:在完成了对NioServerSocketChannel 对象的创建并初始化pipeline和设置其为非阻塞流之后;回到 NioServerSocketChannel 类中:
this.config = new NioServerSocketChannelConfig(this, this.javaChannel().socket())

private NioServerSocketChannelConfig(NioServerSocketChannel channel, ServerSocket javaSocket) {
    super(channel, javaSocket);
}
super(channel, javaSocket) 方法调用到DefaultServerSocketChannelConfig 类:
protected final ServerSocket javaSocket;
private volatile int backlog;

public DefaultServerSocketChannelConfig(ServerSocketChannel channel, ServerSocket javaSocket) {
    super(channel);
    this.backlog = NetUtil.SOMAXCONN;
	// ServerSocket  进行赋值
    this.javaSocket = (ServerSocket)ObjectUtil.checkNotNull(javaSocket, "javaSocket");
}
继续super(channel);调用到 DefaultChannelConfig
//  channel 为 ServerSocketChannel 对象
public DefaultChannelConfig(Channel channel) {
    this(channel, new AdaptiveRecvByteBufAllocator());
}
protected DefaultChannelConfig(Channel channel, RecvByteBufAllocator allocator) {
// channel NioServerSocketChannel   allocator:通道所用的缓冲区
    this.allocator = ByteBufAllocator.DEFAULT;
    this.msgSizeEstimator = DEFAULT_MSG_SIZE_ESTIMATOR;
// 通道属性的赋值
    this.connectTimeoutMillis = 30000;
    this.writeSpinCount = 16;
    this.autoRead = 1;
    this.autoClose = true;
    this.writeBufferWaterMark = WriteBufferWaterMark.DEFAULT;
    this.pinEventExecutor = true;
    this.setRecvByteBufAllocator(allocator, channel.metadata());
    this.channel = channel;
}
2.2.1.2 继续看 initAndRegister() 中的this.init(channel) 方法:
// channel为 NioServerSocketChannel  对象
void init(Channel channel) {
	// 将父类AbstractBootstrap 的options 属性赋值到 NioServerSocketChannel  对象
    setChannelOptions(channel, this.newOptionsArray(), logger);
    // 将父类AbstractBootstrap 的attrs属性赋值到 NioServerSocketChannel  对象
    setAttributes(channel, (Map.Entry[])this.attrs0().entrySet().toArray(EMPTY_ATTRIBUTE_ARRAY));
// 获取  ServerSocketChannel  初始化的pipeline DetaultChannelPipeline
  ChannelPipeline p = channel.pipeline();
// 获取 子事件轮询组
    final EventLoopGroup currentChildGroup = this.childGroup;
// 获取子事件的 业务逻辑处理任务
    final ChannelHandler currentChildHandler = this.childHandler;
// 获取的子事件中设置的配置项
    final Map.Entry[] currentChildOptions;
    synchronized(this.childOptions) {
        currentChildOptions = (Map.Entry[])this.childOptions.entrySet().toArray(EMPTY_OPTION_ARRAY);
    }
// 子事件设置的属性
    final Map.Entry<AttributeKey<?>, Object>[] currentChildAttrs = (Map.Entry[])this.childAttrs.entrySet().toArray(EMPTY_ATTRIBUTE_ARRAY);
    p.addLast(new ChannelHandler[]{new ChannelInitializer<Channel>() {
        public void initChannel(final Channel ch) {
// 获取 ServerSocketChannel 的pipeline
            final ChannelPipeline pipeline = ch.pipeline();
// 添加 原有的handler
            ChannelHandler handler = ServerBootstrap.this.config.handler();
            if (handler != null) {
                pipeline.addLast(new ChannelHandler[]{handler});
            }
// 添加 Acceptor hadler 到 ServerSocketChannel 的pipeline 双向链表中
            ch.eventLoop().execute(new Runnable() {
                public void run() {
                    pipeline.addLast(new ChannelHandler[]{new ServerBootstrapAcceptor(ch, currentChildGroup, currentChildHandler, currentChildOptions, currentChildAttrs)});
                }
            });
        }
    }});
}
关键点:(1)下面代码向ServerSocketChannel 中的pipeline 在双向链表的尾部增加了一个处理客户端连接事件的handler,并且可以看到这个添加handler 的操作是在ServerSocketChannel 初始化完成之后 由eventLoop 中的线程执行了任务:handler 在增加之后双向链表的构造:header->acceptor->tail
pipeline.addLast(new ChannelHandler[]{new ServerBootstrapAcceptor(ch, currentChildGroup, currentChildHandler, currentChildOptions, currentChildAttrs)})
到这里可以做下小结:
- this.channelFactory.newChannel() 完成了对NioServerSocketChannel 的创建,此处可以对应NIo 中的 SocketChannel socketChannel = SocketChannel.open();
- this.init(channel); 对创建的SocketChannel 进行属性的初始化,对于事件处理的Pipeline进行双向链表的初始化,此处可以对应NIo 中的 socketChannel.configureBlocking(false);
- 并且在ServerSocketChannel 真正完成初始化之后会有nio 的Eventloop 线程将ServerBootstrapAcceptor的handler 增加到ServerSocketChannel pipeline 链表中;
(2)再回到 AbstractBootstrap 的 initAndRegister() 方法中:看下事件是如果被注册到ServerSocketChannel 上:
final ChannelFuture initAndRegister() {
    Channel channel = null;

    try {
//  调用NioServerSocketChannel 无参构造方法 初始化 NioServerSocketChannel 对象
        channel = this.channelFactory.newChannel();
// NioServerSocketChannel 对象初始化
        this.init(channel);
    } catch (Throwable var3) {
        if (channel != null) {
            channel.unsafe().closeForcibly();
            return (new DefaultChannelPromise(channel, GlobalEventExecutor.INSTANCE)).setFailure(var3);
        }

        return (new DefaultChannelPromise(new FailedChannel(), GlobalEventExecutor.INSTANCE)).setFailure(var3);
    }
// 从父类group 中的EventLoopGroup 选出一个EventLoop 并注册到channel 管道上
    ChannelFuture regFuture = this.config().group().register(channel);
    if (regFuture.cause() != null) {
// 注册失败 关闭ServerSocketChannel  通道
        if (channel.isRegistered()) {
            channel.close();
        } else {
            channel.unsafe().closeForcibly();
        }
    }
// 返回注册的结果
    return regFuture;
}
关键点(3): ChannelFuture regFuture = this.config().group().register(channel):事件轮询器注册到ServerSocketChannel 对象上:
调用 MultithreadEventLoopGroup 中的register 方法
public ChannelFuture register(Channel channel) {
    return this.next().register(channel);
}
next() 方法: 使用在new NioEventLoopGroup 时设置的 选择器,从父类 EventExecutor[] children 数组中选择一个 EventExecutor ;然后继续看register 方法:
SingleThreadEventLoop 中的register:
public ChannelFuture register(Channel channel) {
// 创建DefaultChannelPromise 的promise 对象 赋值 当前的ServerSocketChannel channel 和 子事件轮询器的EventExecutor ,并返回包装类的ChannelPromise
    return this.register((ChannelPromise)(new DefaultChannelPromise(channel, this)));
}
public ChannelFuture register(ChannelPromise promise) {
    ObjectUtil.checkNotNull(promise, "promise");
//  NioServerSocketChannel 的channel 进行register
    promise.channel().unsafe().register(this, promise);
    return promise;
}
继续进入AbstractChannel 类中的register 方法:
public final void register(EventLoop eventLoop, final ChannelPromise promise) {
    ObjectUtil.checkNotNull(eventLoop, "eventLoop");
    if (AbstractChannel.this.isRegistered()) {
        promise.setFailure(new IllegalStateException("registered to an event loop already"));
    } else if (!AbstractChannel.this.isCompatible(eventLoop)) {
        promise.setFailure(new IllegalStateException("incompatible event loop type: " + eventLoop.getClass().getName()));
    } else {
// 子事件轮训器进行赋值
        AbstractChannel.this.eventLoop = eventLoop;
      // eventLoop 是否有线程可以直接使用
  if (eventLoop.inEventLoop()) {
            this.register0(promise);
        } else {
            try {
// new 一个线程来执行register
                eventLoop.execute(new Runnable() {
                    public void run() {
                        AbstractUnsafe.this.register0(promise);
                    }
                });
            } catch (Throwable var4) {
            	// 注册失败,设置异常原因
                AbstractChannel.logger.warn("Force-closing a channel whose registration task was not accepted by an event loop: {}", AbstractChannel.this, var4);
                this.closeForcibly();
                AbstractChannel.this.closeFuture.setClosed();
                this.safeSetFailure(promise, var4);
            }
        }

    }
}
关键点(3.1 )调用AbstractUnsafe register0 方法:完成占位事件的注册
private voidregister0(ChannelPromise promise) {
    try {
        if (!promise.setUncancellable() || !this.ensureOpen(promise)) {
            return;
        }
		// 第一次注册
        boolean firstRegistration = this.neverRegistered;
        // 事件注册
        AbstractChannel.this.doRegister();
        this.neverRegistered = false;
        // 注册成功
        AbstractChannel.this.registered = true;
        AbstractChannel.this.pipeline.invokeHandlerAddedIfNeeded();
        // promise 设置注册成功标识
        this.safeSetSuccess(promise);
        AbstractChannel.this.pipeline.fireChannelRegistered();
        if (AbstractChannel.this.isActive()) {
            if (firstRegistration) {
                AbstractChannel.this.pipeline.fireChannelActive();
            } else if (AbstractChannel.this.config().isAutoRead()) {
                this.beginRead();
            }
        }
    } catch (Throwable var3) {
        this.closeForcibly();
        AbstractChannel.this.closeFuture.setClosed();
        this.safeSetFailure(promise, var3);
    }

}
关键点(3.2 )AbstractChannel.this.doRegister():占位事件0完成注册:
AbstractNioChannel 类中 doRegister 方法:
protected void doRegister() throws Exception {
    boolean selected = false;

    while(true) {
        try {
        	//  this.javaChannel() 为ServerSocketChannel对象
        	//  ServerSocketChannel对象 调用 register 方法
            this.selectionKey = this.javaChannel().register(this.eventLoop().unwrappedSelector(), 0, this);
            return;
        } catch (CancelledKeyException var3) {
            if (selected) {
                throw var3;
            }

            this.eventLoop().selectNow();
            selected = true;
        }
    }
}
ServerSocketChannel对象 调用 register 方法
AbstractSelectableChannel 类中 register 方法
// Selector  为 从父事件NioEventLoopGroup 中选择出来的某个NioEventLoop 对应的 Selector 选择器器
// ops 感兴趣的事件 0 ,
// att 属性NioServerSocketChannel 对象
public final SelectionKey register(Selector sel, int ops,
                                   Object att)
    throws ClosedChannelException
{
    synchronized (regLock) {
        if (!isOpen())
            throw new ClosedChannelException();
        if ((ops & ~validOps()) != 0)
            throw new IllegalArgumentException();
        if (blocking)
            throw new IllegalBlockingModeException();
        SelectionKey k = findKey(sel);
        if (k != null) {
            k.interestOps(ops);
            k.attach(att);
        }
        if (k == null) {
            // New registration
            synchronized (keyLock) {
                if (!isOpen())
                    throw new ClosedChannelException();
                k = ((AbstractSelector)sel).register(this, ops, att);
                addKey(k);
            }
        }
        return k;
    }
}
调用AbstractSelector 的 register 方法完成将事件注册到selector多路复用器中:
protected final SelectionKey register(AbstractSelectableChannel var1, int var2, Object var3) {
    if (!(var1 instanceof SelChImpl)) {
        throw new IllegalSelectorException();
    } else {
        SelectionKeyImpl var4 = new SelectionKeyImpl((SelChImpl)var1, this);
        var4.attach(var3);
        synchronized(this.publicKeys) {
            this.implRegister(var4);
        }

        var4.interestOps(var2);
        return var4;
    }
}
关键点(3.3) AbstractChannel.this.pipeline.invokeHandlerAddedIfNeeded() 在channel初始化完成之后回调到initAndRegister() 中的this.init(channel) 方法,完成accept handler 的增加:
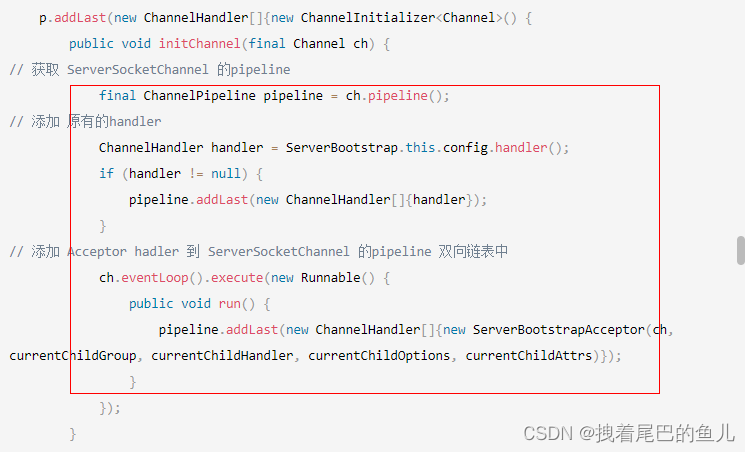
可以看到具体进行accept 事件增加的处理是借由 EventLoop 中的execute 进行任务的提交;
关键点关键点(3.4) this.safeSetSuccess(promise) 为promise 设置成功结果后回调到AbstractBootstrap的doBind的operationComplete 方法进行端口号的绑定:
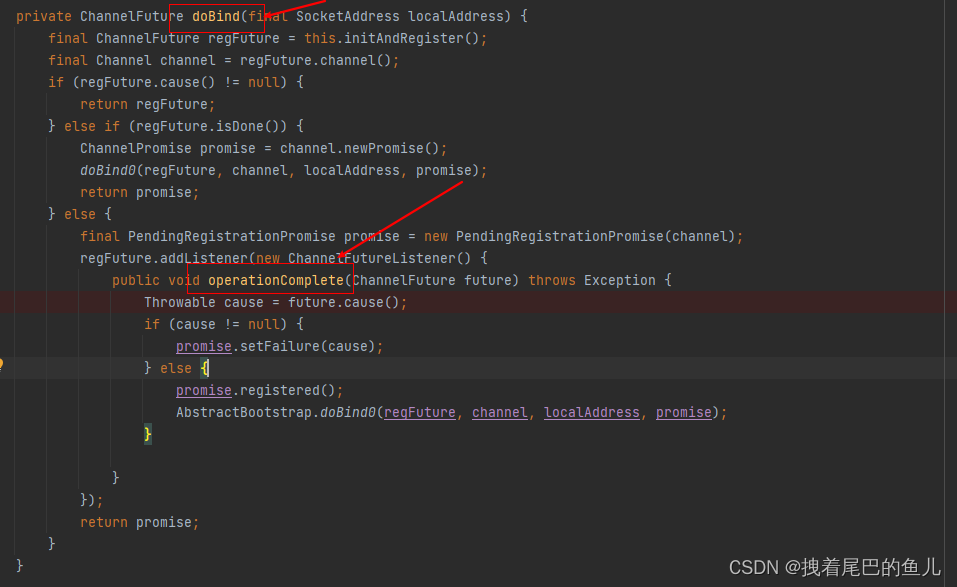
关键点 2.2.1.3 ServerSocketChannel 管道初始化完成之后 进行doBind0 端口的板绑定
private ChannelFuture doBind(final SocketAddress localAddress) {
    final ChannelFuture regFuture = this.initAndRegister();
    final Channel channel = regFuture.channel();
    if (regFuture.cause() != null) {
        return regFuture;
    } else if (regFuture.isDone()) {
        ChannelPromise promise = channel.newPromise();
        doBind0(regFuture, channel, localAddress, promise);
        return promise;
    } else {
        final PendingRegistrationPromise promise = new PendingRegistrationPromise(channel);
        // 监听注册完成的事件
        regFuture.addListener(new ChannelFutureListener() {
            public void operationComplete(ChannelFuture future) throws Exception {
                Throwable cause = future.cause();
                if (cause != null) {
                    promise.setFailure(cause);
                } else {
                	// 设置注册成功标识
                    promise.registered();
                    // 绑定端口
                    AbstractBootstrap.doBind0(regFuture, channel, localAddress, promise);
                }

            }
        });
        return promise;
    }
}
(1) AbstractBootstrap 的doBind0 方法:使用nio 线程进行channel 的绑定:
// ChannelFuture  为 DefaultChannelPromise
// channel 为  NioServerSocketChannel
// localAddress为 0.0.0.0/0.0.0.0:8080
// promise为 AbstractBootstrap$PendingRegistrationPromise
private static void doBind0(final ChannelFuture regFuture, final Channel channel, final SocketAddress localAddress, final ChannelPromise promise) {
    channel.eventLoop().execute(new Runnable() {
        public void run() {
            if (regFuture.isSuccess()) {
                channel.bind(localAddress, promise).addListener(ChannelFutureListener.CLOSE_ON_FAILURE);
            } else {
                promise.setFailure(regFuture.cause());
            }

        }
    });
}
AbstractChannel 的bind 方法:
public ChannelFuture bind(SocketAddress localAddress, ChannelPromise promise) {
	//  this.pipeline 取的 NioServerSocketChannel 的pipeline
    return this.pipeline.bind(localAddress, promise);
}
DefaultChannelPipeline 类中bind 方法:
public final ChannelFuture bind(SocketAddress localAddress, ChannelPromise promise) {
    return this.tail.bind(localAddress, promise);
}
(2) AbstractChannelHandlerContext 类中bind 方法, 找到第一个Outbound handler (head 节点)完成端口绑定:
public ChannelFuture bind(final SocketAddress localAddress, final ChannelPromise promise) {
    ObjectUtil.checkNotNull(localAddress, "localAddress");
    if (this.isNotValidPromise(promise, false)) {
        return promise;
    } else {
        final AbstractChannelHandlerContext next = this.findContextOutbound(512);
        EventExecutor executor = next.executor();
        if (executor.inEventLoop()) {
        	// 端口绑定
            next.invokeBind(localAddress, promise);
        } else {
            safeExecute(executor, new Runnable() {
                public void run() {
                    next.invokeBind(localAddress, promise);
                }
            }, promise, (Object)null, false);
        }

        return promise;
    }
}
AbstractChannelHandlerContext 类 invokeBind 方法:
private void invokeBind(SocketAddress localAddress, ChannelPromise promise) {
    if (this.invokeHandler()) {
        try {
            ((ChannelOutboundHandler)this.handler()).bind(this, localAddress, promise);
        } catch (Throwable var4) {
            notifyOutboundHandlerException(var4, promise);
        }
    } else {
        this.bind(localAddress, promise);
    }

}
关键点(3) 最终进入NioServerSocketChannel 中的doBind 进行端口的绑定 使用原生的java ServerSocketChannel 进行端口的绑定:
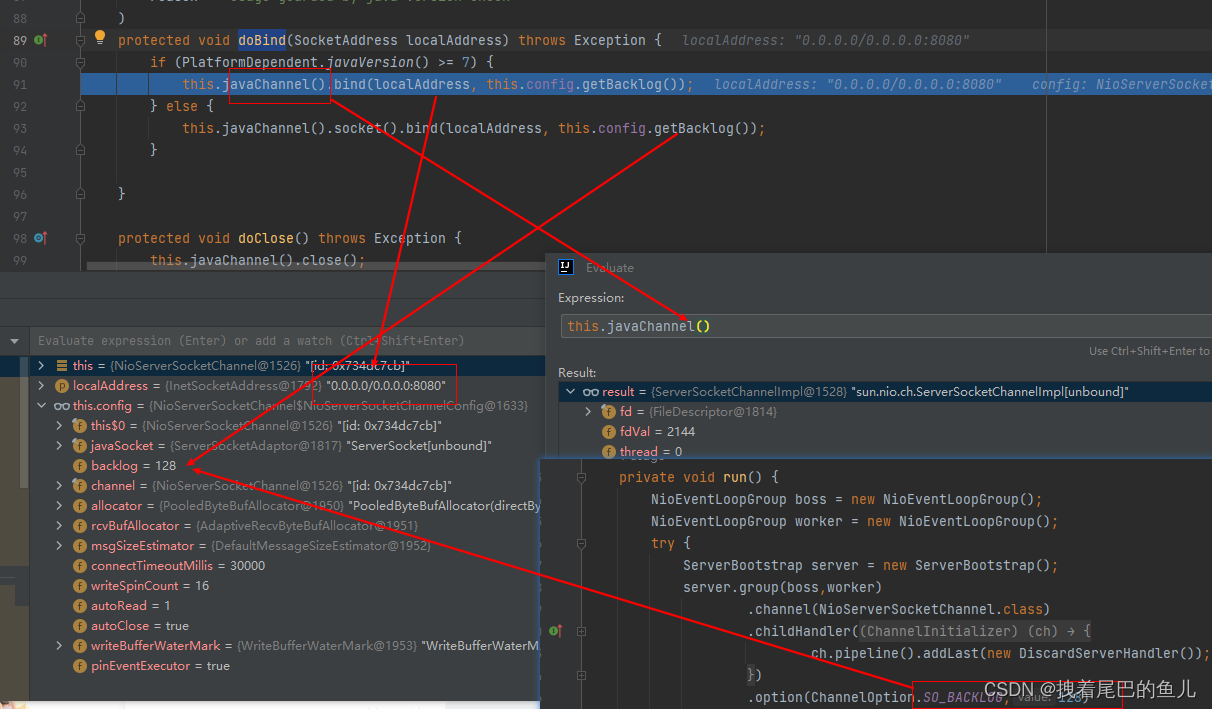
关键点(4) 在dobind 之后:判断channel 管道是否已经就绪了,如果就绪 就依次调用 NioServerSocketChannel 的Pipeline 中的 每个handler 中的channelActive 方法:
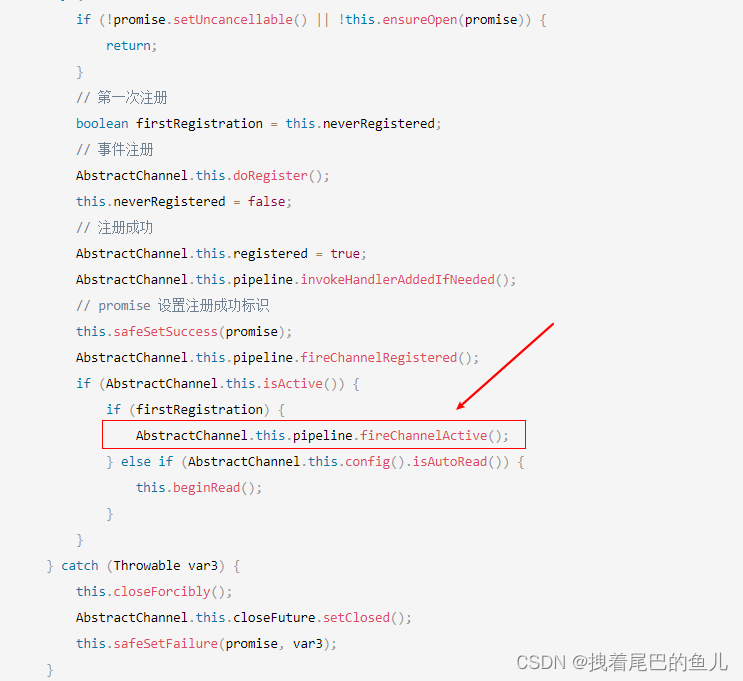
目前Pipeline 中有3个handler :header->acceptor->tail
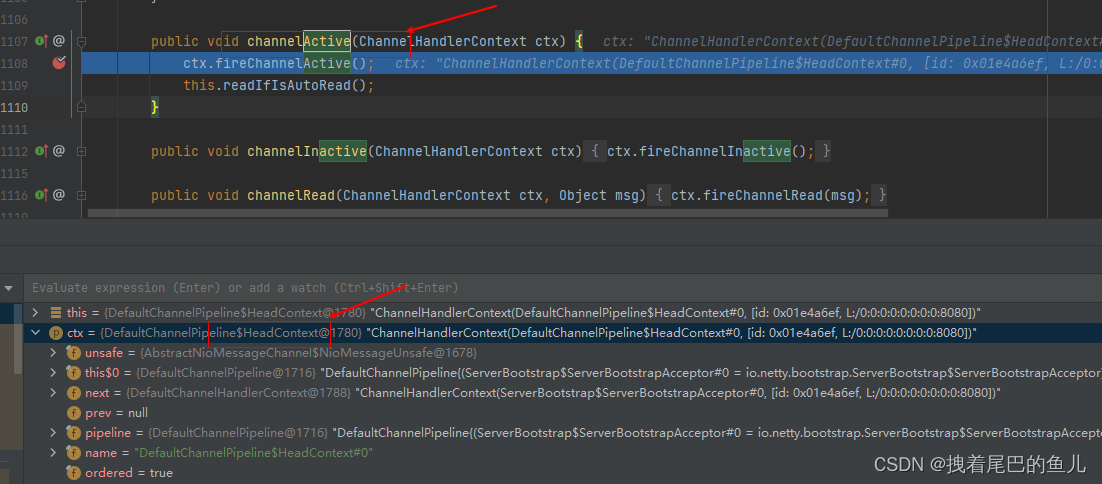
(5) 最终进入head 头节点的 DefaultChannelPipeline 中的channelActive方法 :
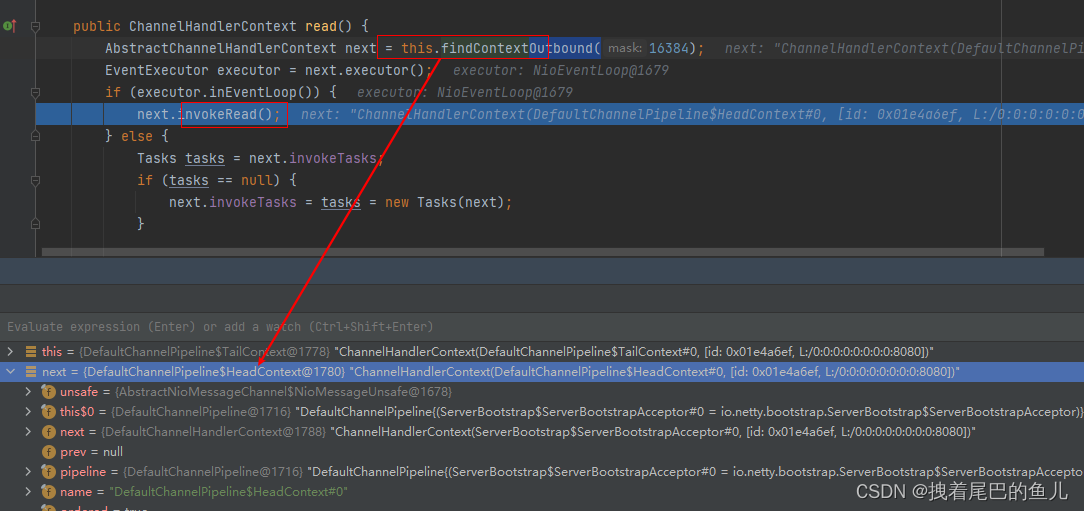
(6) 进入AbstractChannelHandlerContext read 方法,从tail 向前找到Outbound 的handler 然后进行操作:
关键点(7):进入到AbstractNioChannel中doBeginRead() 然后关注accept 事件:
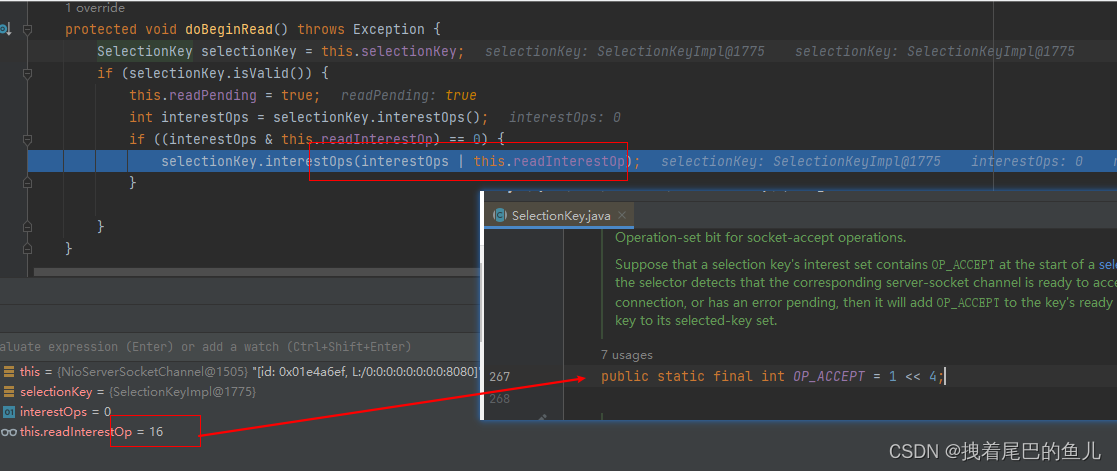
到这里我们看到了NioServerSocketChannel 对象的初始化,以及非阻塞属性的设置,已经最终对管道accept 事件 的注册;
3 对于bind 方法总结:
- initAndRegister 分为init 和register ;
- init 中可以理解为 在main 线程中创建了创 NioServerSocketChannel 对象并且, 在main 线程中 添加 NioServerSocketChannel 初始化 handler ;并随后在NioServerSocketChannel 管道初始化完成之后,使用nio 线程向NioServerSocketChannel 的Pipeline 增加accept 处理客户端连接的handler;
- register 中会切换到nio线程完成对NioServerSocketChannel 初始事件的绑定;
- 在dobind0 中 使用nio 线程完成NioServerSocketChannel 端口的绑定,并触发NioServerSocketChannel active 事件 进入到head 节点selectionKey.interestOps(SelectionKey.OP ACCEPT): 对于accept 事件进行绑定;
- 这里nio 线程指的是我们声明的boss NioEventLoopGroup;需要注意的是 NioEventLoopGroup 中存在多个NioEventLoop,每个NioEventLoop 都有自己的selector,任务队列;所以每个NioEventLoop 都可以处理io 事件,普通任务,和定时任务;值得注意的是每个NioEventLoop 的处理任务的线程只有一个(虽然有线程池,但是也只有一个线程,典型的多生产者,一个消费者);


