| TextCNN文本分类原理及Pytorch实现 |
文章目录
- 一. TextCNN网络结构
- 1.1. CNN在文本分类上得应用
- 1.2. 回顾CNN以及Pytorch解析
- 1.2.1. CNN特点
- 1.2.2. 一维卷积Conv1d
- 1.2.3. 二维卷积 Conv2d
- 1.2.3. 三维卷积 Conv3d
- 1.2.4. 池化(pooling)操作
- 1.2.4. nn.BatchNorm操作
- 1.3. nn.ModuleList和nn.Sequential
- 1.3.1. nn.ModuleList
- 1.3.2. nn.Sequential
- 1.3.3. nn.Sequential与nn.ModuleList的区别
- 二. TextCNN的Pytorch实现
- 2.1. 数据构建
- 2.2. 模型构建
- 2.2. 模型训练和测试
- 四. 参考文献
一. TextCNN网络结构
1.1. CNN在文本分类上得应用
- 卷积神经网络的核心思想是捕捉 局部特征,对于文本来说,局部特征就是由若干单词组成的滑动窗口,类似于N-gram。卷积神经网络的优势在于能够自动地对N-gram特征进行组合和筛选,获得不同抽象层次的语义信息。
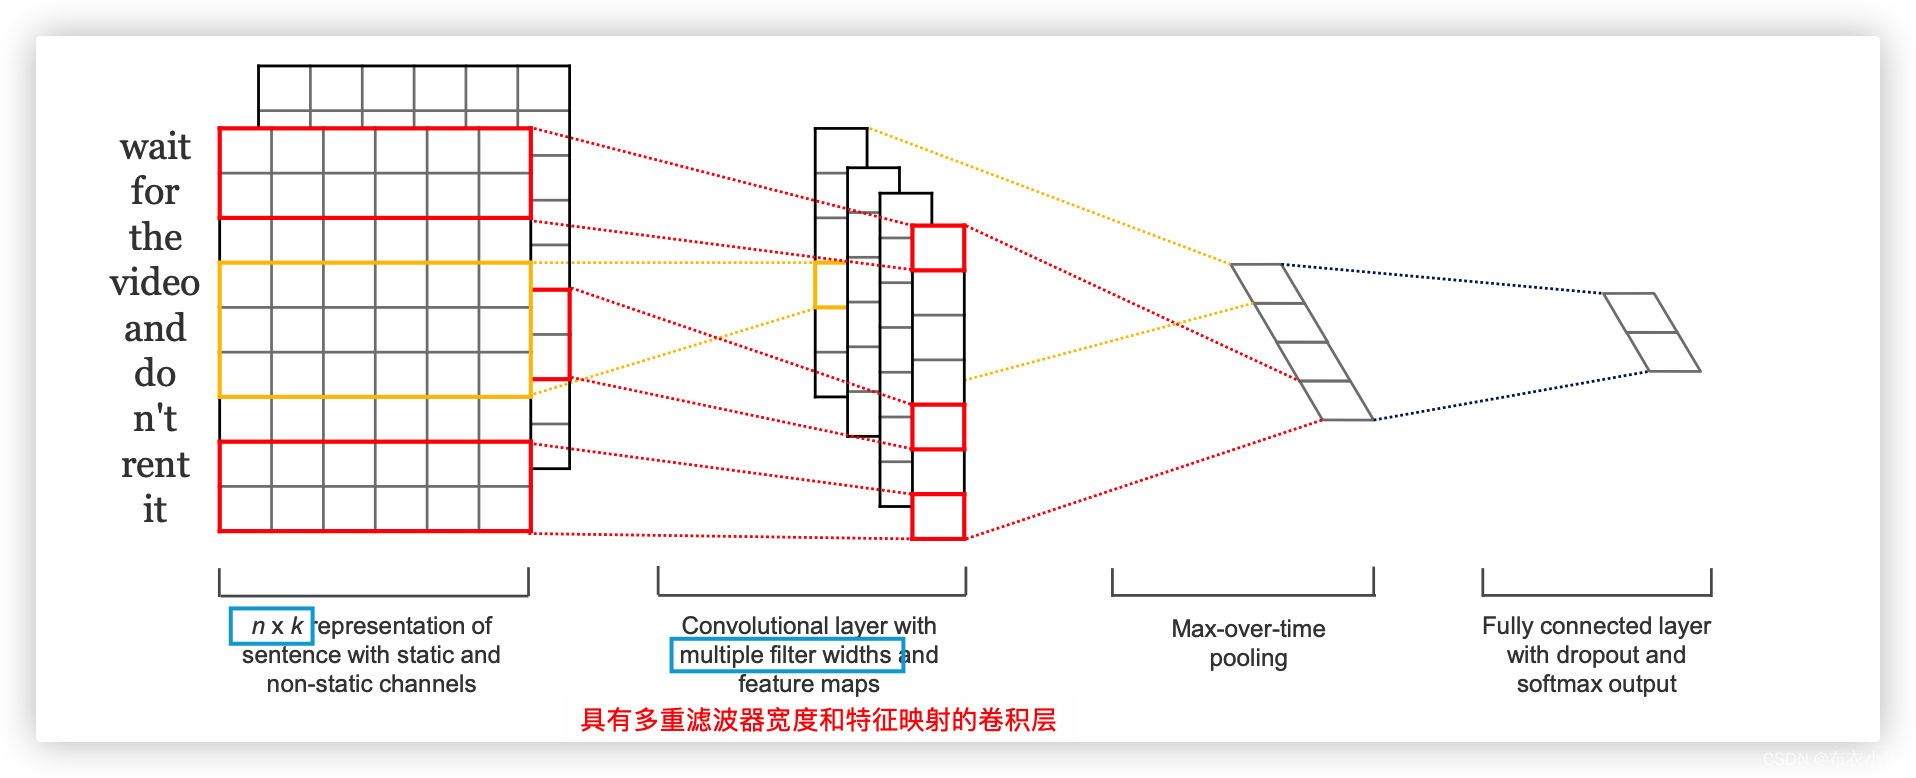
- 论文1:Convolutional Neural Networks for Sentence Classification
- 论文的模型结构如下图所示: 双通道的TextCNN结构。
- 论文2:A Sensitivity Analysis of (and Practitioners Guide to) Convolutional Neural Networks for Sentence Classification
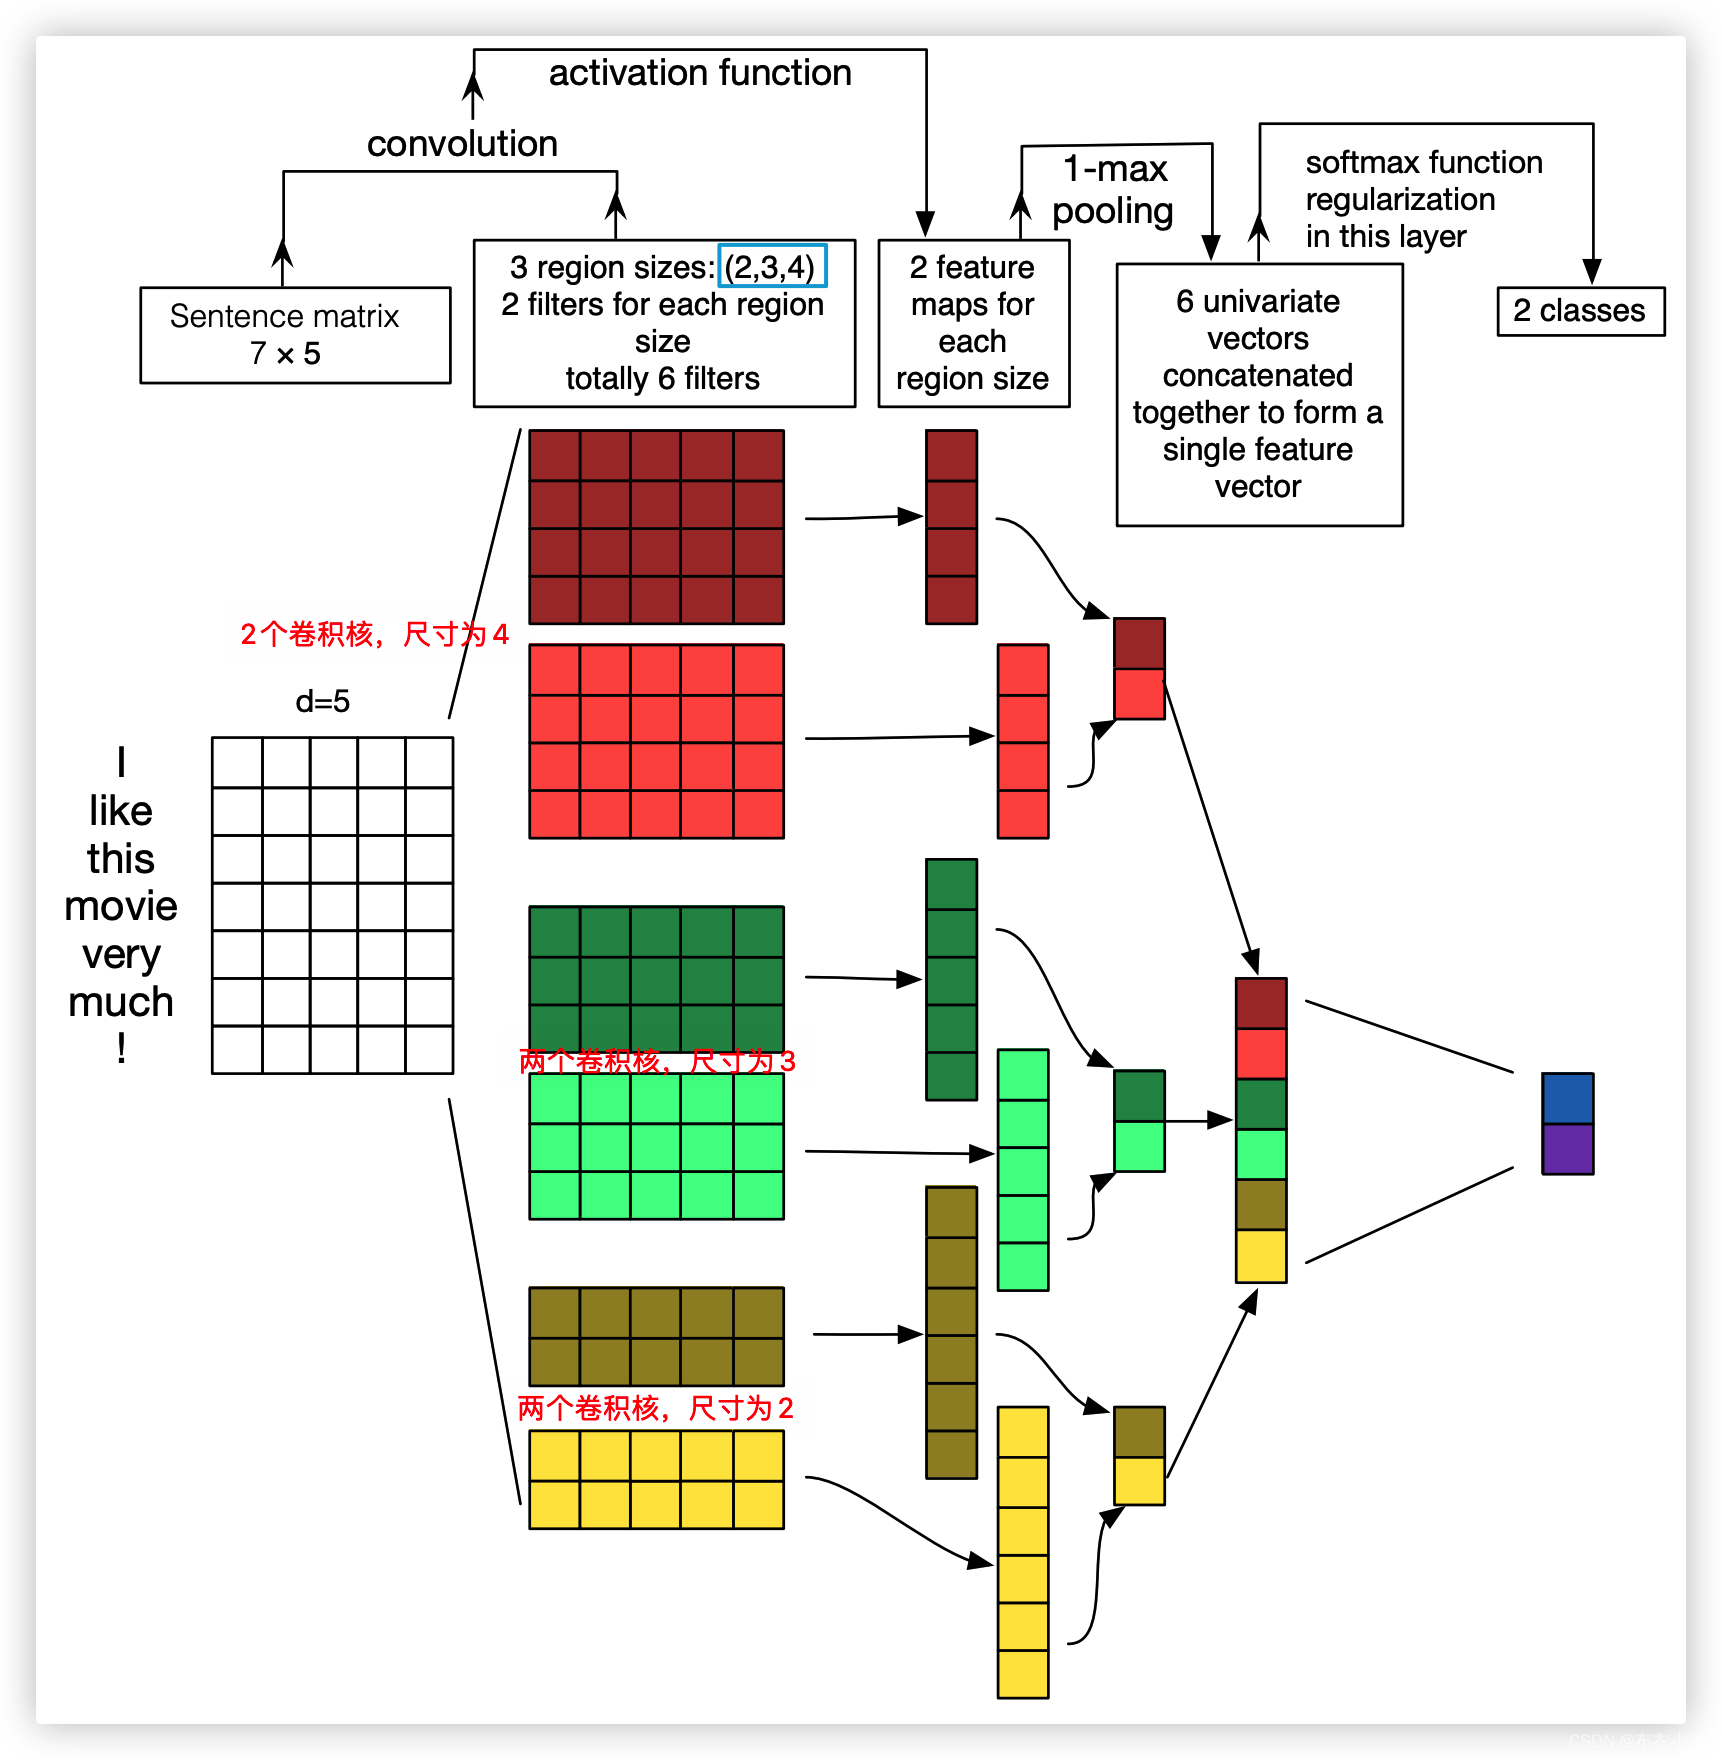
- 论文的模型结构如下图所示: 用于文本分类任务的TextCNN结构描述 这里详细解释TextCNN架构及词向量矩阵是如何做卷积的。
- ①第一层为输入层。输入层是一个 n × k n\times k n×k 的矩阵,其中 n n n为一个句子中的单词数, k k k是每个词对应的词向量的维度。也就是说,输入层的每一行就是一个单词所对应的 k k k维的词向量。另外,这里为了使向量长度一致对原句子进行了padding操作。我们这里使用 x i ∈ R k x_i \in \mathbb{R}^k xi∈Rk表示句子中第 i i i个单词的 k k k维词嵌入。
- 每个词向量可以是预先在其他语料库中训练好的,也可以作为未知的参数由网络训练得到。这两种方法各有优势,预先训练的词嵌入可以利用其他语料库得到更多的先验知识,而由 当前网络训练的词向量能够更好地抓住与当前任务相关联的特征。因此,上图中的输入层实际采用了双通道的形式,即有两个 n × k n\times k n×k的输入矩阵,其中 一个用预训练好的词嵌入表达,并且在训练过程中不再发生变化;另外一个也由同样的方式初始化,但是会作为参数,随着网络的训练过程发生改变。
- ②第二层为卷积层,第三层为池化层。注意卷积操作在计算机视觉(CV)和NLP中的不同之处。在CV中,卷积核往往都是正方形的,比如 3 × 3 3\times 3 3×3的卷积核,然后卷积核在整张image上沿高和宽按步长移动进行卷积操作。与CV中不同的是,在NLP中输入层的"image"是一个由词向量拼成的词矩阵,且卷积核的宽和该词矩阵的宽相同,该宽度即为词向量大小,且卷积核只会在高度方向移动(可以见1.2.2章节一维卷积的图例)。 因此,每次卷积核滑动过的位置都是完整的单词,不会将几个单词的一部分"vector"进行卷积,词矩阵的行表示离散的符号(也就是单词),这就保证了word作为语言中最小粒度的合理性(当然,如果研究的粒度是character-level而不是word-level,需要另外的方式处理)。
- 然后详述这个卷积、池化过程。由于卷积核和word embedding的宽度一致,一个卷积核对于一个sentence,卷积后得到的结果是一个vector,其 shape=(sentence_len - filter_window_size + 1, 1),那么,在经过max-pooling操作后得到的就是一个Scalar。我们会使用多个filter_window_size(原因是,这样不同的kernel可以获取不同范围内词的关系,获得的是纵向的差异信息,即类似于n-gram,也就是在一个句子中不同范围的词出现会带来什么信息。比如可以使用3,4,5个词数分别作为卷积核的大小),每个filter_window_size又有num_filters个卷积核 (原因是卷积神经网络学习的是卷积核中的参数,每个filter都有自己的关注点,这样多个卷积核就能学习到多个不同的信息)。一个卷积核经过卷积操作只能得到一个scalar,将相同filter_window_size卷积出来的num_filter个scalar组合在一起,组成这个filter_window_size下的feature_vector。最后再将所有filter_window_size下的feature_vector也组合成一个single vector,作为最后一层softmax的输入。对这个过程若有不清楚的地方,可以对照着下图来看,该图非常完美地诠释了这个过程。
- ③得到文本句子的向量表示之后,后面的网络结构就和具体的任务相关了。本例中展示的是一个文本分类的场景,因此最后接入了一个全连接层,并使用Softmax激活函数输出每个类别的概率。
1.2. 回顾CNN以及Pytorch解析
1.2.1. CNN特点
- 1. 卷积神经网络的特点(CNN)的特点
- ①稀疏交互(sparse interactions):也叫稀疏权重(sparse weights)、稀疏连接(sparse connectivity)。
- 在传统神经网络中,网络层之间输入与输出的连接关系可以由一个权值参数矩阵来表示。对于全连接网络,任意一对输入与输出神经元之间都产生交互,形成稠密的连接结构。这里面的交互是指每个单独的参数值,该参数值表示了前后层某两个神经元节点之间的交互。
- 在卷积神经网络中,卷积核尺度远小于输入的维度,这样每个输出神经元仅与前一层特定局部区域内的神经元存在连接权重(即产生交互),我们称这种特性为 稀疏交互。
- 稀疏交互的物理意义:通常图像、文本、语音等现实世界中的数据都具有 局部的特征结构, 我们可以先学习局部的特征, 再将局部的特征组合起来形成更复杂和抽象的特征。
- ②参数共享(parameter sharing):参数共享是指在同一个模型的不同模块中使用相同的参数。卷积运算中的参数共享让网络只需要学一个参数集合,而不是对于每一位置都需要学习一个单独的参数集合。
- 参数共享的物理意义:使得卷积层具有 平移等变性。在第三个特点中会谈到。
- 显然,我们可以看到,卷积神经网络在存储大小和统计效率方面极大地优于传统的使用矩阵乘法的神经网络。
- ③等边表示(equivariant representations)
- 假如图像中有一只猫,那么无论它出现在图像中的任何位置,我们都应该将它识别为猫,也就是说神经网络的输出对于平移变换来说应当是等变的。特别地,当函数 f ( x ) f(x) f(x)与 g ( x ) g(x) g(x)满足 f ( g ( x ) ) = g ( f ( x ) ) f(g(x))=g(f(x)) f(g(x))=g(f(x))时,我们称 f ( x ) f(x) f(x)关于变换 g g g具有等变性。在猫的图片上先进行卷积,再向右平移l像素的输出,与先将图片向右平移l像素再进行卷积操作的输出结果是相等的。
- 2. PyTorch重要类解析
- 卷积运算实际是分析数学中的一种运算方式,在卷积神经网络中通常是仅涉及 离散卷积 的情形。因卷积运算的作用就类似于滤波,因此也称卷积核为filter即滤波器的意思。滤波器可以从原始的像素特征中抽取某些特征,如:边缘、角度、形状等。而在实际上,在卷积神经网络中我们并不会手工设计卷积核中的每个卷积核点值,而是通过学习算法自动学得卷积核中每个位置的值。
- 单个卷积核只能提取一种类型的特征,那么我们若想使卷积层能够提取多个特征,则可以并行使用多个卷积核,其中每个卷积核提取一种特征。feature map特征图是卷积层的输出的别名。
- 另外,必须要说明一下,现在大部分的深度学习教程中都把卷积定义为图像矩阵和卷积核的按位点乘。实际上,这种操作应该是互相关(cross-correlation),而卷积需要把卷积核顺时针旋转180度(即翻转)然后再做点乘。互相关是一个衡量两个序列相关性的函数,通常是用滑动窗口的点积计算来实现。互相关和卷积的区别仅仅在于卷积核是否进行翻转,因此 互相关也可以称为不翻转卷积。
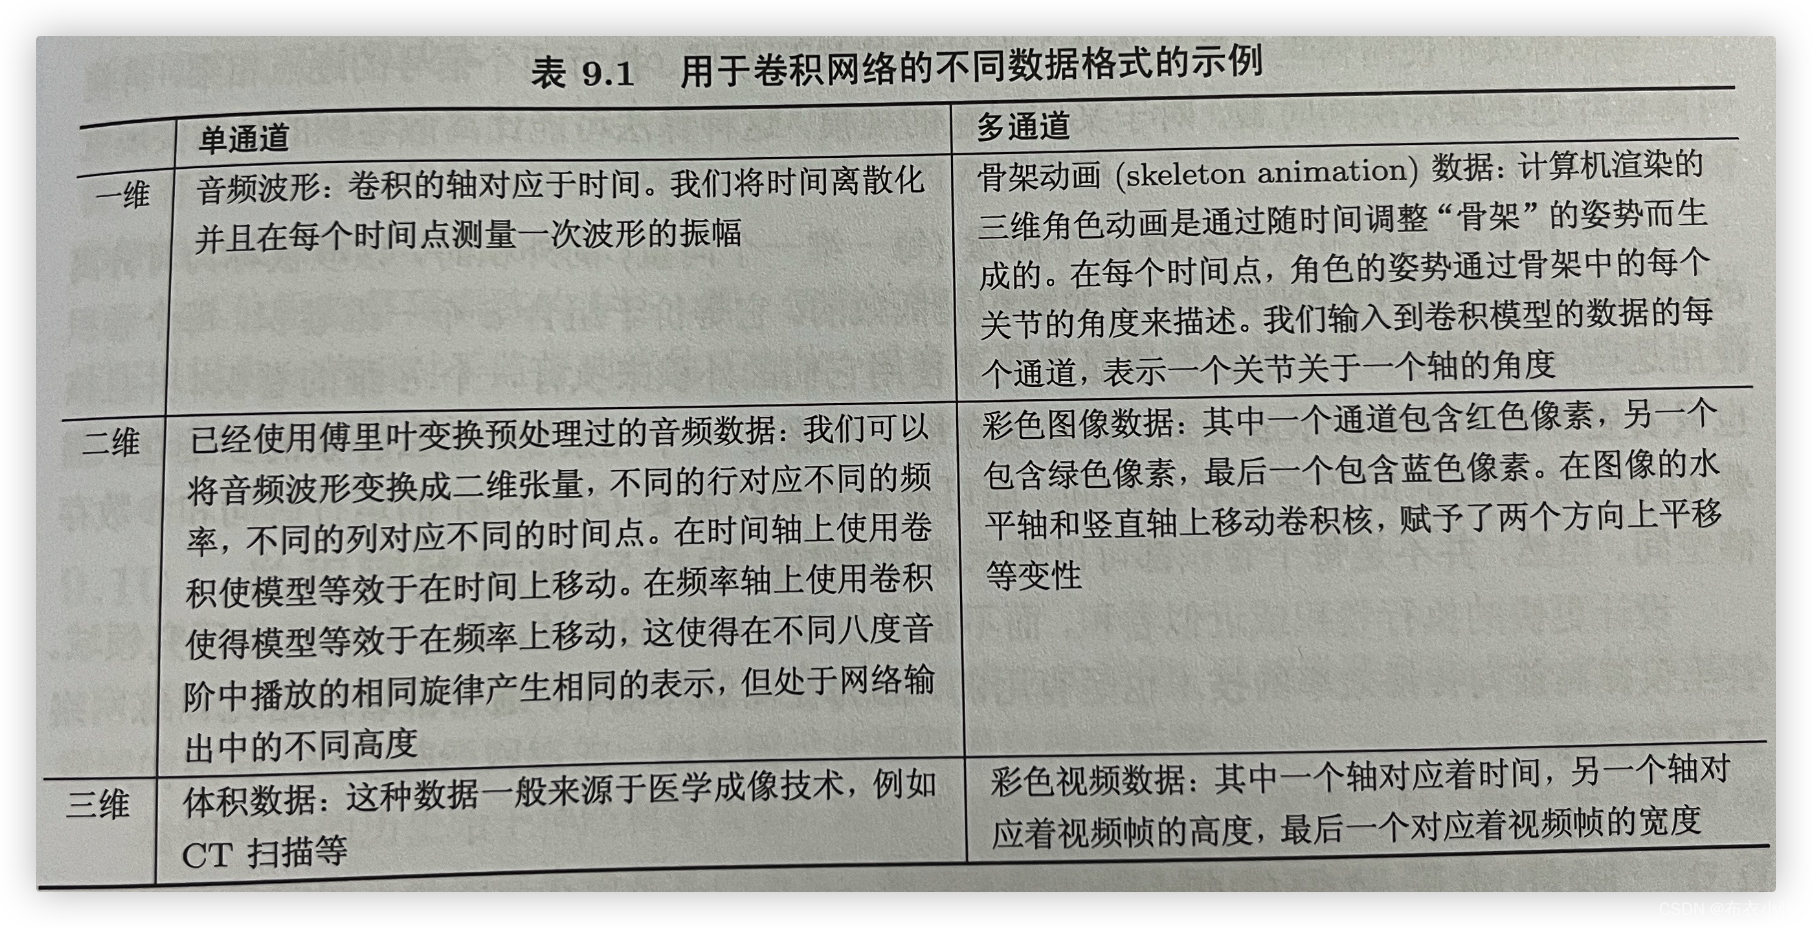
- 必须要注意的是,卷积神经网络使用的数据可以是一维、二维和三维的,对于这三种数据,每种都可以是单通道或者是多通道的(下表)。下面我们介绍不同维数据的情况下通道数不同的卷积操作。
1.2.2. 一维卷积Conv1d
torch.nn.Conv1d(in_channels, out_channels, kernel_size, stride=1,
                padding=0, dilation=1, groups=1, bias=True, padding_mode='zeros')
- 参数介绍如下:
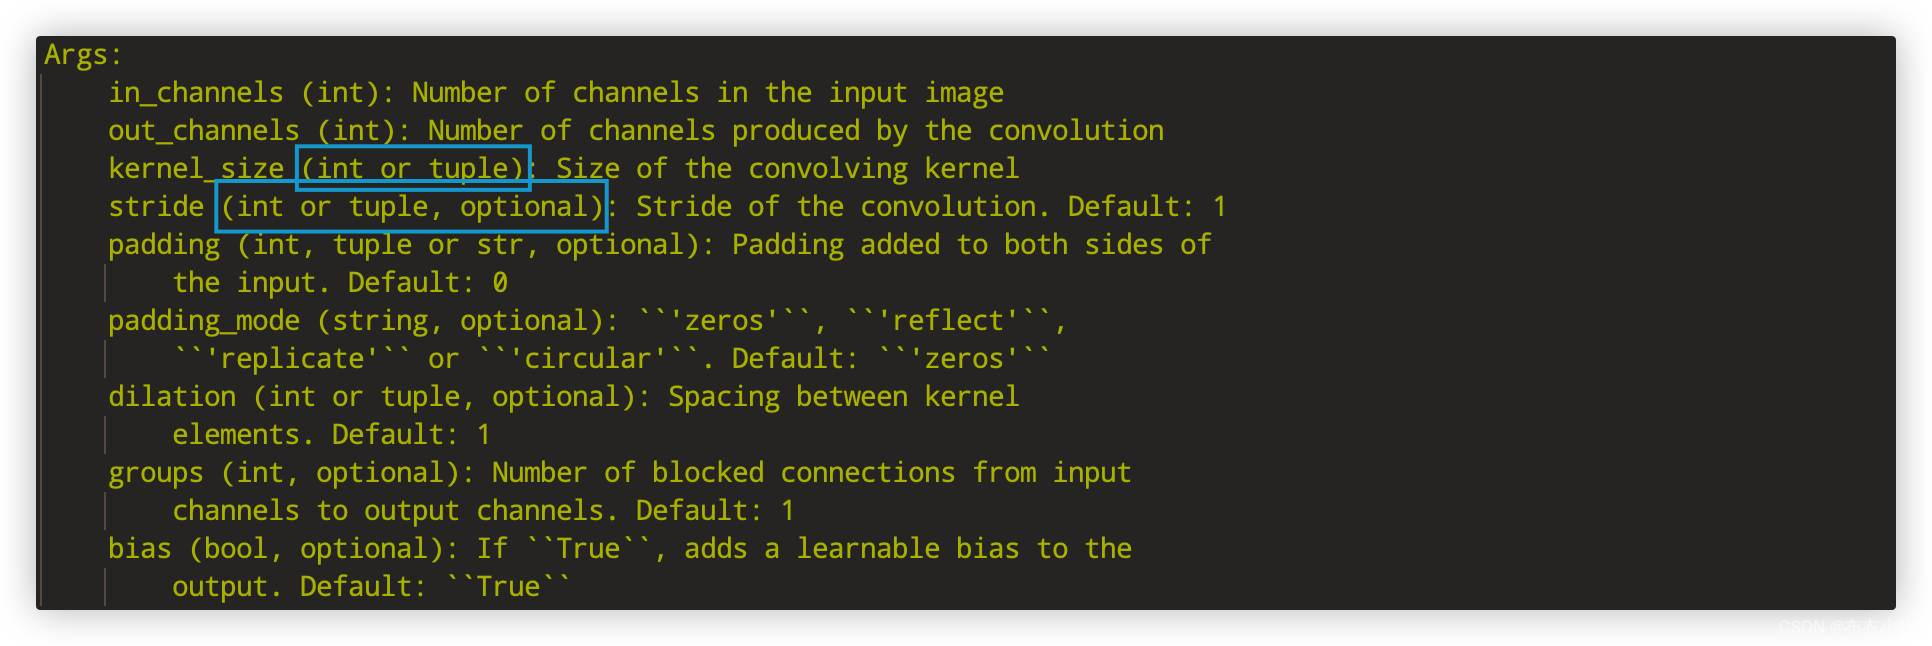
- 在由多个输入平面组成的输入信号上应用1D卷积。如下例子:

- 上面代码的可视化表示:
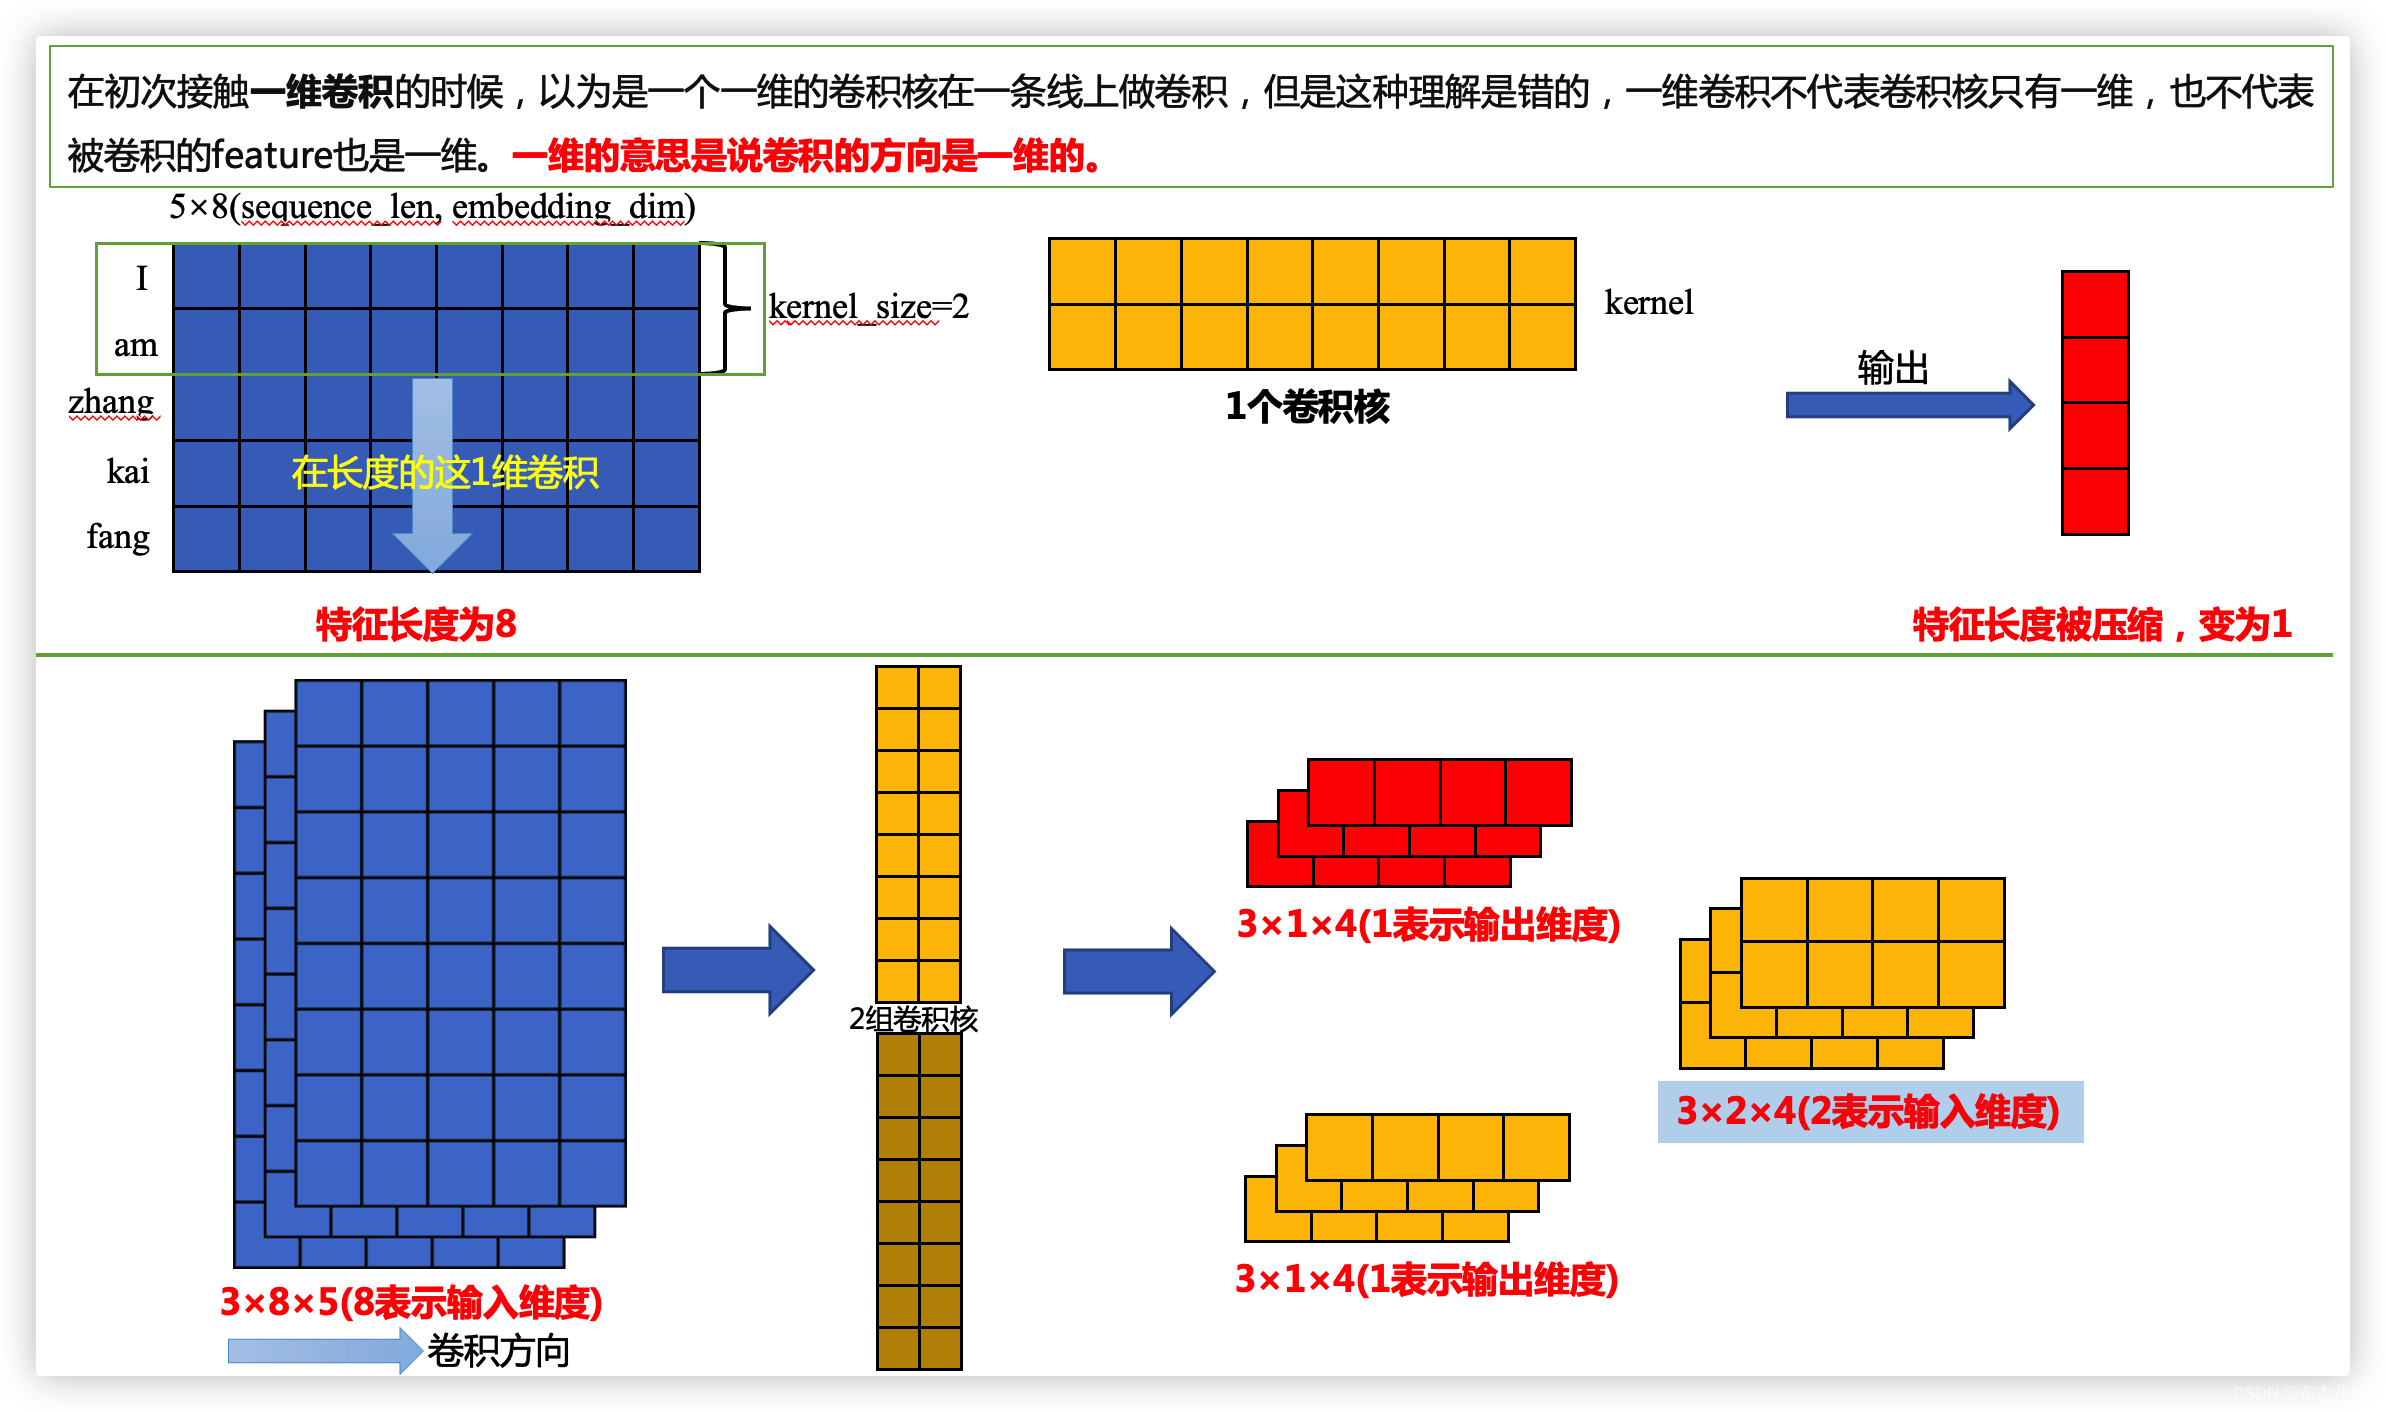
- 一维波形例子:
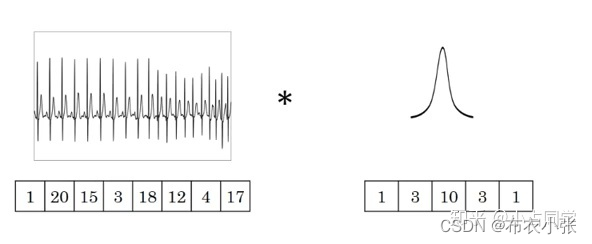
- 1.若channel数等于1,filter个数等于1时。
- 上图中的输入的数据维度为1,长度为8,channel数为1,过滤器filter的维度、个数均为1,长度为5。公式(1)中, L i n L_{in} Lin和 L o u t L_{out} Lout分别为输入序列长度和输出序列长度,其它的均为卷积网络中的常见参数。假定这里的padding为0,dilation为1和stride为1,根据给定条件, 等于8,kernel_size等于5,那么就有一维卷积后输出序列 L o u t L_{out} Lout等于8−5+1=4。

- 2.若channel数不等于1,filter个数等于1时。
- channel不影响输出序列的维度。假设输入数据的channel数量变为6,即输入数据shape为8×6(另,这里channel的概念相当于自然语言处理中的embedding,而该输入数据代表8个单词,其中每个单词的词向量长度为6)。由于卷积操作中过滤器的channel数量必须与输入数据的channel数量相同,于是 过滤器的shape由5变为5×6(广播机制,也就是共享同一个卷积核了)。在卷积的过程中,输入数据与过滤器在每个channel上分别卷积,之后将卷积后的每个channel上的对应数值相加,即执行4×4次6个数值相加的操作,最终输出的数据序列长度和channel等于1时一样仍为4,维度为1维。
- 3.不管channel数是多少,若过滤器filter数量为n,那么输出数据的shape就变为4×n。
- 原因就是卷积后,在channel方向会进行对应数值相加,而增加滤器不会进行这种操作。
- 4.dilation参数。空洞卷积。dilation参数的作用,它控制卷积核点之间的间距大小。如下图所示:
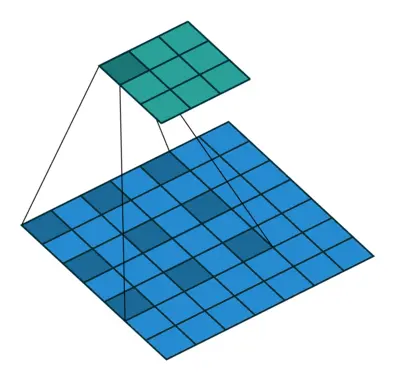
- 5.一维卷积常用于序列模型,NLP领域,但往往很多时候 二维卷积 我们也用在NLP领域之中。
1.2.3. 二维卷积 Conv2d
torch.nn.Conv2d(in_channels, out_channels, kernel_size, stride=1,
                padding=0, dilation=1, groups=1, bias=True, padding_mode='zeros')
- 在由多个输入平面组成的输入信号上应用2D卷积。如下例子:

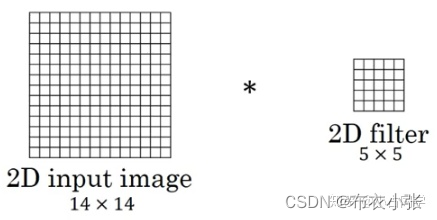
- 1.若channel数等于1,filter个数等于1时。 首先给出公式,在二维卷积中,我们有公式:
- 图中的输入数据shape为14×14,channel数为1,过滤器大小为5×5,过滤器个数为1,二者做卷积,输出的数据维度为10×10(14−5+1=10)。

- 2.若channel数不等于1,filter个数等于1时。
- channel不影响输出数据的维度。假设输入数据的channel数为3,即输入的数据shape变为14×14×3,由前述可知,过滤器大小也变为5×5×3。在卷积的过程中,过滤器与数据在每个channel方向分别卷积,之后将卷积后得到对应数值相加,即执行10×10次3个数值相加的操作,最终输出的数据shape为10×10。
- 3.不管channel数是多少,若过滤器filter数量为n,那么输出数据的shape就变为10×10×n。
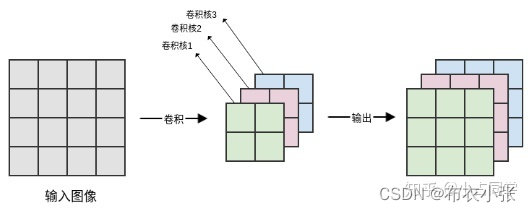
- 假设channel数为3,过滤器数量为16,那么我们就有16个大小为5×5×3的过滤器,最终输出的数据维度就变为10×10×16。可以理解为分别执行每个过滤器的卷积操作,最后将每个卷积的输出在第三个维度(channel 维度)上进行拼接。当filter个数为多个时情况如下图所示:
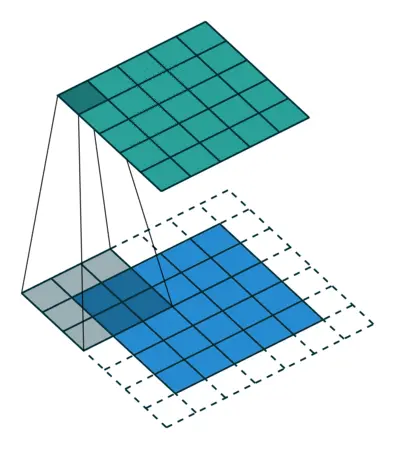
- 4.可视化理解二维卷积: 下图已经进行了操作padding,卷积核大小为3×3,步长stride等于1:
- 5.二维卷积常用于计算机视觉、图像处理领域。
1.2.3. 三维卷积 Conv3d
torch.nn.Conv3d(in_channels, out_channels, kernel_size, stride=1, padding=0,
                dilation=1, groups=1, bias=True, padding_mode='zeros')
- 在由多个输入平面组成的输入信号上应用3D卷积。

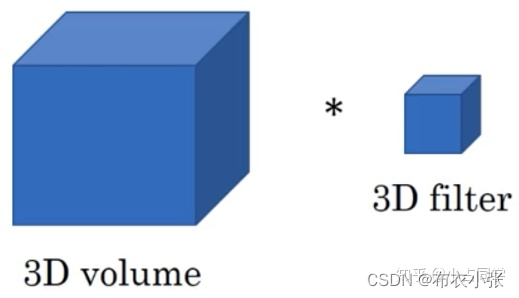
- 1.三维卷积主要思想和一维二维的相似,主要区别就是输入数据本身是几维的,那么就用几维卷积。对于三维卷积的输出 深度、高度和宽度 的计算公式分别如下,具体参数不再详细介绍,都是按标准的方式来写的。
- 假设输入数据的shape为 a 1 × a 2 × a 3 a1 \times a2 \times a3 a1×a2×a3,channel数为 c c c,过滤器每个维度的长度为 f f f,即过滤器shape为 f × f × f f\times f \times f f×f×f,channel数为 c c c,过滤器数量为n。padding等于[0, 0, 0],dilation等于[1, 1, 1]。那么三维卷积的输出为 ( a 1 − f + 1 ) × ( a 2 − f + 1 ) × ( a 3 − f + 1 ) × n (a 1-f+1) \times(a 2-f+1) \times(a 3-f+1) \times n (a1−f+1)×(a2−f+1)×(a3−f+1)×n。

- 2.三维卷积常用于医学领域(CT音像),视频处理领域(检测动作及人物行为)。
1.2.4. 池化(pooling)操作
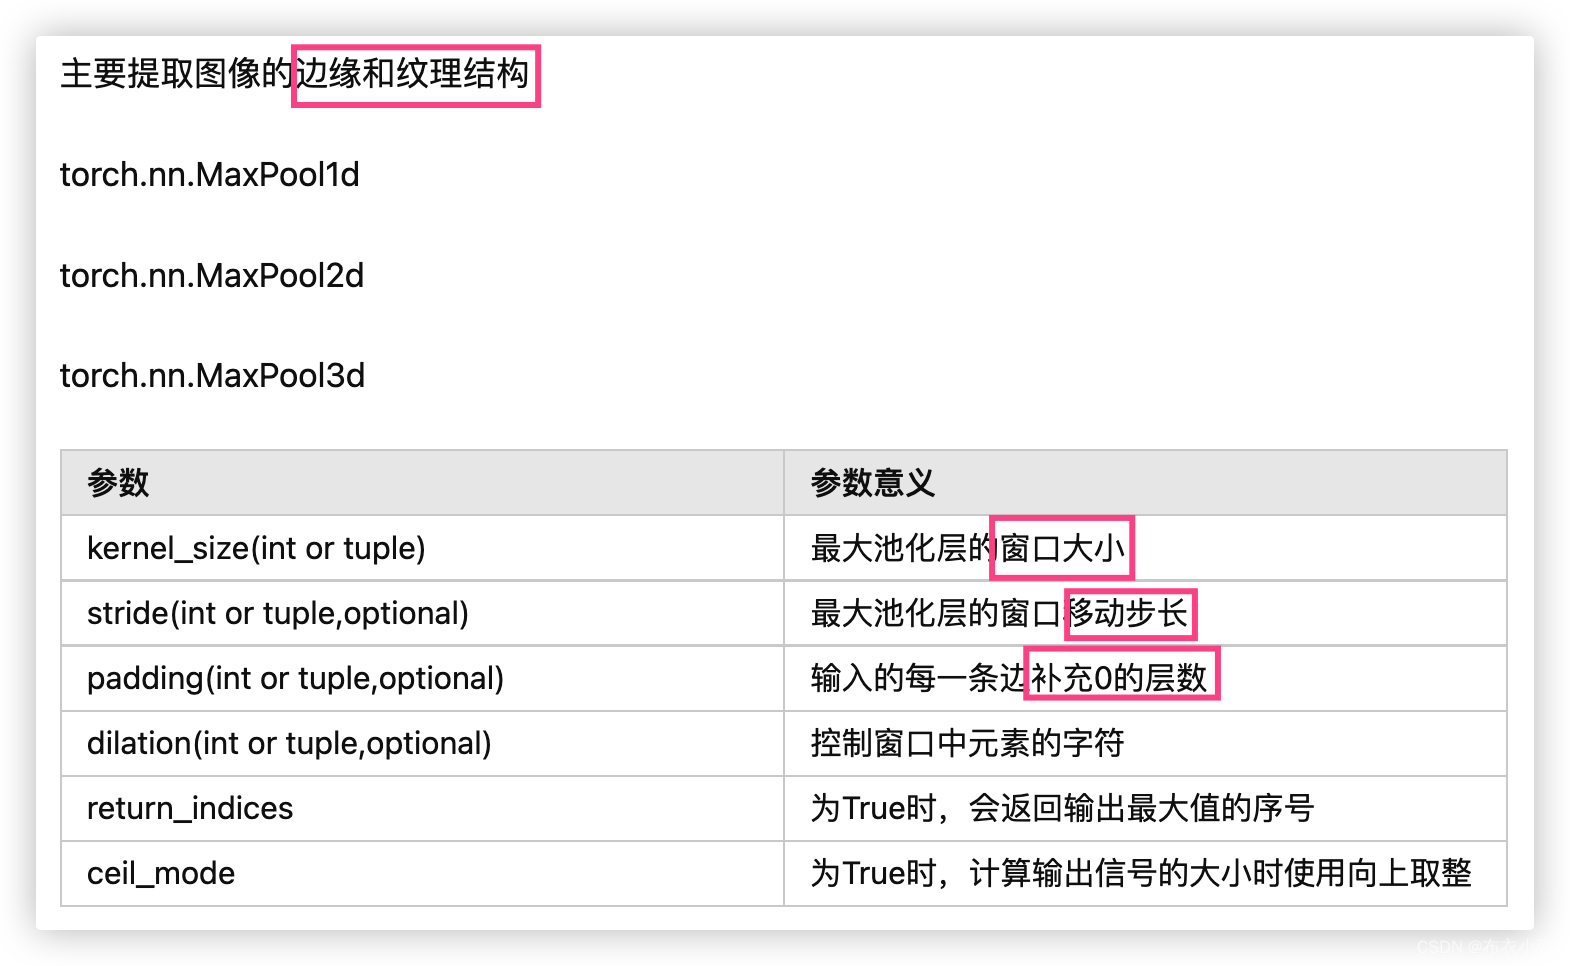
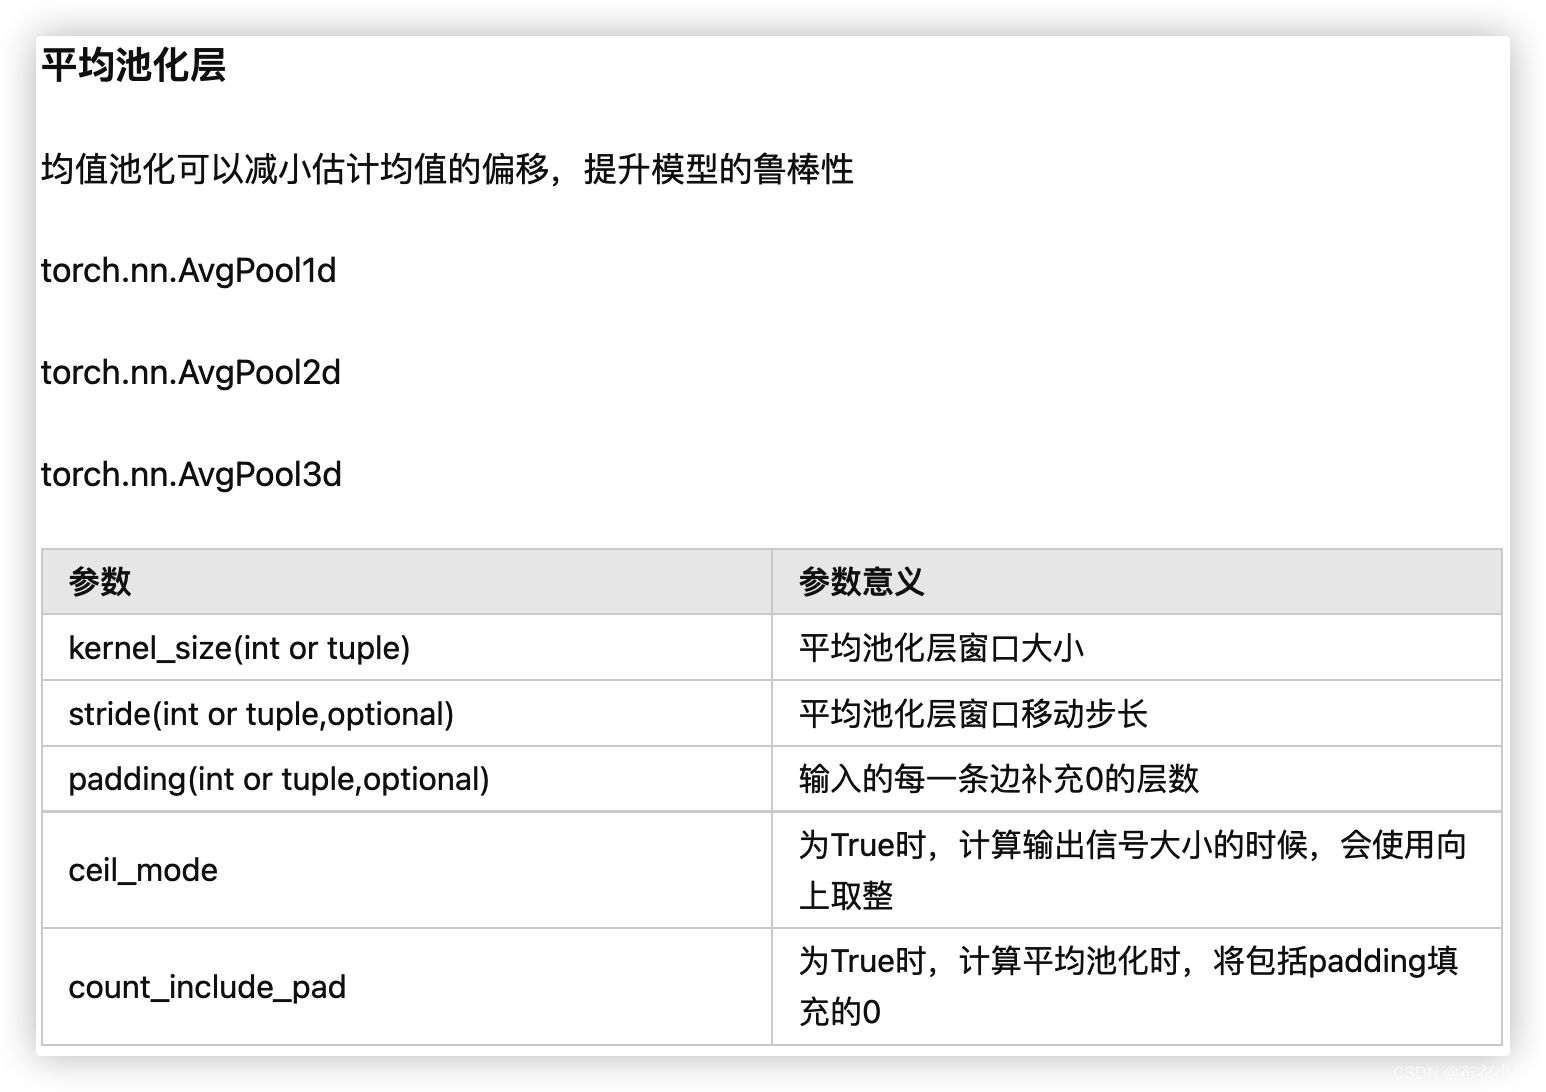
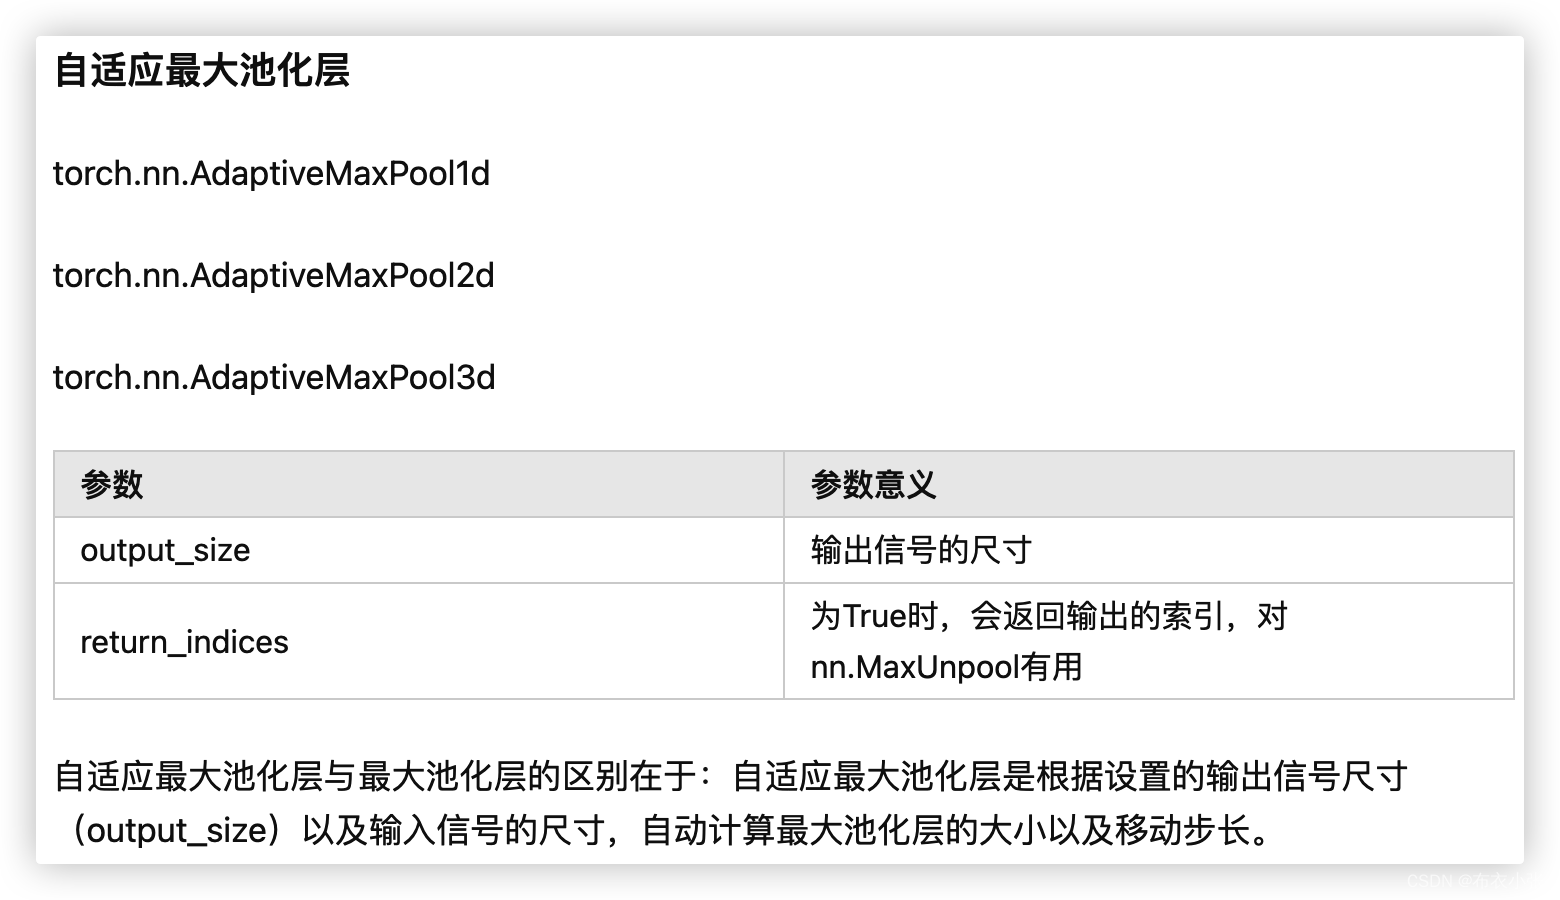
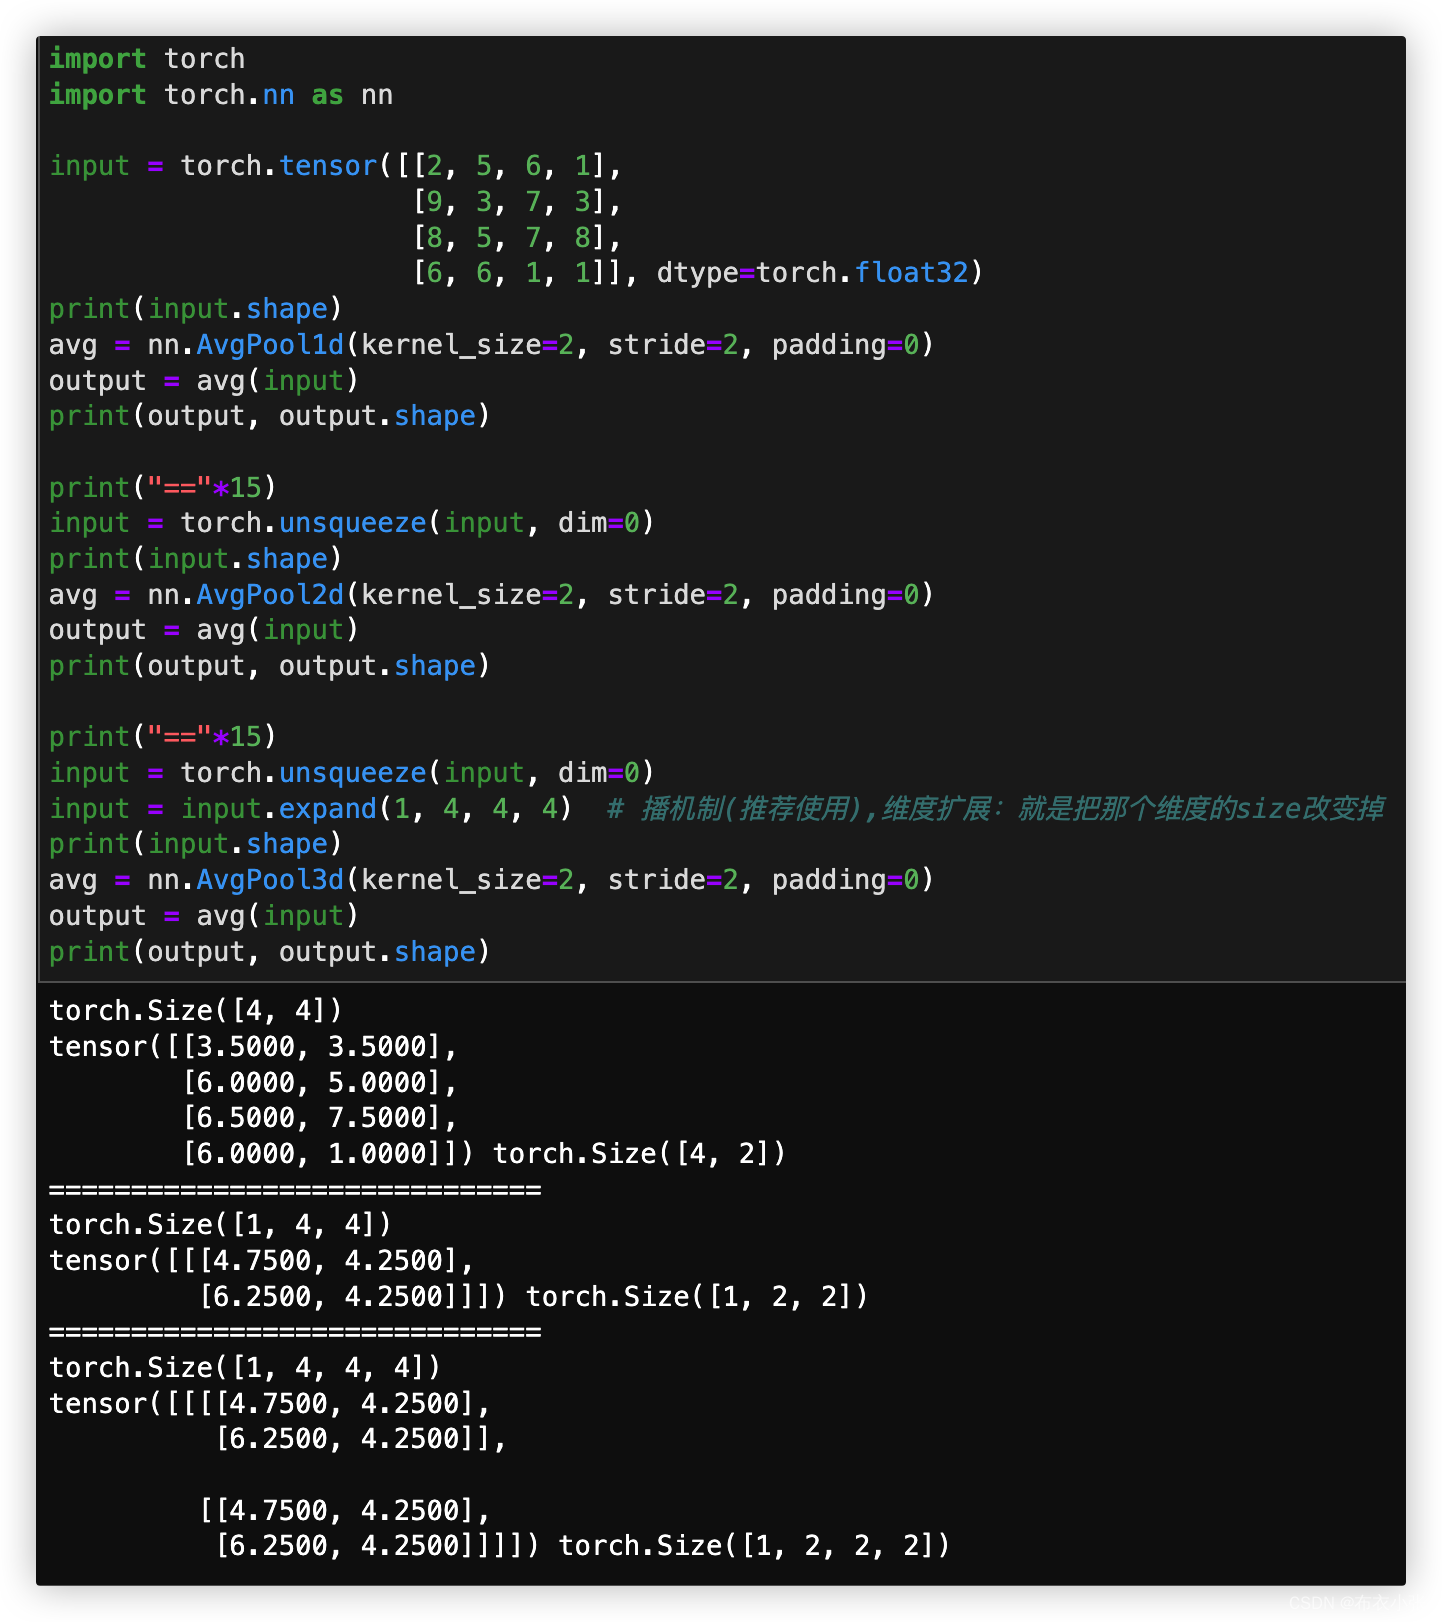
- 池化也叫做亚采样、下采样(downsampling)或子采样(subsampling),主要针对非重叠区域,包括均值池化(mean pooling)、最大池化(max pooling)。池化操作的本质是 降采样。例如,我们可以利用最大池化将4×4的矩阵降采样为2×2的矩阵。
- 特殊的池化方式还包括 相邻重叠区域的池化以及空间金字塔池化 。池化操作除了能显著降低参数量外,还能够保持对平移、伸缩、旋转操作的不变性。这里就不展开细讲了。
- 添加池化层的作用:(1)降低冗余信息(2)扩大感受野(3)防止过拟合(4)提升模型尺度不变性、旋转不变性、平移不变性
- 和PyTorch的卷积类类似,池化类也分为一、二和三维的。那我这里就讲一下一维的情况,二维和三维的类似,只是输入数据的维度不同。
torch.nn.MaxPool1d(kernel_size, stride=None, padding=0, dilation=1,
                   return_indices=False, ceil_mode=False)
1.2.4. nn.BatchNorm操作
- 这里介绍下nn.BatchNorm,此外nn.LayerNorm只是对整个样本求,这里不介绍。
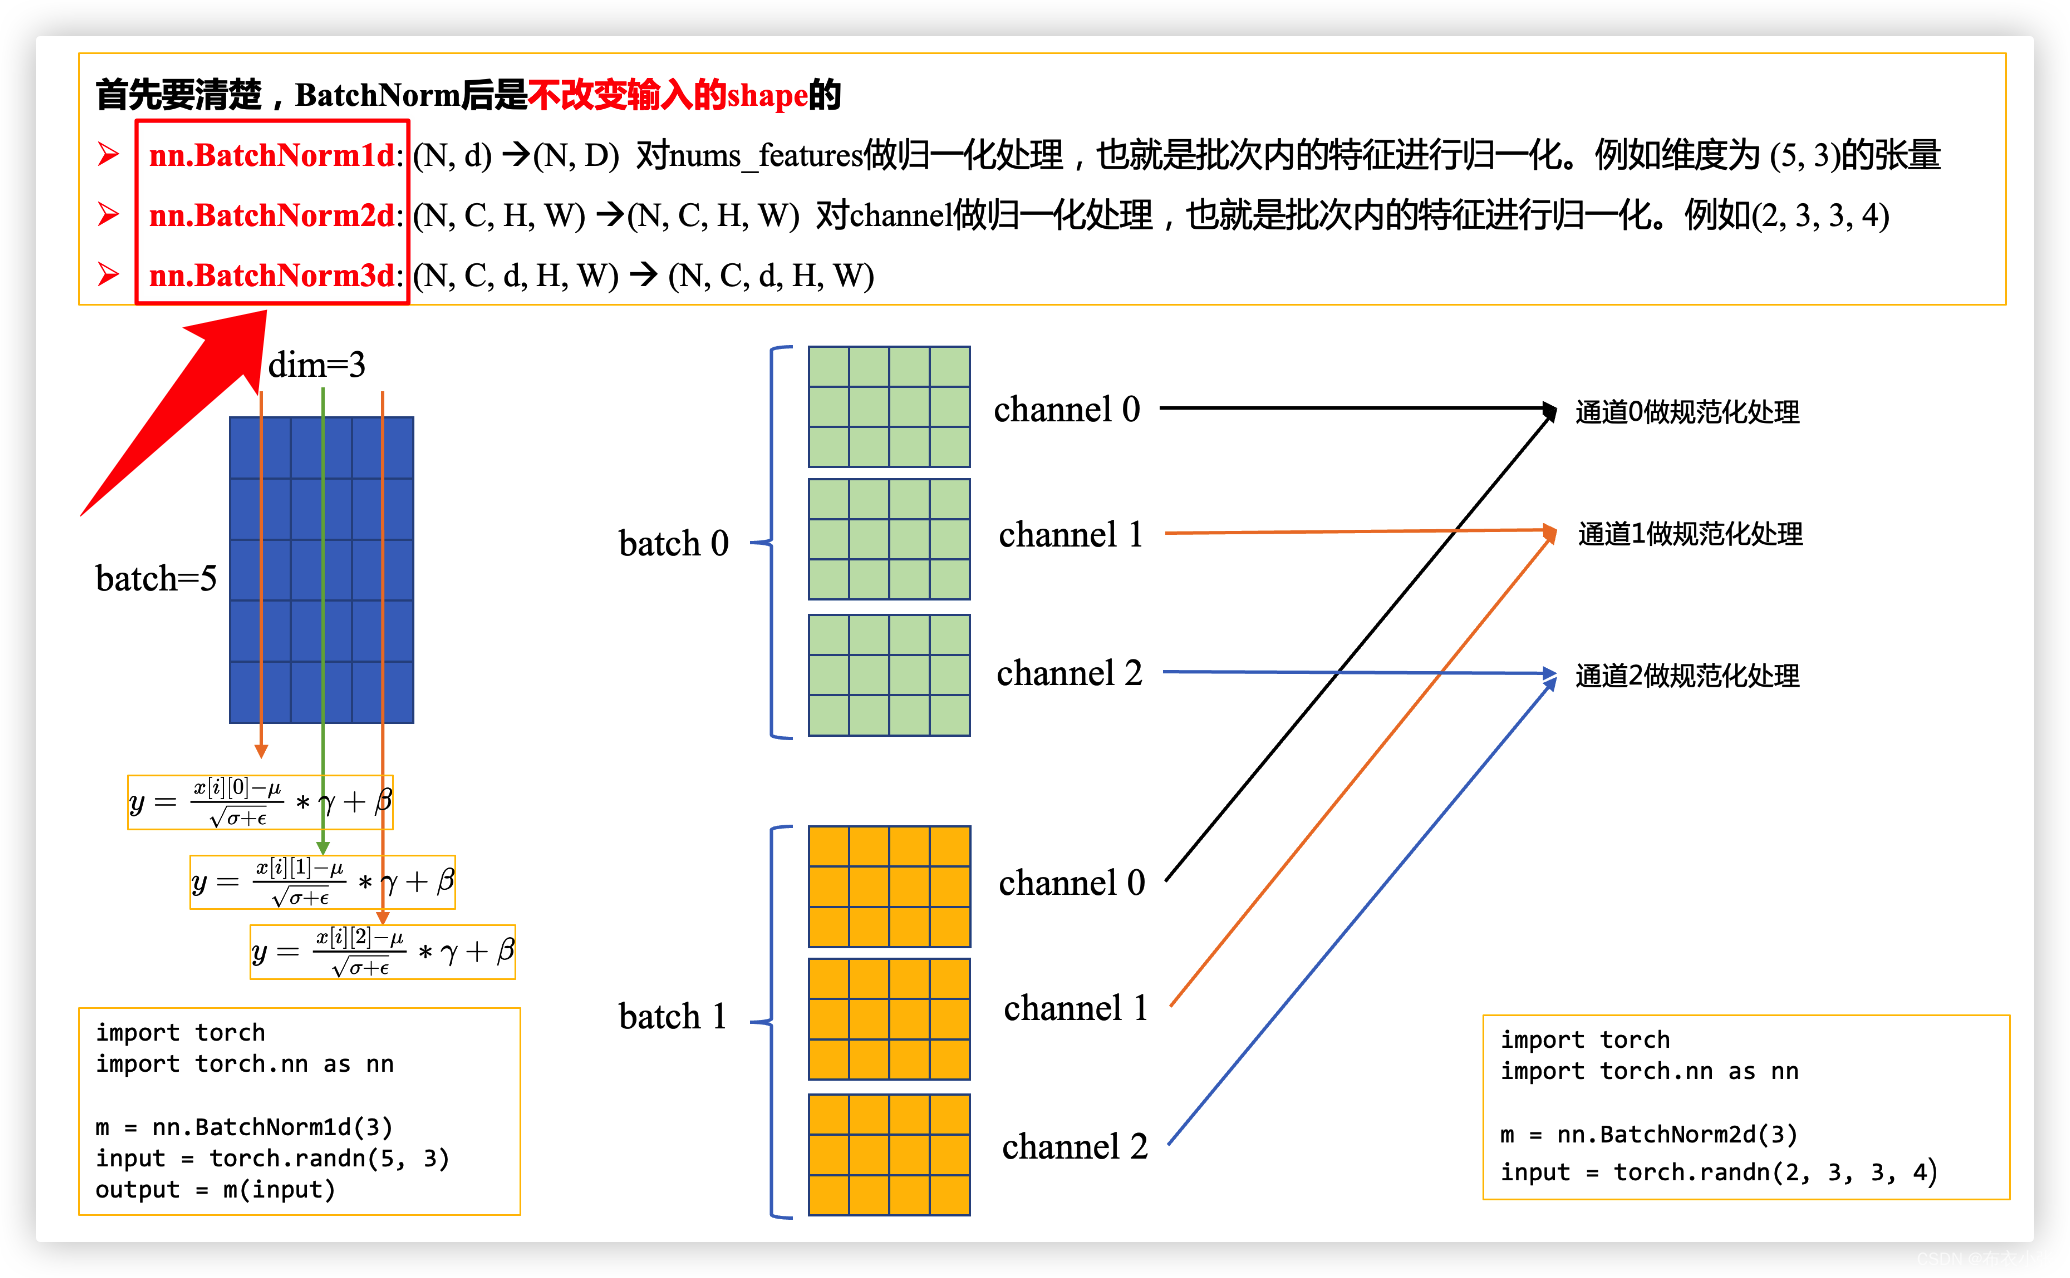
- 深度学习-批量归一化:https://zhuanlan.zhihu.com/p/464606433
1.3. nn.ModuleList和nn.Sequential
- 在构建网络的时候,Pytorch有一些基础概念很重要,比如
nn.Module,nn.ModuleList,nn.Sequential,这些类我们称为为容器(containers),可参考https://pytorch.org/docs/stable/nn.html#containers。下面介绍nn.ModuleList和nn.Sequential,并判断在什么时候用哪一个比较合适。
1.3.1. nn.ModuleList
- nn.ModuleList,它是一个存储不同module,并自动将每个module的parameters添加到网络之中的容器。你可以把任意nn.Module的子类(如nn.Conv2d,nn.Linear等)加到这个list里面,方法和python自带的list一样,无非是extend,append等操作,但不同于一般的list,加入到nn.ModuleList里面的module是会自动注册到整个网络上的,同时module的parameters也会自动添加到整个网络中。若使用python的list,则会出问题。
- nn.ModuleList()可以看到,这个网络权重(weights)和偏置(bias)都在这个网络之内。 而对于使用python自带list的例子如下:
class net1(nn.Module):
    def __init__(self):
        super(net1, self).__init__()
        self.linears = nn.ModuleList([nn.Linear(10,10) for i in range(2)])
    def forward(self, x):
        for m in self.linears:
            x = m(x)
        return x
net = net1()
print(net)
# net1(
#   (modules): ModuleList(
#     (0): Linear(in_features=10, out_features=10, bias=True)
#     (1): Linear(in_features=10, out_features=10, bias=True)
#   )
# )
for param in net.parameters():
    print(type(param.data), param.size())
# <class 'torch.Tensor'> torch.Size([10, 10])
# <class 'torch.Tensor'> torch.Size([10])
# <class 'torch.Tensor'> torch.Size([10, 10])
# <class 'torch.Tensor'> torch.Size([10])
- 对于使用python自带list的例子如下,显然,使用python的list添加的卷积层和它们的parameters并没有自动注册到我们的网络中。当然,我们还是可以使用forward来计算输出结果。但是如果用其实例化的网络进行训练的时候,因为这些层的parameters不在整个网络之中,所以其网络参数也不会被更新,也就是无法训练。
class net2(nn.Module):
    def __init__(self):
        super(net2, self).__init__()
        self.linears = [nn.Linear(10,10) for i in range(2)]
    def forward(self, x):
        for m in self.linears:
            x = m(x)
        return x

net = net2()
print(net)
# net2()
print(list(net.parameters()))
# []
- 但是,我们需要注意到,nn.ModuleList并没有定义一个网络,它只是将不同的模块储存在一起,这些模块之间并没有什么先后顺序可言。根据net3的输出结果,我们可以看出ModuleList里面的顺序并不能决定什么,网络的执行顺序是根据forward函数来决定的。但是一般设置ModuleList中的顺序和forward中保持一致,增强代码的可读性。
class net3(nn.Module):
    def __init__(self):
        super(net3, self).__init__()
        self.linears = nn.ModuleList([nn.Linear(10,20), nn.Linear(20,30), nn.Linear(5,10)])
    def forward(self, x):
        x = self.linears[2](x) # 这里调换顺序进行测试
        x = self.linears[0](x)
        x = self.linears[1](x)
        return x
net = net3()
print(net)
# net3(
#   (linears): ModuleList(
#     (0): Linear(in_features=10, out_features=20, bias=True)
#     (1): Linear(in_features=20, out_features=30, bias=True)
#     (2): Linear(in_features=5, out_features=10, bias=True)
#   )
# )
input = torch.randn(32, 5)
print(net(input).shape)
# torch.Size([32, 30])
- 我们再来考虑另一种情况,既然ModuleList可以根据序号来调用,那么一个模型可以在forward函数中被调用多次。但需要注意的是,被调用多次的模块,是使用同一组parameters的,也就是它们是参数共享的。
class net4(nn.Module):
    def __init__(self):
        super(net4, self).__init__()
        self.linears = nn.ModuleList([nn.Linear(5, 10), nn.Linear(10, 10)])
    def forward(self, x):
        x = self.linears[0](x)
        x = self.linears[1](x)
        x = self.linears[1](x)
        return x
net = net4()
print(net)
# net4(
#   (linears): ModuleList(
#     (0): Linear(in_features=5, out_features=10, bias=True)
#     (1): Linear(in_features=10, out_features=10, bias=True)
#   )
# )
for name, param in net.named_parameters():
    print(name, param.size())
# linears.0.weight torch.Size([10, 5])
# linears.0.bias torch.Size([10])
# linears.1.weight torch.Size([10, 10])
# linears.1.bias torch.Size([10])
1.3.2. nn.Sequential
- 不同于nn.ModuleList,nn.Sequential已经实现了内部的forward函数,而且里面的模块必须是按照顺序进行排列的,所以我们必须确保前一个模块的输出大小和下一个模块的输入大小是一致的。
class net5(nn.Module):
    def __init__(self):
        super(net5, self).__init__()
        self.block = nn.Sequential(nn.Conv2d(1,20,5),
                                    nn.ReLU(),
                                    nn.Conv2d(20,64,5),
                                    nn.ReLU())
    def forward(self, x):
        x = self.block(x)
        return x
net = net5()
print(net)
# net5(
#   (block): Sequential(
#     (0): Conv2d(1, 20, kernel_size=(5, 5), stride=(1, 1))
#     (1): ReLU()
#     (2): Conv2d(20, 64, kernel_size=(5, 5), stride=(1, 1))
#     (3): ReLU()
#   )
# )
- 下面给出了两个nn.Sequential初始化的例子,在第二个初始化中我们用到了OrderedDict来指定每个module的名字
# Example of using Sequential
model1 = nn.Sequential(
          nn.Conv2d(1,20,5),
          nn.ReLU(),
          nn.Conv2d(20,64,5),
          nn.ReLU()
        )
print(model1)
# Sequential(
#   (0): Conv2d(1, 20, kernel_size=(5, 5), stride=(1, 1))
#   (1): ReLU()
#   (2): Conv2d(20, 64, kernel_size=(5, 5), stride=(1, 1))
#   (3): ReLU()
# )

# Example of using Sequential with OrderedDict
import collections
model2 = nn.Sequential(collections.OrderedDict([
          ('conv1', nn.Conv2d(1,20,5)),
          ('relu1', nn.ReLU()),
          ('conv2', nn.Conv2d(20,64,5)),
          ('relu2', nn.ReLU())
        ]))
print(model2)
# Sequential(
#   (conv1): Conv2d(1, 20, kernel_size=(5, 5), stride=(1, 1))
#   (relu1): ReLU()
#   (conv2): Conv2d(20, 64, kernel_size=(5, 5), stride=(1, 1))
#   (relu2): ReLU()
# )
- 一般情况下 nn.Sequential 的用法是来组成卷积块 (block),然后像拼积木一样把不同的 block 拼成整个网络,让代码更简洁,更加结构化。
1.3.3. nn.Sequential与nn.ModuleList的区别
- 不同点1:
nn.Sequential内部实现了forward函数,因此可以不用写forward函数,而nn.ModuleList则没有实现内部forward函数。- 不同点2:
nn.Sequential可以使用OrderedDict对每层进行命名。- 不同点3:
nn.Sequential里面的模块按照顺序进行排列的,所以必须确保前一个模块的输出大小和下一个模块的输入大小是一致的。而nn.ModuleList并没有定义一个网络,它只是将不同的模块储存在一起,这些模块之间并没有什么先后顺序可言。- 不同点4:有的时候网络中有很多相似或者重复的层,我们一般会考虑用 for 循环来创建它们,而不是一行一行地写,比如:
layers = [nn.Linear(10, 10) for i in range(5)]
- 那么这里我们使用
ModuleList:
class net4(nn.Module):
    def __init__(self):
        super(net4, self).__init__()
        layers = [nn.Linear(10, 10) for i in range(5)]
        self.linears = nn.ModuleList(layers)

    def forward(self, x):
        for layer in self.linears:
            x = layer(x)
        return x

net = net4()
print(net)
# net4(
#   (linears): ModuleList(
#     (0): Linear(in_features=10, out_features=10, bias=True)
#     (1): Linear(in_features=10, out_features=10, bias=True)
#     (2): Linear(in_features=10, out_features=10, bias=True)
#     (3): Linear(in_features=10, out_features=10, bias=True)
#     (4): Linear(in_features=10, out_features=10, bias=True)
#   )
# )
- 这个是比较一般的方法,但如果不想这么麻烦,我们也可以用 Sequential 来实现,如 net7 所示!注意 * 这个操作符,它可以把一个 list 拆开成一个个独立的元素。但是,请注意这个 list 里面的模块必须是按照想要的顺序来进行排列的。在场景一中,觉得使用 net7 这种方法比较方便和整洁。
class net7(nn.Module):
    def __init__(self):
        super(net7, self).__init__()
        self.linear_list = [nn.Linear(10, 10) for i in range(5)]
        self.linears = nn.Sequential(*self.linear_list)

    def forward(self, x):
        self.x = self.linears(x)
        return x

net = net7()
print(net)
# net7(
#   (linears): Sequential(
#     (0): Linear(in_features=10, out_features=10, bias=True)
#     (1): Linear(in_features=10, out_features=10, bias=True)
#     (2): Linear(in_features=10, out_features=10, bias=True)
#     (3): Linear(in_features=10, out_features=10, bias=True)
#     (4): Linear(in_features=10, out_features=10, bias=True)
#   )
# )
- 下面我们考虑==场景二,当我们需要之前层的信息的时候,比如 ResNets 中的 shortcut 结构,或者是像 FCN 中用到的 skip architecture 之类的==,当前层的结果需要和之前层中的结果进行融合,一般使用 ModuleList 比较方便,一个非常简单的例子如下:我们使用了一个 trace 的列表来储存网络每层的输出结果,这样如果以后的层要用的话,就可以很方便地调用了。
class net8(nn.Module):
    def __init__(self):
        super(net8, self).__init__()
        self.linears = nn.ModuleList([nn.Linear(10, 20), nn.Linear(20, 30), nn.Linear(30, 50)])
        self.trace = []
    def forward(self, x):
        for layer in self.linears:
            x = layer(x)
            self.trace.append(x)
        return x
net = net8()
input  = torch.randn(32, 10) # input batch size: 32
output = net(input)
for each in net.trace:
    print(each.shape)
# torch.Size([32, 20])
# torch.Size([32, 30])
# torch.Size([32, 50])
二. TextCNN的Pytorch实现
2.1. 数据构建
import torch
import torch.nn as nn
import torch.optim as optim
import torch.utils.data as Data

device = torch.device("cuda" if torch.cuda.is_available() else "cpu")

# 3 words sentences (=sequence_length is 3)
sentences = ["i love you", "he loves me", "she likes baseball", "i hate you", "sorry for that", "this is awful"]
# 1 is good, 0 is not good.
labels = [1, 1, 1, 0, 0, 0]

embedding_size = 2
sequence_length = len(sentences[0])
num_classes = len(set(labels))
batch_size = 3

word_list = " ".join(sentences).split()
vocab = list(set(word_list))
vocab_size = len(vocab)
word2idx = {w: i for i, w in enumerate(vocab)}

def make_data(sentences):
    inputs = []
    for sen in sentences:
        inputs.append([word2idx[s] for s in sen.split()])
    return inputs


input_batch = torch.LongTensor(make_data(sentences))
target_batch = torch.LongTensor(labels)

dataset = Data.TensorDataset(input_batch, target_batch)
loader = Data.DataLoader(dataset, batch_size=batch_size, shuffle=True)
2.2. 模型构建
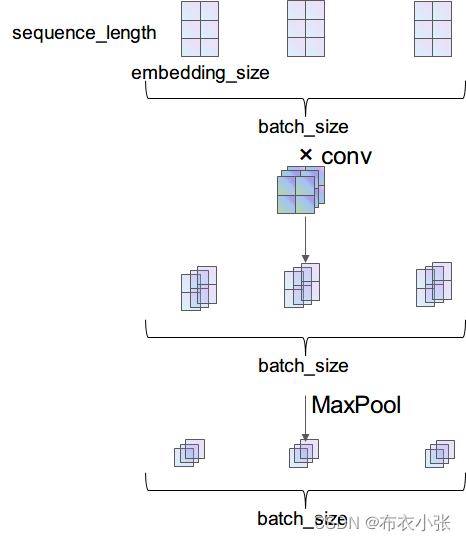
- 模型结构如下所示:
- 下面详细介绍一下数据在网络中流动的过程中维度的变化。输入数据是个矩阵,矩阵维度为 [batch_size, seqence_length],输入矩阵的数字代表的是某个词在整个词库中的索引(下标)
- 首先通过 Embedding 层,也就是查表,将每个索引转为一个向量,比方说 12 可能会变成 [0.3,0.6,0.12,…],因此整个数据无形中就增加了一个维度,变成了 [batch_size, sequence_length, embedding_size]
- 之后使用
unsqueeze(1)函数使数据增加一个维度,变成 [batch_size, 1, sequence_length, embedding_size]。现在的数据才能做卷积,因为在传统 CNN 中,输入数据就应该是 [batch_size, in_channel, height, width] 这种维度- [batch_size, 1, 3, 2] 的输入数据通过
nn.Conv2d(1, 3, (2, 2))的卷积之后,得到的就是 [batch_size, 3, 2, 1] 的数据,由于经过 ReLU 激活函数是不改变维度的,所以就没画出来。最后经过一个nn.MaxPool2d((2, 1))池化,得到的数据维度就是 [batch_size, 3, 1, 1]
class TextCNN(nn.Module):
    def __init__(self):
        super(TextCNN, self).__init__()
        self.W = nn.Embedding(vocab_size, embedding_size)
        output_channel = 3
        self.conv = nn.Sequential(
            # (batch, channel, sequence_len, embedding_dim):(3, 1, 3, 2)--> (3, 3, 2, 1)
            nn.Conv2d(in_channels=1, out_channels=output_channel, kernel_size=(2, embedding_size)),
            nn.ReLU(),
            # (3, 3, 2, 1)-->(3, 3, 1, 1)
            nn.MaxPool2d(kernel_size=(2, 1))
        )
        self.fc = nn.Linear(output_channel, num_classes)

    def forward(self, X):
        """
        Args:
            X: (batch_size, sequence_len)
        Returns:
        """
        batch_size = X.shape[0]
        embedding_X = self.W(X)  # [batch_size, sequence_length, embedding_size]
        embedding_X = torch.unsqueeze(embedding_X, dim=1)  # [batch_size, 1, sequence_length, embedding_size]
        conved = self.conv(embedding_X)  # (b, 3, 1, 1)
        flatten = conved.view(batch_size, -1)
        output = self.fc(flatten)
        return output
2.2. 模型训练和测试
# Training
model.train()
for epoch in range(500):
    for batch_x, batch_y in loader:
        batch_x, batch_y = batch_x.to(device), batch_y.to(device)
        pred = model(batch_x)
        loss = criterion(pred, batch_y)
        if (epoch + 1) % 200 == 0:
            print(f"epoch: {epoch + 1}, loss:{loss}")

        optimizer.zero_grad()
        loss.backward()
        optimizer.step()

# Test
model.eval()
test_text = "i hate me"
texts = [[word2idx[one] for one in test_text.split()]]
test_batch = torch.LongTensor(texts).to(device)

# Predict
predict = model(test_batch).detach().cpu().max(dim=1, keepdim=True)

print(predict[1].item())
- 最终代码如下:
# !/usr/bin/env python
# -*- encoding: utf-8 -*-
"""=====================================
@project: myProject
@author : kaifang zhang
@time   : 2022/12/4 10:37
@contact: devinzhang1994@163.com
====================================="""
import torch
import torch.nn as nn
import torch.optim as optim
import torch.utils.data as Data

device = torch.device("cuda" if torch.cuda.is_available() else "cpu")

# 3 words sentences (=sequence_length is 3)
sentences = ["i love you", "he loves me", "she likes baseball", "i hate you", "sorry for that", "this is awful"]
# 1 is good, 0 is not good.
labels = [1, 1, 1, 0, 0, 0]

embedding_size = 2
sequence_length = len(sentences[0])
num_classes = len(set(labels))
batch_size = 3

word_list = " ".join(sentences).split()
vocab = list(set(word_list))
vocab_size = len(vocab)
word2idx = {w: i for i, w in enumerate(vocab)}


class TextCNN(nn.Module):
    def __init__(self):
        super(TextCNN, self).__init__()
        self.W = nn.Embedding(vocab_size, embedding_size)
        output_channel = 3
        self.conv = nn.Sequential(
            # (batch, channel, sequence_len, embedding_dim):(3, 1, 3, 2)--> (3, 3, 2, 1)
            nn.Conv2d(in_channels=1, out_channels=output_channel, kernel_size=(2, embedding_size)),
            nn.ReLU(),
            # (3, 3, 2, 1)-->(3, 3, 1, 1)
            nn.MaxPool2d(kernel_size=(2, 1))
        )
        self.fc = nn.Linear(output_channel, num_classes)

    def forward(self, X):
        """
        Args:
            X: (batch_size, sequence_len)
        Returns:
        """
        batch_size = X.shape[0]
        embedding_X = self.W(X)  # [batch_size, sequence_length, embedding_size]
        embedding_X = torch.unsqueeze(embedding_X, dim=1)  # [batch_size, 1, sequence_length, embedding_size]
        conved = self.conv(embedding_X)  # (b, 3, 1, 1)
        flatten = conved.view(batch_size, -1)
        output = self.fc(flatten)
        return output


def make_data(sentences):
    inputs = []
    for sen in sentences:
        inputs.append([word2idx[s] for s in sen.split()])
    return inputs


input_batch = torch.LongTensor(make_data(sentences))
target_batch = torch.LongTensor(labels)

dataset = Data.TensorDataset(input_batch, target_batch)
loader = Data.DataLoader(dataset, batch_size=batch_size, shuffle=True)

model = TextCNN().to(device)
criterion = nn.CrossEntropyLoss().to(device)
optimizer = optim.Adam(model.parameters(), lr=1e-3)

# Training
model.train()
for epoch in range(500):
    for batch_x, batch_y in loader:
        batch_x, batch_y = batch_x.to(device), batch_y.to(device)
        pred = model(batch_x)
        loss = criterion(pred, batch_y)
        if (epoch + 1) % 200 == 0:
            print(f"epoch: {epoch + 1}, loss:{loss}")

        optimizer.zero_grad()
        loss.backward()
        optimizer.step()

# Test
model.eval()
test_text = "i hate me"
texts = [[word2idx[one] for one in test_text.split()]]
test_batch = torch.LongTensor(texts).to(device)

# Predict
predict = model(test_batch).detach().cpu().max(dim=1, keepdim=True)

print(predict[1].item())
四. 参考文献
- 深入TextCNN(一)详述CNN及TextCNN原理:https://zhuanlan.zhihu.com/p/77634533
- 深度学习 - 池化层:https://zhuanlan.zhihu.com/p/463234293
- 一维卷积应该怎么理解?https://www.zhihu.com/question/305080152/answer/2223288342
- 用TextCNN进行IMDB电影评论情感分析:https://blog.csdn.net/m0_50896529/article/details/121100496
- pytorch小记:nn.ModuleList和nn.Sequential的用法以及区别:
https://blog.csdn.net/u014090429/article/details/112618607- 深度学习-卷积层:https://zhuanlan.zhihu.com/p/460945929







![[附源码]Python计算机毕业设计SSM金牛社区疫情防控系统(程序+LW)](https://img-blog.csdnimg.cn/417db15b077449b8b45f4073bfec11b4.png)
![[附源码]JAVA毕业设计老年人健康饮食管理系统(系统+LW)](https://img-blog.csdnimg.cn/47bec3a52da948c0b5e07b9a18165cf7.png)
