文章目录
- 1 环境安装(Pytorch)
- 1.1 安装conda
- 1.1 安装pytorch
- 1.3 安装nnUNet
- 1.4 安装隐藏层(可选)
- 2 配置自定义数据集
- 2.1 数据集格式
- 2.2 创建需要目录
- 2.3 数据格式转换
- 2.3.1 修改路径与数据集名称
- 2.3.2 修改训练集与测试集
- 2.3.3 修改掩码所在的文件夹,并修改后缀
- 3 数据预处理命令与训练命令
- 3.1 配置环境变量
- 3.2 对数据集进行预处理
- 3.3 执行训练
- 参考
nnUNet: https://github.com/MIC-DKFZ/nnUNet/tree/master
1 环境安装(Pytorch)
1.1 安装conda
使用Anaconda或者 Miniconda,下载https://mirrors.tuna.tsinghua.edu.cn/anaconda/
创建虚拟环境,并激活,这里建议python>=3.9
conda create -n nnUNet python=3.10 -y
conda activate
1.1 安装pytorch
安装Pytorch: https://pytorch.org/get-started/previous-versions/
根据nvidia版本安装,我的为cu117

pip install torch==2.0.0+cu117 torchvision==0.15.1+cu117 torchaudio==2.0.1 --index-url https://download.pytorch.org/whl/cu117
1.3 安装nnUNet
参考: https://github.com/MIC-DKFZ/nnUNet/blob/master/documentation/installation_instructions.md
- 作标准化基线、开箱即用的分割算法或使用预训练模型进行推理
pip install nnunetv2
- 当作框架使用
git clone https://github.com/MIC-DKFZ/nnUNet.git
cd nnUNet
pip install -e .
解释pip install -e .:
- 最后
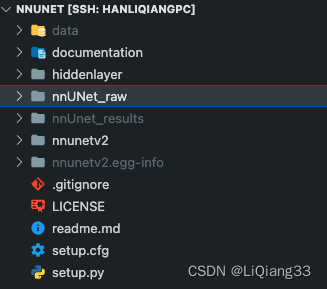
pip install -e .相当于python setup.py,也就是运行上图这个setup.py文件 - 向终端添加几个新命令。这些命令用于运行整个
nnU-Net pipeline。您可以从系统上的任何位置执行它们。所有nnU-Net命令都带有前缀“nnUNet_”,以便于识别
可见setup.py中的命令行格式
entry_points={
    'console_scripts': [
        'nnUNetv2_plan_and_preprocess = nnunetv2.experiment_planning.plan_and_preprocess_entrypoints:plan_and_preprocess_entry',  # api available
        'nnUNetv2_extract_fingerprint = nnunetv2.experiment_planning.plan_and_preprocess_entrypoints:extract_fingerprint_entry',  # api available
        'nnUNetv2_plan_experiment = nnunetv2.experiment_planning.plan_and_preprocess_entrypoints:plan_experiment_entry',  # api available
        'nnUNetv2_preprocess = nnunetv2.experiment_planning.plan_and_preprocess_entrypoints:preprocess_entry',  # api available
        'nnUNetv2_train = nnunetv2.run.run_training:run_training_entry',  # api available
        'nnUNetv2_predict_from_modelfolder = nnunetv2.inference.predict_from_raw_data:predict_entry_point_modelfolder',  # api available
        'nnUNetv2_predict = nnunetv2.inference.predict_from_raw_data:predict_entry_point',  # api available
        'nnUNetv2_convert_old_nnUNet_dataset = nnunetv2.dataset_conversion.convert_raw_dataset_from_old_nnunet_format:convert_entry_point',  # api available
        'nnUNetv2_find_best_configuration = nnunetv2.evaluation.find_best_configuration:find_best_configuration_entry_point',  # api available
        'nnUNetv2_determine_postprocessing = nnunetv2.postprocessing.remove_connected_components:entry_point_determine_postprocessing_folder',  # api available
        'nnUNetv2_apply_postprocessing = nnunetv2.postprocessing.remove_connected_components:entry_point_apply_postprocessing',  # api available
        'nnUNetv2_ensemble = nnunetv2.ensembling.ensemble:entry_point_ensemble_folders',  # api available
        'nnUNetv2_accumulate_crossval_results = nnunetv2.evaluation.find_best_configuration:accumulate_crossval_results_entry_point',  # api available
        'nnUNetv2_plot_overlay_pngs = nnunetv2.utilities.overlay_plots:entry_point_generate_overlay',  # api available
        'nnUNetv2_download_pretrained_model_by_url = nnunetv2.model_sharing.entry_points:download_by_url',  # api available
        'nnUNetv2_install_pretrained_model_from_zip = nnunetv2.model_sharing.entry_points:install_from_zip_entry_point', # api available
        'nnUNetv2_export_model_to_zip = nnunetv2.model_sharing.entry_points:export_pretrained_model_entry', # api available
        'nnUNetv2_move_plans_between_datasets = nnunetv2.experiment_planning.plans_for_pretraining.move_plans_between_datasets:entry_point_move_plans_between_datasets',  # api available
        'nnUNetv2_evaluate_folder = nnunetv2.evaluation.evaluate_predictions:evaluate_folder_entry_point',  # api available
        'nnUNetv2_evaluate_simple = nnunetv2.evaluation.evaluate_predictions:evaluate_simple_entry_point',  # api available
        'nnUNetv2_convert_MSD_dataset = nnunetv2.dataset_conversion.convert_MSD_dataset:entry_point'  # api available
    ],
},
1.4 安装隐藏层(可选)
nnU-net能够给出其生成的网络拓扑图
- 使用pip 安装
pip install --upgrade git+https://github.com/FabianIsensee/hiddenlayer.git@more_plotted_details #egg=hiddenlayer
- 源码安装
网站: https://github.com/FabianIsensee/hiddenlayer.git
cd nnUNet
git clone https://github.com/FabianIsensee/hiddenlayer.git
cd hiddenlayer
pip install -e .
2 配置自定义数据集
2.1 数据集格式
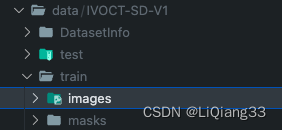
- 这里数据集中的文件均为
RGB三通道图片png图片 - Image为RGB,Label也为RGB,
单通道灰度图会报错,访问三个通道只有一个
2.2 创建需要目录
- 创建
nnUNet_raw保存格式转换后的数据集 - 创建
nnUNet_result保存结果文件
2.3 数据格式转换
修改文件nnunetv2/dataset_conversion/Dataset120_RoadSegmentation.py
2.3.1 修改路径与数据集名称
这个根据数据集存放的位置修改

Note:
- 数据集名称
dataset_name的格式:Dataset数字_名称, 数字大于10,为数据集的ID - 转换后的数据集中图片的名字与转换后的对应
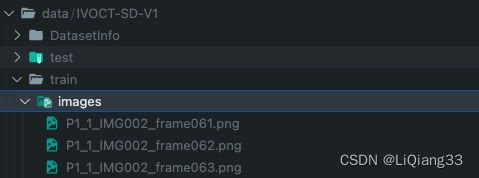

2.3.2 修改训练集与测试集

2.3.3 修改掩码所在的文件夹,并修改后缀
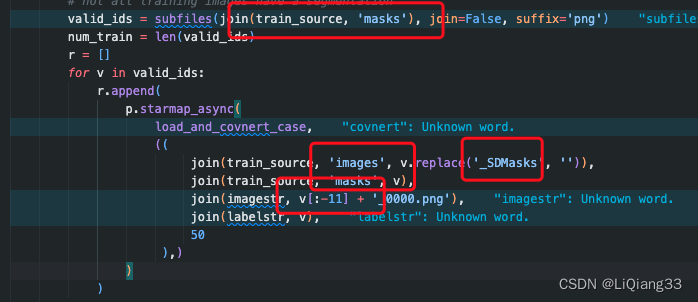
- 根据自己的图片命名规则修改即可
之后运行 Dataset120_RoadSegmentation.py
3 数据预处理命令与训练命令
3.1 配置环境变量
vim .bashrc
在最后添加
export nnUNet_raw="/sharefiles1/hanliqiang/GitCode/nnUNet/nnUNet_raw"
export nnUNet_preprocessed="/sharefiles1/hanliqiang/GitCode/nnUNet/nnunetv2/preprocessing"
export nnUNet_results="/sharefiles1/hanliqiang/GitCode/nnUNet/nnUnet_results"
使其生效
source .bashrc
3.2 对数据集进行预处理
- 将2d格式进行转换
nnUNetv2_plan_and_preprocess -d DATASET_ID --verify_dataset_integrit
DATASET_ID就是数据转换步骤中你设置的datasetname中的id
# nnUNetv2_plan_and_preprocess -d 120 --verify_dataset_integrity
nnUNetv2_plan_and_preprocess -d 110 --verify_dataset_integrity
3.3 执行训练
nnUNetv2_train DATASET_NAME_OR_ID UNET_CONFIGURATION FOLD
DATASET_NAME_OR_ID这里为数据集的id- 二维图像的话
UNET_CONFIGURATION就填2d FOLD代表几折交叉验证,nnUNet中为5
我的
nnUNetv2_train 110 2d 5
未完待续…
参考
nnUNetv2训练二维图像数据集 https://blog.csdn.net/Halloween111/article/details/130928829
nnUNet保姆级使用教程!从环境配置到训练与推理(新手必看)
https://blog.csdn.net/m0_68239345/article/details/128886376

