一、什么是串口
串口叫做串行接口,也称串行通信接口,也可以叫做COM口,按电气标准及协议来分包括RS-232-C、RS-422、RS485、USB等。串行接口是指数据一位一位地顺序传送,其特点是通信线路简单,只要一对传输线就可以实现双向通信,从而大大降低了成本,特别适用于远距离通信,但传送速度较慢。
二、串口通讯方式
- 单工模式:只支持数据在一个方向上传输;在同一时间只有一方能接收或发送信息,不能实现双向通信。一般用在只向一个方向传输数据的场合,比如跟打印机通讯。
- 半双工模式:如果只有一条通讯线,那么它既可以发送数据也可以接收数据,但不能同时进行发送和接收。如果使用两条通讯线,数据可以在两个方向传输,但是在同一时间只可以有一方接受或发送信息,实际上是一种切换方向的单工通讯。比如RS485-2W通讯就是采用这种模式。
- 全双工模式:数据可以同时往两个方向传输,相当于两个单工通讯的结合,它要求发送设备和接收设备都有独立的发送和接收能力,在同一时间可以同时进行发送和接收数据,实现双向通信,数据传输效率比较高。比如RS-232通讯就是采用这种模式。
串口通讯是一个字符一个字符地传输,每个字符一位一位地传输,总是以“起始位”开始,以“停止位”结束,字符之间没有固定的时间间隔要求。
实际传输时每一位的信号宽度与波特率有关,波特率越高,宽度越小,在进行传输之前,双方一定要使用同一个波特率。
三、Android串口开发
通过使用serialport库,直接上代码 :
第一步导包:
// 在项目根目录的build.gradle文件中添加:
allprojects {
repositories {
...
mavenCentral()
}
}
// 在项目Module下的build.gradle文件中添加:
dependencies {
implementation 'io.github.xmaihh:serialport:2.1.1'
}
第二步代码:
import android.os.Build;
import android.os.Bundle;
import android.os.Handler;
import android.os.Message;
import android.os.SystemClock;
import android.support.annotation.RequiresApi;
import android.support.v7.app.AppCompatActivity;
import android.util.Log;
import android.view.View;
import android.widget.EditText;
import android.widget.RadioGroup;
import android.widget.Toast;

import com.alibaba.fastjson.JSONObject;

import java.io.IOException;
import java.io.InputStream;

import butterknife.BindView;
import butterknife.ButterKnife;
import butterknife.OnClick;
import tp.xmaihh.serialport.SerialHelper;
import tp.xmaihh.serialport.bean.ComBean;
import tp.xmaihh.serialport.stick.AbsStickPackageHelper;
import tp.xmaihh.serialport.utils.ByteUtil;

public class MainActivity extends AppCompatActivity implements RadioGroup.OnCheckedChangeListener {

    @BindView(R.id.rg_type)
    RadioGroup mRgType;
    @BindView(R.id.et_read_content)
    EditText mEtReadContent;
    @BindView(R.id.et_send_content)
    EditText mEtSendContent;

    private SerialHelper serialHelper;
    private boolean isHexType = false;
    private String text = "";

    private Handler mHandler = new Handler(new Handler.Callback() {
        @Override
        public boolean handleMessage(Message msg) {
            ComBean comBean = (ComBean) msg.obj;
            String time = comBean.sRecTime;
            String rxText;
            rxText = new String(comBean.bRec);
            if (isHexType) {
                //转成十六进制数据
                rxText = ByteUtil.ByteArrToHex(comBean.bRec);
            }
            text += "Rx-> " + time + ": " + rxText + "\r" + "\n";
            mEtReadContent.setText(text);
            return false;
        }
    });

    @RequiresApi(api = Build.VERSION_CODES.M)
    @Override
    protected void onCreate(Bundle savedInstanceState) {
        super.onCreate(savedInstanceState);
        setContentView(R.layout.activity_main);

        ButterKnife.bind(this);

        mRgType.setOnCheckedChangeListener(this);

        initSerialConfig();
    }

    private void initSerialConfig() {
        //初始化SerialHelper对象,设定串口名称和波特率(此处为接收扫码数据)
        serialHelper = new SerialHelper("/dev/ttyACM0", 9600) {
            @Override
            protected void onDataReceived(ComBean paramComBean) {
                Message message = mHandler.obtainMessage();
                message.obj = paramComBean;
                Log.e("TAG", "onDataReceived: " + JSONObject.toJSONString(message.obj));
                mHandler.sendMessage(message);
            }
        };

        /*
         * 默认的BaseStickPackageHelper将接收的数据扩展成64位,一般用不到这么多位
         * 我这里重新设定一个自适应数据位数的
         */

        serialHelper.setStickPackageHelper(new AbsStickPackageHelper() {
            @Override
            public byte[] execute(InputStream is) {
                try {
                    int available = is.available();
                    if (available > 0) {
                        byte[] buffer = new byte[available];
                        int size = is.read(buffer);
                        if (size > 0) {
                            return buffer;
                        }
                    } else {
                        SystemClock.sleep(50);
                    }

                } catch (IOException e) {
                    e.printStackTrace();
                }
                return null;
            }
        });
    }

    @OnClick({R.id.bt_open, R.id.bt_close, R.id.bt_send, R.id.bt_clear_content})
    public void onButtonClicked(View view){
        switch (view.getId()) {
            case R.id.bt_open:
                if (serialHelper.isOpen()) {
                    Toast.makeText(this, Const.SPORT_NAME + "串口已经打开", Toast.LENGTH_SHORT).show();
                    return;
                }
                try {
                    serialHelper.open();
                } catch (IOException e) {
                    e.printStackTrace();
                }
                Toast.makeText(this, Const.SPORT_NAME + "串口打开成功", Toast.LENGTH_SHORT).show();
                break;

            case R.id.bt_close:
                if (serialHelper.isOpen()) {
                    serialHelper.close();
                    Toast.makeText(this, Const.SPORT_NAME + "串口已经关闭", Toast.LENGTH_SHORT).show();
                }
                break;

            case R.id.bt_clear_content:
                text = "";
                mEtReadContent.setText(text);
                break;

            case R.id.bt_send:
                if (!serialHelper.isOpen()) {
                    Toast.makeText(this, Const.SPORT_NAME + "串口没打开 发送失败", Toast.LENGTH_SHORT).show();
                    return;
                }
                String sendContent = mEtSendContent.getText().toString();
                if (isHexType) {
                    serialHelper.sendHex(sendContent);
                } else {
                    serialHelper.sendTxt(sendContent);
                }
                break;
        }
    }

    @Override
    public void onCheckedChanged(RadioGroup group, int checkedId) {
        switch (checkedId) {
            case R.id.rb_txt:
                isHexType = false;
                mEtSendContent.setText(Const.TXT_TYPE_SEND);
                break;

            case R.id.rb_hex:
                isHexType = true;
                mEtSendContent.setText(Const.HEX_TYPE_SEND);
                break;
        }
    }

    @Override
    protected void onDestroy() {
        super.onDestroy();
        serialHelper.close();
        serialHelper = null;
    }
}
<?xml version="1.0" encoding="utf-8"?>
<android.support.constraint.ConstraintLayout xmlns:android="http://schemas.android.com/apk/res/android"
    xmlns:app="http://schemas.android.com/apk/res-auto"
    xmlns:tools="http://schemas.android.com/tools"
    android:layout_width="match_parent"
    android:layout_height="match_parent"
    tools:context=".MainActivity">

    <!--串口操作部分-->
    <LinearLayout
        android:layout_width="match_parent"
        android:layout_height="wrap_content"
        app:layout_constraintBottom_toTopOf="@id/ll_read_data"
        android:layout_marginBottom="@dimen/dp_10"
        android:orientation="horizontal">

        <Button
            android:id="@+id/bt_open"
            android:layout_width="0dp"
            android:layout_weight="1"
            android:layout_height="wrap_content"
            android:text="@string/open_serial"
            android:layout_marginStart="@dimen/dp_10"
            android:layout_gravity="center_vertical"/>

        <TextView
            android:layout_width="0dp"
            android:layout_weight="1"
            android:layout_height="wrap_content"
            android:textSize="@dimen/edit_text_size"
            android:text="@string/data_type"
            android:layout_marginStart="@dimen/dp_10"
            android:layout_gravity="center_vertical"/>

        <RadioGroup
            android:id="@+id/rg_type"
            android:layout_width="0dp"
            android:layout_weight="2"
            android:layout_height="wrap_content"
            android:layout_gravity="center"
            android:layout_marginStart="@dimen/dp_10"
            android:orientation="horizontal">


            <RadioButton
                android:id="@+id/rb_txt"
                android:layout_width="0dp"
                android:layout_weight="1"
                android:layout_height="wrap_content"
                android:checked="true"
                android:text="@string/data_type_txt"/>

            <RadioButton
                android:id="@+id/rb_hex"
                android:layout_width="0dp"
                android:layout_weight="1"
                android:layout_height="wrap_content"
                android:layout_marginStart="@dimen/dp_10"
                android:text="@string/data_type_hex"/>

        </RadioGroup>

        <Button
            android:id="@+id/bt_close"
            android:layout_width="0dp"
            android:layout_weight="1"
            android:layout_height="wrap_content"
            android:text="@string/close_serial"
            android:layout_marginStart="@dimen/dp_10"
            android:layout_marginEnd="@dimen/dp_10"
            android:layout_gravity="center_vertical"/>

    </LinearLayout>

    <!--数据接收部分-->
    <LinearLayout
        android:id="@+id/ll_read_data"
        android:layout_width="match_parent"
        android:layout_height="wrap_content"
        app:layout_constraintTop_toTopOf="parent"
        app:layout_constraintBottom_toBottomOf="parent"
        android:orientation="horizontal">


        <!--数据接收显示-->
        <EditText
            android:id="@+id/et_read_content"
            android:layout_width="0dp"
            android:layout_height="200dp"
            android:layout_marginStart="@dimen/dp_10"
            android:layout_weight="6"
            android:background="@drawable/edit_bg"
            android:cursorVisible="false"
            android:focusable="false"
            android:focusableInTouchMode="false"
            android:gravity="top"
            android:padding="@dimen/dp_5"
            android:textSize="@dimen/edit_text_size" />

        <Button
            android:id="@+id/bt_clear_content"
            android:layout_width="0dp"
            android:layout_weight="1"
            android:layout_height="wrap_content"
            android:text="@string/clear_all_data"
            android:layout_marginStart="@dimen/dp_10"
            android:layout_marginEnd="@dimen/dp_10"
            android:layout_gravity="center_vertical"/>


    </LinearLayout>

    <View
        android:id="@+id/view_line"
        android:layout_width="match_parent"
        android:layout_height="@dimen/dp_2"
        android:layout_marginTop="@dimen/dp_10"
        android:layout_marginStart="@dimen/dp_10"
        android:layout_marginEnd="@dimen/dp_10"
        android:background="@color/colorAccent"
        app:layout_constraintTop_toBottomOf="@id/ll_read_data"/>

    <!--数据发送部分-->
    <LinearLayout
        android:id="@+id/ll_send_data"
        android:layout_width="match_parent"
        android:layout_height="wrap_content"
        app:layout_constraintTop_toBottomOf="@id/view_line"
        android:layout_marginTop="@dimen/dp_10"
        android:orientation="horizontal">


        <!--数据接收显示-->
        <EditText
            android:id="@+id/et_send_content"
            android:layout_width="0dp"
            android:layout_height="200dp"
            android:layout_marginStart="@dimen/dp_10"
            android:layout_weight="6"
            android:singleLine="false"
            android:background="@drawable/edit_bg"
            android:gravity="top"
            android:padding="@dimen/dp_5"
            android:inputType="text"
            android:textSize="@dimen/edit_text_size"
            android:text="@string/txt_data"/>

        <Button
            android:id="@+id/bt_send"
            android:layout_width="0dp"
            android:layout_weight="1"
            android:layout_height="wrap_content"
            android:text="@string/send_data"
            android:layout_marginStart="@dimen/dp_10"
            android:layout_marginEnd="@dimen/dp_10"
            android:layout_gravity="center_vertical"/>


    </LinearLayout>

</android.support.constraint.ConstraintLayout>
第三步说明:
上面代码,在创建serialHelper之时,就已经传入了一个onDataReceived()方法,用来监听串口数据接收,但是如要打开串口才能开启监听。
SerialHelper创建完成,打开串口
serialHelper.open();
如果需要设置其他的属性,比如设置奇偶检验,需要在执行open()之前设定。
serialHelper.setPort(String sPort); //设置串口
serialHelper.setBaudRate(int iBaud); //设置波特率
serialHelper.setStopBits(int stopBits); //设置停止位
serialHelper.setDataBits(int dataBits); //设置数据位
serialHelper.setParity(int parity); //设置校验位
serialHelper.setFlowCon(int flowcon); //设置流控
发送数据
serialHelper.send(byte[] bOutArray); // 发送byte[]
serialHelper.sendHex(String sHex); // 发送Hex
serialHelper.sendTxt(String sTxt); // 发送ASCII
关闭串口
serialHelper.close();
效果图
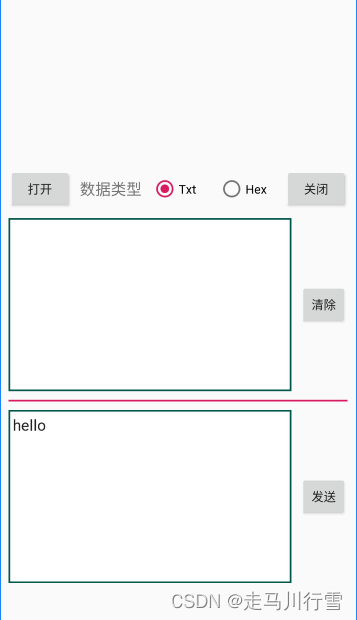
四、参考文章
Android串口使用2之使用Google官方库android-serialport-api_android-serialport-api使用_Steven Jon的博客-CSDN博客
mirrors / xmaihh / Android-Serialport · GitCode


