前言
作为B端开发,导出数据是不可以避免的,但是有时候需求很变态,表头复杂的一笔,各种合并单元格,如下图:

这些虽说用代码可以实现,但是很繁琐,而且代码并不能通用,遇到更复杂的更难受。为了追求更简单,高效率,我们需要换个方法-------利用模板导出数据!
?????能用模板?????
sure!
本文所用的excel样式,如果列更多、更复杂,直接套用就行 (下方图片中的数字是列名),行序号为1的是表格标题名称,行序号为2的是适应导出时把条件也导出来的情况,别怀疑,就是有这种需求!!

正文开始
1.需要用到的包
poi
  <!-- json4excel,poi -->
        <dependency>
            <groupId>org.apache.poi</groupId>
            <artifactId>poi</artifactId>
            <version>4.0.0</version>
        </dependency>
        <dependency>
            <groupId>org.apache.poi</groupId>
            <artifactId>poi-ooxml</artifactId>
            <version>4.0.0</version>
        </dependency>
        <dependency>
            <groupId>org.apache.poi</groupId>
            <artifactId>poi-ooxml-schemas</artifactId>
            <version>4.0.0</version>
        </dependency>
        <dependency>
            <groupId>org.apache.poi</groupId>
            <artifactId>ooxml-schemas</artifactId>
            <version>1.3</version>
        </dependency>
nutz(工具包,非必须,公司框架,本文与之相关的就只有一个NutMap==Map<String,Object>,不用这个请手动替换)
   <!-- https://mvnrepository.com/artifact/org.nutz/nutz -->
        <dependency>
            <groupId>org.nutz</groupId>
            <artifactId>nutz</artifactId>
            <version>1.r.68.v20200427</version>
        </dependency>
2.直接上代码
入口
    public static void doExportLongArrearsData() {
        // 要导出的数据
        NutMap nutMap = NutMap.NEW();
        nutMap.addv("comm","1111");
        nutMap.addv("a","1111");
        nutMap.addv("b","2222");
        nutMap.addv("c","11333311");
        nutMap.addv("d","1114441");
        nutMap.addv("e","555");
        nutMap.addv("f","6666");
        nutMap.addv("g","7777");
        nutMap.addv("h","88888");
        List<NutMap> list = Lists.newArrayList();
        list.add(nutMap);
        // 导出列  列数
        int colNum = 9;
        int[] colWidth = new int[colNum];
        for (int i = 0; i < colNum; i++) {
            colWidth[i] = 23;
        }
        // 从XX行开始为数据内容  excel 第一行为0
        int startRow = 5;
        //  2003版本的Excel (xls) ---- HSSFWorkbook
        //    2007版本以及更高版本 (xlsx)---- XSSFWorkbook
        XSSFWorkbook workbook = null;
        try {
            // 此处linux和windows通用   /files/cq.xlsx 在resource目录下  视情况而定

        /**
             *   特殊说明: this.getClass().getResourceAsStream
             *   如果fileUrl路径前不加 / 那么会读取类文件夹下的文件。加了才会读取resource下面的文件
             *   exp: this.getClass().getResourceAsStream("/files/cq.xlsx") ==>读取resource下面的文件
             *   this.getClass().getResourceAsStream("files/cq.xlsx") ==>读取当前类下的文件
             *   源码:
             *     private String resolveName(String name) {
             *         if (name == null) {
             *             return name;
             *         }
             *         if (!name.startsWith("/")) {
             *             Class<?> c = this;
             *             while (c.isArray()) {
             *                 c = c.getComponentType();
             *             }
             *             String baseName = c.getName();
             *             int index = baseName.lastIndexOf('.');
             *             if (index != -1) {
             *                 name = baseName.substring(0, index).replace('.', '/')
             *                     +"/"+name;
             *             }
             *         } else {
             *             name = name.substring(1);
             *         }
             *         return name;
             *     }
             */
            //  InputStream inputStream = this.getClass().getResourceAsStream("/files/cq.xlsx");
            FileInputStream inputStream = new FileInputStream( new File("C:\\Users\\usaer\\Desktop\\buss.xlsx"));
            workbook = new XSSFWorkbook(inputStream);

            // 获取sheet
            XSSFSheet sheetAt = workbook.getSheetAt(0);

            // 动态列  修改表头名 、修改模板数据等操作
            // 自定义参数
            int k = 1;
            updateCellLoad(workbook,sheetAt,k);

            // 填充数据
            fillBodyData( sheetAt,startRow,list,colWidth);

            // 设置单元格宽度 (不设置的话,就是模板的宽度)
            if (null != colWidth) {
                for (int i = 0; i < colWidth.length; i++) {
                    sheetAt.setColumnWidth(i, colWidth[i] * 256 + 184);
                }
            }

            // 输出流
            ByteArrayOutputStream byteArrayOutputStream = new ByteArrayOutputStream();
            // excel工作空间写入流
            workbook.write(byteArrayOutputStream);
            InputStream wrap = new ByteArrayInputStream(byteArrayOutputStream.toByteArray());
            // 写到本地
            writeToLocal("C:\\Users\\usaer\\Desktop\\buss_"+k+".xlsx",wrap);
        } catch (Exception e) {
            System.out.println(e.getMessage());
        } finally {
            // 关闭流
            if (null != workbook)
                try {
                    workbook.close();
                }
                catch (IOException e) {

                }
        }
    }
修改列的方法 (填充数据之前之后都可以修改内容,包括但不限于修改列、修改行、样式等)
    public static void updateCellLoad( XSSFWorkbook workbook,Sheet sheet,int k) {
        try {
            //设置行 指定行
            Row titlerow=sheet.getRow(2);
            //根据索引获取对应的列   如果合并单元格 有可能第一列就找不到  根据需求修改参数值
            Cell cell=titlerow.getCell(0, Row.MissingCellPolicy.CREATE_NULL_AS_BLANK);
            //设置列的类型是字符串
            cell.setCellType(CellType.STRING);
            cell.setCellValue(k==1?"1":"0");
            String titleValue=cell.getStringCellValue();
            System.out.println(titleValue);


            // 设置行 指定行修改数据和样式 有可能第一行就找不到  根据需求修改参数值
            CellStyle style1 = workbook.createCellStyle();
            // 自动换行
            style1.setWrapText(true);
            Row row1 = sheet.createRow(1);
            // 行高度
            row1.setHeight(Short.parseShort("1000"));
            Cell row1Cell = row1.createCell(0, CellType.STRING);
            row1Cell.setCellStyle(style1);
            StringBuilder sb = new StringBuilder();
            sb.append("条件1:").append("ABC").append("\r\n");
            sb.append("条件2:").append("DEF").append("\r\n");
            sb.append("条件3:").append("GHI").append("\r\n");
            row1Cell.setCellValue(sb.toString());

        } catch (EncryptedDocumentException e) {
            // TODO Auto-generated catch block
            e.printStackTrace();
        }

    }
填充数据的方法
private static void fillBodyData(Sheet sheet, int startRow, List<NutMap> bodyList, int[] colWidth) {

        // 碰到 时间、金额等需要转换的  在setCellValue 里面操作
        for (int rowNum = 0; rowNum < bodyList.size(); rowNum++) {
            NutMap map = bodyList.get(rowNum);
            Row row = sheet.createRow(rowNum + startRow);
            int colNum = 0;
            // comm
            Cell accountNumberCell = row.createCell(colNum++, CellType.STRING);
            String accountNumber = map.getString("comm");
            colWidth[colNum - 1] = Math.max(colWidth[colNum - 1], Strings.charLength(accountNumber));
            accountNumberCell.setCellValue(accountNumber);
            // a
            Cell accountNameCell = row.createCell(colNum++, CellType.STRING);
            String accountName = map.getString("a");
            colWidth[colNum - 1] = Math.max(colWidth[colNum - 1], Strings.charLength(accountName));
            accountNameCell.setCellValue(accountName);
            // b
            Cell mobileCell = row.createCell(colNum++, CellType.STRING);
            String mobile = map.getString("b");
            colWidth[colNum - 1] = Math.max(colWidth[colNum - 1], Strings.charLength(mobile));
            mobileCell.setCellValue(mobile);

            // c
            Cell addressCell = row.createCell(colNum++, CellType.STRING);
            String address = map.getString("c");
            colWidth[colNum - 1] = Math.max(colWidth[colNum - 1], Strings.charLength(address));
            addressCell.setCellValue(address);

            // d
            Cell meterNoCell = row.createCell(colNum++, CellType.STRING);
            String meterNo = map.getString("d");
            meterNoCell.setCellValue(meterNo);
            colWidth[colNum - 1] = Math.max(colWidth[colNum - 1], Strings.charLength(meterNo));

            // e
            Cell uncollectedNumberCell = row.createCell(colNum++, CellType.STRING);
            String uncollectedNumber = map.getString("e");
            uncollectedNumberCell.setCellValue(uncollectedNumber);
            colWidth[colNum - 1] = Math.max(colWidth[colNum - 1], Strings.charLength(uncollectedNumber));

            // f
            Cell uncollectedDosageCell = row.createCell(colNum++, CellType.STRING);
            String uncollectedDosage = map.getString("f");
            uncollectedDosageCell.setCellValue(uncollectedDosage);
            colWidth[colNum - 1] = Math.max(colWidth[colNum - 1], Strings.charLength(uncollectedDosage));

            // g
            Cell uncollectedDosageCell1 = row.createCell(colNum++, CellType.STRING);
            String uncollectedDosage1 = map.getString("g");
            uncollectedDosageCell1.setCellValue(uncollectedDosage1);
            colWidth[colNum - 1] = Math.max(colWidth[colNum - 1], Strings.charLength(uncollectedDosage1));

            // h
            Cell uncollectedDosageCell2 = row.createCell(colNum++, CellType.STRING);
            String uncollectedDosage2 = map.getString("h");
            uncollectedDosageCell2.setCellValue(uncollectedDosage2);
            colWidth[colNum - 1] = Math.max(colWidth[colNum - 1], Strings.charLength(uncollectedDosage2));
        }
    }
写到本地
 private static void writeToLocal(String destination, InputStream input)
            throws IOException {
        int index = 0;
        byte[] bytes = new byte[1024];
        FileOutputStream downloadFile = new FileOutputStream(destination);
        while ((index = input.read(bytes)) > 0) {
            downloadFile.write(bytes, 0, index);
        }
        downloadFile.close();
        input.close();
    }
代码就这些,纯测试,有些命名很随意,到时候用的时候自己改
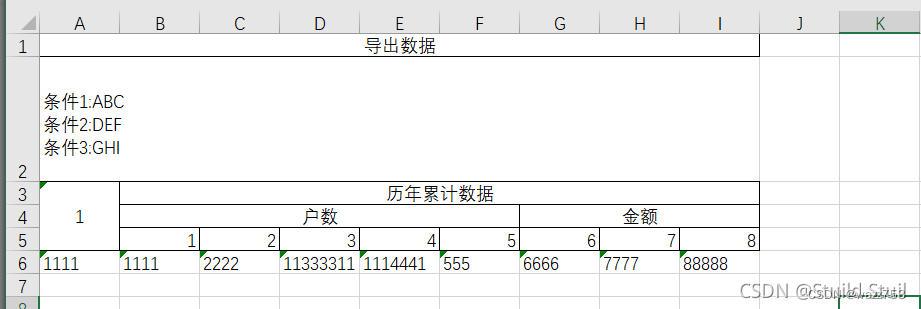
效果图
注意:
本文读取文件是从本地读取的,部署后,需要把模板文件放在resource下,利用代码中
 // 此处linux和windows通用   /files/cq.xlsx 在resource目录下  视情况而定
           //  InputStream inputStream = this.getClass().getResourceAsStream("/files/cq.xlsx");
来读取(本人框架非spring,spring自行解决),总之,获取到模板文件就是成功!!
如果想要设置单元格的样式比如字体垂直、水平居中等可以在 fillBodyData 中添加如下代码
 // 单元格样式
        XSSFCellStyle cellStyle = workbook.createCellStyle();
        // 设置单元格的水平对齐类型
        cellStyle.setAlignment(HorizontalAlignment.CENTER);
        // 设置单元格的垂直对齐类型
        cellStyle.setVerticalAlignment(VerticalAlignment.CENTER);
然后再循环体内每个cell设置style ,例如:
 Cell accountNumberCell = row.createCell(colNum++, CellType.STRING);
            String accountNumber = map.getString("comm");
            colWidth[colNum - 1] = Math.max(colWidth[colNum - 1], Strings.charLength(accountNumber));
            accountNumberCell.setCellValue(accountNumber);
// 设置style
            accountNumberCell.setCellStyle(cellStyle);
附加,如果springboot项目,获取项目目录下的模板,和直接输出到客户端,可参考:
@GetMapping("/exportTest4")
    //@ResponseBody
    public void exportTest4(HttpServletResponse response) {
//设置信息头,告诉浏览器内容为excel类型
        response.setHeader("content-Type", "application/vnd.ms-excel");
        //设置下载名称
        response.setHeader("Content-Disposition", "attachment;filename=" + URLEncoder.encode("展商模板.xlsx", StandardCharsets.UTF_8.name()));

//获取项目resources/excel目录下的excel模板文件
String REPORT_MONTH = ClassUtils.getDefaultClassLoader().getResource("").getPath() + "/excel/test2.xlsx";
        String path = REPORT_MONTH;
        try{
            System.out.println("path1=="+path);
            path = path.substring(1,path.length());
            path = java.net.URLDecoder.decode(path,"utf-8");
            System.out.println("path2=="+path);
        }catch (Exception e){
            e.printStackTrace();
        }

        String filename = "D://核酸检测信息.xls";
        try {
            // 输出到硬盘,所以要用到IO流,输出到fileName指定的路径上
            FileOutputStream fos = new FileOutputStream(filename);
            wb.write(fos);//写出
            wb.close();//关闭
            System.out.println("导出成功");
        } catch (Exception e) {
            //异常信息
            e.printStackTrace();
        }
}
如果是若依系统,也可以使用若依的通用下载方式下载:
直接返回文件名称,然后再页面通过ajax再次请求
return success(filename);


