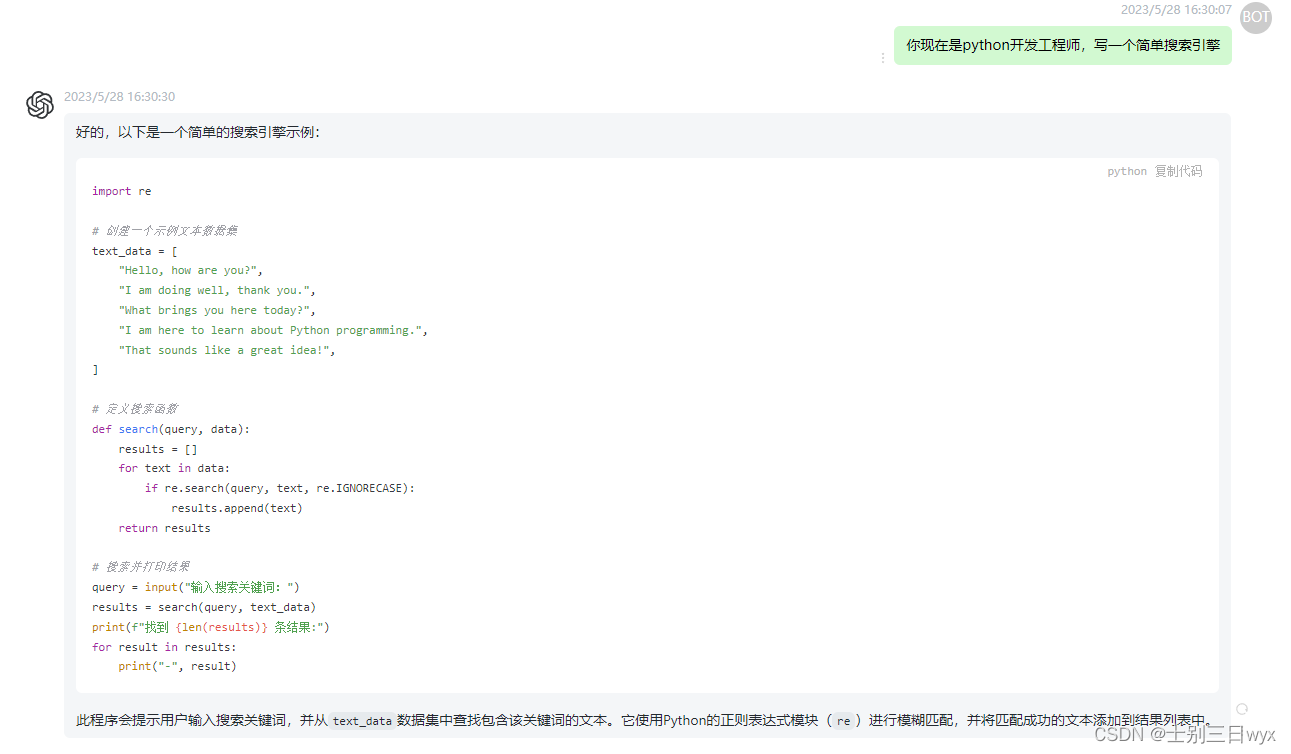
先在UI上添加控件
首先,改变一下原来的方法, 原来的三个控件是没有布局的,添加一下布局。
布局用简单的行布局,也就是说从,上到下,分成一行一行的,如下图
将上一篇文章的代码修改
<Window x:Class="Test.MainWindow"
        xmlns="http://schemas.microsoft.com/winfx/2006/xaml/presentation"
        xmlns:x="http://schemas.microsoft.com/winfx/2006/xaml"
        xmlns:d="http://schemas.microsoft.com/expression/blend/2008"
        xmlns:mc="http://schemas.openxmlformats.org/markup-compatibility/2006"
        xmlns:local="clr-namespace:Test"
        mc:Ignorable="d"
        Title="MainWindow" Height="450" Width="950">
    <Grid>
        <Grid.RowDefinitions>
            <RowDefinition Height="60"></RowDefinition>
            <RowDefinition Height="60"></RowDefinition>
            <RowDefinition Height="170"></RowDefinition>
            <RowDefinition Height="130"></RowDefinition>
        </Grid.RowDefinitions>

        <Grid Grid.Row="0">
            <Label Height="1" Background="Black" VerticalAlignment="Top"></Label>
            <Label Height="40" Width="85" Content="bin文件路径:" VerticalContentAlignment="Center" VerticalAlignment="Center" HorizontalAlignment="Left"></Label>
            <TextBox Name="TextBox_BinFilePath" Height="40" Width="600" VerticalContentAlignment="Center" HorizontalContentAlignment="Left" VerticalAlignment="Center" HorizontalAlignment="Left" Margin="100,0,0,0"></TextBox>
            <Button Name="Button_GetBinFilePath" Content="浏览bin路径" Height="40" Width="70" VerticalAlignment="Center" HorizontalAlignment="Right" Margin="0,0,100,0" Click="Button_GetBinFilePath_Click"></Button>
            <Label Height="1" Background="Black" VerticalAlignment="Bottom"></Label>
        </Grid>

        <Grid Grid.Row="1">
            <Label Height="40" Width="50" Content="端口号" VerticalContentAlignment="Center" VerticalAlignment="Center" HorizontalAlignment="Left"></Label>
            <ComboBox Name="ComboBox_SerialPortNumber" Height="40" Width="80" VerticalContentAlignment="Center" VerticalAlignment="Center" HorizontalAlignment="Left" Margin="50,0,0,0"></ComboBox>

            <Button Content="刷新端口" Name="Button_Refresh" Click="Button_Refresh_Click" Height="40" Width="90" VerticalAlignment="Center" HorizontalAlignment="Left" VerticalContentAlignment="Center" Margin="140,0,0,0"></Button>

            <Label Height="40" Width="50" Content="波特率" VerticalContentAlignment="Center" VerticalAlignment="Center" HorizontalAlignment="Center" Margin="0,0,410,0"></Label>
            <ComboBox SelectedIndex="0" Name="ComboBox_baud" Height="40" Width="80" VerticalContentAlignment="Center" VerticalAlignment="Center" HorizontalAlignment="Center" Margin="0,0,280,0">
                <ComboBoxItem Content="115200"></ComboBoxItem>
                <ComboBoxItem Content="57600"></ComboBoxItem>
                <ComboBoxItem Content="9600"></ComboBoxItem>
            </ComboBox>

            <Label Height="40" Width="50" Content="校验位" VerticalContentAlignment="Center" VerticalAlignment="Center" HorizontalAlignment="Center" Margin="0,0,140,0"></Label>
            <ComboBox SelectedIndex="0" Name="ComboBox_Parity" Height="40" Width="70" VerticalContentAlignment="Center" VerticalAlignment="Center" HorizontalAlignment="Center" Margin="0,0,20,0">
                <ComboBoxItem Content="None"></ComboBoxItem>
                <ComboBoxItem Content="Odd"></ComboBoxItem>
                <ComboBoxItem Content="Even"></ComboBoxItem>
                <ComboBoxItem Content="Space"></ComboBoxItem>
                <ComboBoxItem Content="Mark"></ComboBoxItem>
            </ComboBox>

            <Label Height="40" Width="50" Content="数据位" VerticalContentAlignment="Center" VerticalAlignment="Center" HorizontalAlignment="Center" Margin="110,0,0,0"></Label>
            <ComboBox SelectedIndex="0" Name="ComboBox_DataBit" Height="40" Width="40" VerticalContentAlignment="Center" VerticalAlignment="Center" HorizontalAlignment="Center" Margin="200,0,0,0">
                <ComboBoxItem Content="8"></ComboBoxItem>
                <ComboBoxItem Content="7"></ComboBoxItem>
                <ComboBoxItem Content="6"></ComboBoxItem>
                <ComboBoxItem Content="5"></ComboBoxItem>
            </ComboBox>

            <Label Height="40" Width="50" Content="停止位" VerticalContentAlignment="Center" VerticalAlignment="Center" HorizontalAlignment="Center" Margin="300,0,0,0"></Label>
            <ComboBox SelectedIndex="0" Name="ComboBox_StopBit" Height="40" Width="50" VerticalContentAlignment="Center" VerticalAlignment="Center" HorizontalAlignment="Center" Margin="400,0,0,0">
                <ComboBoxItem Content="1"></ComboBoxItem>
                <ComboBoxItem Content="1.5"></ComboBoxItem>
                <ComboBoxItem Content="2"></ComboBoxItem>
            </ComboBox>

            <Label Height="40" Width="50" Content="流控制" VerticalContentAlignment="Center" VerticalAlignment="Center" HorizontalAlignment="Right" Margin="0,0,190,0"></Label>
            <ComboBox SelectedIndex="0" Name="ComboBox_FlowControl" Height="40" Width="90" VerticalContentAlignment="Center" VerticalAlignment="Center" HorizontalAlignment="Right" Margin="0,0,100,0">
                <ComboBoxItem Content="None"></ComboBoxItem>
                <ComboBoxItem Content="Hardware"></ComboBoxItem>
                <ComboBoxItem Content="Software"></ComboBoxItem>
                <ComboBoxItem Content="Custom"></ComboBoxItem>
            </ComboBox>


            <Button Content="打开串口" Name="Button_OpenCloseSerial" Click="Button_OpenCloseSerial_Click" Height="40" Width="70" VerticalAlignment="Center" HorizontalAlignment="Right" VerticalContentAlignment="Center" Margin="0,0,10,0"></Button>

            <Label Height="1" Background="Black" VerticalAlignment="Bottom"></Label>
        </Grid>

    </Grid>
</Window>
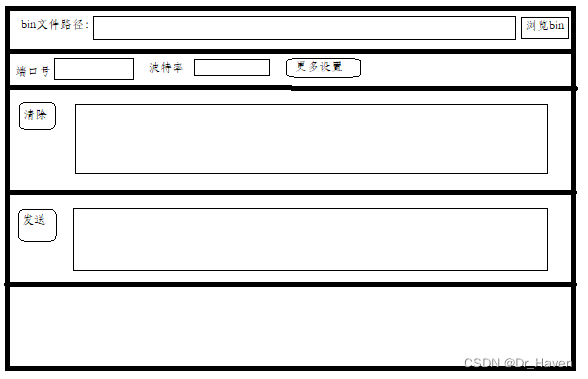
首先在布局中手动添加了边界线,虽然不好看但便于观察(直男审美,如果真正用到项目还需要美工给出UI的总体图和素材)
<Label Height="1" Background="Black" VerticalAlignment="Bottom"></Label>
其次是控件ComboBox,下拉列表框,按微软的说法:组合了 ListBox 和 TextBox 的功能。 用户可以像使用 TextBox 一样输入新值,也可以选择现有值,就像使用 ListBox 一样。微软官网ComboBox说明:https://learn.microsoft.com/zh-cn/dotnet/api/system.windows.controls.combobox?view=windowsdesktop-7.0
第一个ComboBox是端口号,也就是COMx,设备管理器中可以看到的
这个需要我们在后台去获取,即点击刷新端口按钮,然后显示到控件上,所以给了控件的ame=“ComboBox_SerialPortNumber”。
其他的不需要后台更改,所以直接在UI上把所有的选项ComboBoxItem都列出来,例如:
<ComboBoxItem Content="115200"></ComboBoxItem>
<ComboBoxItem Content="57600"></ComboBoxItem>
<ComboBoxItem Content="9600"></ComboBoxItem>
这里还可以添加其他的波特率,我只用过这三种所以只写了三个。
每一个ComboBox的默认值由SelectedIndex="0"来决定。
到此,前台UI的代码本阶段写完,开始写后台的代码了。
首先添加引用 using System.IO.Ports;
using System;
using System.Collections.Generic;
using System.Linq;
using System.Text;
using System.Threading.Tasks;
using System.Windows;
using System.Windows.Controls;
using System.Windows.Data;
using System.Windows.Documents;
using System.Windows.Input;
using System.Windows.Media;
using System.Windows.Media.Imaging;
using System.Windows.Navigation;
using System.Windows.Shapes;
using Microsoft.Win32;
using System.IO;
using System.IO.Ports;
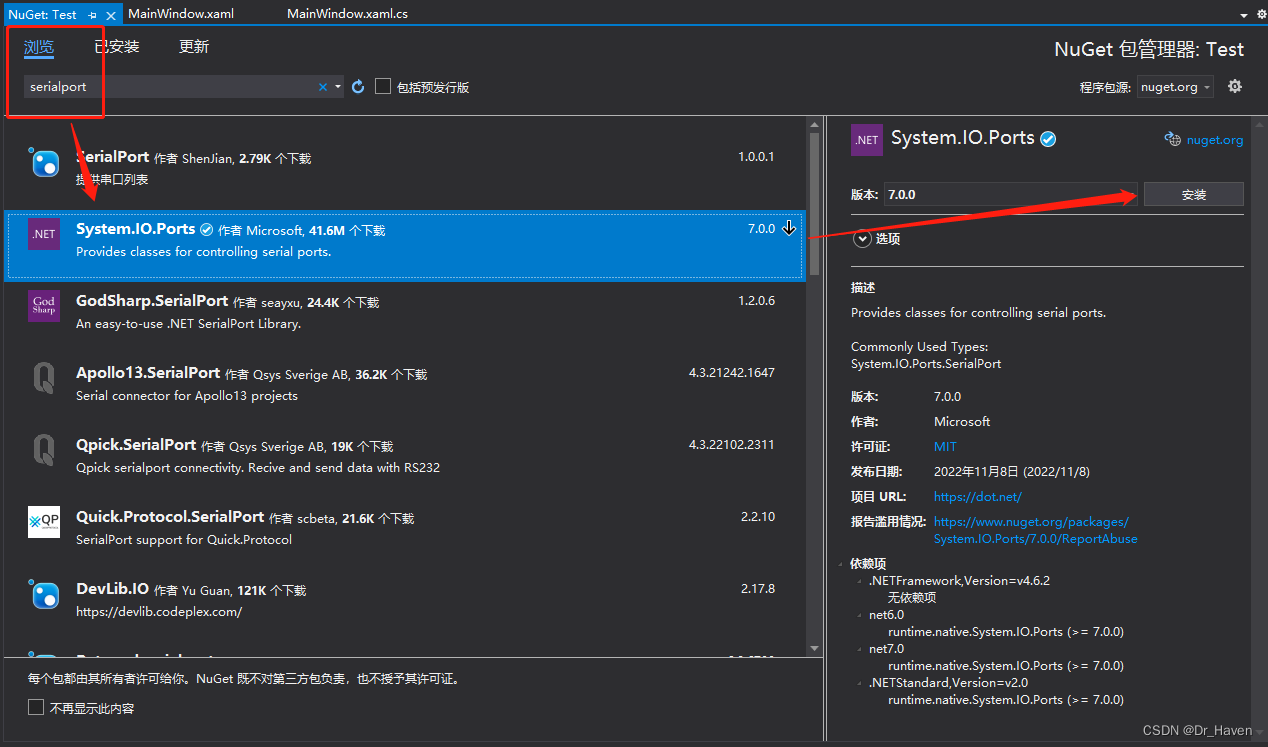
这个在vs2019后经常会报错,找不到,需要我们添加。项目–>管理NuGet程序包(N)…

选择浏览,在搜索栏输入serialport,找到作者是Microsoft的,选中它,右边点击安装
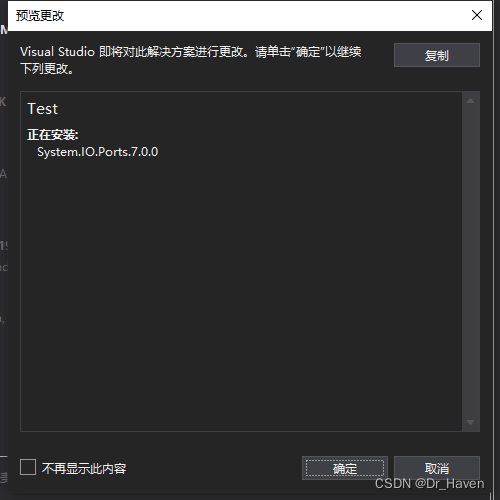
弹出一个窗口,意思是给我们的项目添加System.IO.Ports,点击确定即可
先new SerialPort
    public partial class MainWindow : Window
    {
        //读取bin文件的数据
        private byte[] g_read_data;

        //串口
        public SerialPort serialPort = new SerialPort();

        public MainWindow()
        {
            InitializeComponent();
        }
然后开始写获取端口号的button里面的代码
        private void Button_Refresh_Click(object sender, RoutedEventArgs e)
        {
            //先清空所有选项
            ComboBox_SerialPortNumber.Items.Clear();

            //获取所有端口号
            string[] ports = SerialPort.GetPortNames();

            for (int i = 0; i < ports.Length; i++)
            {
            	//将所有获取的端口号添加到下拉列表里
                ComboBox_SerialPortNumber.Items.Add(ports[i]);
            }

            //如果不只有COM1,那么默认选除了COM1外的第一个
            if (1 != ports.Length)
            {
                ComboBox_SerialPortNumber.SelectedIndex = 1;
            }
            else
            {
                ComboBox_SerialPortNumber.SelectedIndex = 0;
            }
        }
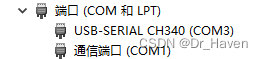
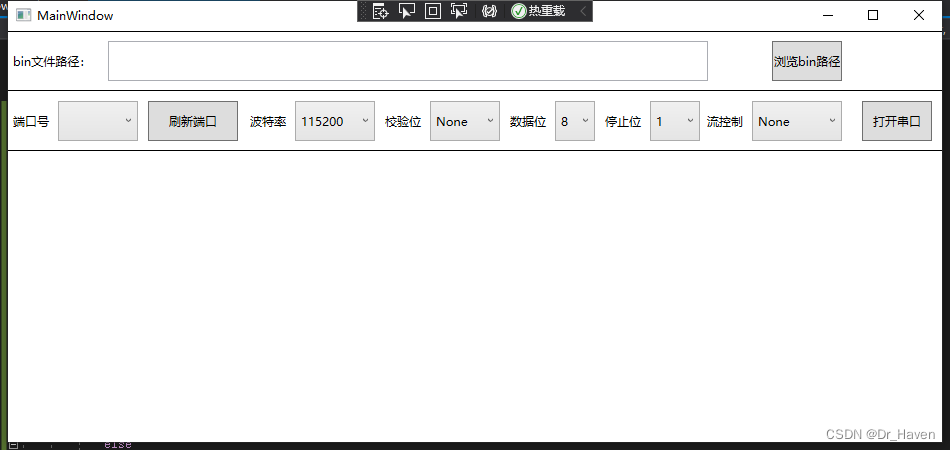
点击启动试试看,一开始端口号是空的
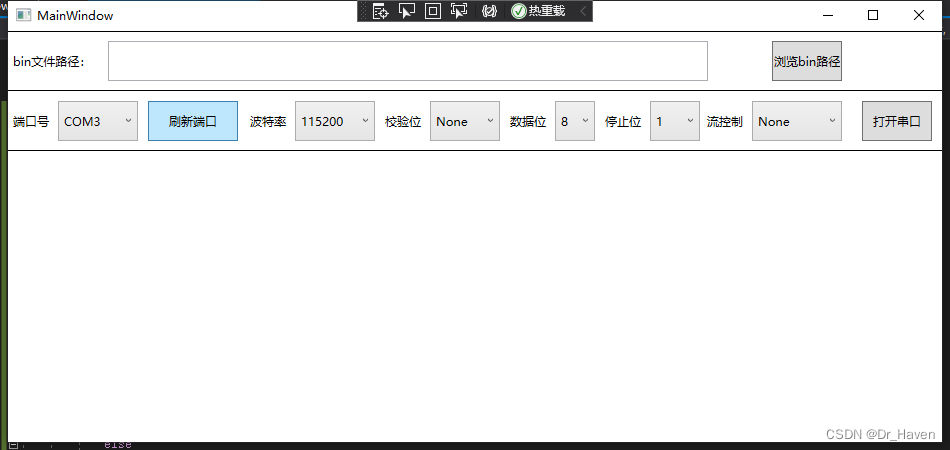
点击刷新端口,COM3出现了,刷新之前要记得插入USB转串口工具哦
如果觉得一开始端口号是空的不好,那么可以在public MainWindow()里面添加Button_Refresh_Click里面的代码,把这些代码封装成一个函数
        private void GetSerialPorts()
        {
            //先清空所有选项
            ComboBox_SerialPortNumber.Items.Clear();

            //获取所有端口号
            string[] ports = SerialPort.GetPortNames();

            for (int i = 0; i < ports.Length; i++)
            {
                //将所有获取的端口号添加到下拉列表里
                ComboBox_SerialPortNumber.Items.Add(ports[i]);
            }

            //如果不只有COM1,那么默认选除了COM1外的第一个
            if (1 != ports.Length)
            {
                ComboBox_SerialPortNumber.SelectedIndex = 1;
            }
            else
            {
                ComboBox_SerialPortNumber.SelectedIndex = 0;
            }
        }
        public MainWindow()
        {
            InitializeComponent();

            GetSerialPorts();
        }

        private void Button_Refresh_Click(object sender, RoutedEventArgs e)
        {
            GetSerialPorts();
        }
如此打开程序后,端口号就不是空的了。
接下来写打开串口的button
        private void Button_OpenCloseSerial_Click(object sender, RoutedEventArgs e)
        {
            if (ComboBox_SerialPortNumber.Items.IsEmpty)
            {
                MessageBox.Show("端口号是空的!");

                return;
            }

            //获取button上的文字内容
            string bt_str = this.Button_OpenCloseSerial.Content.ToString();

            if ("打开串口" == bt_str)
            {
                try
                {
                    //串口号
                    serialPort.PortName = ComboBox_SerialPortNumber.SelectedItem.ToString();

                    //波特率,string转int
                    ComboBoxItem comboBoxItem = (ComboBoxItem)this.ComboBox_baud.SelectedItem;
                    serialPort.BaudRate = Convert.ToInt32(comboBoxItem.Content.ToString());

                    //数据位,string转int
                    comboBoxItem = (ComboBoxItem)this.ComboBox_DataBit.SelectedItem;
                    serialPort.DataBits = Convert.ToInt32(comboBoxItem.Content.ToString());

                    //停止位,这玩意是个enum,不能直接转出int32
                    comboBoxItem = (ComboBoxItem)this.ComboBox_StopBit.SelectedItem;
                    Double stopbits = Convert.ToDouble(comboBoxItem.Content.ToString());

                    switch (stopbits)
                    {
                        case 1:
                            serialPort.StopBits = StopBits.One;
                            break;

                        case 1.5:
                            serialPort.StopBits = StopBits.OnePointFive;
                            break;

                        case 2:
                            serialPort.StopBits = StopBits.Two;
                            break;

                        default:
                            serialPort.StopBits = StopBits.One;
                            break;
                    }

                    //校验位
                    Int32 parity = ComboBox_Parity.SelectedIndex;

                    switch (parity)
                    {
                        case 0:
                            serialPort.Parity = Parity.None;
                            break;

                        case 1:
                            serialPort.Parity = Parity.Odd;
                            break;

                        case 2:
                            serialPort.Parity = Parity.Even;
                            break;

                        case 3:
                            serialPort.Parity = Parity.Mark;
                            break;

                        case 4:
                            serialPort.Parity = Parity.Space;
                            break;

                        default:
                            serialPort.Parity = Parity.None;
                            break;
                    }

                    //SerialPort里flow control的相关内容是Handshake
                    Int32 handshake = ComboBox_FlowControl.SelectedIndex;

                    switch (handshake)
                    {
                        case 0:
                            serialPort.Handshake = Handshake.None;
                            break;

                        case 1:
                            serialPort.Handshake = Handshake.XOnXOff;
                            break;

                        case 2:
                            serialPort.Handshake = Handshake.RequestToSend;
                            break;

                        case 3:
                            serialPort.Handshake = Handshake.RequestToSendXOnXOff;
                            break;

                        default:
                            serialPort.Handshake = Handshake.None;
                            break;
                    }

                    serialPort.Open();

                    //serialPort.DataReceived += new SerialDataReceivedEventHandler(SerialDataReceivedHandler);
                    //serialPort.DataReceived += SerialDataReceivedHandler;

                    Button_OpenCloseSerial.Content = "关闭串口";
                }
                catch
                {
                    MessageBox.Show("打开串口失败!");
                }
            }
            else
            {
                try
                {
                    //serialPort.DataReceived -= SerialDataReceivedHandler;
                    serialPort.Close();

                    Button_OpenCloseSerial.Content = "打开串口";
                }
                catch
                {
                    MessageBox.Show("关闭串口失败!");
                }

            }

        }
运行点击打开串口,没有报错,文字也变成了关闭串口。
在serialPort.Open()打断点,添加serialPort到监视,可以看到端口、波特率等相关的值都是对的
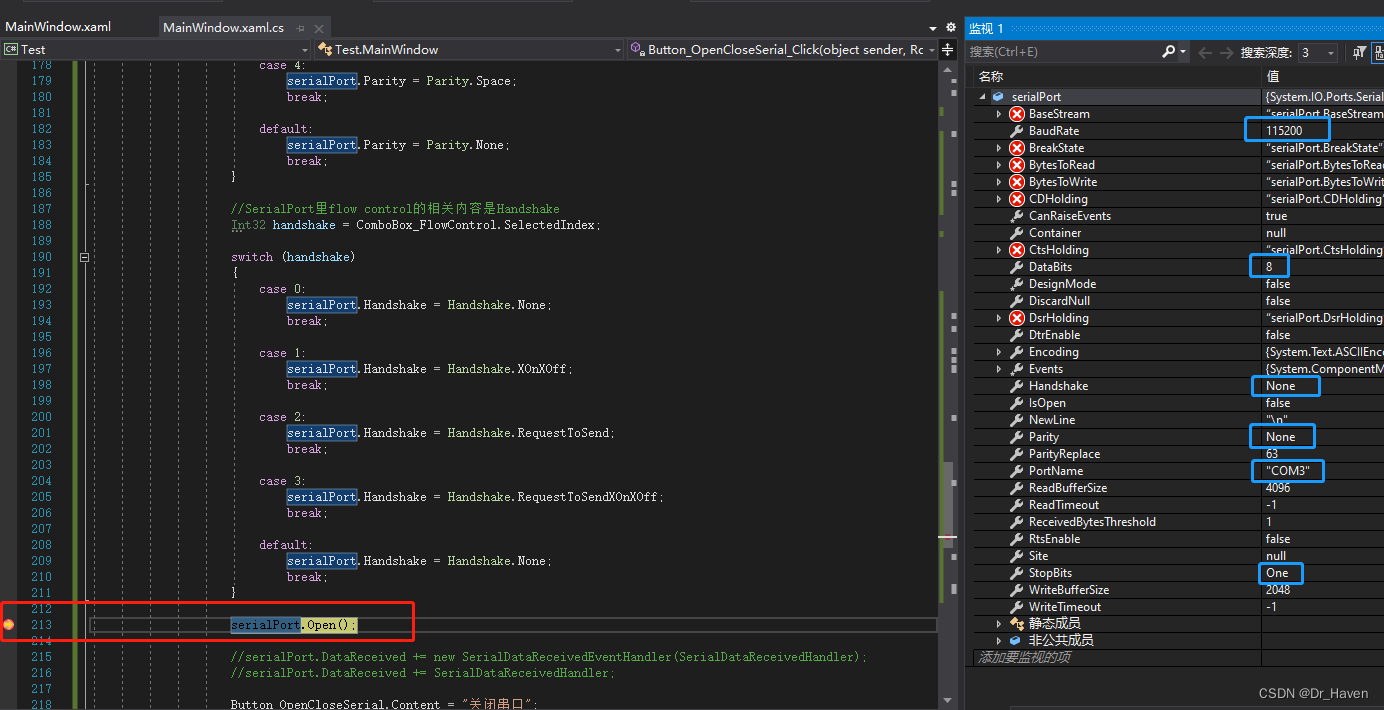
SerialPort类的所有属性和方法可以在官网查看
https://learn.microsoft.com/zh-cn/dotnet/api/system.io.ports.serialport?view=dotnet-plat-ext-7.0
章节到此结束,下一个就要处理串口的数据收发了


![[Nacos] Nacos Server与Nacos Client间的UDP通信 (十)](https://img-blog.csdnimg.cn/d63f96d5baf44cd9a263e0fbb4085909.png)

![[NOIP2004 普及组] FBI 树 队列解法](https://img-blog.csdnimg.cn/478a9d14d11349618823879bedc2cf7a.png)