案例背景(共8页精讲):
该篇将告诉您:如何使用Vector HexView工具,j将一个bin文件转换为Intel Hex或Motorola S-record(S19/SREC/mot/SX)文件。
目录
1 Intel Hex,Motorola S-record(S19/SREC/mot/SX),Bin文件之间的差异/区别
2 使用Vector HexView工具实现:Intel Hex或Motorola S-record(S19/SREC/mot/SX)文件转换为Bin文件
2.1 Bin文件转换为Motorola S-record(S19/SREC/mot/SX)文件
2.1.1 “自动”完成:bin文件到S19文件的转换
2.1.2 “手动”完成:bin文件到S19文件的转换
2.1.3 Command line命令行说明
2.2 Bin文件转换为Intel Hex文件
2.2.1 “自动”完成:bin文件到Hex文件的转换
2.2.2 “手动”完成:bin文件到Hex文件的转换
2.2.3 Command line命令行说明
结尾
优质博文推荐阅读(单击下方链接,即可跳转):
点击返回「《Autosar从入门到精通-实战篇》总目录」
点击返回「《Autosar_BSW高阶配置》总目录」
点击返回《嵌入式硬件/软件开发刷写/烧录文件》专栏
1 Intel Hex,Motorola S-record(S19/SREC/mot/SX),Bin文件之间的差异/区别
详见博文“【嵌入式烧录/刷写文件】-4.1-Intel Hex,Motorola S-record,Bin文件之间的差异/区别![]() https://blog.csdn.net/qfmzhu/article/details/129883916”。
https://blog.csdn.net/qfmzhu/article/details/129883916”。
2 使用Vector HexView工具实现:Intel Hex或Motorola S-record(S19/SREC/mot/SX)文件转换为Bin文件
2.1 Bin文件转换为Motorola S-record(S19/SREC/mot/SX)文件
2.1.1 “自动”完成:bin文件到S19文件的转换
基于批处理Bat(如下图中的Bin_To_S19_File.bat)调用HexView工具提供的Command line,通过该脚本实现将bin文件(Application.s19)转换S19文件。将该脚本集成开发环境IDE(CodeWarrior,S32K DS,Davinci,EB Tresos,ETAS…)中,即可自动实现。见图2-1。
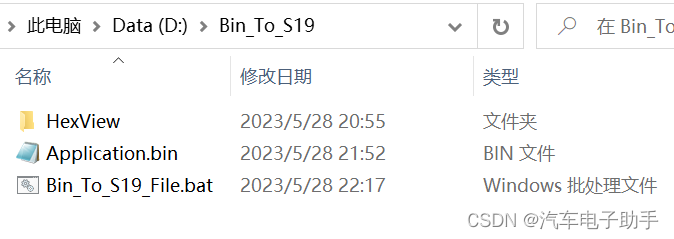
图2-1
Application.bin摘录(见图2-2):
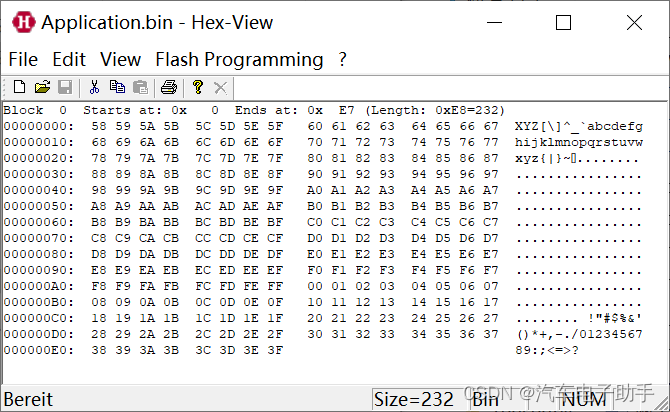
图2-2
Bin_To_S19_File.bat摘录:
@echo off

Rem Path to the executable exe of the Vector HexView tool on your PC
set "HexViewPath=D:\Bin_To_S19\HexView\hexview.exe"

Rem The input file Input_Bin_File
set "Input_Bin_File=D:\Bin_To_S19\Application.bin"

Rem The output file Output_S19_Temp_File
set "Output_S19_Temp_File=D:\Bin_To_S19\Application_Temp.s19"

Rem The output file Output_S19_File
set "Output_S19_File=D:\Bin_To_S19\Application_Finish.s19"

Rem Call the command line provided by the HexView tool to convert the bin file to a S19 file
%HexViewPath% /S %Input_Bin_File% /XS:32:0 -o %Output_S19_Temp_File%

Rem Move the data in the source address range to an "empty, unpopulated" destination address range
%HexViewPath% /S %Output_S19_Temp_File% /remap:0x0-0xe7,0x9100,0xE8,0x10000 /XS:32 -o %Output_S19_File%
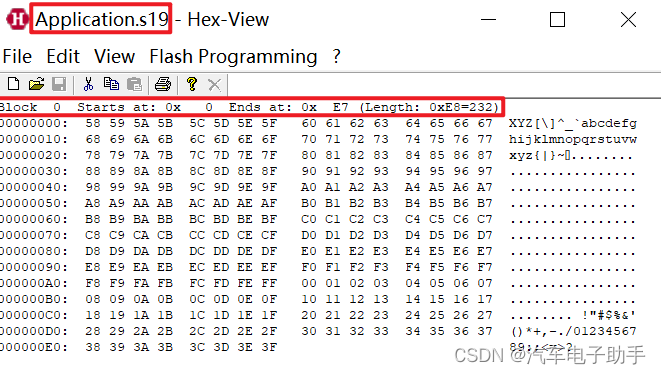
由于Bin文件转换为S19文件的起始地址是0,见图2-3,而“%HexViewPath% /S %Output_S19_Temp_File% /remap:0x0-0xe7,0x9100,0xE8,0x10000 /XS:32 -o %Output_S19_File%”正是参考博文“【嵌入式烧录/刷写文件】-1.4-移动Motorola S-record(S19/SREC/mot/SX)中指定地址范围内的数据”,目的是将:将源地址范围0x0-0xE7中数据,移动至一个“空的,未填充的”目标地址范围0x9100-0x91E7。
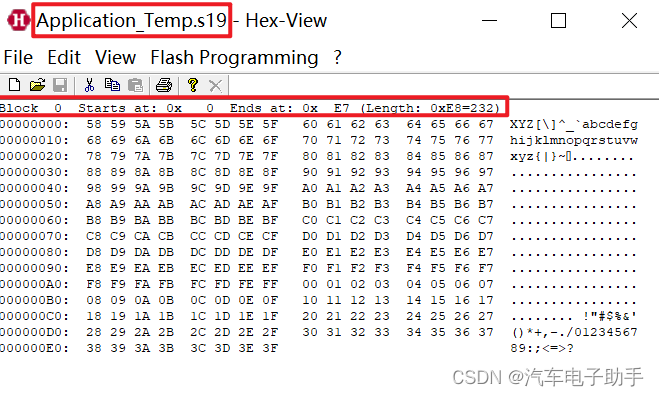
图2-3
运行该批处理Bin_To_S19_File.bat,即可得到转换后的Application_Finish.s19文件。

2.1.2 “手动”完成:bin文件到S19文件的转换
打开Vector Hexview工具打开bin文件,在菜单栏中依次选择File-- > Export -- > Export as S-Record;
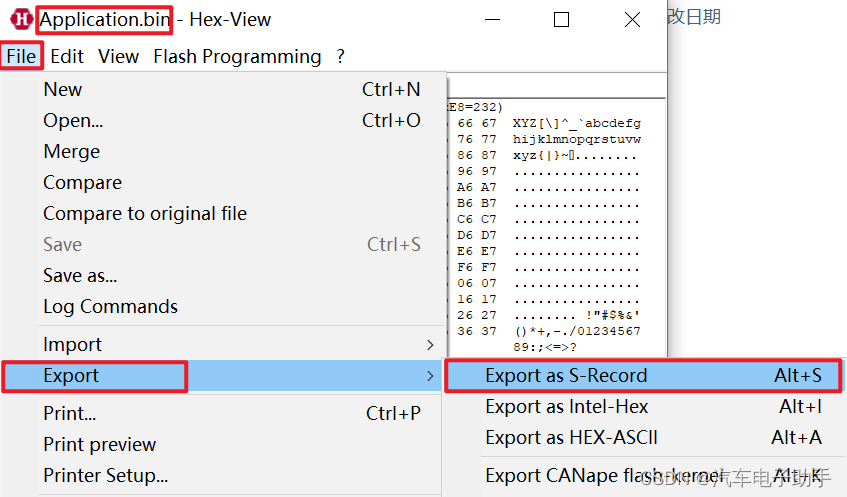
在弹出的Setup SREC-Export对话框中,选择合适: Record type,Record Line Length,以及命名并保存Application.s19文件,并单击OK,完成转换。
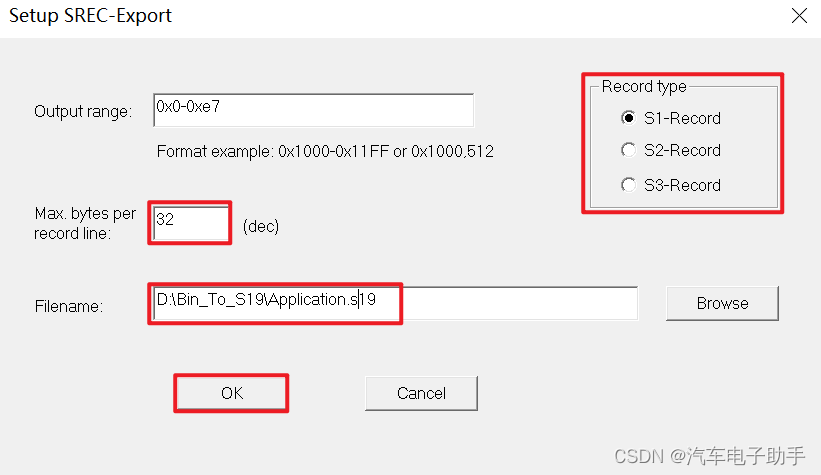
接着打开Application.s19文件,参考博文“【嵌入式烧录/刷写文件】-1.4-移动Motorola S-record(S19/SREC/mot/SX)中指定地址范围内的数据”的第1.2章节,将源地址范围0x0-0xE7中数据,移动至一个“空的,未填充的”目标地址范围0x9100-0x91E7。
2.1.3 Command line命令行说明
/XS[:reclinelen[:rectype]] 以Motorola S-Record格式导出
reclinelen: 指定输出行中的数据字节数;
rectype : 指定记录类型0: S1-Record; 1: S2-Record;2: S3-Record。
/remap:BankStartAddress-BankEndAddress,LinearBaseAddress,BankSize,BankIncrement
这个选项的目的是用于使用内存库寻址方案的控制器。该选项从物理库的寻址计算到线性寻址方案。
BankStartAddress:表示源地址范围的起始地址;
BankEndAddress:表示源地址范围的起始地址;
LinearBaseAddress:表示目标地址范围的起始地址;
BankSize:表示源地址范围内,需要移动的长度;
BankIncrement:BankIncrement是两个bank之间的地址差,例如,1号bank的BankStartAddress和2号bank的BankStartAddress之间的差异。暂默认0x10000。
2.2 Bin文件转换为Intel Hex文件
2.2.1 “自动”完成:bin文件到Hex文件的转换
基于批处理Bat(如下图中的Bin_To_Hex_File.bat)调用HexView工具提供的Command line,通过该脚本实现将bin文件(Application.s19)转换Hex文件。将该脚本集成开发环境IDE(CodeWarrior,S32K DS,Davinci,EB Tresos,ETAS…)中,即可自动实现。见图2-4。

图2-4
Application.bin摘录(见图2-5):
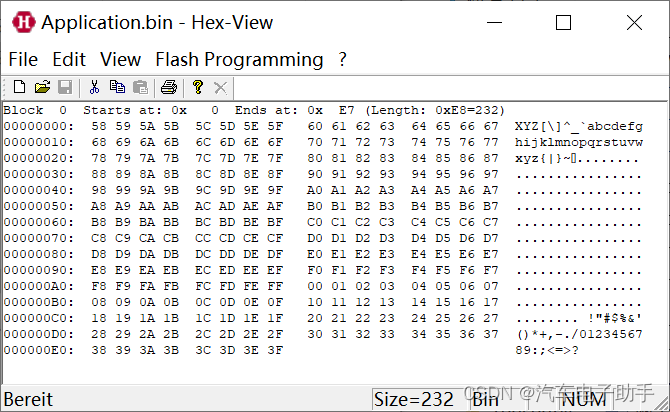
图2-5
Bin_To_Hex_File.bat摘录:
@echo off

Rem Path to the executable exe of the Vector HexView tool on your PC
set "HexViewPath=D:\Bin_To_Hex\HexView\hexview.exe"

Rem The input file Input_Bin_File
set "Input_Bin_File=D:\Bin_To_Hex\Application.bin"

Rem The output file Output_Hex_Temp_File
set "Output_Hex_Temp_File=D:\Bin_To_Hex\Application_Temp.hex"

Rem The output file Output_Hex_File
set "Output_Hex_File=D:\Bin_To_Hex\Application_Finish.hex"

Rem Call the command line provided by the HexView tool to convert the hex file to a bin file
%HexViewPath% /S %Input_Bin_File% /XI:32:0 -o %Output_Hex_Temp_File%

Rem Move the data in the source address range to an "empty, unpopulated" destination address range
%HexViewPath% /S %Output_Hex_Temp_File% /remap:0x0-0xe7,0x9100,0xE8,0x10000 /XI:32 -o %Output_Hex_File%
由于Bin文件转换为Hex文件的起始地址是0,见图2-6,而“%HexViewPath% /S %Output_Hex_Temp_File% /remap:0x0-0xe7,0x9100,0xE8,0x10000 /XI:32 -o %Output_Hex_File%”正是参考博文“【嵌入式烧录/刷写文件】-2.4-移动Intel Hex中指定地址范围内的数据 ”,目的是将:将源地址范围0x0-0xE7中数据,移动至一个“空的,未填充的”目标地址范围0x9100-0x91E7。
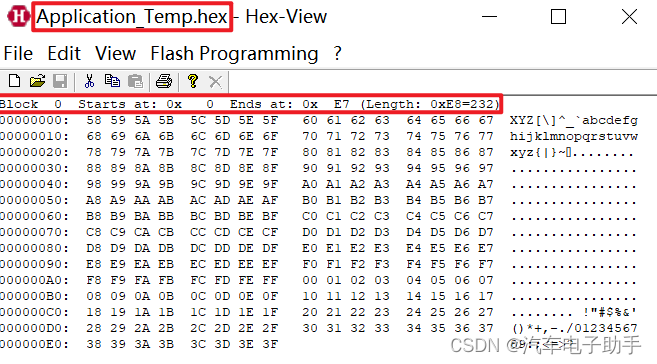
图2-6
运行该批处理Bin_To_Hex_File.bat,即可得到转换后的Application_Finish.hex文件。

2.2.2 “手动”完成:bin文件到Hex文件的转换
打开Vector Hexview工具打开bin文件,在菜单栏中依次选择File-- > Export -- > Export as Intel-Hex;
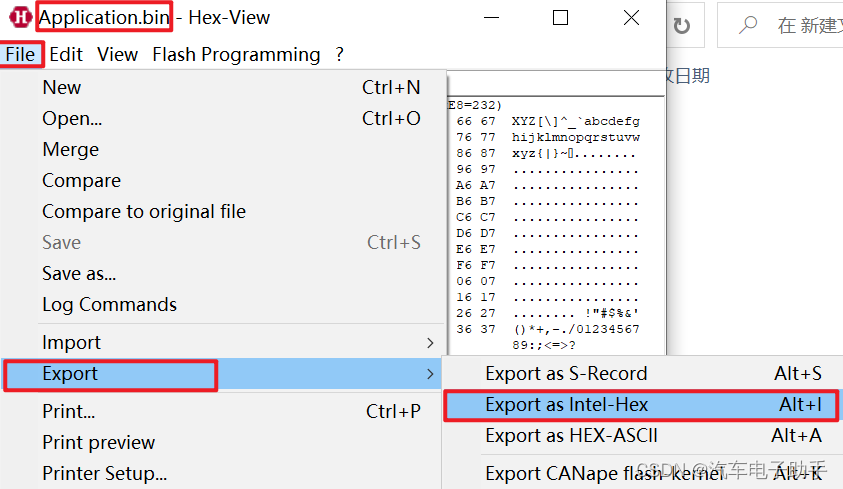
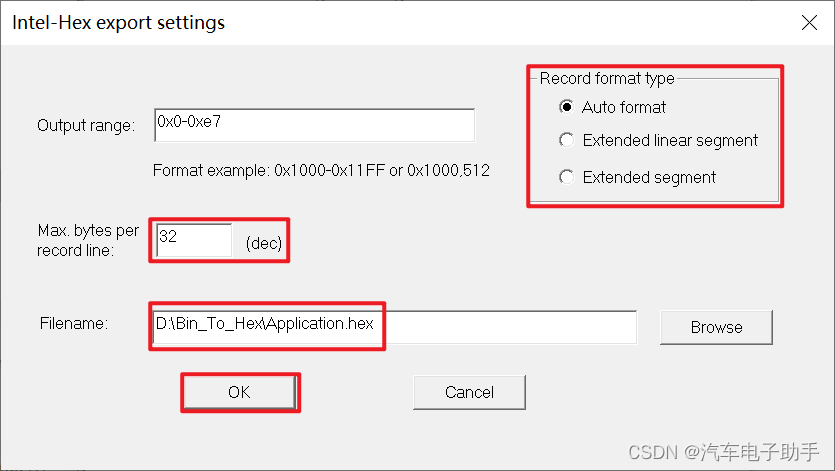
在弹出的Setup SREC-Export对话框中,选择合适: Record format type,Record Line Length,以及命名并保存Application.hex文件,并单击OK,完成转换。
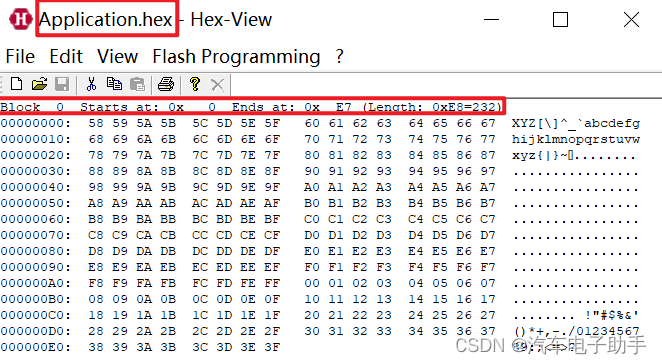
接着打开Application.hex文件,参考博文“【嵌入式烧录/刷写文件】-2.4-移动Intel Hex中指定地址范围内的数据 ”的第1.2章节,将源地址范围0x0-0xE7中数据,移动至一个“空的,未填充的”目标地址范围0x9100-0x91E7。
2.2.3 Command line命令行说明
/XI[:reclinelen[:rectype]] 以Intel-HEX格式导出
reclinelen: 指定输出行中的数据字节数;
rectype : 指定记录类型0: Auto selection (same as omitting the parameter); 1: Extended Linear Segment;2: Extended Segment。
/remap:BankStartAddress-BankEndAddress,LinearBaseAddress,BankSize,BankIncrement
这个选项的目的是用于使用内存库寻址方案的控制器。该选项从物理库的寻址计算到线性寻址方案。
BankStartAddress:表示源地址范围的起始地址;
BankEndAddress:表示源地址范围的起始地址;
LinearBaseAddress:表示目标地址范围的起始地址;
BankSize:表示源地址范围内,需要移动的长度;
BankIncrement:BankIncrement是两个bank之间的地址差,例如,1号bank的BankStartAddress和2号bank的BankStartAddress之间的差异。暂默认0x10000。
结尾
获取更多“汽车电子资讯”和“工具链使用”,
请关注CSDN博客“汽车电子助手”,做您的好助手。

