Spring核心之IoC

一、IoC概念介绍
1.IoC 介绍
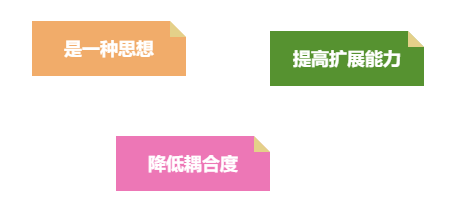
IoC 是 Inversion of Control 的简写,译为“控制反转”,它不是一门技术,而是一种设计思想,是一个重要的面向对象编程法则,能够指导我们如何设计出松耦合、更优良的程序。
Spring 通过 IoC 容器来管理所有 Java 对象的实例化和初始化,控制对象与对象之间的依赖关系。我们将由 IoC 容器管理的 Java 对象称为 Spring Bean,它与使用关键字 new 创建的 Java 对象没有任何区别。
IoC 容器是 Spring 框架中最重要的核心组件之一,它贯穿了 Spring 从诞生到成长的整个过程。
控制反转,反转的是什么?

控制反转这种思想如何实现呢?

有些情况下我们认为IoC包含了DI。当然我们也可以分开来看。
2.DI 介绍
DI(Dependency Injection):依赖注入,依赖注入实现了控制反转的思想。
指Spring创建对象的过程中,将对象依赖属性通过配置进行注入
依赖注入常见的实现方式包括两种:

通过上面的介绍我们可以这么理解IoC和DI的关系
- IoC是一种控制反转的思想
- DI是对IoC的一种具体实现
相对于Bean的管理来说。IoC和DI要做的事情就是Bean对象的创建、以及Bean对象中属性的赋值(或者是相互间的关系维护)。
3. Spring中的IoC实现

Spring 的 IoC 容器就是 IoC思想的一个落地的产品实现。IoC容器中管理的组件也叫做 bean。在创建 bean 之前,首先需要创建IoC 容器。Spring 提供了IoC 容器的两种实现方式:
BeanFactory
这是 IoC 容器的基本实现,是 Spring 内部使用的接口。面向 Spring 本身,不提供给开发人员使用。
ApplicationContext
BeanFactory 的子接口,提供了更多高级特性。面向 Spring 的使用者,几乎所有场合都使用 ApplicationContext 而不是底层的 BeanFactory。
ApplicationContext的主要实现类:
| 类型名 | 简介 |
|---|---|
| ClassPathXmlApplicationContext | 通过读取类路径下的 XML 格式的配置文件创建 IOC 容器对象 |
| FileSystemXmlApplicationContext | 通过文件系统路径读取 XML 格式的配置文件创建 IOC 容器对象 |
| ConfigurableApplicationContext | ApplicationContext 的子接口,包含一些扩展方法 refresh() 和 close() ,让 ApplicationContext 具有启动、关闭和刷新上下文的能力。 |
| WebApplicationContext | 专门为 Web 应用准备,基于 Web 环境创建 IOC 容器对象,并将对象引入存入 ServletContext 域中。 |
二、基于XML的方式
1.搭建案例项目
和前面的入门案例的步骤是一样的,创建项目,添加相关依赖和引入对应的配置文件。
<dependencies>
        <!--spring context依赖-->
        <!--当你引入Spring Context依赖之后,表示将Spring的基础依赖引入了-->
        <dependency>
            <groupId>org.springframework</groupId>
            <artifactId>spring-context</artifactId>
            <version>5.3.27</version>
        </dependency>

        <!--junit5测试-->
        <dependency>
            <groupId>org.junit.jupiter</groupId>
            <artifactId>junit-jupiter-api</artifactId>
            <version>5.3.1</version>
        </dependency>
        <!--log4j2的依赖-->
        <dependency>
            <groupId>org.apache.logging.log4j</groupId>
            <artifactId>log4j-core</artifactId>
            <version>2.19.0</version>
        </dependency>
        <dependency>
            <groupId>org.apache.logging.log4j</groupId>
            <artifactId>log4j-slf4j2-impl</artifactId>
            <version>2.19.0</version>
        </dependency>
    </dependencies>
2. 获取Bean的方式
2.1 根据ID类获取
我们可以通过在Bean 标签中定义的id属性来获取IoC容器中的对象,id属性具有唯一性。我们可以通过id精确的找到唯一的对象。
<bean id="helloWorld" class="com.boge.spring.HelloWorld"></bean>
具体的单元测试代码
    @Test
    public void test1(){
        // 1.获取Spring的IoC容器
        ApplicationContext ac = new ClassPathXmlApplicationContext("ApplicationContext.xml");
       // 2.根据定义的id来从IoC容器中获取Bean的对象 快捷键 Alt + Enter
        HelloWorld helloWorld = (HelloWorld) ac.getBean("helloWorld");
        helloWorld.sayHello();
        logger.info("通过ID获取Bean对象");
    }
2.2 根据类型获取
我们通过id或者name获取是获取到的一个Object对象。我们需要自己强制类型转换,我们还可以根据需要获取的类型中IoC容器中获取我们的对象。
    /**
     * 根据类型属性来获取
     */
    @Test
    public void test3(){
        // 1.获取Spring的IoC容器
        ApplicationContext ac = new ClassPathXmlApplicationContext("ApplicationContext.xml");
        // 2.根据定义的id来从IoC容器中获取Bean的对象 快捷键 Alt + Enter
        HelloWorld helloWorld = ac.getBean(HelloWorld.class);
        helloWorld.sayHello();
        logger.info("通过Class获取Bean对象");
    }
通过类型来获取Bean对象。那么有个问题需要注意。如果IoC容器中有多个相同类型的Bean对象。那么我们直接通过类型来获取就会有问题。

然后我们再获取的时候就会提示异常信息
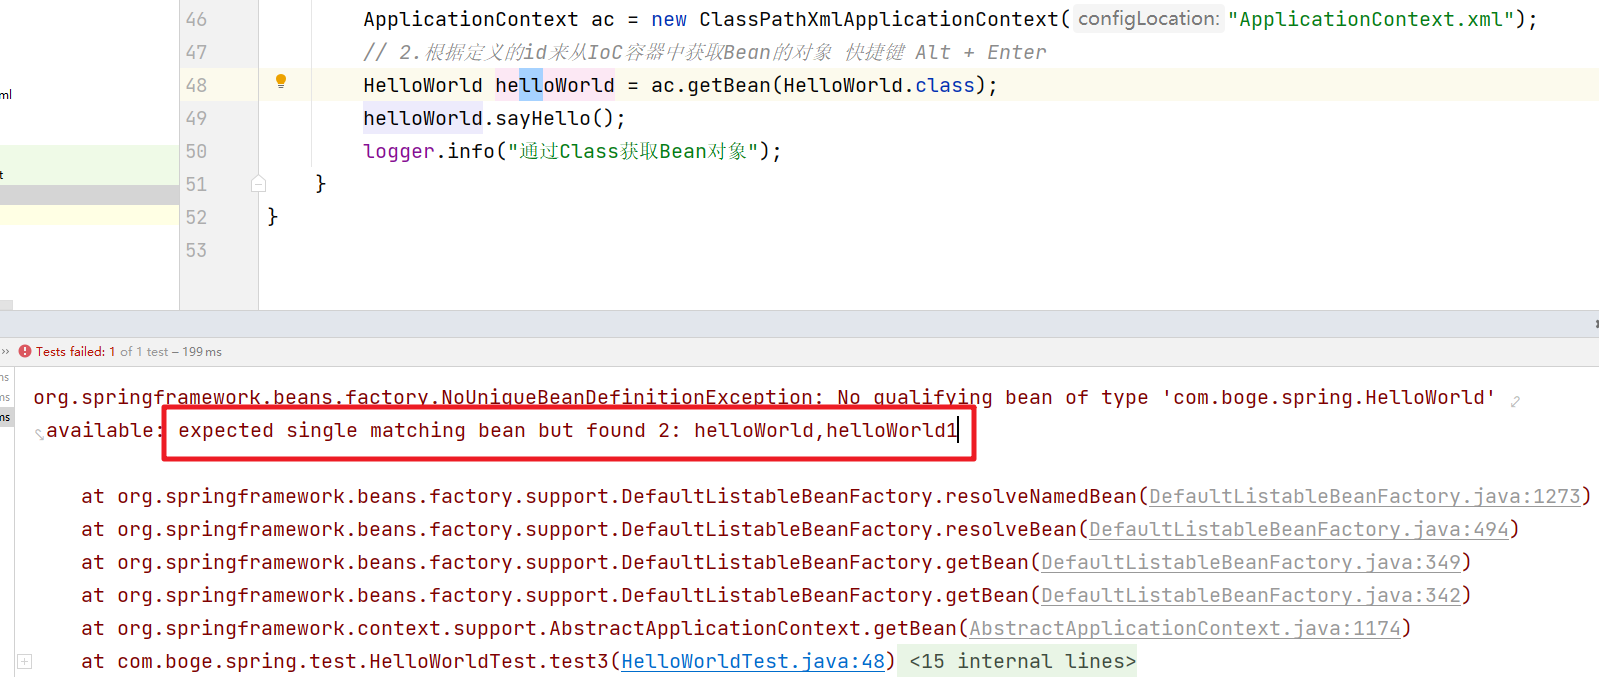
那么针对于这种情况我们的解决方案如下:
2.3 根据Id和类型获取
上面的情况中相同类型的Bean对象在IoC容器中有多个。直接获取会抛出异常信息。这时我们可以通过组合的方式来获取,也就就通过id+class的方式来获取。
    /**
     * 根据Id + 类型属性来获取
     */
    @Test
    public void test4(){
        // 1.获取Spring的IoC容器
        ApplicationContext ac = new ClassPathXmlApplicationContext("ApplicationContext.xml");
        // 2.根据定义的id+类型从IoC容器中获取Bean的对象 快捷键 Alt + Enter
        HelloWorld helloWorld = ac.getBean("helloWorld1",HelloWorld.class);
        helloWorld.sayHello();
        logger.info("通过Class获取Bean对象");
    }
3. 依赖注入之setter
我们前面的案例都只是直接创建了一个对象。并没有对相关的属性做对应的操作。我们可以通过依赖注入来完成相关的属性的初始化。我们可以创建一个简单的Bean。
package com.boge.spring.bean;

public class Student {
    private Integer id;
    private String name;
    private Integer age;
    private String gender;

    public Integer getId() {
        return id;
    }

    public void setId(Integer id) {
        this.id = id;
    }

    public String getName() {
        return name;
    }

    public void setName(String name) {
        this.name = name;
    }

    public Integer getAge() {
        return age;
    }

    public void setAge(Integer age) {
        this.age = age;
    }

    public String getGender() {
        return gender;
    }

    public void setGender(String gender) {
        this.gender = gender;
    }

    @Override
    public String toString() {
        return "Student{" +
                "id=" + id +
                ", name='" + name + '\'' +
                ", age=" + age +
                ", gender='" + gender + '\'' +
                '}';
    }
}
然后我们的配置文件中通过 property标签来完成setter注入:
    <!-- 我们可以通过setter来完成属性的赋值操作 -->
    <bean id="student1" class="com.boge.spring.bean.Student">
        <!--
            property标签:通过Bean中定义的setter方法来给组件做赋值
            name属性:指定的属性名称。setXxx() 方法来完成赋值
            value属性:setXxx(value) 属性值
         -->
        <property name="id" value="1"></property>
        <property name="name" value="波哥"></property>
        <property name="age" value="18"></property>
        <property name="gender" value="男" ></property>
    </bean>
然后对应的执行效果
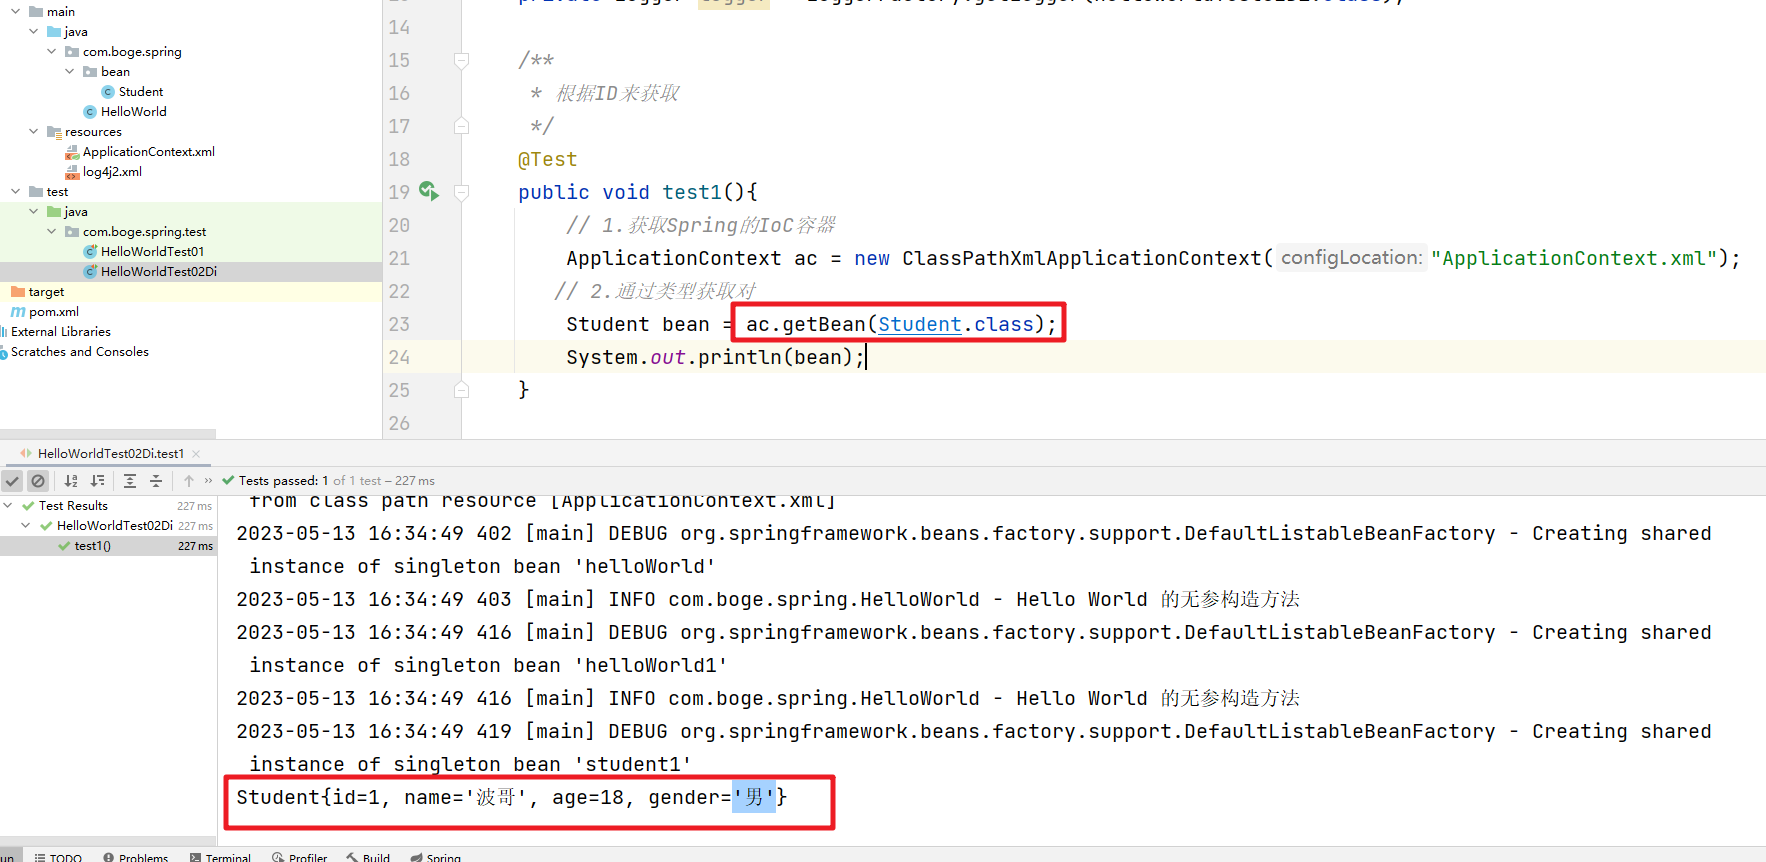
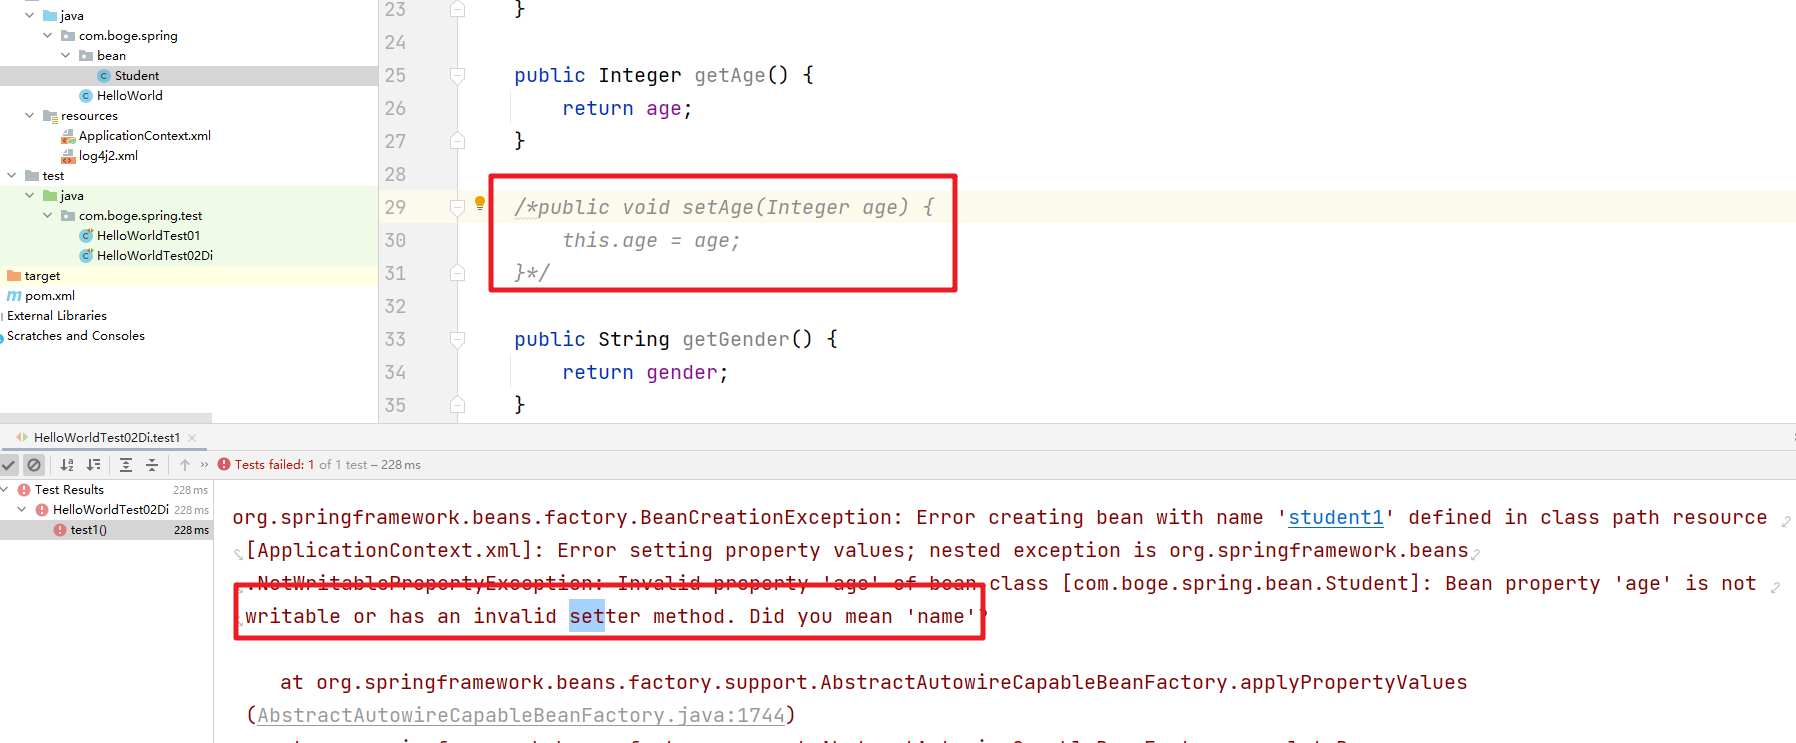
在这儿需要注意。对应的属性我们必须要提供setter方法。
4. 依赖注入之构造注入
针对上面的设置注入中的必要条件是对应的属性必须添加相关的setter方法。我们可以通过构造注入的方式来解决。
package com.boge.spring.bean;

public class User {

    private Integer id;

    private String name;

    private Integer age;

    private String gender;

    public User(Integer id, String name, Integer age, String gender) {
        this.id = id;
        this.name = name;
        this.age = age;
        this.gender = gender;
    }

    public User() {
    }

    @Override
    public String toString() {
        return "User{" +
                "id=" + id +
                ", name='" + name + '\'' +
                ", age=" + age +
                ", gender='" + gender + '\'' +
                '}';
    }
}
然后我们在配置文件中定义
<bean class="com.boge.spring.bean.User">
        <!--
            构造注入的实现
            constructor-arg标签:表示了对应Bean中的构造选项
        -->
        <!--<constructor-arg value="10086"></constructor-arg>
        <constructor-arg value="boge"></constructor-arg>
        <constructor-arg value="20"></constructor-arg>
        <constructor-arg value="女"></constructor-arg>-->
        <!-- name属性:指定的就是构造方法中的属性名称 -->
        <!--<constructor-arg name="id" value="10086"></constructor-arg>
        <constructor-arg name="name" value="boge"></constructor-arg>
        <constructor-arg name="age" value="20"></constructor-arg>
        <constructor-arg name="gender" value="女"></constructor-arg>-->
        <!-- index:表示该属性在构造方法中的位置。从0开始 -->
        <constructor-arg index="0" value="10086"></constructor-arg>
        <constructor-arg index="1" value="boge"></constructor-arg>
        <constructor-arg index="2" value="20"></constructor-arg>
        <constructor-arg index="3" value="女"></constructor-arg>

    </bean>
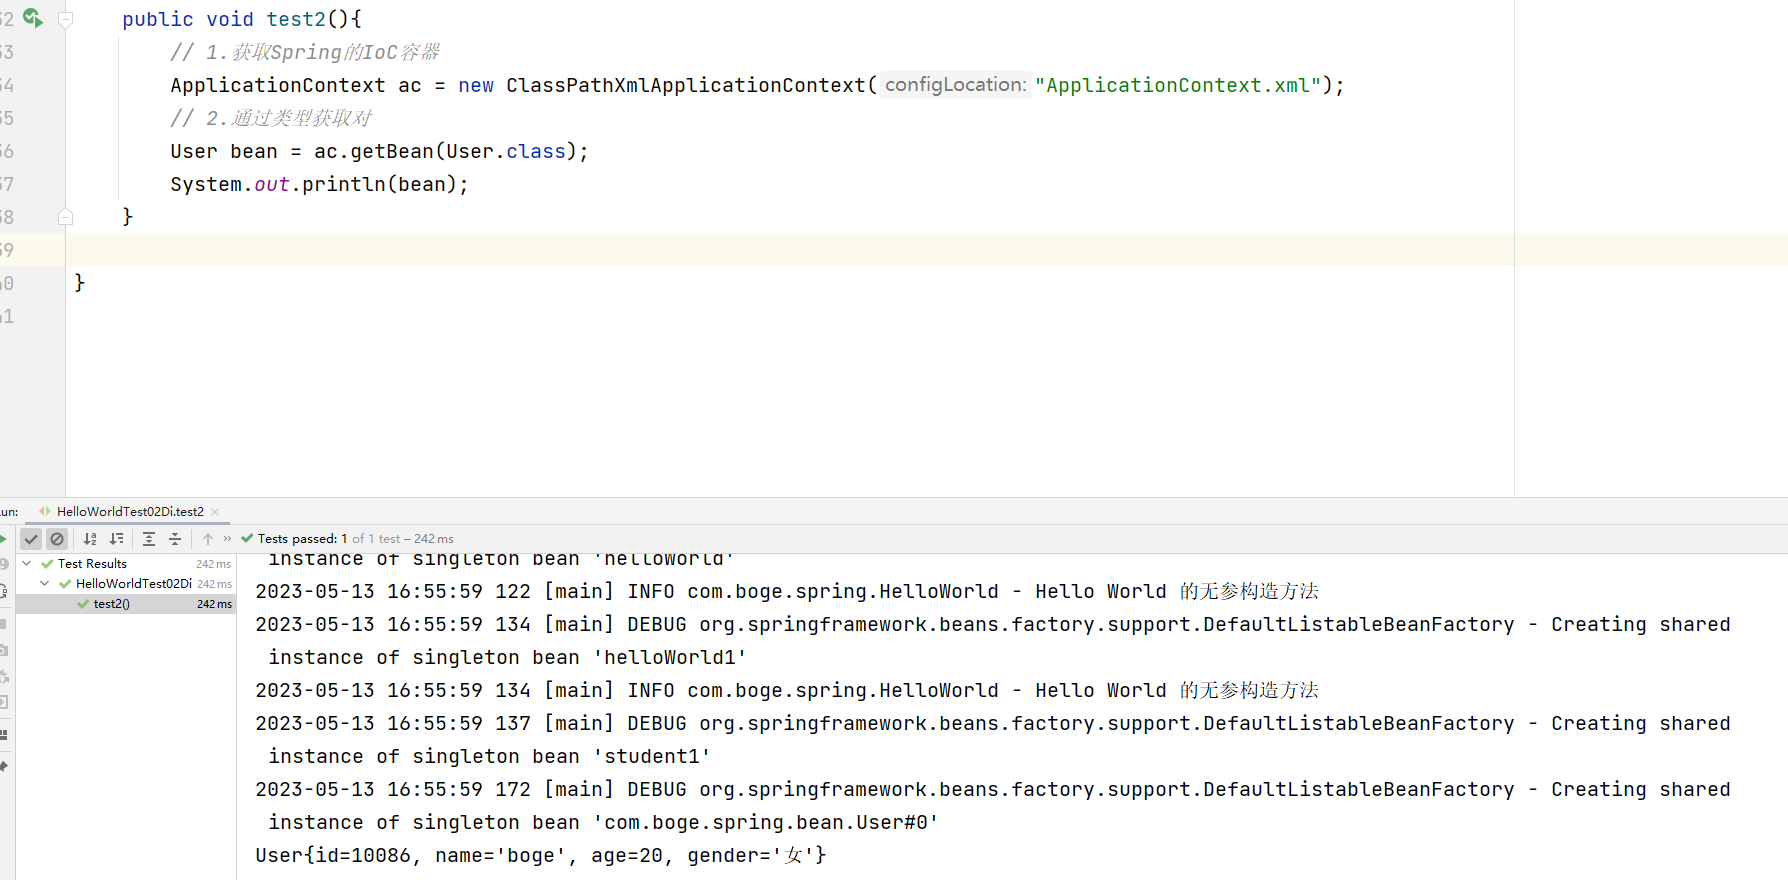
然后对应的执行效果
5. 特殊值处理
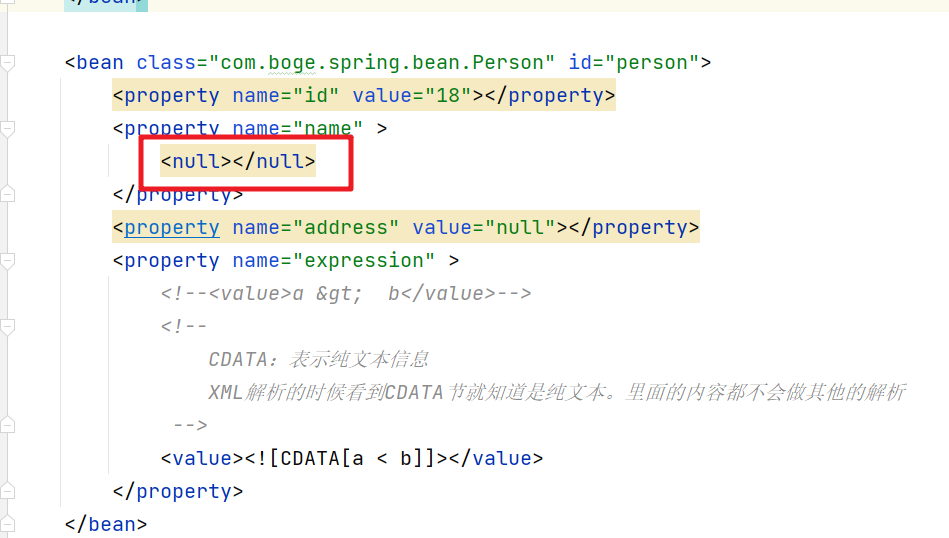
5.1 null值
针对属性赋值中的null的处理。我们不能直接在value中赋值。需要通过 标签来处理
5.2 xml实体
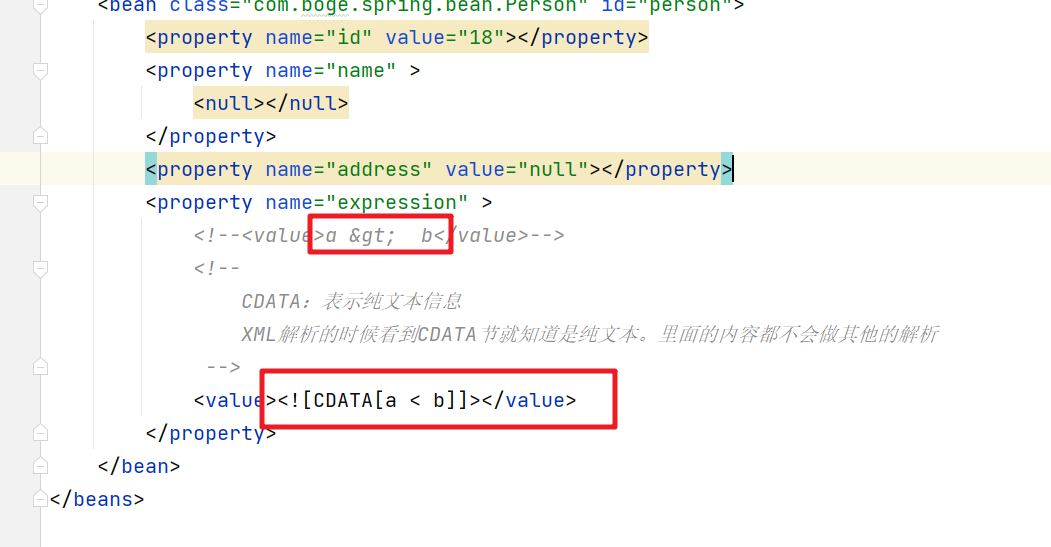
针对我们赋值中有的特殊符号。比如 < > 等。xml文件解析的时候会作为xml中的组成部分来解析。这时我们可以通过 xml实体或者CDATA来解决
6. 对象类型赋值
6.1 引用外部Bean
我们可以通过ref属性来引入我们在配置文件中定义的外部Bean对象。
<bean class="com.boge.spring.bean2.Clazz" id="clazz">
        <property name="classId" value="1001"></property>
        <property name="className" value="软件1班"></property>
    </bean>

    <bean class="com.boge.spring.bean2.Student" id="student1">
        <property name="id" value="18"></property>
        <property name="name" value="波哥"></property>
        <property name="clazz" ref="clazz"></property>
    </bean>
6.2 内部定义Bean
当然如果我们需要赋值的Bean仅仅只是在当前的Bean中需要使用到。那么我们还可以直接在property标签的内部通过bean标签来定义要赋值的Bean
    <bean class="com.boge.spring.bean2.Student" id="student2">
        <property name="id" value="18"></property>
        <property name="name" value="波哥"></property>
        <property name="clazz" >
            <!-- 在一个bean的内部我们再声明一个内部bean -->
            <bean class="com.boge.spring.bean2.Clazz">
                <property name="classId" value="1002"></property>
                <property name="className" value="软件2班"></property>
            </bean>
        </property>
    </bean>
6.3 级联赋值
针对需要赋值的自定义对象我们可以通过对象属性加 . 存取器来实现级联属性的赋值操作
<bean class="com.boge.spring.bean2.Student" id="student3">
        <property name="id" value="18"></property>
        <property name="name" value="波哥"></property>
        <property name="clazz" ref="clazz"></property>
        <!-- 级联属性赋值 -->
        <property name="clazz.classId" value="1003"></property>
        <property name="clazz.className" value="软件3班" ></property>
    </bean>

    <bean class="com.boge.spring.bean2.Student" id="student4">
        <property name="id" value="18"></property>
        <property name="name" value="波哥"></property>
        <property name="clazz" >
            <!-- 在一个bean的内部我们再声明一个内部bean -->
            <bean class="com.boge.spring.bean2.Clazz">
            </bean>
        </property>
        <property name="clazz.classId" value="1004"></property>
        <property name="clazz.className" value="软件5班" ></property>
    </bean>
7. 数组类型赋值
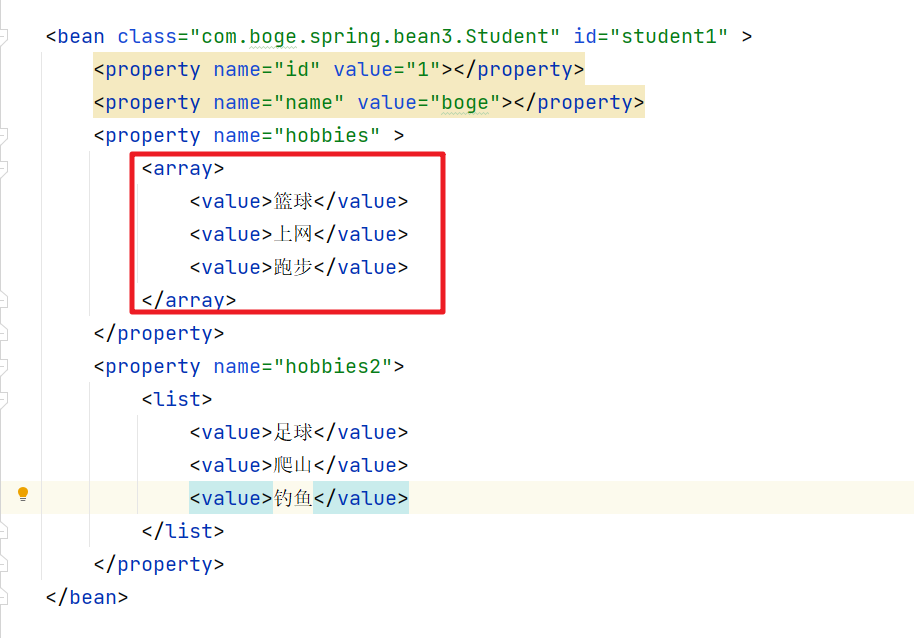
注入到容器中的Bean的属性中可能是数组类型。那么这时我们可以通过array标签来完成赋值
8. 集合类型赋值
注入到容器中的Bean的属性可能是List集合。那么我们需要通过list标签来完成属性的赋值
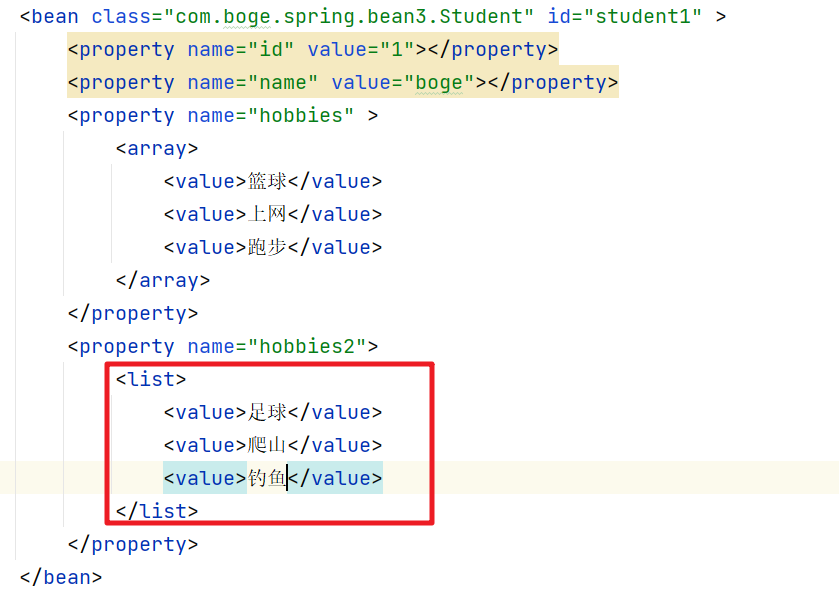
当然上面的例子我们的List的属性是String类型。那么List的类型也可能是自定义类型。那么处理方式和前面的是一致的。
<bean class="com.boge.spring.bean3.Classzz" id="classzz">
        <property name="id" value="1001"></property>
        <property name="classzzName" value="软件1班"></property>
        <property name="stus" >
            <list>
                <ref bean="student1"></ref>
                <bean class="com.boge.spring.bean3.Student"></bean>
            </list>
        </property>
    </bean>
集合中我们还有一种情况是Map集合
        <property name="map">
            <map>
                <entry>
                    <key>
                        <value>张三</value>
                    </key>
                    <value>18</value>
                </entry>
                <entry>
                    <key>
                        <value>李四</value>
                    </key>
                    <value>22</value>
                </entry>
            </map>
        </property>
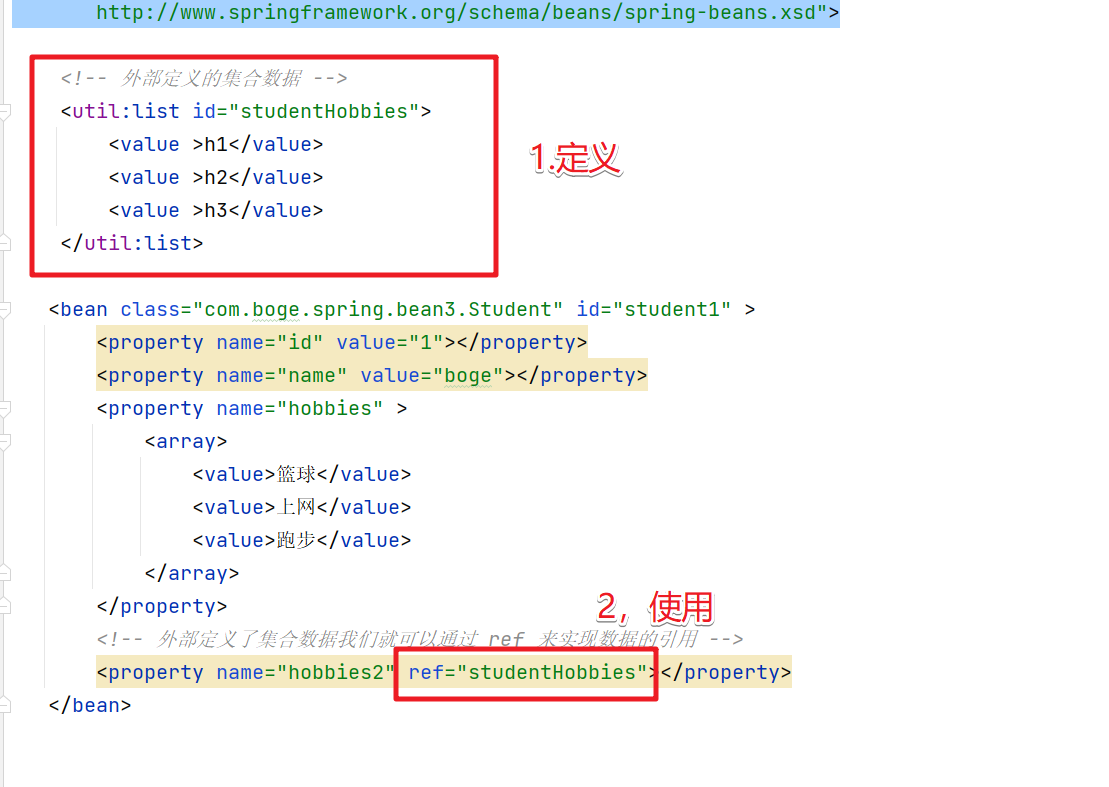
我们可以通过util标签来定义外部的集合数据。然后通过ref来引用就可以了。但是我们需要先声明util的schema。
<beans xmlns="http://www.springframework.org/schema/beans"
       xmlns:xsi="http://www.w3.org/2001/XMLSchema-instance"
       xmlns:util="http://www.springframework.org/schema/util"
       xsi:schemaLocation="http://www.springframework.org/schema/util
       http://www.springframework.org/schema/util/spring-util.xsd
       http://www.springframework.org/schema/beans
       http://www.springframework.org/schema/beans/spring-beans.xsd">
然后具体的使用操作
9. p命名空间
简化属性的赋值操作
<?xml version="1.0" encoding="UTF-8"?>
<beans xmlns="http://www.springframework.org/schema/beans"
       xmlns:xsi="http://www.w3.org/2001/XMLSchema-instance"
       xmlns:util="http://www.springframework.org/schema/util"
       xmlns:p="http://www.springframework.org/schema/p"
       xsi:schemaLocation="http://www.springframework.org/schema/util
       http://www.springframework.org/schema/util/spring-util.xsd
       http://www.springframework.org/schema/beans
       http://www.springframework.org/schema/beans/spring-beans.xsd">

    <!-- 外部定义的集合数据 -->
    <util:list id="studentHobbies">
        <value >h1</value>
        <value >h2</value>
        <value >h3</value>
    </util:list>
   <!-- p 属性 简化属性的赋值操作 -->
   <bean class="com.boge.spring.bean4.Student" id="student1"
         p:id="666" p:name="波哥" p:hobbies2-ref="studentHobbies"></bean>

</beans>
10. 外部属性文件
为了实现配置信息内容的共享。我们可以把一些共享的信息单独的配置在一个独立的properties文件中。然后通过context标签来引入。
<?xml version="1.0" encoding="UTF-8"?>
<beans xmlns="http://www.springframework.org/schema/beans"
       xmlns:xsi="http://www.w3.org/2001/XMLSchema-instance"
       xmlns:util="http://www.springframework.org/schema/util"
       xmlns:p="http://www.springframework.org/schema/p"
       xmlns:context="http://www.springframework.org/schema/context"
       xsi:schemaLocation="http://www.springframework.org/schema/util
       http://www.springframework.org/schema/util/spring-util.xsd
       http://www.springframework.org/schema/beans
       http://www.springframework.org/schema/beans/spring-beans.xsd
        http://www.springframework.org/schema/context
       http://www.springframework.org/schema/context/spring-context.xsd">

    <!-- 引入外部的属性文件 -->
    <context:property-placeholder location="classpath:myProperties.properties"></context:property-placeholder>

    <!-- 外部定义的集合数据 -->
    <util:list id="studentHobbies">
        <value >${user.hobbies.h1}</value>
        <value >${user.hobbies.h2}</value>
        <value >h3</value>
    </util:list>
   <!-- p 属性 简化属性的赋值操作 -->
   <bean class="com.boge.spring.bean4.Student" id="student1"
         p:id="666" p:name="波哥" p:hobbies2-ref="studentHobbies"></bean>

</beans>
具体的步骤:
- 定义属性文件
- 添加context标签的schema
- 通过context中的 property-placeholder引入属性文件
- 然后通过${}表达式来使用属性文件中什么的信息
11.案例练习
首先结合前面的步骤创建一个新的maven项目。完成基本的spring的配置。然后添加Bean实体
public class User {

    private Integer id;

    private String name;

    public Integer getId() {
        return id;
    }

    public void setId(Integer id) {
        this.id = id;
    }

    public String getName() {
        return name;
    }

    public void setName(String name) {
        this.name = name;
    }

    @Override
    public String toString() {
        return "User{" +
                "id=" + id +
                ", name='" + name + '\'' +
                '}';
    }
}
然后创建Dao的接口和实现类
/**
 * 持久层定义的接口
 */
public interface IUserDao {

    public List<User> query();
}

public class UserDaoImpl implements IUserDao {
    @Override
    public List<User> query() {
        List<User> list = new ArrayList<>();
        for (int i = 0; i < 5; i++) {
            User user = new User();
            user.setId(i);
            user.setName("boge"+i);
            list.add(user);
        }
        return list;
    }
}
然后创建Service层的接口和实现类。我们在service中获取Dao的实现是通过设值注入来完成的
public interface IUserService {

    public List<User> querUser();
}
public class UserServiceImpl implements IUserService {
    // 声明 dao 需要通过设置注入或者构造注入来实现
    private IUserDao dao ;

    @Override
    public List<User> querUser() {
        return dao.query();
    }

    public void setDao(IUserDao dao) {
        this.dao = dao;
    }
}
然后创建Controller层,需要获取的Service我们通过构造注入完成依赖
/**
 * 控制器
 */
public class UserController {

    // 也需要我们通过构造或者设值注入  此处我们通过构造注入来完成
    private IUserService userService;

    public void queryList(){
        List<User> users = userService.querUser();
        for (User user : users) {
            System.out.println(user);
        }
    }

    public UserController(IUserService userService) {
        this.userService = userService;
    }
}
上面的基本代码完成后我们在配置文件中完成相关的配置信息
<?xml version="1.0" encoding="UTF-8"?>
<beans xmlns="http://www.springframework.org/schema/beans"
       xmlns:xsi="http://www.w3.org/2001/XMLSchema-instance"
       xsi:schemaLocation="http://www.springframework.org/schema/beans http://www.springframework.org/schema/beans/spring-beans.xsd">

    <!-- 注入相关的对象 -->
    <bean class="com.boge.spring.dao.impl.UserDaoImpl" id="userDao"></bean>

    <bean class="com.boge.spring.service.impl.UserServiceImpl" id="userService">
        <!-- 通过设值注入Dao -->
        <property name="dao" ref="userDao"></property>
    </bean>

    <bean class="com.boge.spring.controller.UserController" id="userController">
        <!-- 通过构造注入完成service依赖管理 -->
        <constructor-arg name="userService" ref="userService"></constructor-arg>
    </bean>
</beans>
最后完成测试
    /**
     * 案例测试
     */
    @Test
    public void test1(){
        ApplicationContext ac = new ClassPathXmlApplicationContext("application.xml");
        UserController bean = ac.getBean(UserController.class);
        bean.queryList();
    }
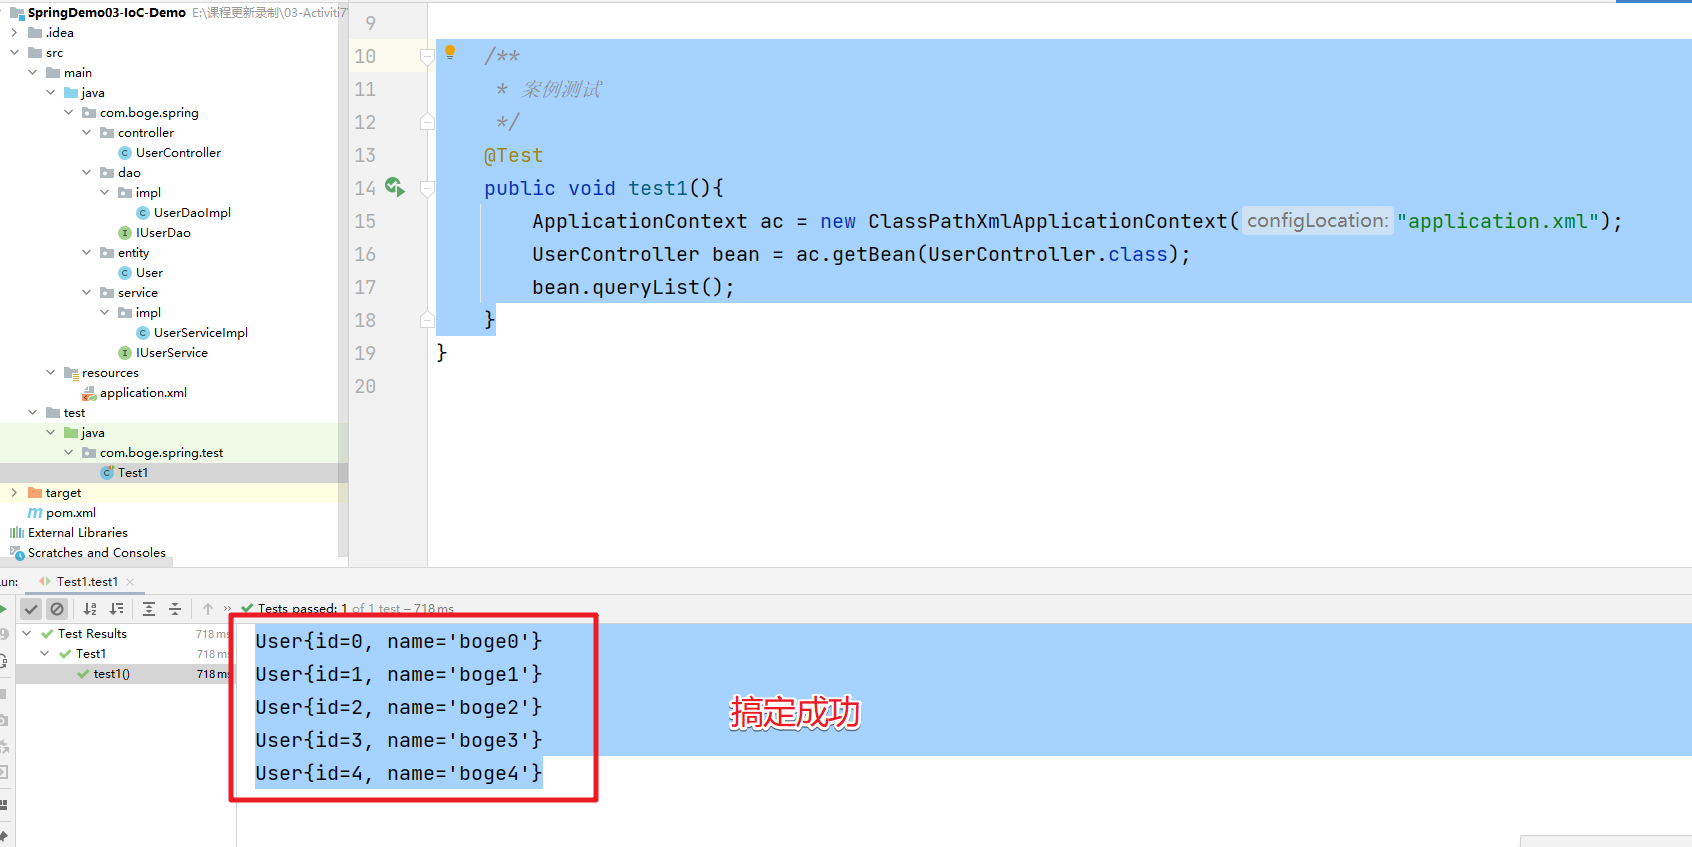
执行效果
三、基于注解的方式
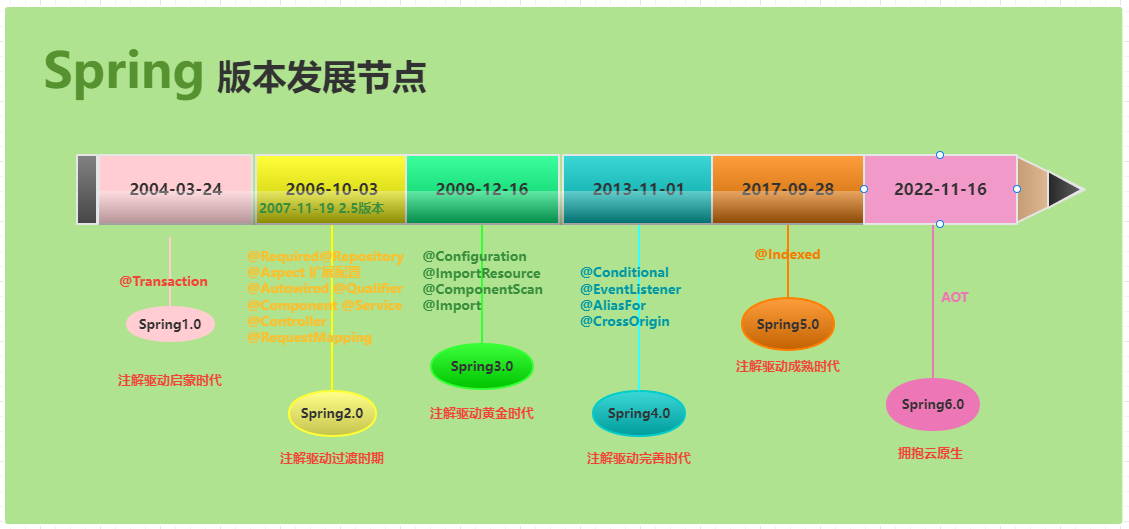
Spring 从 2.5 版本开始提供了对注解技术的全面支持,我们可以使用注解来实现自动装配,简化 Spring 的 XML 配置。
Spring 通过注解实现自动装配的步骤如下:
- 引入依赖
- 开启组件扫描
- 使用注解定义 Bean
- 依赖注入
1. 搭建案例项目
和上面的操作是一样的。
2. 开启扫描
开启扫描需要添加context的schema。然后通过context:componment-scan 来指定扫描的路径
<?xml version="1.0" encoding="UTF-8"?>
<beans xmlns="http://www.springframework.org/schema/beans"
       xmlns:xsi="http://www.w3.org/2001/XMLSchema-instance"
       xmlns:context="http://www.springframework.org/schema/context"
       xsi:schemaLocation="http://www.springframework.org/schema/beans
       http://www.springframework.org/schema/beans/spring-beans.xsd
       http://www.springframework.org/schema/context
       http://www.springframework.org/schema/context/spring-context.xsd">

    <!--
        1.引入 context 的schema
        2.开启扫描
        3.通过相关的注解实现注入
     -->
    <!-- 放开扫描 -->
    <context:component-scan base-package="com.boge.spring.entity"></context:component-scan>

</beans>
上面的扫描指定的路径是 com.boge.spring.entity 那么项目启动的时候就会去这个包下面加载所有被@Component 注解修饰的Java类。
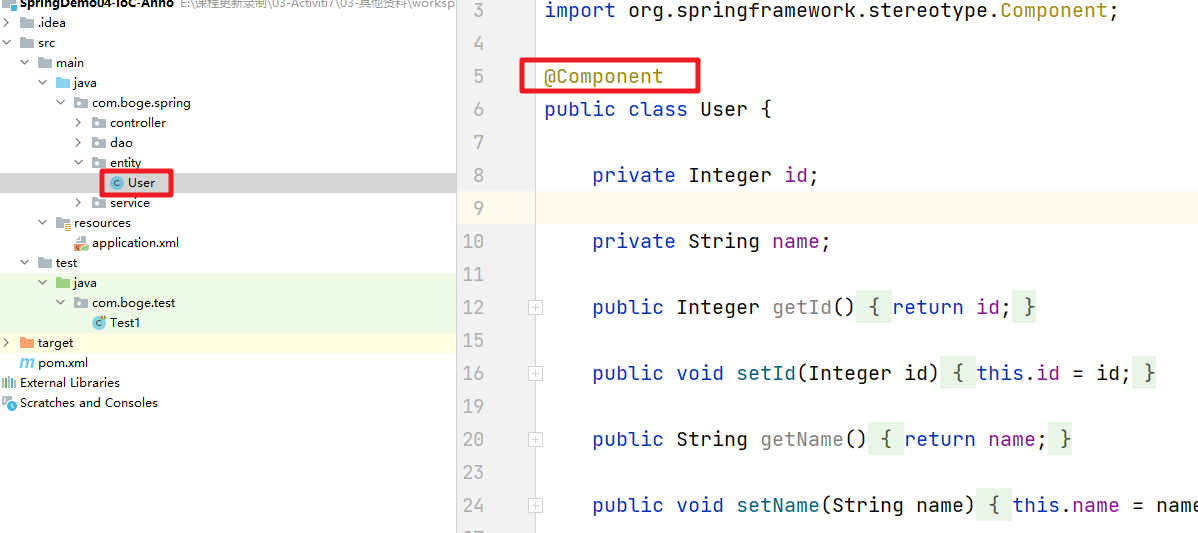
3. 注解标识
在需要被Spring注入的类的头部添加@Compnent 注解
4. 案例测试
编写测试案例。完成逻辑校验
    @Test
    public void test1(){
        ApplicationContext ac = new ClassPathXmlApplicationContext("application.xml");
        User bean = ac.getBean(User.class);
        System.out.println(bean);
    }
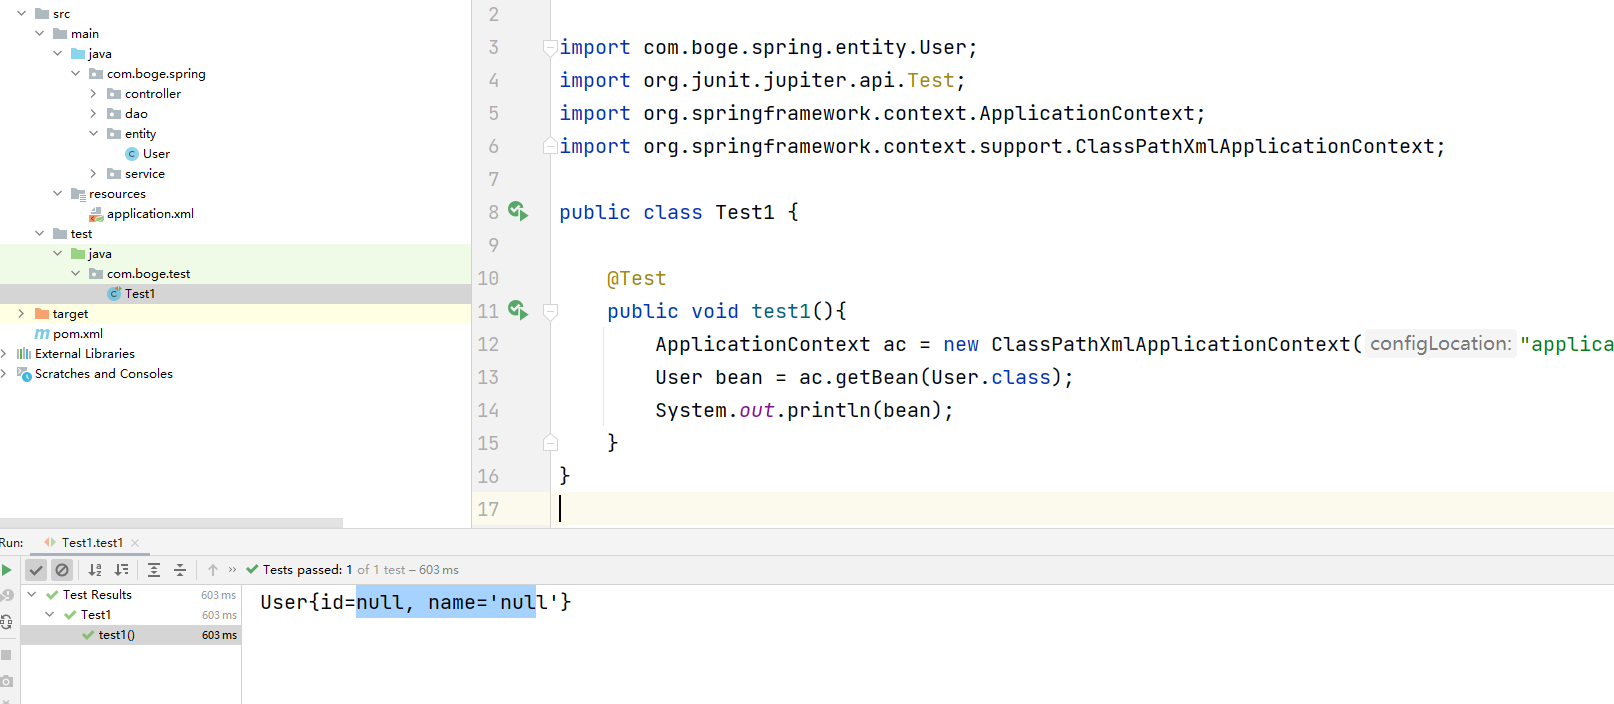
对应的执行效果
5.依赖注入问题
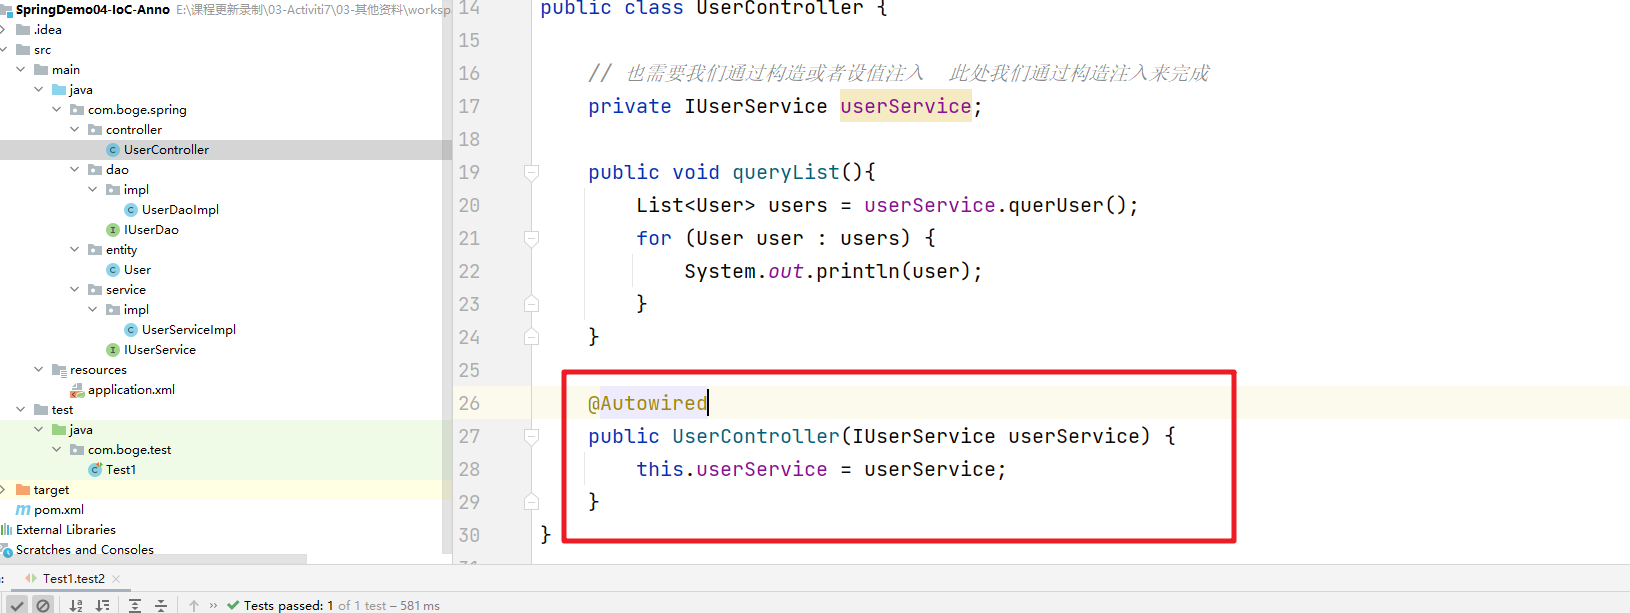
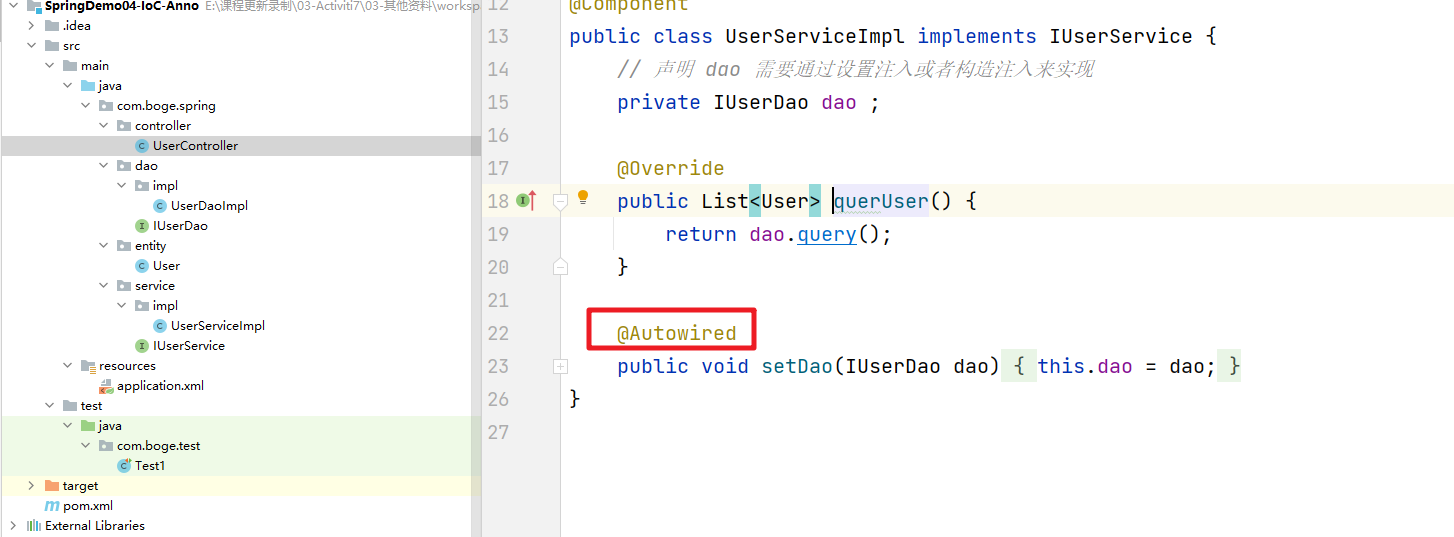
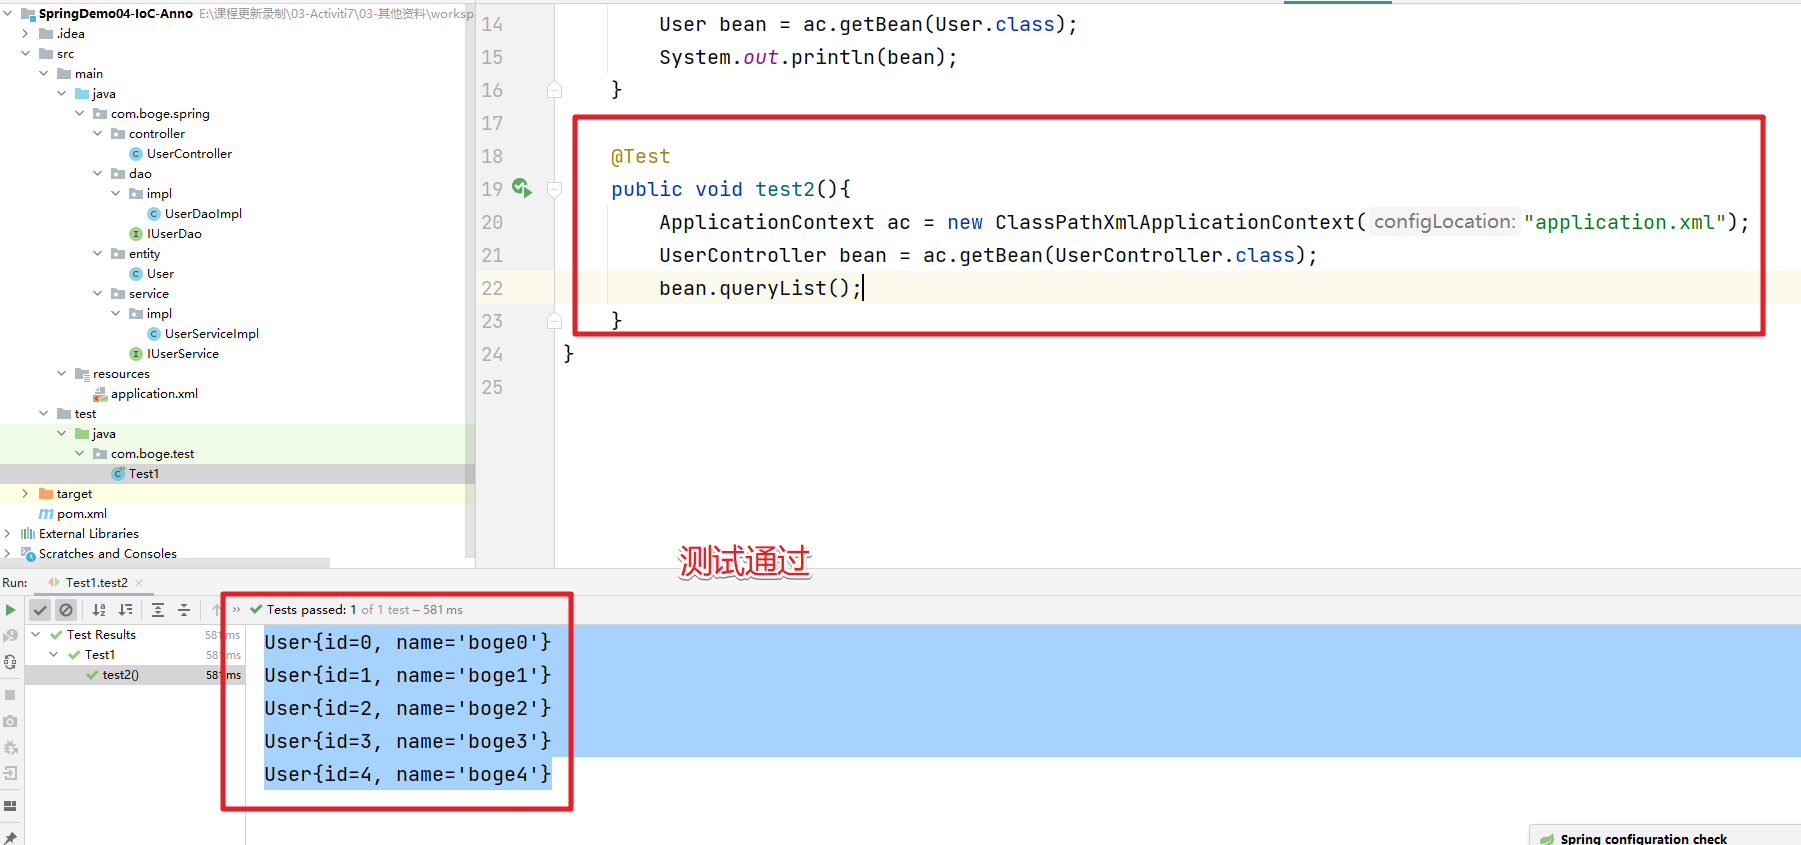
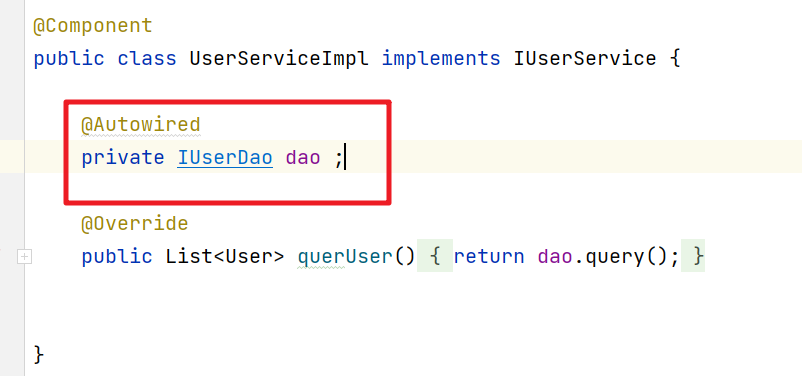
在上面的案例中。我们的controller service dao我们都可以通过@Component注解来完成对象的注入。但是controller对service的依赖,service对Dao的依赖。也就是 设值注入和构造注入是不能使用的。这时候我们可以通过@Autowired注解来解决这个问题
测试通过
6. 接口注入
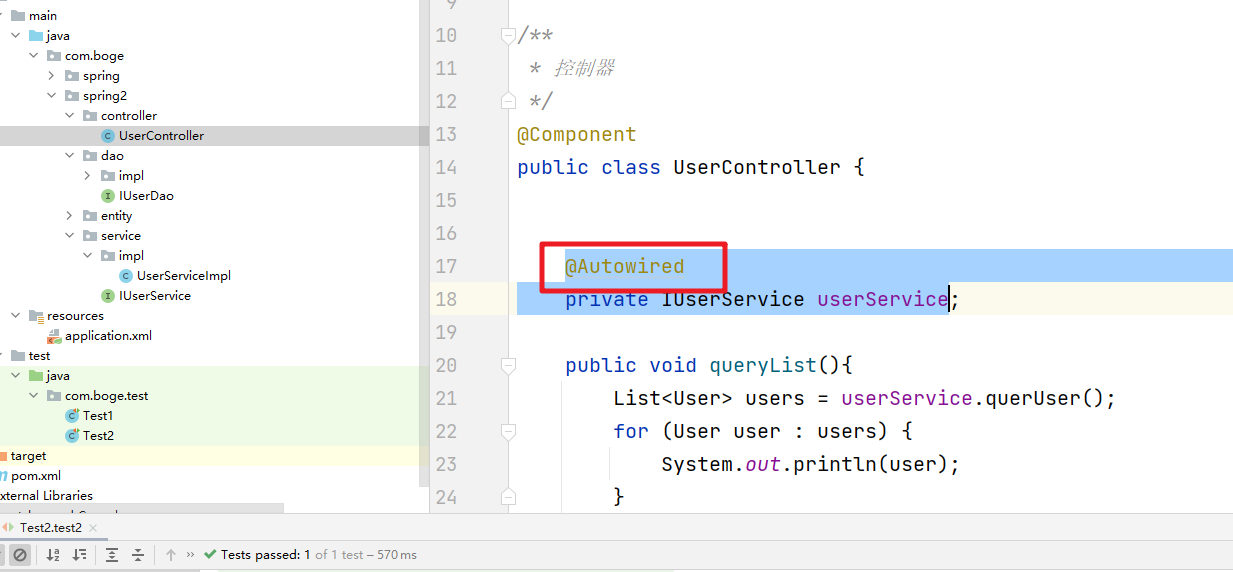
上面我们虽然通过@Autowried注解解决了属性的依赖注入问题。但是在我们的实体中还是需要添加对应的setter和构造方法。会显得整个的代码结构不太简洁,这时我们可以通过接口注入的方式来处理。
7. 注解的多样性
Spring 提供了以下多个注解,这些注解可以直接标注在 Java 类上,将它们定义成 Spring Bean。
| 注解 | 说明 |
|---|---|
| @Component | 该注解用于描述 Spring 中的 Bean,它是一个泛化的概念,仅仅表示容器中的一个组件(Bean),并且可以作用在应用的任何层次,例如 Service 层、Dao 层等。 使用时只需将该注解标注在相应类上即可。 |
| @Repository | 该注解用于将数据访问层(Dao 层)的类标识为 Spring 中的 Bean,其功能与 @Component 相同。 |
| @Service | 该注解通常作用在业务层(Service 层),用于将业务层的类标识为 Spring 中的 Bean,其功能与 @Component 相同。 |
| @Controller | 该注解通常作用在控制层(如SpringMVC 的 Controller),用于将控制层的类标识为 Spring 中的 Bean,其功能与 @Component 相同。 |
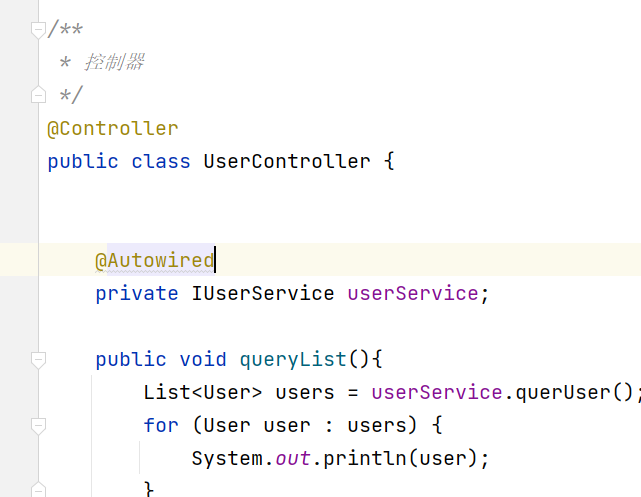
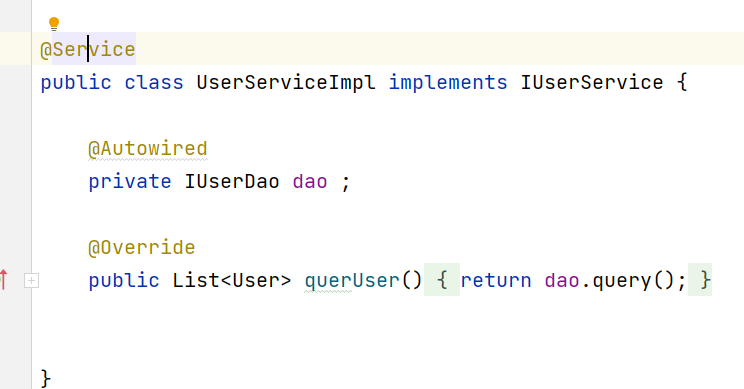
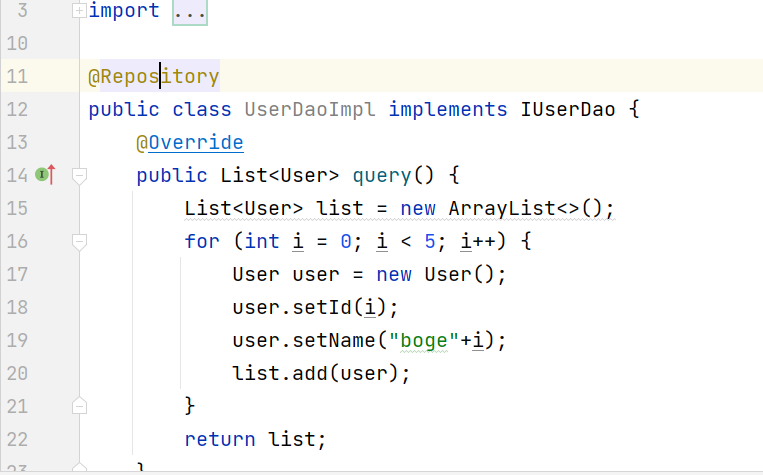
8.Autowired注解
@Autowired注解作用是完成对应的Bean依赖注入。
@Target({ElementType.CONSTRUCTOR, ElementType.METHOD, ElementType.PARAMETER, ElementType.FIELD, ElementType.ANNOTATION_TYPE})
@Retention(RetentionPolicy.RUNTIME)
@Documented
public @interface Autowired {

	/**
	 * Declares whether the annotated dependency is required.
	 * <p>Defaults to {@code true}.
	 */
	boolean required() default true;

}
通过源码的查看我们可以发现@Autowired注解的作用位置
- 构造方法–构造注入
- 方法上–setter方法上完成设值注入
- 形参上–接口注入
- 属性上
- 注解上
还有就是在源码中有一个 required 抽象方法。表示注入的bean是否是必须的。默认为true,表示在注入的bean必须是存在,如果不存在就报错,如果required设值为false。如果不存在就不会报错。
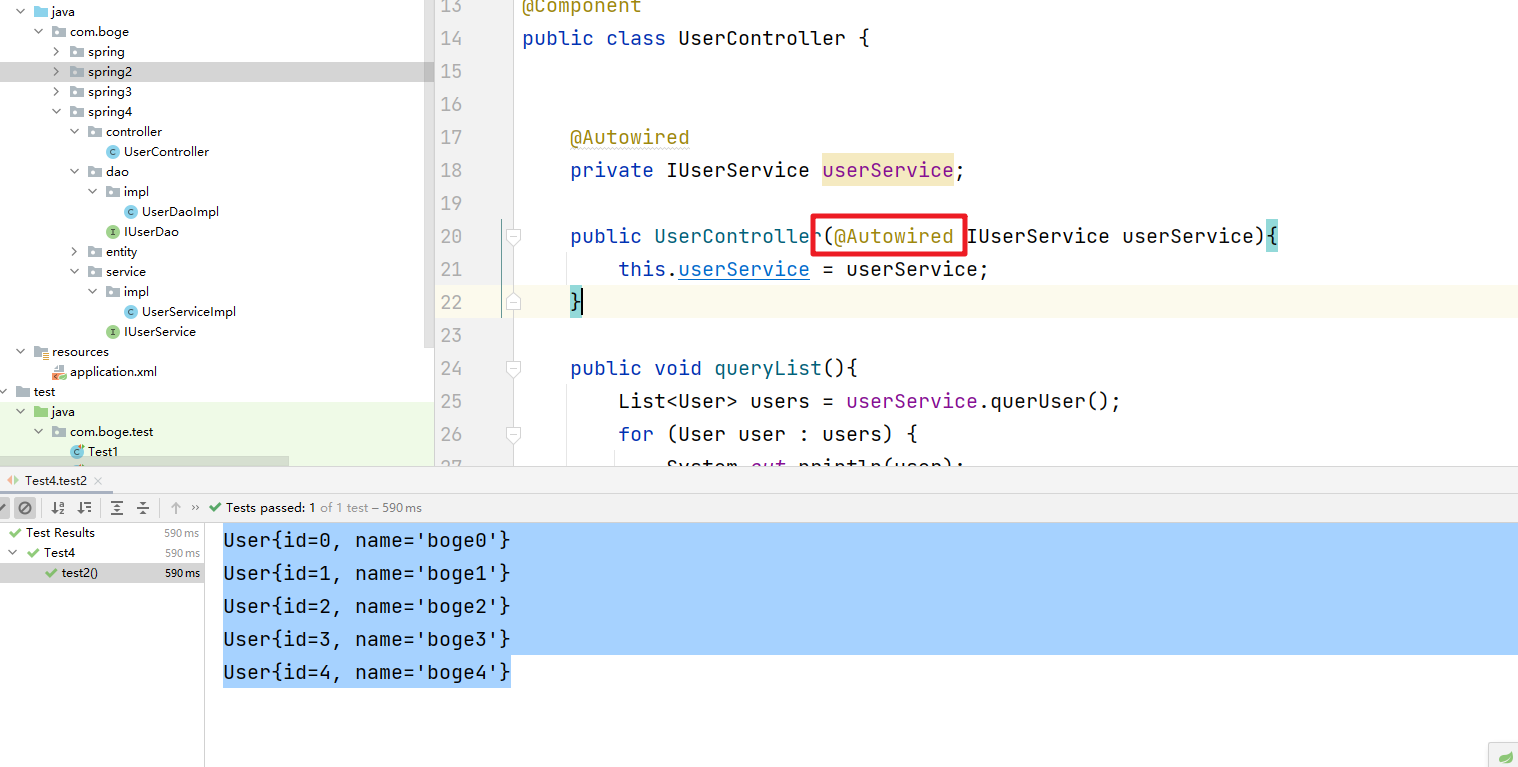
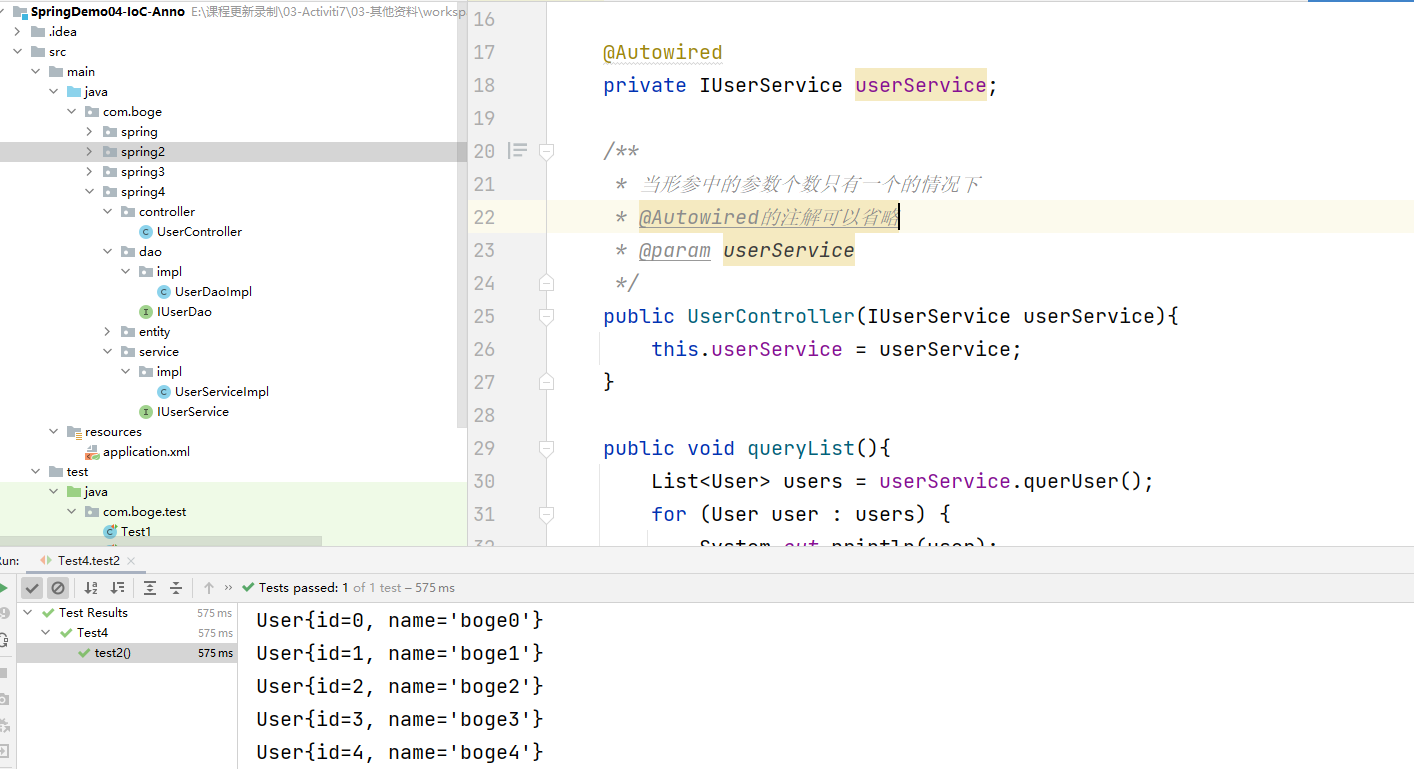
当我们的形参只有一个的情况下 @Autowired 注解可以省略
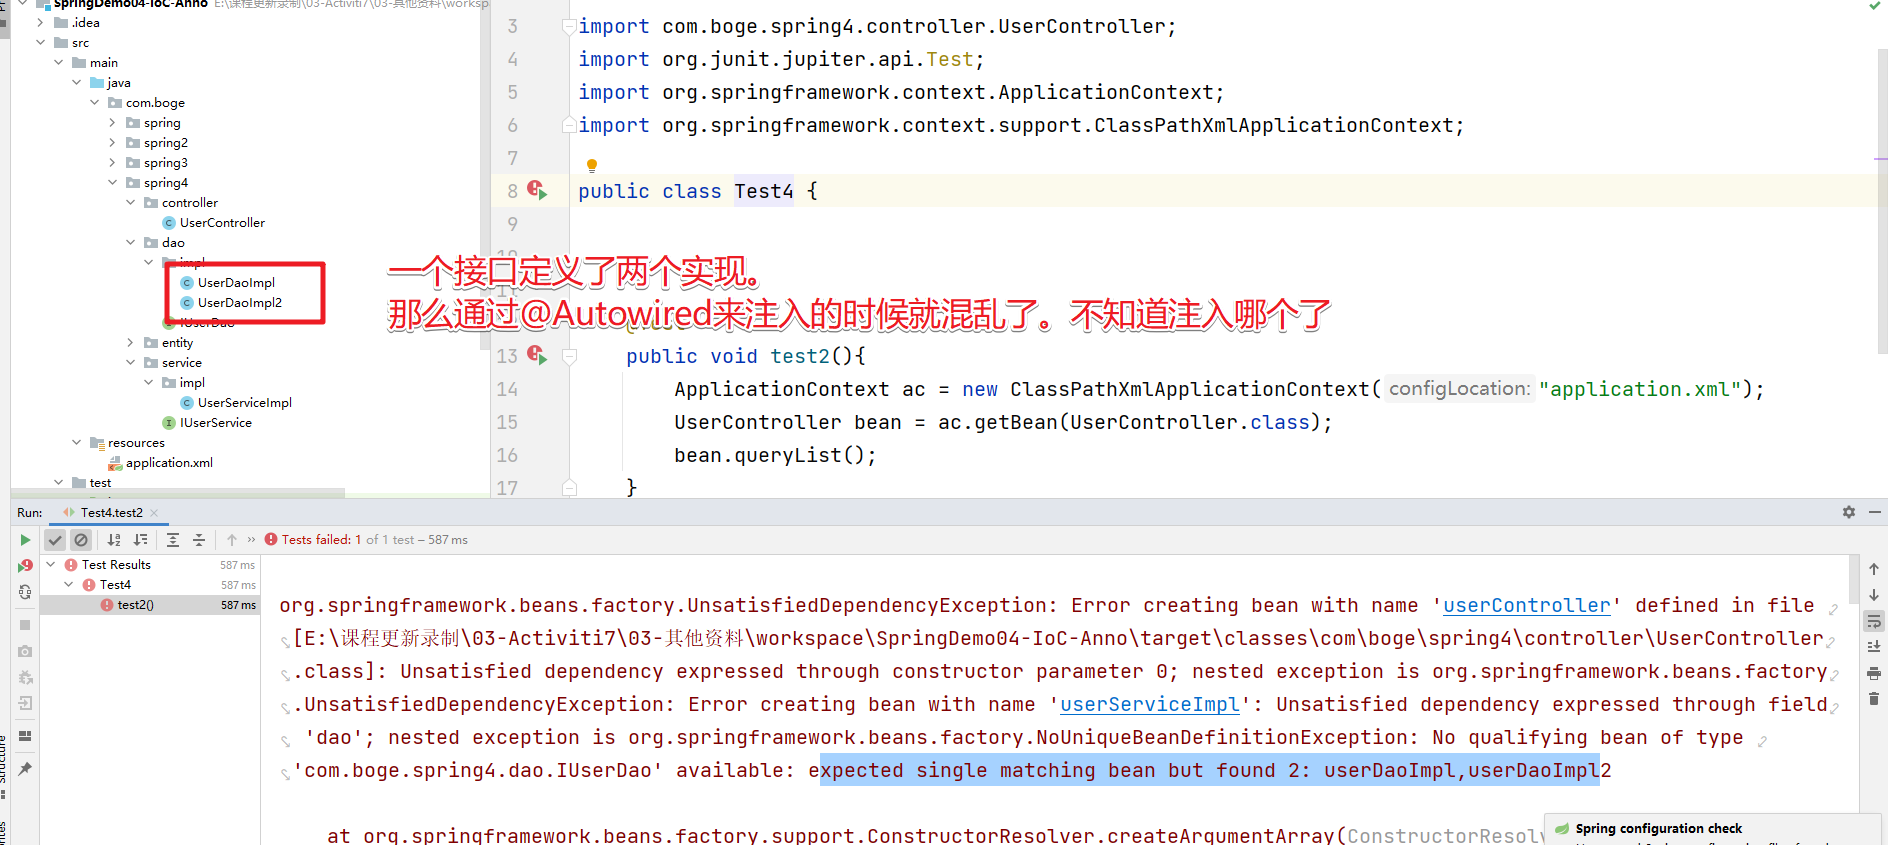
@Autowired注解可以和@Qualifier注解一块去使用。@Autowired注解默认是基于类型类完成Bean的依赖注入的
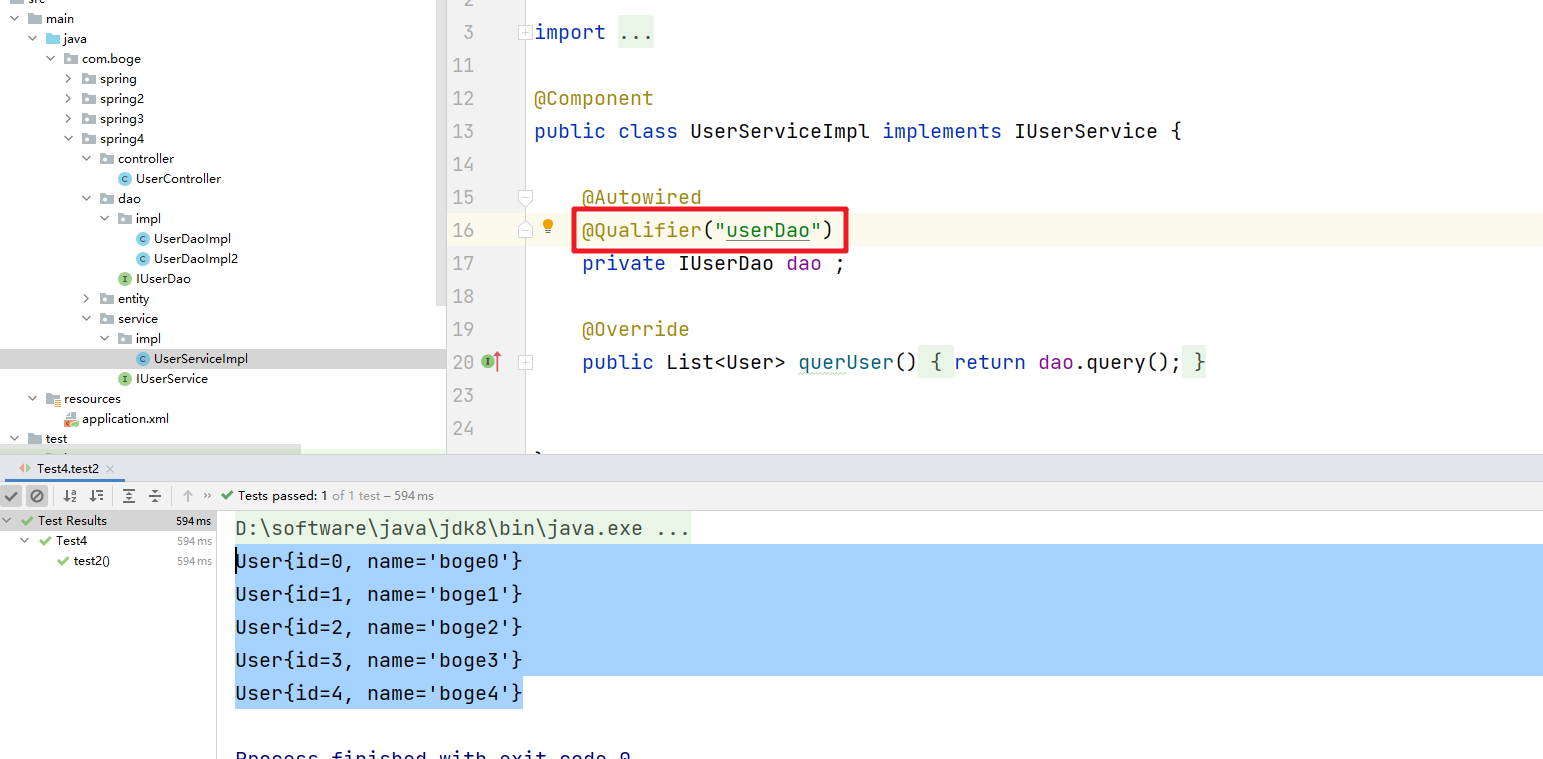
针对这种情况。@Qualifier 可以实现基于name的查找注入
简单总结:
- @Autowired注解可以出现的位置:属性上,方法上,构造方法上,形参上,注解上
- 当带有参数的构造方法只有一个的情况下。@Autowired注解可以省略
- @Autowired注解默认是根据类型来注入的,如果要根据名称来注入。我们需要配置@Qualifier注解来实现
9.综合案例
对上面注解的方式的综合练习
/**
 * Lombok 插件。会帮助我们管理Bean的实体对象
 */
@Data
@AllArgsConstructor
public class UserEntity {

    private Integer id;

    private String userName;

}
@Repository
public class UserDaoImpl implements IUserDao {
    @Override
    public List<UserEntity> list() {
        List<UserEntity> list = new ArrayList<>();
        for (int i = 0; i < 5; i++) {
            UserEntity user = new UserEntity(i,"boge"+i);
            list.add(user);
        }
        return list;
    }
}
@Service
public class UserServiceImpl implements IUserService {

    @Autowired
    private IUserDao dao;

    @Override
    public List<UserEntity> list() {
        return dao.list();
    }
}
@Controller
public class UserController {

    @Autowired
    private IUserService userService;

    public void list(){
        System.out.println("---->");
        List<UserEntity> list = userService.list();

        for (UserEntity userEntity : list) {
            System.out.println(userEntity);
        }
    }
}
上面的业务代码完成后我们需要添加对应的配置文件。然后添加对应扫描路径即可
<?xml version="1.0" encoding="UTF-8"?>
<beans xmlns="http://www.springframework.org/schema/beans"
       xmlns:xsi="http://www.w3.org/2001/XMLSchema-instance"
       xmlns:context="http://www.springframework.org/schema/context"
       xsi:schemaLocation="http://www.springframework.org/schema/beans
       http://www.springframework.org/schema/beans/spring-beans.xsd
        http://www.springframework.org/schema/context
       http://www.springframework.org/schema/context/spring-context.xsd">

    <!-- 添加对应的扫描路径 -->
    <context:component-scan base-package="com.boge.*"></context:component-scan>
</beans>
然后测试即可
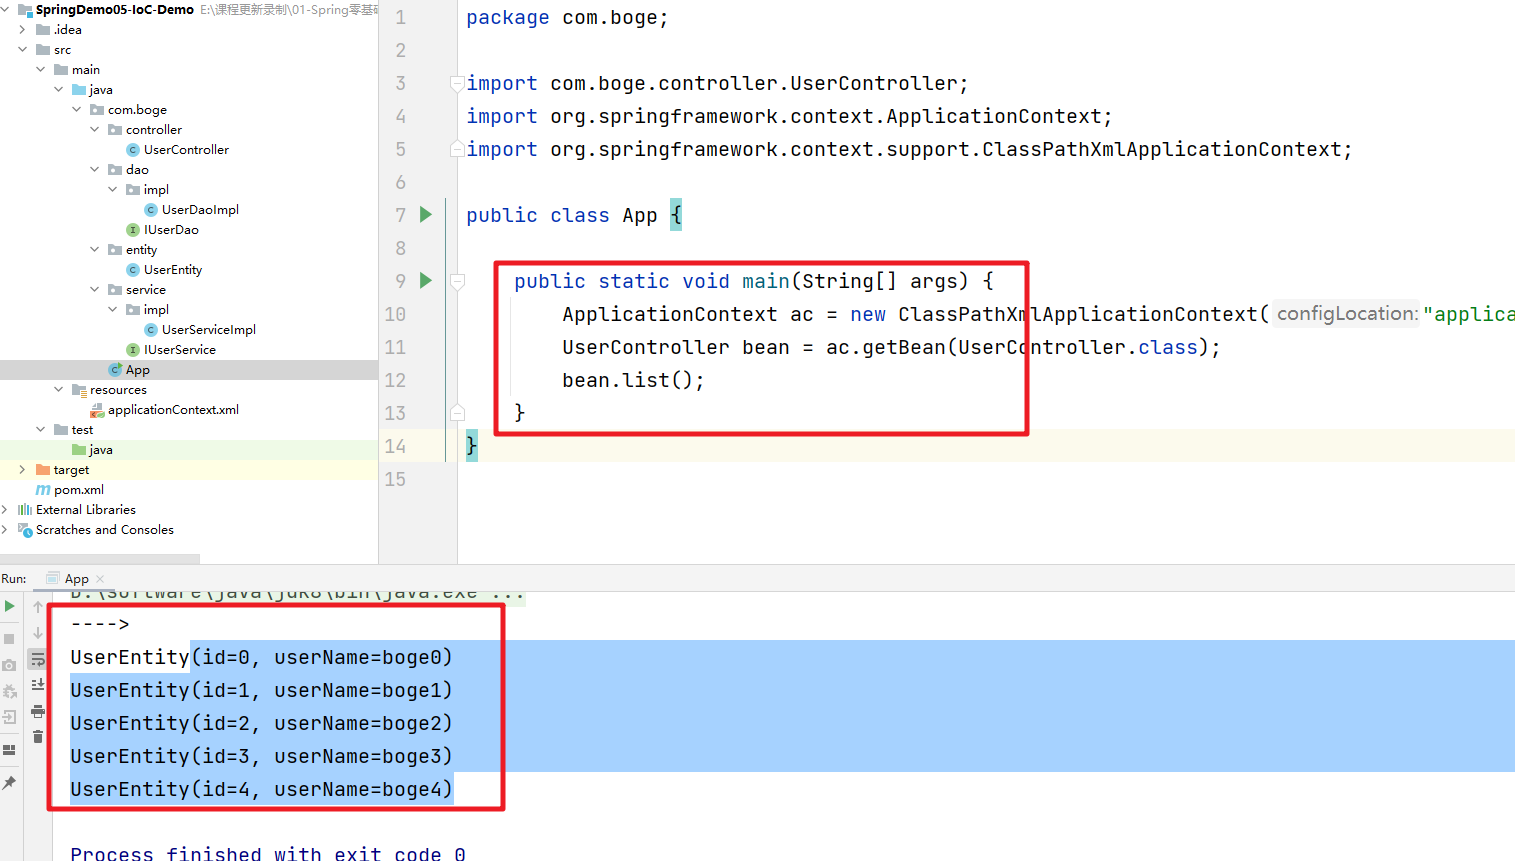
10 @Resource
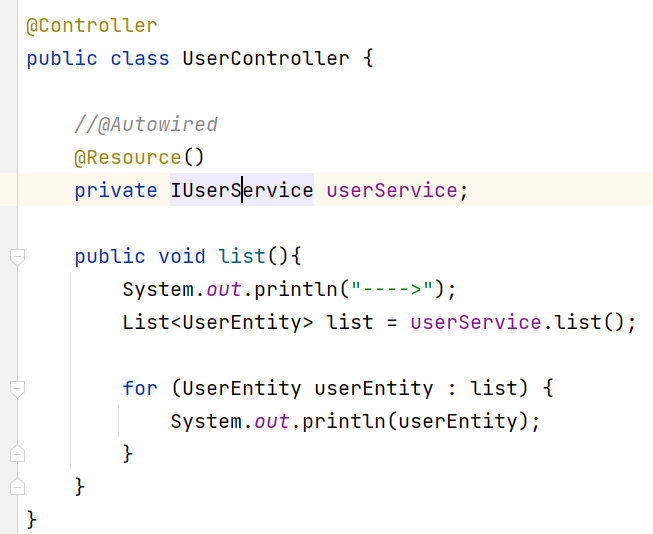
@Resource注解也可以完成属性注入。那它和@Autowired注解有什么区别?
- @Resource注解是JDK扩展包中的,也就是说属于JDK的一部分。所以该注解是标准注解,更加具有通用性。(JSR-250标准中制定的注解类型。JSR是Java规范提案。)
- @Autowired注解是Spring框架自己的。
- @Resource注解默认根据名称装配byName,未指定name时,使用属性名作为name。通过name找不到的话会自动启动通过类型byType装配。
- @Autowired注解默认根据类型装配byType,如果想根据名称装配,需要配合@Qualifier注解一起用。
- @Resource注解用在属性上、setter方法上。
- @Autowired注解用在属性上、setter方法上、构造方法上、构造方法参数上。
@Resource注解属于JDK扩展包,所以不在JDK当中,需要额外引入以下依赖:【****如果是JDK8的话不需要额外引入依赖。高于JDK11或低于JDK8需要引入以下依赖。】
<dependency>
    <groupId>jakarta.annotation</groupId>
    <artifactId>jakarta.annotation-api</artifactId>
    <version>2.1.1</version>
</dependency>
11. 基于Java配置类的方式
上面的介绍中基于注解的使用我们还是需要添加对应的配置文件。不是分方便。那么从Spring3.0开始提供的@Configuration注解。到Spring3.1 推出的@ComponentScan注解。那么我们完全可以脱离xml配置文件的使用方式了。
/**
 * Spring的配置类
 * 作用是替换调配置文件
 */
@Configuration // 加了这个注解 我们的这个配置类就相对于 applicationContext.xml 配置文件
@ComponentScan(basePackages = "com.boge")
public class SpringConfiguration {

}
@ComponentScan注解指定的扫描路径在启动的时候就会加载相关路径下的@Component注解修饰的Bean对象。然后我们也可以通过@Bean注解实现对象的注入操作
/**
 * Spring的配置类
 * 作用是替换调配置文件
 */
@Configuration // 加了这个注解 我们的这个配置类就相对于 applicationContext.xml 配置文件
@ComponentScan(basePackages = "com.boge")
public class SpringConfiguration {


    /**
     * 我们在相关的方法的头部添加 @Bean注解 可以实现讲改方法的返回对象注入到容器中
     * @return
     */
    @Bean
    public UserEntity userEntity(){
        UserEntity bean = new UserEntity(1, "波哥");
        return bean;
    }
}
