目录
第一章 需求分析
第二章 概要设计
第三章 详细设计
3.1 环境搭建
3.1.1 获取百度地图ak
3.1.2 创建springboot项目
3.2 配置application.properties
3.3 配置pox.xml
3.4 创建定位接口
3.5 创建前端页面
3.6 映射静态文件
第一章 需求分析
如图,当点下定位按钮时,可以在页面上显示所在区域的大致位置(精确到市级)。
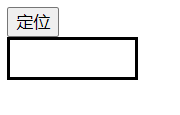
点击。

第二章 概要设计
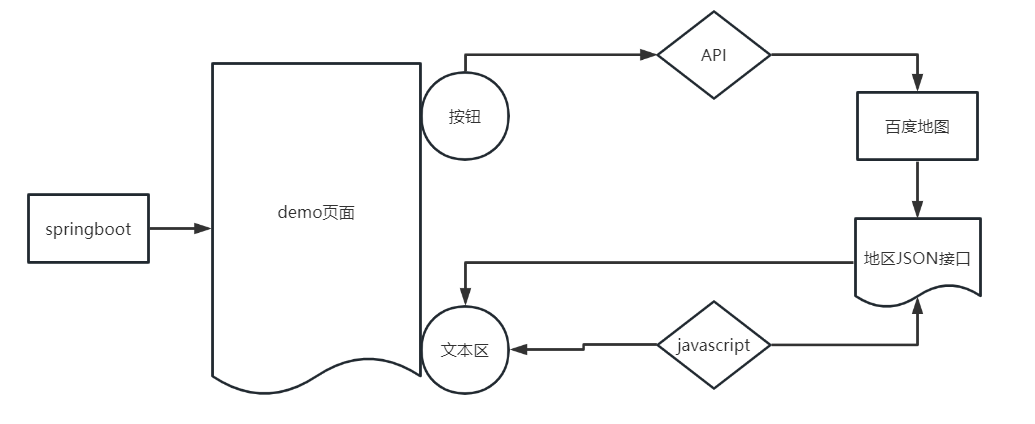
- 使用的框架为springboot,新建一个demo页面,设置一个按钮和一个文本域,按钮用来向接口请求信息,文本域用来存放定位信息。
- 使用百度地图的API实现定位功能,将返回的json数据封装成接口。
- 点击按钮向接口请求数据,将请求后的定位信息使用javascript嵌入到文本域中。
第三章 详细设计
3.1 环境搭建
3.1.1 获取百度地图ak
具体见官方普通ip定位文档。
注意使用服务端,亲测浏览器端报错240。
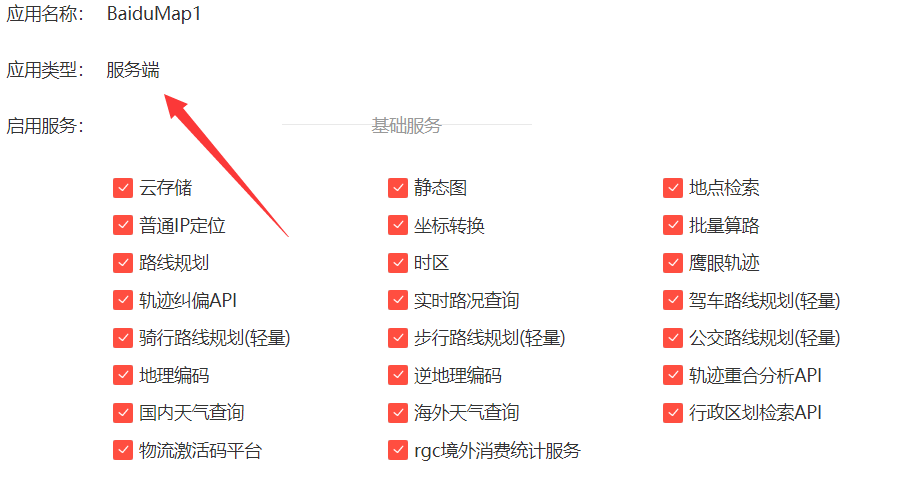
IP白名单学习推荐。
3.1.2 创建springboot项目
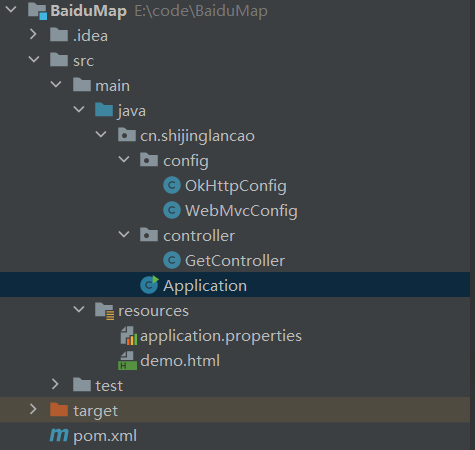
使用maven或者spring initializate方式建立springboot项目,这里不做具体阐述。
以下为参考目录。
3.2 配置application.properties
#编码
spring.http.encoding.force=true
spring.http.encoding.charset=UTF-8
spring.http.encoding.enabled=true
server.tomcat.uri-encoding=UTF-8

ak:
注意,将申请好的ak填进去。
3.3 配置pox.xml
看是否缺少相关依赖。
<?xml version="1.0" encoding="UTF-8"?>
<project xmlns="http://maven.apache.org/POM/4.0.0"
         xmlns:xsi="http://www.w3.org/2001/XMLSchema-instance"
         xsi:schemaLocation="http://maven.apache.org/POM/4.0.0 http://maven.apache.org/xsd/maven-4.0.0.xsd">
    <modelVersion>4.0.0</modelVersion>

    <parent>
        <groupId>org.springframework.boot</groupId>
        <artifactId>spring-boot-starter-parent</artifactId>
        <version>2.5.3</version>
        <relativePath/> <!-- lookup parent from repository -->
    </parent>

    <groupId>cn.shijinglancao</groupId>
    <artifactId>BaiduMap</artifactId>
    <version>1.0-SNAPSHOT</version>

    <properties>
        <maven.compiler.source>17</maven.compiler.source>
        <maven.compiler.target>17</maven.compiler.target>
        <project.build.sourceEncoding>UTF-8</project.build.sourceEncoding>
    </properties>
    <dependencies>
        <dependency>
            <groupId>org.springframework.boot</groupId>
            <artifactId>spring-boot-starter</artifactId>
        </dependency>

        <dependency>
            <groupId>org.springframework.boot</groupId>
            <artifactId>spring-boot-starter-test</artifactId>
            <scope>test</scope>
        </dependency>
        <dependency>
            <groupId>org.springframework.boot</groupId>
            <artifactId>spring-boot-starter-web</artifactId>
        </dependency>

        <!--网络请求-->
        <dependency>
            <groupId>com.squareup.okhttp3</groupId>
            <artifactId>okhttp</artifactId>
        </dependency>
    </dependencies>

    <build>
        <plugins>
            <plugin>
                <groupId>org.springframework.boot</groupId>
                <artifactId>spring-boot-maven-plugin</artifactId>
            </plugin>
        </plugins>
    </build>

</project>
3.4 创建定位接口
以下是官方文档的相关信息。

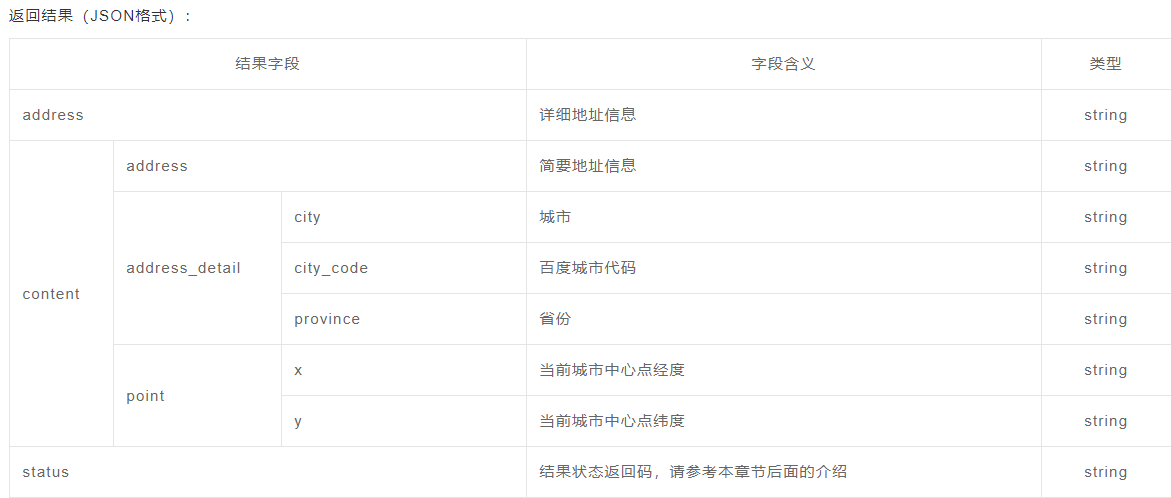
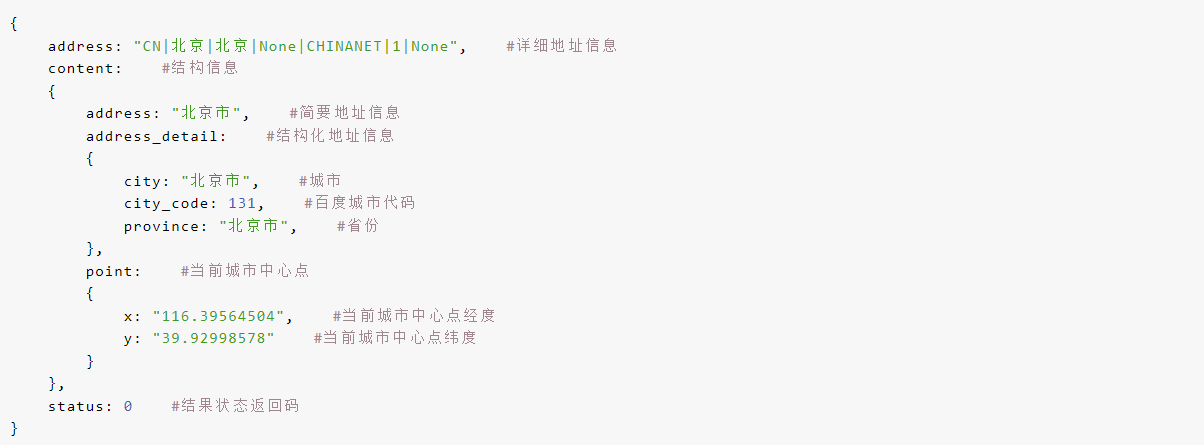
在config下新建OkHttpConfig。
package cn.shijinglancao.config;

import org.springframework.context.annotation.Bean;
import org.springframework.context.annotation.Configuration;
import org.springframework.http.client.OkHttp3ClientHttpRequestFactory;
import org.springframework.web.client.RestTemplate;

@Configuration
public class OkHttpConfig {
    @Bean
    public RestTemplate restTemplate(){
        return  new RestTemplate(new OkHttp3ClientHttpRequestFactory());
    }
}
在controller下新建GetController.java。
声明url。
String url = "https://api.map.baidu.com/location/ip?ak="+ak+"&coor=bd09ll";发送请求。
ResponseEntity<Map> forEntity = restTemplate.getForEntity(new URI(url), Map.class);完整代码。
package cn.shijinglancao.controller;

import org.springframework.beans.factory.annotation.Value;
import org.springframework.http.ResponseEntity;
import org.springframework.web.bind.annotation.GetMapping;
import org.springframework.web.bind.annotation.RestController;
import org.springframework.web.client.RestTemplate;

import javax.annotation.Resource;
import javax.servlet.http.HttpServletRequest;
import java.net.URI;
import java.net.URISyntaxException;
import java.util.Map;

@RestController
public class GetController {
    @Resource
    private RestTemplate restTemplate;
    @Value("${ak}")
    private String ak;

    @GetMapping("/get")
    public Object getAddrByUserIP(HttpServletRequest request) throws URISyntaxException {
        String url = "https://api.map.baidu.com/location/ip?ak="+ak+"&coor=bd09ll";
        //发送请求
        ResponseEntity<Map> forEntity = restTemplate.getForEntity(new URI(url), Map.class);
        Map result = forEntity.getBody();
        return result;
    }
}
启动项目,浏览框输入
http://localhost:8080/get
可以发现,接口搭建成功。
3.5 创建前端页面
在resource下新建demo.html。
解析json文件,引入jquery。
<script src="https://code.jquery.com/jquery-3.2.1.min.js"></script>定位按钮和文本域,简单修饰一下。
<button id="button" onclick="get()">定位</button>
<div id="address" style="border-style:solid;width:100px;height:30px"></div>
获取所要的具体定位信息。
var address = eval(data).content.address;使用DOM插入。
let it = document.getElementById('address');
it.innerHTML = address;
完整代码。
<html>
<head>
    <meta charset="utf-8" />
    <script src="https://code.jquery.com/jquery-3.2.1.min.js"></script>
</head>
<body>
    <button id="button" onclick="get()">定位</button>
    <div id="address" style="border-style:solid;width:100px;height:30px"></div>
    <script>
        function get() {
            var data =  $.parseJSON($.ajax({
                url: "get",//json文件位置
                dataType: "json", //返回数据格式为json
                async: false
            }).responseText);
            //获取所要的具体定位信息
            var address = eval(data).content.address;
            //使用DOM插入
            let it = document.getElementById('address');
            it.innerHTML = address;
        }
    </script>
</body>
</html>
3.6 映射静态文件
现在在浏览器中访问不到静态资源,即demo.html。
在config下新建WebMvcConfig。
package cn.shijinglancao.config;

import org.springframework.context.annotation.Configuration;
import org.springframework.web.servlet.config.annotation.ResourceHandlerRegistry;
import org.springframework.web.servlet.config.annotation.WebMvcConfigurationSupport;

@Configuration
public class WebMvcConfig extends WebMvcConfigurationSupport {
    @Override
    protected void addResourceHandlers(ResourceHandlerRegistry registry) {
        registry.addResourceHandler("/**").addResourceLocations("classpath:/");
    }
}
在浏览框中输入
http://localhost:8080/demo.html即可看到第一章的效果。
完整代码
完整代码已上传csdn
springboot小功能:集成百度地图实现定位打卡功能



![在vite或者vue-cli中使用.env[mode]环境变量](https://img-blog.csdnimg.cn/0a01356b41a242baaffeafa7ba5c53a6.png)
