目录
- 1 dubbo中数据格式
- 2 消费方发送请求
- 3 提供方接收请求
- 4 提供方返回调用结果
- 5 消费方接收调用结果
- 6 异步转同步
- 7 异步多线程数据一致
- 8 心跳检查
1 dubbo中数据格式

解决socket中数据粘包拆包问题,一般有三种方式
- 定长协议(数据包长度一致)
- 定长的协议是指协议内容的长度是固定的,比如协议byte长度是50,当从网络上读取50个byte后,就进行decode解码操作。定长协议在读取或者写入时,效率比较高,因为数据缓存的大小基本都确定了,就好比数组一样,缺陷就是适应性不足,以RPC场景为例,很难估计出定长的长度是多少。
- 特殊结束符(数据尾:通过特殊的字符标识#)
- 相比定长协议,如果能够定义一个特殊字符作为每个协议单元结束的标示,就能够以变长的方式进行通信,从而在数据传输和高效之间取得平衡,比如用特殊字符
\n。特殊结束符方式的问题是过于简单的思考了协议传输的过程,对于一个协议单元必须要全部读入才能够进行处理,除此之外必须要防止用户传输的数据不能同结束符相同,否则就会出现紊乱。
- 相比定长协议,如果能够定义一个特殊字符作为每个协议单元结束的标示,就能够以变长的方式进行通信,从而在数据传输和高效之间取得平衡,比如用特殊字符
- 变长协议(协议头+payload模式)
- 这种一般是自定义协议,会以定长加不定长的部分组成,其中定长的部分需要描述不定长的内容长度。
- dubbo就是使用这种形式的数据传输格式
Dubbo 框架定义了私有的RPC协议,其中请求和响应协议的具体内容我们使用表格来展示。
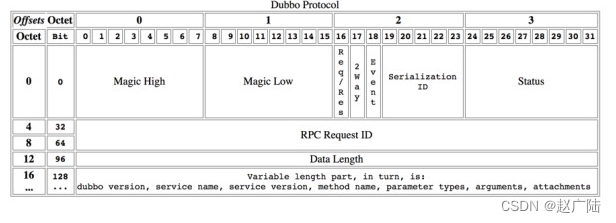
Dubbo 数据包分为消息头和消息体,消息头用于存储一些元信息,比如魔数(Magic),数据包类型(Request/Response),消息体长度(Data Length)等。消息体中用于存储具体的调用消息,比如方法名称,参数列表等。下面简单列举一下消息头的内容,整个协议消息头共占据16字节。
| 偏移量(Bit) | 字段 | 取值 |
|---|---|---|
| 0 ~ 7 | 魔数高位 | 0xda00 |
| 16 | 数据包类型 | 0 - Response, 1 - Request |
| 8 ~ 15 | 魔数低位 | 0xbb |
| 17 | 调用方式 | 仅在第16位被设为1的情况下有效,0 - 单向调用,1 - 双向调用 |
| 18 | 事件标识 | 0 - 当前数据包是请求或响应包,1 - 当前数据包是心跳包 |
| 19 ~ 23 | 序列化器编号 | 2 - Hessian2Serialization 3 - JavaSerialization 4 - CompactedJavaSerialization 6 - FastJsonSerialization 7 - NativeJavaSerialization 8 - KryoSerialization 9 - FstSerialization |
| 24 ~ 31 | 状态 | 20 - OK 30 - CLIENT_TIMEOUT 31 - SERVER_TIMEOUT 40 - BAD_REQUEST 50 - BAD_RESPONSE … |
| 32 ~ 95 | 请求编号 | 共8字节,运行时生成 |
| 96 ~ 127 | 消息体长度 | 运行时计算 |
2 消费方发送请求
(1)发送请求
为了便于大家阅读代码,这里以 DemoService 为例,将 sayHello 方法的整个调用路径贴出来。
先看从容器中获取的demoService这个代理对象是什么样的,如下图:

接下来跟着这个调用路径来看。
proxy0#sayHello(String)
  —> InvokerInvocationHandler#invoke(Object, Method, Object[])
    —> MockClusterInvoker#invoke(Invocation)
      —> AbstractClusterInvoker#invoke(Invocation)
        —> FailoverClusterInvoker#doInvoke(Invocation, List<Invoker<T>>, LoadBalance)
          —> Filter#invoke(Invoker, Invocation)  // 包含多个 Filter 调用
            —> ListenerInvokerWrapper#invoke(Invocation)
              —> AbstractInvoker#invoke(Invocation)
                —> DubboInvoker#doInvoke(Invocation)
                  —> ReferenceCountExchangeClient#request(Object, int)
                    —> HeaderExchangeClient#request(Object, int)
                      —> HeaderExchangeChannel#request(Object, int)
                        —> AbstractPeer#send(Object)
                          —> AbstractClient#send(Object, boolean)
                            —> NettyChannel#send(Object, boolean)
                              —> NioClientSocketChannel#write(Object)
dubbo消费方,自动生成代码对象如下
public class proxy0 implements ClassGenerator.DC, EchoService, DemoService {

    private InvocationHandler handler;

    public String sayHello(String string) {
        // 将参数存储到 Object 数组中
        Object[] arrobject = new Object[]{string};
        // 调用 InvocationHandler 实现类的 invoke 方法得到调用结果
        Object object = this.handler.invoke(this, methods[0], arrobject);
        // 返回调用结果
        return (String)object;
    }
}
InvokerInvocationHandler 中的 invoker 成员变量类型为 MockClusterInvoker,MockClusterInvoker 内部封装了服务降级逻辑。下面简单看一下:
    public Result invoke(Invocation invocation) throws RpcException {
        Result result = null;
        // 获取 mock 配置值
        String value = directory.getUrl().getMethodParameter(invocation.getMethodName(), MOCK_KEY, Boolean.FALSE.toString()).trim();
        if (value.length() == 0 || value.equalsIgnoreCase("false")) {
             // 无 mock 逻辑,直接调用其他 Invoker 对象的 invoke 方法,
            // 比如 FailoverClusterInvoker
            result = this.invoker.invoke(invocation);
        } else if (value.startsWith("force")) {
            // force:xxx 直接执行 mock 逻辑,不发起远程调用
            result = doMockInvoke(invocation, null);
        } else {
             // fail:xxx 表示消费方对调用服务失败后,再执行 mock 逻辑,不抛出异常
            try {
                result = this.invoker.invoke(invocation);
            } catch (RpcException e) {
                 // 调用失败,执行 mock 逻辑
                result = doMockInvoke(invocation, e);
            }
        }
        return result;
    }
考虑到前文已经详细分析过 FailoverClusterInvoker,因此本节略过 FailoverClusterInvoker,直接分析 DubboInvoker。
public abstract class AbstractInvoker<T> implements Invoker<T> {

    public Result invoke(Invocation inv) throws RpcException {
        if (destroyed.get()) {
            throw new RpcException("Rpc invoker for service ...");
        }
        RpcInvocation invocation = (RpcInvocation) inv;
        // 设置 Invoker
        invocation.setInvoker(this);
        if (attachment != null && attachment.size() > 0) {
            // 设置 attachment
            invocation.addAttachmentsIfAbsent(attachment);
        }
        Map<String, String> contextAttachments = RpcContext.getContext().getAttachments();
        if (contextAttachments != null && contextAttachments.size() != 0) {
            // 添加 contextAttachments 到 RpcInvocation#attachment 变量中
            invocation.addAttachments(contextAttachments);
        }
        if (getUrl().getMethodParameter(invocation.getMethodName(), Constants.ASYNC_KEY, false)) {
            // 设置异步信息到 RpcInvocation#attachment 中
            invocation.setAttachment(Constants.ASYNC_KEY, Boolean.TRUE.toString());
        }
        RpcUtils.attachInvocationIdIfAsync(getUrl(), invocation);

        try {
            // 抽象方法,由子类实现
            return doInvoke(invocation);
        } catch (InvocationTargetException e) {
            // ...
        } catch (RpcException e) {
            // ...
        } catch (Throwable e) {
            return new RpcResult(e);
        }
    }

    protected abstract Result doInvoke(Invocation invocation) throws Throwable;

    // 省略其他方法
}
上面的代码来自 AbstractInvoker 类,其中大部分代码用于添加信息到 RpcInvocation#attachment 变量中,添加完毕后,调用 doInvoke 执行后续的调用。doInvoke 是一个抽象方法,需要由子类实现,下面到 DubboInvoker 中看一下。
  @Override
    protected Result doInvoke(final Invocation invocation) throws Throwable {
        RpcInvocation inv = (RpcInvocation) invocation;
        final String methodName = RpcUtils.getMethodName(invocation);
        //将目标方法以及版本好作为参数放入到Invocation中
        inv.setAttachment(PATH_KEY, getUrl().getPath());
        inv.setAttachment(VERSION_KEY, version);

        //获得客户端连接
        ExchangeClient currentClient; //初始化invoker的时候,构建的一个远程通信连接
        if (clients.length == 1) { //默认
            currentClient = clients[0];
        } else {
            //通过取模获得其中一个连接
            currentClient = clients[index.getAndIncrement() % clients.length];
        }
        try {
            //表示当前的方法是否存在返回值
            boolean isOneway = RpcUtils.isOneway(getUrl(), invocation);
            int timeout = getUrl().getMethodParameter(methodName, TIMEOUT_KEY, DEFAULT_TIMEOUT);
            //isOneway 为 true,表示“单向”通信
            if (isOneway) {//异步无返回值
                boolean isSent = getUrl().getMethodParameter(methodName, Constants.SENT_KEY, false);
                currentClient.send(inv, isSent);
                RpcContext.getContext().setFuture(null);
                return AsyncRpcResult.newDefaultAsyncResult(invocation);
            } else { //存在返回值
                //是否采用异步
                AsyncRpcResult asyncRpcResult = new AsyncRpcResult(inv);
                //真正发送请求获取结果
                CompletableFuture<Object> responseFuture = currentClient.request(inv, timeout);
                responseFuture.whenComplete((obj, t) -> {
                    if (t != null) {
                        asyncRpcResult.completeExceptionally(t);
                    } else {
                        asyncRpcResult.complete((AppResponse) obj);
                    }
                });
                RpcContext.getContext().setFuture(new FutureAdapter(asyncRpcResult));
                return asyncRpcResult;
            }
        }
        //省略无关代码
    }
最终进入到HeaderExchangeChannel#request方法,拼装Request并将请求发送出去
public CompletableFuture<Object> request(Object request, int timeout) throws RemotingException {
        if (closed) {
            throw new RemotingException(this.getLocalAddress(), null, "Failed tosend request " + request + ", cause: The channel " + this + " is closed!");
        }
        // 创建请求对象
        Request req = new Request();
        req.setVersion(Version.getProtocolVersion());
        req.setTwoWay(true);
        req.setData(request);
        DefaultFuture future = DefaultFuture.newFuture(channel, req, timeout);
        try {
            //NettyClient
            channel.send(req);
        } catch (RemotingException e) {
            future.cancel();
            throw e;
        }
        return future;
    }
(2)请求编码
在netty启动时,我们设置了编解码器,其中通过ExchangeCodec完成编解码工作如下:
public class ExchangeCodec extends TelnetCodec {

    // 消息头长度
    protected static final int HEADER_LENGTH = 16;
    // 魔数内容
    protected static final short MAGIC = (short) 0xdabb;
    protected static final byte MAGIC_HIGH = Bytes.short2bytes(MAGIC)[0];
    protected static final byte MAGIC_LOW = Bytes.short2bytes(MAGIC)[1];
    protected static final byte FLAG_REQUEST = (byte) 0x80;
    protected static final byte FLAG_TWOWAY = (byte) 0x40;
    protected static final byte FLAG_EVENT = (byte) 0x20;
    protected static final int SERIALIZATION_MASK = 0x1f;
    private static final Logger logger = LoggerFactory.getLogger(ExchangeCodec.class);

    public Short getMagicCode() {
        return MAGIC;
    }

    @Override
    public void encode(Channel channel, ChannelBuffer buffer, Object msg) throws IOException {
        if (msg instanceof Request) {
            // 对 Request 对象进行编码
            encodeRequest(channel, buffer, (Request) msg);
        } else if (msg instanceof Response) {
            // 对 Response 对象进行编码,后面分析
            encodeResponse(channel, buffer, (Response) msg);
        } else {
            super.encode(channel, buffer, msg);
        }
    }

    protected void encodeRequest(Channel channel, ChannelBuffer buffer, Request req) throws IOException {
        Serialization serialization = getSerialization(channel);

        // 创建消息头字节数组,长度为 16
        byte[] header = new byte[HEADER_LENGTH];

        // 设置魔数
        Bytes.short2bytes(MAGIC, header);

        // 设置数据包类型(Request/Response)和序列化器编号
        header[2] = (byte) (FLAG_REQUEST | serialization.getContentTypeId());

        // 设置通信方式(单向/双向)
        if (req.isTwoWay()) {
            header[2] |= FLAG_TWOWAY;
        }

        // 设置事件标识
        if (req.isEvent()) {
            header[2] |= FLAG_EVENT;
        }

        // 设置请求编号,8个字节,从第4个字节开始设置
        Bytes.long2bytes(req.getId(), header, 4);

        // 获取 buffer 当前的写位置
        int savedWriteIndex = buffer.writerIndex();
        // 更新 writerIndex,为消息头预留 16 个字节的空间
        buffer.writerIndex(savedWriteIndex + HEADER_LENGTH);
        ChannelBufferOutputStream bos = new ChannelBufferOutputStream(buffer);
        // 创建序列化器,比如 Hessian2ObjectOutput
        ObjectOutput out = serialization.serialize(channel.getUrl(), bos);
        if (req.isEvent()) {
            // 对事件数据进行序列化操作
            encodeEventData(channel, out, req.getData());
        } else {
            // 对请求数据进行序列化操作
            encodeRequestData(channel, out, req.getData(), req.getVersion());
        }
        out.flushBuffer();
        if (out instanceof Cleanable) {
            ((Cleanable) out).cleanup();
        }
        bos.flush();
        bos.close();

        // 获取写入的字节数,也就是消息体长度
        int len = bos.writtenBytes();
        checkPayload(channel, len);

        // 将消息体长度写入到消息头中
        Bytes.int2bytes(len, header, 12);

        // 将 buffer 指针移动到 savedWriteIndex,为写消息头做准备
        buffer.writerIndex(savedWriteIndex);
        // 从 savedWriteIndex 下标处写入消息头
        buffer.writeBytes(header);
        // 设置新的 writerIndex,writerIndex = 原写下标 + 消息头长度 + 消息体长度
        buffer.writerIndex(savedWriteIndex + HEADER_LENGTH + len);
    }

    // 省略其他方法
}
以上就是请求对象的编码过程,该过程首先会通过位运算将消息头写入到 header 数组中。然后对 Request 对象的 data 字段执行序列化操作,序列化后的数据最终会存储到 ChannelBuffer 中。序列化操作执行完后,可得到数据序列化后的长度 len,紧接着将 len 写入到 header 指定位置处。最后再将消息头字节数组 header 写入到 ChannelBuffer 中,整个编码过程就结束了。本节的最后,我们再来看一下 Request 对象的 data 字段序列化过程,也就是 encodeRequestData 方法的逻辑,如下:
public class DubboCodec extends ExchangeCodec implements Codec2 {

    protected void encodeRequestData(Channel channel, ObjectOutput out, Object data, String version) throws IOException {
        RpcInvocation inv = (RpcInvocation) data;

        // 依次序列化 dubbo version、path、version
        out.writeUTF(version);
        out.writeUTF(inv.getAttachment(Constants.PATH_KEY));
        out.writeUTF(inv.getAttachment(Constants.VERSION_KEY));

        // 序列化调用方法名
        out.writeUTF(inv.getMethodName());
        // 将参数类型转换为字符串,并进行序列化
        out.writeUTF(ReflectUtils.getDesc(inv.getParameterTypes()));
        Object[] args = inv.getArguments();
        if (args != null)
            for (int i = 0; i < args.length; i++) {
                // 对运行时参数进行序列化
                out.writeObject(encodeInvocationArgument(channel, inv, i));
            }

        // 序列化 attachments
        out.writeObject(inv.getAttachments());
    }
}
至此,关于服务消费方发送请求的过程就分析完了,接下来我们来看一下服务提供方是如何接收请求的。
3 提供方接收请求
(1) 请求解码
这里直接分析请求数据的解码逻辑,忽略中间过程,如下:
public class ExchangeCodec extends TelnetCodec {

    @Override
    public Object decode(Channel channel, ChannelBuffer buffer) throws IOException {
        int readable = buffer.readableBytes();
        // 创建消息头字节数组
        byte[] header = new byte[Math.min(readable, HEADER_LENGTH)];
        // 读取消息头数据
        buffer.readBytes(header);
        // 调用重载方法进行后续解码工作
        return decode(channel, buffer, readable, header);
    }

    @Override
    protected Object decode(Channel channel, ChannelBuffer buffer, int readable, byte[] header) throws IOException {
        // 检查魔数是否相等
        if (readable > 0 && header[0] != MAGIC_HIGH
                || readable > 1 && header[1] != MAGIC_LOW) {
            int length = header.length;
            if (header.length < readable) {
                header = Bytes.copyOf(header, readable);
                buffer.readBytes(header, length, readable - length);
            }
            for (int i = 1; i < header.length - 1; i++) {
                if (header[i] == MAGIC_HIGH && header[i + 1] == MAGIC_LOW) {
                    buffer.readerIndex(buffer.readerIndex() - header.length + i);
                    header = Bytes.copyOf(header, i);
                    break;
                }
            }
            // 通过 telnet 命令行发送的数据包不包含消息头,所以这里
            // 调用 TelnetCodec 的 decode 方法对数据包进行解码
            return super.decode(channel, buffer, readable, header);
        }

        // 检测可读数据量是否少于消息头长度,若小于则立即返回 DecodeResult.NEED_MORE_INPUT
        if (readable < HEADER_LENGTH) {
            return DecodeResult.NEED_MORE_INPUT;
        }

        // 从消息头中获取消息体长度
        int len = Bytes.bytes2int(header, 12);
        // 检测消息体长度是否超出限制,超出则抛出异常
        checkPayload(channel, len);

        int tt = len + HEADER_LENGTH;
        // 检测可读的字节数是否小于实际的字节数
        if (readable < tt) {
            return DecodeResult.NEED_MORE_INPUT;
        }

        ChannelBufferInputStream is = new ChannelBufferInputStream(buffer, len);

        try {
            // 继续进行解码工作
            return decodeBody(channel, is, header);
        } finally {
            if (is.available() > 0) {
                try {
                    StreamUtils.skipUnusedStream(is);
                } catch (IOException e) {
                    logger.warn(e.getMessage(), e);
                }
            }
        }
    }
}
上面方法通过检测消息头中的魔数是否与规定的魔数相等,提前拦截掉非常规数据包,比如通过 telnet 命令行发出的数据包。接着再对消息体长度,以及可读字节数进行检测。最后调用 decodeBody 方法进行后续的解码工作,ExchangeCodec 中实现了 decodeBody 方法,但因其子类 DubboCodec 覆写了该方法,所以在运行时 DubboCodec 中的 decodeBody 方法会被调用。下面我们来看一下该方法的代码。
public class DubboCodec extends ExchangeCodec implements Codec2 {

    @Override
    protected Object decodeBody(Channel channel, InputStream is, byte[] header) throws IOException {
        // 获取消息头中的第三个字节,并通过逻辑与运算得到序列化器编号
        byte flag = header[2], proto = (byte) (flag & SERIALIZATION_MASK);
        Serialization s = CodecSupport.getSerialization(channel.getUrl(), proto);
        // 获取调用编号
        long id = Bytes.bytes2long(header, 4);
        // 通过逻辑与运算得到调用类型,0 - Response,1 - Request
        if ((flag & FLAG_REQUEST) == 0) {
            // 对响应结果进行解码,得到 Response 对象。这个非本节内容,后面再分析
            // ...
        } else {
            // 创建 Request 对象
            Request req = new Request(id);
            req.setVersion(Version.getProtocolVersion());
            // 通过逻辑与运算得到通信方式,并设置到 Request 对象中
            req.setTwoWay((flag & FLAG_TWOWAY) != 0);

            // 通过位运算检测数据包是否为事件类型
            if ((flag & FLAG_EVENT) != 0) {
                // 设置心跳事件到 Request 对象中
                req.setEvent(Request.HEARTBEAT_EVENT);
            }
            try {
                Object data;
                if (req.isHeartbeat()) {
                    // 对心跳包进行解码,该方法已被标注为废弃
                    data = decodeHeartbeatData(channel, deserialize(s, channel.getUrl(), is));
                } else if (req.isEvent()) {
                    // 对事件数据进行解码
                    data = decodeEventData(channel, deserialize(s, channel.getUrl(), is));
                } else {
                    DecodeableRpcInvocation inv;
                    // 根据 url 参数判断是否在 IO 线程上对消息体进行解码
                    if (channel.getUrl().getParameter(
                            Constants.DECODE_IN_IO_THREAD_KEY,
                            Constants.DEFAULT_DECODE_IN_IO_THREAD)) {
                        inv = new DecodeableRpcInvocation(channel, req, is, proto);
                        // 在当前线程,也就是 IO 线程上进行后续的解码工作。此工作完成后,可将
                        // 调用方法名、attachment、以及调用参数解析出来
                        inv.decode();
                    } else {
                        // 仅创建 DecodeableRpcInvocation 对象,但不在当前线程上执行解码逻辑
                        inv = new DecodeableRpcInvocation(channel, req,
                                new UnsafeByteArrayInputStream(readMessageData(is)), proto);
                    }
                    data = inv;
                }

                // 设置 data 到 Request 对象中
                req.setData(data);
            } catch (Throwable t) {
                // 若解码过程中出现异常,则将 broken 字段设为 true,
                // 并将异常对象设置到 Reqeust 对象中
                req.setBroken(true);
                req.setData(t);
            }
            return req;
        }
    }
}
如上,decodeBody 对部分字段进行了解码,并将解码得到的字段封装到 Request 中。随后会调用 DecodeableRpcInvocation 的 decode 方法进行后续的解码工作。此工作完成后,可将调用方法名、attachment、以及调用参数解析出来。
(2)调用服务
解码器将数据包解析成 Request 对象后,NettyHandler 的 messageReceived 方法紧接着会收到这个对象,并将这个对象继续向下传递。整个调用栈如下:
NettyServerHandler#channelRead(ChannelHandlerContext, MessageEvent)
  —> AbstractPeer#received(Channel, Object)
    —> MultiMessageHandler#received(Channel, Object)
      —> HeartbeatHandler#received(Channel, Object)
        —> AllChannelHandler#received(Channel, Object)
          —> ExecutorService#execute(Runnable)    // 由线程池执行后续的调用逻辑 ChannelEventRunnable
这里我们直接分析调用栈中的分析第一个和最后一个调用方法逻辑。如下:
考虑到篇幅,以及很多中间调用的逻辑并非十分重要,所以这里就不对调用栈中的每个方法都进行分析了。这里我们直接分析最后一个调用方法逻辑。如下:
public class ChannelEventRunnable implements Runnable {

    private final ChannelHandler handler;
    private final Channel channel;
    private final ChannelState state;
    private final Throwable exception;
    private final Object message;

    @Override
    public void run() {
        // 检测通道状态,对于请求或响应消息,此时 state = RECEIVED
        if (state == ChannelState.RECEIVED) {
            try {
                // 将 channel 和 message 传给 ChannelHandler 对象,进行后续的调用
                handler.received(channel, message);
            } catch (Exception e) {
                logger.warn("... operation error, channel is ... message is ...");
            }
        }

        // 其他消息类型通过 switch 进行处理
        else {
            switch (state) {
            case CONNECTED:
                try {
                    handler.connected(channel);
                } catch (Exception e) {
                    logger.warn("... operation error, channel is ...");
                }
                break;
            case DISCONNECTED:
                // ...
            case SENT:
                // ...
            case CAUGHT:
                // ...
            default:
                logger.warn("unknown state: " + state + ", message is " + message);
            }
        }

    }
}
如上,请求和响应消息出现频率明显比其他类型消息高,所以这里对该类型的消息进行了针对性判断。ChannelEventRunnable 仅是一个中转站,它的 run 方法中并不包含具体的调用逻辑,仅用于将参数传给其他 ChannelHandler 对象进行处理,该对象类型为 DecodeHandler
public class DecodeHandler extends AbstractChannelHandlerDelegate {

    public DecodeHandler(ChannelHandler handler) {
        super(handler);
    }

    @Override
    public void received(Channel channel, Object message) throws RemotingException {
        if (message instanceof Decodeable) {
            // 对 Decodeable 接口实现类对象进行解码
            decode(message);
        }

        if (message instanceof Request) {
            // 对 Request 的 data 字段进行解码
            decode(((Request) message).getData());
        }

        if (message instanceof Response) {
            // 对 Response 的 result 字段进行解码
            decode(((Response) message).getResult());
        }

        // 执行后续逻辑
        handler.received(channel, message);
    }

    private void decode(Object message) {
        // Decodeable 接口目前有两个实现类,
        // 分别为 DecodeableRpcInvocation 和 DecodeableRpcResult
        if (message != null && message instanceof Decodeable) {
            try {
                // 执行解码逻辑
                ((Decodeable) message).decode();
            } catch (Throwable e) {
                if (log.isWarnEnabled()) {
                    log.warn("Call Decodeable.decode failed: " + e.getMessage(), e);
                }
            }
        }
    }
}
DecodeHandler 主要是包含了一些解码逻辑,完全解码后的 Request 对象会继续向后传递
public class DubboProtocol extends AbstractProtocol {

    public static final String NAME = "dubbo";

    private ExchangeHandler requestHandler = new ExchangeHandlerAdapter() {

        @Override
        public Object reply(ExchangeChannel channel, Object message) throws RemotingException {
            if (message instanceof Invocation) {
                Invocation inv = (Invocation) message;
                // 获取 Invoker 实例
                Invoker<?> invoker = getInvoker(channel, inv);
                if (Boolean.TRUE.toString().equals(inv.getAttachments().get(IS_CALLBACK_SERVICE_INVOKE))) {
                    // 回调相关,忽略
                }
                RpcContext.getContext().setRemoteAddress(channel.getRemoteAddress());
                // 通过 Invoker 调用具体的服务
                return invoker.invoke(inv);
            }
            throw new RemotingException(channel, "Unsupported request: ...");
        }

        // 忽略其他方法
    }

    Invoker<?> getInvoker(Channel channel, Invocation inv) throws RemotingException {
        // 忽略回调和本地存根相关逻辑
        // ...

        int port = channel.getLocalAddress().getPort();

        // 计算 service key,格式为 groupName/serviceName:serviceVersion:port。比如:
        //   dubbo/com.alibaba.dubbo.demo.DemoService:1.0.0:20880
        String serviceKey = serviceKey(port, path, inv.getAttachments().get(Constants.VERSION_KEY), inv.getAttachments().get(Constants.GROUP_KEY));

        // 从 exporterMap 查找与 serviceKey 相对应的 DubboExporter 对象,
        // 服务导出过程中会将 <serviceKey, DubboExporter> 映射关系存储到 exporterMap 集合中
        DubboExporter<?> exporter = (DubboExporter<?>) exporterMap.get(serviceKey);

        if (exporter == null)
            throw new RemotingException(channel, "Not found exported service ...");

        // 获取 Invoker 对象,并返回
        return exporter.getInvoker();
    }

    // 忽略其他方法
}
在之前课程中介绍过,服务全部暴露完成之后保存到exporterMap中。这里就是通过serviceKey获取exporter之后获取Invoker,并通过 Invoker 的 invoke 方法调用服务逻辑
public abstract class AbstractProxyInvoker<T> implements Invoker<T> {

    @Override
    public Result invoke(Invocation invocation) throws RpcException {
        try {
            // 调用 doInvoke 执行后续的调用,并将调用结果封装到 RpcResult 中
            return new RpcResult(doInvoke(proxy, invocation.getMethodName(), invocation.getParameterTypes(), invocation.getArguments()));
        } catch (InvocationTargetException e) {
            return new RpcResult(e.getTargetException());
        } catch (Throwable e) {
            throw new RpcException("Failed to invoke remote proxy method ...");
        }
    }

    protected abstract Object doInvoke(T proxy, String methodName, Class<?>[] parameterTypes, Object[] arguments) throws Throwable;
}
如上,doInvoke 是一个抽象方法,这个需要由具体的 Invoker 实例实现。Invoker 实例是在运行时通过 JavassistProxyFactory 创建的,创建逻辑如下:
public class JavassistProxyFactory extends AbstractProxyFactory {

    // 省略其他方法

    @Override
    public <T> Invoker<T> getInvoker(T proxy, Class<T> type, URL url) {
        final Wrapper wrapper = Wrapper.getWrapper(proxy.getClass().getName().indexOf('$') < 0 ? proxy.getClass() : type);
        // 创建匿名类对象
        return new AbstractProxyInvoker<T>(proxy, type, url) {
            @Override
            protected Object doInvoke(T proxy, String methodName,
                                      Class<?>[] parameterTypes,
                                      Object[] arguments) throws Throwable {
                // 调用 invokeMethod 方法进行后续的调用
                return wrapper.invokeMethod(proxy, methodName, parameterTypes, arguments);
            }
        };
    }
}
Wrapper 是一个抽象类,其中 invokeMethod 是一个抽象方法。Dubbo 会在运行时通过 Javassist 框架为 Wrapper 生成实现类,并实现 invokeMethod 方法,该方法最终会根据调用信息调用具体的服务。以 DemoServiceImpl 为例,Javassist 为其生成的代理类如下。
/** Wrapper0 是在运行时生成的,大家可使用 Arthas 进行反编译 */
public class Wrapper0 extends Wrapper implements ClassGenerator.DC {
    public static String[] pns;
    public static Map pts;
    public static String[] mns;
    public static String[] dmns;
    public static Class[] mts0;

    // 省略其他方法

    public Object invokeMethod(Object object, String string, Class[] arrclass, Object[] arrobject) throws InvocationTargetException {
        DemoService demoService;
        try {
            // 类型转换
            demoService = (DemoService)object;
        }
        catch (Throwable throwable) {
            throw new IllegalArgumentException(throwable);
        }
        try {
            // 根据方法名调用指定的方法
            if ("sayHello".equals(string) && arrclass.length == 1) {
                return demoService.sayHello((String)arrobject[0]);
            }
        }
        catch (Throwable throwable) {
            throw new InvocationTargetException(throwable);
        }
        throw new NoSuchMethodException(new StringBuffer().append("Not found method \"").append(string).append("\" in class com.alibaba.dubbo.demo.DemoService.").toString());
    }
}
到这里,整个服务调用过程就分析完了。最后把调用过程贴出来,如下:
ChannelEventRunnable#run()
  —> DecodeHandler#received(Channel, Object)
    —> HeaderExchangeHandler#received(Channel, Object)
      —> HeaderExchangeHandler#handleRequest(ExchangeChannel, Request)
        —> DubboProtocol.requestHandler#reply(ExchangeChannel, Object)
          —> Filter#invoke(Invoker, Invocation)
            —> AbstractProxyInvoker#invoke(Invocation)
              —> Wrapper0#invokeMethod(Object, String, Class[], Object[])
                —> DemoServiceImpl#sayHello(String)
4 提供方返回调用结果
服务提供方调用指定服务后,会将调用结果封装到 Response 对象中,并将该对象返回给服务消费方。服务提供方也是通过 NettyChannel 的 send 方法将 Response 对象返回,这里就不在重复分析了。本节我们仅需关注 Response 对象的编码过程即可
public class ExchangeCodec extends TelnetCodec {
    public void encode(Channel channel, ChannelBuffer buffer, Object msg) throws IOException {
        if (msg instanceof Request) {
            encodeRequest(channel, buffer, (Request) msg);
        } else if (msg instanceof Response) {
            // 对响应对象进行编码
            encodeResponse(channel, buffer, (Response) msg);
        } else {
            super.encode(channel, buffer, msg);
        }
    }

    protected void encodeResponse(Channel channel, ChannelBuffer buffer, Response res) throws IOException {
        int savedWriteIndex = buffer.writerIndex();
        try {
            Serialization serialization = getSerialization(channel);
            // 创建消息头字节数组
            byte[] header = new byte[HEADER_LENGTH];
            // 设置魔数
            Bytes.short2bytes(MAGIC, header);
            // 设置序列化器编号
            header[2] = serialization.getContentTypeId();
            if (res.isHeartbeat()) header[2] |= FLAG_EVENT;
            // 获取响应状态
            byte status = res.getStatus();
            // 设置响应状态
            header[3] = status;
            // 设置请求编号
            Bytes.long2bytes(res.getId(), header, 4);

            // 更新 writerIndex,为消息头预留 16 个字节的空间
            buffer.writerIndex(savedWriteIndex + HEADER_LENGTH);
            ChannelBufferOutputStream bos = new ChannelBufferOutputStream(buffer);
            ObjectOutput out = serialization.serialize(channel.getUrl(), bos);

            if (status == Response.OK) {
                if (res.isHeartbeat()) {
                    // 对心跳响应结果进行序列化,已废弃
                    encodeHeartbeatData(channel, out, res.getResult());
                } else {
                    // 对调用结果进行序列化
                    encodeResponseData(channel, out, res.getResult(), res.getVersion());
                }
            } else {
                // 对错误信息进行序列化
                out.writeUTF(res.getErrorMessage())
            };
            out.flushBuffer();
            if (out instanceof Cleanable) {
                ((Cleanable) out).cleanup();
            }
            bos.flush();
            bos.close();

            // 获取写入的字节数,也就是消息体长度
            int len = bos.writtenBytes();
            checkPayload(channel, len);

            // 将消息体长度写入到消息头中
            Bytes.int2bytes(len, header, 12);
            // 将 buffer 指针移动到 savedWriteIndex,为写消息头做准备
            buffer.writerIndex(savedWriteIndex);
            // 从 savedWriteIndex 下标处写入消息头
            buffer.writeBytes(header);
            // 设置新的 writerIndex,writerIndex = 原写下标 + 消息头长度 + 消息体长度
            buffer.writerIndex(savedWriteIndex + HEADER_LENGTH + len);
        } catch (Throwable t) {
            // 异常处理逻辑不是很难理解,但是代码略多,这里忽略了
        }
    }
}

public class DubboCodec extends ExchangeCodec implements Codec2 {

    protected void encodeResponseData(Channel channel, ObjectOutput out, Object data, String version) throws IOException {
        Result result = (Result) data;
        // 检测当前协议版本是否支持带有 attachment 集合的 Response 对象
        boolean attach = Version.isSupportResponseAttachment(version);
        Throwable th = result.getException();

        // 异常信息为空
        if (th == null) {
            Object ret = result.getValue();
            // 调用结果为空
            if (ret == null) {
                // 序列化响应类型
                out.writeByte(attach ? RESPONSE_NULL_VALUE_WITH_ATTACHMENTS : RESPONSE_NULL_VALUE);
            }
            // 调用结果非空
            else {
                // 序列化响应类型
                out.writeByte(attach ? RESPONSE_VALUE_WITH_ATTACHMENTS : RESPONSE_VALUE);
                // 序列化调用结果
                out.writeObject(ret);
            }
        }
        // 异常信息非空
        else {
            // 序列化响应类型
            out.writeByte(attach ? RESPONSE_WITH_EXCEPTION_WITH_ATTACHMENTS : RESPONSE_WITH_EXCEPTION);
            // 序列化异常对象
            out.writeObject(th);
        }

        if (attach) {
            // 记录 Dubbo 协议版本
            result.getAttachments().put(Constants.DUBBO_VERSION_KEY, Version.getProtocolVersion());
            // 序列化 attachments 集合
            out.writeObject(result.getAttachments());
        }
    }
}
以上就是 Response 对象编码的过程,和前面分析的 Request 对象编码过程很相似。如果大家能看 Request 对象的编码逻辑,那么这里的 Response 对象的编码逻辑也不难理解,就不多说了。接下来我们再来分析双向通信的最后一环 —— 服务消费方接收调用结果。
5 消费方接收调用结果
服务消费方在收到响应数据后,首先要做的事情是对响应数据进行解码,得到 Response 对象。然后再将该对象传递给下一个入站处理器,这个入站处理器就是 NettyHandler。接下来 NettyHandler 会将这个对象继续向下传递,最后 AllChannelHandler 的 received 方法会收到这个对象,并将这个对象派发到线程池中。这个过程和服务提供方接收请求的过程是一样的,因此这里就不重复分析了
(1)响应数据解码
响应数据解码逻辑主要的逻辑封装在 DubboCodec 中,我们直接分析这个类的代码。如下:
public class DubboCodec extends ExchangeCodec implements Codec2 {

    @Override
    protected Object decodeBody(Channel channel, InputStream is, byte[] header) throws IOException {
        byte flag = header[2], proto = (byte) (flag & SERIALIZATION_MASK);
        Serialization s = CodecSupport.getSerialization(channel.getUrl(), proto);
        // 获取请求编号
        long id = Bytes.bytes2long(header, 4);
        // 检测消息类型,若下面的条件成立,表明消息类型为 Response
        if ((flag & FLAG_REQUEST) == 0) {
            // 创建 Response 对象
            Response res = new Response(id);
            // 检测事件标志位
            if ((flag & FLAG_EVENT) != 0) {
                // 设置心跳事件
                res.setEvent(Response.HEARTBEAT_EVENT);
            }
            // 获取响应状态
            byte status = header[3];
            // 设置响应状态
            res.setStatus(status);

            // 如果响应状态为 OK,表明调用过程正常
            if (status == Response.OK) {
                try {
                    Object data;
                    if (res.isHeartbeat()) {
                        // 反序列化心跳数据,已废弃
                        data = decodeHeartbeatData(channel, deserialize(s, channel.getUrl(), is));
                    } else if (res.isEvent()) {
                        // 反序列化事件数据
                        data = decodeEventData(channel, deserialize(s, channel.getUrl(), is));
                    } else {
                        DecodeableRpcResult result;
                        // 根据 url 参数决定是否在 IO 线程上执行解码逻辑
                        if (channel.getUrl().getParameter(
                                Constants.DECODE_IN_IO_THREAD_KEY,
                                Constants.DEFAULT_DECODE_IN_IO_THREAD)) {
                            // 创建 DecodeableRpcResult 对象
                            result = new DecodeableRpcResult(channel, res, is,
                                    (Invocation) getRequestData(id), proto);
                            // 进行后续的解码工作
                            result.decode();
                        } else {
                            // 创建 DecodeableRpcResult 对象
                            result = new DecodeableRpcResult(channel, res,
                                    new UnsafeByteArrayInputStream(readMessageData(is)),
                                    (Invocation) getRequestData(id), proto);
                        }
                        data = result;
                    }

                    // 设置 DecodeableRpcResult 对象到 Response 对象中
                    res.setResult(data);
                } catch (Throwable t) {
                    // 解码过程中出现了错误,此时设置 CLIENT_ERROR 状态码到 Response 对象中
                    res.setStatus(Response.CLIENT_ERROR);
                    res.setErrorMessage(StringUtils.toString(t));
                }
            }
            // 响应状态非 OK,表明调用过程出现了异常
            else {
                // 反序列化异常信息,并设置到 Response 对象中
                res.setErrorMessage(deserialize(s, channel.getUrl(), is).readUTF());
            }
            return res;
        } else {
            // 对请求数据进行解码,前面已分析过,此处忽略
        }
    }
}
以上就是响应数据的解码过程,上面逻辑看起来是不是似曾相识。对的,我们在前面章节分析过 DubboCodec 的 decodeBody 方法中关于请求数据的解码过程,该过程和响应数据的解码过程很相似。下面,我们继续分析调用结果的反序列化过程
public class DecodeableRpcResult extends AppResponse implements Codec, Decodeable {

    private static final Logger log = LoggerFactory.getLogger(DecodeableRpcResult.class);

    private Channel channel;

    private byte serializationType;

    private InputStream inputStream;

    private Response response;

    private Invocation invocation;

    private volatile boolean hasDecoded;

    public DecodeableRpcResult(Channel channel, Response response, InputStream is, Invocation invocation, byte id) {
        Assert.notNull(channel, "channel == null");
        Assert.notNull(response, "response == null");
        Assert.notNull(is, "inputStream == null");
        this.channel = channel;
        this.response = response;
        this.inputStream = is;
        this.invocation = invocation;
        this.serializationType = id;
    }

    @Override
    public void encode(Channel channel, OutputStream output, Object message) throws IOException {
        throw new UnsupportedOperationException();
    }

    @Override
    public Object decode(Channel channel, InputStream input) throws IOException {
        ObjectInput in = CodecSupport.getSerialization(channel.getUrl(), serializationType)
                .deserialize(channel.getUrl(), input);
        // 反序列化响应类型
        byte flag = in.readByte();
        switch (flag) {
            case DubboCodec.RESPONSE_NULL_VALUE:
                break;
            case DubboCodec.RESPONSE_VALUE:
                handleValue(in);
                break;
            case DubboCodec.RESPONSE_WITH_EXCEPTION:
                handleException(in);
                break;
                // 返回值为空,且携带了 attachments 集合
            case DubboCodec.RESPONSE_NULL_VALUE_WITH_ATTACHMENTS:
                handleAttachment(in);
                break;
                //返回值不为空,且携带了 attachments 集合
            case DubboCodec.RESPONSE_VALUE_WITH_ATTACHMENTS:
                handleValue(in);
                handleAttachment(in);
                break;
            // 异常对象不为空,且携带了 attachments 集合
            case DubboCodec.RESPONSE_WITH_EXCEPTION_WITH_ATTACHMENTS:
                handleException(in);
                handleAttachment(in);
                break;
            default:
                throw new IOException("Unknown result flag, expect '0' '1' '2' '3' '4' '5', but received: " + flag);
        }
        if (in instanceof Cleanable) {
            ((Cleanable) in).cleanup();
        }
        return this;
    }
正常调用下,线程会进入 RESPONSE_VALUE_WITH_ATTACHMENTS 分支中。然后线程会从 invocation 变量(大家探索一下 invocation 变量的由来)中获取返回值类型,接着对调用结果进行反序列化,并将序列化后的结果存储起来。最后对 attachments 集合进行反序列化,并存到指定字段中
(2)获取调用结果
解码完成后,解码结果Response会进入NettyClientHandler,调用路径如下:
NettyServerHandler#channelRead(ChannelHandlerContext, MessageEvent)
  —> AbstractPeer#received(Channel, Object)
    —> MultiMessageHandler#received(Channel, Object)
      —> HeartbeatHandler#received(Channel, Object)
        —> AllChannelHandler#received(Channel, Object)
          —> ExecutorService#execute(Runnable)    // 由线程池执行后续的调用逻辑 ChannelEventRunnable
跟服务提供者收到请求后的处理逻辑一样,接下来在ChannelEventRunnable中进行处理
最终在HeaderExchangeHandler.received中有处理响应结果的分支
public void received(Channel channel, Object message) throws RemotingException {
    channel.setAttribute(KEY_READ_TIMESTAMP, System.currentTimeMillis());
    final ExchangeChannel exchangeChannel = HeaderExchangeChannel.getOrAddChannel(channel);
    try {
        if (message instanceof Request) {
            // handle request. 处理请求
            Request request = (Request) message;
            if (request.isEvent()) {
                handlerEvent(channel, request);
            } else {
                if (request.isTwoWay()) {
                    /**
                         * 真正处理请求,重点来看
                         */
                    handleRequest(exchangeChannel, request);
                } else {
                    handler.received(exchangeChannel, request.getData());
                }
            }
        } else if (message instanceof Response) {
            /**
                 * 处理响应,重点来看
                 */
            handleResponse(channel, (Response) message);

        } else if (message instanceof String) {
            if (isClientSide(channel)) {
                Exception e = new Exception("Dubbo client can not supported string message: " + message + " in channel: " + channel + ", url: " + channel.getUrl());
                logger.error(e.getMessage(), e);
            } else {
                String echo = handler.telnet(channel, (String) message);
                if (echo != null && echo.length() > 0) {
                    channel.send(echo);
                }
            }
        } else {
            handler.received(exchangeChannel, message);
        }
    } finally {
        HeaderExchangeChannel.removeChannelIfDisconnected(channel);
    }
}

static void handleResponse(Channel channel, Response response) throws RemotingException {
    if (response != null && !response.isHeartbeat()) {
        DefaultFuture.received(channel, response);
    }
}
然后在DefaultFuture中继续处理
public static void received(Channel channel, Response response) {
    received(channel, response, false);
}

public static void received(Channel channel, Response response, boolean timeout) {
    try {
        /**
             * Map<Long, DefaultFuture> FUTURES
             */
        DefaultFuture future = FUTURES.remove(response.getId());
        if (future != null) {
            Timeout t = future.timeoutCheckTask;
            if (!timeout) {
                // decrease Time
                t.cancel();
            }
            future.doReceived(response);
        } else {
            logger.warn("The timeout response finally returned at "
                        + (new SimpleDateFormat("yyyy-MM-dd HH:mm:ss.SSS").format(new Date()))
                        + ", response " + response
                        + (channel == null ? "" : ", channel: " + channel.getLocalAddress()
                           + " -> " + channel.getRemoteAddress()));
        }
    } finally {
        CHANNELS.remove(response.getId());
    }
}
private void doReceived(Response res) {
    if (res == null) {
        throw new IllegalStateException("response cannot be null");
    }
    if (res.getStatus() == Response.OK) {
        /**
             * 通过`CompletableFuture#complete`方法来设置异步的返回结果
             *  CompletableFuture 是 jdk 提供的
             */
        this.complete(res.getResult());
    } else if (res.getStatus() == Response.CLIENT_TIMEOUT || res.getStatus() == Response.SERVER_TIMEOUT) {
        this.completeExceptionally(new TimeoutException(res.getStatus() == Response.SERVER_TIMEOUT, channel, res.getErrorMessage()));
    } else {
        this.completeExceptionally(new RemotingException(channel, res.getErrorMessage()));
    }
}
设置完结果,在哪里获取呢?这得追溯到消费方代理方法的执行,在InvokerInvocationHandler中
public Object invoke(Object proxy, Method method, Object[] args) throws Throwable {
        String methodName = method.getName();
        Class<?>[] parameterTypes = method.getParameterTypes();
        if (method.getDeclaringClass() == Object.class) {
            return method.invoke(invoker, args);
        }
        if ("toString".equals(methodName) && parameterTypes.length == 0) {
            return invoker.toString();
        }
        if ("hashCode".equals(methodName) && parameterTypes.length == 0) {
            return invoker.hashCode();
        }
        if ("equals".equals(methodName) && parameterTypes.length == 1) {
            return invoker.equals(args[0]);
        }
        /**
         * Invocation 是会话域,它持有调用过程中的变量,比如方法名,参数等
         * 将 method 和 args 封装到 RpcInvocation 中,并执行后续的调用
         *
         * invoker: MockClusterInvoker  内部封装了服务降级逻辑
         */
        return invoker.invoke(new RpcInvocation(method, args)).recreate();// recreate获取结果,在AsyncRpcResult中
    }

public Object recreate() throws Throwable {
    RpcInvocation rpcInvocation = (RpcInvocation) invocation;
    FutureAdapter future = new FutureAdapter(this);
    RpcContext.getContext().setFuture(future);
    if (InvokeMode.FUTURE == rpcInvocation.getInvokeMode()) {
        return future;
    }
    // return getAppResponse().recreate(); //原代码
    Result appResponse = getAppResponse();
    return appResponse.recreate();
}
public Result getAppResponse() {
    try {
        if (this.isDone()) {
            /**
                 * this= AsyncRpcResult extends AbstractResult extends CompletableFuture
                 获取到结果了
                 */
            return this.get();
        }
    } catch (Exception e) {
        // This should never happen;
        logger.error("Got exception when trying to fetch the underlying result from AsyncRpcResult.", e);
    }
    return new AppResponse();
}
6 异步转同步
Dubbo发送数据至服务方后,在通信层面是异步的,通信线程并不会等待结果数据返回。而我们在使用Dubbo进行RPC调用缺省就是同步的,这其中就涉及到了异步转同步的操作。
而在2.7.x版本中,这种自实现的异步转同步操作进行了修改。新的DefaultFuture继承了CompletableFuture,新的doReceived(Response res)方法如下:
private void doReceived(Response res) {
    if (res == null) {
        throw new IllegalStateException("response cannot be null");
    }
    if (res.getStatus() == Response.OK) {
        this.complete(res.getResult());
    } else if (res.getStatus() == Response.CLIENT_TIMEOUT || res.getStatus() == Response.SERVER_TIMEOUT) {
        this.completeExceptionally(new TimeoutException(res.getStatus() == Response.SERVER_TIMEOUT, channel, res.getErrorMessage()));
    } else {
        this.completeExceptionally(new RemotingException(channel, res.getErrorMessage()));
    }
}
通过CompletableFuture#complete方法来设置异步的返回结果,且删除旧的get()方法,使用CompletableFuture#get()方法:
public T get() throws InterruptedException, ExecutionException {
    Object r;
    return reportGet((r = result) == null ? waitingGet(true) : r);
}
使用CompletableFuture完成了异步转同步的操作。
7 异步多线程数据一致
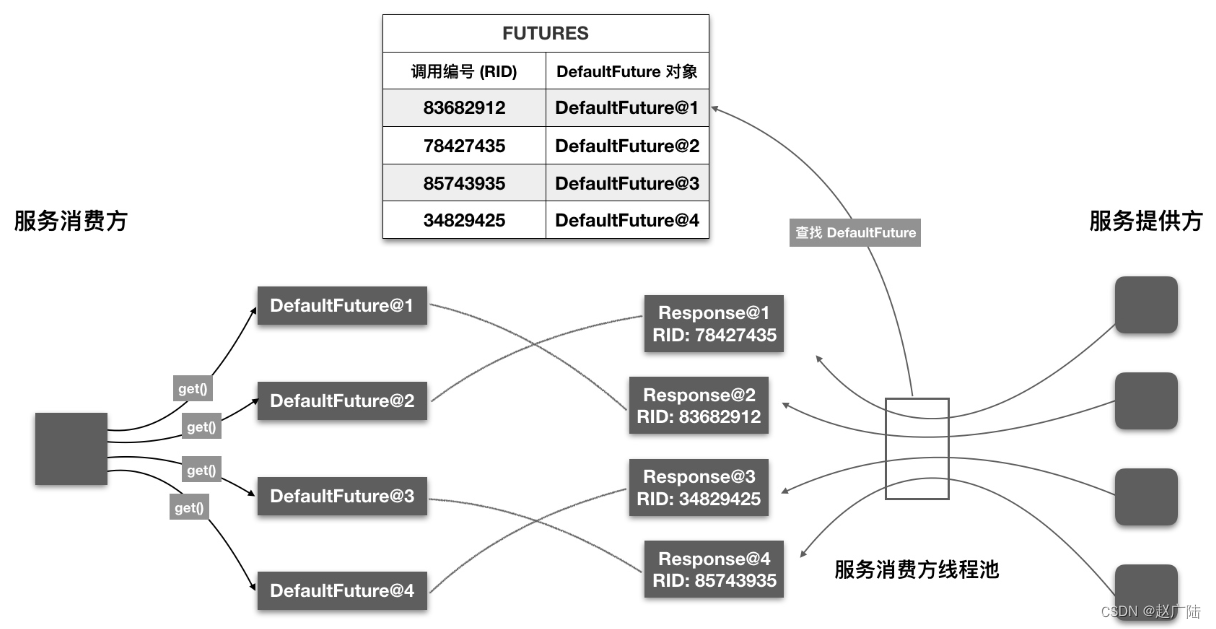
这里简单说明一下。一般情况下,服务消费方会并发调用多个服务,每个用户线程发送请求后,会调用 get 方法进行等待。 一段时间后,服务消费方的线程池会收到多个响应对象。这个时候要考虑一个问题,如何将每个响应对象传递给相应的 Future 对象,不出错。答案是通过调用编号。Future 被创建时,会要求传入一个 Request 对象。此时 DefaultFuture 可从 Request 对象中获取调用编号,并将 <调用编号, DefaultFuture 对象> 映射关系存入到静态 Map 中,即 FUTURES。线程池中的线程在收到 Response 对象后,会根据 Response 对象中的调用编号到 FUTURES 集合中取出相应的 DefaultFuture 对象,然后再将 Response 对象设置到 DefaultFuture 对象中。这样用户线程即可从 DefaultFuture 对象中获取调用结果了。整个过程大致如下图:
private DefaultFuture(Channel channel, Request request, int timeout) {
    this.channel = channel;
    this.request = request;
    this.id = request.getId();
    this.timeout = timeout > 0 ? timeout : channel.getUrl().getPositiveParameter(TIMEOUT_KEY, DEFAULT_TIMEOUT);
    // put into waiting map.
    FUTURES.put(id, this);
    CHANNELS.put(id, channel);
}
8 心跳检查
Dubbo采用双向心跳的方式检测Client端与Server端的连通性。
我们再来看看 Dubbo 是如何设计应用层心跳的。Dubbo 的心跳是双向心跳,客户端会给服务端发送心跳,反之,服务端也会向客户端发送心跳。
1. 创建定时器
public class HeaderExchangeClient implements ExchangeClient {

    private final Client client;
    private final ExchangeChannel channel;

    private static final HashedWheelTimer IDLE_CHECK_TIMER = new HashedWheelTimer(
            new NamedThreadFactory("dubbo-client-idleCheck", true), 1, TimeUnit.SECONDS, TICKS_PER_WHEEL);

    private HeartbeatTimerTask heartBeatTimerTask;
    private ReconnectTimerTask reconnectTimerTask;

    public HeaderExchangeClient(Client client, boolean startTimer) {
        Assert.notNull(client, "Client can't be null");
        this.client = client;
        this.channel = new HeaderExchangeChannel(client);

        if (startTimer) {
            URL url = client.getUrl();
            //开启心跳失败之后处理重连,断连的逻辑定时任务
            startReconnectTask(url);
            //开启发送心跳请求定时任务
            startHeartBeatTask(url);
        }
    }
Dubbo 在 HeaderExchangeClient初始化时开启了两个定时任务
startReconnectTask主要用于定时发送心跳请求startHeartBeatTask主要用于心跳失败之后处理重连,断连的逻辑
2. 发送心跳请求
详细解析下心跳检测定时任务的逻辑 HeartbeatTimerTask#doTask:
  protected void doTask(Channel channel) {
      Long lastRead = lastRead(channel);
      Long lastWrite = lastWrite(channel);
      if ((lastRead != null && now() - lastRead > heartbeat)
          || (lastWrite != null && now() - lastWrite > heartbeat)) {
          Request req = new Request();
          req.setVersion(Version.getProtocolVersion());
          req.setTwoWay(true);
          req.setEvent(Request.HEARTBEAT_EVENT);
          channel.send(req);
      }
   }
前面已经介绍过,Dubbo 采取的是双向心跳设计,即服务端会向客户端发送心跳,客户端也会向服务端发送心跳,接收的一方更新 lastRead 字段,发送的一方更新 lastWrite 字段,超过心跳间隙的时间,便发送心跳请求给对端。这里的 lastRead/lastWrite 同样会被同一个通道上的普通调用更新,通过更新这两个字段,实现了只在连接空闲时才会真正发送空闲报文的机制,符合我们一开始科普的做法。
3. 处理重连和断连
继续研究下重连和断连定时器都实现了什么 ReconnectTimerTask#doTask。
   protected void doTask(Channel channel) {
       Long lastRead = lastRead(channel);
       Long now = now();
       if (!channel.isConnected()) {
           ((Client) channel).reconnect();
           // check pong at client
       } else if (lastRead != null && now - lastRead > idleTimeout) {
           ((Client) channel).reconnect();
       }
    }
第二个定时器则负责根据客户端、服务端类型来对连接做不同的处理,当超过设置的心跳总时间之后,客户端选择的是重新连接,服务端则是选择直接断开连接。这样的考虑是合理的,客户端调用是强依赖可用连接的,而服务端可以等待客户端重新建立连接。
Dubbo 对于建立的每一个连接,同时在客户端和服务端开启了 2 个定时器,一个用于定时发送心跳,一个用于定时重连、断连,执行的频率均为各自检测周期的 1/3。定时发送心跳的任务负责在连接空闲时,向对端发送心跳包。定时重连、断连的任务负责检测 lastRead 是否在超时周期内仍未被更新,如果判定为超时,客户端处理的逻辑是重连,服务端则采取断连的措施。





![[HarekazeCTF2019]baby_rop2](https://img-blog.csdnimg.cn/837bc7a5c57e48a0bf1fedd766454d15.png)
