图片模块封装:Glide高级使用+使用设计模式图片封装+Bitmap尺寸压缩和质量压缩+Bitmap加载大图长图
- 一.如何更换图片框架
- 二.Glide配置
- 1.依赖:
- 2.缓存配置:
- 3.网络配置:glide默认使用httpUrlConnection完成网络请求,可以改成okhttp
- 三.策略模式+构建者模式图片框架搭建
- 1.ImageOptions图片参数设置
- 2.IImageLoader接口以及实现子类
- 3.图片加载策略
- 4.ImageLoader
- 5.ImageLoaderManager
- 6.使用:
- 四.Bitmap三级缓存二次采样
- 五.长图大图处理
一.如何更换图片框架
框架设计过程中对于对于架构要求高内聚低耦合,图片加载框架中引
入三方框架提示开发效率,对于技术选型后的方案可能后面需求的变更原三方
sdk无法满足当前业务需求,故而需要更换原有sdk,为了将更改降到最低,所
有前面设计图片加载框架时要考虑当前这个风险点
使用设计模式来进一步解耦代码耦合度,来解决隔离风险点的目的,
即定义接口层业务依赖抽象即当前接口,具体实现有不同三方sdk完成。
因为业务依赖的是接口层对应后期代码维护更改量会控制在最小,对于原软件
稳定性影响也会极小达到更换图片加载框架的目的。
二.Glide配置
1.依赖:
config.gradle配置:
 //Glide
    // Glide集成OkHttp时需要使用的库,库已经将需要适配Okhhtp的大部分代码封装,注意如果之前已经使用了okhttp依赖注释掉
    libIntegration =  'com.github.bumptech.glide:okhttp3-integration:4.13.0'
    libGlide = 'com.github.bumptech.glide:glide:4.13.0'
    libGlideCompiler = 'com.github.bumptech.glide:compiler:4.13.0'//Glide注解处理器的依赖
library-base封装网络
   //glide图片框架
    api libGlide
    api libIntegration
    kapt libGlideCompiler
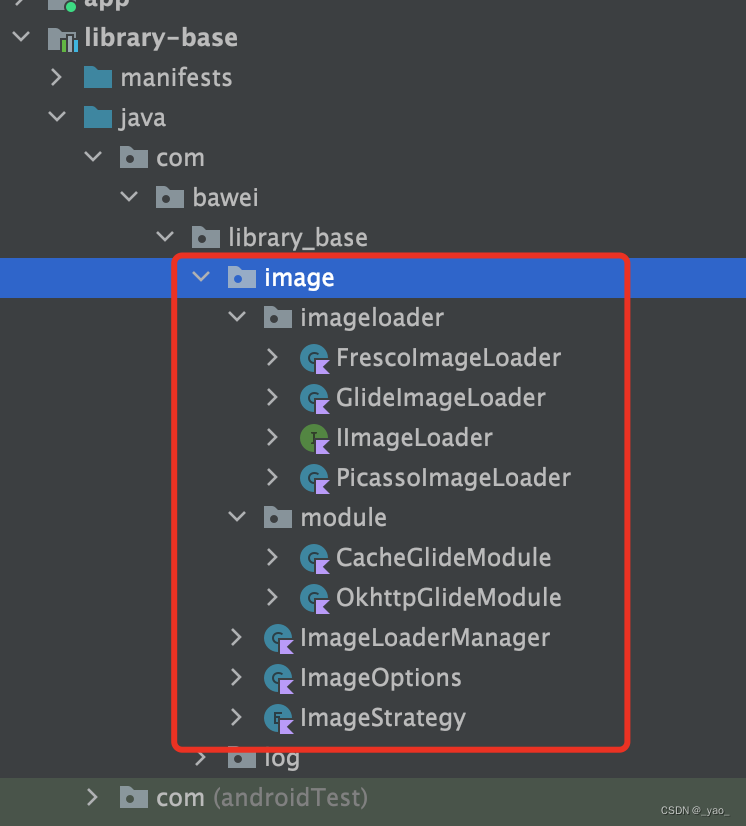
项目结构:
2.缓存配置:
/**
 * @Author : yaotianxue
 * @Time : On 2023/5/22 17:03
 * @Description : MyGlideModule 配置glide缓存
 */
@GlideModule
class CacheGlideModule:AppGlideModule() {
    override fun applyOptions(context: Context, builder: GlideBuilder) {
        //super.applyOptions(context, builder)
        //设置内存缓存大小:根据机器自动计算
//        var  memorySizeCalculator = MemorySizeCalculator.Builder(context).build()
//        builder.setMemoryCache(LruResourceCache(memorySizeCalculator.memoryCacheSize.toLong()))
        //设置内存缓存大小:10M
        builder.setMemoryCache(LruResourceCache(10*1024*1024))
        //设置磁盘缓存大小:500M 默认250M 设置磁盘缓存文件夹名称 "my_image" 默认 "image_manager_disk_cache"
        builder.setDiskCache(InternalCacheDiskCacheFactory(context,"my_image",500*1024*1024))//修改磁盘缓存的文件夹和磁盘大小
    }
}
3.网络配置:glide默认使用httpUrlConnection完成网络请求,可以改成okhttp
/**
 * @Author : yaotianxue
 * @Time : On 2023/5/22 17:07
 * @Description : OkhttpGlideModule:配置okhttp认证所有证书,可以认证自定义ca证书
 */
@GlideModule
class OkhttpGlideModule:LibraryGlideModule() {
    override fun registerComponents(context: Context, glide: Glide, registry: Registry) {
        //        super.registerComponents(context, glide, registry)
        var client = OkHttpClient.Builder()
            .sslSocketFactory(sSLSocketFactory,trustManager)
            .build()
        registry.replace(GlideUrl::class.java, InputStream::class.java, OkHttpUrlLoader.Factory(client))
    }

    /** 获取一个SSLSocketFactory */
    val sSLSocketFactory: SSLSocketFactory
        get() = try {
            val sslContext = SSLContext.getInstance("SSL")
            sslContext.init(null, arrayOf(trustManager), SecureRandom())
            sslContext.socketFactory
        } catch (e: Exception) {
            throw RuntimeException(e)
        }

    /** 获取一个忽略证书的X509TrustManager */
    val trustManager: X509TrustManager
        get() = object : X509TrustManager {
            override fun checkClientTrusted(chain: Array<X509Certificate>, authType: String) { }
            override fun checkServerTrusted(chain: Array<X509Certificate>, authType: String) { }
            override fun getAcceptedIssuers(): Array<X509Certificate> { return arrayOf() }
        }
}
三.策略模式+构建者模式图片框架搭建
1.ImageOptions图片参数设置
/**
 * @Author : yaotianxue
 * @Time : On 2023/5/22 15:04
 * @Description : ImageOptions图片设置
 */
class ImageOptions( var placeImage:Int,//占位符
                    var errorImage:Int,//错误图
                    var isStaticImage:Boolean,//是否为静态图片
                    var isGif:Boolean,//是否为动图
                    var imageSize:Array<Int>,//图片大小
                    var skipMemoryCache:Boolean,//关闭内存缓存
                    var skipDiskCache:Boolean//关闭磁盘缓存
){
    constructor(builder: Builder):this(
        builder.placeImage,
        builder.errorImage,
        builder.isStaticImage,
        builder.isGif,
        builder.imageSize,
        builder.skipMemoryCache,
        builder.skipDiskCache
    )

    class Builder{
         var placeImage:Int = 0//占位符
         var errorImage:Int = 0 //错误图
         var isStaticImage:Boolean = true//是否为静态图片
         var isGif:Boolean = false//是否为动图
         var imageSize:Array<Int> = arrayOf(0,0)//图片大小
         var skipMemoryCache:Boolean = false//关闭内存缓存
         var skipDiskCache:Boolean = false//关闭磁盘缓存
        fun  setPlaceImage(placeImage:Int):Builder{
            this.placeImage = placeImage
            return this
        }
        fun  setErrorImage(errorImage:Int):Builder{
            this.errorImage = errorImage
            return this
        }
        fun build():ImageOptions{
            return ImageOptions(this)
        }
    }

}
2.IImageLoader接口以及实现子类
/**
 * @Author : yaotianxue
 * @Time : On 2023/5/22 15:03
 * @Description : IImageLoader
 */
interface IImageLoader {
    /**
     * 加载本地图片到指定图片控件
     */
    fun loadFileIntoImageView(context: Context,file: File,target: ImageView,config: ImageOptions)
    /**
     * 加载网络图片到指定图片控件
     */
    fun loadUrlIntoImageView(context: Context,url: String,target: ImageView,config: ImageOptions)
    /**
     * 加载资源图片到指定图片控件
     */
    fun loadResourceIntoImageView(context: Context,source: Int,target: ImageView,config: ImageOptions)
    /**
     * 加载Uri图片到指定图片控件
     */
    fun loadUriIntoImageView(context: Context, uri: Uri, target: ImageView, config: ImageOptions)
    /**
     * 加载二进制数组到指定图片控件
     */
    fun loadByteArrayIntoImageView(context: Context,bytes: Array<Byte>,target: ImageView,config: ImageOptions)
}
GlideImageLoader/FrscoImageLoader/PicassoImageLoader
/**
 * @Author : yaotianxue
 * @Time : On 2023/5/22 16:50
 * @Description : GlideImageLoader
 */
class GlideImageLoader:IImageLoader {
    override fun loadFileIntoImageView(
        context: Context,
        file: File,
        target: ImageView,
        config: ImageOptions,
    ) {
        loadImageView(context,file,target,config)
    }

    override fun loadUrlIntoImageView(
        context: Context,
        url: String,
        target: ImageView,
        config: ImageOptions,
    ) {
        loadImageView(context,url,target,config)
    }

    override fun loadResourceIntoImageView(
        context: Context,
        source: Int,
        target: ImageView,
        config: ImageOptions,
    ) {
        loadImageView(context,source,target,config)
    }

    override fun loadUriIntoImageView(
        context: Context,
        uri: Uri,
        target: ImageView,
        config: ImageOptions,
    ) {
        loadImageView(context,uri,target,config)
    }

    override fun loadByteArrayIntoImageView(
        context: Context,
        bytes: Array<Byte>,
        target: ImageView,
        config: ImageOptions,
    ) {
        loadImageView(context,bytes,target,config)
    }


    /**
     * 加载
     */
    private fun loadImageView(
        context: Context,
        source: Any,
        target: ImageView,
        config: ImageOptions,
    ) {
        var builder = GlideApp.with(context).load(source)
        setBuilderOptions(builder,config)
        builder.into(target)

    }

    /**
     * 设置图片参数
     */
    private fun setBuilderOptions(builder: GlideRequest<Drawable>, config: ImageOptions) {
        config.let {
            var options = RequestOptions()
            if(config.placeImage != 0){
                options.placeholder(config.placeImage)
            }
            if(config.errorImage != 0){
                options.error(config.errorImage)
            }
            config.imageSize.let {
                if(config.imageSize.size != 2){
                    throw IllegalArgumentException("please set imageSize length size is 2")
                }
                options.override(config.imageSize[0],config.imageSize[1])
            }
            if(config.skipDiskCache)  options.diskCacheStrategy(DiskCacheStrategy.NONE)
            if(config.skipMemoryCache) options.skipMemoryCache(true)
            builder.apply(options)
        }
    }
}
3.图片加载策略
/**
 * @Author : yaotianxue
 * @Time : On 2023/5/22 18:51
 * @Description : ImageStrategy
 */
enum class ImageStrategy {
    Glide,Picasso,Fresco
}
4.ImageLoader
/**
 * @Author : yaotianxue
 * @Time : On 2023/5/22 18:49
 * @Description : ImageLoader
 */
class ImageLoaderManager(var imageStrategy: ImageStrategy):IImageLoader{
    private var imageLoader:IImageLoader = when(imageStrategy){
        ImageStrategy.Glide -> GlideImageLoader()
        ImageStrategy.Fresco -> FrescoImageLoader()
        ImageStrategy.Picasso -> PicassoImageLoader()
    }

    override fun loadFileIntoImageView(
        context: Context,
        file: File,
        target: ImageView,
        config: ImageOptions,
    ) {
        imageLoader.loadFileIntoImageView(context,file,target,config)
    }

    override fun loadUrlIntoImageView(
        context: Context,
        url: String,
        target: ImageView,
        config: ImageOptions,
    ) {
        imageLoader.loadUrlIntoImageView(context,url,target,config)
    }

    override fun loadResourceIntoImageView(
        context: Context,
        source: Int,
        target: ImageView,
        config: ImageOptions,
    ) {
        imageLoader.loadResourceIntoImageView(context,source,target,config)
    }

}
5.ImageLoaderManager
/**
 * @Author : yaotianxue
 * @Time : On 2023/5/22 18:49
 * @Description : ImageLoader
 */
class ImageLoaderManager(var imageStrategy: ImageStrategy):IImageLoader{
    private var imageLoader:IImageLoader = when(imageStrategy){
        ImageStrategy.Glide -> GlideImageLoader()
        ImageStrategy.Fresco -> FrescoImageLoader()
        ImageStrategy.Picasso -> PicassoImageLoader()
    }

    override fun loadFileIntoImageView(
        context: Context,
        file: File,
        target: ImageView,
        config: ImageOptions,
    ) {
        imageLoader.loadFileIntoImageView(context,file,target,config)
    }

    override fun loadUrlIntoImageView(
        context: Context,
        url: String,
        target: ImageView,
        config: ImageOptions,
    ) {
        imageLoader.loadUrlIntoImageView(context,url,target,config)
    }

    override fun loadResourceIntoImageView(
        context: Context,
        source: Int,
        target: ImageView,
        config: ImageOptions,
    ) {
        imageLoader.loadResourceIntoImageView(context,source,target,config)
    }

    override fun loadUriIntoImageView(
        context: Context,
        uri: Uri,
        target: ImageView,
        config: ImageOptions,
    ) {
        imageLoader.loadUriIntoImageView(context,uri,target,config)
    }

    override fun loadByteArrayIntoImageView(
        context: Context,
        bytes: Array<Byte>,
        target: ImageView,
        config: ImageOptions,
    ) {
        imageLoader.loadByteArrayIntoImageView(context,bytes, target, config)
    }
}
6.使用:
   		val manager = ImageLoaderManager(ImageStrategy.Glide)
        val options: ImageOptions = ImageOptions.Builder()
            .setPlaceImage(R.mipmap.ic_launcher)
            .setErrorImage(R.mipmap.ic_launcher)
            .skipDiskCache(true)
            .skipDiskCache(true)
            .build()
        val imgUrl =
           "https://gimg2.baidu.com/image_search/src=http%3A%2F%2Fpic13.nipic.com%2F20110324%2F6999402_050849259122_2.jpg&refer=http%3A%2F%2Fpic13.nipic.com&app=2002&size=f9999,10000&q=a80&n=0&g=0n&fmt=jpeg?sec=1634607623&t=be4a718762c5f4aadb0e640961437e41"
        manager.loadUrlIntoImageView(this, imgUrl, imageView, options)
在使用的时候可以进一步封装
四.Bitmap三级缓存二次采样
传送门走你!!
五.长图大图处理
https://www.jianshu.com/p/5ec13b295dd0
import android.app.appsearch.GetByDocumentIdRequest;
import android.content.Context;
import android.graphics.Bitmap;
import android.graphics.BitmapFactory;
import android.graphics.BitmapRegionDecoder;
import android.graphics.BitmapShader;
import android.graphics.Canvas;
import android.graphics.Rect;
import android.util.AttributeSet;
import android.util.Log;
import android.view.GestureDetector;
import android.view.InputDevice;
import android.view.MotionEvent;
import android.view.View;
import android.view.ViewConfiguration;

import java.io.FileDescriptor;
import java.io.IOException;
import java.io.InputStream;

/**
 * @Author : yaotianxue
 * @Time : On 2023/5/22 19:47
 * @Description : LargeImageView
 */
public class LargeImageView extends View implements GestureDetector.OnGestureListener {
    private BitmapRegionDecoder mDecoder;
    //绘制的区域
    private volatile Rect mRect = new Rect();
    private int mScaledTouchSlop;
    //分别记录上次的滑动的坐标
    private int mLastX = 0;
    private int mLastY = 0;
    //图片的宽度和高度
    private int mImageWidth,mImageHeight;
    //手势控制器
    private GestureDetector mGestureDetector;
    //Bitmap工厂参数配置
    private BitmapFactory.Options mOptions;

    private String name;

    public void setName(String name) {
        this.name = name;
    }

    public LargeImageView(Context context) {
        super(context);
        init(context,null);
    }

    public LargeImageView(Context context, AttributeSet attrs) {
        super(context, attrs);
        init(context,attrs);
    }


    public LargeImageView(Context context, AttributeSet attrs, int defStyleAttr) {
        super(context, attrs, defStyleAttr);
        init(context,attrs);
    }

    public LargeImageView(Context context, AttributeSet attrs, int defStyleAttr, int defStyleRes) {
        super(context, attrs, defStyleAttr, defStyleRes);
        init(context,attrs);
    }

    private void init(Context context, AttributeSet attrs) {
        //设置图片参数,如果对图片要求高采用ARGB_8888
        mOptions = new BitmapFactory.Options();
        mOptions.inPreferredConfig = Bitmap.Config.RGB_565;

        mScaledTouchSlop = ViewConfiguration.get(getContext()).getScaledTouchSlop();
        Log.d("ytx", "init: "+mScaledTouchSlop);
        //初始化手势控制器
        mGestureDetector = new GestureDetector(context,this);
        InputStream inputStream = null;
        try {
            inputStream = context.getResources().getAssets().open("demo.jpg");
            //初始化BitmapRegionDecoder,并用他显示图片
            mDecoder = BitmapRegionDecoder.newInstance(inputStream,false);
            //设置为true只采取图片的宽度和高度,不加载进内存
            BitmapFactory.Options options = new BitmapFactory.Options();
            options.inJustDecodeBounds = true;
            BitmapFactory.decodeStream(inputStream,null,options);
            mImageHeight = options.outHeight;
            mImageWidth = options.outWidth;

        } catch (IOException e) {
            e.printStackTrace();
        }finally {
            if(inputStream != null){
                try {
                    inputStream.close();
                } catch (IOException e) {
                    e.printStackTrace();
                }
            }
        }

    }
    //把触摸事件交给手势控制器处理
    @Override
    public boolean onTouchEvent(MotionEvent event) {
        return mGestureDetector.onTouchEvent(event);
    }

    @Override
    public boolean onDown(MotionEvent e) {
        mLastX = (int) e.getRawX();
        mLastY = (int) e.getRawY();
        return true;
    }

    @Override
    public void onShowPress(MotionEvent e) {

    }

    @Override
    public boolean onSingleTapUp(MotionEvent e) {
        return false;
    }

    @Override
    public boolean onScroll(MotionEvent e1, MotionEvent e2, float distanceX, float distanceY) {
        int x = (int) e2.getRawX();
        int y = (int) e2.getY();
        move(x,y);
        return true;
    }
    //移动的时候更新图片的显示的区域
    private void move(int x, int y) {
        int deltaX = x - mLastX;
        int deltaY = y - mLastY;
        if(mImageWidth > getWidth()){
            mRect.offset(-deltaX,0);
            if(mRect.right < mImageWidth){
                mRect.right = mImageWidth;
                mRect.left = mImageWidth - getWidth();
            }
            if(mRect.left < 0){
                mRect.left = 0;
                mRect.right = getRight();
            }
            invalidate();
        }

        if(mImageHeight > getHeight()){
            mRect.offset(0,-deltaY);
            if(mRect.bottom > mImageHeight){
                mRect.bottom = mImageHeight;
                mRect.top = mImageHeight - getHeight();
            }
            if(mRect.top < 0){
                mRect.top = 0;
                mRect.bottom = getHeight();
            }
            invalidate();
        }
        mLastX = x;
        mLastY = y;

    }

    @Override
    public void onLongPress(MotionEvent e) {
        mLastX = (int) e.getRawX();
        mLastY = (int) e.getRawY();
    }

    @Override
    public boolean onFling(MotionEvent e1, MotionEvent e2, float velocityX, float velocityY) {
        int x = (int)e2.getRawX();
        int y = (int) e2.getRawY();
        move(x,y);
        return true;
    }

    @Override
    protected void onDraw(Canvas canvas) {
        Bitmap bitmap = mDecoder.decodeRegion(mRect,mOptions);
        canvas.drawBitmap(bitmap,0,0,null);
    }

    @Override
    protected void onMeasure(int widthMeasureSpec, int heightMeasureSpec) {
        super.onMeasure(widthMeasureSpec, heightMeasureSpec);
        int width = getMeasuredWidth();
        int height = getMeasuredHeight();
        int imageWidth = mImageWidth;
        int imageHeight = mImageHeight;
        mRect.left = imageWidth/2 - width/2;
        mRect.top = imageHeight/2 - height/2;
        mRect.right = mRect.left +width;
        mRect.bottom = mRect.top + height;

    }
}

