实验内容
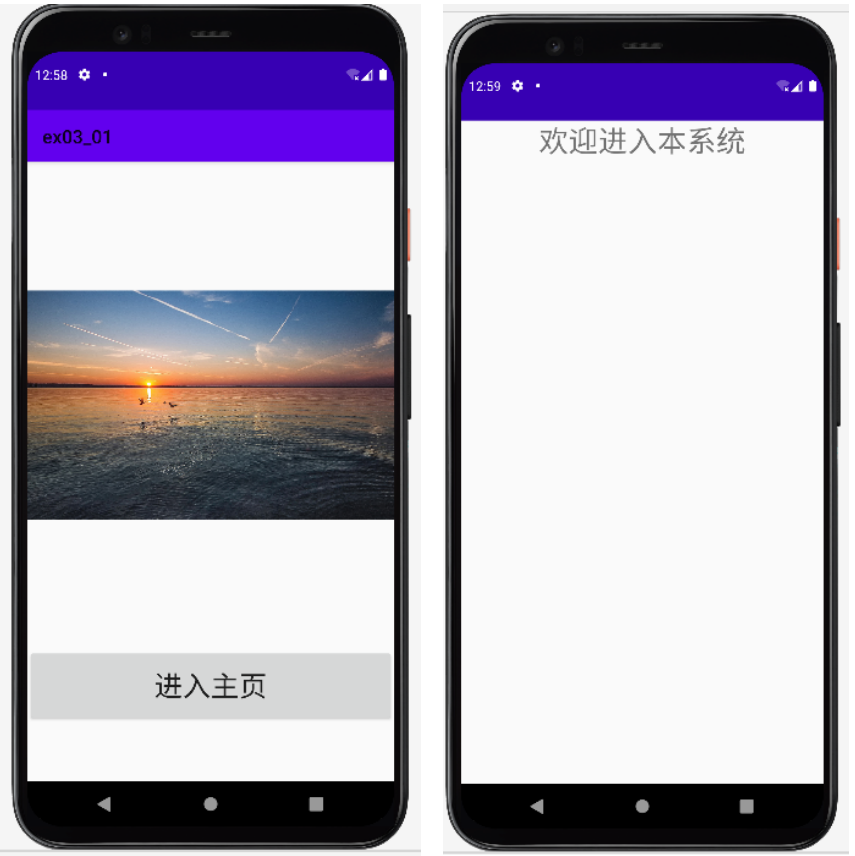
1.设计一个具有两个页面的程序,第一个页面显示一张封面的图片,第二个页面显示“欢迎进入本系统”,这两个页面之间能相互切换。
2.设计一个具有3个选项的菜单程序,当单击每个选项时,分别跳转到3个不同的页面。
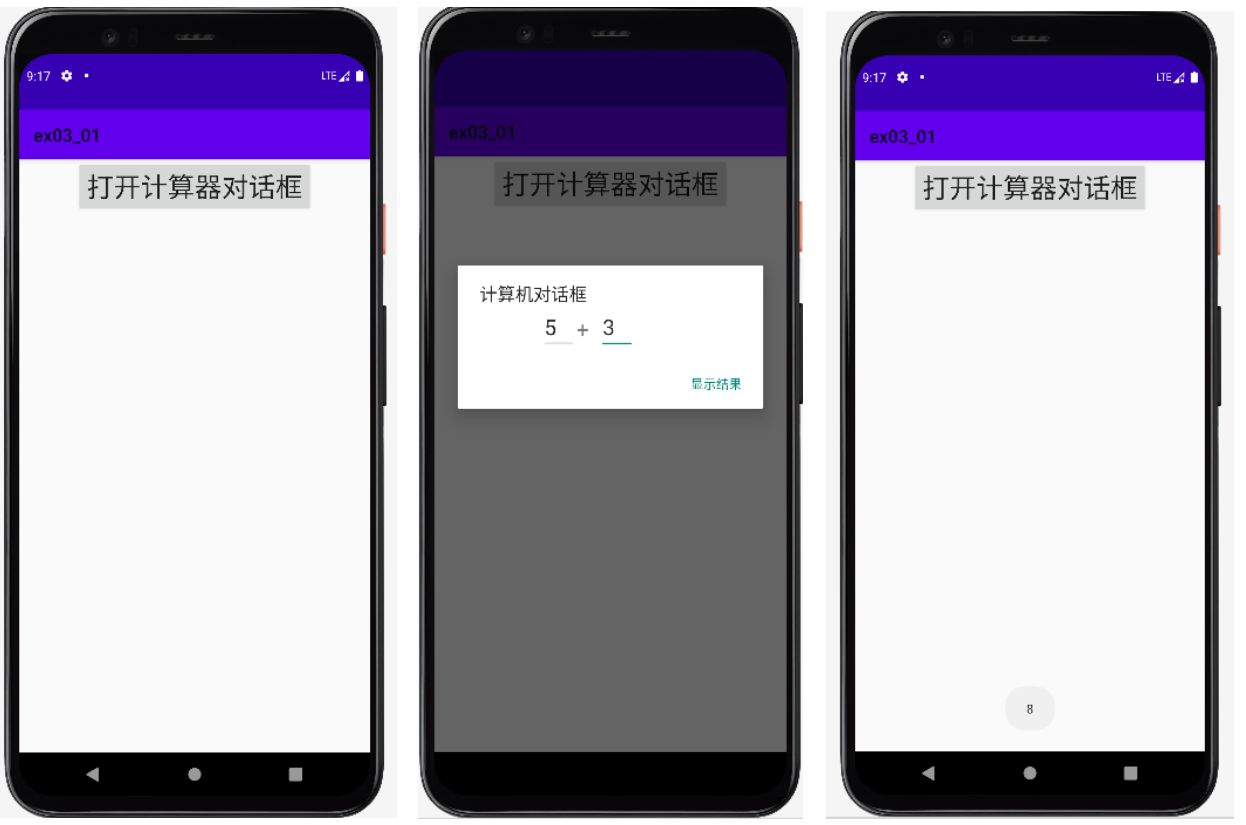
3.设计一个具有计算器功能的对话框程序。
1.activity_main.xml源代码:
<?xml version="1.0" encoding="utf-8"?>
<LinearLayout xmlns:android="http://schemas.android.com/apk/res/android"
    xmlns:app="http://schemas.android.com/apk/res-auto"
    xmlns:tools="http://schemas.android.com/tools"
    android:layout_width="fill_parent"
    android:layout_height="fill_parent"
    android:orientation="vertical"
    tools:context=".MainActivity">
    <ImageView
        android:id="@+id/image"
        android:layout_width="wrap_content"
        android:layout_height="520dp"
        android:src="@drawable/icon"/>
    <Button
        android:id="@+id/btn1"
        android:layout_width="match_parent"
        android:layout_height="80dp"
        android:text="进入主页"
        android:textSize="30sp" />

</LinearLayout>
MainActivity.java源代码:
package com.example.helloworld;
import androidx.annotation.CheckResult;
import androidx.appcompat.app.AppCompatActivity;

import android.annotation.SuppressLint;
import android.app.Activity;
import android.provider.ContactsContract;
import android.view.Gravity;
import android.widget.Adapter;
import android.widget.AdapterView;
import android.widget.ArrayAdapter;
import android.widget.LinearLayout;
import android.widget.TextView;//文本标签
import android.widget.Button;//按钮
import android.widget.EditText;//文本编辑框
import android.widget.Toast;
import android.widget.ListView;
import android.widget.ImageView;
import android.view.View.OnClickListener;
import android.widget.AdapterView.OnItemClickListener;
import android.content.Intent;
import org.w3c.dom.Text;

public class MainActivity extends AppCompatActivity {
    private TextView txt,txt1,txt2,txt3,txt4,txt5;
    private Button button1,button2,button3,btn;
    private EditText edit1,edit2,edit3,edit4;
    ListView list;
    ProgressBar progress;
    @SuppressLint("MissingInflatedId")
    @Override
    protected void onCreate(Bundle savedInstanceState) {
        super.onCreate(savedInstanceState);
        setContentView(R.layout.activity_main);
        btn=(Button) findViewById(R.id.btn1);
        btn.setOnClickListener(new mClick());
    }
    class mClick implements OnClickListener{
        @Override
        public void onClick(View view) {
            Intent intent=new Intent(MainActivity.this,secondActivity.class);
            startActivity(intent);
        }
    }
}

secondActivity.java代码:
package com.example.helloworld;
import android.os.Bundle;
import android.app.Activity;
public class secondActivity extends Activity{
    public void onCreate(Bundle savedInstanceState){
        super.onCreate(savedInstanceState);
        setContentView(R.layout.second);
    }
}
second.xml代码:
<?xml version="1.0" encoding="utf-8"?>
<LinearLayout
    xmlns:android="http://schemas.android.com/apk/res/android"
    android:layout_width="fill_parent"
    android:layout_height="fill_parent"
    android:orientation="vertical"
    android:layout_gravity="center_horizontal">
    <TextView
        android:id="@+id/txt"
        android:layout_width="wrap_content"
        android:layout_height="fill_parent"
        android:layout_gravity="center_horizontal"
        android:text="欢迎进入本系统"
        android:textSize="32sp" />
</LinearLayout>
结果图:
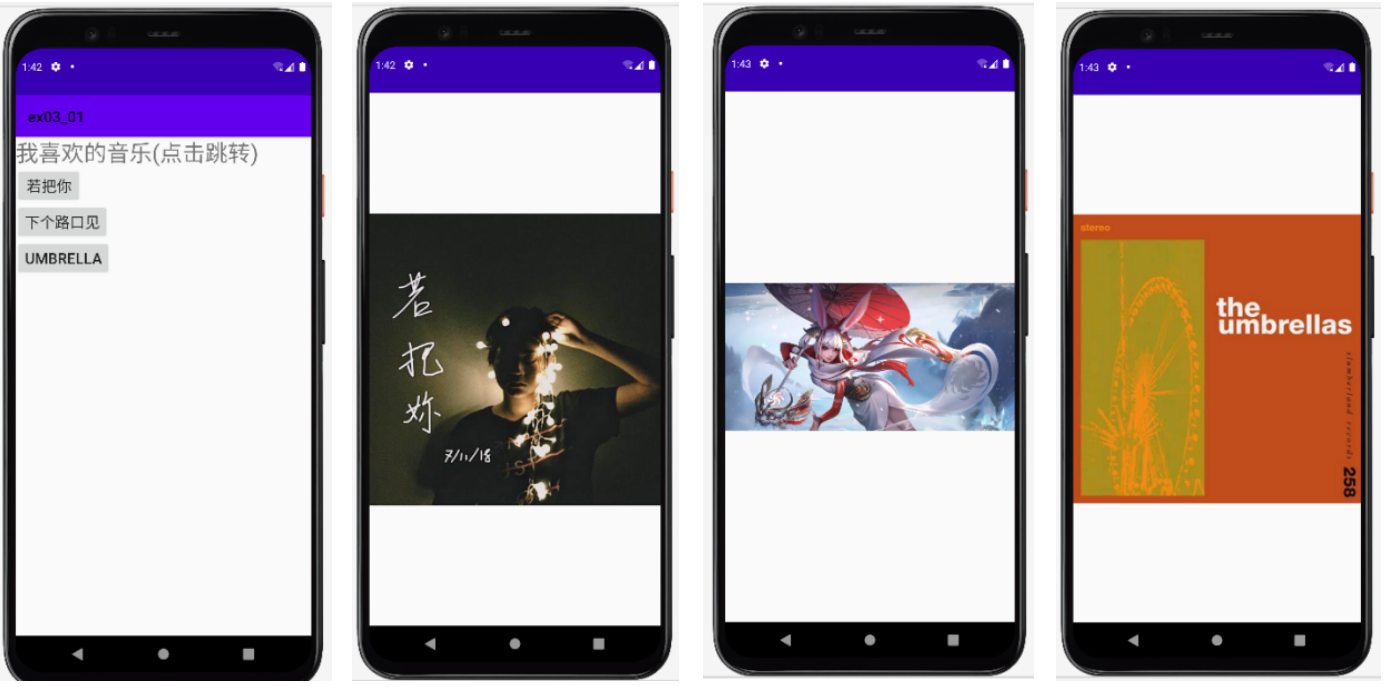
2.activity_main.xml源代码:
<?xml version="1.0" encoding="utf-8"?>
<LinearLayout xmlns:android="http://schemas.android.com/apk/res/android"
    xmlns:app="http://schemas.android.com/apk/res-auto"
    xmlns:tools="http://schemas.android.com/tools"
    android:layout_width="fill_parent"
    android:layout_height="fill_parent"
    android:orientation="vertical"
    tools:context=".MainActivity">

    <TextView
        android:id="@+id/txt"
        android:layout_width="wrap_content"
        android:layout_height="wrap_content"
        android:text="我喜欢的音乐(点击跳转)"
        android:textSize="30sp"/>
    <Button
        android:id="@+id/btn1"
        android:layout_width="wrap_content"
        android:layout_height="wrap_content"
        android:text="若把你"
        android:textSize="20sp" />
    <Button
        android:id="@+id/btn2"
        android:layout_width="wrap_content"
        android:layout_height="wrap_content"
        android:text="下个路口见"
        android:textSize="20sp" />
    <Button
        android:id="@+id/btn3"
        android:layout_width="wrap_content"
        android:layout_height="wrap_content"
        android:text="Umbrella"
        android:textSize="20sp" />
</LinearLayout>
MainActivity.java源代码:
package com.example.helloworld;
import androidx.annotation.CheckResult;
import androidx.appcompat.app.AppCompatActivity;
import android.annotation.SuppressLint;
import android.app.Activity;
import android.graphics.Color;
import android.provider.ContactsContract;
import android.view.Gravity;
import android.widget.Adapter;
import android.widget.AdapterView;
import android.widget.ArrayAdapter;
import android.widget.LinearLayout;
import android.widget.TextView;//文本标签
import android.widget.Button;//按钮
import android.widget.EditText;//文本编辑框
import android.widget.Toast;
import android.widget.ListView;
import android.widget.ImageView;
import android.os.Bundle;
import android.view.View;
import android.view.View.OnClickListener;
import android.widget.AdapterView.OnItemClickListener;
import android.content.Intent;

import org.w3c.dom.Text;

public class MainActivity extends AppCompatActivity {
    private TextView txt,txt1,txt2,txt3,txt4,txt5;
    private Button button1,button2,button3,btn;
    private EditText edit1,edit2,edit3,edit4;
    @SuppressLint("MissingInflatedId")
    @Override
    protected void onCreate(Bundle savedInstanceState) {
        super.onCreate(savedInstanceState);
        setContentView(R.layout.activity_main);
        button1=(Button)findViewById(R.id.btn1);
        button2=(Button)findViewById(R.id.btn2);
        button3=(Button)findViewById(R.id.btn3);
        button1.setOnClickListener(new mClick1());
        button2.setOnClickListener(new mClick2());
        button3.setOnClickListener(new mClick3());
    }
    class mClick1 implements OnClickListener{
        @Override
        public void onClick(View view) {
            Intent intent=new Intent(MainActivity.this,firstActivity.class);
            startActivity(intent);
        }
    }
    class mClick2 implements OnClickListener{
        @Override
        public void onClick(View view) {
            Intent intent=new Intent(MainActivity.this,secondActivity.class);
            startActivity(intent);
        }
    }
    class mClick3 implements OnClickListener{
        @Override
        public void onClick(View view) {
            Intent intent=new Intent(MainActivity.this,thirdActivity.class);
            startActivity(intent);
        }
    }
}
first.xml代码:
<?xml version="1.0" encoding="utf-8"?>
<LinearLayout
    xmlns:android="http://schemas.android.com/apk/res/android"
    android:layout_width="fill_parent"
    android:layout_height="fill_parent"
    android:orientation="vertical"
    android:layout_gravity="center_horizontal">

    <ImageView
        android:id="@+id/image"
        android:layout_width="wrap_content"
        android:layout_height="fill_parent"
        android:src="@drawable/pic1" />

</LinearLayout>
firstActivity.java代码:
package com.example.helloworld;
import android.os.Bundle;
import android.app.Activity;

public class firstActivity extends Activity{
    public void onCreate(Bundle savedInstanceState){
        super.onCreate(savedInstanceState);
        setContentView(R.layout.first);
    }
}
second.xml代码:
<?xml version="1.0" encoding="utf-8"?>
<LinearLayout
    xmlns:android="http://schemas.android.com/apk/res/android"
    android:layout_width="fill_parent"
    android:layout_height="fill_parent"
    android:orientation="vertical"
    android:layout_gravity="center_horizontal">
    <ImageView
        android:id="@+id/image"
        android:layout_width="wrap_content"
        android:layout_height="fill_parent"
        android:src="@drawable/pic2" />

</LinearLayout>
secondActivity.java代码:
package com.example.helloworld;
import android.os.Bundle;
import android.app.Activity;

public class secondActivity extends Activity{
    public void onCreate(Bundle savedInstanceState){
        super.onCreate(savedInstanceState);
        setContentView(R.layout.second);
    }
}
third.xml代码:
<?xml version="1.0" encoding="utf-8"?>
<LinearLayout
    xmlns:android="http://schemas.android.com/apk/res/android"
    android:layout_width="fill_parent"
    android:layout_height="fill_parent"
    android:orientation="vertical"
    android:layout_gravity="center_horizontal">
    <ImageView
        android:id="@+id/image"
        android:layout_width="wrap_content"
        android:layout_height="fill_parent"
        android:src="@drawable/pic3" />

</LinearLayout>
thirdActivity.java代码:
package com.example.helloworld;
import android.os.Bundle;
import android.app.Activity;

public class thirdActivity extends Activity{
    public void onCreate(Bundle savedInstanceState){
        super.onCreate(savedInstanceState);
        setContentView(R.layout.third);
    }
}
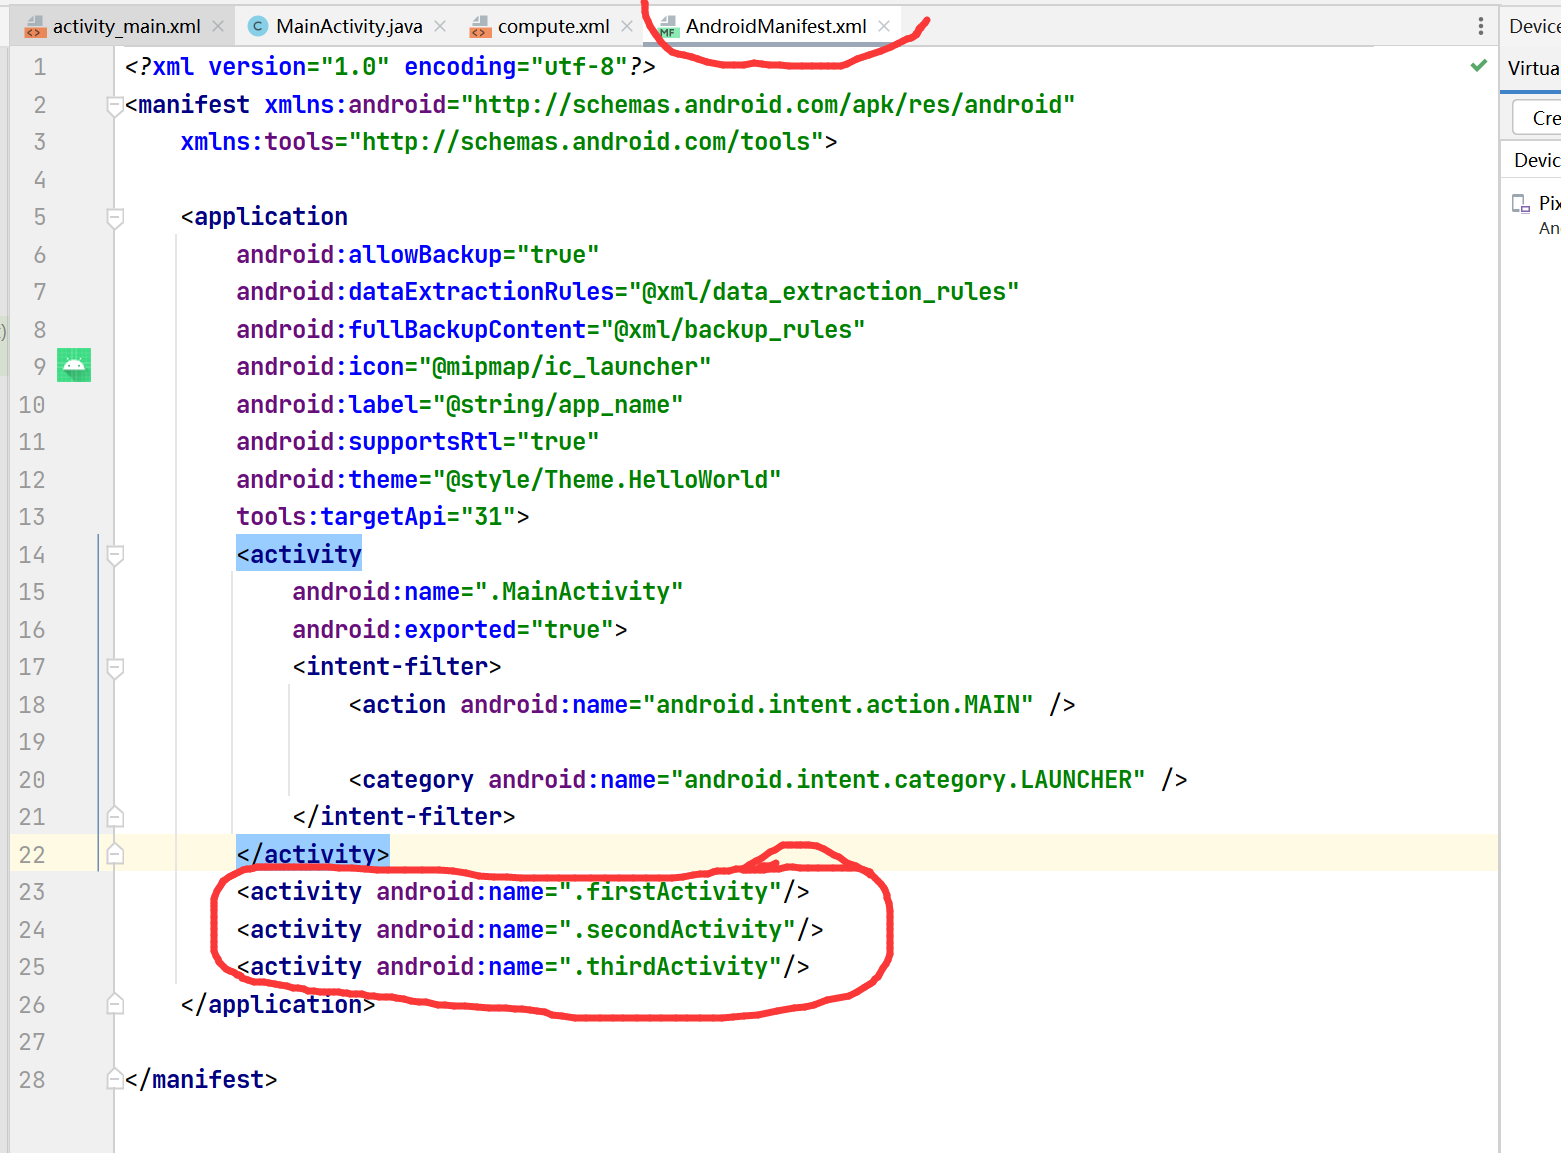
需要注意的是切换多个页面时,要在AndroidManifest.xml
中添加对应的xml的注册
结果图:
3.MainActivity.java代码:
package com.example.helloworld;
import androidx.annotation.CheckResult;
import androidx.appcompat.app.AppCompatActivity;

import android.annotation.SuppressLint;
import android.app.Activity;
import android.graphics.Color;
import android.provider.ContactsContract;
import android.view.Gravity;
import android.widget.Adapter;
import android.widget.AdapterView;
import android.widget.ArrayAdapter;
import android.widget.CheckBox;
import android.widget.LinearLayout;
import android.widget.ProgressBar;
import android.widget.RadioButton;
import android.widget.TextView;//文本标签
import android.widget.Button;//按钮
import android.widget.EditText;//文本编辑框
import android.widget.Toast;
import android.widget.ListView;
import android.widget.ImageView;
import android.os.Bundle;
import android.view.View;
import android.view.View.OnClickListener;
import android.widget.AdapterView.OnItemClickListener;
import android.content.Intent;
import android.app.AlertDialog;
import android.content.DialogInterface;

import org.w3c.dom.Text;

public class MainActivity extends AppCompatActivity {
    private TextView txt,txt1,txt2,txt3,txt4,txt5;
    private Button button1,button2,button3,btn;
    private EditText edit1,edit2,edit3,edit4;
    LinearLayout com;
    @SuppressLint("MissingInflatedId")
    @Override
    protected void onCreate(Bundle savedInstanceState) {
        super.onCreate(savedInstanceState);
        setContentView(R.layout.activity_main);
        button1=(Button)findViewById(R.id.btn1);
        button1.setOnClickListener(new mClick1());
    }
    class mClick1 implements OnClickListener{
        AlertDialog.Builder dialog=new AlertDialog.Builder(MainActivity.this);
        @Override
        public void onClick(View view) {
            com=(LinearLayout)getLayoutInflater().inflate(R.layout.compute,null);
            dialog.setTitle("计算机对话框").setView(com);
            dialog.setPositiveButton("显示结果",new resClick());
            dialog.create();
            dialog.show();
        }
    }
    class resClick implements DialogInterface.OnClickListener{
        EditText e1=(EditText)com.findViewById(R.id.myEditText1);
        EditText e2=(EditText)com.findViewById(R.id.myEditText2);
        @Override
        public void onClick(DialogInterface dialog, int i) {
            String str1=e1.getText().toString();
            String str2=e2.getText().toString();
            int a=Integer.parseInt(str1);
            int b=Integer.parseInt(str2);
            int c=a+b;
            Toast.makeText(getApplicationContext(),Integer.toString(c),Toast.LENGTH_LONG).show();
            dialog.dismiss();
        }
    }
}
activity_main.xml代码:
<?xml version="1.0" encoding="utf-8"?>
<LinearLayout xmlns:android="http://schemas.android.com/apk/res/android"
    xmlns:app="http://schemas.android.com/apk/res-auto"
    xmlns:tools="http://schemas.android.com/tools"
    android:layout_width="fill_parent"
    android:layout_height="fill_parent"
    android:orientation="vertical"
    tools:context=".MainActivity">

    <Button
        android:id="@+id/btn1"
        android:layout_width="wrap_content"
        android:layout_height="wrap_content"
        android:text="打开计算器对话框"
        android:layout_gravity="center"
        android:textSize="30sp" />

</LinearLayout>
compute.xml代码:
<?xml version="1.0" encoding="utf-8"?>
<LinearLayout
    xmlns:android="http://schemas.android.com/apk/res/android"
    xmlns:app="http://schemas.android.com/apk/res-auto"
    xmlns:tools="http://schemas.android.com/tools"
    android:layout_width="fill_parent"
    android:layout_height="fill_parent"
    tools:context=".MainActivity"
    android:orientation="vertical"
    android:gravity="center|fill">
    <LinearLayout
        android:layout_width="match_parent"
        android:layout_height="wrap_content"
        android:layout_gravity="center_horizontal"
        android:gravity="center_horizontal"
        android:orientation="horizontal">

        <EditText
            android:id="@+id/myEditText1"
            android:layout_width="40dp"
            android:layout_height="50dp"
            android:layout_x="50dp"
            android:layout_y="50dp"
            android:autofillHints=""
            android:inputType="number"
            android:textSize="24sp"
            tools:ignore="LabelFor,SpeakableTextPresentCheck,TouchTargetSizeCheck" />

        <TextView
            android:id="@+id/textview1"
            android:layout_width="25dp"
            android:layout_height='59dp'
            android:text="+"
            android:textSize="24sp" />
        <EditText
            android:id="@+id/myEditText2"
            android:layout_width="40dp"
            android:layout_height="50dp"
            android:layout_x="50dp"
            android:layout_y="50dp"
            android:inputType="number"
            android:textSize="24sp"
            tools:ignore="SpeakableTextPresentCheck,TouchTargetSizeCheck" />

    </LinearLayout>
</LinearLayout>
结果:
