1、主要参考
(1)官方介绍地址
ICP registration — Open3D 0.16.0 documentation
2、介绍
2.1 原理
(1)关于ICP registration
本教程演示ICP(迭代最近点)配准算法。多年来,它一直是研究和工业中几何配准的支柱。输入是两个点云和一个初始转换,该转换大致将源点云与目标点云对齐。输出是一个精细化的转换,它将两个点云紧密对齐。一个助手函数draw_registration_result可视化注册过程中的对齐情况。在本教程中,我们展示了两种ICP变体,点到点ICP和点到面ICP [Rusinkiewicz2001]。
2.2 辅助可视化函数
(2)采用的辅助可视化函数
下面的函数可视化了一个目标点云和一个经过对齐转换的源点云。目标点云和源点云分别绘以青色和黄色。两点云重叠越紧密,对准效果越好。
def draw_registration_result(source, target, transformation):
    source_temp = copy.deepcopy(source)
    target_temp = copy.deepcopy(target)
    source_temp.paint_uniform_color([1, 0.706, 0])
    target_temp.paint_uniform_color([0, 0.651, 0.929])
    source_temp.transform(transformation)
    o3d.visualization.draw_geometries([source_temp, target_temp],
                                      zoom=0.4459,
                                      front=[0.9288, -0.2951, -0.2242],
                                      lookat=[1.6784, 2.0612, 1.4451],
up=[-0.3402, -0.9189, -0.1996])注意:由于函数transform和paint_uniform_color改变了点云,我们调用copy.deepcopy(深度复制,即重新拷贝一份全新的对象)来复制和保护原始的点云。
2.3 输入
下面的代码从两个文件读取一个源点云和一个目标点云。给出了一个粗略的变换。
注意:初始对准通常采用全局配准算法。有关示例,请参见全局注册 Global registration例子。
2.3 .1 两个原始输入
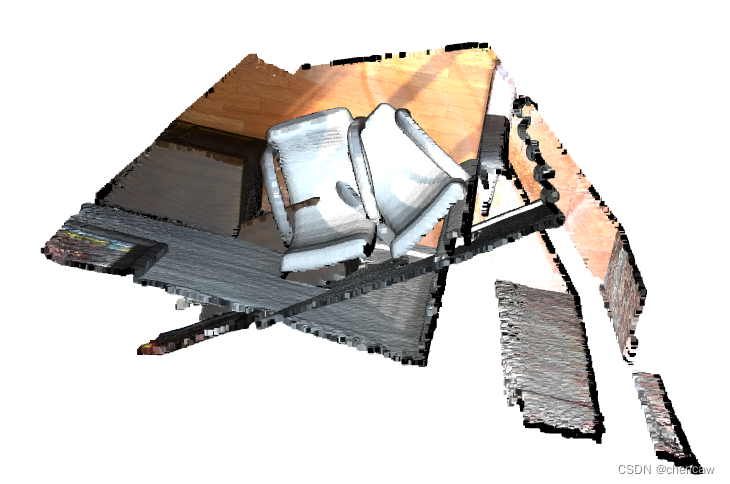
(1)先看看两个原始点云的分别
import open3d as o3d
import numpy as np
from copy import deepcopy

#(一)先简单看看
demo_icp_pcds = o3d.data.DemoICPPointClouds()
source = o3d.io.read_point_cloud(demo_icp_pcds.paths[0])
target = o3d.io.read_point_cloud(demo_icp_pcds.paths[1])

o3d.visualization.draw_geometries([source,target])
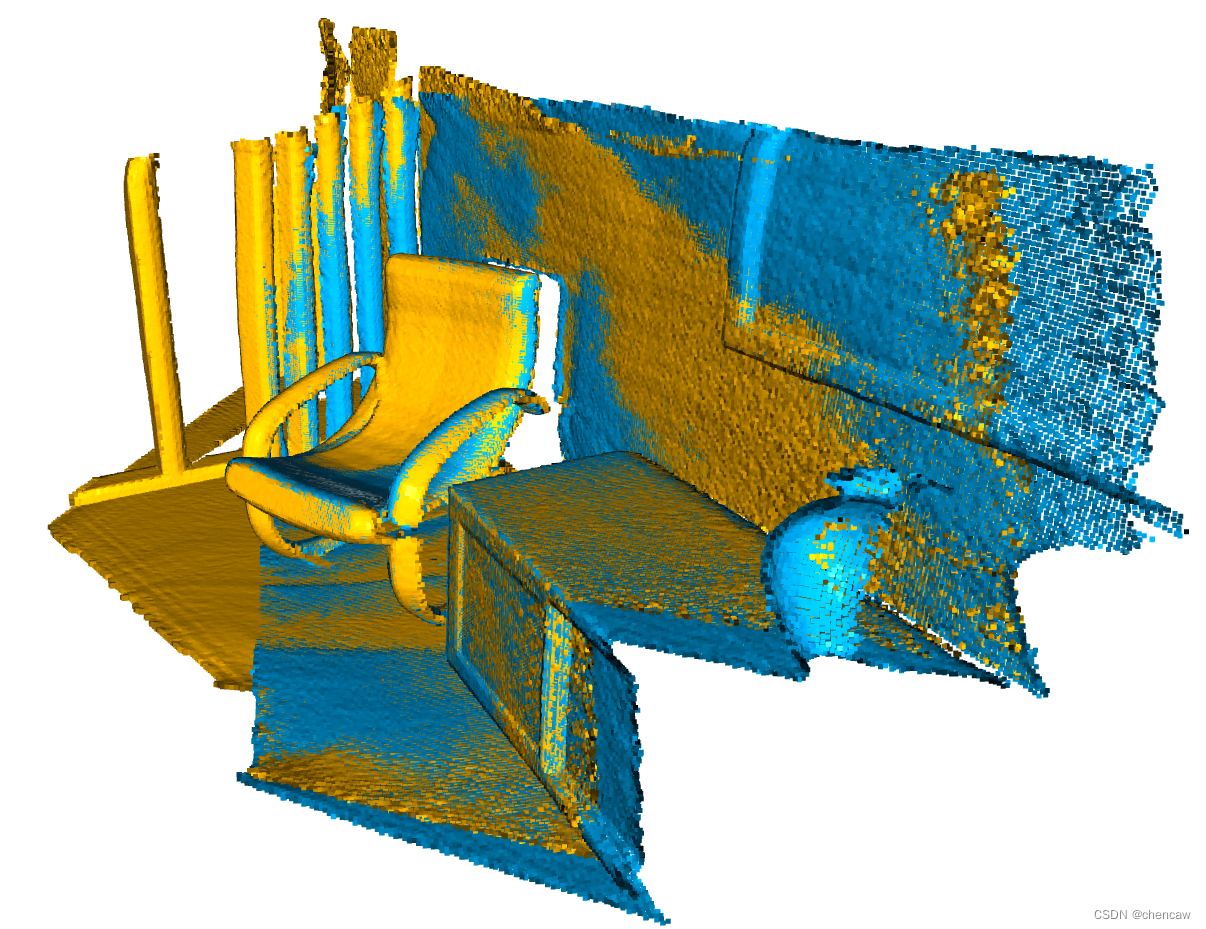
(2)可以看到两个模型一开始没有对准,可以理解成在两个角度采集的
2.3.2两个输入粗略配准
(1)下面是
import open3d as o3d
import numpy as np
from copy import deepcopy

def draw_registration_result(source, target, transformation):
    # source_temp = copy.deepcopy(source)
    # target_temp = copy.deepcopy(target)
    source_temp = deepcopy(source)
    target_temp = deepcopy(target)
    source_temp.paint_uniform_color([1, 0.706, 0])
    target_temp.paint_uniform_color([0, 0.651, 0.929])
    source_temp.transform(transformation)
    o3d.visualization.draw_geometries([source_temp, target_temp],
                                      zoom=0.4459,
                                      front=[0.9288, -0.2951, -0.2242],
                                      lookat=[1.6784, 2.0612, 1.4451],
                                      up=[-0.3402, -0.9189, -0.1996])


demo_icp_pcds = o3d.data.DemoICPPointClouds()
source = o3d.io.read_point_cloud(demo_icp_pcds.paths[0])
target = o3d.io.read_point_cloud(demo_icp_pcds.paths[1])
threshold = 0.02
trans_init = np.asarray([[0.862, 0.011, -0.507, 0.5],
                         [-0.139, 0.967, -0.215, 0.7],
                         [0.487, 0.255, 0.835, -1.4], [0.0, 0.0, 0.0, 1.0]])
draw_registration_result(source, target, trans_init)
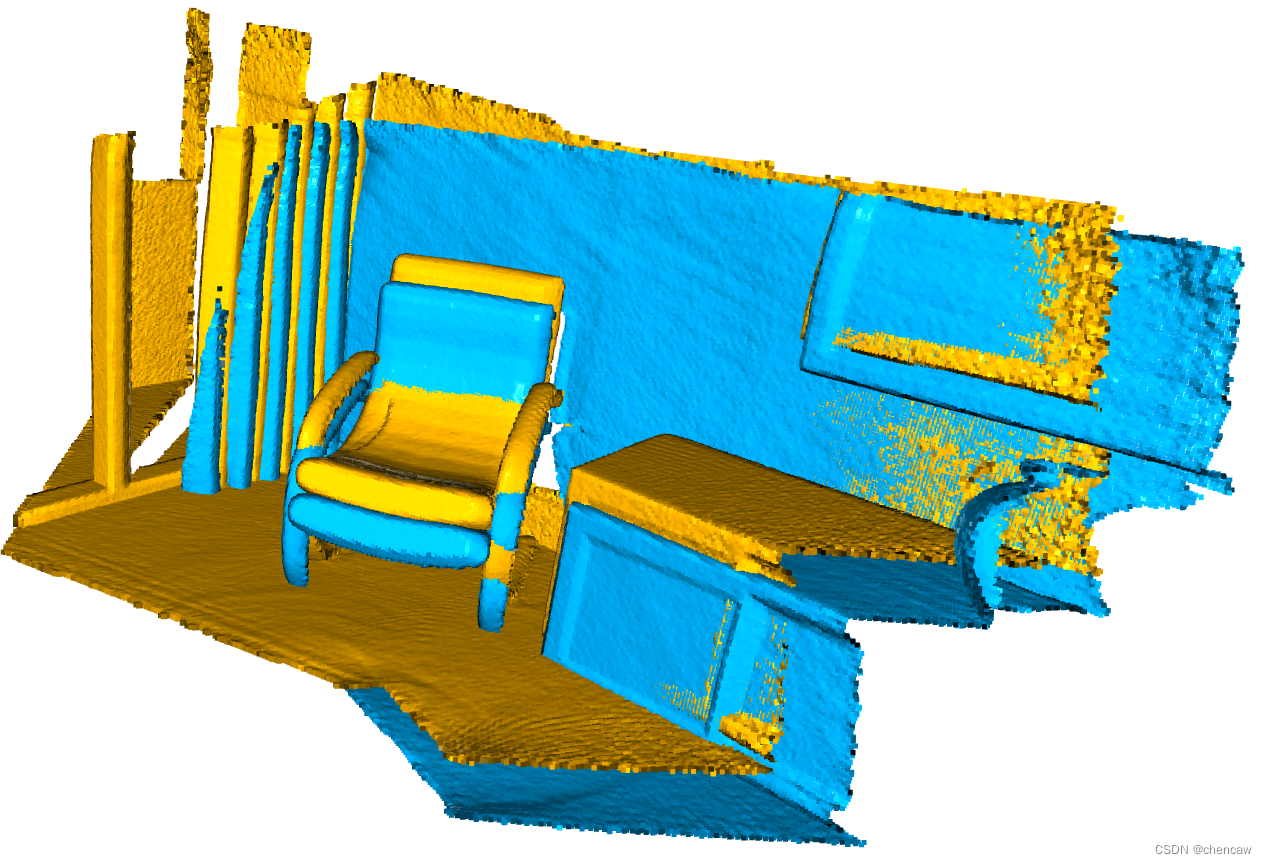
(2)配准后的两种颜色,对应两个输入,看看是真的粗略配准了
2.4 初始化注册函数evaluate_registration
(1)说明
evaluate_registration函数计算两个主要指标:
fitness, 适应度,衡量重叠区域(内部对应的# /目标点的#)。越高越好。
inlier_rmse,它计算所有内部(inlier)匹配的RMSE。越低越好。
(2)代码测试一下
import open3d as o3d
import numpy as np
from copy import deepcopy

# #(一)先简单看看
# demo_icp_pcds = o3d.data.DemoICPPointClouds()
# source = o3d.io.read_point_cloud(demo_icp_pcds.paths[0])
# target = o3d.io.read_point_cloud(demo_icp_pcds.paths[1])

# o3d.visualization.draw_geometries([source,target])


#(二)粗略配准
def draw_registration_result(source, target, transformation):
    # source_temp = copy.deepcopy(source)
    # target_temp = copy.deepcopy(target)
    source_temp = deepcopy(source)
    target_temp = deepcopy(target)
    source_temp.paint_uniform_color([1, 0.706, 0])
    target_temp.paint_uniform_color([0, 0.651, 0.929])
    source_temp.transform(transformation)
    o3d.visualization.draw_geometries([source_temp, target_temp],
                                      zoom=0.4459,
                                      front=[0.9288, -0.2951, -0.2242],
                                      lookat=[1.6784, 2.0612, 1.4451],
                                      up=[-0.3402, -0.9189, -0.1996])


demo_icp_pcds = o3d.data.DemoICPPointClouds()
source = o3d.io.read_point_cloud(demo_icp_pcds.paths[0])
target = o3d.io.read_point_cloud(demo_icp_pcds.paths[1])
threshold = 0.02
trans_init = np.asarray([[0.862, 0.011, -0.507, 0.5],
                         [-0.139, 0.967, -0.215, 0.7],
                         [0.487, 0.255, 0.835, -1.4], [0.0, 0.0, 0.0, 1.0]])
draw_registration_result(source, target, trans_init)

print("Initial alignment")
evaluation = o3d.pipelines.registration.evaluate_registration(
    source, target, threshold, trans_init)
print(evaluation)
Initial alignment
RegistrationResult with fitness=1.747228e-01, inlier_rmse=1.177106e-02, and correspondence_set size of 34741
Access transformation to get result.
3点对点ICP(Point-to-point ICP )
3.1原理
通常情况下,ICP算法迭代两个步骤:
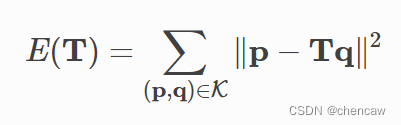
(1)从目标点云P中找对应集K={(p,q)},用当前变换矩阵T变换源点云Q。
(2)通过对应集合K上定义的,最小化目标函数E(T),来更新变换矩阵T。
Different variants of ICP use different objective functions E(T)E(T) [BeslAndMcKay1992] [ChenAndMedioni1992] [Park2017].
我们首先展示了使用目标的点对点ICP算法[BeslAndMcKay1992]
TransformationEstimationPointToPoint类提供函数来计算点对点ICP目标的残差和雅可比矩阵。函数registration_icp将其作为参数并运行点对点ICP以获得结果。
3.2 代码测试
(1)测试代码
import open3d as o3d
import numpy as np
from copy import deepcopy
# #(一)先简单看看
# demo_icp_pcds = o3d.data.DemoICPPointClouds()
# source = o3d.io.read_point_cloud(demo_icp_pcds.paths[0])
# target = o3d.io.read_point_cloud(demo_icp_pcds.paths[1])
# o3d.visualization.draw_geometries([source,target])
#(二)粗略配准
def draw_registration_result(source, target, transformation):
# source_temp = copy.deepcopy(source)
# target_temp = copy.deepcopy(target)
source_temp = deepcopy(source)
target_temp = deepcopy(target)
source_temp.paint_uniform_color([1, 0.706, 0])
target_temp.paint_uniform_color([0, 0.651, 0.929])
source_temp.transform(transformation)
o3d.visualization.draw_geometries([source_temp, target_temp],
zoom=0.4459,
front=[0.9288, -0.2951, -0.2242],
lookat=[1.6784, 2.0612, 1.4451],
up=[-0.3402, -0.9189, -0.1996])
demo_icp_pcds = o3d.data.DemoICPPointClouds()
source = o3d.io.read_point_cloud(demo_icp_pcds.paths[0])
target = o3d.io.read_point_cloud(demo_icp_pcds.paths[1])
threshold = 0.02
trans_init = np.asarray([[0.862, 0.011, -0.507, 0.5],
[-0.139, 0.967, -0.215, 0.7],
[0.487, 0.255, 0.835, -1.4], [0.0, 0.0, 0.0, 1.0]])
draw_registration_result(source, target, trans_init)
print("Initial alignment")
evaluation = o3d.pipelines.registration.evaluate_registration(
source, target, threshold, trans_init)
print(evaluation)
print("Apply point-to-point ICP")
reg_p2p = o3d.pipelines.registration.registration_icp(
source, target, threshold, trans_init,
o3d.pipelines.registration.TransformationEstimationPointToPoint())
print(reg_p2p)
print("Transformation is:")
print(reg_p2p.transformation)
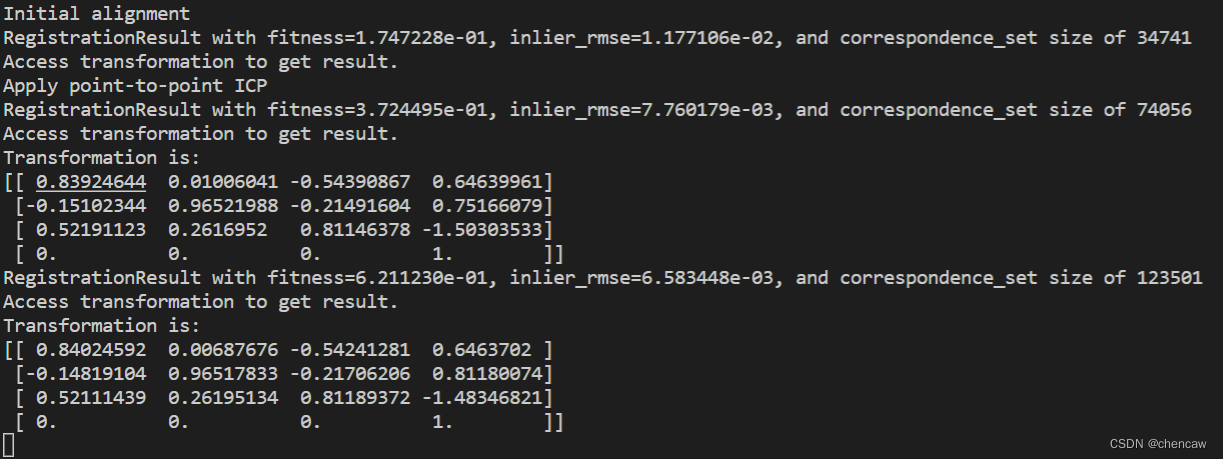
draw_registration_result(source, target, reg_p2p.transformation)(2)展示的结果
(3)改进
适应度(
fitness)分数从0.174723增加到0.372450。inlier_rmse从0.011771减少到0.007760。默认情况下,registration_icp运行直到收敛或达到最大迭代次数(默认为30)。可以更改它以允许更多的计算时间并进一步改进结果。
(4)改进的参数设置
o3d.pipelines.registration.ICPConvergenceCriteria(max_iteration=2000)
(5)测试代码
import open3d as o3d
import numpy as np
from copy import deepcopy

# #(一)先简单看看
# demo_icp_pcds = o3d.data.DemoICPPointClouds()
# source = o3d.io.read_point_cloud(demo_icp_pcds.paths[0])
# target = o3d.io.read_point_cloud(demo_icp_pcds.paths[1])

# o3d.visualization.draw_geometries([source,target])


#(二)粗略配准
def draw_registration_result(source, target, transformation):
    # source_temp = copy.deepcopy(source)
    # target_temp = copy.deepcopy(target)
    source_temp = deepcopy(source)
    target_temp = deepcopy(target)
    source_temp.paint_uniform_color([1, 0.706, 0])
    target_temp.paint_uniform_color([0, 0.651, 0.929])
    source_temp.transform(transformation)
    o3d.visualization.draw_geometries([source_temp, target_temp],
                                      zoom=0.4459,
                                      front=[0.9288, -0.2951, -0.2242],
                                      lookat=[1.6784, 2.0612, 1.4451],
                                      up=[-0.3402, -0.9189, -0.1996])


demo_icp_pcds = o3d.data.DemoICPPointClouds()
source = o3d.io.read_point_cloud(demo_icp_pcds.paths[0])
target = o3d.io.read_point_cloud(demo_icp_pcds.paths[1])
threshold = 0.02
trans_init = np.asarray([[0.862, 0.011, -0.507, 0.5],
                         [-0.139, 0.967, -0.215, 0.7],
                         [0.487, 0.255, 0.835, -1.4], [0.0, 0.0, 0.0, 1.0]])
draw_registration_result(source, target, trans_init)

print("Initial alignment")
evaluation = o3d.pipelines.registration.evaluate_registration(
    source, target, threshold, trans_init)
print(evaluation)

print("Apply point-to-point ICP")
reg_p2p = o3d.pipelines.registration.registration_icp(
    source, target, threshold, trans_init,
    o3d.pipelines.registration.TransformationEstimationPointToPoint())
print(reg_p2p)
print("Transformation is:")
print(reg_p2p.transformation)
draw_registration_result(source, target, reg_p2p.transformation)

reg_p2p = o3d.pipelines.registration.registration_icp(
    source, target, threshold, trans_init,
    o3d.pipelines.registration.TransformationEstimationPointToPoint(),
    o3d.pipelines.registration.ICPConvergenceCriteria(max_iteration=2000))
print(reg_p2p)
print("Transformation is:")
print(reg_p2p.transformation)
draw_registration_result(source, target, reg_p2p.transformation)
果然,2000步迭代后,果然匹配的漂亮了很多
计算得到的变换矩阵也更精确了
4、点对面ICP(Point-to-plane ICP )
4.1原理
点到平面的ICP算法[ChenAndMedioni1992]使用了不同的目标函数
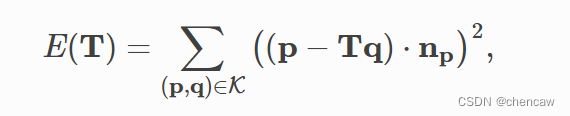
其中np为点p的法线。[Rusinkiewicz2001]证明了点到面ICP算法比点到点ICP算法具有更快的收敛速度。
registration_icp调用了使用不同的参数TransformationEstimationPointToPlane。在内部,这个类实现函数来计算残差和点到平面的ICP目标的雅可比矩阵。
4.2 测试代码
(1)代码
import open3d as o3d
import numpy as np
from copy import deepcopy
# #(一)先简单看看
# demo_icp_pcds = o3d.data.DemoICPPointClouds()
# source = o3d.io.read_point_cloud(demo_icp_pcds.paths[0])
# target = o3d.io.read_point_cloud(demo_icp_pcds.paths[1])
# o3d.visualization.draw_geometries([source,target])
#(二)粗略配准
def draw_registration_result(source, target, transformation):
# source_temp = copy.deepcopy(source)
# target_temp = copy.deepcopy(target)
source_temp = deepcopy(source)
target_temp = deepcopy(target)
source_temp.paint_uniform_color([1, 0.706, 0])
target_temp.paint_uniform_color([0, 0.651, 0.929])
source_temp.transform(transformation)
o3d.visualization.draw_geometries([source_temp, target_temp],
zoom=0.4459,
front=[0.9288, -0.2951, -0.2242],
lookat=[1.6784, 2.0612, 1.4451],
up=[-0.3402, -0.9189, -0.1996])
demo_icp_pcds = o3d.data.DemoICPPointClouds()
source = o3d.io.read_point_cloud(demo_icp_pcds.paths[0])
target = o3d.io.read_point_cloud(demo_icp_pcds.paths[1])
threshold = 0.02
trans_init = np.asarray([[0.862, 0.011, -0.507, 0.5],
[-0.139, 0.967, -0.215, 0.7],
[0.487, 0.255, 0.835, -1.4], [0.0, 0.0, 0.0, 1.0]])
# draw_registration_result(source, target, trans_init)
# print("Initial alignment")
# evaluation = o3d.pipelines.registration.evaluate_registration(
# source, target, threshold, trans_init)
# print(evaluation)
#(三)点对点配准
# print("Apply point-to-point ICP")
# reg_p2p = o3d.pipelines.registration.registration_icp(
# source, target, threshold, trans_init,
# o3d.pipelines.registration.TransformationEstimationPointToPoint())
# print(reg_p2p)
# print("Transformation is:")
# print(reg_p2p.transformation)
# draw_registration_result(source, target, reg_p2p.transformation)
# reg_p2p = o3d.pipelines.registration.registration_icp(
# source, target, threshold, trans_init,
# o3d.pipelines.registration.TransformationEstimationPointToPoint(),
# o3d.pipelines.registration.ICPConvergenceCriteria(max_iteration=2000))
# print(reg_p2p)
# print("Transformation is:")
# print(reg_p2p.transformation)
# draw_registration_result(source, target, reg_p2p.transformation)
#(四)平面配准
print("Apply point-to-plane ICP")
reg_p2l = o3d.pipelines.registration.registration_icp(
source, target, threshold, trans_init,
o3d.pipelines.registration.TransformationEstimationPointToPlane())
print(reg_p2l)
print("Transformation is:")
print(reg_p2l.transformation)
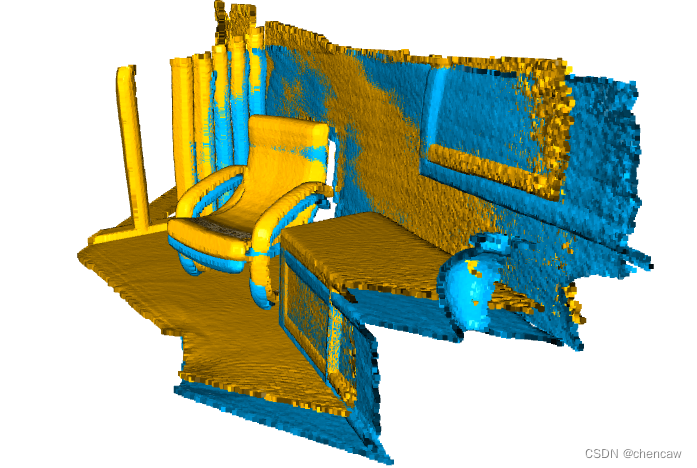
draw_registration_result(source, target, reg_p2l.transformation)(2)测试结果图
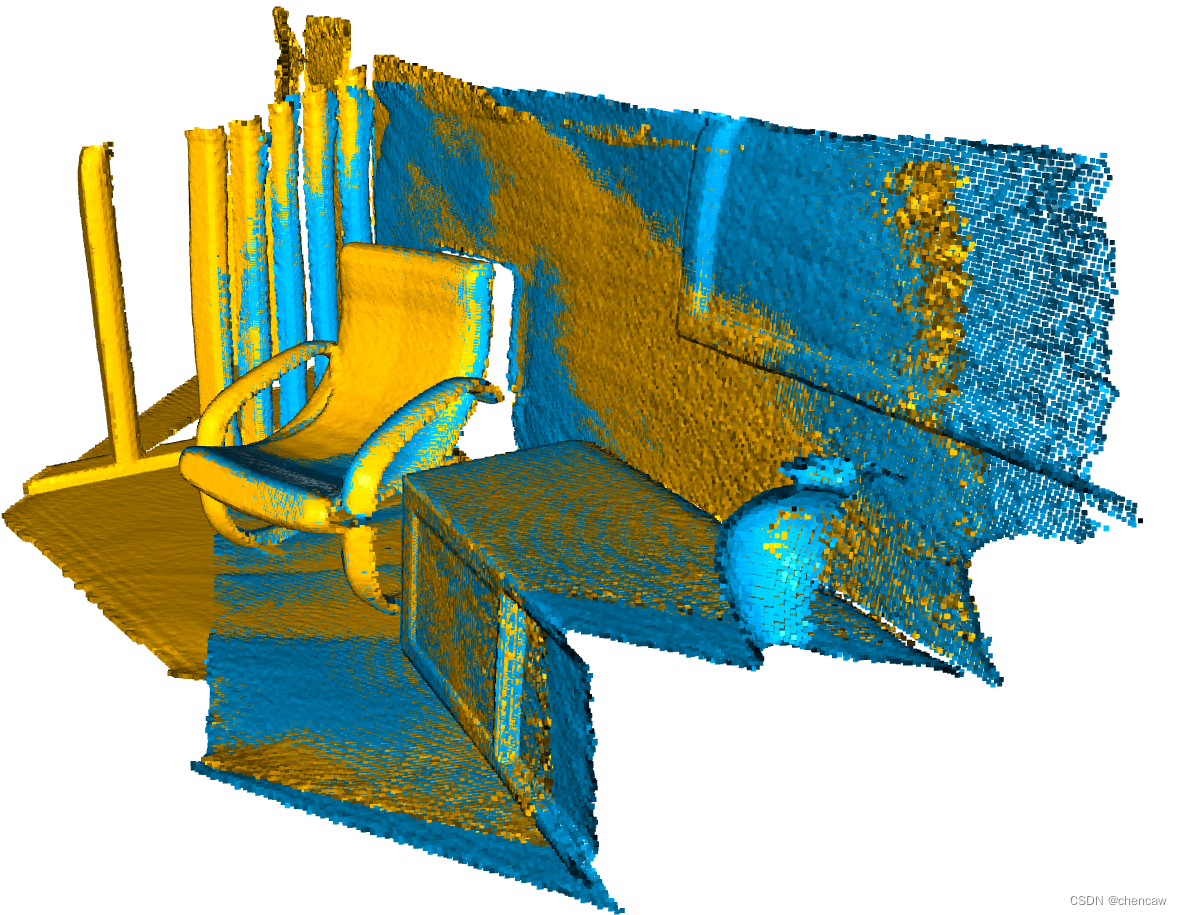
点到平面的ICP在30次迭代中达到紧密对齐(适合度评分为0.620972,inlier_rmse评分为0.006581)。效果还很不错
Apply point-to-plane ICP
RegistrationResult with fitness=6.209722e-01, inlier_rmse=6.581453e-03, and correspondence_set size of 123471
注意:点到平面的ICP算法使用点法线。在本教程中,我们从文件加载法线。如果没有给出法线,可以用顶点法线估计来计算。


![B2B电子商务策略[在2022年发展您的业务]](https://img-blog.csdnimg.cn/img_convert/f5ca9d04ab8b2d6193f4b5256b8976ff.png)


![[附源码]计算机毕业设计在线教育系统Springboot程序](https://img-blog.csdnimg.cn/fc3a9645bbb94097a7f249746fe06e14.png)