SNAT的原理和应用
SNAT 应用环境∶局域网主机共享单个公网IP地址接入Internet (私有IP不能在Internet中正常路由)
SNAT原理∶修改数据包的源地址。
SNAT转换前提条件∶
- 局域网各主机已正确设置IP地址、子网掩码、默认网关地址
- Linux网关开启IP路由转发
开启SNAT的命令
临时打开
echo 1 >/proc/sys/net/ipv4/ip_forward
或
sysctl -w net.ipv4.ip forward=1
永久打开
vim /etc/ sysctl. conf
net. ipv4.ip_ forward = 1				#将此行写入配置文件

sysctl -P #读取修改后的配置SNAT转换1:固定的公网IP地址:
iptables -t nat -A POSTROUTING -s 192.168.80.0/24 -o ens33 -j SNAT --to 12.0.0.1
或
iptables -t nat -A POSTROUTING -s 192.168.80.0/24 -o ens33 -j SNAT --to-source 12.0.0.1-12.0.0.10
内网IP 出站 外网网卡 外网IP或地址池SNAT转换2:非固定的公网IP地址(共享动态IP地址):
iptables -t nat -A POSTROUTING -s 192.168.80.0/24 -o ens33 -j MASQUERADE
小知识扩展:
一个IP地址做SNAT转换,一般可以让内网 100到200 台主机实现上网。
SNAT实验
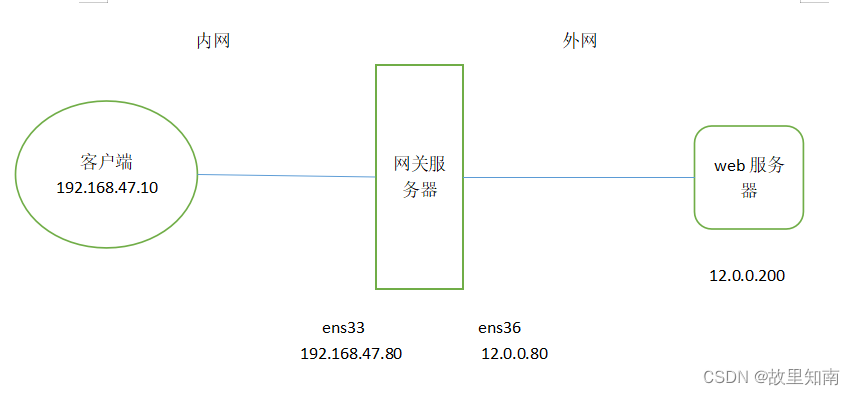
配置外网Web服务器
1 安装httpd服务
2 修改网卡并重启网卡
3 开启httpd服务,关闭防火墙服务

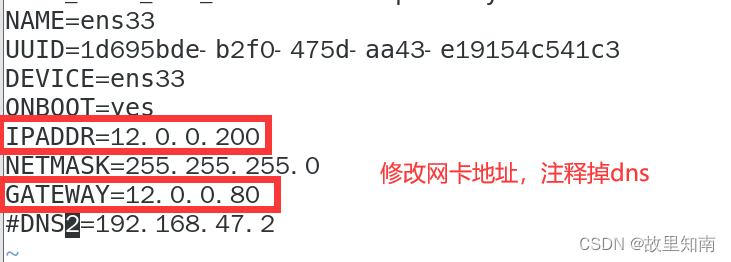


配置内网客户端服务器
1 修改并重启网卡 vim /etc/sysconfig/network-scripts/ifcfg-ens33
2 关闭防火墙 systemctl stop firewalld
systemctl disable firewalld
3 加载链规则
4 打开SNAT命令
5 添加 SNAT转换∶固定的公网IP地址
配置网关服务器
添加网卡修改配置

[root@cx yum.repos.d]# iptables -t filter -A FORWARD -s 192.168.47.0/24 -j ACCEPT

允许所有该网段的数据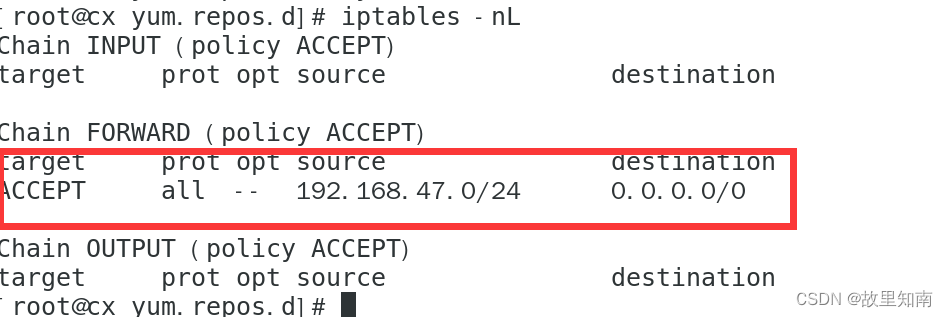
网关服务器,设置SNAT规则
[root@cx yum.repos.d]# iptables -t nat -A POSTROUTING -s 192.168.47.0/24 -o ens35 -j SNAT --to 12.0.0.80
[root@cx yum.repos.d]# iptables -nL -t  nat
Chain PREROUTING (policy ACCEPT)
target     prot opt source               destination

Chain INPUT (policy ACCEPT)
target     prot opt source               destination

Chain OUTPUT (policy ACCEPT)
target     prot opt source               destination

Chain POSTROUTING (policy ACCEPT)
target     prot opt source               destination
SNAT       all  --  192.168.47.0/24      0.0.0.0/0            to:12.0.0.80
验证

DNAT原理的应用
应用场景
在Internet中发布位于企业局域网内的服务器
DNAT的原理
目标地址转换,Destination Network Address Translation
根据指定条件修改数据包的目标IP地址,保证了内网服务器的安全,通常被叫做目的映射。
DNAT转换前提条件
局域网的web服务器能够访问Internet
网关的外网IP地址有正确的DNS解析记录
Linux网关支持IP路由转换
vim /etc/sysctl.conf
net.ipv4.ip_forward = 1
sysct1 -p
DNAT 转换流程
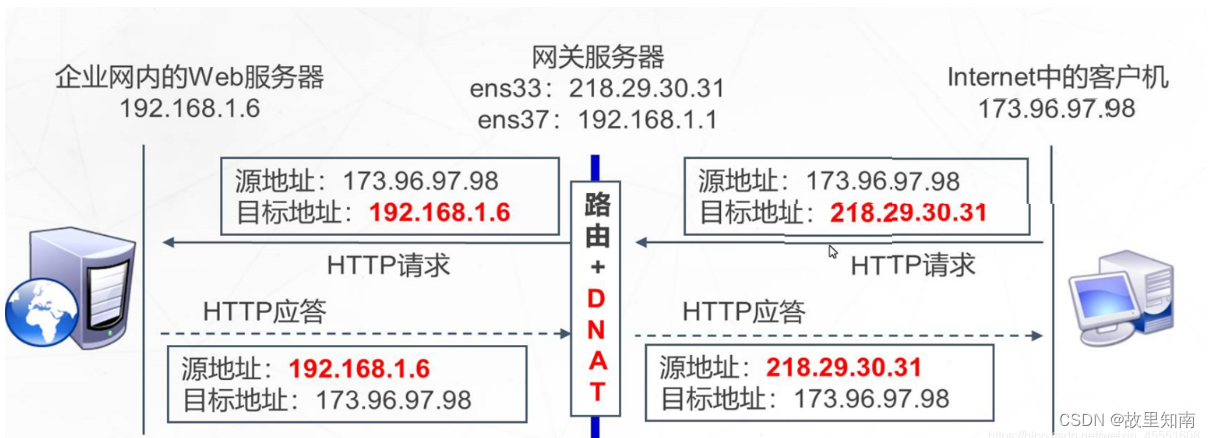
DNAT转换1∶ 发布内网的Web服务
#把从ens33进来的要访问web服务的数据包目的地址转换为 192.168.80.11
iptables -t nat -A PREROUTING -i ens33 -d 12.0.0.1 -p tcp--dport 80 -j DNAT --to 192.168.80.11
或
iptables -t nat -A PREROUTING -i ens33 -d 12.0.0.1 -p tcp--dport 80-j DNAT --to-destination 192.168.80.11
							 入站|外网网卡 | 外网ip											内网服务器ip
iptables -t nat -A PREROUTING -i ens33 -p tcp --dport 80-j DNAT --to 192.168.80.11-192.168.80.20
DNAT转换2∶ 发布时修改目标端口
yum -y install net-tools 		#若没有 ifconfig 命令可提前使用 yum 进行安装
ifconfig ens33#在外网环境中使用SSH测试ssh -p 250 root@12.0.0.1
yum -y install net-tools 		#若没有 ifconfig 命令可提前使用 yum 进行安装
ifconfig ens33
注意∶ 使用DNAT时,同时还有配合SNAT使用,才能实现响应数据包的正确返回 小知识扩展∶
主机型防火墙 主要使用 INPUT、oUTPUT 链, 设置规则时一般要详细的指定到端口
网络型防火墙 主要使用 FORWARD链,设置规则时很少去指定到端口,一般指定到IP地址或者到网段即可
防火墙规则的备份和还原
1.导出 (备份)所有表的规则
iptables-save > /opt/ipt.txt
2.导入(还原)规则
iptables-restore < /opt/ipt.txt
3.将iptables规则文件保存在 /etc/sysconfig/iptables 中,iptables服务启动时会自动还原规则 iptables-save >/etc/sysconfig/iptables
systemctl stop iptables		#停止iptables服务会清空掉所有表的规则
systemctl start iptables		#启动iptables服务会自动还原/etc/sysconfig/iptables 中的规则
抓包
tcpdump tcp-i ens33 -t -s 0 -c 100 and dst port ! 22 and src net 192.168.1.0/24 -w ./target.cap
(1)tcp∶ ip icmp arp rarp 和 tcp、udp、icmp这些选项等都要放到第一个参数的位置,用来过滤数据报的类型
(2)-i ens33 ∶只抓经过接口ens33的包
(3)-t ∶不显示时间戳
(4)-s 0 ∶ 抓取数据包时默认抓取长度为68字节。加上-s 0 后可以抓到完整的数据包
(5)-c 100 ∶只抓取100个数据包
(6)dst port ! 22 ∶不抓取目标端口是22的数据包
(7)src net 192.168.1.0/24 ∶数据包的源网络地址为192.168.1.0/24。Net:网段,host:主机
(8)-w ./target.cap ∶ 保存成cap文件,方便用ethereal (即wireshark)分析


![[Nacos] Nacos Client获取所有服务和定时更新Client端的注册表 (三)](https://img-blog.csdnimg.cn/59115e29f79344f6a06c3ac7446547c9.png)


