文章目录
- 1 mask2json ——代码实现
- 1.1 通过mask获取每个类别对应的灰度值
- 1.2 mask 转 json
- 2 mask2json ——利用工具转
- 2.1支持数据增强
- 2.2 支持多种格式转换
本文介绍两种语义分割mask转json的方法:
-
方法1:是参考语义分割mask转json(改进版本), 基于将图像转换为二值图,并利用cv2.findContours来识别轮廓点, 将轮廓点保存为json -
方法2:利用github中开源的工具直接转,它支持
1 mask2json ——代码实现
1.1 通过mask获取每个类别对应的灰度值
import os
import cv2
from tqdm import tqdm

mask_path = 'mask'

data_files = os.listdir(mask_path)

# color_list = []
# for data_file in tqdm(data_files):
#     img_file_path = os.path.join(data_path,data_file)
#     img = cv2.imread(img_file_path)
#     for x in range(img.shape[0]):
#         for y in range(img.shape[1]):
#             color = img[x,y]
#             color = list(color)
#             if color not in color_list:
#                 color_list.append(color)
#
#
# print(color_list)

gray_list = []

for data_file in tqdm(data_files):
    img_file_path = os.path.join(mask_path,data_file)
    img = cv2.imread(img_file_path)
    gray = cv2.cvtColor(img, cv2.COLOR_BGR2GRAY)
    for x in range(img.shape[0]):
        for y in range(img.shape[1]):
            value = gray[x,y]
            if value not in gray_list:
                gray_list.append(value)

print(gray_list)
1.2 mask 转 json
通过提取灰度图每个类别的像素值得到轮廓信息并转化为json
import cv2
import os
import json
from PIL import Image
import io
import base64

# class_dict = {
#     "sky": 10,
#     "building": 0,
#     "column pole": 1,
#     "road": 2,
#     "sidewalk": 3,
#     "tree": 4,
#     "sign symbol": 5,
#     "fence": 6,
#     "car": 7,
#     "pedestrian": 8,
#     "bicyclist": 9

# }


color_list = [128, 0, 0], [0, 0, 244], [255, 96, 0], [240, 0, 0], [255, 212, 0], [0, 212, 255], [0, 100, 255], [74, 255,
                                                                                                                182]

gray_list = [15, 73, 85, 27, 154, 201, 135, 213]

# def rgb_to_gray_value(RGB):
#     R = RGB[0]
#     G = RGB[1]
#     B = RGB[2]
#     Gray = (R * 299 + G * 587 + B * 114) / 1000
#     return round(Gray)
#
#
# def bgr_2_rgb(color):
#     color[0], color[2] = color[2], color[0]
#     return color


# class_dict = {
#     "A1 尾胶面破损": rgb_to_gray_value(bgr_2_rgb(color_list[0])),
#     "B1 尾胶少胶": rgb_to_gray_value(bgr_2_rgb(color_list[1])),
#     "C1 尾胶裂": rgb_to_gray_value(bgr_2_rgb(color_list[2])),
#     "E1 骨架破损": rgb_to_gray_value(bgr_2_rgb(color_list[3])),
#     "F1 骨架裂纹": rgb_to_gray_value(bgr_2_rgb(color_list[4])),
#     "G1 尾胶溢胶": rgb_to_gray_value(bgr_2_rgb(color_list[5])),
#     "H1 磁芯": rgb_to_gray_value(bgr_2_rgb(color_list[6])),
# }

class_dict = {
    "A1 尾胶面破损": gray_list[0],
    "B1 尾胶少胶": gray_list[1],
    "C1 尾胶裂": gray_list[2],
    "E1 骨架破损": gray_list[3],
    "F1 骨架裂纹": gray_list[4],
    "G1 尾胶溢胶": gray_list[5],
    "H1 磁芯": gray_list[6]
}


def img_tobyte(img_pil):
    # 类型转换 重要代码
    # img_pil = Image.fromarray(roi)
    ENCODING = 'utf-8'
    img_byte = io.BytesIO()
    img_pil.save(img_byte, format='PNG')
    binary_str2 = img_byte.getvalue()
    imageData = base64.b64encode(binary_str2)
    base64_string = imageData.decode(ENCODING)
    return base64_string

 ##########################Mask2json 主函数#####################################
def func(file: str) -> dict:
    if os.path.basename(file) == "0016E5_07959.png":
        print('t')
    png = cv2.imread(file)
    gray = cv2.cvtColor(png, cv2.COLOR_BGR2GRAY)
    img_file_path = os.path.join(img_path, os.path.basename(file).split('.')[0] + '.jpg')
    img = Image.open(img_file_path)
    imgData = img_tobyte(img)
    dic = {"version": "5.1.1", "flags": {}, "shapes": list(), "imagePath": os.path.basename(file), "imageData": imgData,
           "imageHeight": png.shape[0], "imageWidth": png.shape[1]}
    #
    # cv2.imshow("mask", gray)
    # cv2.waitKey(0)
    # cv2.destroyAllWindows()
    for k, v in class_dict.items():

        # _, binary = cv2.threshold(gray, v + 1 , 255, cv2.THRESH_TOZERO_INV)
        # _, binary = cv2.threshold(binary, v , 255, cv2.THRESH_BINARY_INV)
        binary = gray.copy()
        binary[binary != v] = 0
        binary[binary == v] = 255

        # _, binary = cv2.threshold(gray, i+1, 255, cv2.THRESH_BINARY_INV)
        # _, binary = cv2.threshold(binary, i, 255, cv2.THRESH_TOZERO_INV)
        # _, binary = cv2.threshold(binary, 125, 255, cv2.THRESH_BINARY_INV)

        # if os.path.basename(file) == "16729150388540_class3.png":
        # print('t')
        # cv2.imshow('bin', binary)
        # cv2.waitKey(0)
        # cv2.destroyAllWindows()
        # 只检测外轮廓并存储所有的轮廓点
        contours, _ = cv2.findContours(binary, cv2.RETR_EXTERNAL, cv2.CHAIN_APPROX_SIMPLE)

        for contour in contours:

            # img = cv2.imread(img_file_path)
            # cv2.drawContours(img, contour, -1, (0, 0, 255), 3)
            # cv2.imshow("img", img)
            # cv2.waitKey(0)
            # cv2.destroyWindow("img")
            temp = list()
            if len(contour) < 4:
                continue
            for point in contour:
                # if (point[0][0] <  edge_th and point[0][1] < edge_th) or (point[0][0] < edge_th and point[0][1] > png.shape[0] -edge_th) \
                #         or (point[0][0] > png.shape[1] - edge_th and point[0][1] < edge_th) or (point[0][0] > png.shape[1] - edge_th and point[0][1] > png.shape[0] -edge_th):
                #     continue
                # if len(temp) > 1 and temp[-2][0] * temp[-2][1] * int(point[0][0]) * int(point[0][1]) != 0 and (
                #         int(point[0][0]) - temp[-2][0]) * (
                #         temp[-1][1] - temp[-2][1]) == (int(point[0][1]) - temp[-2][1]) * (temp[-1][0] - temp[-1][0]):
                #     temp[-1][0] = int(point[0][0])
                #     temp[-1][1] = int(point[0][1])
                # else:
                temp.append([float(point[0][0]), float(point[0][1])])
            dic["shapes"].append({"label": k, "points": temp, "group_id": None,
                                  "shape_type": "polygon", "flags": {}})

    return dic


if __name__ == "__main__":
    # print(rgb_to_gray_value(bgr_2_rgb(color_list[0])))
    # print(class_dict)

    # edge_th = 2
    img_path = 'image'
    mask_path = 'mask'
    save_path = 'json'
    os.makedirs(save_path, exist_ok=True)

    mask_files = os.listdir(mask_path)
    for mask_file in mask_files:
        mask_file_path = os.path.join(mask_path, mask_file)
        save_file = mask_file.split('.')[0] + '.json'
        save_file_path = os.path.join(save_path, save_file)
        with open(save_file_path, mode='w', encoding='utf-8') as f:
            json.dump(func(mask_file_path), f)
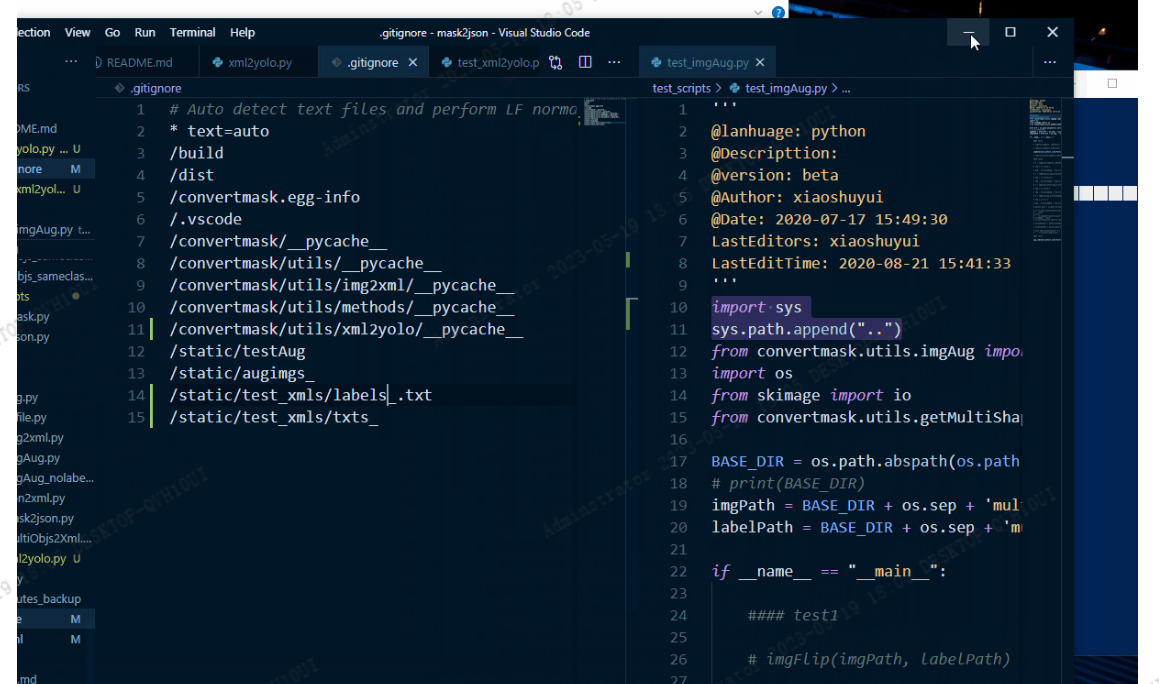
2 mask2json ——利用工具转
github地址:https://github.com/guchengxi1994/mask2json

该工具支持多种格式转换:
- 1.augmentation
- 2.img2xml
- 3.json2mask
- 4.json2xml
- 5.longImgSplit
- 6.xml2json
- 7.xml2mask
- 8.xml2yolo
- 9.yolo2xml
- 10.mask2json
2.1支持数据增强
- (1)
image crop supported.(single and multiple crops,rectangle and polygon support. See here)

- (2).
image resize supported(auto labeled). See here and the test script is here

- (3) image distortion supported.see here or test-script for details.
2.2 支持多种格式转换
- xml2yolo
- json2xml

其他格式 等等。。。


![[230528] 托福阅读真题|TPO66 13/30|整卷得分22/30|9:45~10:45|15:40~16:40](https://img-blog.csdnimg.cn/82b16bf7d5644c408dc6f2ba3d3cf89a.png)