1.多表查询--自关联查询
# 格式: select * from A join A on 条件; 或者 select * from A left join A on 条件;
# 自关联查询的用法和 内连接, 外连接等操作一模一样, 只不过是: 表自己关联自己.
# 应用场景: 分类表(多级), 行政区域表(3级, 省市区).
# 查询结果: 跟上述多表查询结果一样, 如果是内连接就是交集, 如果是左外就是: 左表全集+交集, 如果是右外: 右表全集 + 交集.
# 1. 准备数据源.
drop table areas;
create table areas( # 区域表
id varchar(30) not null primary key, # (省, 市, 县区)自身id, 主键, 自增
title varchar(30), # (省, 市, 县区)名称
pid varchar(30) # 当前的(省, 市, 县区)的 父级id
);
# 2. 查询河南省的信息.
select * from areas where id = '410000';
# 3. 查询河南省所有的市的信息.
select * from areas where pid = '410000';
# 4. 查询新乡市各县区的信息.
select * from areas where pid = '410700';
# 5. 查询河南省,所有的市的, 所有县区的信息.
select
province.id, province.title, # 省的信息
city.id, city.title, # 市的信息
county.id, county.title # 县区的信息
from areas county # 县区
join areas city # 市
join areas province # 省
on
county.pid = city.id
and
city.pid = province.id
where
province.title='河南省';2.多表查询--子查询
# 概述: 子查询指的是 1个SQL语句的查询条件 需要依赖 另1个SQL语句的执行结果.
# 主查询(父查询) 子查询
# 格式: select * from 表A where 字段 = (select 列 from 表A/表B); # 查询结果: 取决于你写的SQL.
# 需求: 获取河南省所有的市的信息.
# 方式1: 自关联查询实现, 实际开发中的写法.
select * from areas p join areas c on p.id = c.pid where p.title = '河南省';
# 方式2: 子查询实现.
# 步骤1: 查询出河南省的id
select * from areas where title = '河南省';
# 步骤2: 根据上述的id, 查询出该省所有的市.
select * from areas where pid = '410000';
# 步骤3: 合并上述的内容, 最终写法为:
select * from areas where pid = (select id from areas where title = '河南省');3.扩展--表关系分析
因为MySQL属于关系型数据库, 所以MySQL中的数据表与数据表之间是有关系的, 常见的关系有:
一对多
1个部门可以有多个员工, 但是1个员工只能属于1个部门
1种分类可以有多个商品, 但是1个商品只能属于1个分类
多对多
1个学生可以选择多门课程, 1门课程也可以被多个学生选择
1个订单可以包含多个商品, 1个商品也可以出现在多个订单中
一对一
1个人只有1个身份证号
1个公司只能有1个注册地址
-
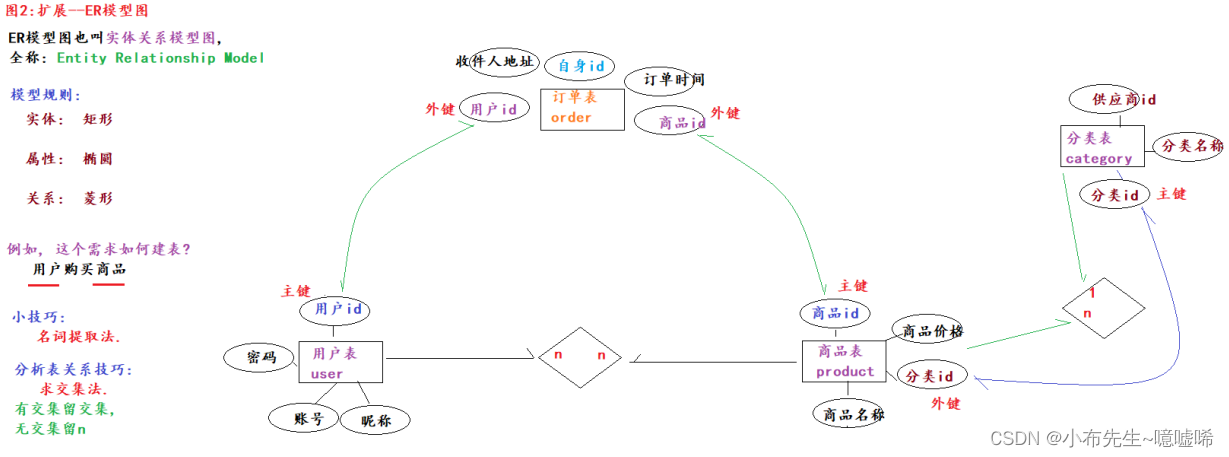
问题: 如何分析表关系呢?
-
答案: 通过ER模型图.
-
4.多表建表案例--一对多
建表原则: 在多的一方新建一列, 充当外键列, 去关联一的一方的主键列.

# 0. 切库.
create database day04;
use day04;
show tables;
# 1. 建表.
# 1.1 创建分类表, 主表.
drop table category;
create table category(
cid int primary key auto_increment, # 分类id,主键,自增
cname varchar(20) # 分类名称
);
# 1.2 创建商品表, 外表.
drop table product;
create table product(
pid int primary key auto_increment, # 商品id
pname varchar(20), # 商品名称
price double, # 商品价格
cid int # 商品所属的分类id
);
# 2. 添加外键约束.
alter table product add constraint fk01 foreign key (cid) references category(cid);
# 删除约束
# alter table product drop foreign key fk01;
# 3. 添加表数据
# 3.1 添加数据到 分类表, 主表.
insert into category value (null, '电脑'), (null, '手机'), (null, '相机'), (null, '手表');
# 3.2 添加数据到 商品表, 外表.
insert into product value (null, 'Iphone100', 200, 2);
insert into product value (null, '虫洞OG80', 100, 10); # 因为没有分类id10, 所以报错.
# 4. 查询表数据.
# 4.1 查询 分类表, 主表.
select * from category;
# 4.2 查询 商品表, 外表.
select * from product;5.多表建表案例--多对多
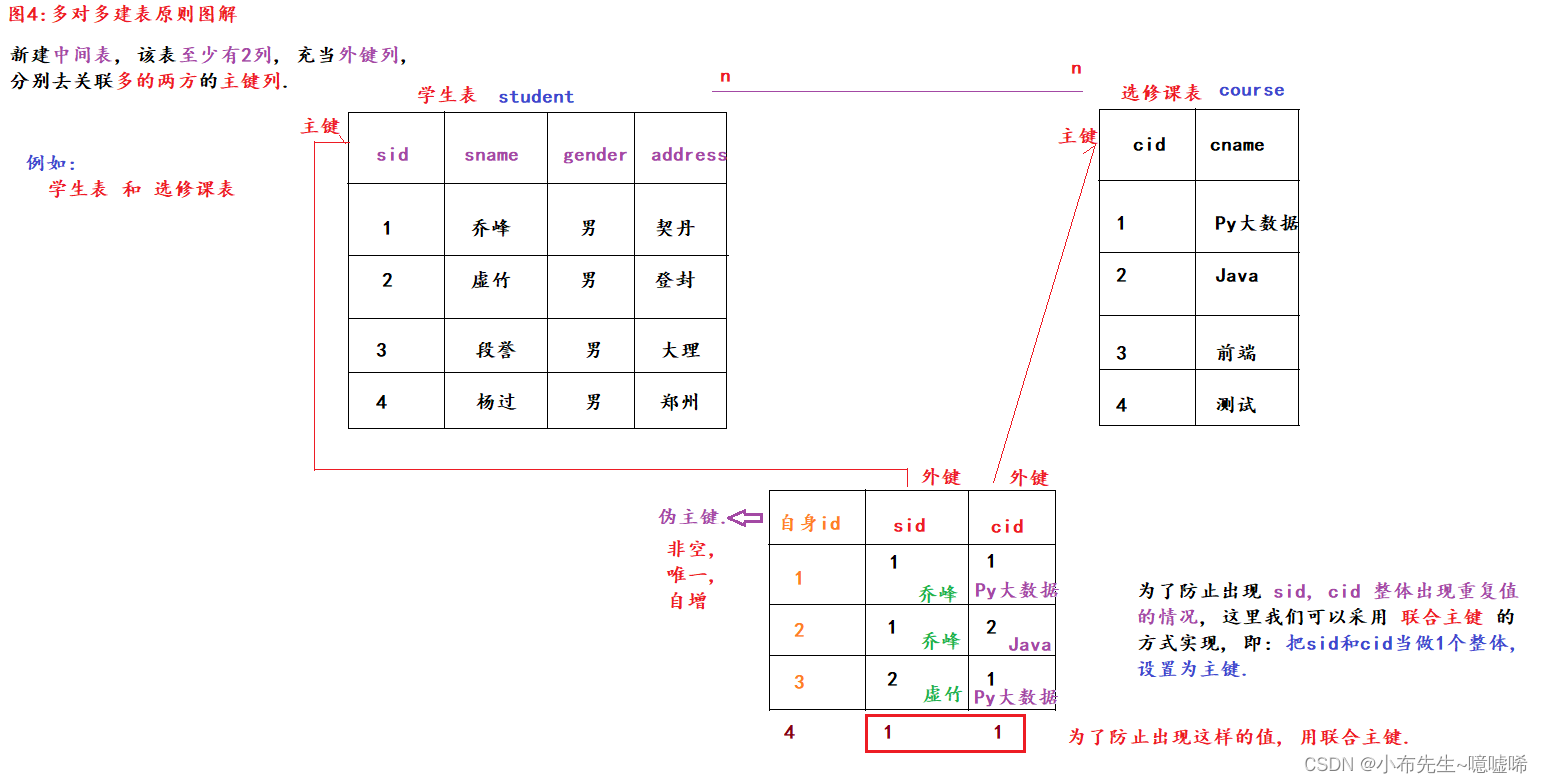
建表原则: 新建中间表, 该表至少有两列, 充当外键列, 分别去关联多的两方的主键列.
# 1. 建表.
# 1.1 创建学生表, 主表.
create table student(
sid int primary key auto_increment, # id,主键,约束
sname varchar(20), # 学生姓名
gender varchar(10), # 性别
address varchar(20) # 地址
);
# 1.2 创建选修课表, 主表.
create table course(
cid int primary key auto_increment,
cname varchar(20) # 选修课名
);
# 1.3 创建中间表(学生和选修课)表, 外表.
create table stu_course(
# 核心细节1: 伪主键, id, 非空, 唯一, 自增
id int not null unique auto_increment,
sid int,
cid int
# primary key (sid, cid) # 建表的时候, 指定联合主键.
);
# 2. 添加外键约束.
# 2.1 添加 学生表 和 中间表的 约束.
alter table stu_course add constraint fk_s_sc foreign key (sid) references student(sid);
# 2.2 添加 课程表 和 中间表的 约束.
alter table stu_course add constraint fk_c_sc foreign key (cid) references course(cid);
# 核心细节2: 设置中间表的联合主键, 不允许出现 相同学生选了相同课的情况.
alter table stu_course add primary key(sid, cid);
# 3. 添加表数据
# 3.1 添加数据到 学生表, 主表.
insert into student value
(null, '乔峰', '男', '契丹'),
(null, '虚竹', '男', '登封'),
(null, '段誉', '男', '大理'),
(null, '杨过', '男', '郑州');
# 3.2 添加数据到 课程表, 主表.
insert into course value (null, 'Py大数据'),(null, 'Java'),(null, '前端'),(null, '测试');
# 3.3 添加数据到 中间表, 外表.
# 需求1: 乔峰 学习Py大数据 和 Java
insert into stu_course value(null, 1, 1), (null, 1, 2);
# 需求2: 虚竹 Java, 测试
insert into stu_course value(null, 2, 2), (null, 2, 4);
# 需求3: 乔峰学习Py大数据.
insert into stu_course value(null, 1, 1);
# 4. 查询表数据.
# 4.1 查询 学生表, 主表.
select * from student;
# 4.2 查询 课程表, 主表.
select * from course;
# 4.3 查询 中间表, 外表.
select * from stu_course;
# 扩展需求: 找到每个学生选修了哪些课程, 要求显示: 学生id, 学生姓名, 学生地址, 选修课id, 选修课名.
select
s.sid, s.sname, s.address, c.cid, c.cname
from
student s, course c, stu_course sc
where
s.sid = sc.sid and c.cid = sc.cid;6.窗口函数--相关概述
窗口函数详解:
    函数:
        函数也叫方法, 指的是程序内容已经定义好的功能, 我们直接拿来用即可, 相当于程序准备好的工具, 我们传入指定值, 就可以获取到既定的结果.
        例如: select ceil(3.1);       => 4
    概述:
        窗口函数指的是 over()函数, 它相当于给表新增一列, 至于新增的内容是什么, 取决于你的 窗口函数 结合了 什么函数一起使用.
    问题: 能和窗口函数一起使用的函数有哪些呢?
    答案:
        情境1: 窗口函数 + 聚合函数(count, sum, max, min, avg)
        情境2: 窗口函数 + 排序函数(row_number, rank, dense_rank, ntile)
        情境3: 窗口函数 + 其他函数(lag, lead, first_value, last_value)
    格式:
        可以结合窗口函数一起使用的函数 over(partition by 分组的列 order by 排序列 rows between 起始行 and 结束行)
    细节:
        1. 窗口函数是MySQL8.0的特性, 你的MySQL必须是8.X及其以上版本才可以使用.
        2. 窗口函数相当于给表新增一列, 至于加的内容是什么, 取决于 结合了什么函数一起使用.
        3. 如果over()里边什么都不写, 默认操作的是: 表中 该列所有的数据.
        4. 如果写了partition by(表示分组): 则默认操作 组内所有的数据.
        5. 如果写了order by(表示排序):     则默认操作 组内第一行 至 当前行的数据.
        6. 如果要执行操作数据的范围, 即: 从哪一行开始, 到哪一行结束, 可以使用 rows between 起始行 and 结束行, 它主要涉及的参数如下:
            unbound preceding    表示第1行
            n preceding            n表示数字, 表示向上n行, 例如: 3 preceding 表示 向上 3行.
            current row            表示 当前行
            n following            n表示数字, 表示向下n行, 例如: 3 following 表示 向下 3行.
            unbound following    表示最后1行
7.窗口函数--结合聚合函数使用
# 切换数据库.
use day04;
show tables ;
# 员工表
CREATE TABLE employee
(
id int, # 编号
name varchar(20), # 姓名
deg varchar(20), # 职位
salary int, # 工资
dept varchar(20) # 部门
);
insert into employee value (1201, 'gopal', 'manager', 50000, 'TP');
insert into employee value (1202, 'manisha', 'cto', 50000, 'TP');
insert into employee value (1203, 'khalil', 'dev', 30000, 'AC');
insert into employee value (1204, 'prasanth', 'dev', 30000, 'AC');
insert into employee value (1206, 'kranthi', 'admin', 20000, 'TP');
# 网站点击量表
create table website_pv_info
(
cookieid varchar(20), # 用户id
createtime varchar(20), # 访问时间
pv int # 页面浏览量
);
insert into website_pv_info value ('cookie1', '2018-04-10', 1);
insert into website_pv_info value ('cookie1', '2018-04-11', 5);
insert into website_pv_info value ('cookie1', '2018-04-12', 7);
insert into website_pv_info value ('cookie1', '2018-04-13', 3);
insert into website_pv_info value ('cookie1', '2018-04-14', 2);
insert into website_pv_info value ('cookie1', '2018-04-15', 4);
insert into website_pv_info value ('cookie1', '2018-04-16', 4);
insert into website_pv_info value ('cookie2', '2018-04-10', 2);
insert into website_pv_info value ('cookie2', '2018-04-11', 3);
insert into website_pv_info value ('cookie2', '2018-04-12', 5);
insert into website_pv_info value ('cookie2', '2018-04-13', 6);
insert into website_pv_info value ('cookie2', '2018-04-14', 3);
insert into website_pv_info value ('cookie2', '2018-04-15', 9);
insert into website_pv_info value ('cookie2', '2018-04-16', 7);
# 网站访问记录表
create table website_url_info
(
cookieid varchar(20), # 用户id
createtime varchar(20), # 访问时间
url varchar(20) # 访问的url页面
);
insert into website_url_info value ('cookie1', '2018-04-10 10:00:02', 'url2');
insert into website_url_info value ('cookie1', '2018-04-10 10:00:00', 'url1');
insert into website_url_info value ('cookie1', '2018-04-10 10:03:04', '1url3');
insert into website_url_info value ('cookie1', '2018-04-10 10:50:05', 'url6');
insert into website_url_info value ('cookie1', '2018-04-10 11:00:00', 'url7');
insert into website_url_info value ('cookie1', '2018-04-10 10:10:00', 'url4');
insert into website_url_info value ('cookie1', '2018-04-10 10:50:01', 'url5');
insert into website_url_info value ('cookie2', '2018-04-10 10:00:02', 'url22');
insert into website_url_info value ('cookie2', '2018-04-10 10:00:00', 'url11');
insert into website_url_info value ('cookie2', '2018-04-10 10:03:04', '1url33');
insert into website_url_info value ('cookie2', '2018-04-10 10:50:05', 'url66');
insert into website_url_info value ('cookie2', '2018-04-10 11:00:00', 'url77');
insert into website_url_info value ('cookie2', '2018-04-10 10:10:00', 'url44');
insert into website_url_info value ('cookie2', '2018-04-10 10:50:01', 'url55');案例:
# 案例1: 窗口函数初体验.
# 不使用窗口函数, 直接用传统的 聚合函数.
select sum(salary) total_salary from employee;

# 需求: 统计每个所有员工的工资, 并将其展示在每个员工数据的最后.
select *, sum(salary) over() as total_salary from employee;
窗口函数案例 窗口 + 聚合
# 补充概述: PV: Page View 页面浏览量, UV: user view, 用户访问数 IP: ip(独立访客)访问数
# 例如: 我通过我电脑的谷歌浏览器访问了京东的10个页面, 通过Edge浏览器访问了京东的7个页面, 请问: PV, UV, IP分别是多少?
# 答案: IP: 1个, UV: 2个, PV: 17个

# 案例2: 演示 窗口函数 + 聚合函数一起使用.
# 需求:求出网站总的pv数 所有用户所有访问加起来
select sum(pv) from website_pv_info;

# 如果over()里边什么都不写, 默认操作的是: 表中 该列所有的数据.
select *, sum(pv) over() total_pv from website_pv_info;

# 需求: 求出每个用户总pv数
# 方式1: sum() + group by 一起使用.
select cookieid, sum(pv) total_pv from website_pv_info group by cookieid;

# 方式2: 聚合函数 + 窗口函数一起使用.
# 细节: 如果写了partition by(表示分组): 则默认操作 组内所有的数据.
select *, sum(pv) over(partition by cookieid) total_pv from website_pv_info;

# 细节: 如果写了order by(表示排序):     则默认操作 组内第一行 至 当前行的数据.
select *, sum(pv) over(partition by cookieid order by createtime) total_pv from website_pv_info;
# 上述的代码, 等价于如下的内容:
select *, sum(pv) over(partition by cookieid order by createtime rows between unbounded preceding and current row ) total_pv from website_pv_info;

# 需求: 统计每个cookieID的pv(访问量), 只统计: 当前行及 向前3行 向后1行
select *, sum(pv) over(partition by cookieid order by createtime rows between 3 preceding and 1 following ) total_pv from website_pv_info;
窗口函数--结合排序函数使用
# 需求: 根据点击量(pv)做排名, 组内排名.
# 这里的排序函数指的是: row_number(), rank(), dense_rank(), 它们都可以做排名, 不同的是, 对相同值的处理结果.
# 例如: 数据是100, 90, 90, 60, 则: row_number是: 1, 2, 3, 4,  rank: 1, 2, 2, 4,  dense_rank: 1, 2, 2, 3
select
       *,
        row_number() over(partition by cookieid order by pv) rn1,       # 根据cookieid分组, 根据pv进行排序(升序)
        rank() over(partition by cookieid order by pv) rn2,             # 根据cookieid分组, 根据pv进行排序(升序)
        dense_rank() over(partition by cookieid order by pv) rn3        # 根据cookieid分组, 根据pv进行排序(升序)
from website_pv_info;

# 需求: 根据cookieID进行分组, 获取每组点击量最高的前2名数据, 这个就是经典的案例: 分组求TopN
# Step1: 根据cookieID进行分组, 根据点击量进行排名.
select *, dense_rank() over (partition by cookieid order by pv desc) rn from website_pv_info;

# 细节: where只能筛选表中已经有的列(数据)
# Step2: 把上述的查询结果当做一张表, 然后从中获取我们要的数据即可.
select * from (
    select *, dense_rank() over (partition by cookieid order by pv desc) rn from website_pv_info
) t1 where rn <= 2;

# ntile(数字,表示分成几份)  采用均分策略, 每份之间的差值不超过1, 优先参考最小的那个部分, 即: 7分成3份, 则是: 3, 2, 2
select *, ntile(2) over(partition by cookieid order by pv desc) rn from website_pv_info;
窗口函数--结合其它函数使用
# 1. LAG 用于统计窗口内往上第n行值
# 需求: 显示用户上一次的访问时间.
select *, lag(createtime, 1) over(partition by cookieid order by createtime) lag1 from website_url_info;

# 根据cookieID分组, createtime升序排序, 获取当前行 向上2行的createtime列的值, 找不到就用默认值(夯哥)填充.
select *, lag(createtime, 2, '1970-01-01 00:00:00') over(partition by cookieid order by createtime) lag1 from website_url_info;

# 2. LEAD 用于统计窗口内往下第n行值
select *, LEAD(createtime, 1) over(partition by cookieid order by createtime) lead1 from website_url_info;

# 3. FIRST_VALUE 取分组内排序后,截止到当前行,第一个值
select *, first_value(createtime) over(partition by cookieid order by createtime) lead1 from website_url_info;

# 4. LAST_VALUE  取分组内排序后,截止到当前行,最后一个值
select *, last_value(createtime) over(partition by cookieid order by createtime) lead1 from website_url_info;

# 5. 上述的其它函数, 你只需要注意lag()函数即可, 它在实际开发中的应用场景是: 判断某个账号(用户)是否连续登陆n天.
select * from website_pv_info;
# 改造下值.
update website_pv_info set createtime='2018-04-17' where cookieid = 'cookie1' and createtime='2018-04-16';

# Step1: 获取当前日期, 往前数的第6个日期, 即为一周的初始日期.
select
       *,
       lag(createtime, 6) over(partition by cookieid order by createtime) lag1
from website_pv_info;

# 扩展: 通过 datediff可以计算两个日期的差值, 即: 前边的日期 - 后边的日期.
select datediff('2018-04-17', '2018-04-10');        # 7

# Step2: 获取当前时间, 及它的前6个的登陆时间 的差值.
select * from (
    select
           *,
           lag(createtime, 6) over(partition by cookieid order by createtime) lag1
    from website_pv_info
) t1 where datediff(createtime, lag1) = 6;      # 10, 11, 12, 13, 14, 15, 16
SQL语句总结
# --------------------------------- DDL操作 数据库  CURD ---------------------------------
# 1. 创建数据库  *
create database 数据库名 charset '码表';      # utf8, gbk

# 2. 查看数据库.
show databases ;

# 3. 切换数据库    *
use 数据库名;

# 4. 删除数据库.
drop database 数据库名;

# 5. 修改数据库的码表.
alter database 数据库名 charset '码表';

# --------------------------------- DDL操作 数据表  CURD ---------------------------------
# 1. 创建数据表. *
create table 数据表名(
    id int primary key auto_increment,
    列名1 数据类型 [约束],
    列名1 数据类型 [约束],
    ......
);

# 2. 删除数据表. *
drop table 数据表名;
truncate table 数据表名;

# 3. 修改数据表名
rename table 旧表名 to 新表名;

# 4. 查看数据表. *
show tables;
desc 数据表名;

# --------------------------------- DDL操作 字段  CURD ---------------------------------
# 1. 添加字段.
alter table 数据表名 add 列名 数据类型 [约束];
# 2. 删除字段.
alter table 数据表名 drop 列名;

# 3. 修改字段.
alter table 数据表名 modify 列名 数据类型 [约束];
alter table 数据表名 change 旧列名 新列名 数据类型 [约束];

# 4. 查询字段  *
desc 表名;

# --------------------------------- DML操作 表数据  增删改(更新), 全部掌握 ---------------------------------
# 1. 添加表数据
insert into 表名 value(值1, 值2...);        # 个数, 类型, 一致.
insert into 表名 value(值1, 值2...),(值1, 值2...),(值1, 值2...);

# 2. 修改表数据.
update 表名 set 列1 = 值, 列2 = 值 where 条件;

# 3. 删除表数据.
delete from 表名 where 条件;

# --------------------------------- DQL操作 表数据  查询, 全部掌握 ---------------------------------
# 1. 简单查询, 比较运算符, 逻辑运算符, 模糊查询, 范围查询, 空值过滤.
select * from 表名 where id > 3;
select * from 表名 where id > 3 and id <= 5;
select * from 表名 where name like '夯%';
select * from 表名 where age between 10 and 30 ;
select * from 表名 where age in (1, 3, 6) ;
select * from 表名 where name is not null;

# 2. 聚合查询
# count(), sum(), max(), min(), avg()

# 3. 排序
# order by 列 asc/desc

# 4.  分组 group by

# 5. 分页查询 limit 起始索引, 每页的数据条数.

# 6. 一个完整的(单表)查询
select
    distinct 列1, 列2 as 别名
from
    表名
where
    组前筛选
group by
    分组的列
having
    组后筛选
order by
    排序的列 asc/desc
limit 起始索引, 每页的数据条数;

# --------------------------------- 多表 查询, 全部掌握(除了交叉查询, 子查询) ---------------------------------
# 1. 交叉查询,  笛卡尔积.
select * from A, B;
# 2. 内连接, 交集.
select * from A join B on 条件;       # 显式.
select * from A, B where 条件;        # 隐式.

# 3. 外连接
select * from A left join B on 条件;  # 左表全集 + 交集

# 4. 自关联查询.
select * from A a1, A a2, A a3 where a1.pid = a2.id and a2.pid = a3.id;

# 5. 子查询
select * from A where id = (select id from B where 条件);

# --------------------------------- 窗口函数, 重点掌握 排序函数  ---------------------------------
# 格式
select
       *,
       #   聚合函数---------------------, 排序函数-------------------------------, 其它函数-------------------------------
       count()/sum()/avg()/max()/min()/row_number()/rank()/dense_rank()/ntile()/lag()/lead()/first_value()/last_value()
           over(partition by 分组的列 order by 排序的列 [asc/desc] rows between 起始行 and 结束行 )
from 表名;

# 窗口函数 = 给表新增1列, 至于增加的内容是什么, 取决于窗口函数结合什么函数一起使用.
# over()啥都不写, 默认是全局聚合(统计该列所有数据), 写了partition by则是分组聚合(统计组内所有), 写了order by则是统计: 组内第1行 至 当前行.
# 其他的关于行数的限定: unbound preceding 第1行,  n preceding 向上n行, current row 当前行, n following 向下n行, unbound following 最后1行.

