目录
- 一、list的介绍及其使用
- 1、list的介绍
- 2、list的使用
- 2.1 list的构造
- 2.2 list iterator的使用
- 3、list的元素访问接口
- 4、list的调节器
- 6、list的迭代器失效
- 二、list的模拟实现及反向迭代器
- 1、模拟实现list
- 2、list的反向迭代器
- 三、list和vector的比较
一、list的介绍及其使用
1、list的介绍

- list是可以在常数范围内在任意位置进行插入和删除的序列容器,并且该容器可以前后双向迭代。
- list的底层是双向链表结构,双向链表中每个元素存储在互不相关的独立节点中,在节点中通过指针指向其前一个元素和后一个元素。
- list与forward_list很相似,但是forward_list是单链表,只是向前迭代。
- 与其他序列容器相比,list和forward_list最大的缺陷是不支持任意位置的随机访问,比如:要访问list的第6个元素,就必须从已知的位置迭代到当前位置,list还需要一些额外的空间,一保持每个节点的相关信息。
2、list的使用
2.1 list的构造
| 构造函数 | 说明 |
|---|---|
| list (size_type n, const value_type& val = value_type()) | 构造的list中包含n个值为val的元素 |
| list () | 构造空的list |
| list (const list& x) | 拷贝构造函数 |
| list (Inputlterator first, Inputlterator last) | 用[first, last)区间中的元素构造list |
代码演示:
void TestList1()
{
    list<int> l1;                         // 构造空的l1
    list<int> l2(4, 100);                 // l2中放4个值为100的元素
    list<int> l3(l2.begin(), l2.end());  // 用l2的[begin(), end())左闭右开的区间构造l3
    list<int> l4(l3);                    // 用l3拷贝构造l4

    // 以数组为迭代器区间构造l5
    int array[] = { 16,2,77,29 };
    list<int> l5(array, array + sizeof(array) / sizeof(int));

    // 列表格式初始化,C++11
    list<int> l6{ 1,2,3,4,5 };

    // 用迭代器方式打印l5中的元素
    list<int>::iterator it = l5.begin();
    while (it != l5.end())
    {
        cout << *it << " "; //结果:16 2 77 29
        ++it;
    }
    cout << endl;

    // C++11范围for的方式遍历
    for (auto& e : l5)
        cout << e << " "; //结果:16 2 77 29

    cout << endl;
}
2.2 list iterator的使用
此处,可将迭代器理解成一个指针,该指针指向list中的某个节点。
| 函数声明 | 说明 |
|---|---|
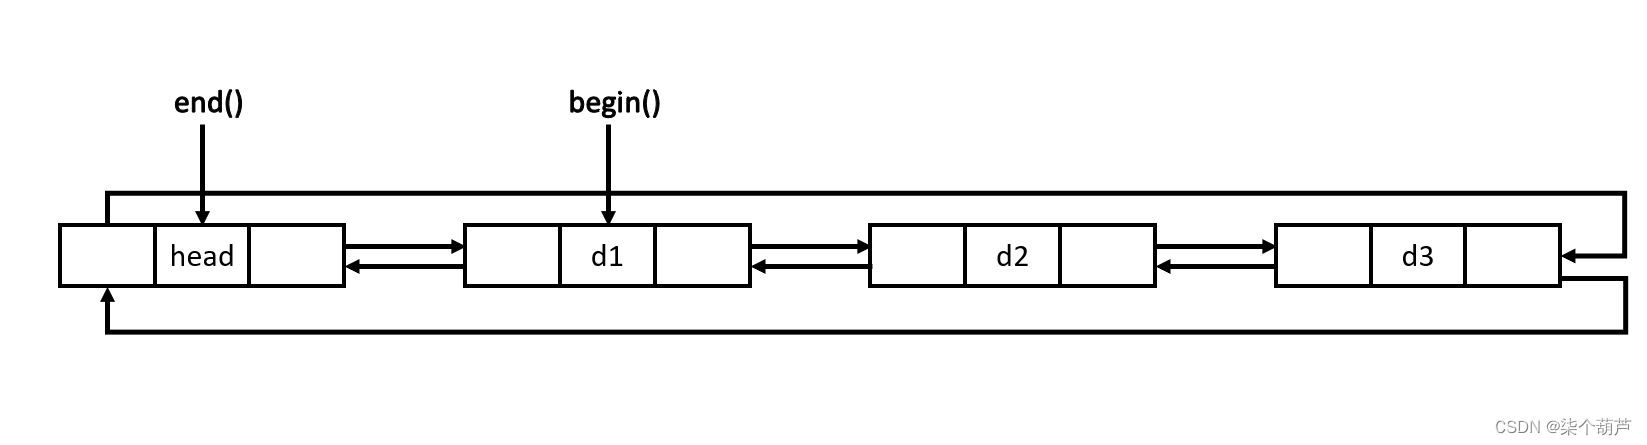
| begin() + end() | 返回第一个元素的迭代器 + 返回最后一个元素下一个位置的迭代器 |
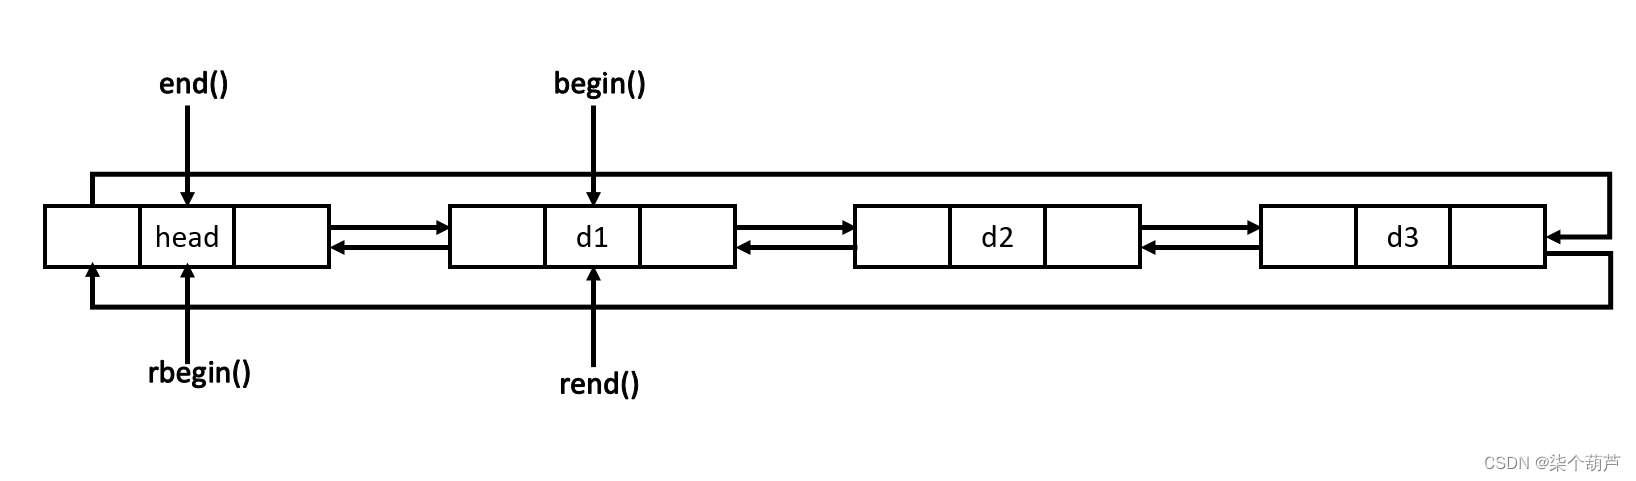
| rbegin() + end() | 返回第一个元素的reverse_iterator,即end位置 + 返回最后一个元素下一个位置的 |
| reverse_iterator,即begin位置 |
注意:
- begin与end为正向迭代器,对迭代器执行++操作,迭代器向后移动
- rbegin与rend为反向迭代器,对迭代器执行++操作,迭代器向前移动
代码演示:
// 注意:遍历链表只能用迭代器和范围for
void PrintList(const list<int>& l)
{
    // 注意这里调用的是list的 begin() const,返回list的const_iterator对象
    for (list<int>::const_iterator it = l.begin(); it != l.end(); ++it)
    {
        cout << *it << " ";
        // *it = 10; 编译不通过
    }
    cout << endl;
}

void TestList2()
{
    int array[] = { 1, 2, 3, 4, 5, 6, 7, 8, 9, 0 };
    list<int> l(array, array + sizeof(array) / sizeof(array[0]));

    // 使用正向迭代器正向list中的元素
    // list<int>::iterator it = l.begin();   // C++98中语法
    auto it = l.begin();                     // C++11之后推荐写法
    while (it != l.end())
    {
        cout << *it << " "; //结果:1 2 3 4 5 6 7 8 9 0
        ++it;
    }
    cout << endl;

    // 使用反向迭代器逆向打印list中的元素
    // list<int>::reverse_iterator rit = l.rbegin();
    auto rit = l.rbegin();
    while (rit != l.rend())
    {
        cout << *rit << " "; //结果:0 9 8 7 6 5 4 3 2 1
        ++rit;
    }
    cout << endl;
}
注意:遍历链表只能用迭代器和范围for
3、list的元素访问接口
| 函数声明 | 说明 |
|---|---|
| empty | 检测list是否为空,是则返回true,否则返回false |
| size | 返回list中有效节点的个数 |
| front | 返回list的第一个节点中值的引用 |
| back | 返回list的最后一个节点中值的引用 |
4、list的调节器
| 函数声明 | 接口说名 |
|---|---|
| push_front | 在list首元素前插入值为val的元素 |
| pop_front | 删除list中第一个元素 |
| push_back | 在list尾部插入值为val的元素 |
| pop_back | 删除list中最后一个元素 |
| insert | 在list position 位置中插入值为val的元素 |
| erase | 删除list position位置的元素 |
| swap | 交换两个list中的元素 |
| clear | 清空list中的有效元素 |
插入与删除代码演示:
void TestList3()
{
    int array[] = { 1, 2, 3 };
    list<int> L(array, array + sizeof(array) / sizeof(array[0]));

    // 在list的尾部插入4,头部插入0
    L.push_back(4);
    L.push_front(0);
    PrintList(L);

    // 删除list尾部节点和头部节点
    L.pop_back();
    L.pop_front();
    PrintList(L); //结果:0 1 2 3 4
                  //     1 2 3
}
insert / erase代码演示:
void TestList4()
{
    int array1[] = { 1, 2, 3 };
    list<int> L(array1, array1 + sizeof(array1) / sizeof(array1[0]));

    // 获取链表中第二个节点
    auto pos = ++L.begin();
    cout << *pos << endl; //结果:2

    // 在pos前插入值为4的元素
    L.insert(pos, 4);
    PrintList(L); //结果:1 4 2 3

    // 在pos前插入5个值为5的元素
    L.insert(pos, 5, 5);
    PrintList(L); //结果:1 4 5 5 5 5 5 2 3

    // 在pos前插入[v.begin(), v.end)区间中的元素
    vector<int> v{ 7, 8, 9 };
    L.insert(pos, v.begin(), v.end());
    PrintList(L); //结果:1 4 5 5 5 5 5 7 8 9 2 3

    // 删除pos位置上的元素
    L.erase(pos);
    PrintList(L); //结果:1 4 5 5 5 5 5 7 8 9 3

    // 删除list中[begin, end)区间中的元素,即删除list中的所有元素
    L.erase(L.begin(), L.end());
    PrintList(L);
}
swap / clear代码演示:
void TestList5()
{
    // 用数组来构造list
    int array1[] = { 1, 2, 3 };
    list<int> l1(array1, array1 + sizeof(array1) / sizeof(array1[0]));
    PrintList(l1); //结果:1 2 3

    // 交换l1和l2中的元素
    list<int> l2;
    l1.swap(l2);
    PrintList(l1);
    PrintList(l2); //结果:1 2 3

    // 将l2中的元素清空
    l2.clear(); //结果:0
    cout << l2.size() << endl;
}
6、list的迭代器失效
迭代器失效即迭代器所指向的节点的无效,即该节点被删了。因为list的底层结果为带头节点的双向循环链表,因此在list中进行插入时是不会导致list的迭代器失效的,只有在删除时才会失效,并且失效的只是指向被删除节点的迭代器,其他迭代器不会受到影响。
实例:
void TestListIterator1()
{
    int array[] = { 1, 2, 3, 4, 5, 6, 7, 8, 9, 0 };
    list<int> l(array, array + sizeof(array) / sizeof(array[0]));
    auto it = l.begin();
    while (it != l.end())
    {
        // erase()函数执行后,it所指向的节点已被删除,
        //因此it无效,在下一次使用it时,必须先给其赋值
        l.erase(it);
        ++it;
    }
}
// 改正
void TestListIterator()
{
    int array[] = { 1, 2, 3, 4, 5, 6, 7, 8, 9, 0 };
    list<int> l(array, array + sizeof(array) / sizeof(array[0]));
    auto it = l.begin();
    while (it != l.end())
    {
        l.erase(it++); // it = l.erase(it);
    }
}
二、list的模拟实现及反向迭代器
1、模拟实现list
using namespace std;
namespace hxj
{
	// List的节点类
	template<class T>
	struct ListNode
	{
		ListNode(const T& val = T())
			: _prev(nullptr)
			, _next(nullptr)
			, _val(val)
		{}

		ListNode<T>* _prev;
		ListNode<T>* _next;
		T _val;
	};

	/*
	List 的迭代器
	迭代器有两种实现方式,具体应根据容器底层数据结构实现:
	  1. 原生态指针,比如:vector
	  2. 将原生态指针进行封装,因迭代器使用形式与指针完全相同,因此在自定义的类中必须实现以下方法:
		 1. 指针可以解引用,迭代器的类中必须重载operator*()
		 2. 指针可以通过->访问其所指空间成员,迭代器类中必须重载oprator->()
		 3. 指针可以++向后移动,迭代器类中必须重载operator++()与operator++(int)
			至于operator--()/operator--(int)释放需要重载,根据具体的结构来抉择,双向链表可以向前             移动,所以需要重载,如果是forward_list就不需要重载--
		 4. 迭代器需要进行是否相等的比较,因此还需要重载operator==()与operator!=()
	*/
	template<class T, class Ref, class Ptr>
	struct ListIterator
	{
		typedef ListNode<T> Node;
		typedef ListIterator<T, Ref, Ptr> Self;
		Node* _node;
		// 构造
		ListIterator(Node* node = nullptr)
			: _node(node)
		{}

		// 具有指针类似行为
		Ref operator*()
		{
			return _node->_val;
		}

		Ptr operator->()
		{
			return &(operator*());
		}

		// 迭代器支持移动
		Self& operator++()
		{
			_node = _node->_next;
			return *this;
		}

		Self operator++(int)
		{
			Self temp(*this);
			_node = _node->_next;
			return temp;
		}

		Self& operator--()
		{
			_node = _node->_prev;
			return *this;
		}

		Self operator--(int)
		{
			Self temp(*this);
			_node = _node->_prev;
			return temp;
		}

		// 迭代器支持比较
		bool operator!=(const Self& l)const
		{
			return _node != l._node;
		}

		bool operator==(const Self& l)const
		{
			return _node != l._node;
		}
	};

	template<class T>
	class list
	{
		typedef ListNode<T> Node;

	public:
		typedef ListIterator<T, T&, T*> iterator;
		typedef ListIterator<T, const T&, const T&> const_iterator;

		// List的构造
		list()
		{
			CreateHead();
		}

		list(int n, const T& value = T())
		{
			CreateHead();
			for (int i = 0; i < n; ++i)
				push_back(value);
		}

		template <class Iterator>
		list(Iterator first, Iterator last)
		{
			CreateHead();
			while (first != last)
			{
				push_back(*first);
				++first;
			}
		}

		list(const list<T>& l)
		{
			CreateHead();

			// 用l中的元素构造临时的temp,然后与当前对象交换
			list<T> temp(l.begin(), l.end());
			this->swap(temp);
		}

		list<T>& operator=(list<T> l)
		{
			this->swap(l);
			return *this;
		}

		~list()
		{
			clear();
			delete _head;
			_head = nullptr;
		}

		// List的迭代器
		iterator begin()
		{
			return iterator(_head->_next);
		}

		iterator end()
		{
			return iterator(_head);
		}

		const_iterator begin()const
		{
			return const_iterator(_head->_next);
		}

		const_iterator end()const
		{
			return const_iterator(_head);
		}

		// List的容量相关
		size_t size()const
		{
			Node* cur = _head->_next;
			size_t count = 0;
			while (cur != _head)
			{
				count++;
				cur = cur->_next;
			}

			return count;
		}

		bool empty()const
		{
			return _head->_next == _head;
		}

		void resize(size_t newsize, const T& data = T())
		{
			size_t oldsize = size();
			if (newsize <= oldsize)
			{
				// 有效元素个数减少到newsize
				while (newsize < oldsize)
				{
					pop_back();
					oldsize--;
				}
			}
			else
			{
				while (oldsize < newsize)
				{
					push_back(data);
					oldsize++;
				}
			}
		}

		// List的元素访问操作
		// 注意:List不支持operator[]
		T& front()
		{
			return _head->_next->_val;
		}

		const T& front()const
		{
			return _head->_next->_val;
		}

		T& back()
		{
			return _head->_prev->_val;
		}

		const T& back()const
		{
			return _head->_prev->_val;
		}


		// List的插入和删除
		void push_back(const T& val)
		{
			insert(end(), val);
		}

		void pop_back()
		{
			erase(--end());
		}

		void push_front(const T& val)
		{
			insert(begin(), val);
		}

		void pop_front()
		{
			erase(begin());
		}

		// 在pos位置前插入值为val的节点
		iterator insert(iterator pos, const T& val)
		{
			Node* pNewNode = new Node(val);
			Node* pCur = pos._node;
			// 先将新节点插入
			pNewNode->_prev = pCur->_prev;
			pNewNode->_next = pCur;
			pNewNode->_prev->_next = pNewNode;
			pCur->_prev = pNewNode;
			return iterator(pNewNode);
		}

		// 删除pos位置的节点,返回该节点的下一个位置
		iterator erase(iterator pos)
		{
			// 找到待删除的节点
			Node* pDel = pos._node;
			Node* pRet = pDel->_next;

			// 将该节点从链表中拆下来并删除
			pDel->_prev->_next = pDel->_next;
			pDel->_next->_prev = pDel->_prev;
			delete pDel;

			return iterator(pRet);
		}

		void clear()
		{
			Node* cur = _head->_next;

			// 采用头删除删除
			while (cur != _head)
			{
				_head->_next = cur->_next;
				delete cur;
				cur = _head->_next;
			}

			_head->_next = _head->_prev = _head;
		}

		void swap(hxj::list<T>& l)
		{
			std::swap(_head, l._head);
		}

	private:
		void CreateHead()
		{
			_head = new Node;
			_head->_prev = _head;
			_head->_next = _head;
		}
	private:
		Node* _head;
	};
}


// 对模拟实现的list进行测试
// 正向打印链表
template<class T>
void PrintList(const hxj::list<T>& l)
{
	auto it = l.begin();
	while (it != l.end())
	{
		cout << *it << " ";
		++it;
	}

	cout << endl;
}

// 测试List的构造
void TestBiteList1()
{
	hxj::list<int> l1;
	hxj::list<int> l2(10, 5);
	PrintList(l2);

	int array[] = { 1, 2, 3, 4, 5, 6, 7, 8, 9, 0 };
	hxj::list<int> l3(array, array + sizeof(array) / sizeof(array[0]));
	PrintList(l3);

	hxj::list<int> l4(l3);
	PrintList(l4);

	l1 = l4;
	PrintList(l1);
}

// PushBack()/PopBack()/PushFront()/PopFront()
void TestBiteList2()
{
	// 测试PushBack与PopBack
	hxj::list<int> l;
	l.push_back(1);
	l.push_back(2);
	l.push_back(3);
	PrintList(l);

	l.pop_back();
	l.pop_back();
	PrintList(l);

	l.pop_back();
	cout << l.size() << endl;

	// 测试PushFront与PopFront
	l.push_front(1);
	l.push_front(2);
	l.push_front(3);
	PrintList(l);

	l.pop_front();
	l.pop_front();
	PrintList(l);

	l.pop_front();
	cout << l.size() << endl;
}

// 测试insert和erase
void TestBiteList3()
{
	int array[] = { 1, 2, 3, 4, 5 };
	hxj::list<int> l(array, array + sizeof(array) / sizeof(array[0]));

	auto pos = l.begin();
	l.insert(l.begin(), 0);
	PrintList(l);

	++pos;
	l.insert(pos, 2);
	PrintList(l);

	l.erase(l.begin());
	l.erase(pos);
	PrintList(l);

	// pos指向的节点已经被删除,pos迭代器失效
	cout << *pos << endl;

	auto it = l.begin();
	while (it != l.end())
	{
		it = l.erase(it);
	}
	cout << l.size() << endl;
}
2、list的反向迭代器
反向迭代器的++就是正向迭代器的- -,反向迭代器的- -就是正向迭代器的++,因此反向迭代器的实现可以借助正向迭代器,即:反向迭代器内部可以包含一个正向迭代器,对正向迭代器的接口进行包装即可。
代码演示:
template<class Iterator, class Ref, class Ptr>
struct ReverseIterator
{
	typedef ReverseIterator<Iterator, Ref, Ptr> Self;
	Iterator _cur;

	ReverseIterator(Iterator it)
		:_cur(it)
	{}

	Ref operator*()
	{
		Iterator tmp = _cur;
		--tmp;
		return *tmp;
	}

	Self& operator++()
	{
		--_cur;
		return *this;
	}

	Self operator++(int) {
		Self temp(*this);
		--_it;
		return temp;
	}

	Self& operator--()
	{
		++_cur;
		return *this;
	}

	Self operator--(int)
	{
		Self temp(*this);
		++_it;
		return temp;
	}

	bool operator!=(const Self& l) const
	{
		return _cur != s._cur;
	}

	bool operator==(const Self& l) const
	{
		return _it != l._it;
	}
};
三、list和vector的比较
list和vector都是STL中常见的序列式容器,两个容器的底层结构不同,使其特性与运用场景也不相同:
| vector | list | |
|---|---|---|
| 底层结构 | 动态顺序表,一段连续空间 | 带头结点的双向循环链表 |
| 随机访问 | 支持随机访问,访问某个元素效率O(1) | 不支持随机访问,访问某个元素效率O(N) |
| 插入和删除 | 任意位置插入和删除效率低,需要搬移元素,时间复杂度为O(N),插入时有可能需要增容,增容:开辟新空间,拷贝元素,释放旧空间,导致效率更低 | 任意位置插入和删除效率高,不需要搬移元素,时间复杂度为O(1) |
| 空间利用率 | 底层为连续空间,不容易造成内存碎片,空间利用率高,缓存利用率高 | 底层节点动态开辟,小节点容易造成内存碎片,空间利用率低,缓存利用率低 |
| 迭代器 | 原生态指针 | 对原生态指针(节点指针)进行封装 |
| 迭代器失效 | 在插入元素时,要给所有的迭代器重新赋值,因为插入元素有可能会导致重新扩容,致使原来迭代器失效,删除时,当前迭代器需要重新赋值否则会失效 | 插入元素不会导致迭代器失效,删除元素时,只会导致当前迭代器失效,其他迭代器不受影响 |
| 使用场景 | 需要高效存储,支持随机访问,不关心插入删除效率 | 大量插入和删除操作,不关心随机访问 |