一、前言
“深入解析”对我来说的确有些难度,所以我尽量将我学习到和观察到的gtest内部实现介绍给大家。本文算是抛砖引玉吧,只能是对gtest的整体结构的一些介绍,想要了解更多细节最好的办法还是看gtest源码,如果你看过gtest源码,你会发现里面的注释非常的详细!好了,下面就开始了解gtest吧。
二、从TEST宏开始
前面的文章已经介绍过TEST宏的用法了,通过TEST宏,我们可以非法简单、方便的编写测试案例,比如:
TEST(FooTest, Demo)
{
EXPECT_EQ(1, 1);
}
我们先不去看TEST宏的定义,而是先使用/P参数将TEST展开。如果使用的是Vistual Studio的话:
1. 选中需要展开的代码文件,右键 - 属性 - C/C++ - Preprocessor
2. Generate Preprocessed File 设置 Without Line Numbers (/EP /P) 或 With Line Numbers (/P)
3. 关闭属性对话框,右键选中需要展开的文件,右键菜单中点击:Compile
编译过后,会在源代码目录生成一个后缀为.i的文件,比如我对上面的代码进行展开,展开后的内容为:

class FooTest_Demo_Test : public ::testing::Test
{
public:
FooTest_Demo_Test() {}
private:
virtual void TestBody();
static ::testing::TestInfo* const test_info_;
FooTest_Demo_Test(const FooTest_Demo_Test &);
void operator=(const FooTest_Demo_Test &);
};
::testing::TestInfo* const FooTest_Demo_Test
::test_info_ =
::testing::internal::MakeAndRegisterTestInfo(
"FooTest", "Demo", "", "",
(::testing::internal::GetTestTypeId()),
::testing::Test::SetUpTestCase,
::testing::Test::TearDownTestCase,
new ::testing::internal::TestFactoryImpl< FooTest_Demo_Test>);
void FooTest_Demo_Test::TestBody()
{
switch (0)
case 0:
if (const ::testing::AssertionResult
gtest_ar =
(::testing::internal:: EqHelper<(sizeof(::testing::internal::IsNullLiteralHelper(1)) == 1)>::Compare("1", "1", 1, 1)))
;
else
::testing::internal::AssertHelper(
::testing::TPRT_NONFATAL_FAILURE,
".\\gtest_demo.cpp",
9,
gtest_ar.failure_message()
) = ::testing::Message();
}

展开后,我们观察到:
1. TEST宏展开后,是一个继承自testing::Test的类。
2. 我们在TEST宏里面写的测试代码,其实是被放到了类的TestBody方法中。
3. 通过静态变量test_info_,调用MakeAndRegisterTestInfo对测试案例进行注册。
如下图:
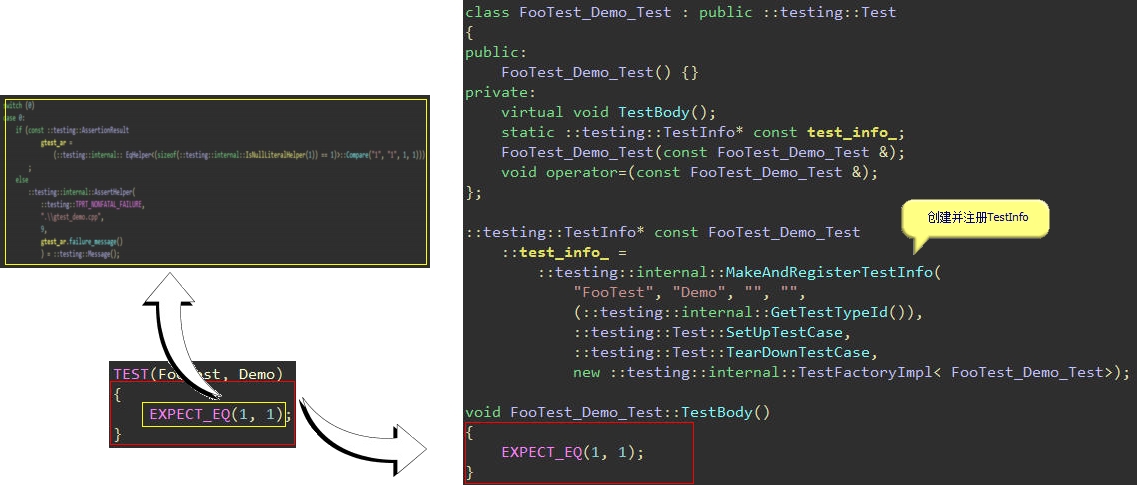
上面关键的方法就是MakeAndRegisterTestInfo了,我们跳到MakeAndRegisterTestInfo函数中:

// 创建一个 TestInfo 对象并注册到 Google Test;
// 返回创建的TestInfo对象
//
// 参数:
//
// test_case_name: 测试案例的名称
// name: 测试的名称
// test_case_comment: 测试案例的注释信息
// comment: 测试的注释信息
// fixture_class_id: test fixture类的ID
// set_up_tc: 事件函数SetUpTestCases的函数地址
// tear_down_tc: 事件函数TearDownTestCases的函数地址
// factory: 工厂对象,用于创建测试对象(Test)
TestInfo* MakeAndRegisterTestInfo(
const char* test_case_name, const char* name,
const char* test_case_comment, const char* comment,
TypeId fixture_class_id,
SetUpTestCaseFunc set_up_tc,
TearDownTestCaseFunc tear_down_tc,
TestFactoryBase* factory) {
TestInfo* const test_info =
new TestInfo(test_case_name, name, test_case_comment, comment,
fixture_class_id, factory);
GetUnitTestImpl()->AddTestInfo(set_up_tc, tear_down_tc, test_info);
return test_info;
}

我们看到,上面创建了一个TestInfo对象,然后通过AddTestInfo注册了这个对象。TestInfo对象到底是一个什么样的东西呢?
TestInfo对象主要用于包含如下信息:
1. 测试案例名称(testcase name)
2. 测试名称(test name)
3. 该案例是否需要执行
4. 执行案例时,用于创建Test对象的函数指针
5. 测试结果
我们还看到,TestInfo的构造函数中,非常重要的一个参数就是工厂对象,它主要负责在运行测试案例时创建出Test对象。我们看到我们上面的例子的factory为:
new ::testing::internal::TestFactoryImpl< FooTest_Demo_Test>
我们明白了,Test对象原来就是TEST宏展开后的那个类的对象(FooTest_Demo_Test),再看看TestFactoryImpl的实现:
template <class TestClass>
class TestFactoryImpl : public TestFactoryBase {
public:
virtual Test* CreateTest() { return new TestClass; }
};
这个对象工厂够简单吧,嗯,Simple is better。当我们需要创建一个测试对象(Test)时,调用factory的CreateTest()方法就可以了。
创建了TestInfo对象后,再通过下面的方法对TestInfo对象进行注册:
GetUnitTestImpl()->AddTestInfo(set_up_tc, tear_down_tc, test_info);
GetUnitTestImpl()是获取UnitTestImpl对象:
inline UnitTestImpl* GetUnitTestImpl() {
return UnitTest::GetInstance()->impl();
}
其中UnitTest是一个单件(Singleton),整个进程空间只有一个实例,通过UnitTest::GetInstance()获取单件的实例。上面的代码看到,UnitTestImpl对象是最终是从UnitTest对象中获取的。那么UnitTestImpl到底是一个什么样的东西呢?可以这样理解:
UnitTestImpl是一个在UnitTest内部使用的,为执行单元测试案例而提供了一系列实现的那么一个类。(自己归纳的,可能不准确)
我们上面的AddTestInfo就是其中的一个实现,负责注册TestInfo实例:

// 添加TestInfo对象到整个单元测试中
//
// 参数:
//
// set_up_tc: 事件函数SetUpTestCases的函数地址
// tear_down_tc: 事件函数TearDownTestCases的函数地址
// test_info: TestInfo对象
void AddTestInfo(Test::SetUpTestCaseFunc set_up_tc,
Test::TearDownTestCaseFunc tear_down_tc,
TestInfo * test_info) {
// 处理死亡测试的代码,先不关注它
if (original_working_dir_.IsEmpty()) {
original_working_dir_.Set(FilePath::GetCurrentDir());
if (original_working_dir_.IsEmpty()) {
printf("%s\n", "Failed to get the current working directory.");
abort();
}
}
// 获取或创建了一个TestCase对象,并将testinfo添加到TestCase对象中。
GetTestCase(test_info->test_case_name(),
test_info->test_case_comment(),
set_up_tc,
tear_down_tc)->AddTestInfo(test_info);
}

我们看到,TestCase对象出来了,并通过AddTestInfo添加了一个TestInfo对象。这时,似乎豁然开朗了:
1. TEST宏中的两个参数,第一个参数testcase_name,就是TestCase对象的名称,第二个参数test_name就是Test对象的名称。而TestInfo包含了一个测试案例的一系列信息。
2. 一个TestCase对象对应一个或多个TestInfo对象。
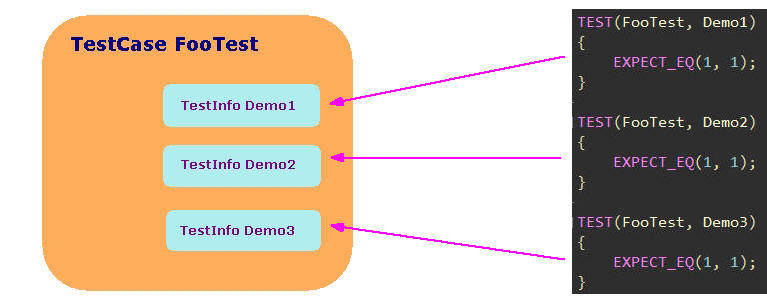
我们来看看TestCase的创建过程(UnitTestImpl::GetTestCase):

// 查找并返回一个指定名称的TestCase对象。如果对象不存在,则创建一个并返回
//
// 参数:
//
// test_case_name: 测试案例名称
// set_up_tc: 事件函数SetUpTestCases的函数地址
// tear_down_tc: 事件函数TearDownTestCases的函数地址
TestCase* UnitTestImpl::GetTestCase(const char* test_case_name,
const char* comment,
Test::SetUpTestCaseFunc set_up_tc,
Test::TearDownTestCaseFunc tear_down_tc) {
// 从test_cases里查找指定名称的TestCase
internal::ListNode<TestCase*>* node = test_cases_.FindIf(
TestCaseNameIs(test_case_name));
if (node == NULL) {
// 没找到,我们来创建一个
TestCase* const test_case =
new TestCase(test_case_name, comment, set_up_tc, tear_down_tc);
// 判断是否为死亡测试案例
if (internal::UnitTestOptions::MatchesFilter(String(test_case_name),
kDeathTestCaseFilter)) {
// 是的话,将该案例插入到最后一个死亡测试案例后
node = test_cases_.InsertAfter(last_death_test_case_, test_case);
last_death_test_case_ = node;
} else {
// 否则,添加到test_cases最后。
test_cases_.PushBack(test_case);
node = test_cases_.Last();
}
}
// 返回TestCase对象
return node->element();
}

三、回过头看看TEST宏的定义
#define TEST(test_case_name, test_name)\
GTEST_TEST_(test_case_name, test_name, \
::testing::Test, ::testing::internal::GetTestTypeId())
同时也看看TEST_F宏
#define TEST_F(test_fixture, test_name)\
GTEST_TEST_(test_fixture, test_name, test_fixture, \
::testing::internal::GetTypeId<test_fixture>())
都是使用了GTEST_TEST_宏,在看看这个宏如何定义的:

#define GTEST_TEST_(test_case_name, test_name, parent_class, parent_id)\
class GTEST_TEST_CLASS_NAME_(test_case_name, test_name) : public parent_class {\
public:\
GTEST_TEST_CLASS_NAME_(test_case_name, test_name)() {}\
private:\
virtual void TestBody();\
static ::testing::TestInfo* const test_info_;\
GTEST_DISALLOW_COPY_AND_ASSIGN_(\
GTEST_TEST_CLASS_NAME_(test_case_name, test_name));\
};\
\
::testing::TestInfo* const GTEST_TEST_CLASS_NAME_(test_case_name, test_name)\
::test_info_ =\
::testing::internal::MakeAndRegisterTestInfo(\
#test_case_name, #test_name, "", "", \
(parent_id), \
parent_class::SetUpTestCase, \
parent_class::TearDownTestCase, \
new ::testing::internal::TestFactoryImpl<\
GTEST_TEST_CLASS_NAME_(test_case_name, test_name)>);\
void GTEST_TEST_CLASS_NAME_(test_case_name, test_name)::TestBody()

不需要多解释了,和我们上面展开看到的差不多,不过这里比较明确的看到了,我们在TEST宏里写的就是TestBody里的东西。这里再补充说明一下里面的GTEST_DISALLOW_COPY_AND_ASSIGN_宏,我们上面的例子看出,这个宏展开后:
FooTest_Demo_Test(const FooTest_Demo_Test &);
void operator=(const FooTest_Demo_Test &);
正如这个宏的名字一样,它是用于防止对对象进行拷贝和赋值操作的。
四、再来了解RUN_ALL_TESTS宏
我们的测试案例的运行就是通过这个宏发起的。RUN_ALL_TEST的定义非常简单:
#define RUN_ALL_TESTS()\
(::testing::UnitTest::GetInstance()->Run())
我们又看到了熟悉的::testing::UnitTest::GetInstance(),看来案例的执行时从UnitTest的Run方法开始的,我提取了一些Run中的关键代码,如下:

int UnitTest::Run() {
__try {
return impl_->RunAllTests();
} __except(internal::UnitTestOptions::GTestShouldProcessSEH(
GetExceptionCode())) {
printf("Exception thrown with code 0x%x.\nFAIL\n", GetExceptionCode());
fflush(stdout);
return 1;
}
return impl_->RunAllTests();
}

我们又看到了熟悉的impl(UnitTestImpl),具体案例该怎么执行,还是得靠UnitTestImpl。

int UnitTestImpl::RunAllTests() {
// ...
printer->OnUnitTestStart(parent_);
// 计时
const TimeInMillis start = GetTimeInMillis();
printer->OnGlobalSetUpStart(parent_);
// 执行全局的SetUp事件
environments_.ForEach(SetUpEnvironment);
printer->OnGlobalSetUpEnd(parent_);
// 全局的SetUp事件执行成功的话
if (!Test::HasFatalFailure()) {
// 执行每个测试案例
test_cases_.ForEach(TestCase::RunTestCase);
}
// 执行全局的TearDown事件
printer->OnGlobalTearDownStart(parent_);
environments_in_reverse_order_.ForEach(TearDownEnvironment);
printer->OnGlobalTearDownEnd(parent_);
elapsed_time_ = GetTimeInMillis() - start;
// 执行完成
printer->OnUnitTestEnd(parent_);
// Gets the result and clears it.
if (!Passed()) {
failed = true;
}
ClearResult();
// 返回测试结果
return failed ? 1 : 0;
}

上面,我们很开心的看到了我们前面讲到的全局事件的调用。environments_是一个Environment的链表结构(List),它的内容是我们在main中通过:
testing::AddGlobalTestEnvironment(new FooEnvironment);
添加进去的。test_cases_我们之前也了解过了,是一个TestCase的链表结构(List)。gtest实现了一个链表,并且提供了一个Foreach方法,迭代调用某个函数,并将里面的元素作为函数的参数:

template <typename F> // F is the type of the function/functor
void ForEach(F functor) const {
for ( const ListNode<E> * node = Head();
node != NULL;
node = node->next() ) {
functor(node->element());
}
}

因此,我们关注一下:environments_.ForEach(SetUpEnvironment),其实是迭代调用了SetUpEnvironment函数:
static void SetUpEnvironment(Environment* env) { env->SetUp(); }
最终调用了我们定义的SetUp()函数。
再看看test_cases_.ForEach(TestCase::RunTestCase)的TestCase::RunTestCase实现:
static void RunTestCase(TestCase * test_case) { test_case->Run(); }
再看TestCase的Run实现:

void TestCase::Run() {
if (!should_run_) return;
internal::UnitTestImpl* const impl = internal::GetUnitTestImpl();
impl->set_current_test_case(this);
UnitTestEventListenerInterface * const result_printer =
impl->result_printer();
result_printer->OnTestCaseStart(this);
impl->os_stack_trace_getter()->UponLeavingGTest();
// 哈!SetUpTestCases事件在这里调用
set_up_tc_();
const internal::TimeInMillis start = internal::GetTimeInMillis();
// 嗯,前面分析的一个TestCase对应多个TestInfo,因此,在这里迭代对TestInfo调用RunTest方法
test_info_list_->ForEach(internal::TestInfoImpl::RunTest);
elapsed_time_ = internal::GetTimeInMillis() - start;
impl->os_stack_trace_getter()->UponLeavingGTest();
// TearDownTestCases事件在这里调用
tear_down_tc_();
result_printer->OnTestCaseEnd(this);
impl->set_current_test_case(NULL);
}

第二种事件机制又浮出我们眼前,非常兴奋。可以看出,SetUpTestCases和TearDownTestCaess是在一个TestCase之前和之后调用的。接着看test_info_list_->ForEach(internal::TestInfoImpl::RunTest):
static void RunTest(TestInfo * test_info) {
test_info->impl()->Run();
}
哦?TestInfo也有一个impl?看来我们之前漏掉了点东西,和UnitTest很类似,TestInfo内部也有一个主管各种实现的类,那就是TestInfoImpl,它在TestInfo的构造函数中创建了出来(还记得前面讲的TestInfo的创建过程吗?):

TestInfo::TestInfo(const char* test_case_name,
const char* name,
const char* test_case_comment,
const char* comment,
internal::TypeId fixture_class_id,
internal::TestFactoryBase* factory) {
impl_ = new internal::TestInfoImpl(this, test_case_name, name,
test_case_comment, comment,
fixture_class_id, factory);
}

因此,案例的执行还得看TestInfoImpl的Run()方法,同样,我简化一下,只列出关键部分的代码:

void TestInfoImpl::Run() {
// ...
UnitTestEventListenerInterface* const result_printer =
impl->result_printer();
result_printer->OnTestStart(parent_);
// 开始计时
const TimeInMillis start = GetTimeInMillis();
Test* test = NULL;
__try {
// 我们的对象工厂,使用CreateTest()生成Test对象
test = factory_->CreateTest();
} __except(internal::UnitTestOptions::GTestShouldProcessSEH(
GetExceptionCode())) {
AddExceptionThrownFailure(GetExceptionCode(),
"the test fixture's constructor");
return;
}
// 如果Test对象创建成功
if (!Test::HasFatalFailure()) {
// 调用Test对象的Run()方法,执行测试案例
test->Run();
}
// 执行完毕,删除Test对象
impl->os_stack_trace_getter()->UponLeavingGTest();
delete test;
test = NULL;
// 停止计时
result_.set_elapsed_time(GetTimeInMillis() - start);
result_printer->OnTestEnd(parent_);
}

上面看到了我们前面讲到的对象工厂fatory,通过fatory的CreateTest()方法,创建Test对象,然后执行案例又是通过Test对象的Run()方法:

void Test::Run() {
if (!HasSameFixtureClass()) return;
internal::UnitTestImpl* const impl = internal::GetUnitTestImpl();
impl->os_stack_trace_getter()->UponLeavingGTest();
__try {
// Yeah!每个案例的SetUp事件在这里调用
SetUp();
} __except(internal::UnitTestOptions::GTestShouldProcessSEH(
GetExceptionCode())) {
AddExceptionThrownFailure(GetExceptionCode(), "SetUp()");
}
// We will run the test only if SetUp() had no fatal failure.
if (!HasFatalFailure()) {
impl->os_stack_trace_getter()->UponLeavingGTest();
__try {
// 哈哈!!千辛万苦,我们定义在TEST宏里的东西终于被调用了!
TestBody();
} __except(internal::UnitTestOptions::GTestShouldProcessSEH(
GetExceptionCode())) {
AddExceptionThrownFailure(GetExceptionCode(), "the test body");
}
}
impl->os_stack_trace_getter()->UponLeavingGTest();
__try {
// 每个案例的TearDown事件在这里调用
TearDown();
} __except(internal::UnitTestOptions::GTestShouldProcessSEH(
GetExceptionCode())) {
AddExceptionThrownFailure(GetExceptionCode(), "TearDown()");
}
}

上面的代码里非常极其以及特别的兴奋的看到了执行测试案例的前后事件,测试案例执行TestBody()的代码。仿佛整个gtest的流程在眼前一目了然了。
四、总结
本文通过分析TEST宏和RUN_ALL_TEST宏,了解到了整个gtest运作过程,可以说整个过程简洁而优美。之前读《代码之美》,感触颇深,现在读过gtest代码,再次让我感触深刻。记得很早前,我对设计的理解是“功能越强大越好,设计越复杂越好,那样才显得牛”,渐渐得,我才发现,简单才是最好。我曾总结过自己写代码的设计原则:功能明确,设计简单。了解了gtest代码后,猛然发现gtest不就是这样吗,同时gtest也给了我很多惊喜,因此,我对gtest的评价是:功能强大,设计简单,使用方便。
总结一下gtest里的几个关键的对象:
1. UnitTest 单例,总管整个测试,包括测试环境信息,当前执行状态等等。
2. UnitTestImpl UnitTest内部具体功能的实现者。
3. Test 我们自己编写的,或通过TEST,TEST_F等宏展开后的Test对象,管理着测试案例的前后事件,具体的执行代码TestBody。
4. TestCase 测试案例对象,管理着基于TestCase的前后事件,管理内部多个TestInfo。
5. TestInfo 管理着测试案例的基本信息,包括Test对象的创建方法。
6. TestInfoImpl TestInfo内部具体功能的实现者 。
本文还有很多gtest的细节没有分析到,比如运行参数,死亡测试,跨平台处理,断言的宏等等,希望读者自己把源码下载下来慢慢研究。如本文有错误之处,也请大家指出,谢谢!
系列链接:
1.玩转Google开源C++单元测试框架Google Test系列(gtest)之一 - 初识gtest
2.玩转Google开源C++单元测试框架Google Test系列(gtest)之二 - 断言
3.玩转Google开源C++单元测试框架Google Test系列(gtest)之三 - 事件机制
4.玩转Google开源C++单元测试框架Google Test系列(gtest)之四 - 参数化
5.玩转Google开源C++单元测试框架Google Test系列(gtest)之五 - 死亡测试
6.玩转Google开源C++单元测试框架Google Test系列(gtest)之六 - 运行参数
7.玩转Google开源C++单元测试框架Google Test系列(gtest)之七 - 深入解析gtest
8.玩转Google开源C++单元测试框架Google Test系列(gtest)之八 - 打造自己的单元测试框架
