准备工作
准备一个空的SpringBoot项目
写入依赖
<dependency>
    <groupId>org.springframework.boot</groupId>
    <artifactId>spring-boot-starter-data-elasticsearch</artifactId>
</dependency>
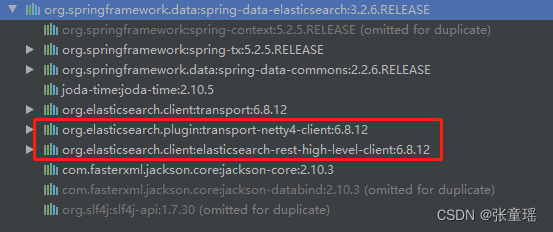
注意你的SpringBoot和你的es版本,一定要对应,如果不知道的可以查看这篇文章:https://blog.csdn.net/u014641168/article/details/130386872
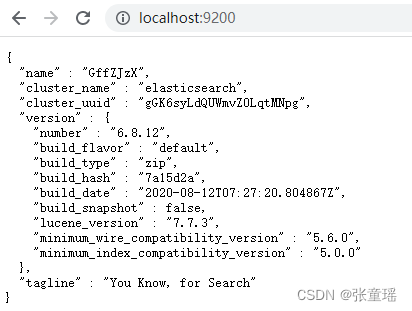
我的版本是2.2.6,所以用的ES版本是 6.8.12,安装es请看这篇文章:https://blog.csdn.net/u014641168/article/details/130622430

查看ES版本
配置
创建ES配置文件,下面有2个Bean,一个是你的ES有账号密码的,另一个默认是没有的。
package cn.ityao.es.config;

import org.apache.http.HttpHost;
import org.apache.http.auth.AuthScope;
import org.apache.http.auth.UsernamePasswordCredentials;
import org.apache.http.client.CredentialsProvider;
import org.apache.http.impl.client.BasicCredentialsProvider;
import org.apache.http.impl.nio.client.HttpAsyncClientBuilder;
import org.elasticsearch.client.RestClient;
import org.elasticsearch.client.RestHighLevelClient;
import org.springframework.beans.factory.annotation.Value;
import org.springframework.context.annotation.Bean;
import org.springframework.context.annotation.Configuration;

/**
 * @Author tongyao
 */
@Configuration
public class ElasticsearchConfig {
    @Value("${elasticsearch.port}")
    private int port;

    @Value("${elasticsearch.ip}")
    private String ip;

    @Value("${elasticsearch.username}")
    private String username;

    @Value("${elasticsearch.password}")
    private String password;

    /**
     * 创建带HTTP Basic Auth认证rest客户端
     */
    @Bean
    public RestHighLevelClient restHighLevelClient() {
        CredentialsProvider credentialsProvider = new BasicCredentialsProvider();
        credentialsProvider.setCredentials(AuthScope.ANY, new UsernamePasswordCredentials(username, password));
        return new RestHighLevelClient(RestClient.builder(
                new HttpHost[]{
                    new HttpHost(ip, port, "http")
                }).setHttpClientConfigCallback((HttpAsyncClientBuilder httpAsyncClientBuilder) -> httpAsyncClientBuilder.setDefaultCredentialsProvider(credentialsProvider)));
    }

    //不带用户名密码验证
    //@Bean
    public RestHighLevelClient restClient() {
        return new RestHighLevelClient(RestClient.builder(new HttpHost[]{
                new HttpHost(ip, port, "http")
        }));
    }
}
yml配置文件内容
server:
  # 服务端口
  port: 9990

elasticsearch:
  port: 9200
  ip: 127.0.0.1
  username: elastic
  password: 123456


# 查看es信息时需要的序列化
spring:
  jackson:
    serialization:
      FAIL_ON_EMPTY_BEANS: false
注入依赖
在controller下注入依赖
@Autowired
private RestHighLevelClient restHighLevelClient;
对索引的CURD
1、创建索引
/**
 * 创建索引
 *
 * @return
 * @throws IOException
 */
@GetMapping("/createIndex")
public Object createIndex() throws IOException {
	//1.创建索引请求
	CreateIndexRequest request = new CreateIndexRequest("testindex");
	//2.客户端执行请求IndicesClient,执行create方法创建索引,请求后获得响应
	CreateIndexResponse response =
			restHighLevelClient.indices().create(request, RequestOptions.DEFAULT);
	return response;
}

可以看到已经添加成功了,但是一定注意,索引名称,一定要小写!
2、查询索引
/**
 * 查询索引
 *
 * @return
 * @throws IOException
 */
@GetMapping("/searchIndex")
public Object searchIndex() throws IOException {
	//1.查询索引请求
	GetIndexRequest request = new GetIndexRequest("testindex");
	//2.执行exists方法判断是否存在
	boolean exists = restHighLevelClient.indices().exists(request, RequestOptions.DEFAULT);
	return exists;
}
3、删除索引
/**
 * 删除索引
 *
 * @return
 * @throws IOException
 */
@GetMapping("delIndex")
public Object delIndex() throws IOException {
	//1.删除索引请求
	DeleteIndexRequest request = new DeleteIndexRequest("testindex");
	//执行delete方法删除指定索引
	AcknowledgedResponse delete = restHighLevelClient.indices().delete(request, RequestOptions.DEFAULT);
	return delete.isAcknowledged();
}
对文档的CRUD
1、新增文档
注意:如果添加时不指定文档ID,他就会随机生成一个ID,ID唯一。
/**
 * 新增文档
 *
 * @return
 * @throws IOException
 */
@GetMapping("/add")
public Object add() throws IOException {
	//1.创建对象
	User user = new User("张三", 21);
	//2.创建请求(索引的名字)
	IndexRequest request = new IndexRequest("indexdocument");
	//3.设置规则 PUT /ljx666/_doc/1
	//设置文档id=6,设置超时=1s等,不设置会使用默认的
	//同时支持链式编程如 request.id("6").timeout("1s");
	request.id("6");
	// 指定要写入的 Index
	request.type("_doc");
	/*request.index("test");*/
	/*request.timeout(TimeValue.timeValueSeconds(1));*/
	request.timeout("1s");

	//4.将数据放入请求,要将对象转化为json格式
	//XContentType.JSON,告诉它传的数据是JSON类型
	request.source(JSON.toJSONString(user), XContentType.JSON);

	//5.客户端发送请求,获取响应结果
	IndexResponse indexResponse = restHighLevelClient.index(request, RequestOptions.DEFAULT);
	System.out.println(indexResponse.toString());
	System.out.println(indexResponse.status());
	return indexResponse;
}
2、查询文档中的数据
/**
 * 获取文档中的数据
 *
 * @return
 * @throws IOException
 */
@GetMapping("/get")
public Object get() throws IOException {
	//1.创建请求,指定索引、文档id(索引的名字)
	GetRequest request = new GetRequest("indexdocument").id("6").type("_doc");
	GetResponse getResponse = restHighLevelClient.get(request, RequestOptions.DEFAULT);
	System.out.println(getResponse);//获取响应结果
	//getResponse.getSource() 返回的是Map集合
	System.out.println(getResponse.getSourceAsString());//获取响应结果source中内容,转化为字符串
	return getResponse;
}
3、更新文档中的数据
注意:需要将User对象中的属性全部指定值,不然会被设置为空,如User只设置了名称,那么只有名称会被修改成功,其他会被修改为null。
/**
 * 更新文档数据
 *
 * @return
 * @throws IOException
 */
@GetMapping("/update")
public Object update() throws IOException {
	//1.创建请求,指定索引、文档id(索引的名字)
	UpdateRequest request = new UpdateRequest("indexdocument","_doc","6");

	User user = new User("小明", 21);
	//将创建的对象放入文档中
	request.doc(JSON.toJSONString(user), XContentType.JSON);
	UpdateResponse updateResponse = restHighLevelClient.update(request, RequestOptions.DEFAULT);
	System.out.println(updateResponse.status());//更新成功返回OK
	return updateResponse;
}
3、删除文档中的数据
/**
 * 删除文档数据
 *
 * @return
 * @throws IOException
 */
@GetMapping("/delete")
public Object delete() throws IOException {
	//1.创建删除文档请求
	DeleteRequest request = new DeleteRequest("indexdocument").id("6").type("_doc");
	DeleteResponse deleteResponse = restHighLevelClient.delete(request, RequestOptions.DEFAULT);
	System.out.println(deleteResponse.status());//更新成功返回OK
	return deleteResponse;
}
4、批量新增文档中的数据
/**
 * 批量新增文档数据
 *
 * @return
 * @throws IOException
 */
@GetMapping("/addBatch")
public Object addBatch() throws IOException {
	BulkRequest bulkRequest = new BulkRequest();
	//设置超时
	bulkRequest.timeout("10s");

	List<User> list = new ArrayList<>();
	list.add(new User("李四", 25));
	list.add(new User("王五", 18));
	list.add(new User("赵六", 30));
	list.add(new User("田七", 26));
	list.add(new User("刘八", 20));

	int id = 1;
	//批量处理请求
	for (User user : list) {
		//不设置id会生成随机id
		bulkRequest.add(new IndexRequest("indexdocument")
				.id("" + (id++))
				.type("_doc")
				.source(JSON.toJSONString(user), XContentType.JSON));
	}

	BulkResponse bulkResponse = restHighLevelClient.bulk(bulkRequest, RequestOptions.DEFAULT);
	System.out.println(bulkResponse.hasFailures());//是否执行失败,false为执行成功
	return bulkResponse;
}
5、询所有、模糊查询、分页查询、排序、高亮显示
/**
 * 复杂的es查询
 * @return
 * @throws IOException
 */
@GetMapping("test")
public Object test() throws IOException {
	SearchRequest searchRequest = new SearchRequest("indexdocument");//里面可以放多个索引
	SearchSourceBuilder sourceBuilder = new SearchSourceBuilder();//构造搜索条件
	//此处可以使用QueryBuilders工具类中的方法
	//1.查询所有
	sourceBuilder.query(QueryBuilders.matchAllQuery());
	//2.查询name中含有Java的
	sourceBuilder.query(QueryBuilders.multiMatchQuery("张三", "name"));
	//3.分页查询
	sourceBuilder.from(0).size(5);
	//4.按照score正序排列
	sourceBuilder.sort(SortBuilders.scoreSort().order(SortOrder.ASC));
	//5.按照id倒序排列(score会失效返回NaN)
	sourceBuilder.sort(SortBuilders.fieldSort("_id").order(SortOrder.DESC));
	//6.给指定字段加上指定高亮样式
	HighlightBuilder highlightBuilder = new HighlightBuilder();
	highlightBuilder.field("name").preTags("<span style='color:red;'>").postTags("</span>");
	sourceBuilder.highlighter(highlightBuilder);
	searchRequest.source(sourceBuilder);
	SearchResponse searchResponse = restHighLevelClient.search(searchRequest, RequestOptions.DEFAULT);
	//获取总条数
	System.out.println(searchResponse.getHits().getTotalHits());
	//输出结果数据(如果不设置返回条数,大于10条默认只返回10条)
	SearchHit[] hits = searchResponse.getHits().getHits();
	for (SearchHit hit : hits) {
		System.out.println("分数:" + hit.getScore());
		Map<String, Object> source = hit.getSourceAsMap();
		System.out.println("index->" + hit.getIndex());
		System.out.println("id->" + hit.getId());
		for (Map.Entry<String, Object> s : source.entrySet()) {
			System.out.println(s.getKey() + "--" + s.getValue());
		}
	}
	return searchResponse;
}
总结
1.大致流程
创建对应的请求 --> 设置请求(添加规则,添加数据等) --> 执行对应的方法(传入请求,默认请求选项)–> 接收响应结果(执行方法返回值)–> 输出响应结果中需要的数据(source,status等)
2.注意事项
如果不指定id,会自动生成一个随机id
正常情况下,不应该这样使用new IndexRequest(“indexName”),如果索引发生改变了,那么代码都需要修改,可以定义一个枚举类或者一个专门存放常量的类,将变量用final static等进行修饰,并指定索引值。其他地方引用该常量即可,需要修改也只需修改该类即可。
elasticsearch相关的东西,版本都必须一致,不然会报错
elasticsearch很消耗内存,建议在内存较大的服务器上运行elasticsearch,否则会因为内存不足导致elasticsearch自动killed
文章参考:https://blog.csdn.net/zhiyikeji/article/details/128902860


