目录
一、说明
二、创建 ansible 环境
三、实验操作
四、install_ansible.sh 脚本内容
一、说明
该文档是日常经常使用的模板,通过该例子让更多的初学者了解ansible 剧本的写法,很多情况,可以按照该模版来套用即可。
读者不需要下载或者复制全部内容,直接下载或者复制 install_ansible.sh 脚本文件即可,该脚本文件会自动安装ansible ,以及创建 ansible roles 结构和测试文件。
roles用例,自动生成用安装redis、nginx以及httpd为例子的 roles 文件。以及使用了以下的常用功能:
- 通过 role 角色来执行不同的类型的剧本
- 剧本引用了自定义变量以及内置的 setup模块变量
- 剧本使用注册变量,输出部分debug返回值
- 使用COPY和template模块,更好比较两者区别
- 剧本 task 文件导入其他task文件的方法
- 剧本使用 触发器效果的功能 notify 和 handler
- 主机清单变量和剧本变量两种写法的区别
- template模块 Jinja2 常用语句写法,条件控制等
- 剧本里面使用循环的用法
ansible日常开发和使用,还会用到 when 判断等指令,可能还是根据不同的 task 使用不同的tags 标签,方便后续根据 tags 执行指定部分的内容 ,读者还可以 自行 比较 vars 和 vars_files的区别、以及多种include 的区别:如:include 、include_tasks 、include_roles等;要巧用模块帮助命令:ansible-doc
注意:执行 install_ansible.sh 脚本后,一定要记得修改当前目录生成的 hosts 文件内容:将ansible主机清单以及账号信息等内容修改成你自己的信息
二、创建 ansible 环境
1.下载或者复制 install_ansible.sh 脚本 到你的测试环境,并执行改脚本:
# 执行 install_ansible.sh 脚本;
# 确保你的服务器要能正常访问公网

chmod a+x install_ansible.sh
sh install_ansible.sh
2. 执行完成 install_ansible.sh 后,你不但已完成安装 ansible,还完成了 测试环境构建;执行脚本后生成的环境结构如下:

3. 执行完成 install_ansible.sh 脚本后,根据提示即可完成测试

三、实验操作
1、执行 测试命令
ansible-playbook -i hosts test.yaml -C[root@192 test]# ansible-playbook -i hosts test.yaml -C
PLAY [first palybook] *******************************************************************************************************************************************************
TASK [Gathering Facts] ******************************************************************************************************************************************************
ok: [192.168.51.140]
TASK [test : install apps] **************************************************************************************************************************************************
[DEPRECATION WARNING]: Invoking "yum" only once while using a loop via squash_actions is deprecated. Instead of using a loop to supply multiple items and specifying `name:
"{{ item }}"`, please use `name: ['nginx', 'redis', 'httpd']` and remove the loop. This feature will be removed in version 2.11. Deprecation warnings can be disabled by
setting deprecation_warnings=False in ansible.cfg.
changed: [192.168.51.140] => (item=[u'nginx', u'redis', u'httpd'])
TASK [test : copy nginx.conf] ***********************************************************************************************************************************************
changed: [192.168.51.140]
TASK [test : template for redis.conf] ***************************************************************************************************************************************
changed: [192.168.51.140]
TASK [test : template for httpd.con] ****************************************************************************************************************************************
changed: [192.168.51.140]
TASK [test : start apps] ****************************************************************************************************************************************************
changed: [192.168.51.140] => (item=nginx)
changed: [192.168.51.140] => (item=redis)
changed: [192.168.51.140] => (item=httpd)
TASK [test : 引用定义在主机清单的变量] **************************************************************************************************************************************************
ok: [192.168.51.140] => {
"msg": "mytesthost.com"
}
TASK [test : 引用定义在vars目录文件的变量] **********************************************************************************************************************************************
ok: [192.168.51.140] => {
"msg": "myhost1.com.cn"
}
TASK [test_ext 引用其他的tasks文件] ************************************************************************************************************************************************
included: /root/test/roles/test/tasks/mytest.yaml for 192.168.51.140
TASK [test : ping server for ext tasks] *************************************************************************************************************************************
ok: [192.168.51.140]
TASK [test : ping stdout ext task] ******************************************************************************************************************************************
ok: [192.168.51.140] => {
"out": {
"changed": false,
"failed": false,
"ping": "pong"
}
}
RUNNING HANDLER [test : restart nginx] **************************************************************************************************************************************
changed: [192.168.51.140]
RUNNING HANDLER [test : restart redis] **************************************************************************************************************************************
changed: [192.168.51.140]
RUNNING HANDLER [test : restart httpd] **************************************************************************************************************************************
changed: [192.168.51.140]
PLAY RECAP ******************************************************************************************************************************************************************
192.168.51.140 : ok=14 changed=8 unreachable=0 failed=0 skipped=0 rescued=0 ignored=0
[root@192 test]# 2. 执行 剧本
ansible-playbook -i hosts test.yaml[root@192 test]#
[root@192 test]# ansible-playbook -i hosts test.yaml
PLAY [first palybook] *******************************************************************************************************************************************************
TASK [Gathering Facts] ******************************************************************************************************************************************************
ok: [192.168.51.140]
TASK [test : install apps] **************************************************************************************************************************************************
[DEPRECATION WARNING]: Invoking "yum" only once while using a loop via squash_actions is deprecated. Instead of using a loop to supply multiple items and specifying `name:
"{{ item }}"`, please use `name: ['nginx', 'redis', 'httpd']` and remove the loop. This feature will be removed in version 2.11. Deprecation warnings can be disabled by
setting deprecation_warnings=False in ansible.cfg.
changed: [192.168.51.140] => (item=[u'nginx', u'redis', u'httpd'])
TASK [test : copy nginx.conf] ***********************************************************************************************************************************************
changed: [192.168.51.140]
TASK [test : template for redis.conf] ***************************************************************************************************************************************
changed: [192.168.51.140]
TASK [test : template for httpd.con] ****************************************************************************************************************************************
changed: [192.168.51.140]
TASK [test : start apps] ****************************************************************************************************************************************************
changed: [192.168.51.140] => (item=nginx)
changed: [192.168.51.140] => (item=redis)
changed: [192.168.51.140] => (item=httpd)
TASK [test : 引用定义在主机清单的变量] **************************************************************************************************************************************************
ok: [192.168.51.140] => {
"msg": "mytesthost.com"
}
TASK [test : 引用定义在vars目录文件的变量] **********************************************************************************************************************************************
ok: [192.168.51.140] => {
"msg": "myhost1.com.cn"
}
TASK [test_ext 引用其他的tasks文件] ************************************************************************************************************************************************
included: /root/test/roles/test/tasks/mytest.yaml for 192.168.51.140
TASK [test : ping server for ext tasks] *************************************************************************************************************************************
ok: [192.168.51.140]
TASK [test : ping stdout ext task] ******************************************************************************************************************************************
ok: [192.168.51.140] => {
"out": {
"changed": false,
"failed": false,
"ping": "pong"
}
}
RUNNING HANDLER [test : restart nginx] **************************************************************************************************************************************
changed: [192.168.51.140]
RUNNING HANDLER [test : restart redis] **************************************************************************************************************************************
changed: [192.168.51.140]
RUNNING HANDLER [test : restart httpd] **************************************************************************************************************************************
changed: [192.168.51.140]
PLAY RECAP ******************************************************************************************************************************************************************
192.168.51.140 : ok=14 changed=8 unreachable=0 failed=0 skipped=0 rescued=0 ignored=0
[root@192 test]#3. 查看剧本安装结果

4. 修改redis端口测试 handler 触发器效果,redis端口变量是 redis_port
ansible-playbook -i hosts test.yaml -e redis_port=6380[root@192 test]#
[root@192 test]# ansible-playbook -i hosts test.yaml -e redis_port=6380
PLAY [first palybook] *******************************************************************************************************************************************************
TASK [Gathering Facts] ******************************************************************************************************************************************************
ok: [192.168.51.140]
TASK [test : install apps] **************************************************************************************************************************************************
[DEPRECATION WARNING]: Invoking "yum" only once while using a loop via squash_actions is deprecated. Instead of using a loop to supply multiple items and specifying `name:
"{{ item }}"`, please use `name: ['nginx', 'redis', 'httpd']` and remove the loop. This feature will be removed in version 2.11. Deprecation warnings can be disabled by
setting deprecation_warnings=False in ansible.cfg.
ok: [192.168.51.140] => (item=[u'nginx', u'redis', u'httpd'])
TASK [test : copy nginx.conf] ***********************************************************************************************************************************************
ok: [192.168.51.140]
TASK [test : template for redis.conf] ***************************************************************************************************************************************
changed: [192.168.51.140]
TASK [test : template for httpd.con] ****************************************************************************************************************************************
ok: [192.168.51.140]
TASK [test : start apps] ****************************************************************************************************************************************************
ok: [192.168.51.140] => (item=nginx)
ok: [192.168.51.140] => (item=redis)
ok: [192.168.51.140] => (item=httpd)
TASK [test : 引用定义在主机清单的变量] **************************************************************************************************************************************************
ok: [192.168.51.140] => {
"msg": "mytesthost.com"
}
TASK [test : 引用定义在vars目录文件的变量] **********************************************************************************************************************************************
ok: [192.168.51.140] => {
"msg": "myhost1.com.cn"
}
TASK [test_ext 引用其他的tasks文件] ************************************************************************************************************************************************
included: /root/test/roles/test/tasks/mytest.yaml for 192.168.51.140
TASK [test : ping server for ext tasks] *************************************************************************************************************************************
ok: [192.168.51.140]
TASK [test : ping stdout ext task] ******************************************************************************************************************************************
ok: [192.168.51.140] => {
"out": {
"changed": false,
"failed": false,
"ping": "pong"
}
}
RUNNING HANDLER [test : restart redis] **************************************************************************************************************************************
changed: [192.168.51.140]
PLAY RECAP ******************************************************************************************************************************************************************
192.168.51.140 : ok=12 changed=2 unreachable=0 failed=0 skipped=0 rescued=0 ignored=0
[root@192 test]#5. 修改redis端口后的结果

四、install_ansible.sh 脚本内容
# 一键 安装 ansible; 一键构建 ansible 测试剧本环境
# cat install_ansible.sh
#!/bin/bash
# 一键安装 ansible
# creator: @tudou
# date 2023-05-14
# Centos 7
####################################################################################################
#
# 使用说明: 直接复制或者下载 install_ansible.sh 脚本即可,其他目录和内容会自动形成,无需额外理会
#
####################################################################################################
# 关闭 selinux 要不然更改 应用默认端口后,可能会启动失败,影响测试
setenforce 0
sed -i '/^SELINUX/c SELINUX=disabled' /etc/selinux/config
# 1、安装 ansible
mv /etc/yum.repos.d/CentOS-Base.repo /etc/yum.repos.d/CentOS-Base.repo.backup
wget -O /etc/yum.repos.d/CentOS-Base.repo http://mirrors.cloud.tencent.com/repo/centos7_base.repo
mv /etc/yum.repos.d/epel.repo /etc/yum.repos.d/epel.repo.backup
wget -O /etc/yum.repos.d/epel.repo http://mirrors.cloud.tencent.com/repo/epel-7.repo
yum clean all
yum makecache
yum install -y ansible tree
echo "=============================================================================================="
echo "已成功安装 ansible"
echo ""
echo "=============================================================================================="
echo "开始构建 ansible 测试剧本环境..."
echo "=============================================================================================="
# 2、此项为环境说明项,执行 install_ansible.sh 脚本,会自动生成相关的 roles 目录和文件;
# 使用说明: 直接复制或者 install_ansible.sh 脚本即可,其他目录和内容会自动形成,无需额外理会
# ansible 测试剧本目录结构为:
# [root@192 test]# tree
# .
# ├── hosts
# ├── install_ansible.sh
# ├── roles
# │ └── test
# │ ├── defaults
# │ ├── files
# │ │ └── nginx.conf
# │ ├── handlers
# │ │ └── main.yaml
# │ ├── meta
# │ ├── tasks
# │ │ ├── main.yaml
# │ │ └── mytest.yaml
# │ ├── templates
# │ │ ├── httpd.conf.j2
# │ │ └── redis.conf.j2
# │ └── vars
# │ └── main.yaml
# └── test.yaml
#
# 9 directories, 10 files
# ansible 测试剧本目录结构为
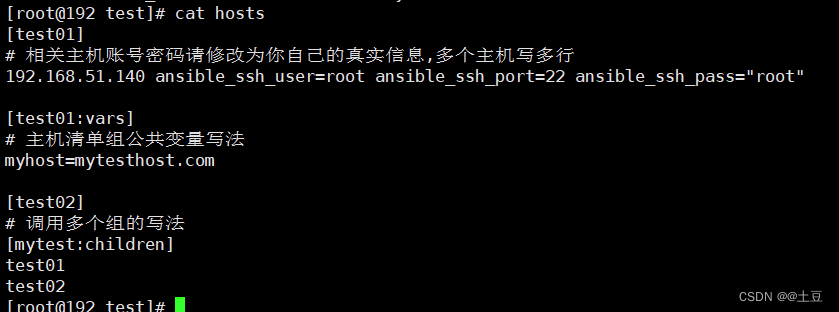
# 3、创建 hosts 清单文件,你也可以直接修改ansible默认的 hosts 文件: /etc/ansible/hosts
cat > hosts << EOF
[test01]
# 相关主机账号密码请修改为你自己的真实信息,多个主机写多行
192.168.51.140 ansible_ssh_user=root ansible_ssh_port=22 ansible_ssh_pass="root"
[test01:vars]
# 主机清单组公共变量写法
myhost=mytesthost.com
[test02]
# 调用多个组的写法
[mytest:children]
test01
test02
EOF
# 4、创建剧本入口文件
cat > test.yaml << EOF
---
- hosts: test01
name: first palybook
gather_facts: true
roles:
- { role: test }
#- hosts: test02
# name: secend palybook
# roles:
# - { role: test02 }
# - { role: ext/test03 }
EOF
# 5、创建 roles 相关目录,空的目录,可有可无,但为了指导初学者,我列出了平常使用的目录
mkdir -p roles/test/{defaults,files,handlers,meta,tasks,templates,vars}
# defaults 目录默认变量等信息; meta 可以写依赖相关的信息
# 6、创建 task 文件; 我这里以 main.yaml 和 mytest.yaml 为例
# 6-1、在 tasks 目录,创建 task 文件: main.yaml
cat > roles/test/tasks/main.yaml << EOF
---
- name: install apps
yum: name={{ item }} state=present
with_items:
- nginx
- redis
- httpd
- name: copy nginx.conf
copy: src=files/nginx.conf dest=/etc/nginx/nginx.conf
notify: restart nginx
- name: template for redis.conf
template: src=templates/redis.conf.j2 dest=/etc/redis.conf
notify: restart redis
- name: template for httpd.con
template: src=templates/httpd.conf.j2 dest=/etc/httpd/conf/httpd.conf
notify: restart httpd
- name: start apps
service: name={{ item }} state=started
with_items:
- nginx
- redis
- httpd
# 应用自定义变量
- name: "引用定义在主机清单的变量"
debug: msg={{ myhost }}
- name: "引用定义在vars目录文件的变量"
debug: msg={{ myhost1 }}
# 其他的tasks
- name: test_ext 引用其他的tasks文件
#include: mytest.yaml
include_tasks: mytest.yaml
#import_tasks: mytest.yaml
EOF
# 6-2、在 tasks 目录,创建 task 文件: mytest.yaml ; mytest.yaml 的作用是用来举例说明 task 文件引用更多的task的方法
cat > roles/test/tasks/mytest.yaml << EOF
---
- name: ping server for ext tasks
ping:
register: out
- name: ping stdout ext task
debug: var=out
- name: cat hosts info for ext tasks
shell: cat /etc/hosts
register: out
- name: "hosts info ext task"
debug: var=out.stdout_lines
EOF
# 7、在 handler 目录,创建处理文件: main.yaml; handler目录下的文件需要 notify 触发器触发才会执行
cat > roles/test/handlers/main.yaml << EOF
---
- name: restart nginx
systemd: name=nginx state=restarted
- name: restart redis
systemd: name=redis state=restarted
- name: restart httpd
systemd: name=httpd state=restarted
EOF
# 8、在 vars 目录,创建自定义的变量文件: main.yaml
cat > roles/test/vars/main.yaml << EOF
myhost1: myhost1.com.cn
httpd_host: httpd.com.cn
redis_port: 6379
# redis_port: 6380
EOF
# 9、在files 目录,创建 nginx.conf配置文件
cat > roles/test/files/nginx.conf << EOF
user nginx;
worker_processes auto;
error_log /var/log/nginx/error.log;
pid /run/nginx.pid;
# Load dynamic modules. See /usr/share/doc/nginx/README.dynamic.
include /usr/share/nginx/modules/*.conf;
events {
worker_connections 1024;
}
http {
log_format main '\$remote_addr - \$remote_user [\$time_local] "\$request" '
'\$status \$body_bytes_sent "\$http_referer" '
'"\$http_user_agent" "\$http_x_forwarded_for"';
access_log /var/log/nginx/access.log main;
sendfile on;
tcp_nopush on;
tcp_nodelay on;
keepalive_timeout 65;
types_hash_max_size 4096;
include /etc/nginx/mime.types;
default_type application/octet-stream;
include /etc/nginx/conf.d/*.conf;
server {
listen [::]:80;
server_name _;
root /usr/share/nginx/html;
# Load configuration files for the default server block.
include /etc/nginx/default.d/*.conf;
error_page 404 /404.html;
location = /404.html {
}
error_page 500 502 503 504 /50x.html;
location = /50x.html {
}
}
}
EOF
# 10、在 templastes 目录,创建模版文件
# 10-1、在 templastes 目录,创建模版文件:redis.conf.j2
cat > roles/test/templates/redis.conf.j2 << EOF
# 绑定主机IP,多网卡多IP可能会失败
bind {{ ansible_default_ipv4.address }}
#port 6379
{% if redis_port is defined %}
port {{ redis_port }}
{% endif %}
daemonize no
EOF
# 10-2、在 templastes 目录,创建模版文件:httpd.conf.j2
cat > roles/test/templates/httpd.conf.j2 << EOF
ServerRoot "/etc/httpd"
Listen 8080
Include conf.modules.d/*.conf
User apache
Group apache
ServerAdmin root@localhost
#ServerName www.example.com:80
#####################################################
# 添加用于 ansible template 部分
{% if httpd_host is defined %}
ServerName {{ httpd_host }}
{% endif %}
# 添加用于 ansible template 部分
#####################################################
<Directory />
AllowOverride none
Require all denied
</Directory>
DocumentRoot "/var/www/html"
<Directory "/var/www">
AllowOverride None
# Allow open access:
Require all granted
</Directory>
<Directory "/var/www/html">
Options Indexes FollowSymLinks
AllowOverride None
Require all granted
</Directory>
<IfModule dir_module>
DirectoryIndex index.html
</IfModule>
<Files ".ht*">
Require all denied
</Files>
ErrorLog "logs/error_log"
LogLevel warn
<IfModule log_config_module>
LogFormat "%h %l %u %t \"%r\" %>s %b \"%{Referer}i\" \"%{User-Agent}i\"" combined
LogFormat "%h %l %u %t \"%r\" %>s %b" common
<IfModule logio_module>
LogFormat "%h %l %u %t \"%r\" %>s %b \"%{Referer}i\" \"%{User-Agent}i\" %I %O" combinedio
</IfModule>
CustomLog "logs/access_log" combined
</IfModule>
<IfModule alias_module>
ScriptAlias /cgi-bin/ "/var/www/cgi-bin/"
</IfModule>
<Directory "/var/www/cgi-bin">
AllowOverride None
Options None
Require all granted
</Directory>
<IfModule mime_module>
TypesConfig /etc/mime.types
AddType application/x-compress .Z
AddType application/x-gzip .gz .tgz
AddType text/html .shtml
AddOutputFilter INCLUDES .shtml
</IfModule>
AddDefaultCharset UTF-8
<IfModule mime_magic_module>
MIMEMagicFile conf/magic
</IfModule>
EnableSendfile on
IncludeOptional conf.d/*.conf
EOF
# 11、成功构建 ansible 测试剧本环境
echo "已成功构建 ansible 测试剧本环境..."
echo "=============================================================================================="
echo "请在当前目录执行以下命令测试: "
echo ""
echo "测试命令: ansible-playbook -i hosts test.yaml -C"
echo ""
echo "执行命令: ansible-playbook -i hosts test.yaml"
echo ""
echo "=============================================================================================="