1. setContentView初步分析之继承自Activity
我们创建的MainActivity继承自Activity,在代码中使用setContentView(R.layout.activity_main),查看他在Activity中的源码如下:
public void setContentView(@LayoutRes int layoutResID) {
    //这里的getWindow方法获取到一个PhoneWindow实例,然后再分析PhoneWindow中的setContentView方法
    getWindow().setContentView(layoutResID);
    initWindowDecorActionBar();
}
这里的getWindow方法,获取到的其实是一个PhoneWindow的实例,通过Activity.java中的attach()方法中创建的mWindow对象,代码如下:
mWindow = new PhoneWindow(this, window, activityConfigCallback);
然后我们再从PhoneWindow.java中分析setContentView方法,而setContentView方法主要有两个目的(作用):
创建DecorView/FrameLayout,然后创建mContentParent/ViewGroup(Root对象)installDecor()->generateDecor()->new DecorView()->mDecor->generateLayout(mDecor)->mContentParent
解析我们的布局文件,利用反射创建View对象mLayoutInflater.inflate(layoutResID, mContentParent);
- 创建
rootView- ->创建布局的
rootView(比如一个xml布局文件是以ConstrantLayout作为根布局)
crateViewFromTag()
->onCreateView()/createView()
->PhoneLayoutInflater.onCreateView()
->PhoneLayoutInflater.createView()
->LayoutInflater.createView()
->通过反射创建View并返回
clazz = Class.forName(解析到的控件全路径,classLoader);
然后通过clazz获取到构造器,最后根据构造器创建出view对象
- ->创建布局的
- 创建
子ViewrInflateChildren(parser, temp, attrs, true);
->rInflate(parser, parent, parent.getContext(), attrs, finishInflate);迭代遍历while循环
->createViewFromTag(parent, name, context, attrs);
后面的流程同上面创建rootView流程中接createViewFromTag后面的流程
面试题: LayoutInflater.inflate(int resource, ViewGroup root, boolean attachToRoot)中参数的作用是什么?
resource子控件的布局文件root父容器attachToRoot逻辑判断,是否可以将子控件resource添加到父容器root中去
root非空,并且attachToRoot为true,则可以将第一个参数中的布局文件resource添加到父容器root中去root为空,或者attachToRoot为false,则可以将第一个参数中的布局文件resource创建的View返回
流程图如下:
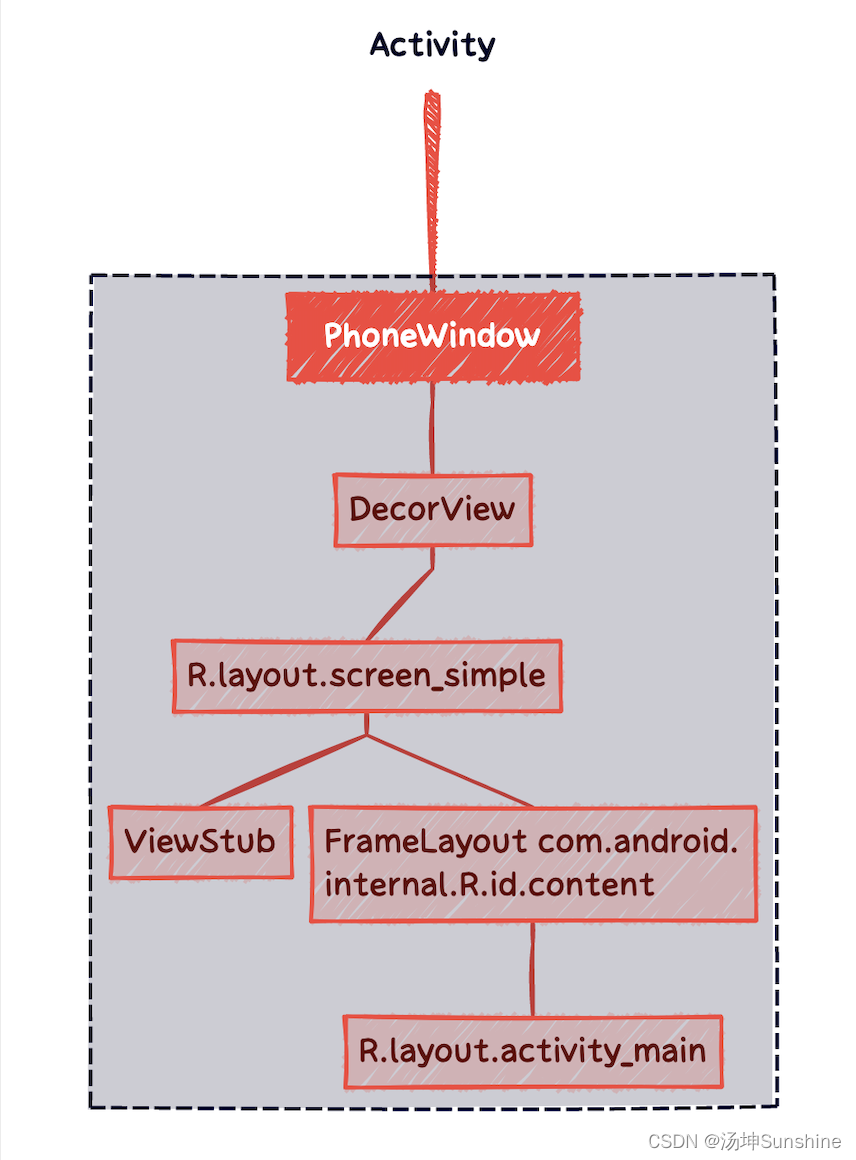
哪些地方可以创建PhoneWindow?
- Activity
- Dialog
- PopupWindow
- Toast
如何布局?使用 mLayoutInflater.inflate(layoutResID, mContentParent);
使用XMLResourceParser解析,传入的参数mContentParent就是root对象,然后调用rInflate方法或者是调用rInflateChildren方法,正常情况下是调用rInflateChildren方法,但是rInflateChildren方法又会去调用rInflate方法,最终返回一个View
2. setContentView初步分析之继承自AppCompatActivity(继承自FragmentActivity)
我们创建的MainActivity继承自AppCompatActivity,在代码中使用setContentView(R.layout.activity_main),查看他在AppCompatActivity.java中的源码如下:
public void setContentView(@LayoutRes int layoutResID) {
    //delegate是代理的意思,为了实现版本兼容
    //这里的getDelegate返回的是一个AppCompatDelegateImpl类对象,然后在AppCompatDelegateImpl.java类中分析setContentView的方法
    getDelegate().setContentView(layoutResID);
}
这里的getDelegate()方法返回的是AppCompatDelegateImpl对象的实例,然后在AppCompatDelegateImpl.java类中分析setContentView的代码,源码如下:
public void setContentView(int resId) {
    //通过这个方法创建mSubDecor/ViewGroup;创建DecorView,创建mContentParent;
    //迁移旧的布局文件中的控件到新的布局文件中,替换content为新的布局文件中的ID
    ensureSubDecor();
    //找到新的布局文件中的控件ID
    ViewGroup contentParent = mSubDecor.findViewById(android.R.id.content);
    contentParent.removeAllViews();
    LayoutInflater.from(mContext).inflate(resId, contentParent);
    mAppCompatWindowCallback.getWrapped().onContentChanged();
}
首先调用ensureSubDecor()方法创建mSubDecor对象实例(他是一个ViewGroup对象),代码如下:
mSubDecor = createSubDecor();
然后在createSubDecor()方法中,会调用如下两行代码:
ensureWindow();
mWindow.getDecorView();
第二行代码中就会执行创建DecorView和mContentParent对象的操作;
然后创建subDecor局部变量,并把他作为这个方法的返回值返回给mSubDecor对象;
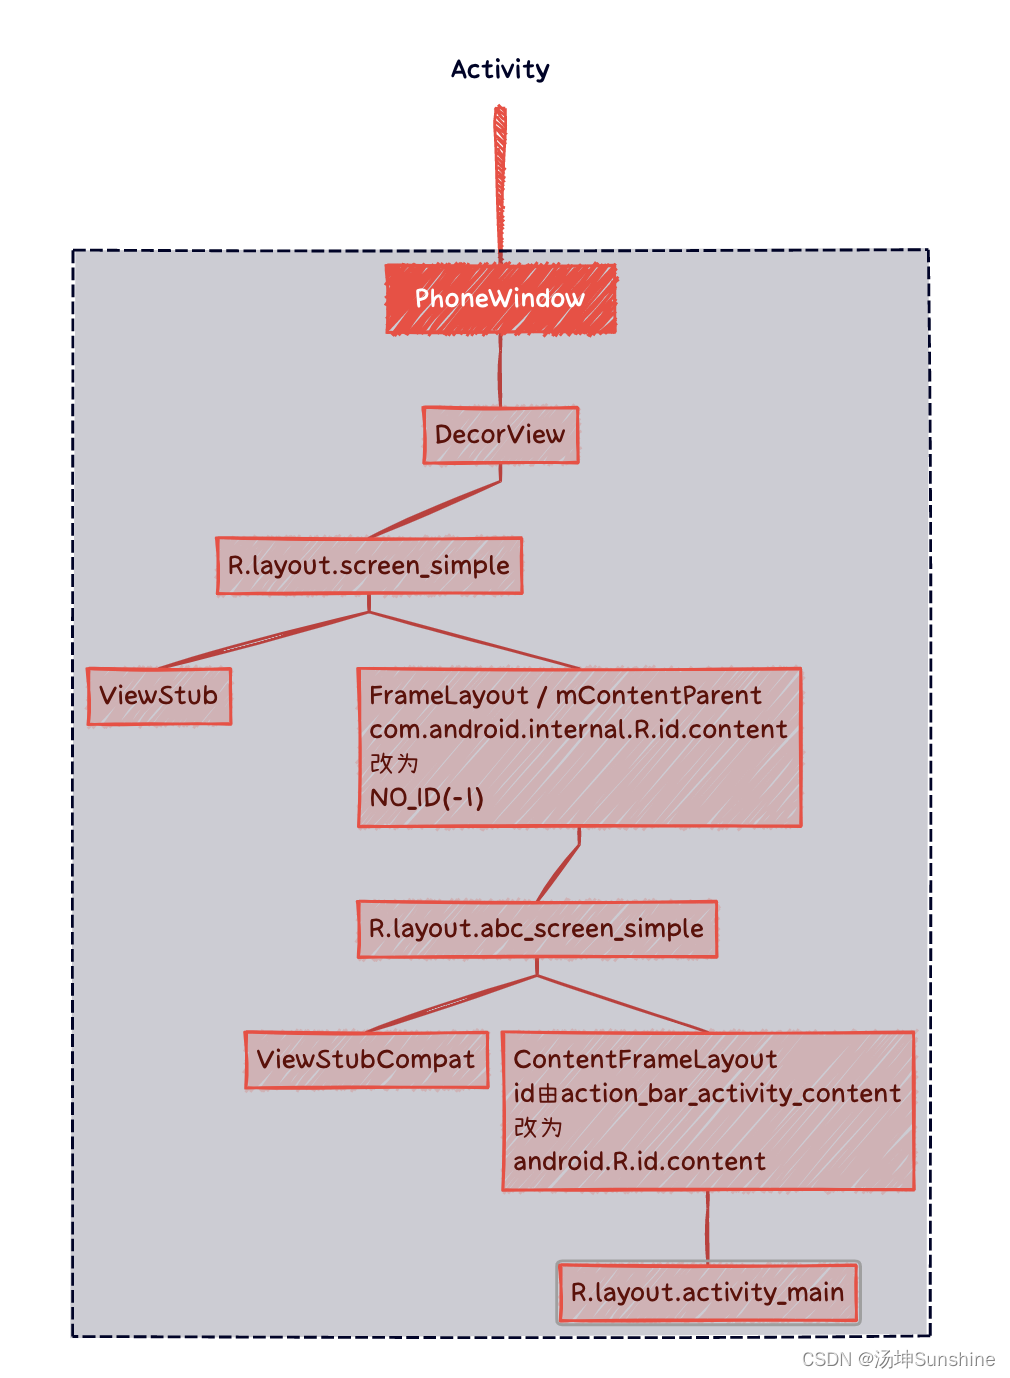
subDecor引入的布局问文件是R.layout.abc_screen_simple,
为了版本兼容,将screen_simple.xml中content下面的控件迁移过来,同时移除screen_simple.xml中content下面的控件;
然后将sceen_simple.xml文件中id值为content置为空,同时将abc_screen_simple.xml文件中的id更改为content(这个content原本是sceen_simple.xml文件中的id);
达到将旧版本中的布局控件迁移至新版布局文件和contentid兼容的目的;
然后将subDeocr赋值给PhoneWindow,代码如下:
mWindow.setContentView(subDecor);
然后就会执行PhoneWindow.java中的setContentView方法,同Activity中逻辑类似,这里就会执行创建decorView,接着会返回mContentParent对象
流程图如下:






![[免疫学]抗原递呈详解](https://img-blog.csdnimg.cn/img_convert/8a6b8ef0126bd255e6a25d5f7d14abb4.png)

