- 安装vsftpd
使用yum安装vsftpd:
yum install -y vsftpd
配置vsftpd
编辑vsftpd配置文件:
vim /etc/vsftpd/vsftpd.conf
以下是一些常见的配置项:
anonymous_enable=NO
 local_enable=YES
 write_enable=YES
 local_umask=022
 dirmessage_enable=YES
 use_localtime=YES
 xferlog_enable=YES
 xferlog_std_format=YES
 #ascii_upload_enable=YES
 #ascii_download_enable=YES
 chroot_local_user=YES
 listen=YES
 pam_service_name=vsftpd
 #userlist_enable=YES
 userlist_deny=NO
 tcp_wrappers=YES
 deny_email_enable=NO
 allow_writeable_chroot=YES
解释一下这些选项:
- anonymous_enable:是否允许匿名用户登录,默认为YES,改为NO。- local_enable:是否允许本地用户登录,默认为NO,改为YES。- write_enable:是否允许用户上传文件,默认为NO,改为YES。- local_umask:上传文件的默认文件权限,默认为077,改为022。- dirmessage_enable:是否显示目录的说明文件,默认为NO,改为YES。- xferlog_enable:是否记录文件传输日志,默认为NO,改为YES。- connect_from_port_20:是否使用20号端口传输数据,默认为NO,改为YES。- xferlog_file:文件传输日志的路径。- idle_session_timeout:连接空闲超时时间。- data_connection_timeout:数据连接超时时间。- listen:是否监听网络连接。- pam_service_name:PAM认证服务名称。- tcp_wrappers:是否启用TCP包过滤。
- 启动vsftpd
使用systemctl启动vsftpd服务:
sudo systemctl restart vsftpd.service
设置vsftpd开机自启:
sudo systemctl enable vsftpd
- 创建FTP用户
使用以下命令创建FTP用户:
adduser user1 ##创建 用户
passwd user1 ##设置user1密码
添加允许访问ftp的用户,由于 vsftp.conf文件中有:userlist_deny=NO #的配置,代办允许
/etc/vsftpd/user_list文件 中的用户访问 ftp服务, /etc/vsftpd/ftpusers文件 是拒绝访问 ftp的用户;
所以需要在 user_list文件中添加上需要访问的用户;
echo "user1" >> /etc/vsftpd/user_list
- userlist_enable:是否启用用户列表,默认为NO,改为YES。- userlist_file:用户列表的文件路径,默认为/etc/vsftpd/user_list。- userlist_deny:是否禁止用户列表中的用户登录,默认为YES,改为NO。 创建用户列表文件:
# 重启vsftpd
sudo systemctl restart vsftpd.service
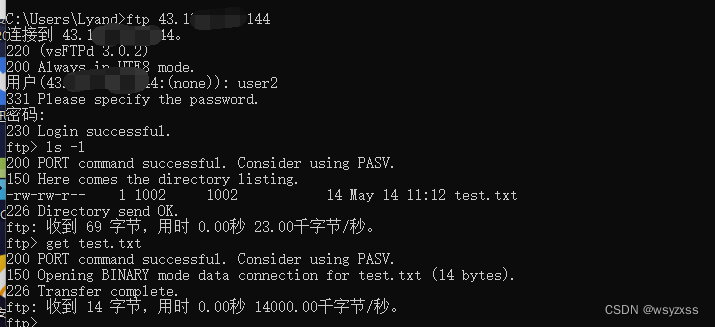
,如果使用 xftp软件登录 ftp服务,显示的报错问题,无法查到有用信息,
可以尝试,用 cmd 的 ftp命令 登录服务,查看更多报错信息;
问题:
1. 如果提示:用户(43.138.105.144:(none)): user1
530 Permission denied.
:那么可能是 /etc/vsftpd/user_list 文件中没有 添加登录的用户,或者 /etc/vsftpd/ftpusers中添加的登录的用户;
上边 /etc/vsftpd/vsftpd.conf 配置内容是:
允许/etc/vsftpd/user_list 中的用户登录;
禁止:/etc/vsftpd/ftpusers用户登录;
如果两个里面都写了 该用户,则 不能登录;
2. xftp用户验证失败
需要,修改 /etc/vsftpd/vsftpd.conf 配置文件中:把下边2行添加上注释;
#ascii_upload_enable=YES
#ascii_download_enable=YES
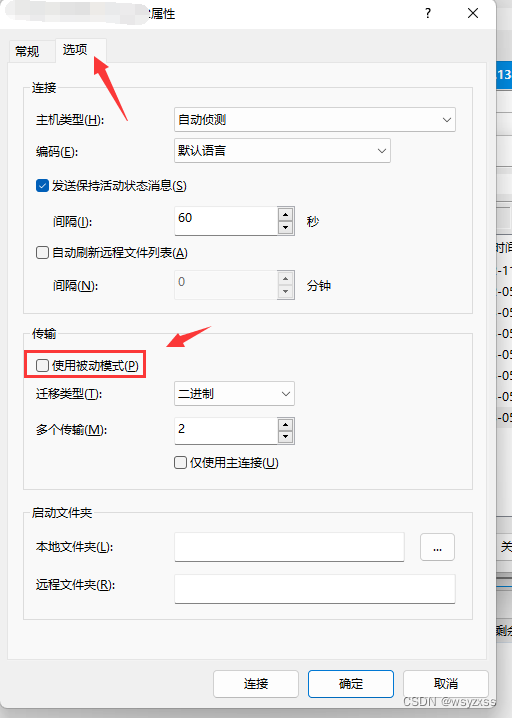
3. xftp登录提示:无法显示远程文件夹
在选项中,取消“使用被动模式”





![[golang gin框架] 33.Gin 商城项目- 微信支付操作相关功能讲解](https://img-blog.csdnimg.cn/img_convert/18d66b503b9475280cfb2979203b468c.png)

