引言
我们会讨论一些内建变量(Built-in Variable)、组织着色器输入和输出的新方式以及一个叫做uniform缓冲对象(Uniform Buffer Object)的非常有用的工具。
GLSL的内建变量
着色器是很小的,如果我们需要从当前着色器以外的别的资源里的数据,那么我们就不得不传给它。我们学过了使用顶点属性、uniform和采样器可以实现这个目标。
GLSL有几个以gl_为前缀的变量,使我们有一个额外的手段来获取和写入数据。其中两个我们已经打过交道了:gl_Position和gl_FragCoord,前一个是顶点着色器的输出向量,后一个是片段着色器的变量。
我们会讨论几个有趣的GLSL内建变量,并向你解释为什么它们对我们来说很有好处。注意,我们不会讨论到GLSL中所有的内建变量,因此如果你想看到所有的内建变量还是最好去查看OpenGL官网。
顶点着色器变量
gl_Position
gl_Position:顶点着色器裁切空间输出的位置向量。
我们可以使用的另一个可用于渲染的基本图形(primitive)是GL_POINTS,使用它每个顶点作为一个基本图形,被渲染为一个点(point)。可以使用glPointSize函数来设置这个点的大小,但我们还可以在顶点着色器里修改点的大小。
gl_PointSize
GLSL有另一个输出变量叫做gl_PointSize,他是一个float变量,你可以以像素的方式设置点的高度和宽度。它在着色器中描述每个顶点做为点被绘制出来的大小。
在着色器中影响点的大小默认是关闭的,但是如果你打算开启它,你需要开启OpenGL的GL_PROGRAM_POINT_SIZE:
glEnable(GL_PROGRAM_POINT_SIZE);
渲染展示:

顶点着色器:
#version 330 core
layout (location = 0) in vec3 position;

void main()
{
    gl_Position = vec4(position, 1.0f);
    gl_PointSize = gl_Position.z * 100;
}
片段着色器:
#version 330 core

out vec4 color;

void main()
{
	color = vec4(1.0f, 0.0f, 0.0f, 1.0f);
}
主程序:
// Std. Includes
#include <string>
#include <algorithm>
using namespace std;

// GLEW
#define GLEW_STATIC
#include <GL/glew.h>

// GLFW
#include <GLFW/glfw3.h>

// GL includes
#include "Shader.h"
#include "Camera.h"
#include "Model.h"

// GLM Mathemtics
#include <glm/glm.hpp>
#include <glm/gtc/matrix_transform.hpp>
#include <glm/gtc/type_ptr.hpp>

// Other Libs
#include <SOIL.h>

// Properties
GLuint screenWidth = 800, screenHeight = 600;

// Function prototypes
void key_callback(GLFWwindow* window, int key, int scancode, int action, int mode);
void scroll_callback(GLFWwindow* window, double xoffset, double yoffset);
void mouse_callback(GLFWwindow* window, double xpos, double ypos);
void Do_Movement();
GLuint loadTexture(GLchar* path, GLboolean alpha = false);
GLuint loadCubemap(vector<const GLchar*> faces);

// Camera
Camera camera(glm::vec3(0.0f, 0.0f, 3.0f));
bool keys[1024];
GLfloat lastX = 400, lastY = 300;
bool firstMouse = true;

GLfloat deltaTime = 0.0f;
GLfloat lastFrame = 0.0f;


// The MAIN function, from here we start our application and run our Game loop
int main()
{
    // Init GLFW
    glfwInit();
    glfwWindowHint(GLFW_CONTEXT_VERSION_MAJOR, 3);
    glfwWindowHint(GLFW_CONTEXT_VERSION_MINOR, 3);
    glfwWindowHint(GLFW_OPENGL_PROFILE, GLFW_OPENGL_CORE_PROFILE);
    glfwWindowHint(GLFW_RESIZABLE, GL_FALSE);

    GLFWwindow* window = glfwCreateWindow(screenWidth, screenHeight, "LearnOpenGL", nullptr, nullptr); // Windowed
    glfwMakeContextCurrent(window);

    // Set the required callback functions
    glfwSetKeyCallback(window, key_callback);
    glfwSetCursorPosCallback(window, mouse_callback);
    glfwSetScrollCallback(window, scroll_callback);

    // Options
    glfwSetInputMode(window, GLFW_CURSOR, GLFW_CURSOR_DISABLED);

    // Initialize GLEW to setup the OpenGL Function pointers
    glewExperimental = GL_TRUE;
    glewInit();
    glGetError(); // Debug GLEW bug fix

    // Define the viewport dimensions
    glViewport(0, 0, screenWidth, screenHeight);

    // Setup some OpenGL options
    glEnable(GL_DEPTH_TEST);
    glDepthFunc(GL_LESS);
    glEnable(GL_PROGRAM_POINT_SIZE);

    // Setup and compile our shaders
    Shader shader("C:\\Users\\32156\\source\\repos\\LearnOpenGL\\Shader\\vertexShader.txt", "C:\\Users\\32156\\source\\repos\\LearnOpenGL\\Shader\\fragmentShader.txt");
    Shader skyboxShader("C:\\Users\\32156\\source\\repos\\LearnOpenGL\\Shader\\skyboxVertexShader.txt", "C:\\Users\\32156\\source\\repos\\LearnOpenGL\\Shader\\skyboxFragmentShader.txt");

    GLfloat vertices[] = {
        0.0 , 0.0, 0.0 ,
        0.3 , 0.3, 0.3 ,
        -0.1, -0.4, 0.4,
        0.5 ,-0.5 , 0.1
    };
    GLuint VAO, VBO;
    glGenVertexArrays(1, &VAO);
    glGenBuffers(1, &VBO);
    glBindVertexArray(VAO);
    glBindBuffer(GL_ARRAY_BUFFER, VBO);
    glBufferData(GL_ARRAY_BUFFER, sizeof(vertices), &vertices, GL_STATIC_DRAW);
    glEnableVertexAttribArray(0);
    glVertexAttribPointer(0, 3, GL_FLOAT, GL_FALSE, 3 * sizeof(GL_FLOAT), (GLvoid*) 0);
    glBindVertexArray(0);

    // Game loop
    while (!glfwWindowShouldClose(window))
    {
        // Set frame time
        GLfloat currentFrame = glfwGetTime();
        deltaTime = currentFrame - lastFrame;
        lastFrame = currentFrame;

        // Check and call events
        glfwPollEvents();
        Do_Movement();

        // Clear buffers
        glClearColor(0.1f, 0.1f, 0.1f, 1.0f);
        glClear(GL_COLOR_BUFFER_BIT | GL_DEPTH_BUFFER_BIT);

        shader.Use();
        glBindVertexArray(VAO);
        glDrawArrays(GL_POINTS, 0, 4);
        glBindVertexArray(0);

        // Swap the buffers
        glfwSwapBuffers(window);

        GLuint errorCode = glGetError();
        if (errorCode)
            std::cout << errorCode << std::endl;
    }

    glfwTerminate();
    return 0;
}

// Loads a cubemap texture from 6 individual texture faces
// Order should be:
// +X (right)
// -X (left)
// +Y (top)
// -Y (bottom)
// +Z (front)
// -Z (back)
GLuint loadCubemap(vector<const GLchar*> faces)
{
    GLuint textureID;
    glGenTextures(1, &textureID);

    int width, height;
    unsigned char* image;

    glBindTexture(GL_TEXTURE_CUBE_MAP, textureID);
    for (GLuint i = 0; i < faces.size(); i++)
    {
        image = SOIL_load_image(faces[i], &width, &height, 0, SOIL_LOAD_RGB);
        glTexImage2D(GL_TEXTURE_CUBE_MAP_POSITIVE_X + i, 0, GL_RGB, width, height, 0, GL_RGB, GL_UNSIGNED_BYTE, image);
        SOIL_free_image_data(image);
    }
    glTexParameteri(GL_TEXTURE_CUBE_MAP, GL_TEXTURE_MAG_FILTER, GL_LINEAR);
    glTexParameteri(GL_TEXTURE_CUBE_MAP, GL_TEXTURE_MIN_FILTER, GL_LINEAR);
    glTexParameteri(GL_TEXTURE_CUBE_MAP, GL_TEXTURE_WRAP_S, GL_CLAMP_TO_EDGE);
    glTexParameteri(GL_TEXTURE_CUBE_MAP, GL_TEXTURE_WRAP_T, GL_CLAMP_TO_EDGE);
    glTexParameteri(GL_TEXTURE_CUBE_MAP, GL_TEXTURE_WRAP_R, GL_CLAMP_TO_EDGE);
    glBindTexture(GL_TEXTURE_CUBE_MAP, 0);

    return textureID;
}


// This function loads a texture from file. Note: texture loading functions like these are usually
// managed by a 'Resource Manager' that manages all resources (like textures, models, audio).
// For learning purposes we'll just define it as a utility function.
GLuint loadTexture(GLchar* path)
{
    //Generate texture ID and load texture data
    GLuint textureID;
    glGenTextures(1, &textureID);
    int width, height;
    unsigned char* image = SOIL_load_image(path, &width, &height, 0, SOIL_LOAD_RGB);
    // Assign texture to ID
    glBindTexture(GL_TEXTURE_2D, textureID);
    glTexImage2D(GL_TEXTURE_2D, 0, GL_RGB, width, height, 0, GL_RGB, GL_UNSIGNED_BYTE, image);
    glGenerateMipmap(GL_TEXTURE_2D);

    // Parameters
    glTexParameteri(GL_TEXTURE_2D, GL_TEXTURE_WRAP_S, GL_REPEAT);
    glTexParameteri(GL_TEXTURE_2D, GL_TEXTURE_WRAP_T, GL_REPEAT);
    glTexParameteri(GL_TEXTURE_2D, GL_TEXTURE_MIN_FILTER, GL_LINEAR_MIPMAP_LINEAR);
    glTexParameteri(GL_TEXTURE_2D, GL_TEXTURE_MAG_FILTER, GL_LINEAR);
    glBindTexture(GL_TEXTURE_2D, 0);
    SOIL_free_image_data(image);
    return textureID;
}

#pragma region "User input"

// Moves/alters the camera positions based on user input
void Do_Movement()
{
    // Camera controls
    if (keys[GLFW_KEY_W])
        camera.ProcessKeyboard(FORWARD, deltaTime);
    if (keys[GLFW_KEY_S])
        camera.ProcessKeyboard(BACKWARD, deltaTime);
    if (keys[GLFW_KEY_A])
        camera.ProcessKeyboard(LEFT, deltaTime);
    if (keys[GLFW_KEY_D])
        camera.ProcessKeyboard(RIGHT, deltaTime);
}

// Is called whenever a key is pressed/released via GLFW
void key_callback(GLFWwindow* window, int key, int scancode, int action, int mode)
{
    if (key == GLFW_KEY_ESCAPE && action == GLFW_PRESS)
        glfwSetWindowShouldClose(window, GL_TRUE);

    if (action == GLFW_PRESS)
        keys[key] = true;
    else if (action == GLFW_RELEASE)
        keys[key] = false;
}

void mouse_callback(GLFWwindow* window, double xpos, double ypos)
{
    if (firstMouse)
    {
        lastX = xpos;
        lastY = ypos;
        firstMouse = false;
    }

    GLfloat xoffset = xpos - lastX;
    GLfloat yoffset = lastY - ypos;

    lastX = xpos;
    lastY = ypos;

    camera.ProcessMouseMovement(xoffset, yoffset);
}

void scroll_callback(GLFWwindow* window, double xoffset, double yoffset)
{
    camera.ProcessMouseScroll(yoffset);
}

#pragma endregion
gl_Position和gl_PointSize都是输出变量,因为它们的值是作为顶点着色器的输出被读取的;我们可以向它们写入数据来影响结果。顶点着色器为我们提供了一个有趣的输入变量,我们只能从它那里读取,这个变量叫做gl_VertexID。
gl_VertexID是个整型变量,它储存着我们绘制的当前顶点的ID。当进行索引渲染(indexed rendering,使用glDrawElements渲染)时,这个变量保存着当前绘制的顶点的索引。当用的不是索引绘制(glDrawArrays)时,这个变量保存的是从渲染开始起直到当前处理的这个顶点的(当前顶点)编号。尽管目前看似没用,但是我们最好知道我们能获取这样的信息。
片段着色器的变量
gl_FragCoord
gl_FragCoord:此向量的z元素和特定的fragment的深度值相等。
gl_FragCoord的x和y元素是当前片段的窗口空间坐标(window-space coordinate)。它们的起始处是窗口的左下角。如果我们的窗口是800×600的,那么一个片段的窗口空间坐标x的范围就在0到800之间,y在0到600之间。
我们可以使用片段着色器基于片段的窗口坐标计算出一个不同的颜色。gl_FragCoord变量的一个常用的方式是与一个不同的片段计算出来的视频输出进行对比,通常在技术演示中常见。比如我们可以把屏幕分为两个部分,窗口的左侧渲染一个输出,窗口的右边渲染另一个输出。下面是一个基于片段的窗口坐标的位置的不同输出不同的颜色的片段着色器:
void main()
{
    if(gl_FragCoord.x < 400)
        color = vec4(1.0f, 0.0f, 0.0f, 1.0f);
    else
        color = vec4(0.0f, 1.0f, 0.0f, 1.0f);
}
我们现在可以计算出两个完全不同的片段着色器结果,每个显示在窗口的一端。这对于测试不同的光照技术很有好处。
gl_FrontFacing变量能告诉我们当前片段是某个正面的一部分还是背面的一部分。然后我们可以决定做一些事情,比如为正面计算出不同的颜色。
gl_FrontFacing变量是一个布尔值,如果当前片段是正面的一部分那么就是true,否则就是false。这样我们可以创建一个立方体,里面和外面使用不同的纹理:
#version 330 core
out vec4 color;
in vec2 TexCoords;

uniform sampler2D frontTexture;
uniform sampler2D backTexture;

void main()
{
    if(gl_FrontFacing)
        color = texture(frontTexture, TexCoords);
    else
        color = texture(backTexture, TexCoords);
}
运行效果:

顶点着色器:
#version 330 core
layout (location = 0) in vec3 position;
layout (location = 1) in vec2 texCoords;

out vec2 TexCoords;

uniform mat4 model;
uniform mat4 view;
uniform mat4 projection;

void main()
{
    gl_Position = projection * view * model * vec4(position, 1.0f);
    TexCoords = vec2(texCoords.x, 1.0 - texCoords.y);
}
主程序:
// Std. Includes
#include <string>
#include <algorithm>
using namespace std;

// GLEW
#define GLEW_STATIC
#include <GL/glew.h>

// GLFW
#include <GLFW/glfw3.h>

// GL includes
#include "Shader.h"
#include "Camera.h"
#include "Model.h"

// GLM Mathemtics
#include <glm/glm.hpp>
#include <glm/gtc/matrix_transform.hpp>
#include <glm/gtc/type_ptr.hpp>

// Other Libs
#include <SOIL.h>

// Properties
GLuint screenWidth = 800, screenHeight = 600;

// Function prototypes
void key_callback(GLFWwindow* window, int key, int scancode, int action, int mode);
void scroll_callback(GLFWwindow* window, double xoffset, double yoffset);
void mouse_callback(GLFWwindow* window, double xpos, double ypos);
void Do_Movement();
void printError();
GLuint loadTexture(const GLchar* path);
GLuint loadCubemap(vector<const GLchar*> faces);

// Camera
Camera camera(glm::vec3(0.0f, 0.0f, 3.0f));
bool keys[1024];
GLfloat lastX = 400, lastY = 300;
bool firstMouse = true;

GLfloat deltaTime = 0.0f;
GLfloat lastFrame = 0.0f;

// The MAIN function, from here we start our application and run our Game loop
int main()
{
    // Init GLFW
    glfwInit();
    glfwWindowHint(GLFW_CONTEXT_VERSION_MAJOR, 3);
    glfwWindowHint(GLFW_CONTEXT_VERSION_MINOR, 3);
    glfwWindowHint(GLFW_OPENGL_PROFILE, GLFW_OPENGL_CORE_PROFILE);
    glfwWindowHint(GLFW_RESIZABLE, GL_FALSE);

    GLFWwindow* window = glfwCreateWindow(screenWidth, screenHeight, "LearnOpenGL", nullptr, nullptr); // Windowed
    glfwMakeContextCurrent(window);

    // Set the required callback functions
    glfwSetKeyCallback(window, key_callback);
    glfwSetCursorPosCallback(window, mouse_callback);
    glfwSetScrollCallback(window, scroll_callback);

    // Options
    glfwSetInputMode(window, GLFW_CURSOR, GLFW_CURSOR_DISABLED);

    // Initialize GLEW to setup the OpenGL Function pointers
    glewExperimental = GL_TRUE;
    glewInit();
    glGetError(); // Debug GLEW bug fix

    // Define the viewport dimensions
    glViewport(0, 0, screenWidth, screenHeight);

    // Setup some OpenGL options
    glEnable(GL_DEPTH_TEST);
    glDepthFunc(GL_LESS);
    glEnable(GL_PROGRAM_POINT_SIZE);

    // Setup and compile our shaders
    Shader shader("C:\\Users\\32156\\source\\repos\\LearnOpenGL\\Shader\\vertexShader.txt", "C:\\Users\\32156\\source\\repos\\LearnOpenGL\\Shader\\fragmentShader.txt");
    Shader skyboxShader("C:\\Users\\32156\\source\\repos\\LearnOpenGL\\Shader\\skyboxVertexShader.txt", "C:\\Users\\32156\\source\\repos\\LearnOpenGL\\Shader\\skyboxFragmentShader.txt");

    GLfloat vertices[] = {
        // Back face
        -0.5f, -0.5f, -0.5f,  0.0f, 0.0f, // Bottom-left
         0.5f,  0.5f, -0.5f,  1.0f, 1.0f, // top-right
         0.5f, -0.5f, -0.5f,  1.0f, 0.0f, // bottom-right
         0.5f,  0.5f, -0.5f,  1.0f, 1.0f, // top-right
        -0.5f, -0.5f, -0.5f,  0.0f, 0.0f, // bottom-left
        -0.5f,  0.5f, -0.5f,  0.0f, 1.0f, // top-left
        // Front face
        -0.5f, -0.5f,  0.5f,  0.0f, 0.0f, // bottom-left
         0.5f, -0.5f,  0.5f,  1.0f, 0.0f, // bottom-right
         0.5f,  0.5f,  0.5f,  1.0f, 1.0f, // top-right
         0.5f,  0.5f,  0.5f,  1.0f, 1.0f, // top-right
        -0.5f,  0.5f,  0.5f,  0.0f, 1.0f, // top-left
        -0.5f, -0.5f,  0.5f,  0.0f, 0.0f, // bottom-left
        // Left face
        -0.5f,  0.5f,  0.5f,  1.0f, 0.0f, // top-right
        -0.5f,  0.5f, -0.5f,  1.0f, 1.0f, // top-left
        -0.5f, -0.5f, -0.5f,  0.0f, 1.0f, // bottom-left
        -0.5f, -0.5f, -0.5f,  0.0f, 1.0f, // bottom-left
        -0.5f, -0.5f,  0.5f,  0.0f, 0.0f, // bottom-right
        -0.5f,  0.5f,  0.5f,  1.0f, 0.0f, // top-right
        // Right face
         0.5f,  0.5f,  0.5f,  1.0f, 0.0f, // top-left
         0.5f, -0.5f, -0.5f,  0.0f, 1.0f, // bottom-right
         0.5f,  0.5f, -0.5f,  1.0f, 1.0f, // top-right
         0.5f, -0.5f, -0.5f,  0.0f, 1.0f, // bottom-right
         0.5f,  0.5f,  0.5f,  1.0f, 0.0f, // top-left
         0.5f, -0.5f,  0.5f,  0.0f, 0.0f, // bottom-left
        // Bottom face
        -0.5f, -0.5f, -0.5f,  0.0f, 1.0f, // top-right
         0.5f, -0.5f, -0.5f,  1.0f, 1.0f, // top-left
         0.5f, -0.5f,  0.5f,  1.0f, 0.0f, // bottom-left
         0.5f, -0.5f,  0.5f,  1.0f, 0.0f, // bottom-left
        -0.5f, -0.5f,  0.5f,  0.0f, 0.0f, // bottom-right
        -0.5f, -0.5f, -0.5f,  0.0f, 1.0f, // top-right
        // Top face
        -0.5f,  0.5f, -0.5f,  0.0f, 1.0f, // top-left
         0.5f,  0.5f,  0.5f,  1.0f, 0.0f, // bottom-right
         0.5f,  0.5f, -0.5f,  1.0f, 1.0f, // top-right
         0.5f,  0.5f,  0.5f,  1.0f, 0.0f, // bottom-right
        -0.5f,  0.5f, -0.5f,  0.0f, 1.0f, // top-left
        -0.5f,  0.5f,  0.5f,  0.0f, 0.0f  // bottom-left
    };
    GLuint VAO, VBO;
    glGenVertexArrays(1, &VAO);
    glGenBuffers(1, &VBO);
    glBindVertexArray(VAO);
    glBindBuffer(GL_ARRAY_BUFFER, VBO);
    glBufferData(GL_ARRAY_BUFFER, sizeof(vertices), &vertices, GL_STATIC_DRAW);
    glEnableVertexAttribArray(0);
    glVertexAttribPointer(0, 3, GL_FLOAT, GL_FALSE, 5 * sizeof(GL_FLOAT), (GLvoid*)0);
    glEnableVertexAttribArray(1);
    glVertexAttribPointer(1, 2, GL_FLOAT, GL_FALSE, 5 * sizeof(GL_FLOAT), (GLvoid*)(3 * sizeof(GLfloat)));
    glBindVertexArray(0);

    GLuint tex1, tex2;
    tex1 = loadTexture("C:\\Users\\32156\\source\\repos\\LearnOpenGL\\Resource\\container.jpg");
    tex2 = loadTexture("C:\\Users\\32156\\source\\repos\\LearnOpenGL\\Resource\\container2.png");

    // Game loop
    while (!glfwWindowShouldClose(window))
    {
        // Set frame time
        GLfloat currentFrame = glfwGetTime();
        deltaTime = currentFrame - lastFrame;
        lastFrame = currentFrame;

        // Check and call events
        glfwPollEvents();
        Do_Movement();

        // Clear buffers
        glClearColor(0.1f, 0.1f, 0.1f, 1.0f);
        glClear(GL_COLOR_BUFFER_BIT | GL_DEPTH_BUFFER_BIT);

        shader.Use();

        glm::mat4 model = glm::mat4(1.0f);
        glm::mat4 view = camera.GetViewMatrix();
        glm::mat4 projection = glm::perspective(camera.Zoom, (float)screenWidth / (float)screenHeight, 0.1f, 100.0f);
        glUniformMatrix4fv(glGetUniformLocation(shader.Program, "model"), 1, GL_FALSE, glm::value_ptr(model));
        glUniformMatrix4fv(glGetUniformLocation(shader.Program, "view"), 1, GL_FALSE, glm::value_ptr(view));
        glUniformMatrix4fv(glGetUniformLocation(shader.Program, "projection"), 1, GL_FALSE, glm::value_ptr(projection));

        glBindVertexArray(VAO);
        glActiveTexture(GL_TEXTURE0);
        glUniform1i(glGetUniformLocation(shader.Program, "frontTexture"), 0);
        glBindTexture(GL_TEXTURE_2D, tex1);
        glActiveTexture(GL_TEXTURE1);
        glUniform1i(glGetUniformLocation(shader.Program, "backTexture"), 1);
        glBindTexture(GL_TEXTURE_2D, tex2);
        glDrawArrays(GL_TRIANGLES, 0, 36);
        glBindVertexArray(0);

        // Swap the buffers
        glfwSwapBuffers(window);

        printError();
    }

    glfwTerminate();
    return 0;
}

void printError()
{
    GLuint errorCode = glGetError();
    if (errorCode)
        std::cout << errorCode << std::endl;
}

// Loads a cubemap texture from 6 individual texture faces
// Order should be:
// +X (right)
// -X (left)
// +Y (top)
// -Y (bottom)
// +Z (front)
// -Z (back)
GLuint loadCubemap(vector<const GLchar*> faces)
{
    GLuint textureID;
    glGenTextures(1, &textureID);

    int width, height;
    unsigned char* image;

    glBindTexture(GL_TEXTURE_CUBE_MAP, textureID);
    for (GLuint i = 0; i < faces.size(); i++)
    {
        image = SOIL_load_image(faces[i], &width, &height, 0, SOIL_LOAD_RGB);
        glTexImage2D(GL_TEXTURE_CUBE_MAP_POSITIVE_X + i, 0, GL_RGB, width, height, 0, GL_RGB, GL_UNSIGNED_BYTE, image);
        SOIL_free_image_data(image);
    }
    glTexParameteri(GL_TEXTURE_CUBE_MAP, GL_TEXTURE_MAG_FILTER, GL_LINEAR);
    glTexParameteri(GL_TEXTURE_CUBE_MAP, GL_TEXTURE_MIN_FILTER, GL_LINEAR);
    glTexParameteri(GL_TEXTURE_CUBE_MAP, GL_TEXTURE_WRAP_S, GL_CLAMP_TO_EDGE);
    glTexParameteri(GL_TEXTURE_CUBE_MAP, GL_TEXTURE_WRAP_T, GL_CLAMP_TO_EDGE);
    glTexParameteri(GL_TEXTURE_CUBE_MAP, GL_TEXTURE_WRAP_R, GL_CLAMP_TO_EDGE);
    glBindTexture(GL_TEXTURE_CUBE_MAP, 0);

    return textureID;
}


// This function loads a texture from file. Note: texture loading functions like these are usually
// managed by a 'Resource Manager' that manages all resources (like textures, models, audio).
// For learning purposes we'll just define it as a utility function.
GLuint loadTexture(const GLchar* path)
{
    //Generate texture ID and load texture data
    GLuint textureID;
    glGenTextures(1, &textureID);
    int width, height;
    unsigned char* image = SOIL_load_image(path, &width, &height, 0, SOIL_LOAD_RGB);
    // Assign texture to ID
    glBindTexture(GL_TEXTURE_2D, textureID);
    glTexImage2D(GL_TEXTURE_2D, 0, GL_RGB, width, height, 0, GL_RGB, GL_UNSIGNED_BYTE, image);
    glGenerateMipmap(GL_TEXTURE_2D);

    // Parameters
    glTexParameteri(GL_TEXTURE_2D, GL_TEXTURE_WRAP_S, GL_REPEAT);
    glTexParameteri(GL_TEXTURE_2D, GL_TEXTURE_WRAP_T, GL_REPEAT);
    glTexParameteri(GL_TEXTURE_2D, GL_TEXTURE_MIN_FILTER, GL_LINEAR_MIPMAP_LINEAR);
    glTexParameteri(GL_TEXTURE_2D, GL_TEXTURE_MAG_FILTER, GL_LINEAR);
    glBindTexture(GL_TEXTURE_2D, 0);
    SOIL_free_image_data(image);
    return textureID;
}

#pragma region "User input"

// Moves/alters the camera positions based on user input
void Do_Movement()
{
    // Camera controls
    if (keys[GLFW_KEY_W])
        camera.ProcessKeyboard(FORWARD, deltaTime);
    if (keys[GLFW_KEY_S])
        camera.ProcessKeyboard(BACKWARD, deltaTime);
    if (keys[GLFW_KEY_A])
        camera.ProcessKeyboard(LEFT, deltaTime);
    if (keys[GLFW_KEY_D])
        camera.ProcessKeyboard(RIGHT, deltaTime);
}

// Is called whenever a key is pressed/released via GLFW
void key_callback(GLFWwindow* window, int key, int scancode, int action, int mode)
{
    if (key == GLFW_KEY_ESCAPE && action == GLFW_PRESS)
        glfwSetWindowShouldClose(window, GL_TRUE);

    if (action == GLFW_PRESS)
        keys[key] = true;
    else if (action == GLFW_RELEASE)
        keys[key] = false;
}

void mouse_callback(GLFWwindow* window, double xpos, double ypos)
{
    if (firstMouse)
    {
        lastX = xpos;
        lastY = ypos;
        firstMouse = false;
    }

    GLfloat xoffset = xpos - lastX;
    GLfloat yoffset = lastY - ypos;

    lastX = xpos;
    lastY = ypos;

    camera.ProcessMouseMovement(xoffset, yoffset);
}

void scroll_callback(GLFWwindow* window, double xoffset, double yoffset)
{
    camera.ProcessMouseScroll(yoffset);
}

#pragma endregion
gl_FragDepth
输入变量gl_FragCoord让我们可以读得当前片段的窗口空间坐标和深度值,但是它是只读的。我们不能影响到这个片段的窗口屏幕坐标,但是可以设置这个像素的深度值。GLSL给我们提供了一个叫做gl_FragDepth的变量,我们可以用它在着色器中遂舍之像素的深度值。
为了在着色器中设置深度值,我们简单的写一个0.0到1.0之间的float数,赋值给这个输出变量:
gl_FragDepth = 0.0f; //现在片段的深度值被设为0
如果着色器中没有像gl_FragDepth变量写入,它就会自动采用gl_FragCoord.z的值。
我们自己设置深度值有一个显著缺点,因为只要我们在片段着色器中对gl_FragDepth写入什么,OpenGL就会关闭所有的前置深度测试。它被关闭的原因是,在我们运行片段着色器之前OpenGL搞不清像素的深度值,因为片段着色器可能会完全改变这个深度值。因此,你需要考虑到gl_FragDepth写入所带来的性能的下降。
然而从OpenGL4.2起,我们仍然可以对二者进行一定的调和,这需要在片段着色器的顶部使用深度条件(depth condition)来重新声明gl_FragDepth:
layout (depth_<condition>) out float gl_FragDepth;

接口块
到目前位置,每次我们打算从顶点向片段着色器发送数据,我们都会声明一个相互匹配的输出/输入变量。从一个着色器向另一个着色器发送数据,一次将它们声明好是最简单的方式,但是随着应用变得越来越大,你也许会打算发送的不仅仅是变量,最好还可以包括数组和结构体。
为了帮助我们组织这些变量,GLSL为我们提供了一些叫做接口块(Interface Blocks)的东西,好让我们能够组织这些变量。声明接口块和声明struct有点像,不同之处是它现在基于块(block),使用in和out关键字来声明,最后它将成为一个输入或输出块(block)。
#version 330 core
layout (location = 0) in vec3 position;
layout (location = 1) in vec2 texCoords;

uniform mat4 model;
uniform mat4 view;
uniform mat4 projection;

out VS_OUT
{
    vec2 TexCoords;
} vs_out;

void main()
{
    gl_Position = projection * view * model * vec4(position, 1.0f);
    vs_out.TexCoords = texCoords;
}
这次我们声明一个叫做vs_out的接口块,它把我们需要发送给下个阶段着色器的所有输出变量组合起来。虽然这是一个微不足道的例子,但是你可以想象一下,它的确能够帮助我们组织着色器的输入和输出。当我们希望把着色器的输入和输出组织成数组的时候它就变得很有用,我们会在下节几何着色器(geometry)中见到。然后,我们还需要在下一个着色器——片段着色器中声明一个输入interface block。块名(block name)应该是一样的,但是实例名可以是任意的。
#version 330 core
out vec4 color;

in VS_OUT
{
    vec2 TexCoords;
} fs_in;

uniform sampler2D texture;

void main()
{
    color = texture(texture, fs_in.TexCoords);
}
如果两个interface block名一致,它们对应的输入和输出就会匹配起来。这是另一个可以帮助我们组织代码的有用功能,特别是在跨着色阶段的情况,比如几何着色器。
Uniform缓冲对象
我们使用OpenGL很长时间了,也学到了一些很酷的技巧,但是产生了一些烦恼。比如说,当时用一个以上的着色器的时候,我们必须一次次设置uniform变量,尽管对于每个着色器来说它们都是一样的,所以为什么还麻烦地多次设置它们呢?
OpenGL为我们提供了一个叫做uniform缓冲对象(Uniform Buffer Object)的工具,使我们能够声明一系列的全局uniform变量, 它们会在几个着色器程序中保持一致。当时用uniform缓冲的对象时相关的uniform只能设置一次。我们仍需为每个着色器手工设置唯一的uniform。创建和配置一个uniform缓冲对象需要费点功夫。
因为uniform缓冲对象是一个缓冲,因此我们可以使用glGenBuffers创建一个,然后绑定到GL_UNIFORM_BUFFER缓冲目标上,然后把所有相关uniform数据存入缓冲。有一些原则,像uniform缓冲对象如何储存数据,我们会在稍后讨论。首先我们我们在一个简单的顶点着色器中,用uniform块(uniform block)储存投影和视图矩阵:
#version 330 core
layout (location = 0) in vec3 position;

layout (std140) uniform Matrices
{
    mat4 projection;
    mat4 view;
};

uniform mat4 model;

void main()
{
    gl_Position = projection * view * model * vec4(position, 1.0);
}
前面,大多数例子里我们在每次渲染迭代,都为projection和view矩阵设置uniform。这个例子里使用了uniform缓冲对象,这非常有用,因为这些矩阵我们设置一次就行了。
在这里我们声明了一个叫做Matrices的uniform块,它储存两个4×4矩阵。在uniform块中的变量可以直接获取,而不用使用block名作为前缀。接着我们在缓冲中储存这些矩阵的值,每个声明了这个uniform块的着色器都能够获取矩阵。
现在你可能会奇怪layout(std140)是什么意思。它的意思是说当前定义的uniform块为它的内容使用特定的内存布局,这个声明实际上是设置uniform块布局(uniform block layout)。
Uniform块布局
一个uniform块的内容被储存到一个缓冲对象中,实际上就是在一块内存中。因为这块内存也不清楚它保存着什么类型的数据,我们就必须告诉OpenGL哪一块内存对应着色器中哪一个uniform变量。
假想下面的uniform块在一个着色器中:
layout (std140) uniform ExampleBlock
{
    float value;
    vec3 vector;
    mat4 matrix;
    float values[3];
    bool boolean;
    int integer;
};


示例计算:
layout (std140) uniform ExampleBlock
{
                     // base alignment ----------  // aligned offset
    float value;     // 4                          // 0
    vec3 vector;     // 16                         // 16 (必须是16的倍数,因此 4->16)
    mat4 matrix;     // 16                         // 32  (第 0 行)
                     // 16                         // 48  (第 1 行)
                     // 16                         // 64  (第 2 行)
                     // 16                         // 80  (第 3 行)
    float values[3]; // 16 (数组中的标量与vec4相同)//96 (values[0])
                     // 16                        // 112 (values[1])
                     // 16                        // 128 (values[2])
    bool boolean;    // 4                         // 144
    int integer;     // 4                         // 148
};
尝试自己计算出偏移量,把它们和表格对比,你可以把这件事当作一个练习。使用计算出来的偏移量,根据std140布局规则,我们可以用glBufferSubData这样的函数,使用变量数据填充缓冲。虽然不是很高效,但std140布局可以保证在每个程序中声明的这个uniform块的布局保持一致。
在定义uniform块前面添加layout (std140)声明,我们就能告诉OpenGL这个uniform块使用了std140布局。另外还有两种其他的布局可以选择,它们需要我们在填充缓冲之前查询每个偏移量。我们已经了解了分享布局(shared layout)和其他的布局都将被封装(packed)。当使用封装(packed)布局的时候,不能保证布局在别的程序中能够保持一致,因为它允许编译器从uniform块中优化出去uniform变量,这在每个着色器中都可能不同。
使用uniform缓冲
我们讨论了uniform块在着色器中的定义和如何定义它们的内存布局,但是我们还没有讨论如何使用它们。
首先我们需要创建一个uniform缓冲对象,这要使用glGenBuffers来完成。当我们拥有了一个缓冲对象,我们就把它绑定到GL_UNIFORM_BUFFER目标上,调用glBufferData来给它分配足够的空间。
GLuint uboExampleBlock;
glGenBuffers(1, &uboExampleBlock);
glBindBuffer(GL_UNIFORM_BUFFER, uboExampleBlock);
glBufferData(GL_UNIFORM_BUFFER, 150, NULL, GL_STATIC_DRAW); // 分配150个字节的内存空间
glBindBuffer(GL_UNIFORM_BUFFER, 0);
现在任何时候当我们打算往缓冲中更新或插入数据,我们就绑定到uboExampleBlock上,并使用glBufferSubData来更新它的内存。我们只需要更新这个uniform缓冲一次,所有的使用这个缓冲着色器就都会使用它更新的数据了。但是,OpenGL是如何知道哪个uniform缓冲对应哪个uniform块呢?

我们调用glUniformBlockBinding函数来把uniform块设置到一个特定的绑定点上。函数的第一个参数是一个程序对象,接着是一个uniform块索引(uniform block index)和打算链接的绑定点。uniform块索引是一个着色器中定义的uniform块的索引位置,可以调用glGetUniformBlockIndex来获取这个值,这个函数接收一个程序对象和uniform块的名字。我们可以从图表设置Lights这个uniform块链接到绑定点2:
GLuint lights_index = glGetUniformBlockIndex(shaderA.Program, "Lights");
glUniformBlockBinding(shaderA.Program, lights_index, 2);
注意,我们必须在每个着色器中重复做这件事。
从OpenGL4.2起,也可以在着色器中通过添加另一个布局标识符来储存一个uniform块的绑定点,就不用我们调用glGetUniformBlockIndex和glUniformBlockBinding了。下面的代表显式设置了Lights这个uniform块的绑定点:
layout(std140, binding = 2) uniform Lights { ... };
然后我们还需要把uniform缓冲对象绑定到同样的绑定点上,这个可以使用glBindBufferBase或glBindBufferRange来完成。
glBindBufferBase(GL_UNIFORM_BUFFER, 2, uboExampleBlock);
// 或者
glBindBufferRange(GL_UNIFORM_BUFFER, 2, uboExampleBlock, 0, 150);
函数glBindBufferBase接收一个目标、一个绑定点索引和一个uniform缓冲对象作为它的参数。这个函数把uboExampleBlock链接到绑定点2上面,自此绑定点所链接的两端都链接在一起了。你还可以使用glBindBufferRange函数,这个函数还需要一个偏移量和大小作为参数,这样你就可以只把一定范围的uniform缓冲绑定到一个绑定点上了。使用glBindBufferRage函数,你能够将多个不同的uniform块链接到同一个uniform缓冲对象上。
现在所有事情都做好了,我们可以开始向uniform缓冲添加数据了。我们可以使用glBufferSubData将所有数据添加为一个单独的字节数组或者更新缓冲的部分内容,只要我们愿意。为了更新uniform变量boolean,我们可以这样更新uniform缓冲对象:
glBindBuffer(GL_UNIFORM_BUFFER, uboExampleBlock);
GLint b = true; // GLSL中的布尔值是4个字节,因此我们将它创建为一个4字节的整数
glBufferSubData(GL_UNIFORM_BUFFER, 142, 4, &b);
glBindBuffer(GL_UNIFORM_BUFFER, 0);
同样的处理也能够应用到uniform块中其他uniform变量上。
一个简单的例子
我们来师范一个真实的使用uniform缓冲对象的例子。如果我们回头看看前面所有演示的代码,我们一直使用了3个矩阵:投影、视图和模型矩阵。所有这些矩阵中,只有模型矩阵是频繁变化的。如果我们有多个着色器使用了这些矩阵,我们可能最好还是使用uniform缓冲对象。
我们将把投影和视图矩阵储存到一个uniform块中,它被取名为Matrices。我们不打算储存模型矩阵,因为模型矩阵会频繁在着色器间更改,所以使用uniform缓冲对象真的不会带来什么好处。
#version 330 core
layout (location = 0) in vec3 position;

layout (std140) uniform Matrices
{
    mat4 projection;
    mat4 view;
};
uniform mat4 model;

void main()
{
    gl_Position = projection * view * model * vec4(position, 1.0);
}
这儿没什么特别的,除了我们现在使用了一个带有std140布局的uniform块。我们在例程中将显示4个立方体,每个立方体都使用一个不同的着色器程序。4个着色器程序使用同样的顶点着色器,但是它们将使用各自的片段着色器,每个片段着色器输出一个单色。
首先,我们把顶点着色器的uniform块设置为绑定点0。注意,我们必须为每个着色器做这件事。
GLuint uniformBlockIndexRed = glGetUniformBlockIndex(shaderRed.Program, "Matrices");
GLuint uniformBlockIndexGreen = glGetUniformBlockIndex(shaderGreen.Program, "Matrices");
GLuint uniformBlockIndexBlue = glGetUniformBlockIndex(shaderBlue.Program, "Matrices");
GLuint uniformBlockIndexYellow = glGetUniformBlockIndex(shaderYellow.Program, "Matrices");

glUniformBlockBinding(shaderRed.Program, uniformBlockIndexRed, 0);
glUniformBlockBinding(shaderGreen.Program, uniformBlockIndexGreen, 0);
glUniformBlockBinding(shaderBlue.Program, uniformBlockIndexBlue, 0);
glUniformBlockBinding(shaderYellow.Program, uniformBlockIndexYellow, 0);
然后,我们创建真正的uniform缓冲对象,并把缓冲绑定到绑定点0:
Luint uboMatrices
glGenBuffers(1, &uboMatrices);

glBindBuffer(GL_UNIFORM_BUFFER, uboMatrices);
glBufferData(GL_UNIFORM_BUFFER, 2 * sizeof(glm::mat4), NULL, GL_STATIC_DRAW);
glBindBuffer(GL_UNIFORM_BUFFER, 0);

glBindBufferRange(GL_UNIFORM_BUFFER, 0, uboMatrices, 0, 2 * sizeof(glm::mat4));
我们先为缓冲分配足够的内存,它等于glm::mat4的2倍。GLM的矩阵类型的大小直接对应于GLSL的mat4。然后我们把一个特定范围的缓冲链接到绑定点0,这个例子中应该是整个缓冲。
现在所有要做的事只剩下填充缓冲了。如果我们把视野( field of view)值保持为恒定的投影矩阵(这样就不会有摄像机缩放),我们只要在程序中定义它一次就行了,这也意味着我们只需向缓冲中把它插入一次。因为我们已经在缓冲对象中分配了足够的内存,我们可以在我们进入游戏循环之前使用glBufferSubData来储存投影矩阵:
glm::mat4 projection = glm::perspective(45.0f, (float)width/(float)height, 0.1f, 100.0f);
glBindBuffer(GL_UNIFORM_BUFFER, uboMatrices);
glBufferSubData(GL_UNIFORM_BUFFER, 0, sizeof(glm::mat4), glm::value_ptr(projection));
glBindBuffer(GL_UNIFORM_BUFFER, 0);
这里我们用投影矩阵储存了uniform缓冲的前半部分。在我们在每次渲染迭代绘制物体前,我们用视图矩阵更新缓冲的第二个部分:
glm::mat4 view = camera.GetViewMatrix();
glBindBuffer(GL_UNIFORM_BUFFER, uboMatrices);
glBufferSubData(
  GL_UNIFORM_BUFFER, sizeof(glm::mat4), sizeof(glm::mat4), glm::value_ptr(view));
glBindBuffer(GL_UNIFORM_BUFFER, 0);
这就是uniform缓冲对象。每个包含着Matrices这个uniform块的顶点着色器都将对应uboMatrices所储存的数据。所以如果我们现在使用4个不同的着色器绘制4个立方体,它们的投影和视图矩阵都是一样的:
glBindVertexArray(cubeVAO);
shaderRed.Use();
glm::mat4 model;
model = glm::translate(model, glm::vec3(-0.75f, 0.75f, 0.0f)); // 移动到左上方
glUniformMatrix4fv(modelLoc, 1, GL_FALSE, glm::value_ptr(model));
glDrawArrays(GL_TRIANGLES, 0, 36);
// ... 绘制绿色立方体
// ... 绘制蓝色立方体
// ... 绘制黄色立方体
glBindVertexArray(0);
我们只需要在去设置一个model的uniform即可。在一个像这样的场景中使用uniform缓冲对象在每个着色器中可以减少uniform的调用。最后效果看起来像这样:
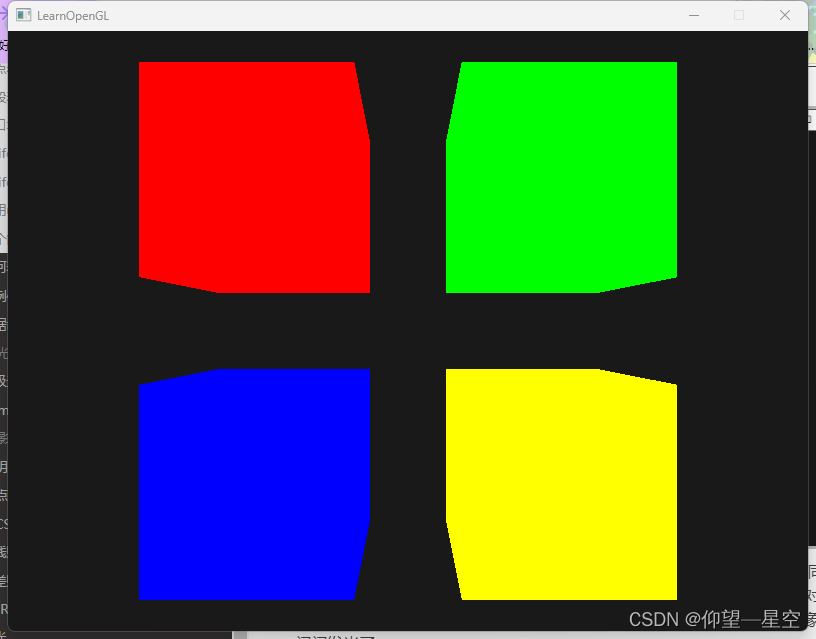
通过改变模型矩阵,每个立方体都移动到窗口的一边,由于片段着色器不同,物体的颜色也不同。这是一个相对简单的场景,我们可以使用uniform缓冲对象,但是任何大型渲染程序有成百上千的活动着色程序,彼时uniform缓冲对象就会闪闪发光了。
uniform缓冲对象比单独的uniform有很多好处。第一,一次设置多个uniform比一次设置一个速度快。第二,如果你打算改变一个横跨多个着色器的uniform,在uniform缓冲中只需更改一次。最后一个好处可能不是很明显,使用uniform缓冲对象你可以在着色器中使用更多的uniform。OpenGL有一个对可使用uniform数据的数量的限制,可以用GL_MAX_VERTEX_UNIFORM_COMPONENTS来获取。当使用uniform缓冲对象中,这个限制的阈限会更高。所以无论何时,你达到了uniform的最大使用数量(比如做骨骼动画的时候),你可以使用uniform缓冲对象。
源代码
顶点着色器:
#version 330 core
layout (location = 0) in vec3 position;
layout (std140) uniform Matrices
{
	mat4 projection;
	mat4 view;
};

uniform mat4 model;

void main()
{
    gl_Position = projection * view * model * vec4(position, 1.0f);
}
主程序:
// Std. Includes
#include <string>
#include <algorithm>
using namespace std;

// GLEW
#define GLEW_STATIC
#include <GL/glew.h>

// GLFW
#include <GLFW/glfw3.h>

// GL includes
#include "Shader.h"
#include "Camera.h"
#include "Model.h"

// GLM Mathemtics
#include <glm/glm.hpp>
#include <glm/gtc/matrix_transform.hpp>
#include <glm/gtc/type_ptr.hpp>

// Other Libs
#include <SOIL.h>

// Properties
GLuint screenWidth = 800, screenHeight = 600;

// Function prototypes
void key_callback(GLFWwindow* window, int key, int scancode, int action, int mode);
void scroll_callback(GLFWwindow* window, double xoffset, double yoffset);
void mouse_callback(GLFWwindow* window, double xpos, double ypos);
void Do_Movement();
void printError();
GLuint loadTexture(const GLchar* path);
GLuint loadCubemap(vector<const GLchar*> faces);

// Camera
Camera camera(glm::vec3(0.0f, 0.0f, 3.0f));
bool keys[1024];
GLfloat lastX = 400, lastY = 300;
bool firstMouse = true;

GLfloat deltaTime = 0.0f;
GLfloat lastFrame = 0.0f;

// The MAIN function, from here we start our application and run our Game loop
int main()
{
    // Init GLFW
    glfwInit();
    glfwWindowHint(GLFW_CONTEXT_VERSION_MAJOR, 3);
    glfwWindowHint(GLFW_CONTEXT_VERSION_MINOR, 3);
    glfwWindowHint(GLFW_OPENGL_PROFILE, GLFW_OPENGL_CORE_PROFILE);
    glfwWindowHint(GLFW_RESIZABLE, GL_FALSE);

    GLFWwindow* window = glfwCreateWindow(screenWidth, screenHeight, "LearnOpenGL", nullptr, nullptr); // Windowed
    glfwMakeContextCurrent(window);

    // Set the required callback functions
    glfwSetKeyCallback(window, key_callback);
    glfwSetCursorPosCallback(window, mouse_callback);
    glfwSetScrollCallback(window, scroll_callback);

    // Options
    glfwSetInputMode(window, GLFW_CURSOR, GLFW_CURSOR_DISABLED);

    // Initialize GLEW to setup the OpenGL Function pointers
    glewExperimental = GL_TRUE;
    glewInit();
    glGetError(); // Debug GLEW bug fix

    // Define the viewport dimensions
    glViewport(0, 0, screenWidth, screenHeight);

    // Setup some OpenGL options
    glEnable(GL_DEPTH_TEST);
    glDepthFunc(GL_LESS);
    glEnable(GL_PROGRAM_POINT_SIZE);

    // Setup and compile our shaders
    Shader shaderRed("C:\\Users\\32156\\source\\repos\\LearnOpenGL\\Shader\\vertexShader.txt", "C:\\Users\\32156\\source\\repos\\LearnOpenGL\\Shader\\RedFragmentShader.txt");
    Shader shaderGreen("C:\\Users\\32156\\source\\repos\\LearnOpenGL\\Shader\\vertexShader.txt", "C:\\Users\\32156\\source\\repos\\LearnOpenGL\\Shader\\GreenFragmentShader.txt");
    Shader shaderBlue("C:\\Users\\32156\\source\\repos\\LearnOpenGL\\Shader\\vertexShader.txt", "C:\\Users\\32156\\source\\repos\\LearnOpenGL\\Shader\\BlueFragmentShader.txt");
    Shader shaderYellow("C:\\Users\\32156\\source\\repos\\LearnOpenGL\\Shader\\vertexShader.txt", "C:\\Users\\32156\\source\\repos\\LearnOpenGL\\Shader\\YellowFragmentShader.txt");

    GLfloat vertices[] = {
        // Back face
        -0.5f, -0.5f, -0.5f,  0.0f, 0.0f, // Bottom-left
         0.5f,  0.5f, -0.5f,  1.0f, 1.0f, // top-right
         0.5f, -0.5f, -0.5f,  1.0f, 0.0f, // bottom-right
         0.5f,  0.5f, -0.5f,  1.0f, 1.0f, // top-right
        -0.5f, -0.5f, -0.5f,  0.0f, 0.0f, // bottom-left
        -0.5f,  0.5f, -0.5f,  0.0f, 1.0f, // top-left
        // Front face
        -0.5f, -0.5f,  0.5f,  0.0f, 0.0f, // bottom-left
         0.5f, -0.5f,  0.5f,  1.0f, 0.0f, // bottom-right
         0.5f,  0.5f,  0.5f,  1.0f, 1.0f, // top-right
         0.5f,  0.5f,  0.5f,  1.0f, 1.0f, // top-right
        -0.5f,  0.5f,  0.5f,  0.0f, 1.0f, // top-left
        -0.5f, -0.5f,  0.5f,  0.0f, 0.0f, // bottom-left
        // Left face
        -0.5f,  0.5f,  0.5f,  1.0f, 0.0f, // top-right
        -0.5f,  0.5f, -0.5f,  1.0f, 1.0f, // top-left
        -0.5f, -0.5f, -0.5f,  0.0f, 1.0f, // bottom-left
        -0.5f, -0.5f, -0.5f,  0.0f, 1.0f, // bottom-left
        -0.5f, -0.5f,  0.5f,  0.0f, 0.0f, // bottom-right
        -0.5f,  0.5f,  0.5f,  1.0f, 0.0f, // top-right
        // Right face
         0.5f,  0.5f,  0.5f,  1.0f, 0.0f, // top-left
         0.5f, -0.5f, -0.5f,  0.0f, 1.0f, // bottom-right
         0.5f,  0.5f, -0.5f,  1.0f, 1.0f, // top-right
         0.5f, -0.5f, -0.5f,  0.0f, 1.0f, // bottom-right
         0.5f,  0.5f,  0.5f,  1.0f, 0.0f, // top-left
         0.5f, -0.5f,  0.5f,  0.0f, 0.0f, // bottom-left
        // Bottom face
        -0.5f, -0.5f, -0.5f,  0.0f, 1.0f, // top-right
         0.5f, -0.5f, -0.5f,  1.0f, 1.0f, // top-left
         0.5f, -0.5f,  0.5f,  1.0f, 0.0f, // bottom-left
         0.5f, -0.5f,  0.5f,  1.0f, 0.0f, // bottom-left
        -0.5f, -0.5f,  0.5f,  0.0f, 0.0f, // bottom-right
        -0.5f, -0.5f, -0.5f,  0.0f, 1.0f, // top-right
        // Top face
        -0.5f,  0.5f, -0.5f,  0.0f, 1.0f, // top-left
         0.5f,  0.5f,  0.5f,  1.0f, 0.0f, // bottom-right
         0.5f,  0.5f, -0.5f,  1.0f, 1.0f, // top-right
         0.5f,  0.5f,  0.5f,  1.0f, 0.0f, // bottom-right
        -0.5f,  0.5f, -0.5f,  0.0f, 1.0f, // top-left
        -0.5f,  0.5f,  0.5f,  0.0f, 0.0f  // bottom-left
    };
    GLuint VAO, VBO;
    glGenVertexArrays(1, &VAO);
    glGenBuffers(1, &VBO);
    glBindVertexArray(VAO);
    glBindBuffer(GL_ARRAY_BUFFER, VBO);
    glBufferData(GL_ARRAY_BUFFER, sizeof(vertices), &vertices, GL_STATIC_DRAW);
    glEnableVertexAttribArray(0);
    glVertexAttribPointer(0, 3, GL_FLOAT, GL_FALSE, 5 * sizeof(GL_FLOAT), (GLvoid*)0);
    glBindVertexArray(0);

    // 获取每个着色器的uniform块索引
    GLuint uniformBlockIndexRed = glGetUniformBlockIndex(shaderRed.Program, "Matrices");
    GLuint uniformBlockIndexGreen = glGetUniformBlockIndex(shaderGreen.Program, "Matrices");
    GLuint uniformBlockIndexBlue = glGetUniformBlockIndex(shaderBlue.Program, "Matrices");
    GLuint uniformBlockIndexYellow = glGetUniformBlockIndex(shaderYellow.Program, "Matrices");

    // 将顶点着色器的uniform块设置为绑定点0 (注意我们必须为每个着色器程序中的顶点着色器做这件事)
    glUniformBlockBinding(shaderRed.Program, uniformBlockIndexRed, 0);
    glUniformBlockBinding(shaderGreen.Program, uniformBlockIndexGreen, 0);
    glUniformBlockBinding(shaderBlue.Program, uniformBlockIndexBlue, 0);
    glUniformBlockBinding(shaderYellow.Program, uniformBlockIndexYellow, 0);

    // 创建真正的uniform缓冲对象,并把缓冲绑定到绑定点0
    GLuint uboMatrices;
    glGenBuffers(1, &uboMatrices);
    glBindBuffer(GL_UNIFORM_BUFFER, uboMatrices);
    glBufferData(GL_UNIFORM_BUFFER, 2 * sizeof(glm::mat4), NULL, GL_STATIC_DRAW);
    glBindBuffer(GL_UNIFORM_BUFFER, 0);

    glBindBufferRange(GL_UNIFORM_BUFFER, 0, uboMatrices, 0, 2 * sizeof(glm::mat4));

    glm::mat4 projection = glm::perspective(45.0f, (float)screenWidth / (float)screenHeight, 0.1f, 100.0f);
    glBindBuffer(GL_UNIFORM_BUFFER, uboMatrices);
    glBufferSubData(GL_UNIFORM_BUFFER, 0, sizeof(glm::mat4), glm::value_ptr(projection));
    glBindBuffer(GL_UNIFORM_BUFFER, 0);

    // Game loop
    while (!glfwWindowShouldClose(window))
    {
        // Set frame time
        GLfloat currentFrame = glfwGetTime();
        deltaTime = currentFrame - lastFrame;
        lastFrame = currentFrame;

        // Check and call events
        glfwPollEvents();
        Do_Movement();

        // Clear buffers
        glClearColor(0.1f, 0.1f, 0.1f, 1.0f);
        glClear(GL_COLOR_BUFFER_BIT | GL_DEPTH_BUFFER_BIT);

        glm::mat4 view = camera.GetViewMatrix();
        glBindBuffer(GL_UNIFORM_BUFFER, uboMatrices);
        glBufferSubData(
            GL_UNIFORM_BUFFER, sizeof(glm::mat4), sizeof(glm::mat4), glm::value_ptr(view));
        glBindBuffer(GL_UNIFORM_BUFFER, 0);

        glBindVertexArray(VAO);

        shaderRed.Use();
        glm::mat4 model = glm::mat4(1.0f);
        model = glm::translate(model, glm::vec3(-0.75f, 0.75f, 0.0f)); // 移动到左上方
        glUniformMatrix4fv(glGetUniformLocation(shaderRed.Program, "model"), 1, GL_FALSE, glm::value_ptr(model));
        glDrawArrays(GL_TRIANGLES, 0, 36);

        shaderGreen.Use();
        model = glm::mat4(1.0f);
        model = glm::translate(model, glm::vec3(0.75f, 0.75f, 0.0f));	// Move top-right
        glUniformMatrix4fv(glGetUniformLocation(shaderRed.Program, "model"), 1, GL_FALSE, glm::value_ptr(model));
        glDrawArrays(GL_TRIANGLES, 0, 36);

        shaderBlue.Use();
        model = glm::mat4(1.0f);
        model = glm::translate(model, glm::vec3(-0.75f, -0.75f, 0.0f));	// Move bottom-left
        glUniformMatrix4fv(glGetUniformLocation(shaderRed.Program, "model"), 1, GL_FALSE, glm::value_ptr(model));
        glDrawArrays(GL_TRIANGLES, 0, 36);

        shaderYellow.Use();
        model = glm::mat4(1.0f);
        model = glm::translate(model, glm::vec3(0.75f, -0.75f, 0.0f));	// Move bottom-right
        glUniformMatrix4fv(glGetUniformLocation(shaderRed.Program, "model"), 1, GL_FALSE, glm::value_ptr(model));
        glDrawArrays(GL_TRIANGLES, 0, 36);

        glBindVertexArray(0);

        // Swap the buffers
        glfwSwapBuffers(window);

        printError();
    }

    glfwTerminate();
    return 0;
}

void printError()
{
    GLuint errorCode = glGetError();
    if (errorCode)
        std::cout << errorCode << std::endl;
}

// Loads a cubemap texture from 6 individual texture faces
// Order should be:
// +X (right)
// -X (left)
// +Y (top)
// -Y (bottom)
// +Z (front)
// -Z (back)
GLuint loadCubemap(vector<const GLchar*> faces)
{
    GLuint textureID;
    glGenTextures(1, &textureID);

    int width, height;
    unsigned char* image;

    glBindTexture(GL_TEXTURE_CUBE_MAP, textureID);
    for (GLuint i = 0; i < faces.size(); i++)
    {
        image = SOIL_load_image(faces[i], &width, &height, 0, SOIL_LOAD_RGB);
        glTexImage2D(GL_TEXTURE_CUBE_MAP_POSITIVE_X + i, 0, GL_RGB, width, height, 0, GL_RGB, GL_UNSIGNED_BYTE, image);
        SOIL_free_image_data(image);
    }
    glTexParameteri(GL_TEXTURE_CUBE_MAP, GL_TEXTURE_MAG_FILTER, GL_LINEAR);
    glTexParameteri(GL_TEXTURE_CUBE_MAP, GL_TEXTURE_MIN_FILTER, GL_LINEAR);
    glTexParameteri(GL_TEXTURE_CUBE_MAP, GL_TEXTURE_WRAP_S, GL_CLAMP_TO_EDGE);
    glTexParameteri(GL_TEXTURE_CUBE_MAP, GL_TEXTURE_WRAP_T, GL_CLAMP_TO_EDGE);
    glTexParameteri(GL_TEXTURE_CUBE_MAP, GL_TEXTURE_WRAP_R, GL_CLAMP_TO_EDGE);
    glBindTexture(GL_TEXTURE_CUBE_MAP, 0);

    return textureID;
}


// This function loads a texture from file. Note: texture loading functions like these are usually
// managed by a 'Resource Manager' that manages all resources (like textures, models, audio).
// For learning purposes we'll just define it as a utility function.
GLuint loadTexture(const GLchar* path)
{
    //Generate texture ID and load texture data
    GLuint textureID;
    glGenTextures(1, &textureID);
    int width, height;
    unsigned char* image = SOIL_load_image(path, &width, &height, 0, SOIL_LOAD_RGB);
    // Assign texture to ID
    glBindTexture(GL_TEXTURE_2D, textureID);
    glTexImage2D(GL_TEXTURE_2D, 0, GL_RGB, width, height, 0, GL_RGB, GL_UNSIGNED_BYTE, image);
    glGenerateMipmap(GL_TEXTURE_2D);

    // Parameters
    glTexParameteri(GL_TEXTURE_2D, GL_TEXTURE_WRAP_S, GL_REPEAT);
    glTexParameteri(GL_TEXTURE_2D, GL_TEXTURE_WRAP_T, GL_REPEAT);
    glTexParameteri(GL_TEXTURE_2D, GL_TEXTURE_MIN_FILTER, GL_LINEAR_MIPMAP_LINEAR);
    glTexParameteri(GL_TEXTURE_2D, GL_TEXTURE_MAG_FILTER, GL_LINEAR);
    glBindTexture(GL_TEXTURE_2D, 0);
    SOIL_free_image_data(image);
    return textureID;
}

#pragma region "User input"

// Moves/alters the camera positions based on user input
void Do_Movement()
{
    // Camera controls
    if (keys[GLFW_KEY_W])
        camera.ProcessKeyboard(FORWARD, deltaTime);
    if (keys[GLFW_KEY_S])
        camera.ProcessKeyboard(BACKWARD, deltaTime);
    if (keys[GLFW_KEY_A])
        camera.ProcessKeyboard(LEFT, deltaTime);
    if (keys[GLFW_KEY_D])
        camera.ProcessKeyboard(RIGHT, deltaTime);
}

// Is called whenever a key is pressed/released via GLFW
void key_callback(GLFWwindow* window, int key, int scancode, int action, int mode)
{
    if (key == GLFW_KEY_ESCAPE && action == GLFW_PRESS)
        glfwSetWindowShouldClose(window, GL_TRUE);

    if (action == GLFW_PRESS)
        keys[key] = true;
    else if (action == GLFW_RELEASE)
        keys[key] = false;
}

void mouse_callback(GLFWwindow* window, double xpos, double ypos)
{
    if (firstMouse)
    {
        lastX = xpos;
        lastY = ypos;
        firstMouse = false;
    }

    GLfloat xoffset = xpos - lastX;
    GLfloat yoffset = lastY - ypos;

    lastX = xpos;
    lastY = ypos;

    camera.ProcessMouseMovement(xoffset, yoffset);
}

void scroll_callback(GLFWwindow* window, double xoffset, double yoffset)
{
    camera.ProcessMouseScroll(yoffset);
}

#pragma endregion