一 : 什么是Spring MVC ?
1.1 概述
Spring MVC全称Spring Web MVC,又称为Spring Web,它是一个原始的基于Servlet API 的 web 框架.
Q : 经典问题 : Spring/Spring Boot/Spring MVC 有什么区别 ?
A : Spring,一般指代的是Spring Framework,它是一个开源的应用程序框架,提供了一个简易的开发方式,通过这种开发方式,将避免那些可能致使代码变得繁杂混乱的大量的业务/工具对象,说的更通俗一点就是由框架来帮你管理这些对象,包括它的创建,销毁等,比如基于Spring的项目里经常能看到的Bean,它代表的就是由Spring管辖的对象。
Spring MVC是Spring的一部分,Spring 出来以后,大家觉得很好用,于是按照这种模式设计了一个 MVC框架(一些用Spring 解耦的组件),主要用于开发WEB应用和网络接口,它是Spring的一个模块 .
Spring Boot 是所有基于 Spring 开发的项目的起点 . Spring Boot是在Spring的基础上面搭设的框架,目的是为了简化Spring项目的搭设和开发过程 .


1.2 MVC
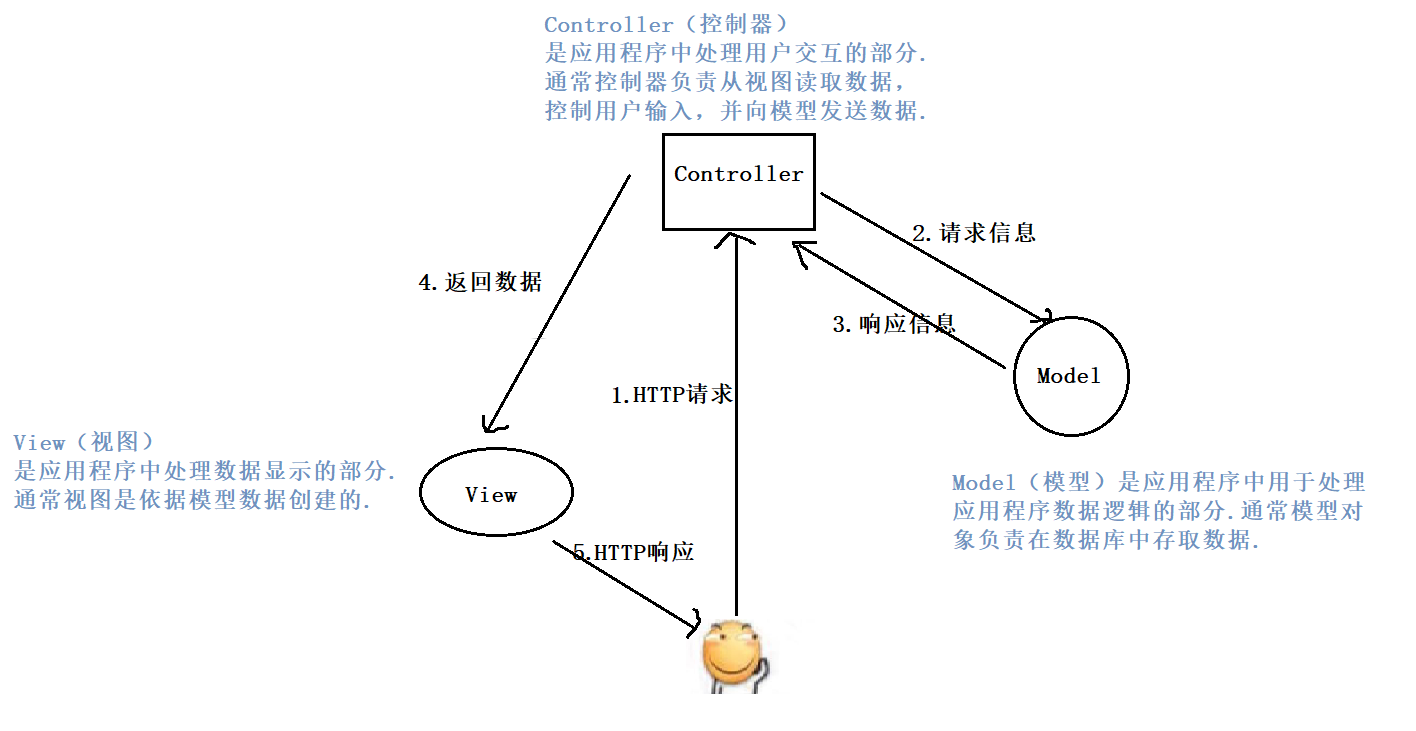
MVC 是 Model View Controller 的缩写,它是软件工程中的一种软件架构模式,它把软件系统分为模型、视图和控制器三个基本部分.
1.3 MVC和Spring MVC的区别与联系
MVC 是一种思想,Spring MVC 是对 MVC 思想的具体实现.
总结来说,Spring MVC 是一个实现了 MVC 模式,并继承了 Servlet API 的 Web 框架 . 既然是 Web 框架,那么当用户在浏览器中输入了 url 之后,我们的 Spring MVC 项目就可以感知到用户的请求 .
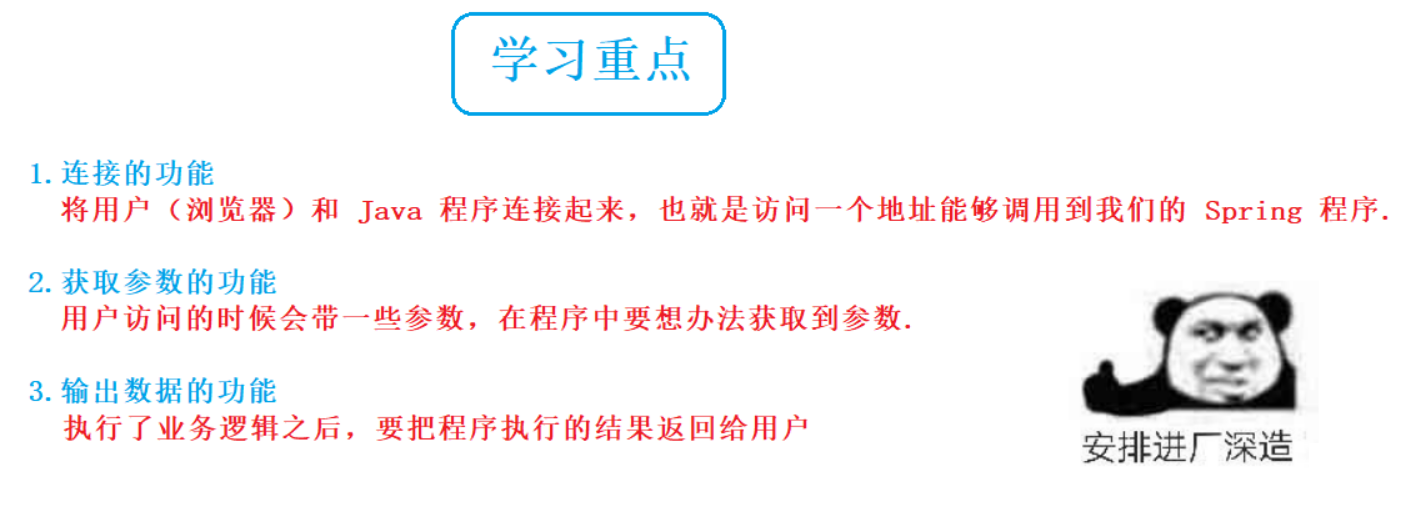
1.4 学习重点
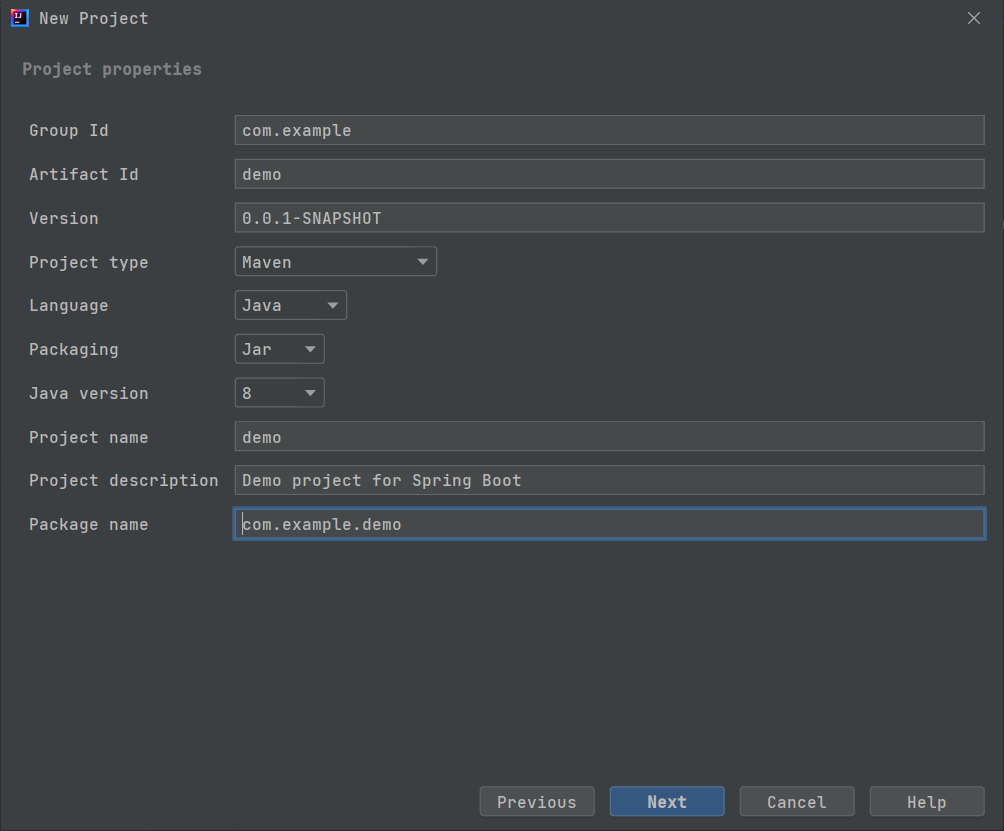
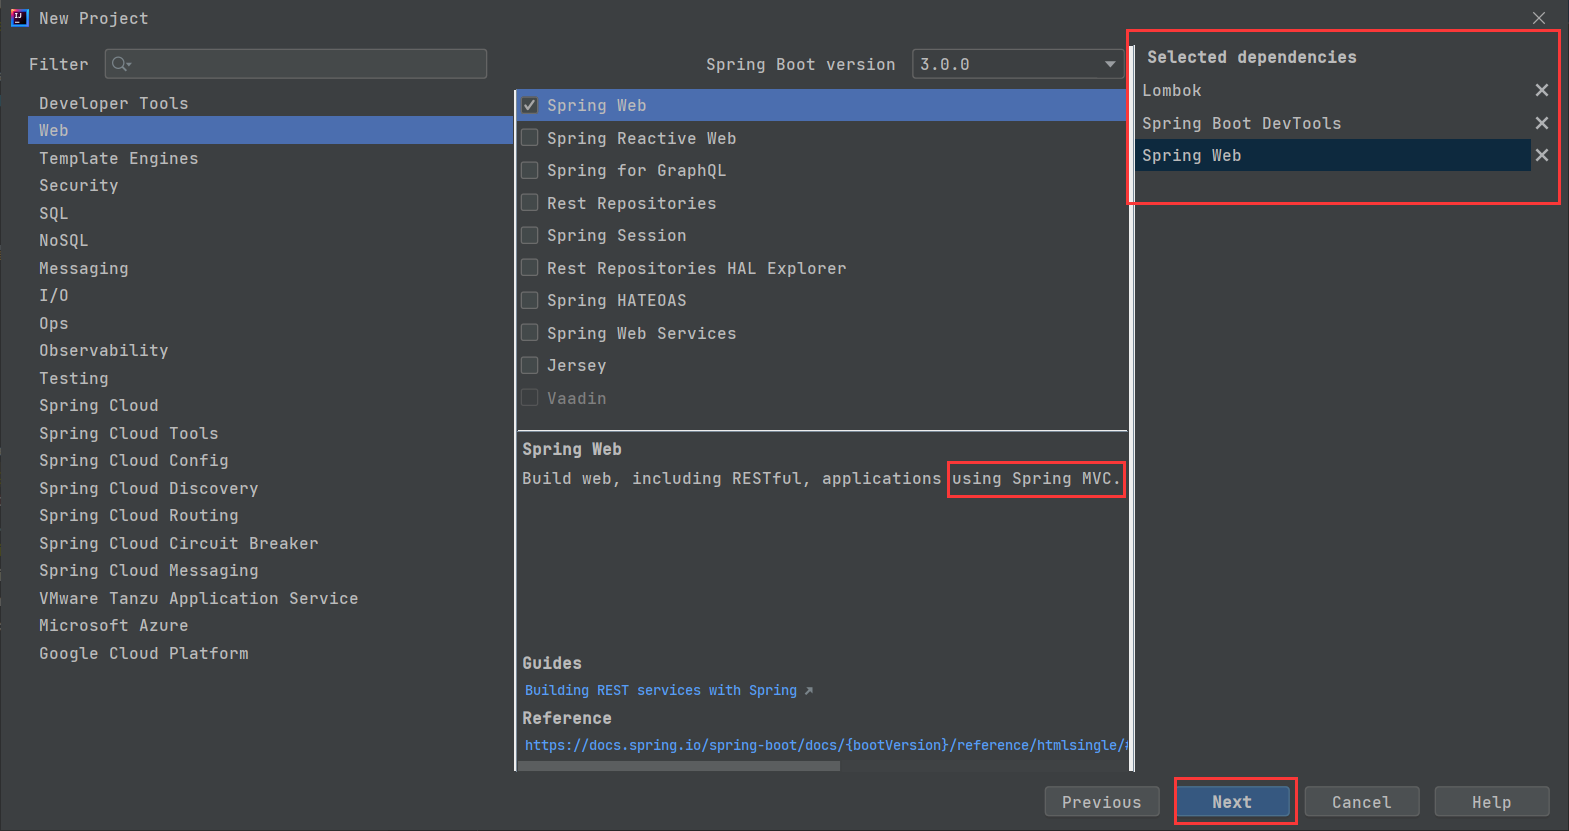
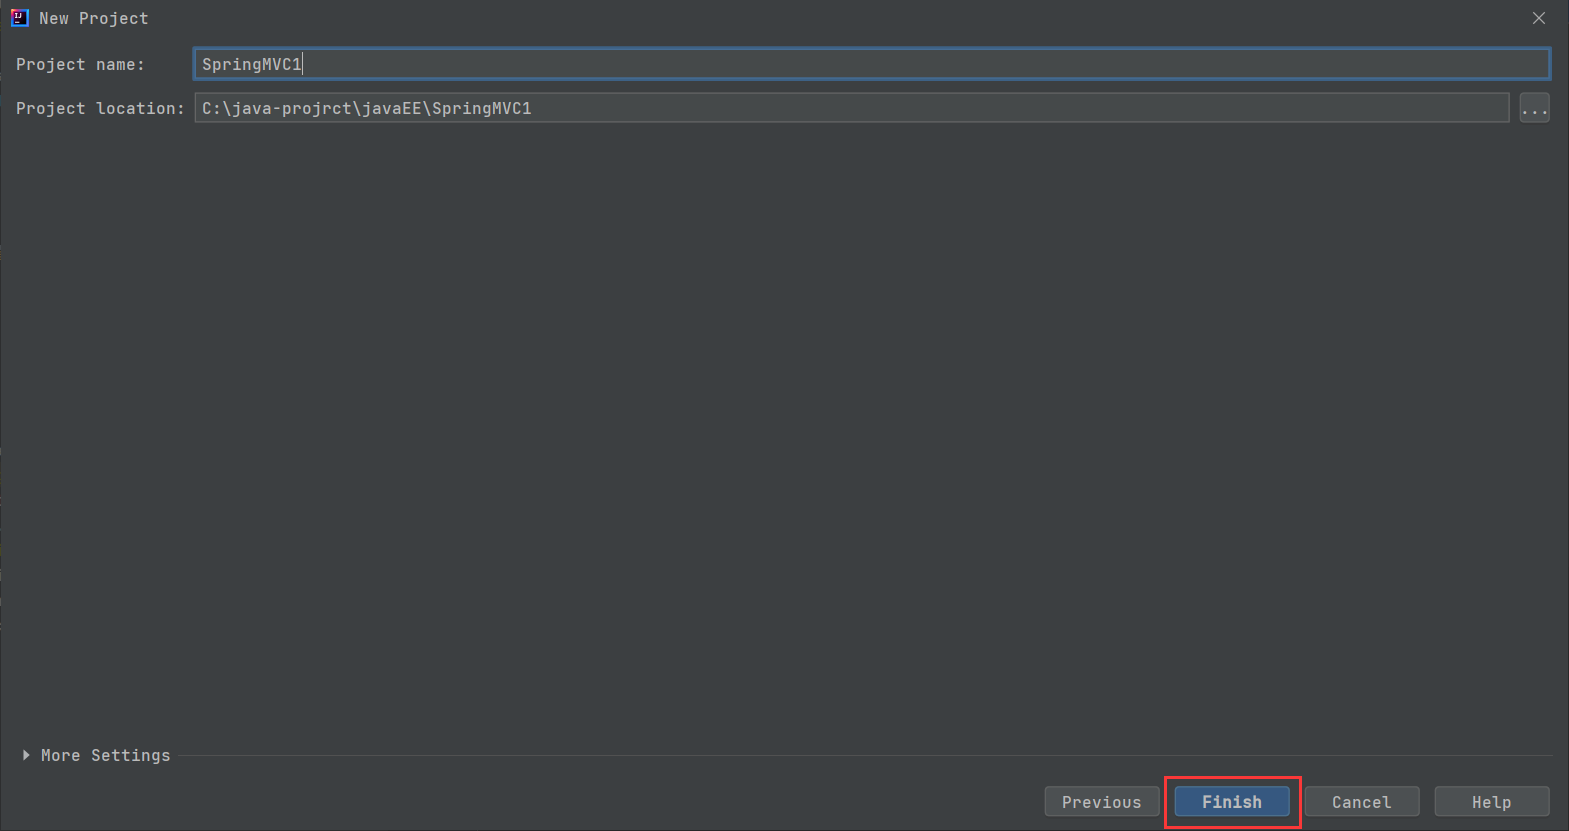
二 : Spring MVC项目的创建

三 : 连接的功能
package com.example.demo;

import org.springframework.stereotype.Controller;
import org.springframework.web.bind.annotation.RequestMapping;
import org.springframework.web.bind.annotation.ResponseBody;

@Controller //控制器,在Spring启动的时候加载并注册
@RequestMapping("/web") //当使用"/web"可以访问到当前类
public class WebController {

    //当使用“/web”+“/hi”可以访问到当前方法
    @RequestMapping("/hi")
    @ResponseBody //将java对象转为json格式的数据
    public Object say() {
        return "Hi,Spring MVC!";
    }
}
运行结果 :

细说注解

@Controller
在SpringMVC 中,控制器Controller 负责处理由DispatcherServlet 分发的请求,它把用户请求的数据经过业务处理层处理之后封装成一个Model ,然后再把该Model 返回给对应的View 进行展示。在SpringMVC 中提供了一个非常简便的定义Controller 的方法,你无需继承特定的类或实现特定的接口,只需使用@Controller 标记一个类是Controller ,然后使用@RequestMapping 和@RequestParam 等一些注解用以定义URL 请求和Controller 方法之间的映射,这样的Controller 就能被外界访问到。
@RequestMapping
@RequestMapping 既可修饰类,也可以修饰方法,当修饰类和方法时,访问的地址是类 + 方法 .
@RequestMapping也可以只修饰方法 :
package com.example.demo;

import org.springframework.stereotype.Controller;
import org.springframework.web.bind.annotation.RequestMapping;
import org.springframework.web.bind.annotation.ResponseBody;

@Controller //控制器,在Spring启动的时候加载并注册
public class WebController {

    @RequestMapping("/hi")
    @ResponseBody
    public Object say() {
        return "Hi,Spring MVC!";
    }
}
运行结果 :

@RequestMapping 是 post 还是 get 请求?
使用Postman进行测试 :
先发送GET请求 :
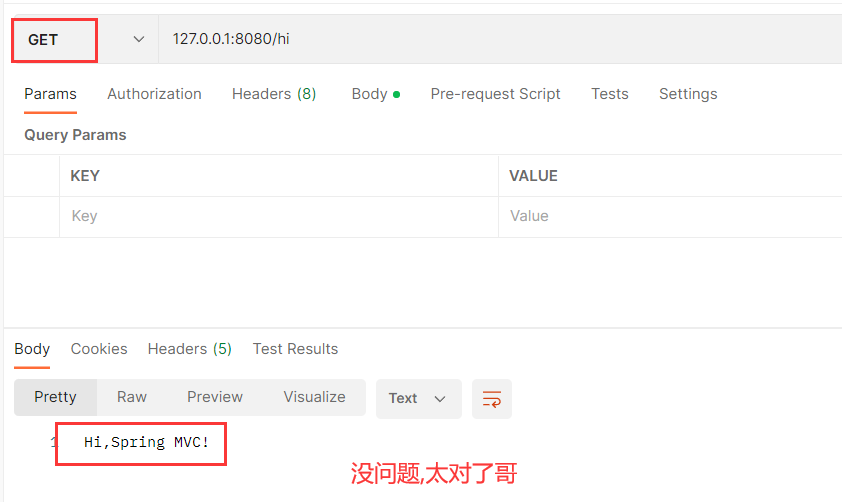
再发送POST请求 :

经过测试 , 发现两种请求都可以正常发送 .
同时 , @RequestMapping 也可以指定发送的请求类型 :
指定GET请求
package com.example.demo;

import org.springframework.stereotype.Controller;
import org.springframework.web.bind.annotation.RequestMapping;
import org.springframework.web.bind.annotation.RequestMethod;
import org.springframework.web.bind.annotation.ResponseBody;

@Controller //控制器,在Spring启动的时候加载并注册
public class WebController {

    @RequestMapping(value = "/hi",method = RequestMethod.GET)
    @ResponseBody
    public Object say() {
        return "Hi,Spring MVC!";
    }
}
当我们指定请求类型时 , 需要添加method参数 , 此时前面的路径/hi也被添加了value注释 , 这说明当只有一个参数时 , 默认类型为value ; 当有多个参数时 , 需要显式指定参数的类型 .
使用Postman进行测试 :
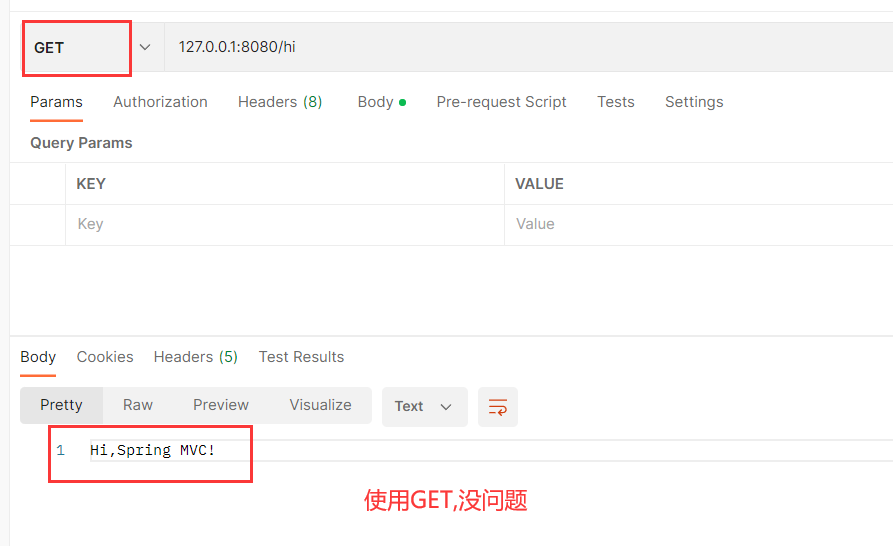
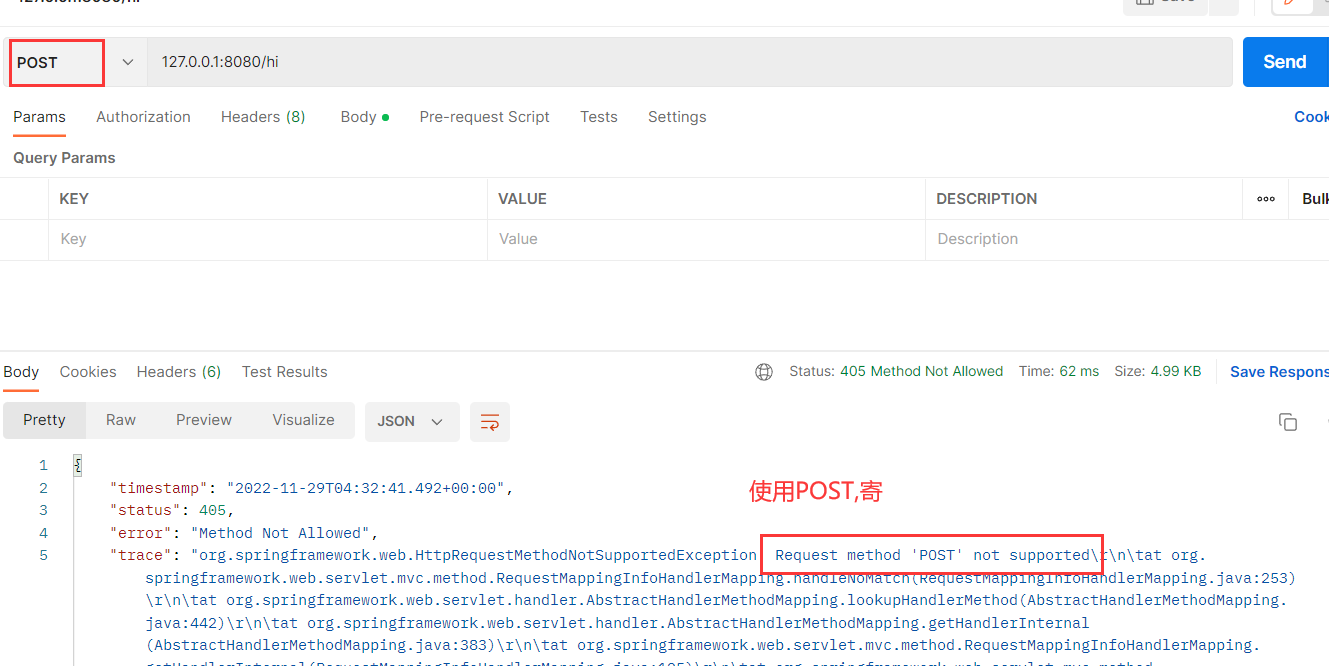
同理可指定请求类型为POST .
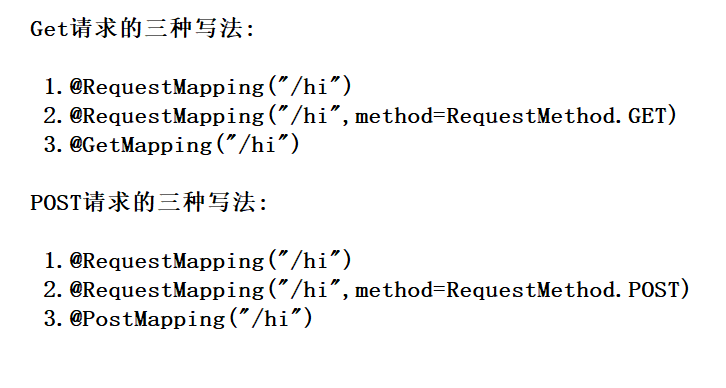
关于请求的指定 , 还可以使用专门的注解 :
@GetMapping 和 PostMapping , 在此不做过多演示 , 使用方法和@RequestMapping类似 .
总结 :
@ResponseBody
@ResponseBody的作用其实是将java对象转为json格式的数据 .
- 如果一个方法上没有加入ResponseBody注解,则Spring会将方法的返回值封装为一个ModelAndView对象返回 .
- 如果一个方法上加入了ResponseBody注解时,当返回值是字符串时,则返回字符串至客户端 ; 如果返回值是一个对象时,则将对象转换为json串,返回到客户端 .
- 如果将ResponseBody注解加在类前面 , 其效果等同于将该注解加在该类的所有方法上 !!!
文章推荐 : @ResponseBody详解
四 : 获取参数的功能
4.1 获取单个参数
在 Spring MVC 中可以直接用方法中的参数来实现传参.
package com.example.demo;

import org.springframework.stereotype.Controller;
import org.springframework.web.bind.annotation.RequestMapping;
import org.springframework.web.bind.annotation.RequestMethod;
import org.springframework.web.bind.annotation.ResponseBody;

@Controller //控制器,在Spring启动的时候加载并注册
@RequestMapping("/web") //当使用"/web"可以访问到当前类
public class WebController {

    @RequestMapping(value = "/say")
    @ResponseBody
    public Object say(String name) {
        return "I am" + name;
    }
}
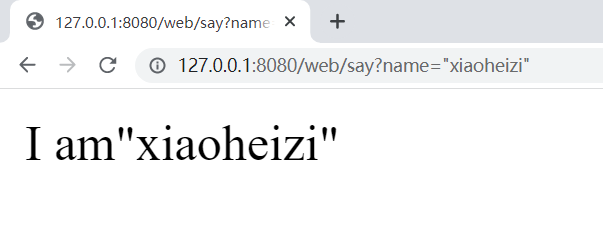
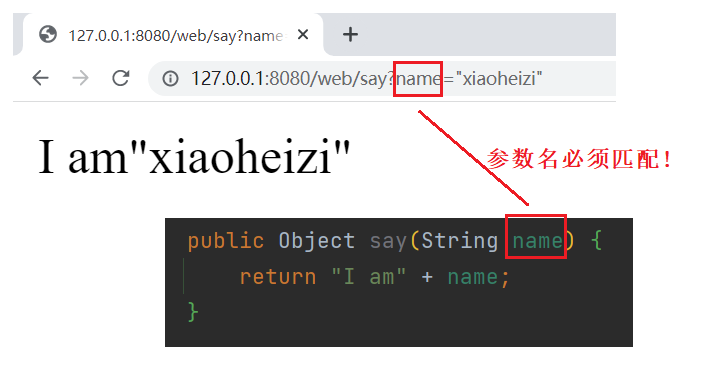
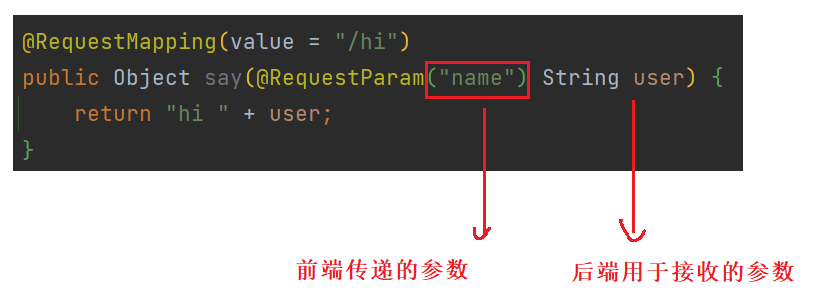
某些特殊的情况下,前端传递的参数 key 和我们后端接收的 key 可以不一致,比如前端传递了一个name后端,而后端又是有user字段来接收的,这样就会出现参数接收不到的情况,如果出现这种情况,我们就可以使用 @RequestParam 来重命名前后端的参数值 .
package com.example.demo;

import com.example.model.Student;
import org.springframework.stereotype.Controller;
import org.springframework.web.bind.annotation.RequestMapping;
import org.springframework.web.bind.annotation.RequestMethod;
import org.springframework.web.bind.annotation.RequestParam;
import org.springframework.web.bind.annotation.ResponseBody;

@Controller //控制器,在Spring启动的时候加载并注册
@RequestMapping("/web") //当使用"/web"可以访问到当前类
public class WebController {

    @RequestMapping(value = "/hi")
    @ResponseBody
    public Object say(@RequestParam("name") String user) {
        return "hi" + user;
    }
}
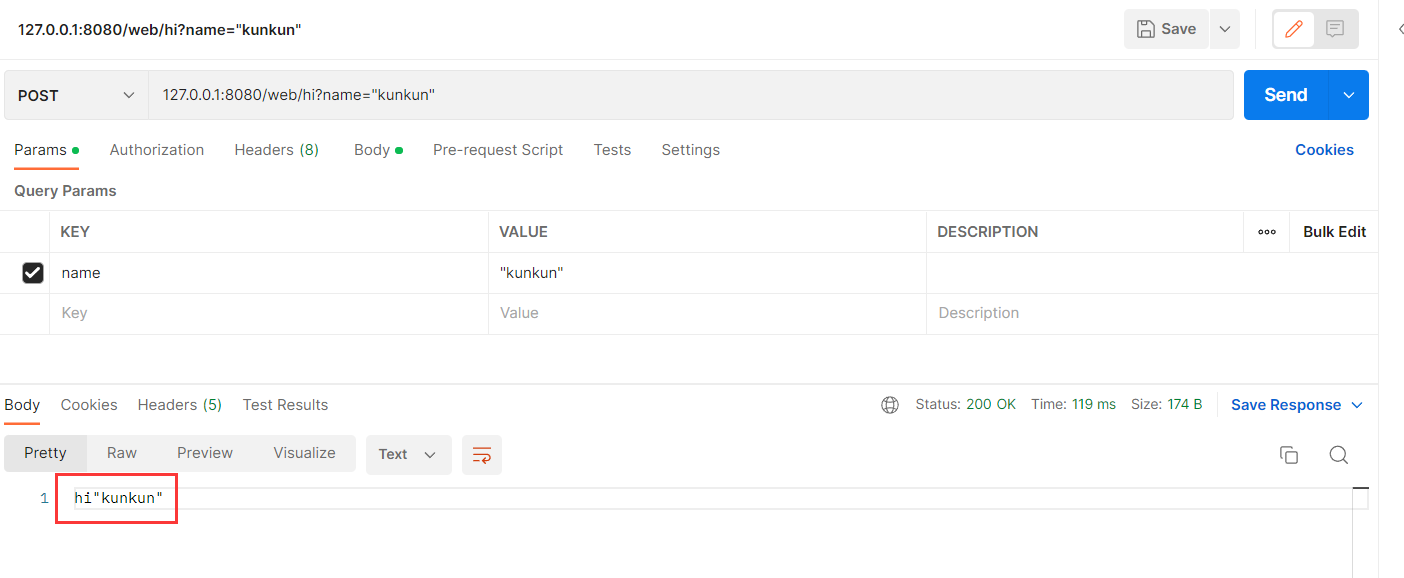
运行结果 :
4.2 获取多个参数
直接在单个参数后进行追加.
package com.example.demo;

import org.springframework.stereotype.Controller;
import org.springframework.web.bind.annotation.RequestMapping;
import org.springframework.web.bind.annotation.RequestMethod;
import org.springframework.web.bind.annotation.ResponseBody;

@Controller //控制器,在Spring启动的时候加载并注册
@RequestMapping("/web") //当使用"/web"可以访问到当前类
public class WebController {

    @RequestMapping(value = "/say")
    @ResponseBody
    public Object say(String name,Integer age) {
        return "I am" + name + " age : " + age;
    }
}
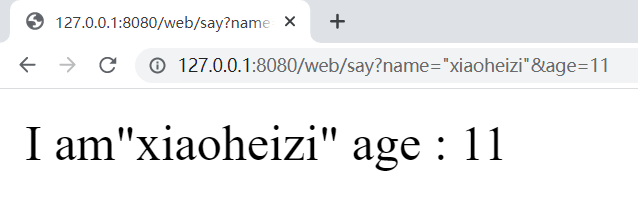
注意 : 参数传递的顺序不影响最终的解析 , 获取结果只和参数的名称有关 .
4.3 获取对象
就和普通的方法获取对象一样.
package com.example.demo;

import com.example.model.Student;
import org.springframework.stereotype.Controller;
import org.springframework.web.bind.annotation.RequestMapping;
import org.springframework.web.bind.annotation.RequestMethod;
import org.springframework.web.bind.annotation.ResponseBody;

@Controller //控制器,在Spring启动的时候加载并注册
@RequestMapping("/web") //当使用"/web"可以访问到当前类
public class WebController {

    @RequestMapping(value = "/say")
    @ResponseBody
    public Object say(String name,Integer age) {
        return "I am" + name + " age : " + age;
    }

    @RequestMapping(value = "/stu")
    @ResponseBody
    public Object func(Student student) {
        return student.toString();
    }
}
package com.example.model;

import lombok.Data;

@Data
public class Student {
    private Integer id;
    private String name;
    private Integer age;
    private String sex;
    private String classId;
}
运行结果 :

注意 : 参数的传递大小写敏感 .
4.4 获取表单参数
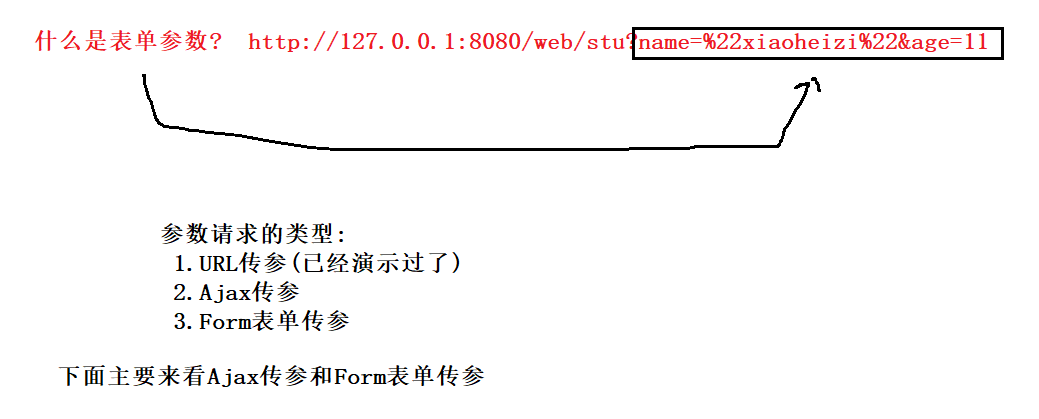
4.4.1 Form表单传参
package com.example.demo;

import com.example.model.Student;
import org.springframework.stereotype.Controller;
import org.springframework.web.bind.annotation.RequestMapping;
import org.springframework.web.bind.annotation.RequestMethod;
import org.springframework.web.bind.annotation.ResponseBody;

@Controller //控制器,在Spring启动的时候加载并注册
@RequestMapping("/web") //当使用"/web"可以访问到当前类
public class WebController {

    @RequestMapping("/login")
    @ResponseBody
    public String login(String user,String password) {
        return "用户名: " + user + "密码: " + password;
    }
}
运行结果 :
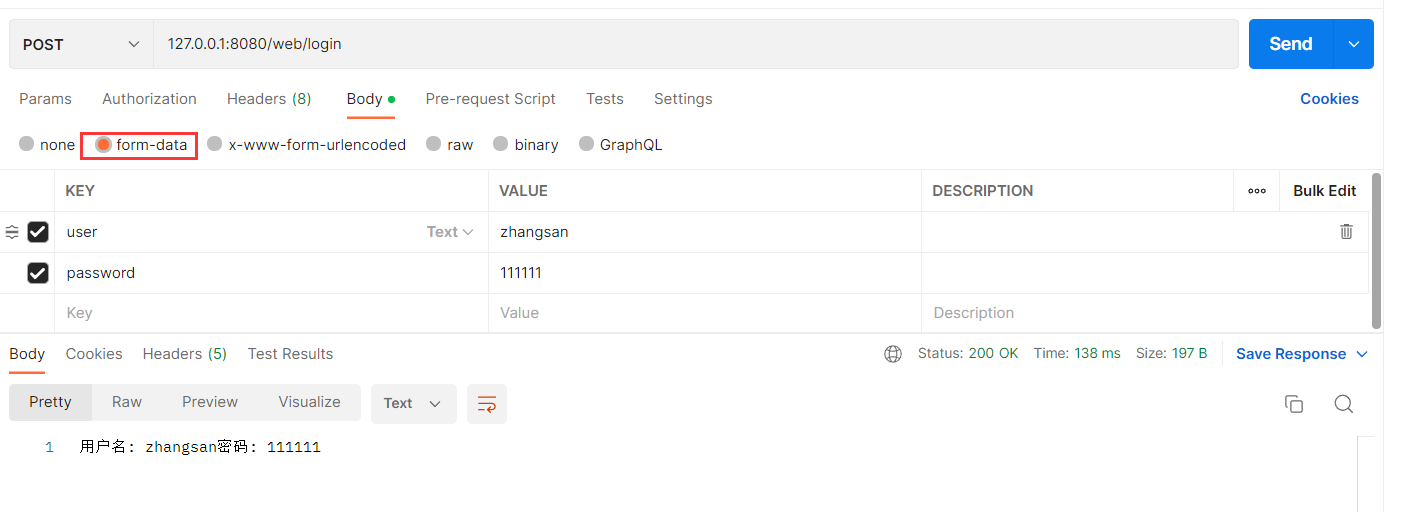
上面这种方法是通过Postman构造前端请求 , 也可以通过写代码构造前端请求 , 演示如下 :
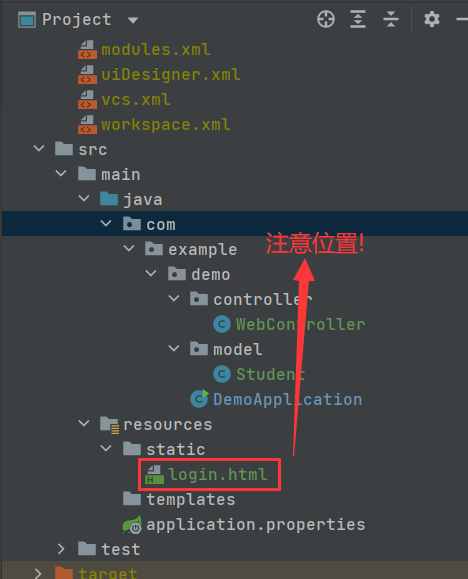
<!DOCTYPE html>
<html lang="en">
<head>
    <meta charset="UTF-8">
    <meta http-equiv="X-UA-Compatible" content="IE=edge">
    <meta name="viewport" content="width=device-width, initial-scale=1.0">
    <title>注册</title>
</head>
<body>
    <form action="login" method="get">
    <div>
        <h1>用户登录</h1>
            用户:<input name="user"><br>
            密码:<input name="password"><br>
            <input type="submit" value="提交">
    </div>
    </form>

</body>
</html>
package com.example.demo.controller;

import com.example.demo.model.Student;
import org.springframework.stereotype.Controller;
import org.springframework.web.bind.annotation.RequestMapping;
import org.springframework.web.bind.annotation.RequestParam;
import org.springframework.web.bind.annotation.ResponseBody;

@Controller //控制器,在Spring启动的时候加载并注册

public class WebController {
    @RequestMapping("/login")
    @ResponseBody
    public String login(String user,String password) {
        return "用户名: " + user + "密码: " + password;
    }
}
运行结果 :
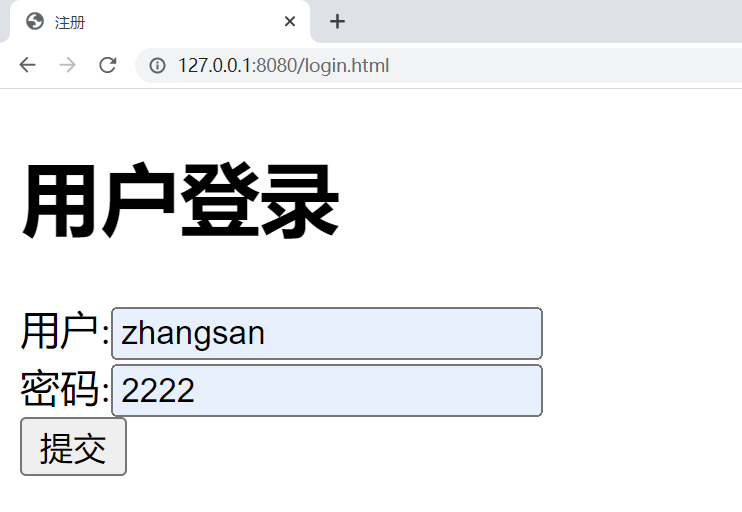
点击提交按钮 :

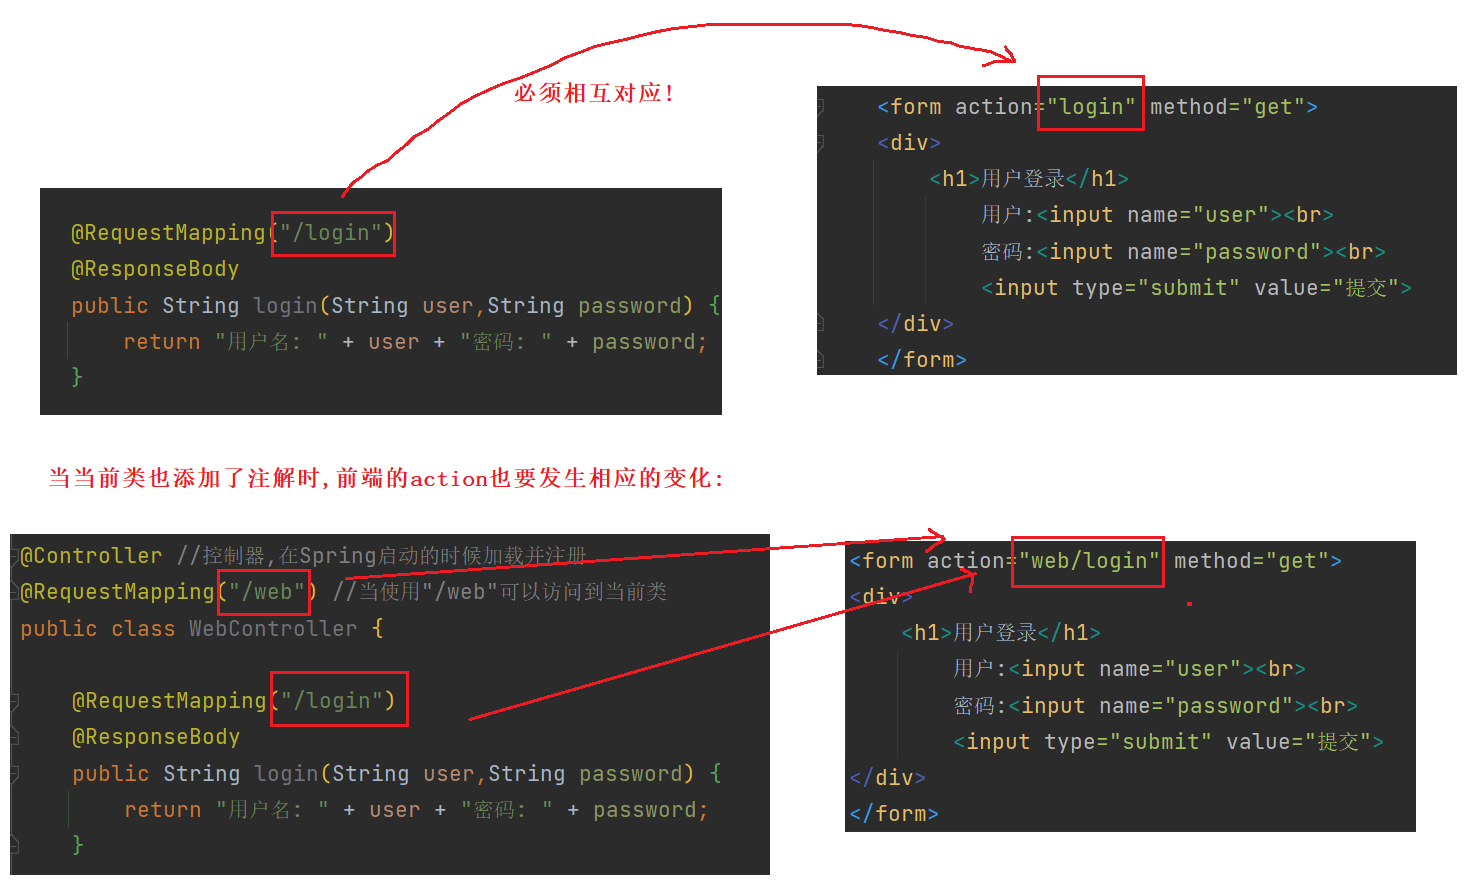
4.4.2 Ajax传参
第一步 : 引入jquery .

第二步 : 在前端构造ajax请求
<!doctype html>
<html lang="en">
<head>
    <meta charset="UTF-8">
    <meta name="viewport"
          content="width=device-width, user-scalable=no, initial-scale=1.0, maximum-scale=1.0, minimum-scale=1.0">
    <meta http-equiv="X-UA-Compatible" content="ie=edge">
    <title>Document</title>
    <script src="js/jquery.min.js"></script>
</head>
<body>
<div>
    <h1> 登录 </h1>
    用户:<input id="name" name="name"><br>
    密码:<input id="password" name="password"><br>
    <input type="button" onclick="func()" value=" 提 交 ">
</div>
<script>
    function func(){
        jQuery.ajax({
            url:"login1",
            type:"POST",
            data:{"name":jQuery("#name").val(),"password":jQuery("#password").val()},
            success:function(result){
               alert(result);
               console.dir(result);
            }
        });
    }
</script>
</body>
</html>
第三步:Ajax传参
新建User对象(普通对象) ;
package com.example.demo.model;

import lombok.Data;

@Data
public class User {
    private Integer id;
    private String name;
    private String password;
    private Integer age;
    private String sex;
    private String classId;
    // ....
}
package com.example.demo.controller;

import com.example.demo.model.Student;
import com.example.demo.model.User;
import org.springframework.stereotype.Controller;
import org.springframework.web.bind.annotation.RequestBody;
import org.springframework.web.bind.annotation.RequestMapping;
import org.springframework.web.bind.annotation.RequestParam;
import org.springframework.web.bind.annotation.ResponseBody;


@ResponseBody
@Controller //控制器,在Spring启动的时候加载并注册
//@RequestMapping("/web") //当使用"/web"可以访问到当前类
public class WebController {

    @RequestMapping("/login1")
    public String login1(String name,String password) {
        return "用户名: " + name + "密码: " + password;
    }
}
运行结果 :
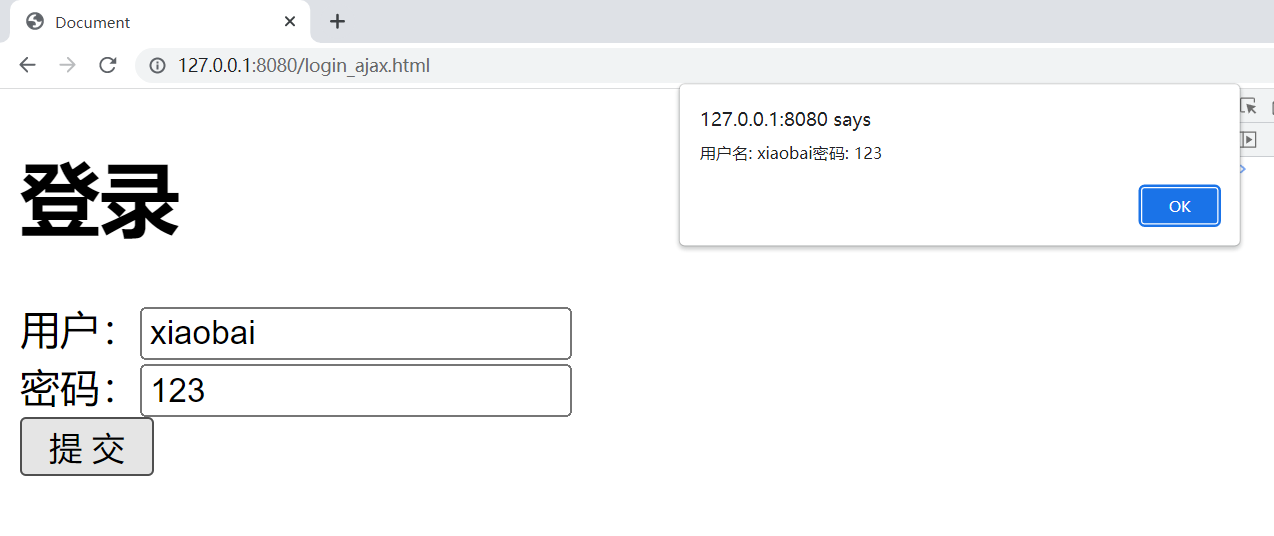
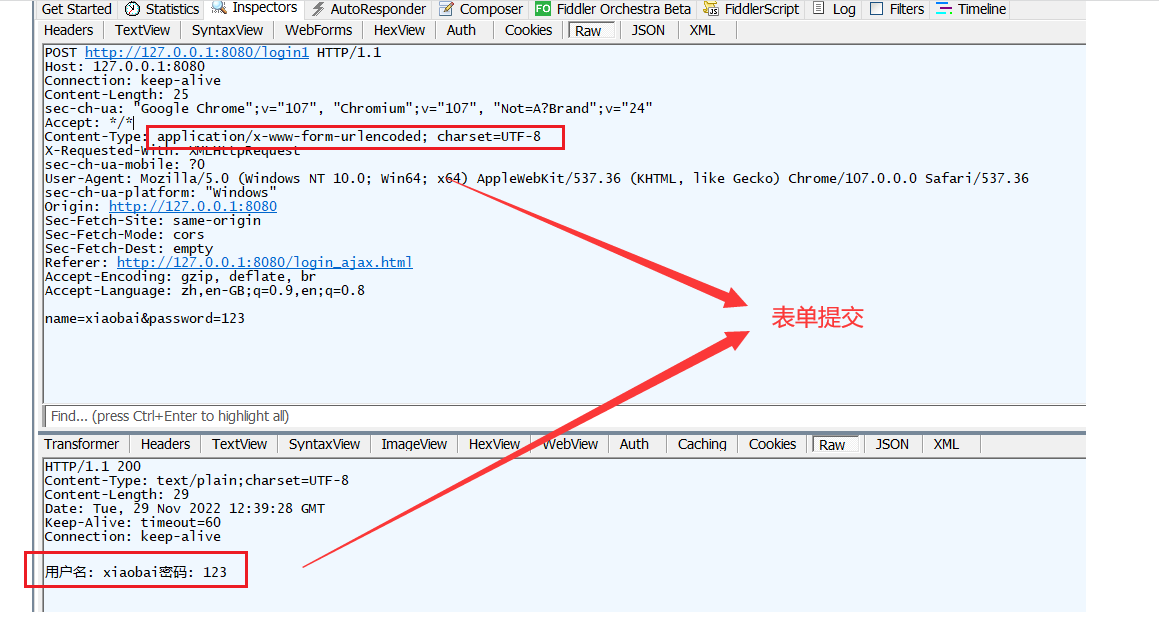
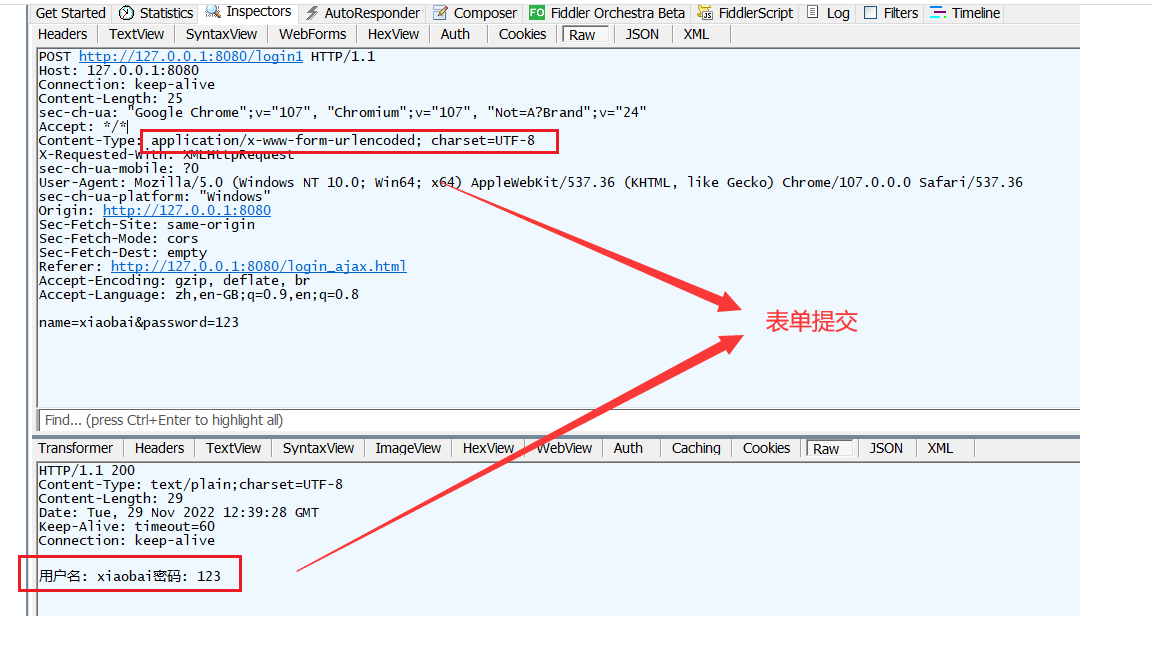
注意 : 这里传递的并不是一个json对象 , 而是一个普通对象 !!! 我们使用Fiddler抓包来查看结果 :
4.5 接收JSON对象
首先 , 我们仍然使用前面的代码 , 并使用Postman构造一个json对象 , 查看结果 :
package com.example.demo.controller;

import com.example.demo.model.Student;
import com.example.demo.model.User;
import org.springframework.stereotype.Controller;
import org.springframework.web.bind.annotation.RequestBody;
import org.springframework.web.bind.annotation.RequestMapping;
import org.springframework.web.bind.annotation.RequestParam;
import org.springframework.web.bind.annotation.ResponseBody;


@ResponseBody
@Controller //控制器,在Spring启动的时候加载并注册
//@RequestMapping("/web") //当使用"/web"可以访问到当前类
public class WebController {

    @RequestMapping("/login1")
    public String login1(String name,String password) {
        return "用户名: " + name + "密码: " + password;
    }
}
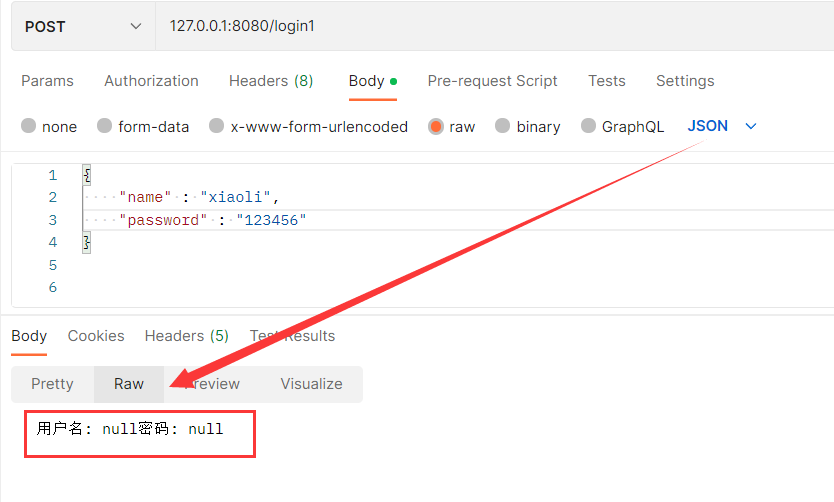
此时你会发现 , 用户名和密码都为null , 说明后端没拿到数据 , 是否是因为我的参数不是一个对象 , 而导致拿不到数据呢 ? 基于此猜想 , 我们写出第二种代码 :
package com.example.demo.controller;

import com.example.demo.model.Student;
import com.example.demo.model.User;
import org.springframework.stereotype.Controller;
import org.springframework.web.bind.annotation.RequestBody;
import org.springframework.web.bind.annotation.RequestMapping;
import org.springframework.web.bind.annotation.RequestParam;
import org.springframework.web.bind.annotation.ResponseBody;


@ResponseBody
@Controller //控制器,在Spring启动的时候加载并注册
//@RequestMapping("/web") //当使用"/web"可以访问到当前类
public class WebController {

    @RequestMapping("/login2")
    public String login2(User user) {
        String name = user.getName();
        String password = user.getPassword();
        return "用户名: " + name + "密码: " + password;
    }
}
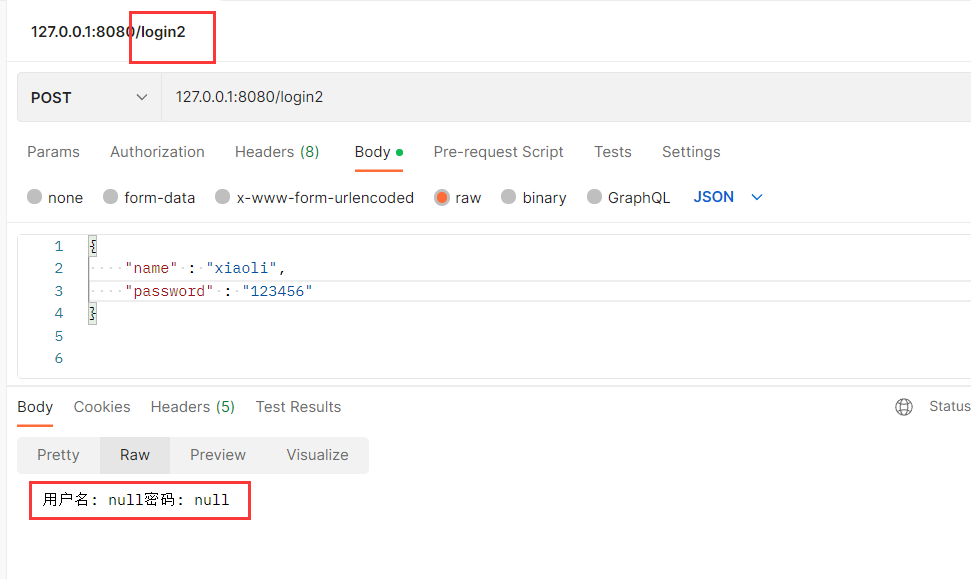
此时后端依然没有拿到数据 . 正确做法是 , 使用**@RequestBody** , 这个注解就是
package com.example.demo.controller;

import com.example.demo.model.Student;
import com.example.demo.model.User;
import org.springframework.stereotype.Controller;
import org.springframework.web.bind.annotation.RequestBody;
import org.springframework.web.bind.annotation.RequestMapping;
import org.springframework.web.bind.annotation.RequestParam;
import org.springframework.web.bind.annotation.ResponseBody;

@ResponseBody
@Controller //控制器,在Spring启动的时候加载并注册
//@RequestMapping("/web") //当使用"/web"可以访问到当前类
public class WebController {

    @RequestMapping("/login3")
    public String login3(@RequestBody User user) {
        String name = user.getName();
        String password = user.getPassword();
        return "用户名: " + name + "密码: " + password;
    }
}
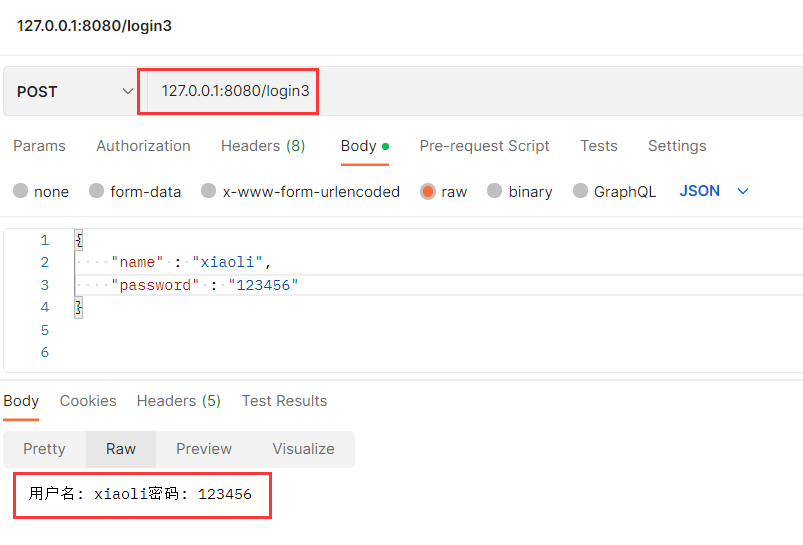
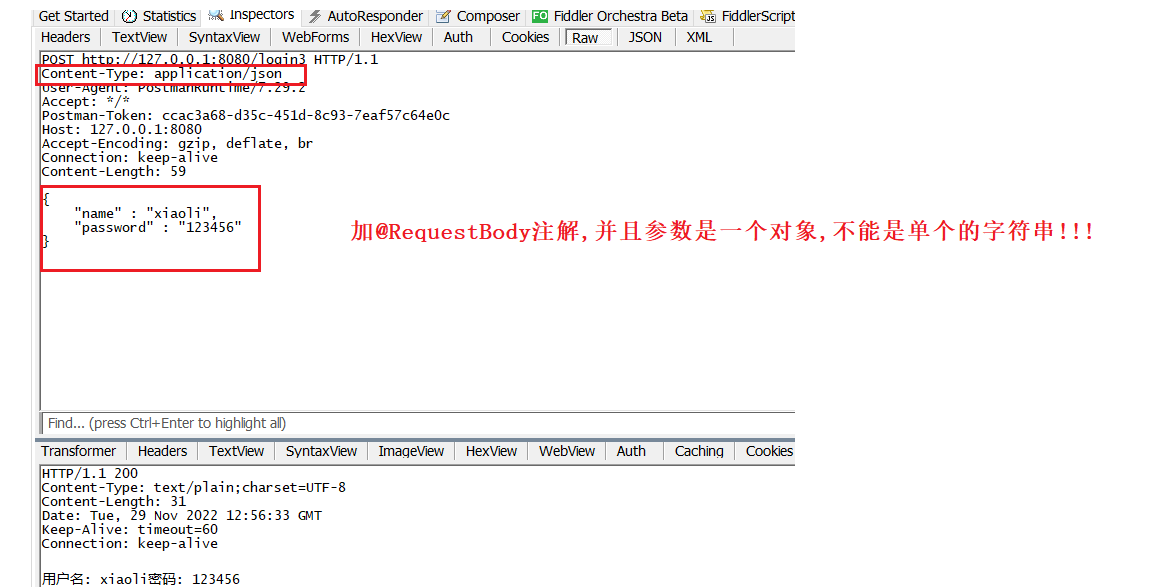
注意 : @RequestBody主要用来接收前端传递给后端的json字符串中的数据的(请求体中的数据的);GET方式无请求体,所以使用@RequestBody接收数据时,前端不能使用GET方式提交数据,而是用POST方式进行提交 .
注意区分 , 表单提交和json对象提交的区别 , 只有在json对象提交时才需要添加 @RequestBody注解 :
4.6 上传文件@RequestPart
package com.example.demo.controller;

import com.example.demo.model.Student;
import com.example.demo.model.User;
import org.springframework.stereotype.Controller;
import org.springframework.web.bind.annotation.*;
import org.springframework.web.multipart.MultipartFile;

import java.io.File;
import java.io.IOException;
import java.util.HashMap;

@ResponseBody
@Controller //控制器,在Spring启动的时候加载并注册
//@RequestMapping("/web") //当使用"/web"可以访问到当前类
public class WebController {

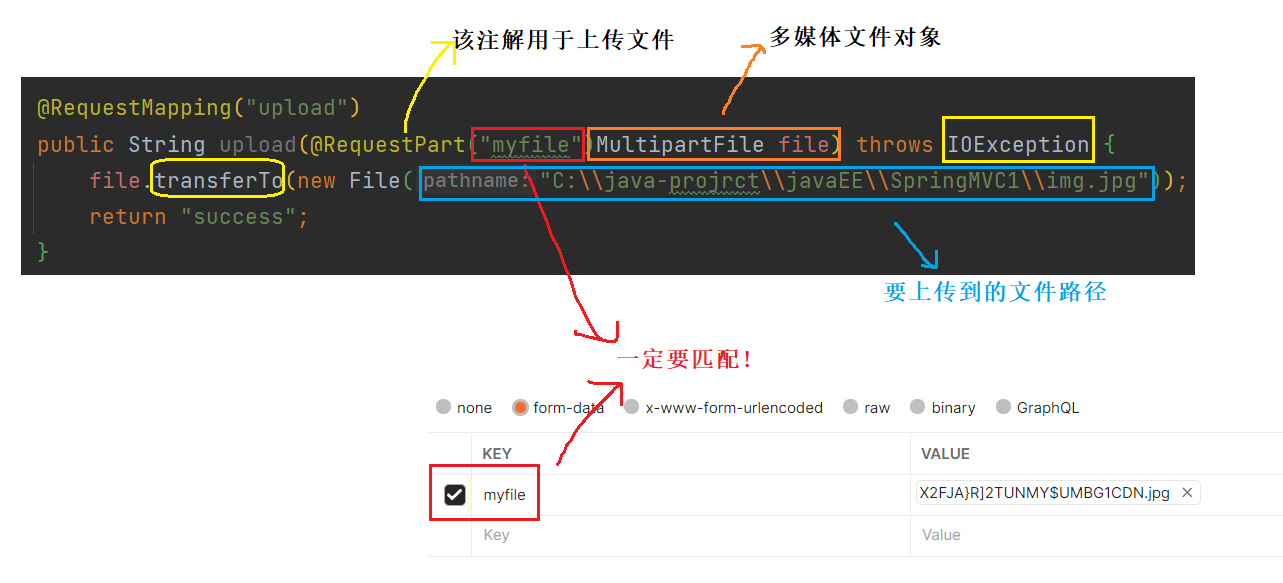
    @RequestMapping("upload")
    public String upload(@RequestPart("myfile")MultipartFile file) throws IOException {
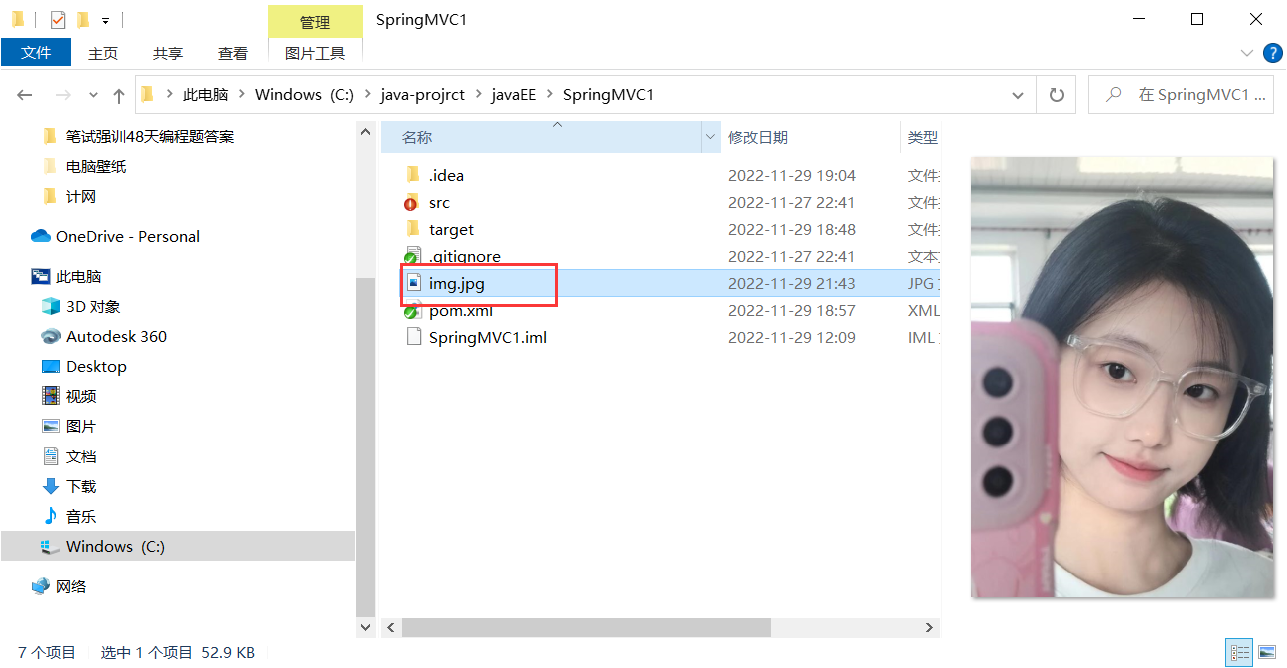
        file.transferTo(new File("C:\\java-projrct\\javaEE\\SpringMVC1\\img.jpg"));
        return "success";
    }
}
使用Postman构造请求 :
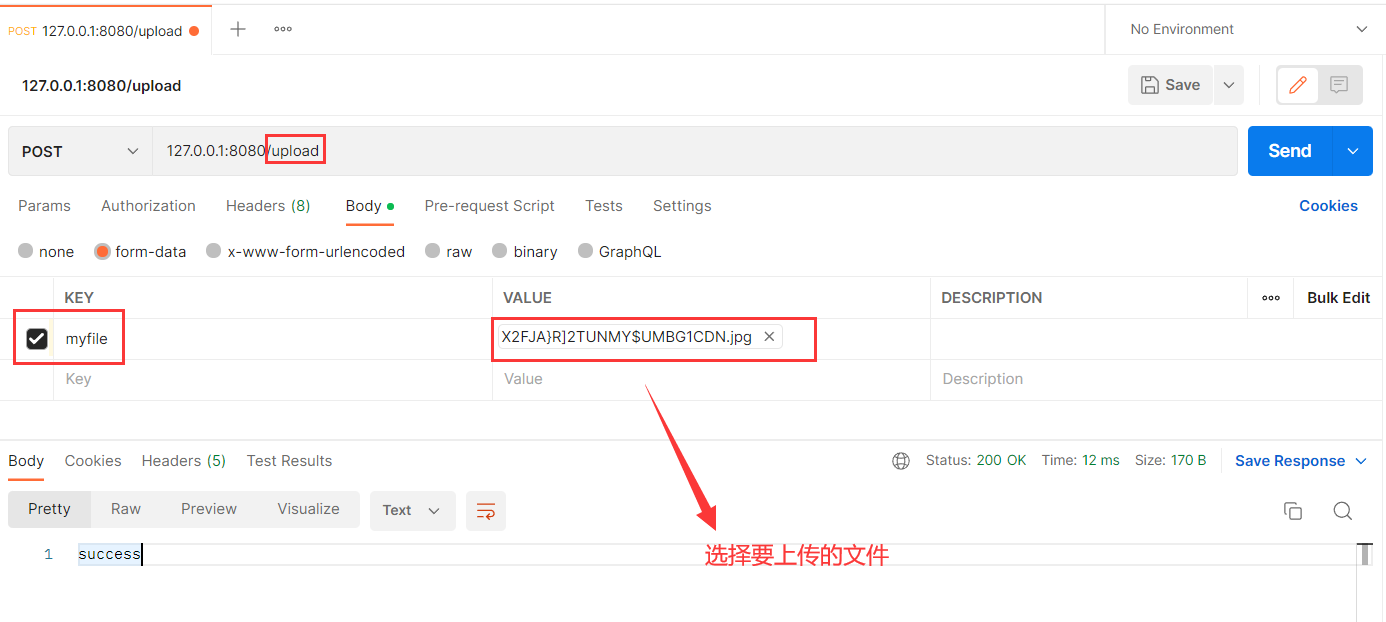
运行结果 :
4.7 获取Cookie/Session/Header
1. 获取cookie
方法一:传统方式,获取 Request 和 Response 对象
package com.example.demo.controller;

import com.example.demo.model.Student;
import com.example.demo.model.User;
import org.springframework.stereotype.Controller;
import org.springframework.web.bind.annotation.*;
import org.springframework.web.multipart.MultipartFile;

import javax.servlet.http.Cookie;
import javax.servlet.http.HttpServletRequest;
import javax.servlet.http.HttpServletResponse;
import java.io.File;
import java.io.IOException;

@Controller //控制器,在Spring启动的时候加载并注册
//@RequestMapping("/web") //当使用"/web"可以访问到当前类
@ResponseBody
public class WebController {

    @RequestMapping("/cookie")
    public String getCookies(HttpServletResponse response, HttpServletRequest request) {
        String name = request.getParameter("name");
        // 获取所有 cookie 信息
        Cookie[] cookies = request.getCookies();
        return name + " 你好.";
    }
}
运行结果 :

方法二:简便方法,使用@CookieValue.
package com.example.demo.controller;

import com.example.demo.model.Student;
import com.example.demo.model.User;
import org.springframework.stereotype.Controller;
import org.springframework.web.bind.annotation.*;
import org.springframework.web.multipart.MultipartFile;

import javax.servlet.http.Cookie;
import javax.servlet.http.HttpServletRequest;
import javax.servlet.http.HttpServletResponse;
import java.io.File;
import java.io.IOException;

@Controller //控制器,在Spring启动的时候加载并注册
//@RequestMapping("/web") //当使用"/web"可以访问到当前类
@ResponseBody
public class WebController {

    @RequestMapping("/getcookie")
    public String getCookie(@CookieValue("name") String name,
                            @CookieValue("talent") String talent) {
        return "name:" + name + " |talent:" + talent;
    }
}
运行结果 :

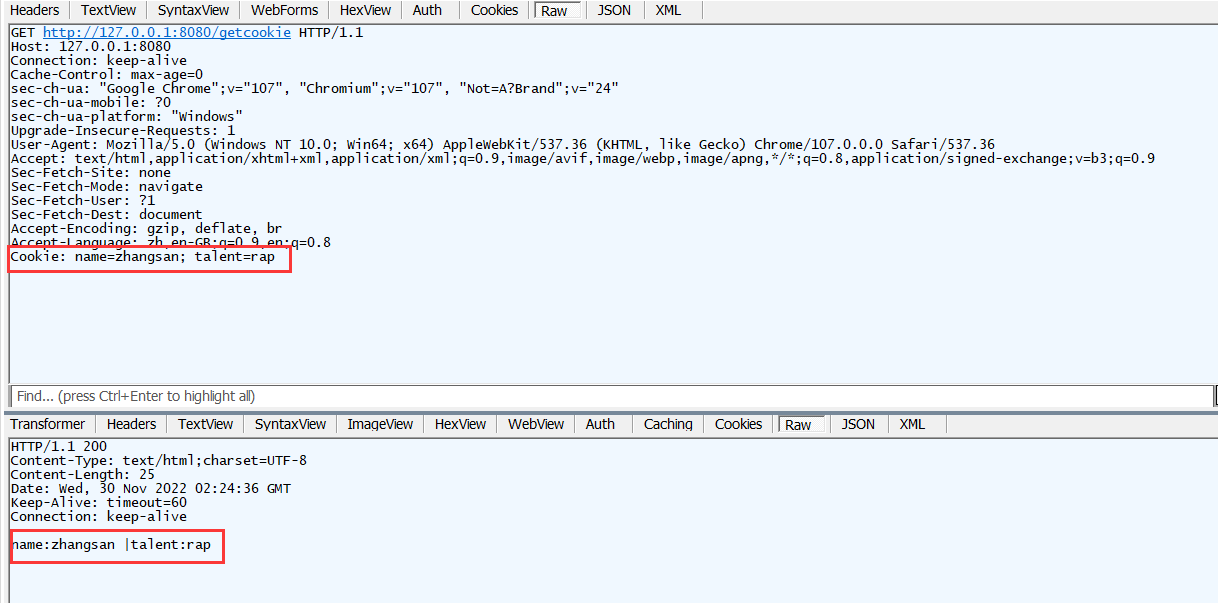
注意 , 每次访问该网页 , 都会把当前浏览器的所有cookie返回给后端 , 不管后端需要不需要用到 . 示例如下 :

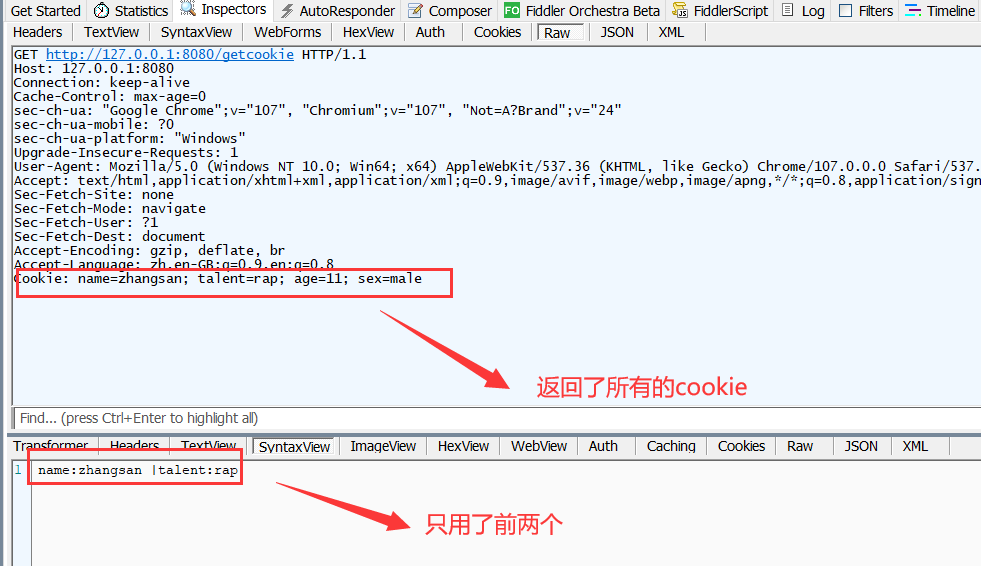
浏览器会默认将当前网站的所有cookie返回给后端 , 原因是http协议是无状态的 . 所谓无状态 , 就是指当用户访问浏览器时 , 浏览器不会记住当前用户是张三 , 还是李四 , 还是王五 , 这就会出现一个问题 . 比如当我在某网站刷题时候 , 我每一次操作网页 , 都需要进行登录 , 这显然是很疯狂的 . 比如我每次选择一个选项 , 要做下一题时 , 一点 , 直接触发重新登录 , 这谁顶得住啊 . 一般情况下 , 登录一段时间后是无需继续操作的 , 比如登录后 , 30min之内无需再次进行登录操作 .
解决方法就是在url上动手脚 , 在url上加一个身份标识, 每次后端在拿请求时 , 先从url里拿到身份标识 , 一看 , 诶 , 这不我张三哥吗 . 但是这种方式是有风险的 . 其一 , 直接将身份标识加在url里 , 有暴露的风险 . 其二 , 我是通过url进行验证的 , 但是url是极容易伪造的 .
所谓"兵来将挡水来土掩" , 我们将身份标识存到浏览器这边 , 即把身份标识加到cookie里 . 当然这种加到cooki里的方式也可以被伪造 , 比如我们前面就使用开发者工具伪造了一系列的cookie . 我们需要记住一句话 :
所有的加密操作 , 不是完全地解决安全问题 , 而是增加了破解的成本 !!!
相比于直接在url中添加参数 , 操作网站的cookie显然要复杂一些 .
此时身份信息已经存到cookie里了 , 但是我也不知道后端什么时候需要这个身份信息 , 什么时候不需要这个身份信息 , 索性认将当前网站的所有cookie返回给后端 !!!
cookie在客户端工作 , session则工作在服务器端 . 服务器端有一个会话表 , 这个会话表里有两部分的数据 . 一部分是session id , 是随机生成的 , 同一个用户 , 在某次登陆时session id也各不同 . 而另外一部分 , 则是这个session id 所对应的用户的信息 . 服务器会把session id给cookie , 相当于在客户端只存储了session id , 没有具体信息 , 所以关键信息并没有泄露 ; 在前端向后端返回数据时 , 服务器拿到cookie中的session id 后 , 判断此session id是否有效 , 如果有效 , 那我就知道 , 诶 , 这不我张三哥吗 .
所以 , cookie和session通常是配合使用的 . cookie是可以伪造的 , 但是session是不能伪造的 .

2. 获取session
先设置 , 后获取 .
package com.example.demo.controller;

import com.example.demo.model.Student;
import com.example.demo.model.User;
import org.springframework.stereotype.Controller;
import org.springframework.web.bind.annotation.*;
import org.springframework.web.multipart.MultipartFile;

import javax.servlet.http.Cookie;
import javax.servlet.http.HttpServletRequest;
import javax.servlet.http.HttpServletResponse;
import javax.servlet.http.HttpSession;
import java.io.File;
import java.io.IOException;

@Controller //控制器,在Spring启动的时候加载并注册
//@RequestMapping("/web") //当使用"/web"可以访问到当前类
@ResponseBody
public class WebController {

    @RequestMapping("/setsession")
    @ResponseBody
    public String setSession(HttpServletRequest request) {
// 获取 HttpSession 对象,参数设置为 true 表示如果没有 session 对象就创建一个session
        HttpSession session = request.getSession(true);
        if(session!=null){
            session.setAttribute("username","pilihuo");
        }
        return "session 存储成功";
    }

    @RequestMapping("/getsession")
    @ResponseBody
    public String getSession(@SessionAttribute(value = "username",required = false)
                                String username) {
        return "username:"+ username;
    }
}

直接获取session (不设置session)
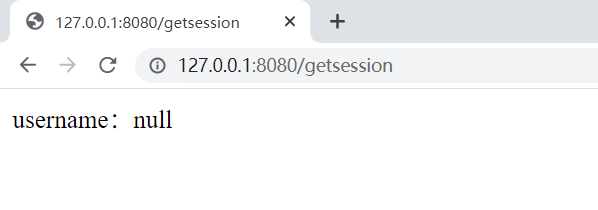
先调用setsession , 后调用getsession :
成功 !!!
2. 获取Header
@RequestHeader
package com.example.demo.controller;

import com.example.demo.model.Student;
import com.example.demo.model.User;
import org.springframework.stereotype.Controller;
import org.springframework.web.bind.annotation.*;
import org.springframework.web.multipart.MultipartFile;

import javax.servlet.http.Cookie;
import javax.servlet.http.HttpServletRequest;
import javax.servlet.http.HttpServletResponse;
import javax.servlet.http.HttpSession;
import java.io.File;
import java.io.IOException;

@Controller //控制器,在Spring启动的时候加载并注册
//@RequestMapping("/web") //当使用"/web"可以访问到当前类
@ResponseBody
public class WebController {


    @RequestMapping("/getheader")
    public String getHeader(@RequestHeader("User-Agent") String userAgent) {
        return "userAgent" + userAgent;
    }
}
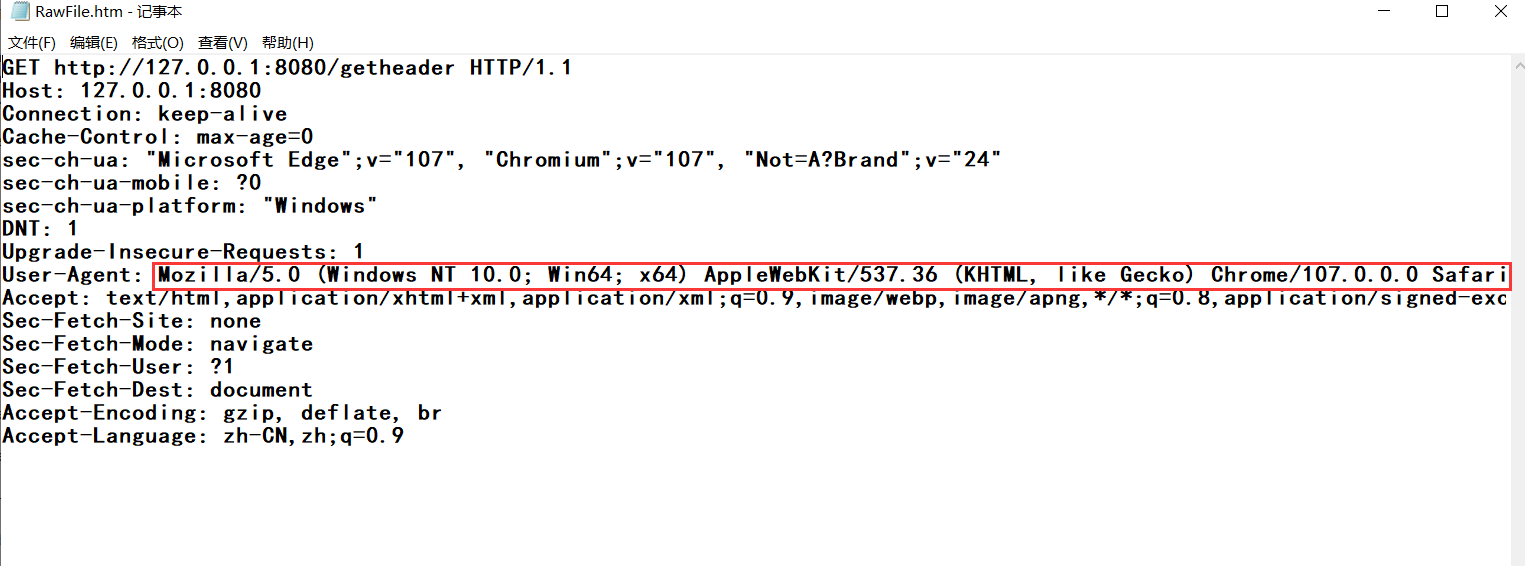
运行结果 :

抓包结果 :
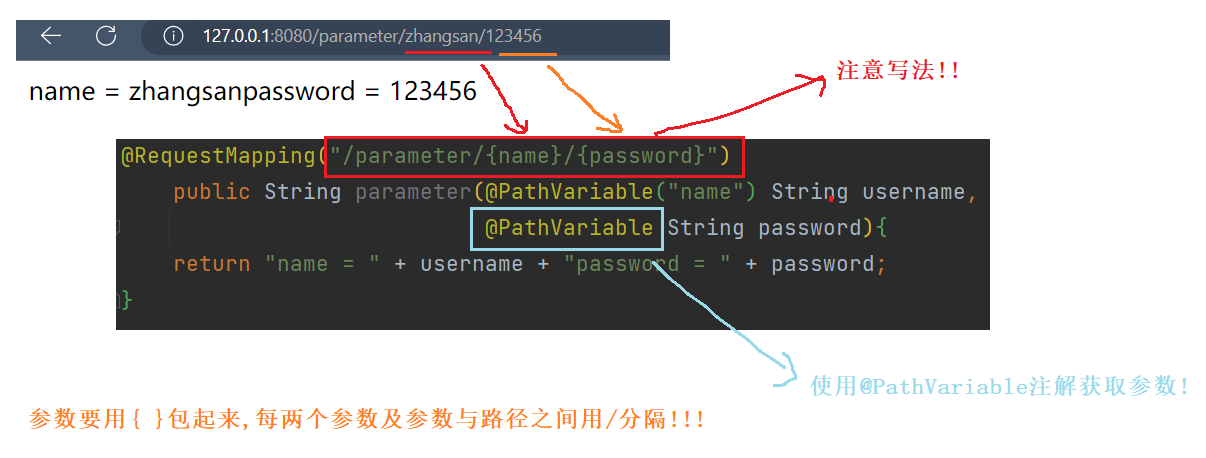
4.8 特殊的URL和获取参数的方式
@PathVariable
什么是特殊的URL ?
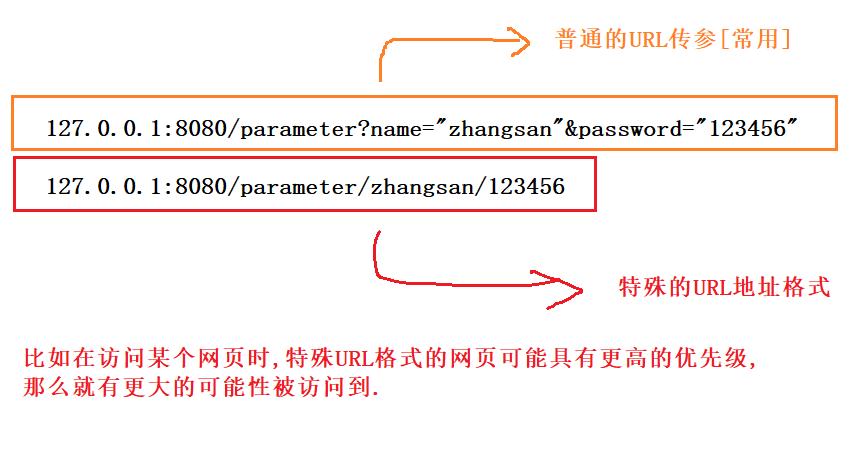
如何获取特殊的URL传递的参数呢 ?
package com.example.demo.controller;

import com.example.demo.model.Student;
import com.example.demo.model.User;
import org.springframework.stereotype.Controller;
import org.springframework.web.bind.annotation.*;
import org.springframework.web.multipart.MultipartFile;

import javax.servlet.http.Cookie;
import javax.servlet.http.HttpServletRequest;
import javax.servlet.http.HttpServletResponse;
import javax.servlet.http.HttpSession;
import java.io.File;
import java.io.IOException;

@Controller //控制器,在Spring启动的时候加载并注册
//@RequestMapping("/web") //当使用"/web"可以访问到当前类
@ResponseBody
public class WebController {

@RequestMapping("parameter/{name}{password}")
	    public String parameter(@PathVariable("name") String username,
	                            @PathVariable("password") String password){
	    return "name = " + username + "password = " + password;
	}
}
运行结果 :
五 : 输出数据的功能
默认请求下无论是 Spring MVC 或者是 Spring Boot 返回的是视图(xx.html),而现在都是前后端分离的,后端只需要返给给前端数据即可,此时需要使用@ResponseBody注解 , 然后直接return即可 .
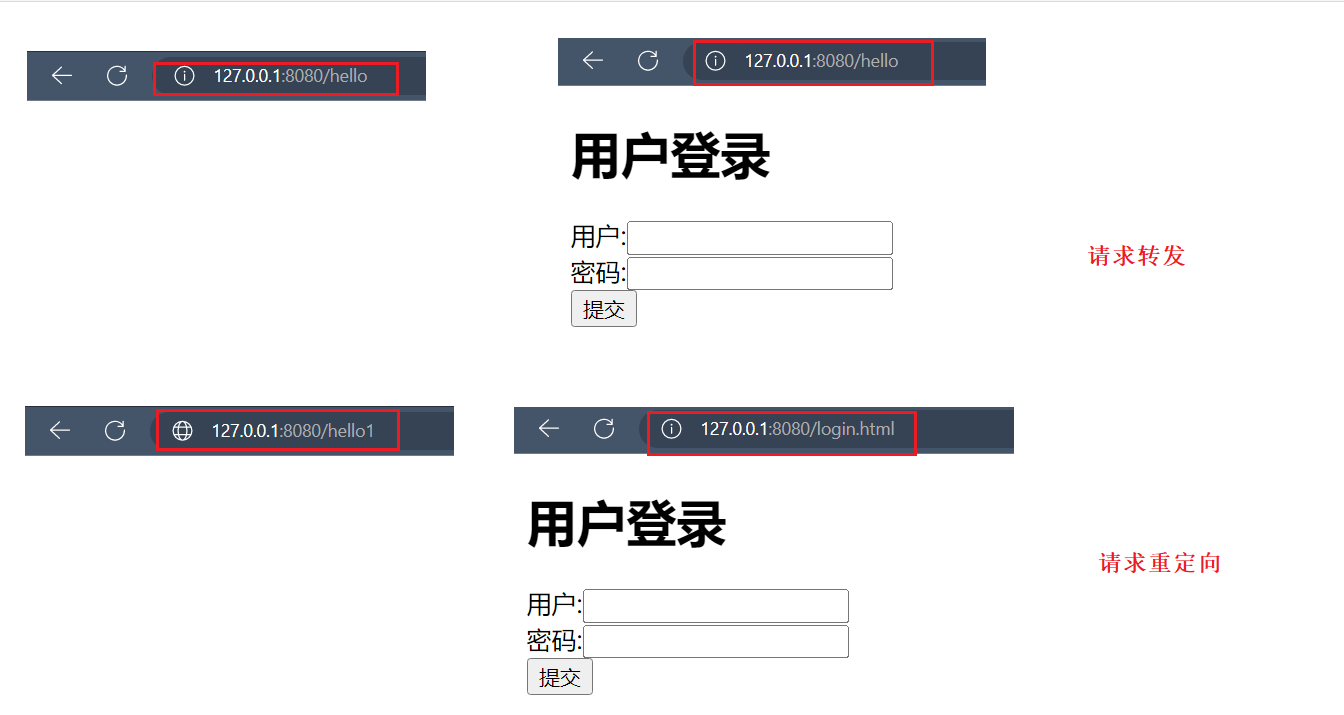
请求转发或请求重定向
forward VS redirect
return还可以实现跳转,跳转的方式有两种:
forward 是请求转发;
redirect:请求重定向 .

举例 :
转发:某人去了甲局,甲局看了之后,直到护照应该由乙局来管,但甲局的工作人员并没有赶走某人,而是让某人等着,自己在办公室后面联系了乙局的工作人员,乙局护照办好后送到了甲局,然后甲局的工作人员将护照交给了某人;
重定向:某人去了甲局后,甲局的工作人员说护照不归他们关,应该去乙局。然后某人自己去了乙局,办了护照 .
演示 :
package com.example.demo.controller;

import org.springframework.stereotype.Controller;
import org.springframework.web.bind.annotation.RequestMapping;

@Controller
public class TestController {
    //请求转发
    @RequestMapping("/hello")
    public String hello() {
        return "forward:/login.html";
    }

    //请求重定向
    @RequestMapping("/hello1")
    public String hello1() {
        return "redirect:/login.html";
    }
}
本文内容到此结束 !!!



![[附源码]Python计算机毕业设计Django个性化产品服务管理系统论文](https://img-blog.csdnimg.cn/c4ee09901b214c28915167148dbdf5e0.png)
