类语法的书写
●在 ES6 的语法标准中, 管构造函数不叫做构造函数了, 叫做 类
●语法:
class 类名 {constructor () {
// 书写属性
}
书写原型上的方法
方法名 () {}
}
    // ES6 类的语法
    class Person {
      // 等价于 ES5 的构造函数体
      constructor(name) {
        this.name = name
      }

      // 直接书写原型上的方法
      sayHi() { console.log('你好 世界') }

      play() { console.log('play game') }
    }

    const p = new Person('Jack')
    console.log(p)
    p.sayHi()
    p.play()
    // 此时 Person 已经不是函数了, 是一个 类
    // 不能当做函数来调用
    Person('Rose')


复制代码
原型和原型链
●我们之前学过构造函数了,也知道了原型对象和对象原型
●那么问题出现了,我们说构造函数的 prototype 是一个对象
●又说了每一个对象都天生自带一个 proto 属性
●那么 构造函数的 prototype 里面的 proto 属性又指向哪里呢?
万物皆对象
●在 JS 内, 任何一个数据类型其实都是对象
○函数也是一个对象, 数组也是一个对象, 正则也是一个对象, ...
○是对象, 就可以存储 键值对
●以函数为例
○当你书写完毕一个函数的时候
○此时函数数据类型出现了, 同时该函数名也是一个对象数据类型
<script>
    function fn() {
        console.log('今天真好');
    }
    fn.a = 100
    console.log(fn);
    /*
    ƒ fn() {
        console.log('今天真好');
    }
    */
    console.dir(fn)
        /*
    ƒ fn()
        a: 100
        arguments: null
        caller: null
        length: 0
        name: "fn"
        prototype: {constructor: ƒ}
        [[FunctionLocation]]:
        [[Prototype]]: ƒ ()
        [[Scopes]]: Scopes[1]
    */
</script>


复制代码
●以数组为例
<script>
    let arr = [100, 200, 300]
    arr.b = 200
    console.log(arr); // [100, 200, 300, b: 200]
    console.dir(arr);
    /*
    Array(3)
        0: 100
        1: 200
        2: 300
        b: 200
        length: 3
        [[Prototype]]: Array(0)
    */
</script>


复制代码
●通过上面的示例说明在js中一切都可以看做对象
●在上面的示例中新添加的是不会在代码中体现的,不过是确实存在的
●这就是说明在内存中是有两部分组成的 一部分是本身的,一部分是对象形式的
一个对象所属的构造函数
●每一个对象都有一个自己所属的构造函数
●比如: 数组
// 数组本身也是一个对象
var arr = []
var arr2 = new Array()


复制代码
●以上两种方式都是创造一个数组
●我们就说数组所属的构造函数就是 Array
比如: 函数
// 函数本身也是一个对象
var fn = function () {}
var fun = new Function()


复制代码
●以上两种方式都是创造一个函数
●我们就说函数所属的构造函数就是 Function
constructor 构造函数
●原型对象prototype 里面也有一个成员叫做 constructor
●也就是说constructor是原型对象上的一个属性
●这个属性的作用就是指向当前这个对象所属的构造函数
<script>
    function Person(name) {
        this.name = name
    }
    let p1 = new Person('张三')
    console.log(p1);
    console.log(p1.constructor === Person);
    console.log(p1.__proto__.constructor === Person);
    console.log(Person.prototype.constructor === Person);
</script>


复制代码
原型链详解
●我们想要清楚的弄明白什么是原型链就需要清楚的知道以下几个问题
●通过下面的一个构造函数来详细的说明
<script>
    function Person(name, age, gender) {
        this.name = name
        this.age = age
        this.gender = gender
    }
    Person.prototype.sayHi = function() {
        console.log('hello world')
    }
    const p1 = new Person('Jack', 18, '男')
    console.log(p1)
</script>


复制代码
●概念:
○1、 每一个函数天生自带一个属性叫做 prototype, 是一个对象数据类型
○2、每一个对象天生自带一个属性叫做 proto, 指向所属构造函数的 prototype
○3、任何一个对象, 如果没有准确的构造函数, 那么看做是 Object 的实例。只要是一个单纯的对象数据类型, 都是内置构造函数 Object 的实例
1、p1 身上的 proto 是谁
●因为 p1 是 Person 的实例
●根据概念1 得到, p1.proto 指向所属构造函数的 prototype
console.log(p1.__proto__ === Person.prototype)

复制代码
2、Person 的 proto 是谁
●Person 是一个构造函数, 同时也是一个函数, 同时也是一个对象
●只要是对象就会有 proto 属性
●JS 内有一个内置构造函数叫做 Function, 只要是函数, 就看做 Function 的实例
●任何一个函数数据类型所属的构造函数都是 Function
●Person 看做是 Function 的实例
●Person 所属的构造函数就是 Function
●Person.proto 指向 Function.prototype
console.log(Person.__proto__ === Function.prototype)


复制代码
3、Person.prototype 的 proto 是谁
●Person.prototype 是函数天生自带的一个对象数据类型
●只要是对象就会有 proto 属性
●JS 内有一个内置构造函数叫做 Object, 只要是单纯的对象, 都是 Object 的实例
●Person.prototype 是一个天生的对象数据类型, 并且是一个单纯的对象数据类型
●把 Person.prototype 看做是 Object 的实例
●Person.prototype 的 proto 就是 Object.prototype
console.log(Person.prototype.__proto__ === Object.prototype)


复制代码
4、Function 的 proto 是谁
●Function 是一个构造函数, 同时也是一个函数, 同时也是一个对象
●只要是对象就会有 proto 属性
●JS 内有一个内置构造函数叫做 Function, 只要是函数就是 Function 的实例
●Function 自己本身是一个内置构造函数, 本身也是一个函数
●Function 自己是自己的实例, 自己是自己的构造函数
●在 JS 内管 Function 叫做顶级函数
●Function.proto 就是 Function.prototype
 console.log(Function.__proto__ === Function.prototype)


复制代码
5、Function.prototype 的 proto 是谁
●Function.prototype 是函数天生自带的一个对象数据类型
●只要是对象就会有 proto 属性
●Function.prototype 是一个天生的对象数据类型, 并且是一个单纯的对象数据类型
●把 Function.prototype 看做是 Object 的实例
●Function.prototype 的 proto 就是 Object.prototype
console.log(Function.prototype.__proto__ === Object.prototype)


复制代码
6、Object 的 proto 是谁
●Object 是一个构造函数, 同时也是一个函数, 同时也是一个对象
●只要是对象就会有 proto 属性
●Object 也是一个函数, 只要是函数就是 Function 的实例
●Object 这个内置函数所属的构造函数依旧是 Function
●Object.proto 就是 Function.prototype
console.log(Object.__proto__ === Function.prototype)


复制代码
7、Object.prototype 的 proto 是谁
●Object.prototype 是函数天生自带的一个对象数据类型
●只要是对象就会有 proto 属性
●在 JS 内, Object 是顶级对象, Object.prototype 是顶级原型
●Object.prototype 是唯一一个没有 proto 的对象数据类型
●Object.prototype 的 proto 是 null
console.log(Object.prototype.__proto__)

复制代码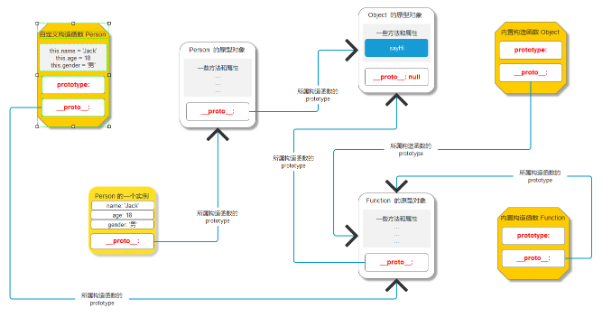
原型链
●概念:用 proto 串联起来的对象链状结构
●作用:为了对象访问机制服务(当你访问一个对象成员的时候, 为你提供一些服务)
●注意:只是 proto 串联起来的对象链状结构, 和原型对象 prototype 没有关系
原型链的访问原则
●我们之前说过,访问一个对象的成员的时候,自己没有就会去 proto 中找
●接下来就是,如果 proto 里面没有就再去 proto 里面找
●一直找到顶级圆形对象 Object.prototype 里面都没有,那么就会返回 undefiend
<!DOCTYPE html>
<html lang="en">

<head>
    <meta charset="UTF-8">
    <meta name="viewport" content="width=device-width, initial-scale=1.0">
    <meta http-equiv="X-UA-Compatible" content="ie=edge">
    <title>Document</title>
</head>

<body>

    <script>
        //创建一个构造函数
        function Person() {
            this.name = 'Jack'
            this.age = 18
            this.gender = '男'
        }
        //构造函数的原型对象上添加一个a方法
        Person.prototype.a = function() {
            console.log('Person.prototype')
        }

        //内置对象的原型对象上添加一个b方法
        Object.prototype.b = function() {
            console.log('Object.prototype')
        }

        //内置构造函数的原型对象上添加一个c方法
        Function.prototype.c = function() {
            console.log('Function.prototype')
        }

        // 创建一个 Person 的实例
        const p = new Person()
        console.log(p)

        //访问实例上的name属性
        console.log(p.name)

        //调用实例上的a方法
        p.a()

        //调用实例上的b方法
        p.b()

        console.log(p.c)

        //调用C方法
        Person.c()

        //调用b方法
        Person.b()
    </script>
</body>

</html>


复制代码
判断数据类型
typeof
●用来判断数据类型的
●但是只能准确的判断基本数据类型
constructor
●语法: 数据结构.constructor
●返回值: 该数据结构所属的构造函数
●缺点:
○undefined 和 null 出不来
  console.log(p.constructor)
    console.log([].constructor)
    console.log((function () {}).constructor)
    console.log(/^$/.constructor)

    // 判断一个数据是不是数组
    console.log([].constructor === Array)


复制代码
instanceOf
●语法: 数据结构 instanceof 构造函数
●得到: 一个布尔值
●缺点:
○undefined 和 null 出不来
  function Person() {}
    const p = new Person()
    console.log(p instanceof Person)
    console.log(p instanceof Array)
    console.log([] instanceof Array)


复制代码
Object.prototype.toString.call
●语法: Object.prototype.toString.call(你要判断的数据结构)
●返回值: '[object 数据类型]'
●可以准确的判断所有数据类型
  console.log(Object.prototype.toString.call({}))
    console.log(Object.prototype.toString.call([]))
    console.log(Object.prototype.toString.call(123))
    console.log(Object.prototype.toString.call('123'))
    console.log(Object.prototype.toString.call(true))
    console.log(Object.prototype.toString.call(undefined))
    console.log(Object.prototype.toString.call(null))
    console.log(Object.prototype.toString.call(new Date()))
    console.log(Object.prototype.toString.call(/^$/))
    console.log(Object.prototype.toString.call(function () {}))
    console.log(Object.prototype.toString.call(function () {}) === '[object Object]')


复制代码
案例--轮播图
结构
<!DOCTYPE html>
<html lang="en">
<head>
<meta charset="UTF-8">
<meta name="viewport" content="width=device-width, initial-scale=1.0">
<meta http-equiv="X-UA-Compatible" content="ie=edge">
<title>Document</title>
<link rel="stylesheet" href="./index.css">
</head>
<body>
<!-- HTML 结构 -->
<div class="banner" id="banner">
<ul class="imgBox">
<li class="active" style="background-color: skyblue;">1</li>
<li style="background-color: orange;">2</li>
<li style="background-color: purple;">3</li>
<li style="background-color: green;">4</li>
<li style="background-color: cyan;">5</li>
</ul>
<ol class="pointBox"></ol>
<div class="prev"><</div>
<div class="next">></div>
</div>
<script src="./swiper.js"></script>
<script>
// 实现轮播图
new Banner('#banner', { duration: 2000 })
</script>
</body>
</html>
复制代码样式
* {
  margin: 0;
  padding: 0;
}

ul, ol, li {
  list-style: none;
}

.banner {
  width: 600px;
  height: 400px;
  border: 4px solid pink;
  margin: 50px auto;
  position: relative;
}

.banner > .imgBox {
  width: 100%;
  height: 100%;
  position: relative;
}

.banner > .imgBox > li {
  width: 100%;
  height: 100%;
  position: absolute;
  left: 0;
  top: 0;

  display: flex;
  justify-content: center;
  align-items: center;
  font-size: 100px;
  color: #fff;

  opacity: 0;

  transition: all .3s linear;
}

.banner > .imgBox > li.active {
  opacity: 1;
}

.banner > .pointBox {
  width: 200px;
  height: 30px;
  background-color: rgba(0, 0, 0, .5);
  border-radius: 15px;
  position: absolute;
  left: 50%;
  bottom: 30px;
  transform: translateX(-50%);
  display: flex;
  justify-content: space-evenly;
  align-items: center;
}

.banner > .pointBox > li {
  width: 20px;
  height: 20px;
  border-radius: 50%;
  background-color: #fff;
  cursor: pointer;
}

.banner > .pointBox > li.active {
  background-color: red;
}

.banner > div {
  width: 30px;
  height: 50px;
  position: absolute;
  top: 50%;
  transform: translateY(-50%);
  background-color: rgba(0, 0, 0, .5);
  display: flex;
  justify-content: center;
  align-items: center;
  font-size: 20px;
  font-weight: 700;
  cursor: pointer;
  color: #fff;
}

.banner > div.prev {
  left: 0;
}

.banner > div.next {
  right: 0;
}


复制代码
交互
// 面向对象的方式书写 轮播图的代码

/*
  分析:
    + 属性
      => banner: 可视区域
      => imgBox: 承载图片的大盒子
      => pointBox: 承载焦点的大盒子

      => index: 表示当前第几张
      => timer: 定时器返回值

    + 方法
      => 设置焦点
  分析:
    + 自动轮播: 每间隔 2000ms 切换下一张
    + 功能:
      => 上一张: 当前这一张取消 active, 上一张 添加 active
      => 下一张: 当前这一张取消 active, 下一张 添加 active
      => 某一张: 当前这一张取消 active, 某一张 添加 active
    + 功能:
      => 某一张: 当前这一张取消 active, 某一张 添加 active
      => 有的时候, 某一张是 index++
      => 有的时候, 某一张是 index--
      => 有的时候, 某一张是 index = xxx
*/

// 轮播图 类
class Banner {
  constructor (selector, options = {}) {
    // 获取可视区域
    this.banner = document.querySelector(selector)
    // 承载图片的盒子
    this.imgBox = this.banner.querySelector('.imgBox')
    // 承载焦点的盒子
    this.pointBox = this.banner.querySelector('.pointBox')

    // 准备变量表示当前第几张
    this.index = 0
    // 准备变量接受定时器返回值
    this.timer = 0

    this.options = options

    // 调用方法
    this.setPoint()
    this.autoPlay()
    this.overOut()
    this.bindEvent()
  }


  // 书写方法
  setPoint () {
    // 1. 拿到有多少个焦点需要生成
    const pointNum = this.imgBox.children.length

    // 2. 循环生成
    for (let i = 0; i < pointNum; i++) {
      const li = document.createElement('li')

      li.classList.add('item')

      // 第一个 li 有 active 类名
      if (i === 0) li.classList.add('active')

      li.dataset.point = i

      this.pointBox.appendChild(li)
    }
  }

  // 切换一张的方法
  // 给 changeOne 设置一个参数
  //   true, false, 数字
  //   true, 表示下一张
  //   false, 上一张
  //   数字, 某一张
  changeOne (type) {
    // index 表示的就是当前的索引
    this.imgBox.children[this.index].classList.remove('active')
    this.pointBox.children[this.index].classList.remove('active')

    // 调整 index
    if (type === true) {
      this.index++
    } else if (type === false) {
      this.index--
    } else {
      this.index = type
    }

    // 判断一下 index 的边界
    if (this.index >= this.imgBox.children.length) this.index = 0
    if (this.index < 0) this.index = this.imgBox.children.length - 1

    // 让当前这一个显示
    this.imgBox.children[this.index].classList.add('active')
    this.pointBox.children[this.index].classList.add('active')
  }

  // 自动轮播
  autoPlay () {
    this.timer = setInterval(() => {
      // 下一张
      this.changeOne(true)
    }, this.options.duration || 5000)
  }

  // 移入移出
  overOut () {
    this.banner.addEventListener('mouseover', () => clearInterval(this.timer))
    this.banner.addEventListener('mouseout', () => this.autoPlay())
  }

  // 点击事件
  bindEvent() {
    this.banner.addEventListener('click', e => {
      if (e.target.className === 'prev') this.changeOne(false)
      if (e.target.className === 'next') this.changeOne(true)
      if (e.target.className === 'item') this.changeOne(e.target.dataset.point - 0)
    })
  }
}


复制代码
案例--贪吃蛇
结构样式
<!DOCTYPE html>
<html lang="en">
<head>
  <meta charset="UTF-8">
  <meta name="viewport" content="width=device-width, initial-scale=1.0">
  <meta http-equiv="X-UA-Compatible" content="ie=edge">
  <title>Document</title>

  <style>
    * {
        margin: 0;
        padding: 0;
    }

    .map {
        width: 1000px;
        height: 600px;
        border: 5px solid #333;
        margin: 50px auto;
        position: relative;

        background-image: url(./imgs/bg.png);
        background-repeat: repeat;
        background-size: 20px 20px;
    }

    .map > div {
        width: 20px;
        height: 20px;
        position: absolute;
        background-size: 20px 20px;
        background-repeat: no-repeat;
    }

    .map > .food {
        /* left:200px;
        top: 260px; */
        background-image: url(./imgs/food.png);
    }

    .map > .head {
        /* left:40px;
        top: 0; */
        background-image: url(./imgs/head.png);
    }

    .map > .body {
        /* left:20px;
        top: 0; */
        background-image: url(./imgs/body.png);
    }
  </style>

</head>
<body>
  <button>开始</button>
  <button>暂停</button>
  <button>重新开始</button>
  <div class="map" id="map">
    <!-- 之后我们动态生成的 -->
    <!-- <div class="food"></div>
    <div class="head"></div>
    <div class="body"></div> -->
  </div>


  <script type="module">
    // 要开始玩游戏
    import Game from './game.js'

    const g = new Game('#map')


    // 和页面元素联动玩游戏
    document.querySelector('button:nth-child(1)').onclick = () => {
      g.start()
    }
    document.querySelector('button:nth-child(2)').onclick = () => {
      g.pause()
    }
    document.querySelector('button:nth-child(3)').onclick = () => {
      g.restart()
    }
    document.addEventListener('keydown', e => {
      console.log(e.keyCode)
      // 左上右下 37 38 39 40
      switch (e.keyCode) {
        case 37:
        case 100:
          g.changeDir('left')
          break
        case 38:
        case 104:
          g.changeDir('top')
          break
        case 39:
        case 102:
          g.changeDir('right')
          break
        case 40:
        case 98:
          g.changeDir('bottom')
          break
        case 13:
          g.start()
          break
        case 32:
          g.pause()
          break
      }
    })

  </script>
</body>
</html>


复制代码
交互
食物
// 我是一个 食物模块, 书写食物类
/*
  食物类
    + 属性:
      => 地图
      => 创建一个食物 div
      => x 坐标
      => y 坐标
    + 方法:
      => 改变坐标(改一个地图内的随机位置)
*/


export default class Food {
  constructor (selector) {
    // 地图
    this.map = document.querySelector(selector)
    // 坐标
    this.x = 0
    this.y = 0
    // 创建一个食物 div
    this.food = document.createElement('div')
    this.food.className = 'food'
    this.map.appendChild(this.food)

    // 调用 changePos
    this.changePos()
  }

  // 随机坐标位置
  changePos () {
    // 计算出一个 x 和 y 的随机值
    // 赋值给 this.x 和 this.y
    // 赋值给 this.food 的 left 和 top

    // 计算一行多少个
    const rowNum = this.map.clientWidth / 20
    const colNum = this.map.clientHeight / 20

    // 计算分别放在哪一个格子位置
    const posX = Math.floor(Math.random() * rowNum) * 20
    const posY = Math.floor(Math.random() * colNum) * 20

    // 赋值
    this.x = posX
    this.y = posY

    // 给元素赋值
    this.food.style.left = posX + 'px'
    this.food.style.top = posY + 'px'
  }
}


复制代码
蛇
// 我是蛇模块, 书写蛇类
/*
  蛇类
    + 属性
      => 地图
      => 方向
      => 蛇: 以数组的方式存储
        -> 约定: [0] 的位置存储的是 蛇头
*/


export default class Snake {
  constructor (selector) {
    // 地图
    this.map = document.querySelector(selector)
    // 方向
    this.direction = 'right'
    // 蛇
    this.snake = []

    // 创建一条蛇
    this.create()
  }

  // 添加一节的方法
  //   需要根据当前是 0 或者不是 0 节
  //     => 当前是 0 节, 那么直接创建头
  //     => 当前不是 0 节, 除了创建头, 还需要把本身的头变成身体
  //   需要根据当前的方向
  //     => 如果方向是 right, 你创建的新头要在原先头 left + 20, top 不动
  createOne () {
    // 1. 拿到现在 this.snake 的 [0]
    const head = this.snake[0]

    // 2. 判断有头还是没有头
    if (head !== undefined) head.className = 'body'

    // 3. 创建一个头
    const ele = document.createElement('div')
    ele.className = 'head'
    // 放在数组里面
    this.snake.unshift(ele)

    // 4. 计算新头的定位位置
    // 如果原先没有头, 就是 0 0
    const pos = { x: 0, y: 0 }
    // 如果有头, 根据现在的头计算
    if (head !== undefined) {
      // 记下头原先的位置
      pos.x = head.offsetLeft
      pos.y = head.offsetTop
      // 如果方向是 右, 原先头的 left + 20, top 不动
      // 如果方向是 左, 原先头的 left - 20, top 不动
      // 如果方向是 上, 原先头的 top - 20, left 不动
      // 如果方向是 下, 原先头的 top + 20, left 不动

      // 计算现在的位置
      switch (this.direction) {
        case 'right': pos.x += 20; break
        case 'left': pos.x -= 20; break
        case 'top': pos.y -= 20; break
        case 'bottom': pos.y += 20; break
      }
    }

    // 5. 设置头的位置
    ele.style.left = pos.x + 'px'
    ele.style.top = pos.y + 'px'

    // 6. 放在页面里面
    this.map.appendChild(ele)
  }

  // 创建一条蛇
  create () {
    // 约定好初始化是 5 节
    for (let i = 0; i < 5; i++) {
      this.createOne()
    }
  }

  // 移动一步
  move () {
    // 从 this.snake 数组中删除最后一项
    const body = this.snake.pop()
    // 从 页面内移除当前 div
    body.remove()
    // 创建一个头
    this.createOne()
  }

  // 判断蛇头是否和食物重叠
  isEat (foodX, foodY) {
    // 拿到 头
    const head = this.snake[0]

    if (head.offsetLeft === foodX && head.offsetTop === foodY) return true
    return false
  }

  // 判断蛇头是否出界
  isDie () {
    // 拿到蛇头
    const head = this.snake[0]

    // 判断
    if (
      head.offsetLeft < 0 ||
      head.offsetTop < 0 ||
      head.offsetLeft >= this.map.clientWidth ||
      head.offsetTop >= this.map.clientHeight
    ) return true
    return false
  }
}


复制代码
规则
// 我是游戏规则模块, 书写游戏规则类
import Food from './food.js'
import Snake from './snake.js'

export default class Game {
  constructor (selector) {
    // 地图
    this.map = document.querySelector(selector)
    // 一个食物实例
    this.food = new Food(selector)
    // 一个蛇的实例
    this.snake = new Snake(selector)

    // 准备变量接受定时器返回值
    this.timer = 0
    // 准备一个变量表示级别
    this.level = 1
    // 准备一个变量表示积分
    this.score = 0
  }

  // 开始游戏
  start () {
    this.timer = setInterval(() => {
      // 让蛇走一步
      this.snake.move()

      // 随时判断是否迟到食物了
      if (this.snake.isEat(this.food.x, this.food.y)) {
        // 吃到食物了
        // 张一节
        this.snake.createOne()
        // 食物换个位置
        this.food.changePos()
        // 更改积分
        this.changeScore()
      }

      // 随时判断是否出界了
      if (this.snake.isDie()) {
        clearInterval(this.timer)
        alert('game over')
      }

    }, 320 - this.level * 20)
  }

  // 暂停游戏
  pause () {
    clearInterval(this.timer)
  }

  // 重新开始
  restart () {
    window.location.reload()
  }

  // 修改积分
  changeScore () {
    this.score++

    this.level++
    this.pause()
    this.start()
  }

  // 修改方向
  changeDir (dir) {
    this.snake.direction = dir
  }
}


复制代码
Object 函数
●Object 是 JavaScript 的一种 数据类型 。
●它用于存储各种键值集合和更复杂的实体。
●所有的对象可以通过 Object() 构造函数或者使用 对象字面量 的方式创建
常用的方法:
Object.assign()
作用:通过复制一个或多个对象来创建一个新的对象
语法: Object.assign(target, ...sources)
返回值: 目标对象
注意: 如果目标对象与源对象具有相同的 key,则目标对象中的属性将被源对象中的属性覆盖,后面的源对象的属性将类似地覆盖前面的源对象的属性。
// Object.assign()
const target = { a: 1, b: 2 };
const source = { b: 4, c: 5 };
const res = Object.assign(target, source);
console.log(target); // {a: 1, b: 4, c: 5}
console.log(res === target); // true


复制代码
Object.defineProperty()
作用: 给对象添加一个属性并指定该属性的配置
语法: Object.defineProperty(obj, prop, descriptor)
- obj: 要定义属性的对象。也就是给那个对象
- prop: 要定义或修改的属性的名称或
- descriptor: 要定义或修改的属性描述符,是一个对象。
- value:该属性名对应的值
- writable:该属性是否可以被重写(就是重新设置值)
-- 默认是 false 不允许被重写 , 也就是只读
-- 选填是 true 表示允许被重写 , 也就是可以被修改 - enumerable: 表示该属性是否可以被枚举(遍历,其实也就是看 in 好不好使)
-- 默认是 false 不可以枚举
-- 选填是 true 表示可以遍历 - get: 是一个函数 , 叫做getter获取器
-- 可以用来获取该属性的值
-- get函数的返回值就是这个属性的值
-- 注意: 不能和 value 和 writable 一起使用 , 会报错 - set: 是一个函数 , 叫做setter设置器
-- 当你需要修改该属性值的时候 , 会触发该函数
// Object.defineProperty()
const obj = {}
console.log(obj) // 这个时候是一个空对象
// 设置
Object.defineProperty(obj,'age',{
    value:18,
    writable:true,
    enumerable:true,
    get () {
        // 该函数的返回值就是这个属性的值
        // 上面设置了value 和 writable 这里就不能返回了
        return 20
    },
    set (val) {
        console.log('你想要修改age的值,修改为:',val);
    }
})
console.log(obj); // 打印结果: {age: 18}
// 之后我们尝试修改
// 修改我们之前的普通设置
obj.name = 'Rose'
console.log(obj); // 没有问题可以修改
// 修改通过Object.defineProperty设置的值
obj.age = 30
console.log(obj); // 打印出来的结果还是18 , 这个时候是不允许被修改的
// 在没有书写 enumerable 之前是不可以遍历出age的 , 书写了enumerable:true 以后是可以的
for (let k in obj) {
    console.log(k);
}
// 测试get函数的返回值不能和 value 和 writable一起使用
console.log(obj)


复制代码
Object.defineProperties()
作用: 给对象添加多个属性并分别指定它们的配置。
语法: Object.defineProperties(对象,{})
- 对象: 你要劫持的对象
- {} : 需要配置的信息
- {哪一个属性:{配置项}}
- {哪一个属性:{配置项}}
- 配置项中的内容
- value:该属性名对应的值
- writable:该属性是否可以被重写(就是重新设置值)
-- 默认是 false 不允许被重写 , 也就是只读
-- 选填是 true 表示允许被重写 , 也就是可以被修改 - enumerable: 表示该属性是否可以被枚举(遍历,其实也就是看 in 好不好使)
-- 默认是 false 不可以枚举
-- 选填是 true 表示可以遍历 - get: 是一个函数 , 叫做getter获取器
-- 可以用来获取该属性的值
-- get函数的返回值就是这个属性的值
-- 注意: 不能和 value 和 writable 一起使用 , 会报错 - set: 是一个函数 , 叫做setter设置器
-- 当你需要修改该属性值的时候 , 会触发该函数
// Object.defineProperties()
const obj = {name:'Jack',age:30}
console.log('原始obj:',obj);
// 开始劫持 把obj劫持到obj身上
// 拿到obj中的所有的key
for (let k in obj) {
    // 开始劫持
    Object.defineProperties(obj,{
        // 这样操作会报错
        // 一旦 obj.name 被修改
        // 不停的获取不停的该 , 不停的改不停的获取
        // 就会造成栈溢出
        // name:{
        //     get () {
        //         return obj.name
        //     }
        // }
        // 步骤1: 我们需要复制一份属性出来(也就是备份一份)
        // 我们这里需要拼接一个变量出来
        // 假设:之前的属性是name , 我们复制出来的属性叫做:_name
        // 语法: ['_' + 属性名] : {}
        ['_' + k] : {
            value: obj[k],
            writable: true
        },
        // 步骤2: 正式开始劫持(劫持的是我们备份的)
        [k] : {
            get () {
                return this['_' + k]
            },
            set (val) {
                this['_' + k] = val
                // 渲染页面操作
                console.log('你尝试修改 ' + k + ' 属性, 你要修改为 : ', val)
            }
        }
    })
}
console.log('劫持后obj',obj);
// 尝试修改
obj.age = 66
/*
    这样劫持的缺点
        => 就是只能劫持当前以前的数据
        => 如果劫持过后 , 后期动态插入的数据不好使(也就的不能再被劫持到)
        => vue2中使用的就是这个 , 要求数据一开始是给好的
*/
obj.gender = '男'
console.log(obj);
