目录
一.引言
二.DIN 模型分析
1.Input 输入
2.Embedding & Concat 嵌入与合并
3.DIN 深度兴趣网络
4.MLP 全连接
三.DIN 模型实现
1.Input
2.DIN Layer
2.1 init 初始化
2.2 build 构建
2.3 call 调用
3.Dice Layer
3.1 init 初始化
3.2 build 构建
3.3 call 调用
四.总结
一.引言
DIN 通过 Attention 机制软搜索用户历史序列中与当前商品匹配的行为,并做加权求和,除此之外引入了 DICE 激活,下面根据思路简易实现下 DIN 逻辑。

二.DIN 模型分析
1.Input 输入
特征包含 User Profile Features 用户基础特征、User Behaviors 用户历史行为、Candidate Ad 候选集广告以及 Context Features 上下文特征,Candidate Ad 包含了 Goods ID 商品、Shop ID 店铺以及 Cate ID 品类。
![]()
2.Embedding & Concat 嵌入与合并
所有特征都根据 id 获取对应的 Emd 嵌入随后 concat 合并,除了 User Behaviors 处 concat 的向量后续还有加权求和操作外,其余 Concat 的 Embedding 直接连接到 MLP 的第一个 FC layer 即全连接层作为输入。

3.DIN 深度兴趣网络
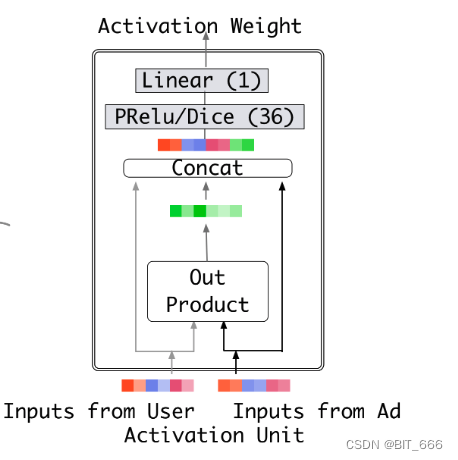
将 UserBehaviors Concat 的向量与 Candidate Concat 的向量通过 Activation Unit 的小 MLP 全连接层最后得到 Behavior - Candidate 对应的 Activation Weight 激活权重,然后将对应 Weight 与 Good 进行加权 sum pooling,随后和其他特征的 Embedding 一起加入 FC layer。

4.MLP 全连接
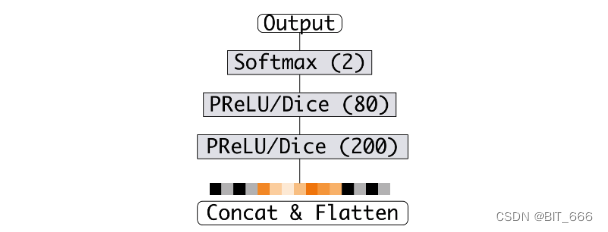
将原始 Concat 向量与 Attention 得到的向量一起送到最后的 MLP,激活函数为 PRule 或者 Dice,最后 Softmax 二分类得到对应的分数。
Tips:
本文代码主要以实现 DIN Attention 加权求和部分 With Dice 激活函数,这一部分的创新是论文的主要贡献,其他 Concat、MLP 全连接都是深度学习最常见的用法,这里不做过多讲解。可以看到DIN 是工程导向的,其出自阿里巴巴,逻辑清晰且易于部署上线,下面使用 keras 简单实现。
三.DIN 模型实现
1.Input
模拟用户行为序列 & 候选商品 ID 的输入数据,论文中还有 Shop Id、Cate Id 这里进行简化只取 Goods Id,多个 ID 的需要进行 Concat,有兴趣同学可自己实现。
def genSamples(batch_size=5, T=10, N=1000, seed=0):
    np.random.seed(seed)
    # 用户历史序列
    user_history = np.random.randint(0, N, size=(batch_size, T))
    # 候选 Item
    user_candidate = np.random.randint(0, N, size=(batch_size, 1))
    return user_history, user_candidate
这里使用 numpy 随机生成序列与候选商品 ID,batch_size 为批次大小,T- Times 代表序列长度,N 代表商品库大小。由于是模拟数据实现,这里 N、T、batch_size 的取值并不大。
    # 用户历史行为序列 && 候选商品 ID
    history, candidate = genSamples()
• 用户序列样式
[[684 559 629 192 835 763 707 359   9 723]
 [277 754 804 599  70 472 600 396 314 705]
 [486 551  87 174 600 849 677 537 845  72]]
• 对应商品样式
[[961]
 [265]
 [697]]
Tips:
实际场景下,高频低频用户的序列长度是不同的,为了保证模型能够正常训练推理,需要对过长的序列进行截断,例如选取近 30 日的最新的 100 个浏览商品,而对于过短的序列则需要进行填充,例如用户只有 80 个商品,则需要补充 20 个默认商品,这里最常见的就是为每个补充的商品补零,再到后面 Sum Pooling 的时候减少这些补充商品对用户 Embedding 的影响。
2.DIN Layer
2.1 init 初始化
import numpy as np
import tensorflow as tf
from tensorflow.python.keras.layers import *
from tensorflow.keras.layers import Layer
from tensorflow.python.ops.init_ops import TruncatedNormal


# 根据用户历史行为 goods 的 id emd 与 candidate id emd 进行 Attention 并输出
class DINLayer(Layer):
    """
        Input
            - User History => [batch_size, T]
            - User Candidate => [batch_size, 1]
        Output
            - Sum Pooling => [batch_size, embedding_dim]
            - Concat => [batch_size, T x embedding_dim]
        Tips
            - T:Time history num
    """

    def __init__(self, embedding_dim=8, N=1000, **kwargs):
        self.N = N  # 商品库大小
        self.embedding_dim = embedding_dim  # 向量维度
        self.kernel = None  # 向量矩阵
        self.T = None  # 序列长度
        self.mask_value = 0  # 掩码
        self.activation = None  # 激活层
        self.weight = None  # 权重层
        self.weight_normalization = True  # 是否归一化权重
        self.pooling_mode = "sum"  # DIN 输出

        super(DINLayer, self).__init__(**kwargs)
N - 商品库大小,这里指全部 Goods 的数量
embedding_dim - 嵌入向量长度
kernel - Embedding 层用于获取对应 id embedding
T - Times 即序列长度
mask_value - 掩码,主要针对填充的补充向量
activation - Activation Unit 激活层参数
weight - Activation Unit 权重层参数
weight_normalization - 权重是否归一化,论文中表示不归一化可以强化与商品相似行为的权重
pooling_mode - 池化方式,不同 mode 下主要区别为输出向量维度不同
2.2 build 构建
    def build(self, input_shape):
        # 获取序列长度
        history_shape, candidate_shape = input_shape
        self.T = history_shape[1]
        # N x embedding_dim 的参数矩阵
        self.kernel = self.add_weight(name='kernel',
                                      shape=(self.N, self.embedding_dim),
                                      initializer=TruncatedNormal,
                                      trainable=True)

        # Activation Layer
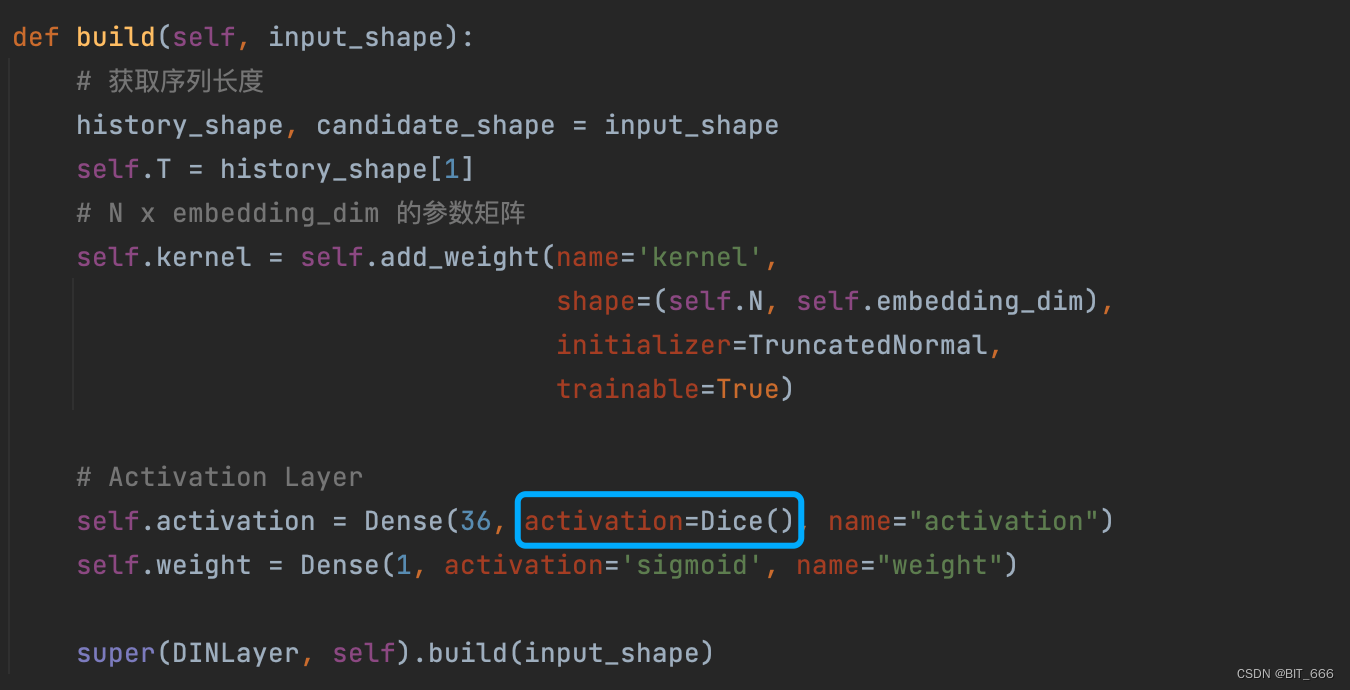
        self.activation = Dense(36, activation=Dice(), name="activation")
        self.weight = Dense(1, activation='sigmoid', name="weight")

        super(DINLayer, self).build(input_shape)
kernel 维度为 [N, embedding_dim] 为每个 good 的嵌入向量,如果还有 Shop、Cate 等属性,则类似 kernel 的数量也会增加,相应的参数量也会增加。
activation 和 weight 主要是 Activation Unit 的权重,论文中隐层中神经元数量为 36,最后一层为 Linear(1) 输出 Activation Weight 激活权重。
2.3 call 调用
这里实现 DIN 利用 Activation Unit 激活单元生成激活权重并执行加权求和,每一步输入输出的维度都会进行标注,方便大家理解 DIN 执行过程中维度的变化。
• 获取历史行为、候选商品 Emd
lookup 获取对应 ID 向量,这里也可以使用 Embedding Layer(goods) 的方式快速获取。
# 1.获取历史行为、候选集 Embedding
_history, _candidate = inputs
_history_emd = tf.nn.embedding_lookup(self.kernel, _history)  # [None, T] => [None, T, embedding_dim]
_candidate_emb = tf.nn.embedding_lookup(self.kernel, _candidate)  # [None, 1] => [None, 1, embedding_dim]
• 构造 Seq Mask
这里 mask_value = 0,主要针对序列长度不足进行补齐的向量计算 mask。
# 2.构造掩码 (None, 1, T)
mask = tf.reduce_mean(_history_emd, axis=-1)
seq_mask = tf.not_equal(mask, tf.constant(self.mask_value, dtype=mask.dtype))
seq_mask = tf.expand_dims(seq_mask, 1)
• 转换 candidate 维度
这里转换候选集 id 商品的维度主要是与历史行为对应的维度进行匹配,匹配后可以将候选集商品与每个历史 good 进行匹配计算。
# 3.转换 candidate 维度,与历史行为匹配 [None, 1, embedding_dim] => [None, T, embedding_dim]
candidates = tf.tile(_candidate_emb, [1, self.T, 1])
• Activation Unit Input

这一步主要实现 candidate 与 history 交互 为 Activation Unit 构造 Input,除了 history 与 候选商品的原始 embedding 向量外,论文中还增加了二者的 Out Product 外积作为 Activation Unit 的输入,也有示意图把外积这里换成了 ⊙、⊕ 等符号代表哈达玛积、对位相加、对位相减等等。按照论文的解释,除了两个原始向量保留原始信息外,这里一系列交互方式的引入为了增加更多显式知识协助建模从而得到更精确的激活权值。例如元素减可以更加显式的让模型学到两个向量是否相似,因为相似的向量相减为 0。实际场景下大家可以尝试不同的交互方式,以供 Activation Unit 更好的学习激活参数。
# 4.通过 candidates history 进行交互 [None, T, embedding_dim] => [None, T, embedding_dim x A]  A:为交互类型数量
din_input = tf.concat([candidates, _history_emd, candidates + _history_emd, candidates * _history_emd], axis=-1)
• Activation Weight Output
将上一步构造的 input 传给 Activation Unit 获取对应 good 与候选商品的激活权重,注意这里原始 Embedding 维度为 K,如果增加 A 种交互方式,则输入向量维度为 A x K。
# 5.构建 DNN 得到权重 [None, T, embedding_dim x A] => [None, T, 36] => [None, T, 1] => [None, 1, T] 代表每个序列行为的权重
din_deep = self.activation(din_input)
din_out = self.weight(din_deep)
din_out = tf.transpose(din_out, (0, 2, 1))
• Padding By Mask
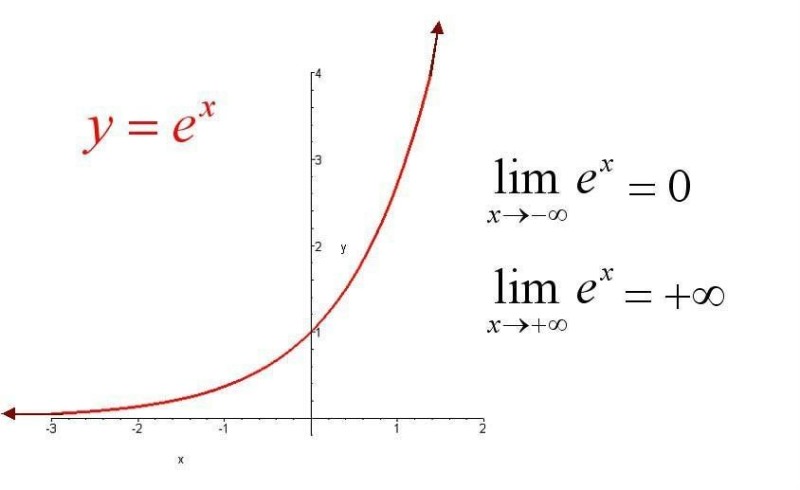
如果使用 softmax 进行参数归一化,则 padding 值为 -2 ** 32 + 1,因为这个 exp(x) 指数函数在这个点会获得一个很小的数,从而填充向量的权重近似为0,不会对用户向量 U(V) 造成影响,如果不进行 softmax 归一化,则直接对应位置为 0。
# 6.根据 mask 与 padding 值,得到有意义的加权平均 [None, 1, T] => [None, 1, T]
if self.weight_normalization:
    # 乘一个很小的数 softmax 会得到近似0,从而忽略补充向量对模型的贡献
    paddings = tf.ones_like(din_out) * (-2 ** 32 + 1)
else:
    # 权重不使用 softmax 归一化默认使用0填充
    paddings = tf.zeros_like(din_out)
din_out = tf.where(seq_mask, din_out, paddings)
• Weight Normalization
是否进行 Softmax 归一化权重,论文中阿里巴巴团队认为 w 在某种程度上可以视为激活用户兴趣强度的近似值,所以尝试采用不归一化的方式,这里大家可以根据自己场景尝试效果。
# 7.权重归一化 [None, 1, T]
if self.weight_normalization:
    din_out = tf.nn.softmax(din_out, axis=2)
• Attention Output
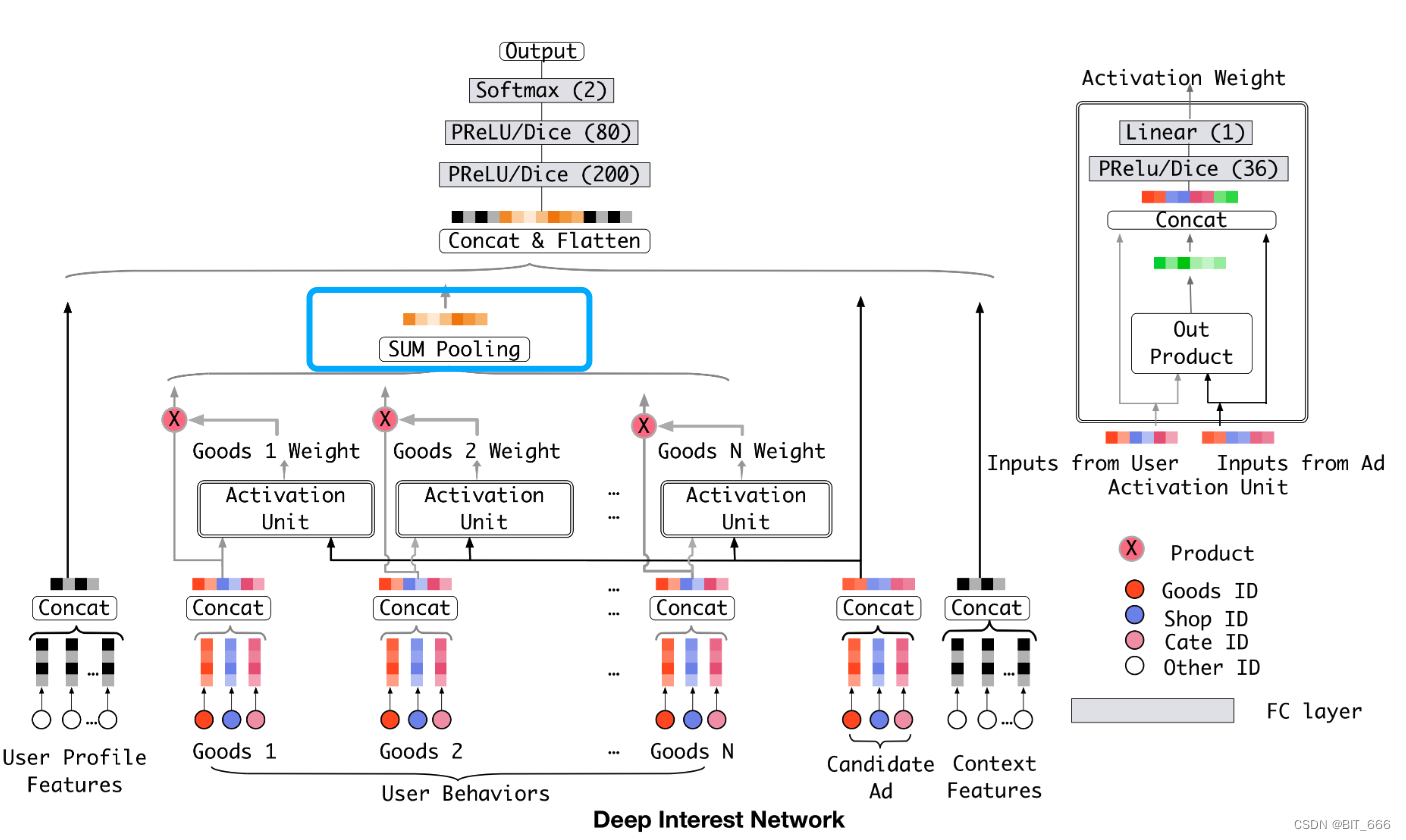
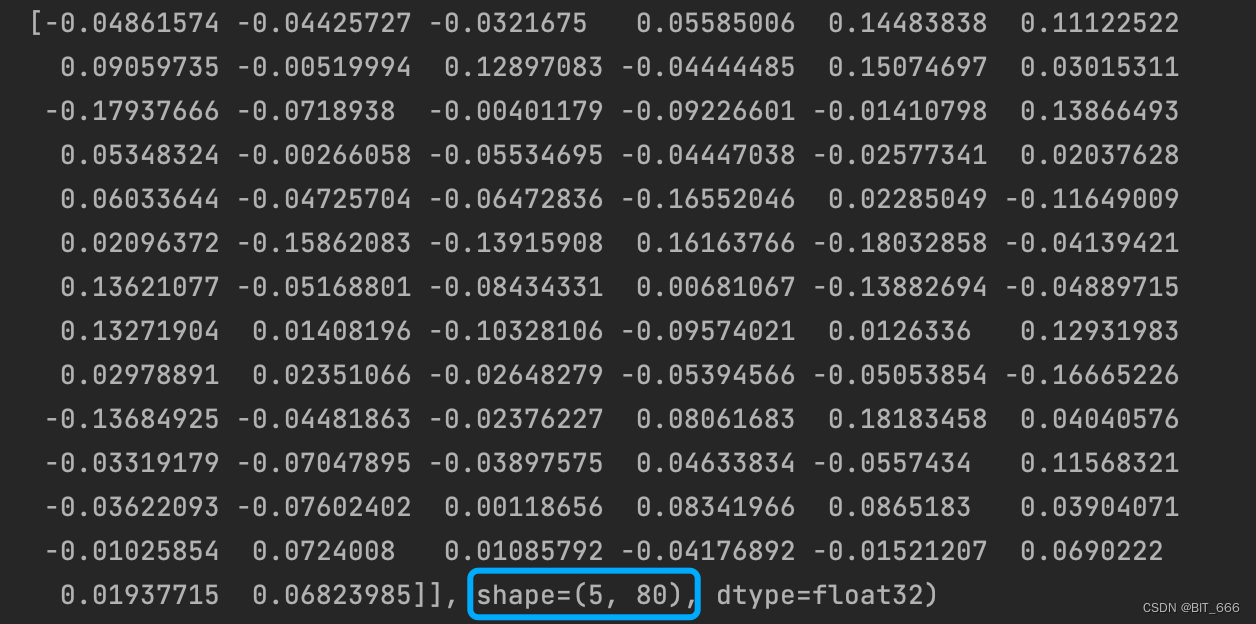
上面得到了每个 Good 对应的 Activation Weight,最后执行 SUM Pooling 得到传给 MLP 的一部分 Input。当前示例 T = 10,embedding_dim = 8。
# 8.加权得到 Attention 结果
if self.pooling_mode == "sum":
    # [None, 1, T] x [None, T, embedding_dim] => [None, 1, embedding_dim] 这里使用矩阵乘法
    attention_output = tf.matmul(din_out, _history_emd)
    attention_output = tf.squeeze(attention_output)
else:
    # [None, 1, T] => [None, T, 1]
    din_out = tf.reshape(din_out, [-1, self.T, 1])
    # [B, T, H] * [B, T, 1] => [B, T, H] 此处涉及到Tensor乘法广播机制
    attention_output = _history_emd * din_out
    attention_output = tf.reshape(attention_output, [-1, self.T * self.embedding_dim])
• DIN Last Output
if __name__ == '__main__':
    # 用户历史行为序列 && 候选商品 ID
    history, candidate = genSamples()
    DIN = DINLayer()
    output = DIN((history, candidate))
    print(output)
mode == "sum" 直接 matmul 矩阵乘法得到 [None, embedding_dim] 的小向量:

mode == "other" 通过哈达玛积计算得到 [None,embedding_dim x T] 的长向量,其中 T 为行为序列长度:
3.Dice Layer
Dice 激活函数上一篇 DIN 论文简介中我们已经给出,下面通过 Layer 实现 Dice 激活。

3.1 init 初始化
Dice Layer 构造比较简单,参数主要有是否 BN 以及一个调节因此 α。
    def __init__(self):
        self.batch_normal = None
        self.alpha = None
        super(Dice, self).__init__()
3.2 build 构建
BN 层采用 tensorflow.python.keras.layers 类下的 BatchNormalizationV1,按照论文的设置,这里 epsilon 取 1e−8。
    def build(self, input_shape):
        # 参数
        self.alpha = self.add_weight(name='alpha',
                                     shape=input_shape[-1],
                                     initializer=tf.constant_initializer(0.0),
                                     dtype=tf.float32,
                                     trainable=True)
        # BN 层
        self.batch_normal = BatchNormalizationV1(trainable=True,
                                                 epsilon=0.00000001,
                                                 axis=-1,
                                                 center=False,
                                                 scale=False)
        super(Dice, self).build(input_shape)
3.3 call 调用

根据论文公式实现 Dice,其中 P(s) 为 sigmoid 函数:
    def call(self, inputs, **kwargs):
        # [None, T, 36] => [None, T, 36] 保持不变
        inputs_normed = self.batch_normal(inputs)
        x_p = tf.sigmoid(inputs_normed)
        _output = self.alpha * (1.0 - x_p) * inputs + x_p * inputs
        return _output
我们在 Activation Unit 的构建过程中指定了 Dice 激活函数:
后面完整的 MLP 也用到了 Dice 激活,同样可以使用上面的方法。
四.总结
上面给出了 Activation Unit 和 Dice 激活的实现,DIN 还引入了 GAUC 的 Metric 与小批量感知正则化的创新,这里并未给出,除此之外,DIN 也为后面序列特征的发展拉开了序幕,DIEN 也在此基础上提出。按照王喆大佬对此文的评价,对于广大算法工程师来说,知道如何引入 Attention 机制是本文最实用的收获。
参考:
推荐系统中的注意力机制——阿里深度兴趣网络(DIN)
深度学习中Batch Normalization和Dice激活函数
更多推荐算法相关深度学习:深度学习导读专栏
