零、文章目录
数据可视化二、综合项目
1、项目概述
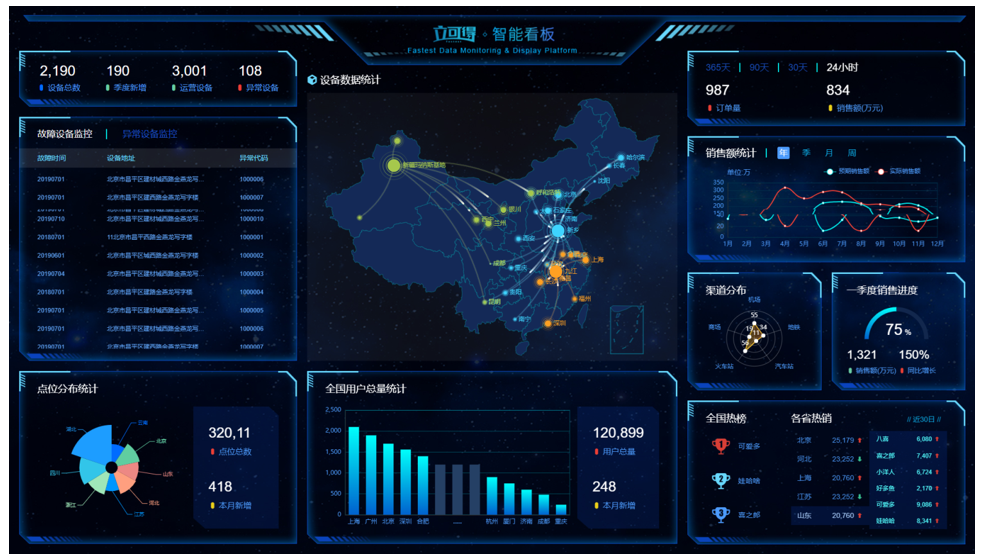
(1)项目展示
(2)项目目的
- 市场需求:应对现在数据可视化的趋势,越来越多企业需要在很多场景(营销数据,生产数据,用户数据)下使用,可视化图表来展示体现数据,让数据更加直观,数据特点更加突出。

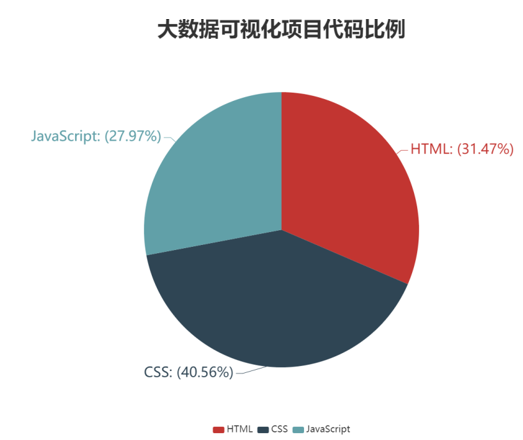
(3)项目技术
- HTML5 + CSS3 布局
- CSS3 动画、渐变
- jQuery库+ 原生 JavaScriptflex
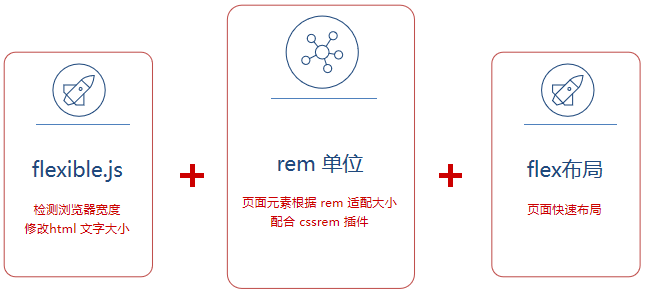
- 布局 和 rem 适配方案
- 图片边框 border-image
- ES6 模板字符
- ECharts 可视化库等等
2、适配方案
(1)项目需求
- 设计稿是1920px
- PC端适配: 宽度在 1024~1920之间页面元素宽高自适应
(2)适配方案
- rem布局相关知识请参考:https://blog.csdn.net/liyou123456789/article/details/129123586
- flex布局相关知识请参考:https://blog.csdn.net/liyou123456789/article/details/129123515
- vscode相关知识请参考:https://blog.csdn.net/liyou123456789/article/details/128314024
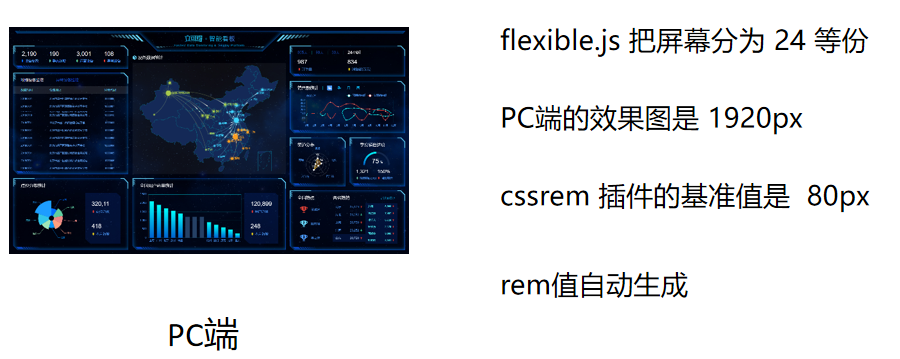
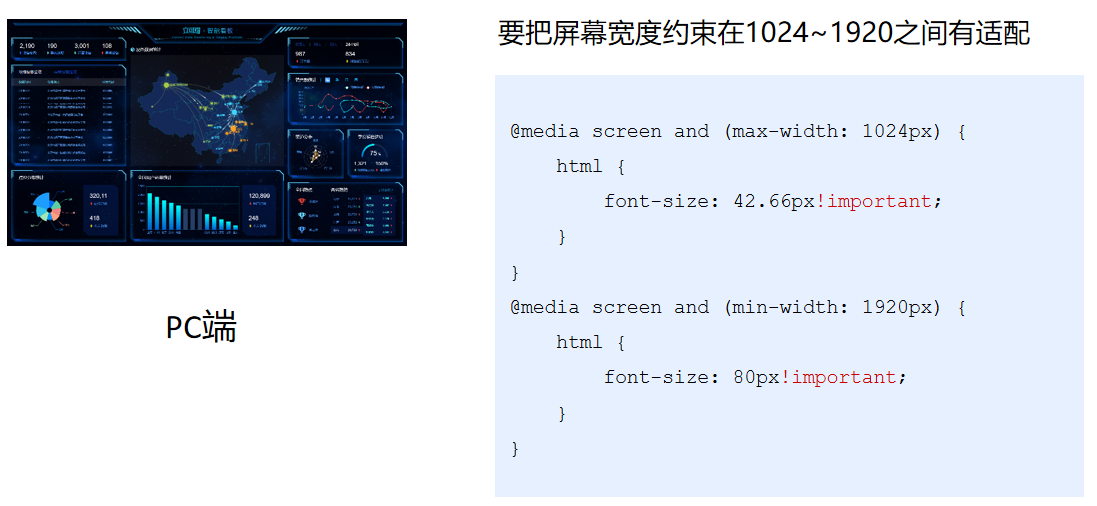
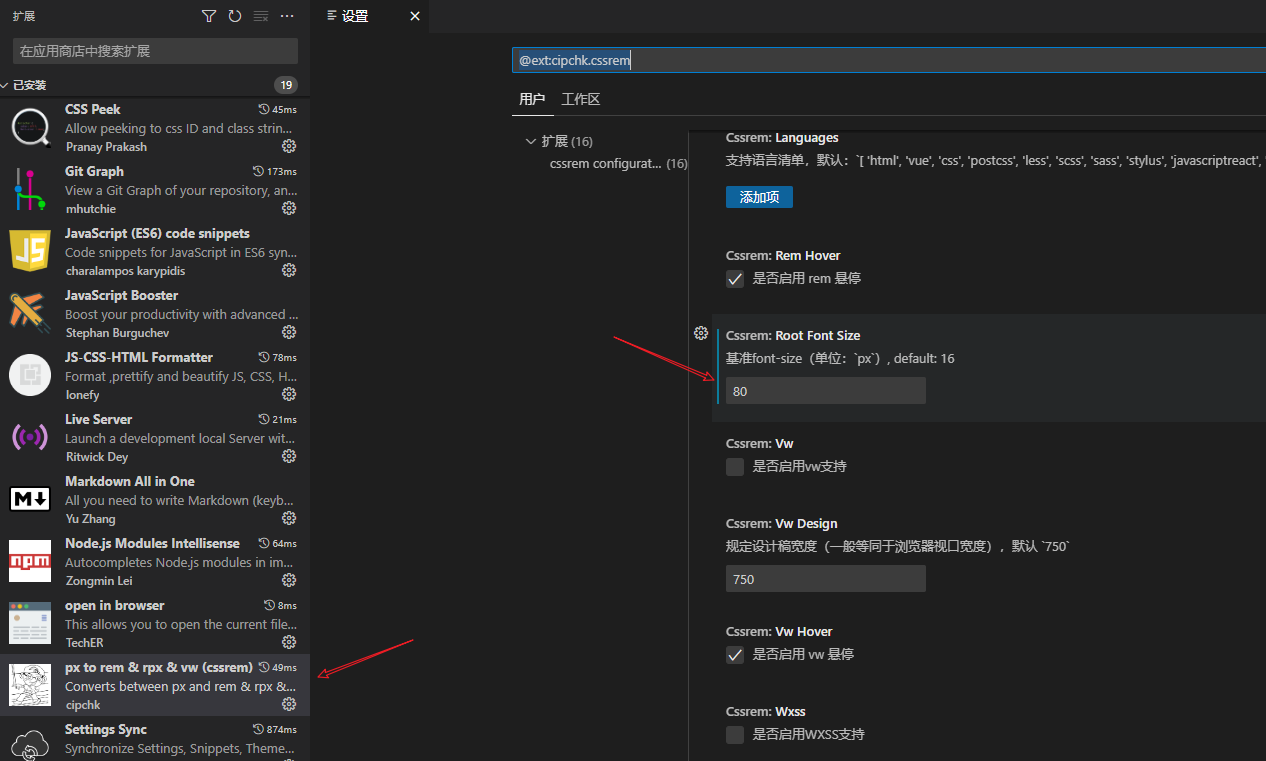
案例如下:
<!DOCTYPE html>
<html lang="en">

<head>
    <meta charset="UTF-8">
    <meta name="viewport" content="width=device-width, initial-scale=1.0">
    <meta http-equiv="X-UA-Compatible" content="ie=edge">
    <title>项目适配方案</title>
    <script src="js/flexible.js"></script>
    <style>
        @media screen and (max-width: 1024px) {
            html {
                font-size: 42.66px !important;
            }
        }

        @media screen and (min-width: 1920px) {
            html {
                font-size: 80px !important;
            }
        }

        div {
            width: 2.5rem;
            height: 2.5rem;
            background-color: pink;
        }
    </style>
</head>

<body>
    <div></div>
</body>

</html>
3、开发要点
(1)文件结构
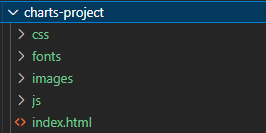
(2)基础布局
- 项目核心: 先布好局, 之后利用ECharts 填充图表
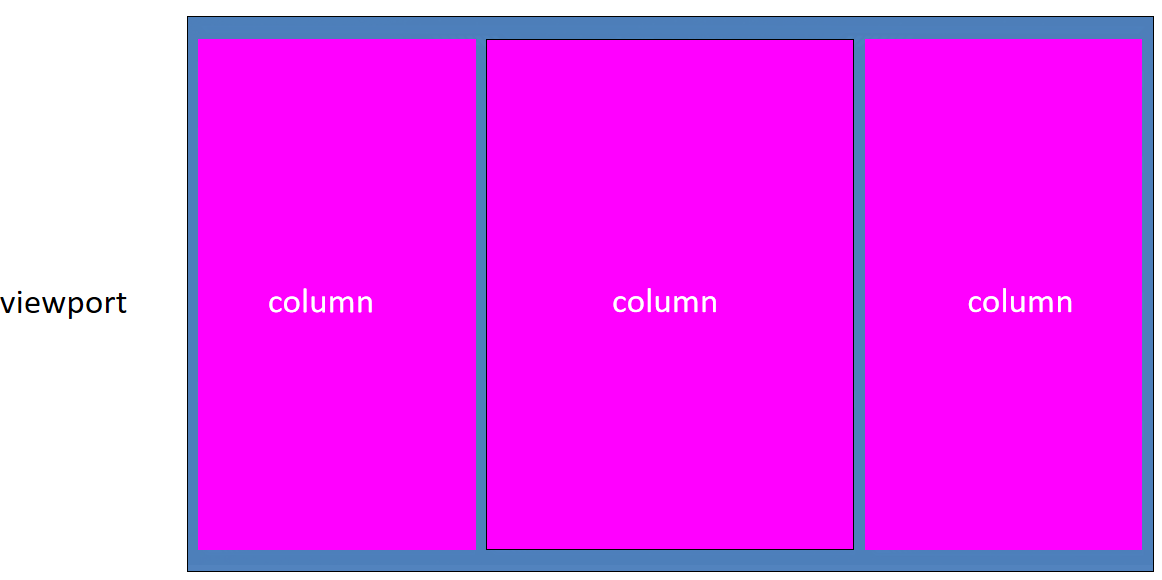
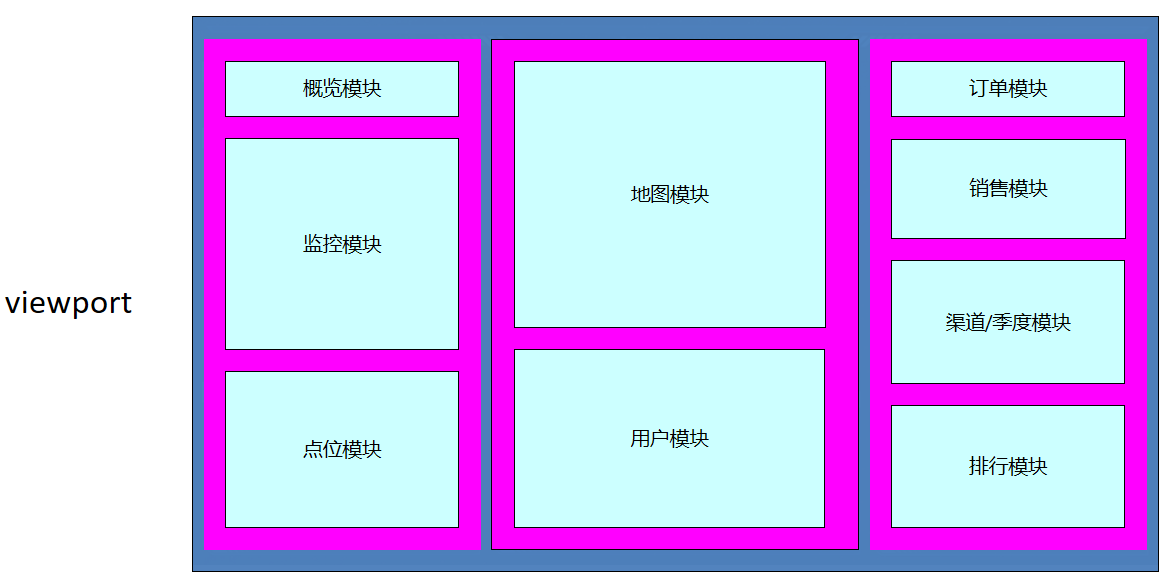
- 效果图: 1920px * 1078px
- body 设置背景图 ,行高1.15
- viewport 主体容器,限制最小宽度1024px,与最大宽度1920px,最小高度780px。
- 需要居中显示
- 使用logo.png做为背景图,在容器内显示
- 内间距 88px 20px 0
- column 列容器,分三列,占比 3:4:3
- 中间容器外间距 32px 20px 0
html如下:
<body>
  <div class="viewport">
  	<div class="column">
      <!--概览-->
    	<div></div>
			<!--监控-->
    	<div></div>
			<!--点位-->
    	<div></div>
    </div>
    <div class="column">
      <!--地图-->
    	<div></div>
			<!--用户-->
    	<div></div>
    </div>
    <div class="column">
      <!--订单-->
    	<div></div>
			<!--销售-->
    	<div></div>
    	<div>
      	<!--渠道-->
    		<div></div>
      	<!--季度-->
    		<div></div>
      </div>
			<!--排行-->
    	<div></div>
    </div>
  </div>
</body>
css如下:
/* 基础布局 */
body{
  font-family: Arial, Helvetica, sans-serif;
  margin: 0;
  padding: 0;
  font-size: 0.5rem;
  line-height: 1.15;
  background: url(../images/bg.jpg) no-repeat 0 0 / cover;
}
h4,h3,ul{
  margin: 0;
  padding: 0;
  font-weight: normal;
}
ul{
  list-style: none;
}
a{
  text-decoration: none;
}
.viewport{
  max-width: 1920px;
  min-width: 1024px;
  margin: 0 auto;
  min-height: 780px;
  padding: 3.667rem 0.833rem 0;
  background: url(../images/logo.png) no-repeat 0 0 / contain;
  display: flex;
}
.column{
  flex: 3;
  position: relative;
}
.column:nth-child(2){
  flex: 4;
  margin: 1.333rem 0.833rem 0;
}
(3)边框图片
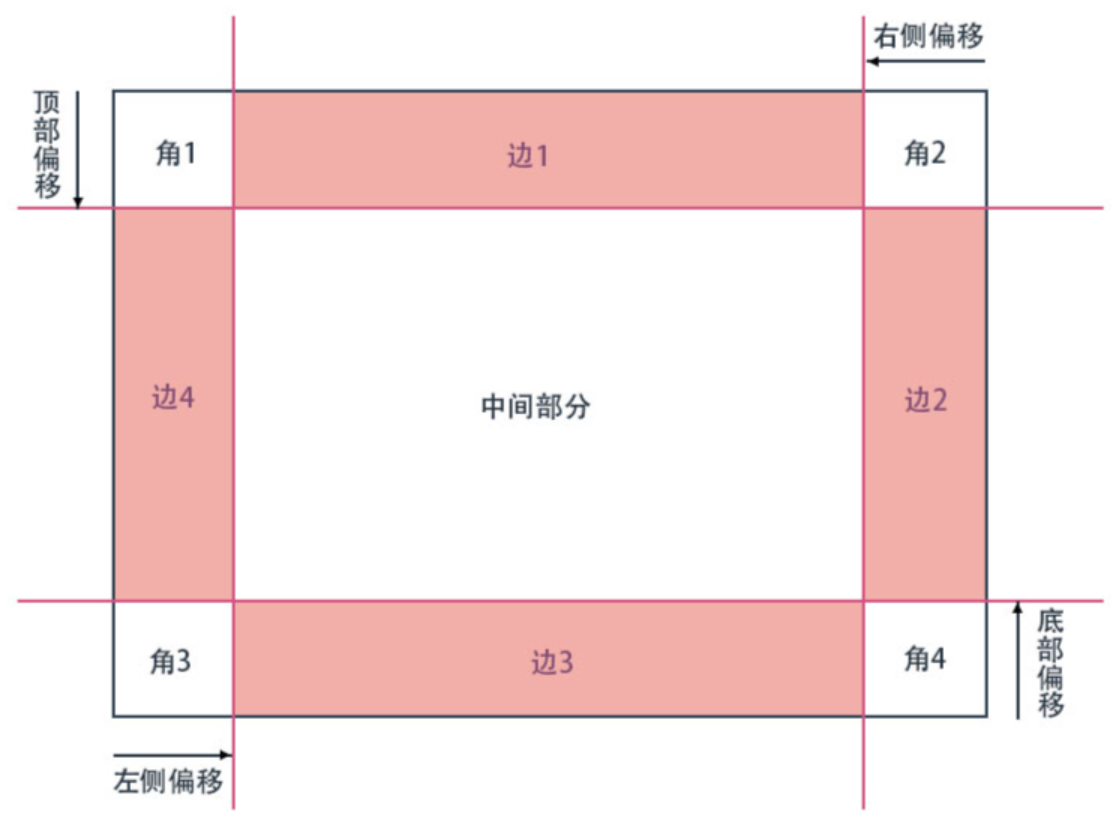
- 边框图片使用场景:盒子大小不一,但是边框样式相同,此时就需要边框图片来完成
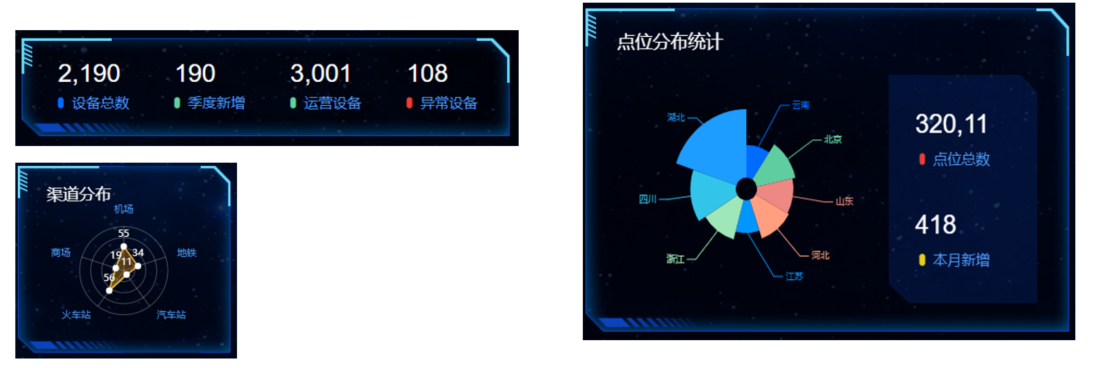
- 为了实现丰富多彩的边框效果,在CSS3中,新增了 border-image属性,这个新属性允许指定一幅图像作为元素的边框。
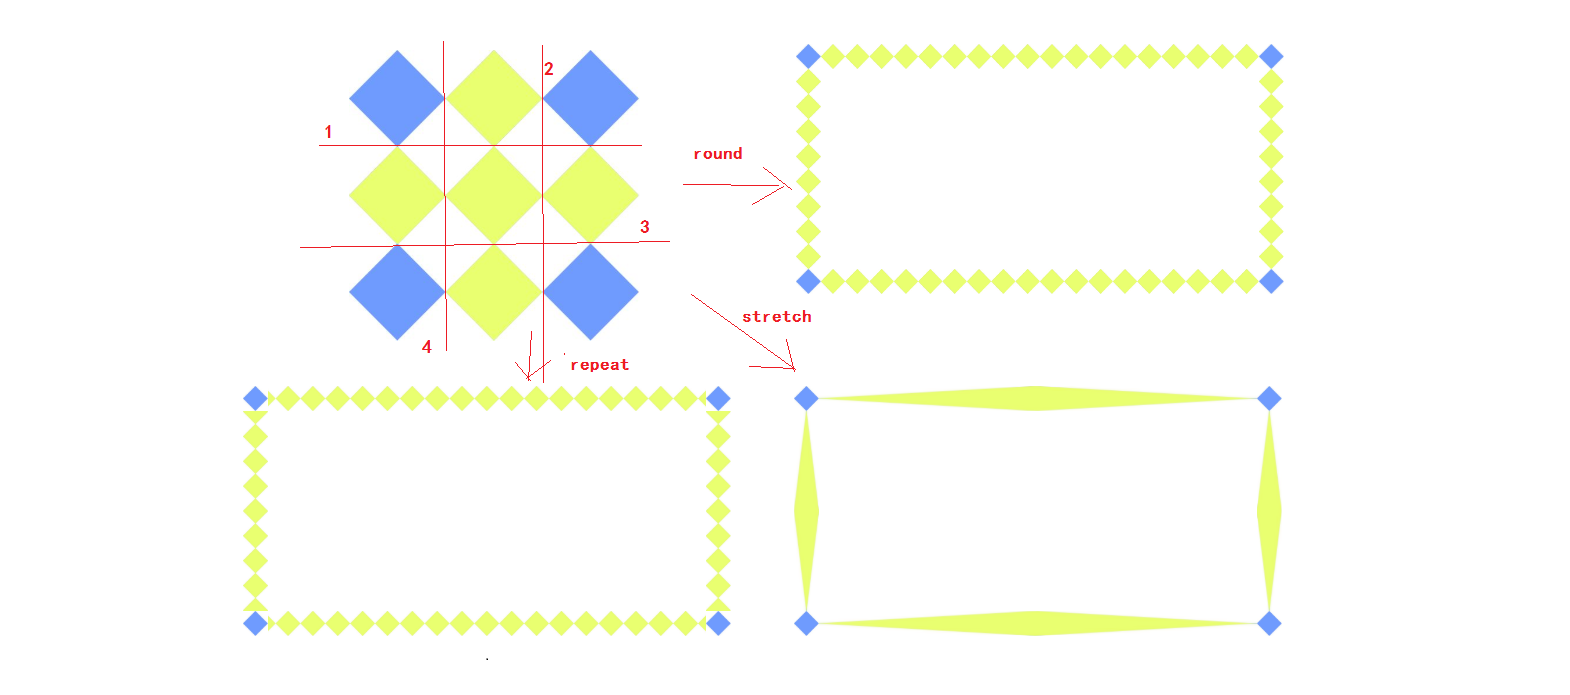
- 边框图片切割原理:把四个角切出去(九宫格的由来),中间部分可以铺排、拉伸或者环绕。

- 组合写法:
border-image: url("images/border.jpg") 167/20px round;
- 拆分写法:
border-image-source: url("images/border.jpg");
border-image-slice: 167 167 167 167;
border-image-width: 20px;
border-image-repeat: round;
- border-image-source:边框图片资源地址
- border-image-slice:裁剪尺寸(上 右 下 左)单位默认px,可使用百分百。
- border-image-width:边框图片的宽度,默认边框的宽度,不会挤压文字。
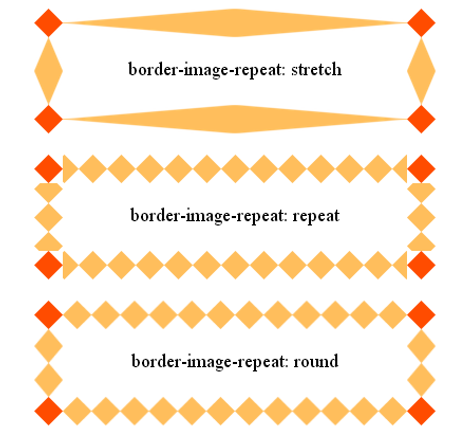
- border-image-repeat:平铺方式
- stretch 拉伸(默认)
- repeat 平铺,从边框的中心向两侧开始平铺,会出现不完整的图片。
- round 环绕,是完整的使用切割后的图片进行平铺。
案例如下:
<!DOCTYPE html>
<html lang="en">

<head>
    <meta charset="UTF-8">
    <meta name="viewport" content="width=device-width, initial-scale=1.0">
    <meta http-equiv="X-UA-Compatible" content="ie=edge">
    <title>边框图片</title>
    <style>
        div {
            width: 400px;
            height: 300px;
            border: 15px solid pink;
            border-image-source: url(images/border.png);
            /* 不要跟单位 */
            border-image-slice: 30 30 30 30;
            /* border-image-slice: 30; */
            /* 这个属性默认的是 border的宽度 但是 有区别,  这个是 边框图片的宽度 不会挤压文字 */
            border-image-width: 30px;
            border-image-repeat: round;
        }
    </style>
</head>

<body>
    <div>奥利给</div>
</body>

</html>

(4)公共面板样式
- 所有的面板的基础样式是一致的,提前布局好。
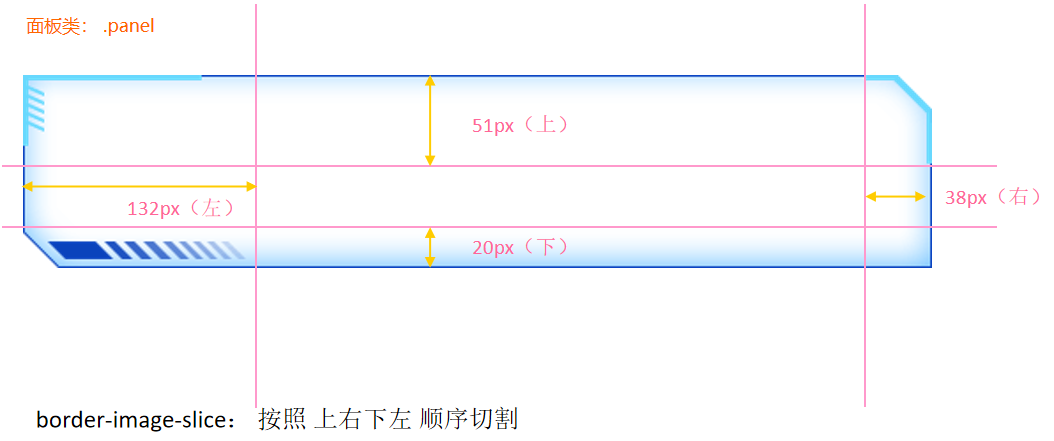
- 面板 .panel
- 容器 .inner 内边距是 上下24px 左右 36px
css如下:
/* 公共面板样式  */
.panel {
    position: relative;
    border: 15px solid transparent;
    border-width: .6375rem .475rem .25rem 1.65rem;
    border-image-source: url(../images/border.png);
    border-image-slice: 51 38 20 132;
    margin-bottom: .25rem;
}
.inner {
    position: absolute;
    top: -0.6375rem;
    left: -1.65rem;
    right: -0.475rem;
    bottom: -0.25rem;
    padding: .3rem .45rem;
}
html如下:
<div class="panel">
     <div class="inner">
          123
     </div>
</div>
(5)类名调用字体图标
-
字体图标相关知识请参考:https://blog.csdn.net/liyou123456789/article/details/128645515
-
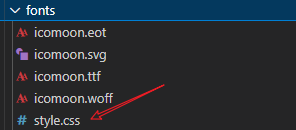
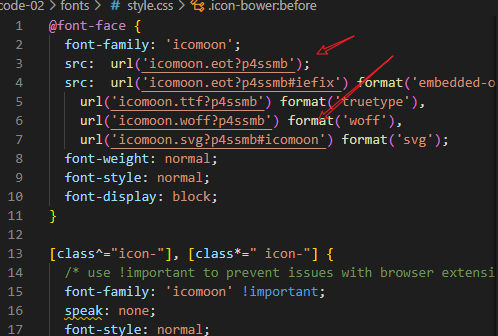
HTML页面引入字体图标中css文件:
<link rel="stylesheet" href="fonts/style.css">,这里把css文件直接放进fonts文件夹方便管理,css文件中的字体文件路径需要修改
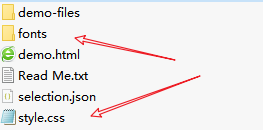
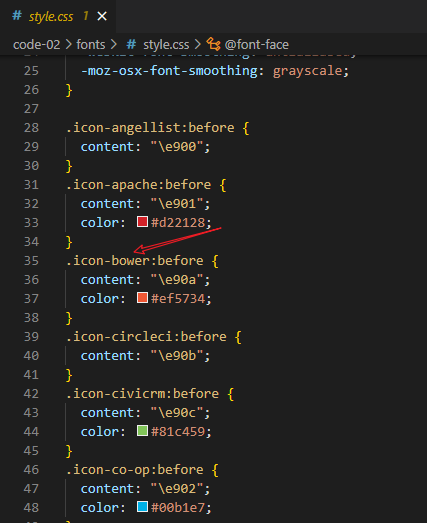
- 标签直接调用图标对应的类名即可:
<span class="icon-bower"></span>
案例如下:
<!DOCTYPE html>
<html lang="en">

<head>
    <meta charset="UTF-8">
    <meta name="viewport" content="width=device-width, initial-scale=1.0">
    <title>通过类名调用字体图标</title>
    <link rel="stylesheet" href="fonts/style.css">
</head>

<body>
    <div class="icon-codeigniter"></div>
    <div class="icon-codepen"></div>
</body>

</html>
(6)立即执行函数用法
- JS文件中,会有大量的变量命名,特别是Echarts使用中,需要大量初始化Echarts对象?为了防止变量名冲突(变量污染) 我们采用立即执行函数策略。
- 立即函数中的变量都在自己的作用域中,不会和其他立即函数的变量冲突。
- 注意: 多个立即执行函数中间必须加
分号隔开
(function(){
   var num = 10;
})();
(function(){
   var num = 10;
})();
(7)索引问题
- div下面有五个子元素,index分别从0-4,所以
$(this).index()获取到的index是2-4
<!DOCTYPE html>
<html lang="en">
  <head>
    <meta charset="UTF-8" />
    <meta name="viewport" content="width=device-width, initial-scale=1.0" />
    <title>索引问题</title>
    <script src="js/jquery.min.js"></script>
  </head>
  <body>
    <div>
      <h1>第一个h1</h1>
      <h1>第二个h1</h1>
      <p>屁1</p>
      <p>屁2</p>
      <p>屁3</p>
    </div>
    <script>
      $("div p").on("click", function() {
        console.log($(this).index());
      });
    </script>
  </body>
</html>
(8)ES6模板字符
- ES6模板字符可以极大的提高我们的开发效率
- 语法规范:
`${表达式}` //模板字符串使用反钩号 `` 而且允许自由换行
<!DOCTYPE html>
<html lang="en">

<head>
    <meta charset="UTF-8" />
    <meta name="viewport" content="width=device-width, initial-scale=1.0" />
    <title>ES6模板字符</title>
</head>

<body>
    <script>
        var star = {
            name: "刘德华",
            age: 18
        };
        //   以前的写法 拼接的时候引号很容易出问题
        console.log("我的名字是" + star.name + "我的年龄是" + star.age);
        //   ES6 模板字符写法
        console.log(`我的名字是${star.name}
      我的年龄是${star.age}`);
        console.log(`<span>${star.name}</span><span>${star.age}</span>`);
    </script>
</body>

</html>
4、模块代码
(1)概览区域(overview)-布局
html结构:
      <div class="overview panel">
        <div class="inner">
          <ul>
            <li>
              <h4>2,190</h4>
              <span>
                <i class="icon-dot" style="color: #006cff"></i>
                设备总数
              </span>
            </li>
            <li class="item">
              <h4>190</h4>
              <span>
                <i class="icon-dot" style="color: #6acca3"></i>
                季度新增
              </span>
            </li>
            <li>
              <h4>3,001</h4>
              <span>
                <i class="icon-dot" style="color: #6acca3"></i>
                运营设备
              </span>
            </li>
            <li>
              <h4>108</h4>
              <span>
                <i class="icon-dot" style="color: #ed3f35"></i>
                异常设备
              </span>
            </li>
            </ul>
        </div>
      </div>
样式描述:
-
容器高度 110px
-
h4字体 28px #fff 左边距 4.8px 下间隙 8px
-
span字体 16px #4c9bfd
/* 概览区域 */
.overview {
    height: 1.375rem;
}
.overview ul {
    display: flex;
    justify-content: space-between;
}
.overview ul li h4 {
    font-size: .35rem;
    color: #fff;
    margin: 0 0 .1rem .06rem;
}
.overview ul li span {
    font-size: .2rem;
    color: #4c9bfd;
}
(2)监控区域(monitor)-布局
html结构:
      <!--监控-->
      <div class="monitor panel">
        <div class="inner">
          <div class="tabs">
            <a href="javascript:;" class="active">故障设备监控</a>
            <a href="javascript:;" >异常设备监控</a>
          </div>
          <div class="content">
            <div class="head">
              <span class="col">故障时间</span>
              <span class="col">设备地址</span>
              <span class="col">异常代码</span>
            </div>
            <div class="marquee-view">
              <div class="marquee">
                <div class="row">
                  <span class="col">20180701</span>
                  <span class="col">11北京市昌平西路金燕龙写字楼</span>
                  <span class="col">1000001</span>
                  <span class="icon-dot"></span>
                </div>
                <div class="row">
                  <span class="col">20190601</span>
                  <span class="col">北京市昌平区城西路金燕龙写字楼</span>
                  <span class="col">1000002</span>
                  <span class="icon-dot"></span>
                </div>
                <div class="row">
                  <span class="col">20190704</span>
                  <span class="col">北京市昌平区建材城西路金燕龙写字楼</span>
                  <span class="col">1000003</span>
                  <span class="icon-dot"></span>
                </div>
                <div class="row">
                  <span class="col">20180701</span>
                  <span class="col">北京市昌平区建路金燕龙写字楼</span>
                  <span class="col">1000004</span>
                  <span class="icon-dot"></span>
                </div>
                <div class="row">
                  <span class="col">20190701</span>
                  <span class="col">北京市昌平区建材城西路金燕龙写字楼</span>
                  <span class="col">1000005</span>
                  <span class="icon-dot"></span>
                </div>
                <div class="row">
                  <span class="col">20190701</span>
                  <span class="col">北京市昌平区建材城西路金燕龙写字楼</span>
                  <span class="col">1000006</span>
                  <span class="icon-dot"></span>
                </div>
                <div class="row">
                  <span class="col">20190701</span>
                  <span class="col">北京市昌平区建西路金燕龙写字楼</span>
                  <span class="col">1000007</span>
                  <span class="icon-dot"></span>
                </div>
                <div class="row">
                  <span class="col">20190701</span>
                  <span class="col">北京市昌平区建材城西路金燕龙写字楼</span>
                  <span class="col">1000008</span>
                  <span class="icon-dot"></span>
                </div>
                <div class="row">
                  <span class="col">20190701</span>
                  <span class="col">北京市昌平区建材城西路金燕龙写字楼</span>
                  <span class="col">1000009</span>
                  <span class="icon-dot"></span>
                </div>
                <div class="row">
                  <span class="col">20190710</span>
                  <span class="col">北京市昌平区建材城西路金燕龙写字楼</span>
                  <span class="col">1000010</span>
                  <span class="icon-dot"></span>
                </div>
              </div>
            </div>
          </div>
          <div class="content">
            <div class="head">
              <span class="col">异常时间</span>
              <span class="col">设备地址</span>
              <span class="col">异常代码</span>
            </div>
            <div class="marquee-view">
              <div class="marquee">
                <div class="row">
                  <span class="col">20190701</span>
                  <span class="col">北京市昌平区建材城西路金燕龙写字楼</span>
                  <span class="col">1000001</span>
                  <span class="icon-dot"></span>
                </div>
                <div class="row">
                  <span class="col">20190701</span>
                  <span class="col">北京市昌平区建材城西路金燕龙写字楼</span>
                  <span class="col">1000002</span>
                  <span class="icon-dot"></span>
                </div>
                <div class="row">
                  <span class="col">20190703</span>
                  <span class="col">北京市昌平区建材城西路金燕龙写字楼</span>
                  <span class="col">1000002</span>
                  <span class="icon-dot"></span>
                </div>
                <div class="row">
                  <span class="col">20190704</span>
                  <span class="col">北京市昌平区建材城西路金燕龙写字楼</span>
                  <span class="col">1000002</span>
                  <span class="icon-dot"></span>
                </div>
                <div class="row">
                  <span class="col">20190705</span>
                  <span class="col">北京市昌平区建材城西路金燕龙写字楼</span>
                  <span class="col">1000002</span>
                  <span class="icon-dot"></span>
                </div>
                <div class="row">
                  <span class="col">20190706</span>
                  <span class="col">北京市昌平区建材城西路金燕龙写字楼</span>
                  <span class="col">1000002</span>
                  <span class="icon-dot"></span>
                </div>
                <div class="row">
                  <span class="col">20190707</span>
                  <span class="col">北京市昌平区建材城西路金燕龙写字楼</span>
                  <span class="col">1000002</span>
                  <span class="icon-dot"></span>
                </div>
                <div class="row">
                  <span class="col">20190708</span>
                  <span class="col">北京市昌平区建材城西路金燕龙写字楼</span>
                  <span class="col">1000002</span>
                  <span class="icon-dot"></span>
                </div>
                <div class="row">
                  <span class="col">20190709</span>
                  <span class="col">北京市昌平区建材城西路金燕龙写字楼</span>
                  <span class="col">1000002</span>
                  <span class="icon-dot"></span>
                </div>
                <div class="row">
                  <span class="col">20190710</span>
                  <span class="col">北京市昌平区建材城西路金燕龙写字楼</span>
                  <span class="col">1000002</span>
                  <span class="icon-dot"></span>
                </div>
              </div>
            </div>
          </div>
        </div>
      </div>
监控区域 monitor 大盒子的高度是 480px
结构解释:
- .tabs 标签选项 加上active激活选项 默认激活第一个选项
- .content 切换内容 加上
style="display: block;"显示内容 默认激活第一个内容
样式描述:
- .inner 容器内间距 24px 0
- .tabs 容器内间距 0 36px
- a 容器 颜色: #1950c4 内间距:0 27px 字体:18px
- 第一个a容器 去除左侧内间距 加上右侧2px宽度边框#00f2f1
- 激活的时候 颜色白色
- .content容器
- 占满剩余高度 flex:1
- 默认隐藏
- .head 容器
- 行高 1.05 背景 rgba(255, 255, 255, 0.1) 内间距 12px 36px 颜色 #68d8fe 字体大小 14px
- row 容器
- 行高 1.05 内间距 12px 36px 颜色 #68d8ff 字体大小 12px
- .icon-dot 字体图标 绝对定位 左边0.2rem 透明度0
- 鼠标经过后:背景 rgba(255, 255, 255, 0.1) 透明度1
- col容器
- 宽度:1rem 2.5rem 1rem
- 第二个col 一行不换行 溢出 省略
/* 监控区域 */
.monitor{
  height: 6rem;
}
.monitor .inner{
  padding: .3rem 0;
  display: flex;
  flex-direction: column;
}
.monitor .tabs{
  padding: 0 .45rem;
  margin-bottom: 0.225rem;
  display: flex;
}
.monitor .tabs a{
  color:#1950c4;
  font-size: 0.225rem;
  padding: 0 .3375rem;
}
.monitor .tabs a:first-child{
  padding-left: 0;
  border-right: 0.025rem solid #00f2f1;
}
.monitor .tabs a.active{
  color: #fff;
}
.monitor .content{
  flex: 1;
  position: relative;
  display: none;
}
.monitor .head{
  display: flex;
  justify-content: space-between;
  line-height: 1.05;
  background-color: rgba(255, 255, 255, 0.1);
  padding: 0.15rem 0.45rem;
  color: #68d8fe;
  font-size: 0.175rem;
}
.monitor .marquee-view {
  position: absolute;
  top: 0.5rem;
  bottom: 0;
  width: 100%;
  overflow: hidden;
}
.monitor .row{
  display: flex;
  justify-content: space-between;
  line-height: 1.05;
  font-size: 0.15rem;
  color: #61a8ff;
  padding: 0.15rem 0.45rem;
}
.monitor .row .icon-dot{
  position: absolute;
  left: 0.2rem;
  opacity: 0;
}
.monitor .row:hover {
  background-color: rgba(255, 255, 255, 0.1);
  color: #68d8fe;
}
.monitor .row:hover .icon-dot{
  opacity: 1;
}
.monitor .col:first-child{
  width: 1rem;
}
.monitor .col:nth-child(2){
  width: 2.5rem;
  white-space: nowrap;
  text-overflow: ellipsis;
  overflow: hidden;
}
.monitor .col:nth-child(3){
  width: 1rem;
}
(2)监控区域(monitor)-效果
切换功能:
- 绑定 标签页点击 事件
- 当前容器加active其他容器移除active
- index对应的内容容器显示其他容器隐藏
  // 切换
 $(".monitor .tabs").on("click", "a", function() {
    $(this).addClass("active").siblings("a").removeClass("active");
    // console.log($(this).index());
    //   选取对应索引号的content
    $(".monitor .content").eq($(this).index()).show().siblings(".content").hide();
  });
无缝滚动原理:
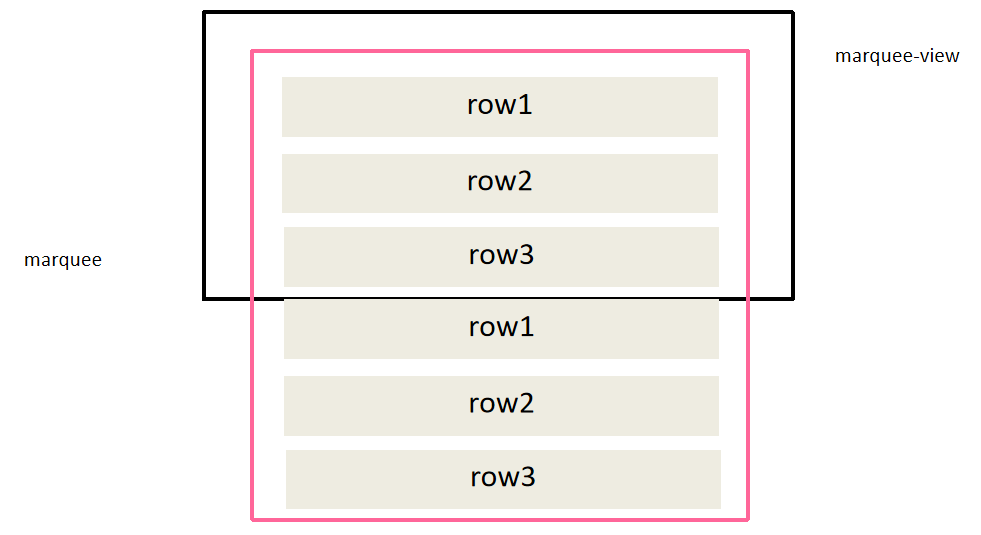
- 先克隆marquee里面所有的行(row)
- 通过CSS3动画滚动marquee
- 鼠标经过marquee 就停止动画:
animation-play-state: paused;
动画功能:
- 实现思路:
- 先克隆列表,追加在后面
- marquee-view 占满剩余高度,溢出隐藏
- 绝对定位,top 1.6rem bottom 0
- 宽度100%,溢出隐藏
- 使用animation实现动画
- 使用 translateY 向上位移 50%
- 动画时间15s,匀速播放,循环执行。
js代码:
  // 动画
  $(".marquee-view .marquee").each(function() {
    // console.log($(this));
    var rows = $(this).children().clone();
    $(this).append(rows);
  });
css代码:
/* 通过CSS3动画滚动marquee */
.marquee-view .marquee {
  animation: move 15s linear infinite;
}
@keyframes move {
  0% {
  }
  100% {
    transform: translateY(-50%);
  }
}
/* 3.鼠标经过marquee 就停止动画 */
.marquee-view .marquee:hover {
  animation-play-state: paused;
}
(3)点位区域(point)-布局
html结构:
      <!-- 点位 -->
      <div class="point panel">
        <div class="inner">
          <h3>点位分布统计</h3>
          <div class="chart">
            <div class="pie"></div>
            <div class="data">
              <div class="item">
                <h4>320,11</h4>
                <span>
                  <i class="icon-dot" style="color: #ed3f35"></i>
                  点位总数
                </span>
              </div>
              <div class="item">
                <h4>418</h4>
                <span>
                  <i class="icon-dot" style="color: #eacf19"></i>
                  本月新增
                </span>
              </div>
            </div>
          </div>
        </div>
      </div>
样式描述:
- point 盒子高度为 340px
/* 点位 */
.point {
  height: 4.25rem;
}
.point .chart {
  display: flex;
  margin-top: 0.3rem;
  justify-content: space-between;
}
.point .pie {
  width: 3.9rem;
  height: 3rem;
  margin-left: -0.125rem;
  background-color: pink;
}
.point .data {
  display: flex;
  flex-direction: column;
  justify-content: space-between;
  width: 2.1rem;
  padding: .45rem .375rem;
  box-sizing: border-box;
  background-image: url(../images/rect.png);
  background-size: cover;
}
.point h4 {
  margin-bottom: 0.15rem;
  font-size: .35rem;
  color: #fff;
}
.point span {
  display: block;
  color: #4c9bfd;
  font-size: .2rem;
}
(3)点位区域(point)-饼图
实现步骤:
- 从官方示例中找到最接近项目需求的例子。
- 按照产品需求,来定制图表。
第一步:参考官方示例
// 点位分布统计模块
(function() {
  // 1. 实例化对象
  var myChart = echarts.init(document.querySelector(".pie"));
  // 2. 指定配置项和数据
  var option = {
    tooltip: {
      trigger: "item",
      formatter: "{a} <br/>{b} : {c} ({d}%)"
    },

    series: [
      {
        name: "面积模式",
        type: "pie",
        radius: [30, 110],
        center: ["75%", "50%"],
        roseType: "area",
        data: [
          { value: 10, name: "rose1" },
          { value: 5, name: "rose2" },
          { value: 15, name: "rose3" },
          { value: 25, name: "rose4" },
          { value: 20, name: "rose5" },
          { value: 35, name: "rose6" },
          { value: 30, name: "rose7" },
          { value: 40, name: "rose8" }
        ]
      }
    ]
  };

  // 3. 配置项和数据给我们的实例化对象
  myChart.setOption(option);
})();
- 熟悉里面参数具体含义
option = {
    // 提示框组件
    tooltip: {
      // trigger 触发方式。  非轴图形,使用item的意思是放到数据对应图形上触发提示
      trigger: 'item',
      // 格式化提示内容:
      // a 代表series系列图表名称
      // b 代表series数据名称 data 里面的name
      // c 代表series数据值 data 里面的value
      // d代表  当前数据/总数据的比例
      formatter: "{a} <br/>{b} : {c} ({d}%)"
    },
    // 控制图表
    series: [
      {
        // 图表名称
        name: '点位统计',
        // 图表类型
        type: 'pie',
        // 南丁格尔玫瑰图 有两个圆  内圆半径10%  外圆半径70%
        // 饼形图半径。 可以是像素。也可以是百分比( 基于DOM容器大小)第一项是内半径,第二项是外半径(通过它可以实现饼形图大小)
        radius: ['10%', '70%'],
        // 图表中心位置 left 50%  top 50%  距离图表DOM容器
        center: ['50%', '50%'],
        // radius 半径模式,另外一种是 area 面积模式
        roseType: 'radius',
        // 数据集 value 数据的值 name 数据的名称
        data: [
                {value:10, name:'rose1'},
                {value:5, name:'rose2'},
                {value:15, name:'rose3'},
                {value:25, name:'rose4'},
                {value:20, name:'rose5'},
                {value:35, name:'rose6'},
                {value:30, name:'rose7'},
                {value:40, name:'rose8'}
            ]
        }
    ]
};
第二步:按照需求修改
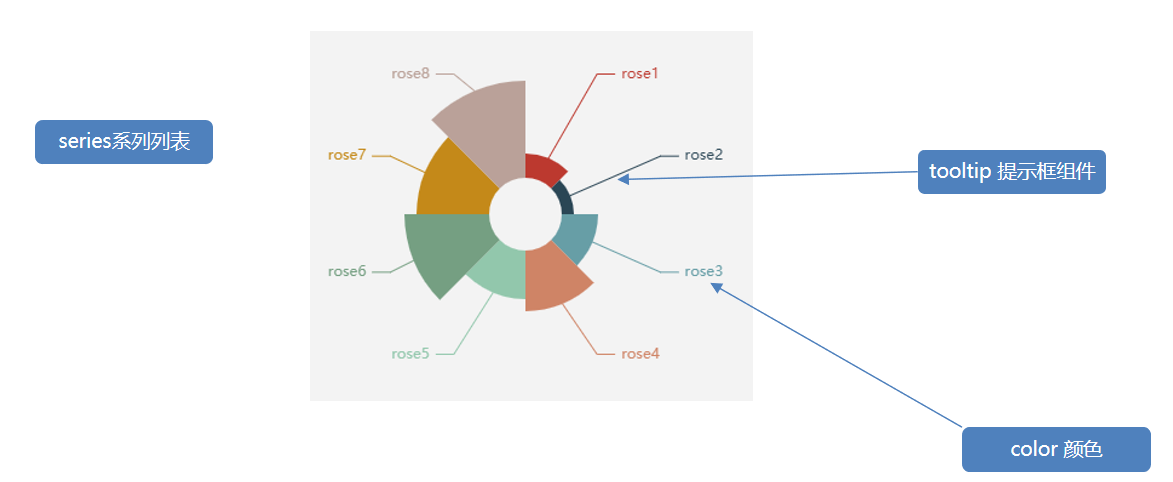
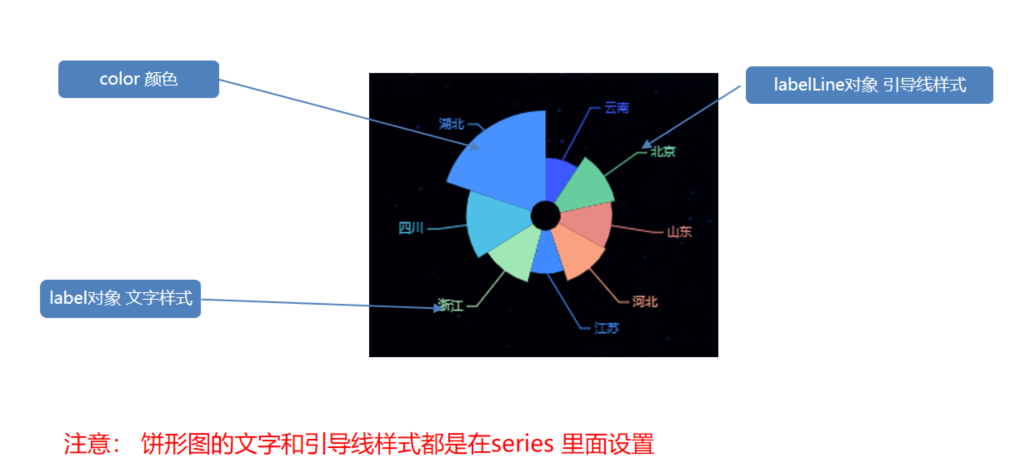
- 需求1:颜色设置
color: ['#006cff', '#60cda0', '#ed8884', '#ff9f7f', '#0096ff', '#9fe6b8', '#32c5e9', '#1d9dff'],
- 需求2:修改饼形图大小 ( series对象)
radius: ['10%', '70%'],
- 需求3: 把饼形图的显示模式改为 半径模式
roseType: "radius",
- 需求4:数据使用更换(series对象 里面 data对象)
{ value: 20, name: '云南' },
{ value: 26, name: '北京' },
{ value: 24, name: '山东' },
{ value: 25, name: '河北' },
{ value: 20, name: '江苏' },
{ value: 25, name: '浙江' },
{ value: 30, name: '四川' },
{ value: 42, name: '湖北' }
-
需求5:字体略小些10 px ( series对象里面 label 对象设置 )
饼图图形上的文本标签可以控制饼形图的文字的一些样式。
series: [
      {
        name: "面积模式",
        type: "pie",
        radius: [30, 110],
        center: ["50%", "50%"],
        roseType: "radius",
        // 文本标签控制饼形图文字的相关样式, 注意它是一个对象
        label: {
          fontSize: 10
        },
      }
    ]
  };
- 需求6:防止缩放的时候,引导线过长。引导线略短些 (series对象里面的 labelLine 对象设置 )
- 连接图表 6 px
- 连接文字 8 px
// 引导线调整
labelLine: {
	// 连接扇形图线长
	length: 6,
	// 连接文字线长
	length2: 8
}
- 需求7:浏览器缩放的时候,图表跟着自动适配。
// 监听浏览器缩放,图表对象调用缩放resize函数
window.addEventListener("resize", function() {
    myChart.resize();
  });
- 点位统计完整JavaScript代码:
// 点位分布统计模块
(function() {
  // 1. 实例化对象
  var myChart = echarts.init(document.querySelector(".pie"));
  // 2. 指定配置项和数据
  var option = {
    tooltip: {
      trigger: "item",
      formatter: "{a} <br/>{b} : {c} ({d}%)"
    },
    // 注意颜色写的位置
    color: [
      "#006cff",
      "#60cda0",
      "#ed8884",
      "#ff9f7f",
      "#0096ff",
      "#9fe6b8",
      "#32c5e9",
      "#1d9dff"
    ],
    series: [
      {
        name: "点位统计",
        type: "pie",
        // 如果radius是百分比则必须加引号
        radius: ["10%", "70%"],
        center: ["50%", "50%"],
        roseType: "radius",
        data: [
          { value: 20, name: "云南" },
          { value: 26, name: "北京" },
          { value: 24, name: "山东" },
          { value: 25, name: "河北" },
          { value: 20, name: "江苏" },
          { value: 25, name: "浙江" },
          { value: 30, name: "四川" },
          { value: 42, name: "湖北" }
        ],
        // 修饰饼形图文字相关的样式 label对象
        label: {
          fontSize: 10
        },
        // 修饰引导线样式
        labelLine: {
          // 连接到图形的线长度
          length: 6,
          // 连接到文字的线长度
          length2: 8
        }
      }
    ]
  };

  // 3. 配置项和数据给我们的实例化对象
  myChart.setOption(option);
  // 4. 当我们浏览器缩放的时候,图表也等比例缩放
  window.addEventListener("resize", function() {
    // 让我们的图表调用 resize这个方法
    myChart.resize();
  });
})();
(4)地图区域 (map)-布局
html结构:
      <!-- 地图 -->
      <div class="map">
        <h3>
          <span class="icon-cube"></span>
          设备数据统计
        </h3>
        <div class="chart">
          <div class="geo"></div>
        </div>
      </div>
css样式:
/* 地图  */
.map {
  height: 7.225rem;
  margin-bottom: 0.25rem;
  display: flex;
  flex-direction: column;
}
.map h3 {
  line-height: 1;
  padding: 0.2rem 0;
  margin: 0;
  font-size: 0.25rem;
  color: #fff;
  font-weight: 400;
}
.map .icon-cube {
  color: #68d8fe;
}
.map .chart {
  flex: 1;
  background-color: rgba(255, 255, 255, 0.05);
}
.map .geo {
  width: 100%;
  height: 100%;
}
注意第二列(column) 有个外边距(上面 32px 左右 20px 下是 0)
.viewport .column:nth-child(2) {
    flex: 4;
    margin: .4rem .25rem 0;
}
(4)地图区域 (map)-地图
参考echarts社区:https://www.makeapie.cn/echarts_content/x0-ExSkZDM.html
社区地址:https://www.makeapie.cn/echarts,搜索模拟航线
实现步骤:
- 第一需要下载china.js提供中国地图的js文件
- 第二个因为里面代码比较多,我们新建一个新的js文件 myMap.js 引入
- 使用社区提供的配置即可。
需要修改:
- 去掉图例组件和标题组件
- 去掉背景颜色
- 修改地图省份背景 #142957
- 地图放大通过zoom设置为1.2即可
    geo: {
      map: 'china',
      zoom: 1.2,
      label: {
        emphasis: {
          show: false
        }
      },
      roam: false,
      itemStyle: {
        normal: {
          areaColor: '#142957',
          borderColor: '#0692a4'
        },
        emphasis: {
          areaColor: '#0b1c2d'
        }
      }
    },
(5)用户统计 (users)-布局
html结构:
      <!-- 用户 -->
      <div class="users panel">
        <div class="inner">
          <h3>全国用户总量统计</h3>
          <div class="chart">
            <div class="bar"></div>
            <div class="data">
              <div class="item">
                <h4>120,899</h4>
                <span>
                  <i class="icon-dot" style="color: #ed3f35"></i>
                  用户总量
                </span>
              </div>
              <div class="item">
                <h4>248</h4>
                <span>
                  <i class="icon-dot" style="color: #eacf19"></i>
                  本月新增
                </span>
              </div>
            </div>
          </div>
        </div>
      </div>
css样式:
/* 用户模块 */
.users {
  height: 4.25rem;
  display: flex;
}
.users .chart {
  display: flex;
  margin-top: .3rem;
}
.users .bar {
  width: 7.35rem;
  height: 3rem;
}
.users .data {
  display: flex;
  flex-direction: column;
  justify-content: space-between;
  width: 2.1rem;
  padding: .45rem .375rem;
  box-sizing: border-box;
  background-image: url(../images/rect.png);
  background-size: cover;
}
.users h4 {
  margin-bottom: .15rem;
  font-size: .35rem;
  color: #fff;
}
.users span {
  display: block;
  color: #4c9bfd;
  font-size: 0.2rem;
}
(5)用户统计 (users)-柱状图
第一步:参考官方示例
(function () {
// 1. 实例化对象
var myChart = echarts.init(document.querySelector(".bar"));
// 2. 指定配置和数据
var option = {
    // 工具提示
    tooltip: {
      // 触发类型  经过轴触发axis  经过轴触发item
      trigger: 'axis',
      // 轴触发提示才有效
      axisPointer: {
        // 默认为直线,可选为:'line' 线效果 | 'shadow' 阴影效果
        type: 'shadow'
      }
    },
    // 图表边界控制
    grid: {
      // 距离 上右下左 的距离
      left: '3%',
      right: '4%',
      bottom: '3%',
      // 是否包含文本
      containLabel: true
    },
    // 控制x轴
    xAxis: [
      {
        // 使用类目,必须有data属性
        type: 'category',
        // 使用 data 中的数据设为刻度文字
        data: ['Mon', 'Tue', 'Wed', 'Thu', 'Fri', 'Sat', 'Sun'],
        // 刻度设置
        axisTick: {
          // true意思:图形在刻度中间
          // false意思:图形在刻度之间
          alignWithLabel: true
        }
      }
    ],
    // 控制y轴
    yAxis: [
      {
        // 使用数据的值设为刻度文字
        type: 'value'
      }
    ],
    // 控制x轴
    series: [
      {
        // 图表数据名称
        name: '用户统计',
        // 图表类型
        type: 'bar',
        // 柱子宽度
        barWidth: '60%',
        // 数据
        data: [10, 52, 200, 334, 390, 330, 220]
      }
    ]
  };

  // 3. 把配置给实例对象
  myChart.setOption(option);
})();
第二步:按照需求修改
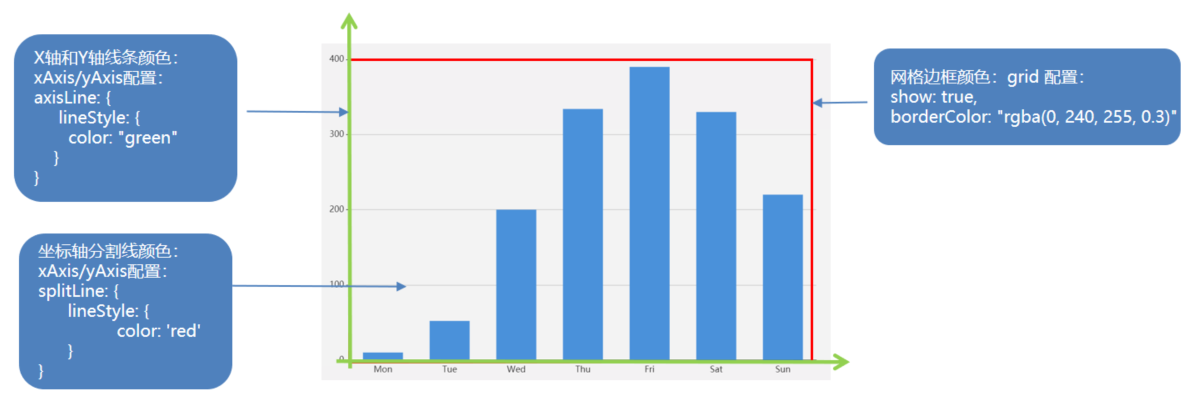
- 需求1: 修改柱子的颜色
// 修改线性渐变色方式 1
color: new echarts.graphic.LinearGradient(
     // (x1,y2) 点到点 (x2,y2) 之间进行渐变
     0, 0, 0, 1,
     [
          { offset: 0, color: '#00fffb' }, // 0 起始颜色
          { offset: 1, color: '#0061ce' }  // 1 结束颜色
    ]
 ),
// 修改线性渐变色方式 2
color: {
    type: 'linear',
    x: 0,
    y: 0,
    x2: 0,
    y2: 1,
    colorStops: [{
        offset: 0, color: 'red' // 0% 处的颜色
    }, {
        offset: 1, color: 'blue' // 100% 处的颜色
    }],
    globalCoord: false // 缺省为 false
},
- 需求2: 提示框组件放到柱子上触发, 没有阴影等效果
//提示框组件
tooltip: {
    trigger: 'item',
   // axisPointer: {            // 坐标轴指示器,坐标轴触发有效  这个模块我们此时不需要删掉即可
       // type: 'shadow'        // 默认为直线,可选为:'line' | 'shadow'
   // }
},
- 需求3: 修改柱形图表大小,以及相关网格。
- 饼形图修改图表大小是通过 series 对象里面的 radius
- 柱形图修改图标大小是通过 series 对象里面的 grid 对象 left right 等
- 显示网格 show: true,网格颜色是 borderColor
// 直角坐标系内绘图网格(区域)
grid: {
   top: '3%',
   right: '3%',
   bottom: '3%',
   left: '0%',
   //图表位置紧贴画布边缘是否显示刻度以及label文字 防止坐标轴标签溢出跟grid 区域有关系
   containLabel: true,
   // 是否显示直角坐标系网格
   show: true,
   //grid 四条边框的颜色
   borderColor: 'rgba(0, 240, 255, 0.3)'
},
- 需求4:X 轴调整
- 柱子在刻度之间
- 剔除刻度不显示
- 刻度标签文字颜色 #4c9bfd 通过 axisLabel 对象设置
- 修改x轴线的颜色 axisLine 里面的 lineStyle
    // 控制x轴
    xAxis: [
      {
        // 使用类目,必须有data属性
        type: 'category',
        // 使用 data 中的数据设为刻度文字
        data: ['Mon', 'Tue', 'Wed', 'Thu', 'Fri', 'Sat', 'Sun'],
        // 刻度设置
        axisTick: {
           // true意思:图形和刻度居中中间
           // false意思:图形在刻度之间
           alignWithLabel: false,
           // 不显示刻度
           show: false
        },
        // x坐标轴文字标签样式设置
        axisLabel: {
          color: '#4c9bfd'
       },
       // x坐标轴颜色设置
       axisLine:{
          lineStyle:{
              color:'rgba(0, 240, 255, 0.3)',
              // width:8,  x轴线的粗细
              // opcity: 0,   如果不想显示x轴线 则改为 0
             }
        }
      }
- 需求5:Y 轴调整
- 剔除刻度不显示
- Y轴文字颜色 #4c9bfd 通过 axisLabel 对象设置
- Y轴分割线颜色 splitLine 对象里面 lineStyle 对象设置
    // 控制y轴
    yAxis: [
      {
        // 使用类目,必须有data属性
        type: 'category',
        // 使用 data 中的数据设为刻度文字
        data: ['Mon', 'Tue', 'Wed', 'Thu', 'Fri', 'Sat', 'Sun'],
        // 刻度设置
        axisTick: {
           // 不显示刻度
           show: false
        },
        // y坐标轴文字标签样式设置
        axisLabel: {
          color: '#4c9bfd'
       },
       // y坐标轴颜色设置
        axisLine:{
          lineStyle:{
               color:'rgba(0, 240, 255, 0.3)',
              // width:8,  x轴线的粗细
              // opcity: 0,   如果不想显示x轴线 则改为 0
             }
        },
        // y轴 分割线的样式
         splitLine: {
            lineStyle: {
                color: 'rgba(0, 240, 255, 0.3)'
            }
         }
    ],
- 需求6:调整数据,与省略图形定制
// series
data: [2100,1900,1700,1560,1400,1200,1200,1200,900,750,600,480,240]
// xAxis
data: ['上海', '广州', '北京', '深圳', '合肥', '', '......', '', '杭州', '厦门', '济南', '成都', '重庆']
-
省略图形
- 经过图形才显示提示,且省略的柱子不需要提示
- 图形单独设置颜色
- 核心原理:series 对象里面的data数组里面的每一个数据对应每一个柱形。重要的是,data数组里面除了直接写数字,还可以是对象。直接把data里面对应的数据修改为需求配置的对象即可。
// 中间省略的数据  准备三项
var item = {
    name:'',
    value: 1200,
    // 柱子颜色
    itemStyle: {
      color: '#254065'
    },
     // 鼠标经过柱子颜色
    emphasis: {
      itemStyle: {
        color: '#254065'
      }
    },
    // 工具提示隐藏
    tooltip: {
      extraCssText: 'opacity:0'
    },
  }
// series配置data选项在中使用
data: [2100,1900,1700,1560,1400,item,item,item,900,750,600,480,240],
需求7:浏览器缩放的时候,图表跟着自动适配。
  // 4. 当我们浏览器缩放的时候,图表也等比例缩放
  window.addEventListener("resize", function() {
    // 让我们的图表调用 resize这个方法
    myChart.resize();
  });
(6)订单区域(order)-布局
html结构:
      <!-- 订单 -->
      <div class="order panel">
        <div class="inner">
          <!-- 筛选 -->
          <div class="filter">
            <a href="javascript:;"  class="active">365天</a>
            <a href="javascript:;" >90天</a>
            <a href="javascript:;" >30天</a>
            <a href="javascript:;" >24小时</a>
          </div>
          <!-- 数据 -->
          <div class="data">
            <div class="item">
              <h4>20,301,987</h4>
              <span>
                <i class="icon-dot" style="color: #ed3f35;"></i>
                订单量
              </span>
            </div>
            <div class="item">
              <h4>99834</h4>
              <span>
                <i class="icon-dot" style="color: #eacf19;"></i>
                销售额(万元)
              </span>
            </div>
          </div>
        </div>
      </div>
css样式:
/* 订单 */
.order {
  height: 1.875rem;
}
.order .filter {
  display: flex;
}
.order .filter a {
  display: block;
  height: 0.225rem;
  line-height: 1;
  padding: 0 0.225rem;
  color: #1950c4;
  font-size: 0.225rem;
  border-right: 0.025rem solid #00f2f1;
}
.order .filter a:first-child {
  padding-left: 0;
}
.order .filter a:last-child {
  border-right: none;
}
.order .filter a.active {
  color: #fff;
  font-size: 0.25rem;
}
.order .data {
  display: flex;
  margin-top: 0.25rem;
}
.order .item {
  width: 50%;
}
.order h4 {
  font-size: 0.35rem;
  color: #fff;
  margin-bottom: 0.125rem;
}
.order span {
  display: block;
  color: #4c9bfd;
  font-size: 0.2rem;
}
(6)订单区域(order)-效果
实现步骤:
- 提前准备数据
- 点击后切tab激活样式
- 点击后切换数据内容
- 开启定时器动态切换数据
// 订单功能
(function(){
  // 1. 准备数据
  var data = {
    day365: { orders: '20,301,987', amount: '99834' },
    day90: { orders: '301,987', amount: '9834' },
    day30: { orders: '1,987', amount: '3834' },
    day1: { orders: '987', amount: '834' }
  }
  // 获取显示 订单数量 容器
  var $h4Orders = $('.order h4:eq(0)')
  // 获取显示 金额数量 容器
  var $h4Amount = $('.order h4:eq(1)')
  $('.order').on('click','.filter a',function(){
    // 2. 点击切换激活样式
    $(this).addClass('active').siblings().removeClass('active')
    // 3. 点击切换数据
    var currdata = data[this.dataset.key]
    $h4Orders.html(currdata.orders)
    $h4Amount.html(currdata.amount)
  })
  // 4. 开启定时器切换数据
  var index = 0
  var $allTab = $('.order .filter a')
  setInterval(function(){
    index ++
    if (index >= 4) index = 0
    $allTab.eq(index).click()
  },5000)
})();
(7)销售统计( sales )-布局
html结构:
      <!-- 销售额 -->
      <div class="sales panel">
        <div class="inner">
          <div class="caption">
            <h3>销售额统计</h3>
            <a href="javascript:;" class="active" >年</a>
            <a href="javascript:;" >季</a>
            <a href="javascript:;" >月</a>
            <a href="javascript:;" >周</a>
          </div>
          <div class="chart">
            <div class="label">单位:万</div>
            <div class="line"></div>
          </div>
        </div>
      </div>
css样式:
/* 销售区域 */
.sales {
  height: 3.1rem;
}
.sales .caption {
  display: flex;
  line-height: 1;
}
.sales h3 {
  height: 0.225rem;
  padding-right: 0.225rem;
  border-right: 0.025rem solid #00f2f1;
}
.sales a {
  padding: 0.05rem;
  font-size: 0.2rem;
  margin: -0.0375rem 0 0 0.2625rem;
  border-radius: 0.0375rem;
  color: #0bace6;
}
.sales a.active {
  background-color: #4c9bfd;
  color: #fff;
}
.sales .inner {
  display: flex;
  flex-direction: column;
}
.sales .chart {
  flex: 1;
  padding-top: 0.1875rem;
  position: relative;
}
.sales .label {
  position: absolute;
  left: 0.525rem;
  top: 0.225rem;
  color: #4996f5;
  font-size: 0.175rem;
}
.sales .line {
  width: 100%;
  height: 100%;
}
(7)销售统计( sales )-线形图
第一步:参考官方示例
// 销售统计模块
(function() {
  // 1. 实例化对象
  var myChart = echarts.init(document.querySelector(".line"));
  // 2. 指定配置和数据
  var option = {
    tooltip: {
      trigger: "axis"
    },
    legend: {
      data: ["邮件营销", "联盟广告"]
    },
    grid: {
      left: "3%",
      right: "4%",
      bottom: "3%",
      containLabel: true
    },

    xAxis: {
      type: "category",
      boundaryGap: false,
      data: ["周一", "周二"]
    },
    yAxis: {
      type: "value"
    },
    series: [
      {
        name: "邮件营销",
        type: "line",
        stack: "总量",
        data: [120, 132, 101, 134, 90, 230, 210]
      },
      {
        name: "联盟广告",
        type: "line",
        stack: "总量",
        data: [220, 182, 191, 234, 290, 330, 310]
      }
    ]
  };

  // 3. 把配置和数据给实例对象
  myChart.setOption(option);
})();
第二步:按照需求修改
- 需求1: 修改折线图大小,显示边框设置颜色:#012f4a,并且显示刻度标签。
    // 设置网格样式
    grid: {
      top: '20%',
      left: '3%',
      right: '4%',
      bottom: '3%',
      show: true,// 显示边框
      borderColor: '#012f4a',// 边框颜色
      containLabel: true // 包含刻度文字在内
    },
- 需求2: 修改图例组件中的文字颜色 #4c9bfd, 距离右侧 right 为 10%
 // 图例组件
    legend: {
      textStyle: {
        color: '#4c9bfd' // 图例文字颜色
      },
      right: '10%' // 距离右边10%
    },
- 需求3: x轴相关配置
- 刻度去除
- x轴刻度标签字体颜色:#4c9bfd
- 剔除坐标轴线颜色(将来使用Y轴分割线)
- 轴两端是不需要内间距 boundaryGap
    xAxis: {
      type: 'category',
      data: ["周一", "周二"],
	  axisTick: {
         show: false // 去除刻度线
       },
       axisLabel: {
         color: '#4c9bfd' // 文本颜色
       },
       axisLine: {
         show: false // 去除轴线
       },
       boundaryGap: false  // 去除轴内间距
    },
- 需求4: y轴的定制
- 刻度去除
- 字体颜色:#4c9bfd
- 分割线颜色:#012f4a
    yAxis: {
      type: 'value',
      axisTick: {
        show: false  // 去除刻度
      },
      axisLabel: {
        color: '#4c9bfd' // 文字颜色
      },
      splitLine: {
        lineStyle: {
          color: '#012f4a' // 分割线颜色
        }
      }
    },
- 需求5: 两条线形图定制
- 颜色分别:#00f2f1 #ed3f35
- 把折线修饰为圆滑 series 数据中添加 smooth 为 true
    color: ['#00f2f1', '#ed3f35'],
	series: [{
      name:'预期销售额',
      data: [820, 932, 901, 934, 1290, 1330, 1320],
      type: 'line',
      // 折线修饰为圆滑
      smooth: true,
      },{
      name:'实际销售额',
      data: [100, 331, 200, 123, 233, 543, 400],
      type: 'line',
      smooth: true,
    }]
- 需求6: 配置数据
// x轴的文字
xAxis: {
  type: 'category',
  data: ['1月', '2月', '3月', '4月', '5月', '6月', '7月', '8月', '9月', '10月', '11月', '12月'],
// 图标数据
    series: [{
      name:'预期销售额',
      data:  [24, 40, 101, 134, 90, 230, 210, 230, 120, 230, 210, 120],
      type: 'line',
      smooth: true
    },{
      name:'实际销售额',
      data: [40, 64, 191, 324, 290, 330, 310, 213, 180, 200, 180, 79],
      type: 'line',
      smooth: true
      }
    }]
总结:现在给的是年份数据,还需要切换效果。
(7)销售统计( sales )-切换效果
核心原理:
- series 里面的
data数据决定着折线的显示 - 当我们点击不同的tab标签, 就让 series 里面的data调用不同的数据即可
- 我们现在只准备了年的数据,还需要准备季度、月和周的数据
实现步骤:
-
准备切换需要依赖的数据 4组
-
绑定点击事件
- 切换激活 tab 的样式
- 切换图表依赖的数据(重新渲染图表)
- 开启定时器,进行切换, 鼠标经过sales停止定时器,离开开启定时器
第一步:准备数据,使用数据
  var data = {
    year: [
      [24, 40, 101, 134, 90, 230, 210, 230, 120, 230, 210, 120],
      [40, 64, 191, 324, 290, 330, 310, 213, 180, 200, 180, 79]
    ],
    quarter: [
      [23, 75, 12, 97, 21, 67, 98, 21, 43, 64, 76, 38],
      [43, 31, 65, 23, 78, 21, 82, 64, 43, 60, 19, 34]
    ],
    month: [
      [34, 87, 32, 76, 98, 12, 32, 87, 39, 36, 29, 36],
      [56, 43, 98, 21, 56, 87, 43, 12, 43, 54, 12, 98]
    ],
    week: [
      [43, 73, 62, 54, 91, 54, 84, 43, 86, 43, 54, 53],
      [32, 54, 34, 87, 32, 45, 62, 68, 93, 54, 54, 24]
    ]
  }
    series: [{
      name:'预期销售额',
      data: data.year[0],
      type: 'line',
      smooth: true,
      itemStyle: {
        color: '#00f2f1'
      }
    },{
      name:'实际销售额',
      data: data.year[1],
      type: 'line',
      smooth: true,
      itemStyle: {
        color: '#ed3f35'
      }
    }]
第二步:点击后切换
  // 切换
  $('.sales').on('click', '.caption a', function(){
    // 样式
    $(this).addClass('active').siblings().removeClass('active')
    // currData 当前对应的数据
    // this.dataset.type 标签上的data-type属性值,对应data中的属性
    var currData = data[this.dataset.type]
    // 修改图表1的数据
    option.series[0].data = currData[0]
    // 修改图表2的数据
    option.series[1].data = currData[1]
    // 重新设置数据  让图标重新渲染
    myChart.setOption(option)
  })
第三步:tab栏自动切换效果
- 开启定时器每隔1s,自动让a触发点击事件即可
- 鼠标经过sales,关闭定时器,离开开启定时器
  var as = $(".sales .caption a");
  var index = 0;
  var timer = setInterval(function() {
    index++;
    if (index >= 4) index = 0;
    as.eq(index).click();
  }, 1000);
  // 鼠标经过sales,关闭定时器,离开开启定时器
  $(".sales").hover(
    function() {
      clearInterval(timer);
    },
    function() {
      clearInterval(timer);
      timer = setInterval(function() {
        index++;
        if (index >= 4) index = 0;
        as.eq(index).click();
      }, 1000);
    }
  );
自动缩放
 // 当我们浏览器缩放的时候,图表也等比例缩放
  window.addEventListener("resize", function() {
    // 让我们的图表调用 resize这个方法
    myChart.resize();
  });
(8)渠道区域&销售进度-布局
html结构:
     <!-- 渠道 季度 -->
     <div class="wrap">
          <div class="channel panel">
            <div class="inner">
              <h3>渠道分布</h3>
              <div class="data">
                <div class="radar"></div>
              </div>
            </div>
          </div>
          <div class="quarter panel">
            <div class="inner">
              <h3>一季度销售进度</h3>
              <div class="chart">
                <div class="box">
                  <div class="gauge"></div>
                  <div class="label">75<small> %</small></div>
                </div>
                <div class="data">
                  <div class="item">
                    <h4>1,321</h4>
                    <span>
                      <i class="icon-dot" style="color: #6acca3"></i>
                      销售额(万元)
                    </span>
                  </div>
                  <div class="item">
                    <h4>150%</h4>
                    <span>
                      <i class="icon-dot" style="color: #ed3f35"></i>
                      同比增长
                    </span>
                  </div>
                </div>
              </div>
            </div>
          </div>
        </div>
css样式:
/* 渠道区块 */
.wrap {
  display: flex;
}
.channel,
.quarter {
  flex: 1;
  height: 2.9rem;
}
.channel {
  margin-right: 0.25rem;
}
.channel .data {
  overflow: hidden;
}
.channel .data .radar {
  height: 2.1rem;
  width: 100%;
  background-color: pink;
}
.channel h4 {
  color: #fff;
  font-size: 0.4rem;
  margin-bottom: 0.0625rem;
}
.channel small {
  font-size: 50%;
}
.channel span {
  display: block;
  color: #4c9bfd;
  font-size: 0.175rem;
}
/* 季度区块 */
.quarter .inner {
  display: flex;
  flex-direction: column;
  margin: 0 -0.075rem;
}
.quarter .chart {
  flex: 1;
  padding-top: 0.225rem;
}
.quarter .box {
  position: relative;
}
.quarter .label {
  transform: translate(-50%, -30%);
  color: #fff;
  font-size: 0.375rem;
  position: absolute;
  left: 50%;
  top: 50%;
}
.quarter .label small {
  font-size: 50%;
}
.quarter .gauge {
  height: 1.05rem;
}
.quarter .data {
  display: flex;
  justify-content: space-between;
}
.quarter .item {
  width: 50%;
}
.quarter h4 {
  color: #fff;
  font-size: 0.3rem;
  margin-bottom: 0.125rem;
}
.quarter span {
  display: block;
  width: 100%;
  white-space: nowrap;
  text-overflow: ellipsis;
  overflow: hidden;
  color: #4c9bfd;
  font-size: 0.175rem;
}
(8)渠道分布(channel)-雷达图
第一步:参考官方示例
(function() {
  // 1. 实例化对象
  var myChart = echarts.init(document.querySelector(".radar"));
  // 2.指定配置
  var dataBJ = [[55, 9, 56, 0.46, 18, 6, 1]];
  var lineStyle = {
    normal: {
      width: 1,
      opacity: 0.5
    }
  };
  var option = {
    backgroundColor: "#161627",
    radar: {
      indicator: [
        { name: "AQI", max: 300 },
        { name: "PM2.5", max: 250 },
        { name: "PM10", max: 300 },
        { name: "CO", max: 5 },
        { name: "NO2", max: 200 },
        { name: "SO2", max: 100 }
      ],
      shape: "circle",
      splitNumber: 5,
      name: {
        textStyle: {
          color: "rgb(238, 197, 102)"
        }
      },
      splitLine: {
        lineStyle: {
          color: [
            "rgba(238, 197, 102, 0.1)",
            "rgba(238, 197, 102, 0.2)",
            "rgba(238, 197, 102, 0.4)",
            "rgba(238, 197, 102, 0.6)",
            "rgba(238, 197, 102, 0.8)",
            "rgba(238, 197, 102, 1)"
          ].reverse()
        }
      },
      splitArea: {
        show: false
      },
      axisLine: {
        lineStyle: {
          color: "rgba(238, 197, 102, 0.5)"
        }
      }
    },
    series: [
      {
        name: "北京",
        type: "radar",
        lineStyle: lineStyle,
        data: dataBJ,
        symbol: "none",
        itemStyle: {
          color: "#F9713C"
        },
        areaStyle: {
          opacity: 0.1
        }
      }
    ]
  };
  // 3.把配置和数据给对象
  myChart.setOption(option);
})();
第二步:按照需求修改


- 需求1: 去掉背景颜色,调整雷达图大小 65%
radar:{
    center: ['50%', '50%'],
    // 外半径占据容器大小
    radius: '65%',
}
需求2: 指示器轴的分割段数为4条(4个圆圈)
radar:{
    center: ['50%', '50%'],
    // 外半径占据容器大小
    radius: '65%',
    // 指示器轴的分割段数
    splitNumber: 4,
}
需求3: 雷达图分割线设为白色半透明 0.5
 // 坐标轴在 grid 区域中的分隔线(圆圈)
   splitLine: {
        lineStyle: {
           color: 'rgba(255, 255, 255, 0.5)',
           // width: 2,
           // type: 'dashed'
           }
   },
需求4: 雷达图 坐标轴轴线相关设置(竖线) axisLine
// 坐标轴轴线相关设置(竖线)axisLine
axisLine: {
       show: true,
            lineStyle: {
                color: 'rgba(255, 255, 255, 0.5)'
                // width: 1,
                // type: 'solid'
             }
 },
需求5: 修饰雷达图文字颜色为 #4c9bfd
name: {
    // 修饰雷达图文本颜色
     textStyle: {
       color: '#4c9bfd'
     }
},
需求6: 修饰 区域填充样式 series 对象
- 区域填充的背景颜色设置为: rgba(238, 197, 102, 0.6)
 areaStyle: {
     color: 'rgba(238, 197, 102, 0.6)',
},
- 区域填充的线条颜色为白色
// 线条样式
  lineStyle: {
         normal: {
              color: '#fff',
              // width: 1
         }
},
需求7: 标记的图形(拐点)设置 注意 series 里面设置
- 用圆点显示, 拐点的大小设置为 5
- 小圆点设置为白色
- 在小圆点上显示相关数据,颜色设置为白色,10像素
// symbol 标记的样式(拐点),还可以取值'rect' 方块 ,'arrow' 三角等
symbol: 'circle',
// 拐点的大小
symbolSize: 5,
// 小圆点(拐点)设置为白色
itemStyle: {
       color: '#fff'
},
// 在圆点上显示相关数据
label: {
     show: true,
     color: '#fff',
     fontSize: 10
},
需求8: 鼠标经过显示提示框组件
tooltip: {
    show: true,
    // 控制提示框组件的显示位置
    position: ['60%', '10%'],
},
需求9: 更换数据
 // 雷达图的指示器 内部填充数据
  indicator: [
        { name: '机场', max: 100 },
        { name: '商场', max: 100 },
        { name: '火车站', max: 100 },
        { name: '汽车站', max: 100 },
        { name: '地铁', max: 100 }
 ],
data: [[90, 19, 56, 11, 34]],
整个代码
// 销售渠道模块 雷达图
(function() {
  // 1. 实例化对象
  var myChart = echarts.init(document.querySelector(".radar"));
  // 2.指定配置

  var option = {
    tooltip: {
      show: true,
      // 控制提示框组件的显示位置
      position: ["60%", "10%"]
    },
    radar: {
      indicator: [
        { name: "机场", max: 100 },
        { name: "商场", max: 100 },
        { name: "火车站", max: 100 },
        { name: "汽车站", max: 100 },
        { name: "地铁", max: 100 }
      ],
      // 修改雷达图的大小
      radius: "65%",
      shape: "circle",
      // 分割的圆圈个数
      splitNumber: 4,
      name: {
        // 修饰雷达图文字的颜色
        textStyle: {
          color: "#4c9bfd"
        }
      },
      // 分割的圆圈线条的样式
      splitLine: {
        lineStyle: {
          color: "rgba(255,255,255, 0.5)"
        }
      },
      splitArea: {
        show: false
      },
      // 坐标轴的线修改为白色半透明
      axisLine: {
        lineStyle: {
          color: "rgba(255, 255, 255, 0.5)"
        }
      }
    },
    series: [
      {
        name: "北京",
        type: "radar",
        // 填充区域的线条颜色
        lineStyle: {
          normal: {
            color: "#fff",
            width: 1,
            opacity: 0.5
          }
        },
        data: [[90, 19, 56, 11, 34]],
        // 设置图形标记 (拐点)
        symbol: "circle",
        // 这个是设置小圆点大小
        symbolSize: 5,
        // 设置小圆点颜色
        itemStyle: {
          color: "#fff"
        },
        // 让小圆点显示数据
        label: {
          show: true,
          fontSize: 10
        },
        // 修饰我们区域填充的背景颜色
        areaStyle: {
          color: "rgba(238, 197, 102, 0.6)"
        }
      }
    ]
  };
  // 3.把配置和数据给对象
  myChart.setOption(option);
  // 当我们浏览器缩放的时候,图表也等比例缩放
  window.addEventListener("resize", function() {
    // 让我们的图表调用 resize这个方法
    myChart.resize();
  });
})();
(8)销售进度 (quarter)-饼状图
第一步:参考官方示例
// 销售模块 饼形图 半圆形 设置方式
(function() {
  // 1. 实例化对象
  var myChart = echarts.init(document.querySelector(".gauge"));
  // 2. 指定数据和配置
  var option = {
    series: [
      {
        name: "销售进度",
        type: "pie",
        radius: ["50%", "70%"],
        //是否启用防止标签重叠策略
        // avoidLabelOverlap: false,
        labelLine: {
          normal: {
            show: false
          }
        },
        data: [{ value: 100 }, { value: 100 }, { value: 200 }]
      }
    ]
  };
  // 3. 把数据和配置给实例对象
  myChart.setOption(option);
})();
第二步:按照需求修改
半圆形做法原理
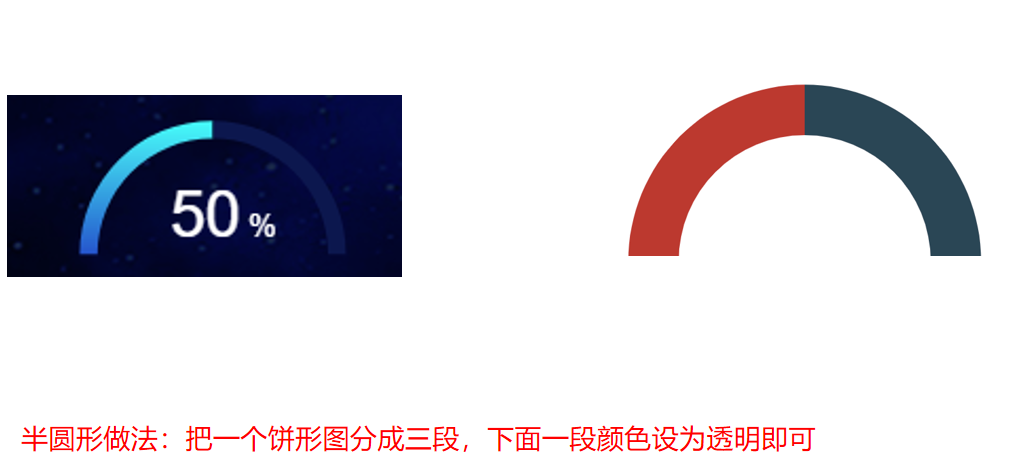
饼形图角度调整startAngle
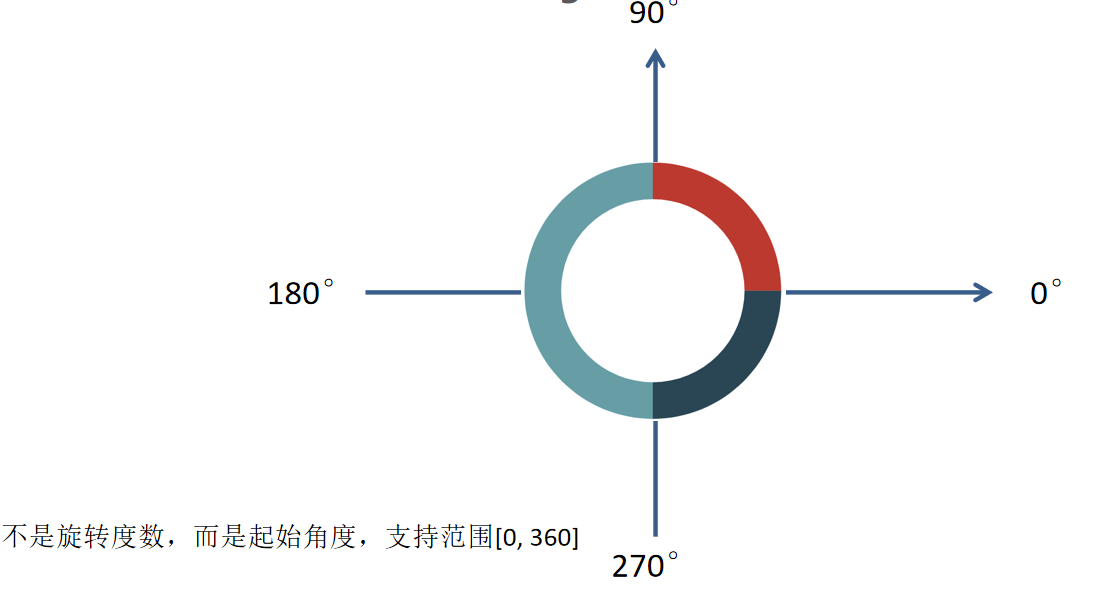
需求1:改成半圆,图表大一些,让50%文字在中心。
  var option = {
    series: [
      {
        type: 'pie',
        // 放大图形
        radius: ['130%', '150%'],
        // 移动下位置  套住50%文字
        center: ['48%', '80%'],
        label: {
          normal: {
            show: false
          }
        },
        // 起始角度,支持范围[0, 360]
        startAngle: 180,
        data: [
          { value: 100 }, // 不需要名称
          { value: 100,}, // 不需要名称
          { value: 200, itemStyle: { color: 'transparent' } } // 透明隐藏第三块区域
        ]
      }
    ]
  }
需求2:鼠标经过无需变大,修改第一段颜色渐变#00c9e0->#005fc1,修改第二段颜色#12274d。
       // 鼠标经过不变大
       hoverOffset: 0,
        data: [
          {
            value: 100,
            itemStyle: {
              // 颜色渐变#00c9e0->#005fc1
              color: new echarts.graphic.LinearGradient(
                // (x1,y2) 点到点 (x2,y2) 之间进行渐变
                0,
                0,
                0,
                1,
                [
                  { offset: 0, color: "#00c9e0" }, // 0 起始颜色
                  { offset: 1, color: "#005fc1" } // 1 结束颜色
                ]
              )
            }
          },
        { value: 100, itemStyle: { color: '#12274d' } }, // 颜色#12274d
(9)热销排行(top)-布局
html结构:
      <!-- 排行榜 -->
      <div class="top panel">
        <div class="inner">
          <div class="all">
            <h3>全国热榜</h3>
            <ul>
              <li>
                <i class="icon-cup1" style="color: #d93f36;"></i>
                可爱多
              </li>
              <li>
                <i class="icon-cup2" style="color: #68d8fe;"></i>
                娃哈啥
              </li>
              <li>
                <i class="icon-cup3" style="color: #4c9bfd;"></i>
                喜之郎
              </li>
            </ul>
          </div>
          <div class="province">
            <h3>各省热销 <i class="date">// 近30日 //</i></h3>
            <div class="data">
              <ul class="sup">
                <li>
                  <span>北京</span>
                  <span>25,179 <s class="icon-up"></s></span>
                </li>
                <li>
                  <span>河北</span>
                  <span>23,252 <s class="icon-down"></s></span>
                </li>
                <li>
                  <span>上海</span>
                  <span>20,760 <s class="icon-up"></s></span>
                </li>
                <li>
                  <span>江苏</span>
                  <span>23,252 <s class="icon-down"></s></span>
                </li>
                <li>
                  <span>山东</span>
                  <span>20,760 <s class="icon-up"></s></span>
                </li>
              </ul>
              <ul class="sub">
                <!-- <li><span></span><span> <s class="icon-up"></s></span></li> -->
              </ul>
            </div>
          </div>
        </div>
      </div>
css样式:
/* 排行榜 */
.top {
  height: 3.5rem;
}
.top .inner {
  display: flex;
}
.top .all {
  display: flex;
  flex-direction: column;
  width: 2.1rem;
  color: #4c9bfd;
  font-size: 0.175rem;
  vertical-align: middle;
}
.top .all ul {
  padding-left: 0.15rem;
  margin-top: 0.15rem;
  flex: 1;
  display: flex;
  flex-direction: column;
  justify-content: space-around;
}
.top .all li {
  overflow: hidden;
}
.top .all [class^="icon-"] {
  font-size: 0.45rem;
  vertical-align: middle;
  margin-right: 0.15rem;
}
.top .province {
  flex: 1;
  display: flex;
  flex-direction: column;
  color: #fff;
}
.top .province i {
  padding: 0 0.15rem;
  margin-top: 0.0625rem;
  float: right;
  font-style: normal;
  font-size: 0.175rem;
  color: #0bace6;
}
.top .province s {
  display: inline-block;
  transform: scale(0.8);
  text-decoration: none;
}
.top .province .icon-up {
  color: #dc3c33;
}
.top .province .icon-down {
  color: #36be90;
}
.top .province .data {
  flex: 1;
  display: flex;
  margin-top: 0.175rem;
}
.top .province ul {
  flex: 1;
  line-height: 1;
  margin-bottom: 0.175rem;
}
.top .province ul li {
  display: flex;
  justify-content: space-between;
}
.top .province ul span {
  display: block;
  overflow: hidden;
  white-space: nowrap;
  text-overflow: ellipsis;
}
.top .province ul.sup {
  font-size: 0.175rem;
}
.top .province ul.sup li {
  color: #4995f4;
  padding: 0.15rem;
}
.top .province ul.sup li.active {
  color: #a3c6f2;
  background-color: rgba(10, 67, 188, 0.2);
}
.top .province ul.sub {
  display: flex;
  flex-direction: column;
  justify-content: space-around;
  font-size: 0.15rem;
  background-color: rgba(10, 67, 188, 0.2);
}
.top .province ul.sub li {
  color: #52ffff;
  padding: 0.125rem 0.175rem;
}
.clock {
  position: absolute;
  top: -0.45rem;
  right: 0.5rem;
  font-size: 0.25rem;
  color: #0bace6;
}
.clock i {
  margin-right: 5px;
  font-size: 0.25rem;
}
@media screen and (max-width: 1600px) {
  .top span {
    transform: scale(0.9);
  }
  .top .province ul.sup li {
    padding: 0.125rem 0.15rem;
  }
  .top .province ul.sub li {
    padding: 0.0625rem 0.15rem;
  }
  .quarter span {
    transform: scale(0.9);
  }
}
(9)热销排行(top)-效果
实现思路:
- 准备后台返回的真实数据
- 利用数据渲染各省热销模块 sup 模块 (拼接html格式字符串,进行渲染)
- 当鼠标进入 tab 的时候
- 激活当前的tab样式,删除其他tab的样式
- 渲染各省热销 sub 模块 (拼接html格式字符串,进行渲染)
- 默认激活第一个tab的效果
- 开启定时器,按依次切换
开始实现:
第一步:得到后台数据(实际开发中,这个数据通过ajax请求获得)
    var hotData = [
      {
        city: '北京',  // 城市
        sales: '25, 179',  // 销售额
        flag: true, //  上升还是下降
        brands: [   //  品牌种类数据
          { name: '可爱多', num: '9,086', flag: true },
          { name: '娃哈哈', num: '8,341', flag: true },
          { name: '喜之郎', num: '7,407', flag: false },
          { name: '八喜', num: '6,080', flag: false },
          { name: '小洋人', num: '6,724', flag: false },
          { name: '好多鱼', num: '2,170', flag: true },
        ]
      },
      {
        city: '河北',
        sales: '23,252',
        flag: false,
        brands: [
          { name: '可爱多', num: '3,457', flag: false },
          { name: '娃哈哈', num: '2,124', flag: true },
          { name: '喜之郎', num: '8,907', flag: false },
          { name: '八喜', num: '6,080', flag: true },
          { name: '小洋人', num: '1,724', flag: false },
          { name: '好多鱼', num: '1,170', flag: false },
        ]
      },
      {
        city: '上海',
        sales: '20,760',
        flag: true,
        brands: [
          { name: '可爱多', num: '2,345', flag: true },
          { name: '娃哈哈', num: '7,109', flag: true },
          { name: '喜之郎', num: '3,701', flag: false },
          { name: '八喜', num: '6,080', flag: false },
          { name: '小洋人', num: '2,724', flag: false },
          { name: '好多鱼', num: '2,998', flag: true },
        ]
      },
      {
        city: '江苏',
        sales: '23,252',
        flag: false,
        brands: [
          { name: '可爱多', num: '2,156', flag: false },
          { name: '娃哈哈', num: '2,456', flag: true },
          { name: '喜之郎', num: '9,737', flag: true },
          { name: '八喜', num: '2,080', flag: true },
          { name: '小洋人', num: '8,724', flag: true },
          { name: '好多鱼', num: '1,770', flag: false },
        ]
      },
       {
        city: '山东',
        sales: '20,760',
        flag: true,
        brands: [
          { name: '可爱多', num: '9,567', flag: true },
          { name: '娃哈哈', num: '2,345', flag: false },
          { name: '喜之郎', num: '9,037', flag: false },
          { name: '八喜', num: '1,080', flag: true },
          { name: '小洋人', num: '4,724', flag: false },
          { name: '好多鱼', num: '9,999', flag: true },
        ]
      }
    ]
第二步:根据数据渲染各省热销 sup 模块内容
- 删掉原先自带小li
- 遍历数据 $.each()
- 拼接字符串把数据渲染到 li 的span 里面
- 追加给 .sup 盒子
 var supHTML = "";
  $.each(hotData, function(index, item) {
    // console.log(item);
    supHTML += `<li><span>${item.city}</span><span> ${item.sales} <s class=
    ${item.flag ? "icon-up" : "icon-down"}></s></span></li>`;
  });
  $(".sup").html(supHTML);
第三步:当数据进入 tab 的时候
- 激活当前的tab样式,删除其他tab的样式
- 渲染各省热销 sub 模块
- 注意鼠标进入tab, 只遍历 当前索引号对应的 城市对象里面的 brands
- 拼接html格式字符串,进行渲染
// 鼠标经过当前的小li要高亮显示
  $(".province .sup").on("mouseenter", "li", function() {
    index = $(this).index();
    render($(this));
  });

  // 声明一个函数 里面设置sup当前小li高亮还有 对应的品牌对象渲染
  // 这个函数需要传递当前元素进去
  function render(currentEle) {
    currentEle
      .addClass("active")
      .siblings()
      .removeClass();
    // 拿到当前城市的品牌对象
    // console.log($(this).index());
    // 可以通过hotData[$(this).index()] 得到当前的城市
    // console.log(hotData[$(this).index()]);
    // 我们可以通过hotData[$(this).index()].brands 拿到的是城市对象的品牌种类
    // console.log(hotData[$(this).index()].brands);
    // 开始遍历品牌数组
    var subHTML = "";
    $.each(hotData[currentEle.index()].brands, function(index, item) {
      // 是对应城市的每一个品牌对象
      // console.log(item);
      subHTML += `<li><span>${item.name}</span><span> ${item.num}<s class=
    ${item.flag ? "icon-up" : "icon-down"}
    ></s></span></li>`;
    });
    // 把生成的6个小li字符串给 sub dom盒子
    $(".sub").html(subHTML);
  }
第四步:默认激活第一个tab
  // 所有的LI
  var $lis = $('.province .sup li')
  // 第一个默认激活
  $lis.eq(0).mouseenter()
第五步:开启定时切换
- 定时器里面 mouseenter 冲突问题的解决方案:定时器里面不加mousenter 事件,而是直接重新渲染数据就可以(执行鼠标经过事件里面的代码)
 var index = 0;
  var timer = setInterval(function() {
    index++;
    if (index >= 5) index = 0;
    // lis.eq(index).mouseenter();
    render(lis.eq(index));
  }, 2000);

  $(".province .sup").hover(
    // 鼠标经过事件
    function() {
      clearInterval(timer);
    },
    // 鼠标离开事件
    function() {
      clearInterval(timer);
      timer = setInterval(function() {
        index++;
        if (index >= 5) index = 0;
        // lis.eq(index).mouseenter();
        render(lis.eq(index));
      }, 2000);
    }
  );


