目录
一、数据采集/消费(存储)
二、数据采集
三、数据消费
四、编写代码
在project-ct.pom
在ct.consume下
在ct.consumer.bean
在ct.consumer.dao
在ct-consumer的resources
在ct-common.pom
在ct.common.api
在ct.common.bean
在ct.common.constant
在ct-common的resources
在ct-consumer-coprocessor
四、数据消费方案优化
打包jar
五、数据消费测试
1. 打包HBase消费者代码
2.在hbase的页面也看到文件出现
一、数据采集/消费(存储)
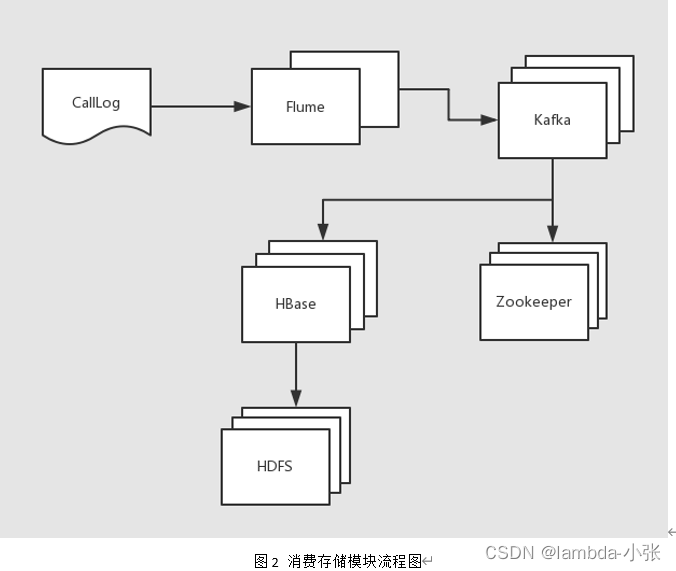
欢迎来到数据采集模块(消费),在企业中你要清楚流式数据采集框架flume和kafka的定位是什么。我们在此需要将实时数据通过flume采集到kafka然后供给给hbase消费。
flume:cloudera公司研发
适合下游数据消费者不多的情况;
适合数据安全性要求不高的操作;
适合与Hadoop生态圈对接的操作。
kafka:linkedin公司研发
适合数据下游消费众多的情况;
适合数据安全性要求较高的操作(支持replication);
因此我们常用的一种模型是:
线上数据 --> flume --> kafka --> flume(根据情景增删该流程) --> HDFS
消费存储模块流程如图2所示:
二、数据采集
思路:
a) 配置kafka,启动zookeeper和kafka集群;
b) 创建kafka主题;
c) 启动kafka控制台消费者(此消费者只用于测试使用);
d) 配置flume,监控日志文件;
e) 启动flume监控任务;
f) 运行日志生产脚本;
g) 观察测试。
1)启动zookeeper,kafka集群
$/opt/module/kafka/bin/kafka-server-start.sh
/opt/module/kafka/config/server.properties
2)创建kafka主题
[root@hadoop01 kafka]# bin/kafka-topics.sh --zookeeper hadoop01:2181 --topic ct --create --replication-factor 2 --partitions 3
检查一下是否创建主题成功:
[root@hadoop01 kafka]# bin/kafka-topics.sh --zookeeper hadoop01:2181 --list3)启动kafka控制台消费者,等待flume信息的输入
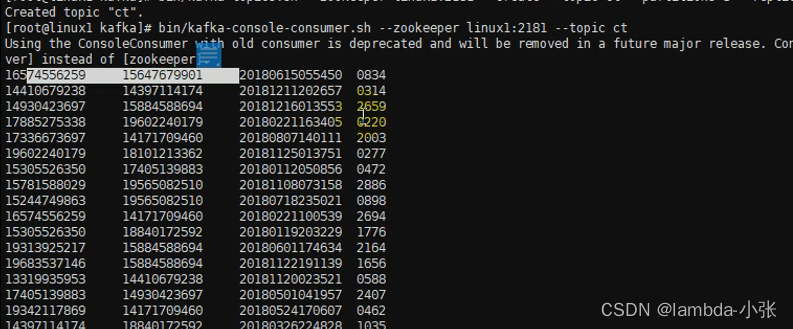
[root@hadoop01 kafka]# bin/kafka-console-consumer.sh --zookeeper hadoop01:2181 -topic ct4)配置flume(flume-kafka.conf)
[root@hadoop01 data]# vim flume-2-kafka.conf
# define
a1.sources = r1
a1.sinks = k1
a1.channels = c1

# source
a1.sources.r1.type = exec
a1.sources.r1.command = tail -F -c +0 /opt/module/data/call.log
a1.sources.r1.shell = /bin/bash -c

# sink
a1.sinks.k1.type = org.apache.flume.sink.kafka.KafkaSink
a1.sinks.k1.kafka.bootstrap.servers = hadoop01:9092,hadoop02:9092,hadoop03:9092
a1.sinks.k1.kafka.topic = ct
a1.sinks.k1.kafka.flumeBatchSize = 20
a1.sinks.k1.kafka.producer.acks = 1
a1.sinks.k1.kafka.producer.linger.ms = 1

# channel
a1.channels.c1.type = memory
a1.channels.c1.capacity = 1000
a1.channels.c1.transactionCapacity = 100

# bind
a1.sources.r1.channels = c1
a1.sinks.k1.channel = c1
5)启动flume
[root@hadoop01 flume]# bin/flume-ng agent -c conf/ -n a1 -f /opt/module/data/flume-2-kafka.conf
6)有数据不断生产中
三、数据消费
如果以上操作均成功,则开始编写操作HBase的代码,用于消费数据,将产生的数据实时存储在HBase中。
思路:
a) 编写kafka消费者,读取kafka集群中缓存的消息,并打印到控制台以观察是否成功;
b) 既然能够读取到kafka中的数据了,就可以将读取出来的数据写入到HBase中,所以编写调用HBaseAPI相关方法,将从Kafka中读取出来的数据写入到HBase;
c) 以上两步已经足够完成消费数据,存储数据的任务,但是涉及到解耦,所以过程中需要将一些属性文件外部化,HBase通用性方法封装到某一个类中。
四、编写代码
在project-ct.pom
    <modules>
        <module>ct-common</module>
        <module>ct-producer</module>
        <module>ct-consumer</module>
        <module>ct-consumer-coprocessor</module>
    </modules>

</project>创建新的module项目:ct_consumer
pom.xml文件配置:
<?xml version="1.0" encoding="UTF-8"?>
<project xmlns="http://maven.apache.org/POM/4.0.0"
         xmlns:xsi="http://www.w3.org/2001/XMLSchema-instance"
         xsi:schemaLocation="http://maven.apache.org/POM/4.0.0 http://maven.apache.org/xsd/maven-4.0.0.xsd">
    <parent>
        <artifactId>lenovo-project-ct</artifactId>
        <groupId>org.example</groupId>
        <version>1.0-SNAPSHOT</version>
    </parent>
    <modelVersion>4.0.0</modelVersion>

    <artifactId>ct-consumer</artifactId>

    <properties>
        <maven.compiler.source>8</maven.compiler.source>
        <maven.compiler.target>8</maven.compiler.target>
    </properties>
    <dependencies>
        <dependency>
            <groupId>org.apache.kafka</groupId>
            <artifactId>kafka-clients</artifactId>
            <version>0.11.0.0</version>
        </dependency>
        <dependency>
            <groupId>org.apache.kafka</groupId>
             <artifactId>kafka_2.12</artifactId>
            <version>0.11.0.0</version>
        </dependency>
        <dependency>
            <groupId>org.example</groupId>
            <artifactId>ct-common</artifactId>
            <version>1.0-SNAPSHOT</version>
        </dependency>
    </dependencies>
</project>
在ct.consume下
创建Bootstrap
/**
 * @program: IntelliJ IDEA
 * @description: 启动消费者
 *
 * @create: 2022-10-21 15:36
 */

/**
 * 启动消费者
 *
 * 使用kafka消费者获取Flume采集的数据
 *
 * 将数据存储到Hbase中去
 */
public class Bootstrap {
    public static void main(String[] args) throws Exception {

        //创建消费者
        Consumer consumer = new CalllogConsumer();

        //消费数据
        consumer.consume();

        //关闭资源
        consumer.close();


    }
}
在ct.consumer.bean
创建CalllogConsumer
import org.apache.kafka.clients.consumer.ConsumerRecord;
import org.apache.kafka.clients.consumer.ConsumerRecords;
import org.apache.kafka.clients.consumer.KafkaConsumer;

import java.io.FileInputStream;
import java.io.IOException;
import java.util.Arrays;
import java.util.Properties;

/**
 * @program: IntelliJ IDEA
 * @description: 通话日志消费对象
 * @author:
 * @create: 2022-10-21 15:41
 */
public class CalllogConsumer implements Consumer {
    /**
     * 消费数据
     */

    public void consume() {
        try{
            //创建配置对象
            Properties prop = new Properties();
            prop.load(Thread.currentThread().getContextClassLoader().getResourceAsStream("consumer.properties"));

            //获取flume采集的数据
            KafkaConsumer<String,String> consumer = new KafkaConsumer<String, String>(prop);

            //关注主题
            consumer.subscribe(Arrays.asList(Names.TOPIC.getValue()));

            //HBase数据访问对象
            HBaseDao dao = new HBaseDao();
            //初始化
            dao.init();

            //消费数据
            while(true){
                ConsumerRecords<String,String> consumerRecords = consumer.poll(100);
                for (ConsumerRecord<String, String> consumerRecord : consumerRecords) {
                    System.out.println(consumerRecord.value());
                    //插入数据
                    dao.insertData(consumerRecord.value());
//                    Calllog log = new Calllog(consumerRecord.value());
//                    dao.insertData(log);
                }
            }
        }catch (Exception e){
            e.printStackTrace();
        }


    }

    /**
     * 关闭资源
     * @throws IOException
     */
    @Override
    public void close() throws IOException {

    }
}
创建 Calllog
/**
 * 通话日志
 */
@TableRef("ct:calllog")
public class Calllog {
    @Rowkey
    private String rowkey;
    @Column(family = "caller")
    private String call1;
    @Column(family = "caller")
    private String call2;
    @Column(family = "caller")
    private String calltime;
    @Column(family = "caller")
    private String duration;
    @Column(family = "caller")
    private String flg = "1";

    private String name;

    public String getFlg() {
        return flg;
    }

    public void setFlg(String flg) {
        this.flg = flg;
    }

    public String getName() {
        return name;
    }

    public void setName(String name) {
        this.name = name;
    }

    public Calllog() {

    }

    public String getRowkey() {
        return rowkey;
    }

    public void setRowkey(String rowkey) {
        this.rowkey = rowkey;
    }

    public Calllog(String data ) {
        String[] values = data.split("\t");
        call1 = values[0];
        call2 = values[1];
        calltime = values[2];
        duration = values[3];
    }

    public String getCall1() {
        return call1;
    }

    public void setCall1(String call1) {
        this.call1 = call1;
    }

    public String getCall2() {
        return call2;
    }

    public void setCall2(String call2) {
        this.call2 = call2;
    }

    public String getCalltime() {
        return calltime;
    }

    public void setCalltime(String calltime) {
        this.calltime = calltime;
    }

    public String getDuration() {
        return duration;
    }

    public void setDuration(String duration) {
        this.duration = duration;
    }
}
在ct.consumer.dao
创建HBaseDao
import org.apache.hadoop.hbase.client.Put;
import org.apache.hadoop.hbase.util.Bytes;
import org.apache.hadoop.yarn.webapp.hamlet.Hamlet;

import java.util.ArrayList;
import java.util.List;

/**
 * @program: IntelliJ IDEA
 * @description: HBase数据访问对象
 * @author:
 * @create: 2022-10-21 16:41
 */


public class HBaseDao extends BaseDao {
    /**
     * 初始化
     */
    public  void init() throws Exception{
        start();

        creatNamespaceNX(Names.NAMESPACE.getValue());
        createTableXX(Names.TABLE.getValue(),"com.lenovo.ct.consumer.coprocessor.InsertCalleeCoprocessor", ValueConstant.REGION_COUNT,Names.CF_CALLER.getValue(),Names.CF_CALLEE.getValue());

        end();
    }

    /**
     * 插入对象
     * @param log
     * @throws Exception
     */
    public void insertData( Calllog log ) throws Exception {
        log.setRowkey(genRegionNum(log.getCall1(), log.getCalltime()) + "_" + log.getCall1() + "_" + log.getCalltime() + "_" + log.getCall2() + "_" + log.getDuration());

        putData(log);
    }


    /**
     * 插入数据
     * @param value
     */
    public void insertData(String value) throws Exception{
        //将通话日志保存到Hbase表中

        //1.获取通话日志数据
        String[] values = value.split("\t");
        String call1 = values[0];
        String call2 = values[1];
        String calltime = values[2];
        String duration = values[3];

        //2.创建数据对象

        // rowkey设计
        // 1)长度原则
        //      最大值64KB,推荐长度为10 ~ 100byte
        //      最好8的倍数,能短则短,rowkey如果太长会影响性能
        // 2)唯一原则 : rowkey应该具备唯一性
        // 3)散列原则
        //      3-1)盐值散列:不能使用时间戳直接作为rowkey
        //           在rowkey前增加随机数
        //      3-2)字符串反转 :1312312334342, 1312312334345
        //           电话号码:133 + 0123 + 4567
        //      3-3) 计算分区号:hashMap


        // rowkey = regionNum + call1 + time + call2 + duration
        String rowkey = genRegionNum(call1, calltime) + "_" + call1 + "_" + calltime + "_" + call2 + "_" + duration + "_1";

        // 主叫用户
        Put put = new Put(Bytes.toBytes(rowkey));

        byte[] family = Bytes.toBytes(Names.CF_CALLER.getValue());

        put.addColumn(family, Bytes.toBytes("call1"), Bytes.toBytes(call1));
        put.addColumn(family, Bytes.toBytes("call2"), Bytes.toBytes(call2));
        put.addColumn(family, Bytes.toBytes("calltime"), Bytes.toBytes(calltime));
        put.addColumn(family, Bytes.toBytes("duration"), Bytes.toBytes(duration));
        put.addColumn(family, Bytes.toBytes("flg"), Bytes.toBytes("1"));

        String calleeRowkey = genRegionNum(call2, calltime) + "_" + call2 + "_" + calltime + "_" + call1 + "_" + duration + "_0";

        // 被叫用户
//        Put calleePut = new Put(Bytes.toBytes(calleeRowkey));
//        byte[] calleeFamily = Bytes.toBytes(Names.CF_CALLEE.getValue());
//        calleePut.addColumn(calleeFamily, Bytes.toBytes("call1"), Bytes.toBytes(call2));
//        calleePut.addColumn(calleeFamily, Bytes.toBytes("call2"), Bytes.toBytes(call1));
//        calleePut.addColumn(calleeFamily, Bytes.toBytes("calltime"), Bytes.toBytes(calltime));
//        calleePut.addColumn(calleeFamily, Bytes.toBytes("duration"), Bytes.toBytes(duration));
//        calleePut.addColumn(calleeFamily, Bytes.toBytes("flg"), Bytes.toBytes("0"));


        //3.保存数据
        List<Put> puts = new ArrayList<Put>();
        puts.add(put);
//        puts.add(calleePut);

        putData(Names.TABLE.getValue(), puts);
    }
}
在ct-consumer的resources
创建consumer.properties
bootstrap.servers=hadoop01:9092,hadoop02:9092,hadoop03:9092
key.deserializer=org.apache.kafka.common.serialization.StringDeserializer
value.deserializer=org.apache.kafka.common.serialization.StringDeserializer
group.id=org.example
enable.auto.commit=true
auto.commit.interval.ms=1000
在ct-common.pom
<dependencies>
        <!-- https://mvnrepository.com/artifact/org.apache.hbase/hbase-client -->
        <dependency>
            <groupId>org.apache.hbase</groupId>
            <artifactId>hbase-client</artifactId>
            <version>1.3.1</version>
        </dependency>
        <!-- https://mvnrepository.com/artifact/org.apache.hbase/hbase-server -->
        <dependency>
            <groupId>org.apache.hbase</groupId>
            <artifactId>hbase-server</artifactId>
            <version>1.3.1</version>
        </dependency>

    </dependencies>
在ct.common.api
创建Column
import java.lang.annotation.ElementType;
import java.lang.annotation.Retention;
import java.lang.annotation.RetentionPolicy;
import java.lang.annotation.Target;

@Target({ElementType.FIELD})
@Retention(RetentionPolicy.RUNTIME)
public @interface Column {
    String family() default "info";
    String column() default  "";
}
创建Rowkey
import java.lang.annotation.ElementType;
import java.lang.annotation.Retention;
import java.lang.annotation.RetentionPolicy;
import java.lang.annotation.Target;

@Target({ElementType.FIELD})
@Retention(RetentionPolicy.RUNTIME)
public @interface Rowkey {
}
创建TableRef
import java.lang.annotation.ElementType;
import java.lang.annotation.Retention;
import java.lang.annotation.RetentionPolicy;
import java.lang.annotation.Target;

@Target({ElementType.TYPE})
@Retention(RetentionPolicy.RUNTIME)
public @interface TableRef {
    String value();
}
在ct.common.bean
创建Consumer
import java.io.Closeable;

/**
 * @program: IntelliJ IDEA
 * @description: 消费者接口
 *
 * @create: 2022-10-21 15:39
 */
public interface Consumer extends Closeable {
    /**
     * 生产数据
     * */
    public void consume();
}
创建BaseDao
/**
 * @program: IntelliJ IDEA
 * @description: 基础数据访问对象
 * @author:
 * @create: 2022-10-21 16:40
 */


import org.apache.hadoop.conf.Configuration;
import org.apache.hadoop.hbase.*;
import org.apache.hadoop.hbase.client.*;
import org.apache.hadoop.hbase.util.Bytes;

import java.lang.reflect.Field;
import java.util.*;


public abstract class BaseDao  {

    private ThreadLocal<Connection> connHolder = new ThreadLocal<Connection>();
    private ThreadLocal<Admin> adminHolder = new ThreadLocal<Admin>();

    protected void start() throws Exception {
        getConnection();
        getAdmin();
    }

    protected void end() throws Exception{
        Admin admin = getAdmin();
        if(admin != null){
            admin.close();
            adminHolder.remove();
        }
        Connection conn = getConnection();
        if(conn != null){
            conn.close();
            connHolder.remove();
        }
    }

    /**
     * 创建表,如果表已经存在,那么删除后在创建新的
     * @param name
     * @param families
     */
    protected void createTableXX(String name ,String... families)throws Exception{
        createTableXX(name,null,null,families);
    }
    protected void createTableXX(String name ,String coprocessorClass,Integer regionCount,String... families)throws Exception{
        Admin admin = getAdmin();
        TableName tableName =TableName.valueOf(name);
        if (admin.tableExists(tableName)){
            //表存在,删除表
            deleteTable(name);
        }
        //创建表
        createTable(name,coprocessorClass,regionCount,families);
    }

    private void createTable(String name,String coprocessorClass,Integer regionCount,String... families) throws Exception{
        Admin admin = getAdmin();
        TableName tableName =TableName.valueOf(name);

        HTableDescriptor tableDescriptor =
                new HTableDescriptor(tableName);
        if ( families == null || families.length == 0){
            families = new String[1];
            families[0] = Names.CF_INFO.getValue();
        }
        for (String family : families) {
            HColumnDescriptor columnDescriptor =
                    new HColumnDescriptor(family);
            tableDescriptor.addFamily(columnDescriptor);
        }

        if ( coprocessorClass != null && !"".equals(coprocessorClass) ) {
            tableDescriptor.addCoprocessor(coprocessorClass);
        }
        //增加预分区
        if(regionCount == null || regionCount <= 1){
            admin.createTable(tableDescriptor);
        }else{
            //分区键
            byte[][] splitKeys = getSplitKeys(regionCount);
            admin.createTable(tableDescriptor,splitKeys);
        }
    }
    /**
     * 获取查询时startrow, stoprow集合
     * @return
     */
    protected  List<String[]> getStartStorRowkeys( String tel, String start, String end ) {
        List<String[]> rowkeyss = new ArrayList<String[]>();

        String startTime = start.substring(0, 6);
        String endTime = end.substring(0, 6);

        Calendar startCal = Calendar.getInstance();
        startCal.setTime(DateUtil.parse(startTime, "yyyyMM"));

        Calendar endCal = Calendar.getInstance();
        endCal.setTime(DateUtil.parse(endTime, "yyyyMM"));

        while (startCal.getTimeInMillis() <= endCal.getTimeInMillis()) {

            // 当前时间
            String nowTime = DateUtil.format(startCal.getTime(), "yyyyMM");

            int regionNum = genRegionNum(tel, nowTime);

            String startRow = regionNum + "_" + tel + "_" + nowTime;
            String stopRow = startRow + "|";

            String[] rowkeys = {startRow, stopRow};
            rowkeyss.add(rowkeys);

            // 月份+1
            startCal.add(Calendar.MONTH, 1);
        }

        return rowkeyss;
    }


    /**
     * 计算分区号(0, 1, 2)
     * @param tel
     * @param date
     * @return
     */
    protected int genRegionNum( String tel, String date ) {

        // 13301234567
        String usercode = tel.substring(tel.length()-4);
        // 20181010120000
        String yearMonth = date.substring(0, 6);

        int userCodeHash = usercode.hashCode();
        int yearMonthHash = yearMonth.hashCode();

        // crc校验采用异或算法, hash
        int crc = Math.abs(userCodeHash ^ yearMonthHash);

        // 取模
        int regionNum = crc % ValueConstant.REGION_COUNT;

        return regionNum;

    }


    /**
     * 生成分区键
     * @param regionCount
     * @return
     */
    private byte[][] getSplitKeys(int regionCount){
        int splitKeyCount = regionCount - 1;
        byte [][] bs = new byte[splitKeyCount][];
        // 0,1,2,3,4
        //(-无穷,0),[0,1),[1 ,+无穷)
        List<byte[]> bsList = new ArrayList<byte[]>();
        for( int i = 0;i <splitKeyCount;i++ ){
            String splitKey = i + "|";
            bsList.add(Bytes.toBytes(splitKey));
        }
        bsList.toArray(bs);
        return bs;
    }

    /**
     * 增加对象:自动封装数据,将对象数据直接保存到hbase中去
     * @param obj
     * @throws Exception
     */

    protected void putData(Object obj) throws Exception {

        // 反射
        Class clazz = obj.getClass();
        TableRef tableRef = (TableRef)clazz.getAnnotation(TableRef.class);
        String tableName = tableRef.value();

        Field[] fs = clazz.getDeclaredFields();
        String stringRowkey = "";
        for (Field f : fs) {
            Rowkey rowkey = f.getAnnotation(Rowkey.class);
            if ( rowkey != null ) {
                f.setAccessible(true);
                stringRowkey = (String)f.get(obj);
                break;
            }
        }

        Connection conn = getConnection();
        Table table = conn.getTable(TableName.valueOf(tableName));
        Put put = new Put(Bytes.toBytes(stringRowkey));

        for (Field f : fs) {
            Column column = f.getAnnotation(Column.class);
            if (column != null) {
                String family = column.family();
                String colName = column.column();
                if ( colName == null || "".equals(colName) ) {
                    colName = f.getName();
                }
                f.setAccessible(true);
                String value = (String)f.get(obj);

                put.addColumn(Bytes.toBytes(family), Bytes.toBytes(colName), Bytes.toBytes(value));
            }
        }

        // 增加数据
        table.put(put);

        // 关闭表
        table.close();
    }

    /**
     * 增加多条数据
     * @param name
     * @param puts
     */
    protected void putData( String name, List<Put> puts ) throws Exception {

        // 获取表对象
        Connection conn = getConnection();
        Table table = conn.getTable(TableName.valueOf(name));

        // 增加数据
        table.put(puts);

        // 关闭表
        table.close();
    }

    /**
     * 增加数据
     * @param name
     * @param put
     */
    protected void putData(String name, Put put) throws Exception{
        //获取表的对象
        Connection conn = getConnection();
        Table table = conn.getTable(TableName.valueOf(name));
        //增加数据
        table.put(put);

        //关闭表
        table.close();

    }

    /**
     * 删除表格
     * @param name
     * @throws Exception
     */
    protected void deleteTable(String name) throws Exception{
        TableName tableName =TableName.valueOf(name);
        Admin admin = getAdmin();
        admin.disableTable(tableName);
        admin.deleteTable(tableName);
    }

    /**
     * 创建命名空间,如果命名空间已经存在,不需要创建,否则,创建新的
     * @param namespace
     */
    protected void creatNamespaceNX(String namespace) throws Exception{
        Admin admin = getAdmin();
        try{
            admin.getNamespaceDescriptor(namespace);

        }catch (NamespaceNotFoundException e){
//            e.printStackTrace();
            NamespaceDescriptor namespaceDescriptor =
                    NamespaceDescriptor.create(namespace).build();
            admin.createNamespace(namespaceDescriptor);
        }

    }

    /**
     * 获取连接对象
     */
    protected synchronized Connection getConnection() throws Exception {
        Connection conn = connHolder.get();
        if( conn == null ){
            Configuration conf = HBaseConfiguration.create();
            conn = ConnectionFactory.createConnection(conf);
            connHolder.set(conn);
        }
        return conn;

    }
    /**
     * 获取连接对象
     */
    protected synchronized Admin getAdmin() throws Exception {
        Admin admin = adminHolder.get();
        if( admin == null ){
            admin = getConnection().getAdmin();
            adminHolder.set(admin);
        }
        return admin;

    }


}
在ct.common.constant
创建ConfigConstant
import java.util.Enumeration;
import java.util.HashMap;
import java.util.Map;
import java.util.ResourceBundle;

/**
 * @program: IntelliJ IDEA
 * @description: ming
 * @author:
 * @create: 2022-10-22 20:21
 */
public class ConfigConstant {
    private static Map<String,String> valueMap = new HashMap<String,String>();
    static {

        //国际化
        ResourceBundle ct = ResourceBundle.getBundle("ct");
        Enumeration<String> enums = ct.getKeys();
        while( enums.hasMoreElements()){
            String key = enums.nextElement();
            String value = ct.getString(key);
            valueMap.put(key,value);
        }

    }
    public static String getVal(String key){
        return valueMap.get(key);
    }
    public static void main(String[] args){
        System.out.println(ConfigConstant.getVal("ct.cf.caller"));
    }

}
创建Names
/*
* 名称常量枚举类
* */
public enum Names implements Val {
    NAMESPACE("ct")
    ,TABLE("ct:calllog")
    ,CF_CALLER("caller")
    ,CF_CALLEE("callee")
    ,CF_INFO("info")
    , TOPIC("ct");

    private String name;

    private Names(String name){
        this.name = name;
    }


    @Override
    public void setValue(Object val) {
        this.name = (String) val;
    }

    @Override
    public String getValue() {
        return name;
    }
}
创建 constant
public class ValueConstant {
    public static final Integer REGION_COUNT = 6;
}
在ct-common的resources
将hdfs-site.xml、core-site.xml、hbase-site.xml、log4j.properties放置于resources目录
创建hdfs-site.xml
<?xml version="1.0" encoding="UTF-8"?>
<?xml-stylesheet type="text/xsl" href="configuration.xsl"?>
<!--
  Licensed under the Apache License, Version 2.0 (the "License");
  you may not use this file except in compliance with the License.
  You may obtain a copy of the License at

    http://www.apache.org/licenses/LICENSE-2.0

  Unless required by applicable law or agreed to in writing, software
  distributed under the License is distributed on an "AS IS" BASIS,
  WITHOUT WARRANTIES OR CONDITIONS OF ANY KIND, either express or implied.
  See the License for the specific language governing permissions and
  limitations under the License. See accompanying LICENSE file.
-->

<!-- Put site-specific property overrides in this file. -->

<configuration>
	<!-- 指定数据冗余份数 -->
	<property>
		<name>dfs.replication</name>
		<value>1</value>
	</property>

	<!-- 关闭权限检查-->
	<property>
		<name>dfs.permissions.enable</name>
		<value>false</value>
	</property>

	<property>
		<name>dfs.namenode.secondary.http-address</name>
		<value>hadoop03:50090</value>
	</property>

	<property>
		<name>dfs.namenode.http-address</name>
		<value>hadoop01:50070</value>
	</property>

	<property>
		<name>dfs.webhdfs.enabled</name>
		<value>true</value>
	</property>
</configuration>
创建core-site.xml
<?xml version="1.0" encoding="UTF-8"?>
<?xml-stylesheet type="text/xsl" href="configuration.xsl"?>
<!--
  Licensed under the Apache License, Version 2.0 (the "License");
  you may not use this file except in compliance with the License.
  You may obtain a copy of the License at

    http://www.apache.org/licenses/LICENSE-2.0

  Unless required by applicable law or agreed to in writing, software
  distributed under the License is distributed on an "AS IS" BASIS,
  WITHOUT WARRANTIES OR CONDITIONS OF ANY KIND, either express or implied.
  See the License for the specific language governing permissions and
  limitations under the License. See accompanying LICENSE file.
-->

<!-- Put site-specific property overrides in this file. -->

<configuration>
	<property>
		<name>fs.defaultFS</name>
		<value>hdfs://hadoop01:9000</value>
	</property>

	<property>
		<name>hadoop.tmp.dir</name>
		<value>/opt/module/hadoop-2.7.2/data/tmp</value>
	</property>

	<property>
		<name>hadoop.proxyuser.admin.hosts</name>
		<value>*</value>
	</property>

	<property>
		<name>hadoop.proxyuser.admin.groups</name>
		<value>*</value>
	</property>

</configuration>
创建hbase-site.xml
<?xml version="1.0"?>
<?xml-stylesheet type="text/xsl" href="configuration.xsl"?>
<!--
/**
 *
 * Licensed to the Apache Software Foundation (ASF) under one
 * or more contributor license agreements.  See the NOTICE file
 * distributed with this work for additional information
 * regarding copyright ownership.  The ASF licenses this file
 * to you under the Apache License, Version 2.0 (the
 * "License"); you may not use this file except in compliance
 * with the License.  You may obtain a copy of the License at
 *
 *     http://www.apache.org/licenses/LICENSE-2.0
 *
 * Unless required by applicable law or agreed to in writing, software
 * distributed under the License is distributed on an "AS IS" BASIS,
 * WITHOUT WARRANTIES OR CONDITIONS OF ANY KIND, either express or implied.
 * See the License for the specific language governing permissions and
 * limitations under the License.
 */
-->
<configuration>
	<property>
		<name>hbase.rootdir</name>
		<value>hdfs://hadoop01:8020/hbase</value>
	</property>

	<property>
		<name>hbase.cluster.distributed</name>
		<value>true</value>
	</property>

	<!-- 0.98后的新变动,之前版本没有.port,默认端口为60000 -->
	<property>
		<name>hbase.master.port</name>
		<value>60000</value>
	</property>

	<property>
		<name>hbase.zookeeper.quorum</name>
		<value>hadoop01:2181,hadoop02:2181,hadoop03:2181</value>
	</property>

	<property>
		<name>hbase.zookeeper.property.dataDir</name>
		<value>/opt/module/zookeeper-3.4.10/zkData</value>
	</property>

</configuration>
导入log4j.properties
创建ct.properties
ct.namespace = ct
ct.table = ct:calllog
ct.topic=ct
ct.cf.caller=caller
ct.cf.info = info
在ct-consumer-coprocessor
pom
<artifactId>ct-consumer-coprocessor</artifactId>

    <properties>
        <maven.compiler.source>8</maven.compiler.source>
        <maven.compiler.target>8</maven.compiler.target>
    </properties>
    <dependencies>
        <dependency>
            <groupId>org.example</groupId>
            <artifactId>ct-common</artifactId>
            <version>1.0-SNAPSHOT</version>
        </dependency>
    </dependencies>
四、数据消费方案优化
现在我们要使用
使用HBase查找数据时,尽可能的使用rowKey去精准的定位数据位置,而非使用ColumnValueFilter或者SingleColumnValueFilter,按照单元格Cell中的Value过滤数据,这样做在数据量巨大的情况下,效率是极低的——如果要涉及到全表扫描。所以尽量不要做这样可怕的事情。注意,这并非ColumnValueFilter就无用武之地。现在,我们将使用协处理器,将数据一分为二。
思路:
a) 编写协处理器类,用于协助处理HBase的相关操作(增删改查)
b) 在协处理器中,一条主叫日志成功插入后,将该日志切换为被叫视角再次插入一次,放入到与主叫日志不同的列族中。
c) 重新创建hbase表,并设置为该表设置协处理器。
d) 编译项目,发布协处理器的jar包到hbase的lib目录下,并群发该jar包
e) 修改hbase-site.xml文件,设置协处理器,并群发该hbase-site.xml文件
编码:
1) 新建协处理器类:InsertCalleeCoprocessor,并覆写postPut方法,该方法会在数据成功插入之后被回调。
创建InsertCalleeCoprocessor
package com.ct.consumer.coprocessor;


import org.apache.hadoop.hbase.TableName;
import org.apache.hadoop.hbase.client.Durability;
import org.apache.hadoop.hbase.client.Put;
import org.apache.hadoop.hbase.client.Table;
import org.apache.hadoop.hbase.coprocessor.BaseRegionObserver;
import org.apache.hadoop.hbase.coprocessor.ObserverContext;
import org.apache.hadoop.hbase.coprocessor.RegionCoprocessorEnvironment;
import org.apache.hadoop.hbase.regionserver.wal.WALEdit;
import org.apache.hadoop.hbase.util.Bytes;

import java.io.IOException;

/**
 *
 * 使用协处理器保存被叫用户的数据
 *
 * 协处理器的使用
 * 1. 创建类
 * 2. 让表找到协处理类(和表有关联)
 * 3. 将项目打成jar包发布到hbase中(关联的jar包也需要发布),并且需要分发
 */
public class InsertCalleeCoprocessor extends BaseRegionObserver {

    // 方法的命名规则
    // login
    // logout
    // prePut
    // doPut :模板方法设计模式
    //    存在父子类:
    //    父类搭建算法的骨架
    //    1. tel取用户代码,2时间取年月,3,异或运算,4 hash散列
    //    子类重写算法的细节
    //    do1. tel取后4位,do2,201810, do3 ^, 4, % &
    // postPut

    /**
     * 保存主叫用户数据之后,由Hbase自动保存被叫用户数据
     * @param e
     * @param put
     * @param edit
     * @param durability
     * @throws IOException
     */
    @Override
    public void postPut(ObserverContext<RegionCoprocessorEnvironment> e, Put put, WALEdit edit, Durability durability) throws IOException {

        // 获取表
        Table table = e.getEnvironment().getTable(TableName.valueOf(Names.TABLE.getValue()));

        // 主叫用户的rowkey
        String rowkey = Bytes.toString(put.getRow());
        // 1_133_2019_144_1010_1
        String[] values = rowkey.split("_");

        CoprocessorDao dao = new CoprocessorDao();
        String call1 = values[1];
        String call2 = values[3];
        String calltime = values[2];
        String duration = values[4];
        String flg = values[5];

        if ( "1".equals(flg) ) {
            // 只有主叫用户保存后才需要触发被叫用户的保存
            String calleeRowkey = dao.getRegionNum(call2, calltime) + "_" + call2 + "_" + calltime + "_" + call1 + "_" + duration + "_0";


            // 保存数据
            Put calleePut = new Put(Bytes.toBytes(calleeRowkey));
            byte[] calleeFamily = Bytes.toBytes(Names.CF_CALLEE.getValue());
            calleePut.addColumn(calleeFamily, Bytes.toBytes("call1"), Bytes.toBytes(call2));
            calleePut.addColumn(calleeFamily, Bytes.toBytes("call2"), Bytes.toBytes(call1));
            calleePut.addColumn(calleeFamily, Bytes.toBytes("calltime"), Bytes.toBytes(calltime));
            calleePut.addColumn(calleeFamily, Bytes.toBytes("duration"), Bytes.toBytes(duration));
            calleePut.addColumn(calleeFamily, Bytes.toBytes("flg"), Bytes.toBytes("0"));
            table.put( calleePut );

            // 关闭表
            table.close();
        }

    }

    private class CoprocessorDao extends BaseDao {

        public int getRegionNum(String tel, String time) {
            return genRegionNum(tel, time);
        }
    }
}
打包jar
1.打包jar的依赖到在linux下测试
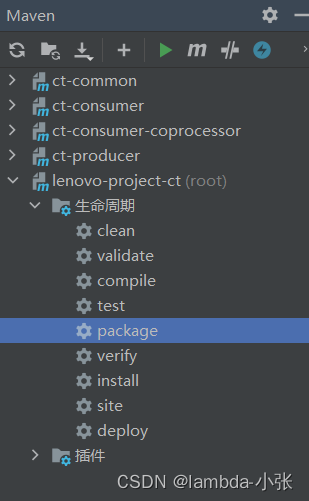
把图中的jar导入到/opt/module/hbase/lib/
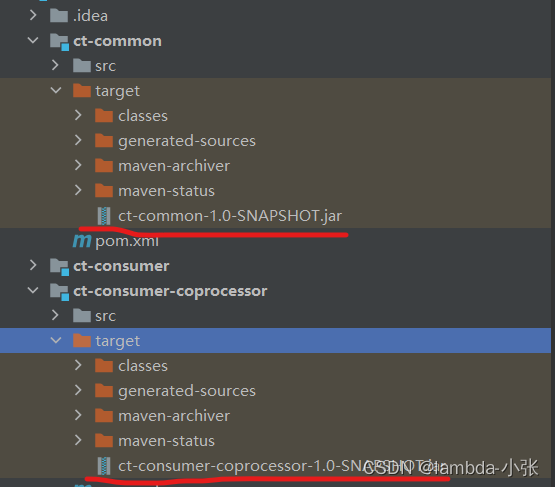
重新编译项目,发布jar包到hbase的lib目录下(注意需群发):
关闭hbase并且重新启动
bin/stop-hbase.sh
bin/start-hbase.sh
在hbase里面查看有文件生成
 bin/hbase shell
hbase(main):001:0> scan 'ct:calllog'
五、数据消费测试
项目成功后,则将项目打包后在linux中运行测试。
1. 打包HBase消费者代码
a) 在windows中,进入工程的pom.xml所在目录下(建议将该工程的pom.xml文件拷贝到其他临时目录中,例如我把pom.xml文件拷贝到了F:\maven-lib\目录下),然后使用mvn命令下载工程所有依赖的jar包
| mvn -DoutputDirectory=./lib -DgroupId=com.atguigu -DartifactId=ct_consumer – Dversion=0.0.1-SNAPSHOT dependency:copy-dependencies |
b) 使用maven打包工程
c) 测试执行该jar包
方案一:推荐,使用*通配符,将所有依赖加入到classpath中,不可使用*.jar的方式。
注意:如果是在Linux中实行,注意文件夹之间的分隔符。自己的工程要单独在cp中指定,不要直接放在maven-lib/lib目录下。
| java -cp F:\maven-lib\ct_consumer-0.0.1-SNAPSHOT.jar;F:\maven-lib\lib\* com.atguigu.ct_consumer.kafka.HBaseConsumer |
方案二:最最推荐,使用java.ext.dirs参数将所有依赖的目录添加进classpath中。
注意:-Djava.ext.dirs=属性后边的路径不能为”~”
| java -Djava.ext.dirs=F:\maven-lib\lib\ -cp F:\maven-lib\ct_consumer-0.0.1- SNAPSHOT.jar com.atguigu.ct_consumer.kafka.HBaseConsumer |
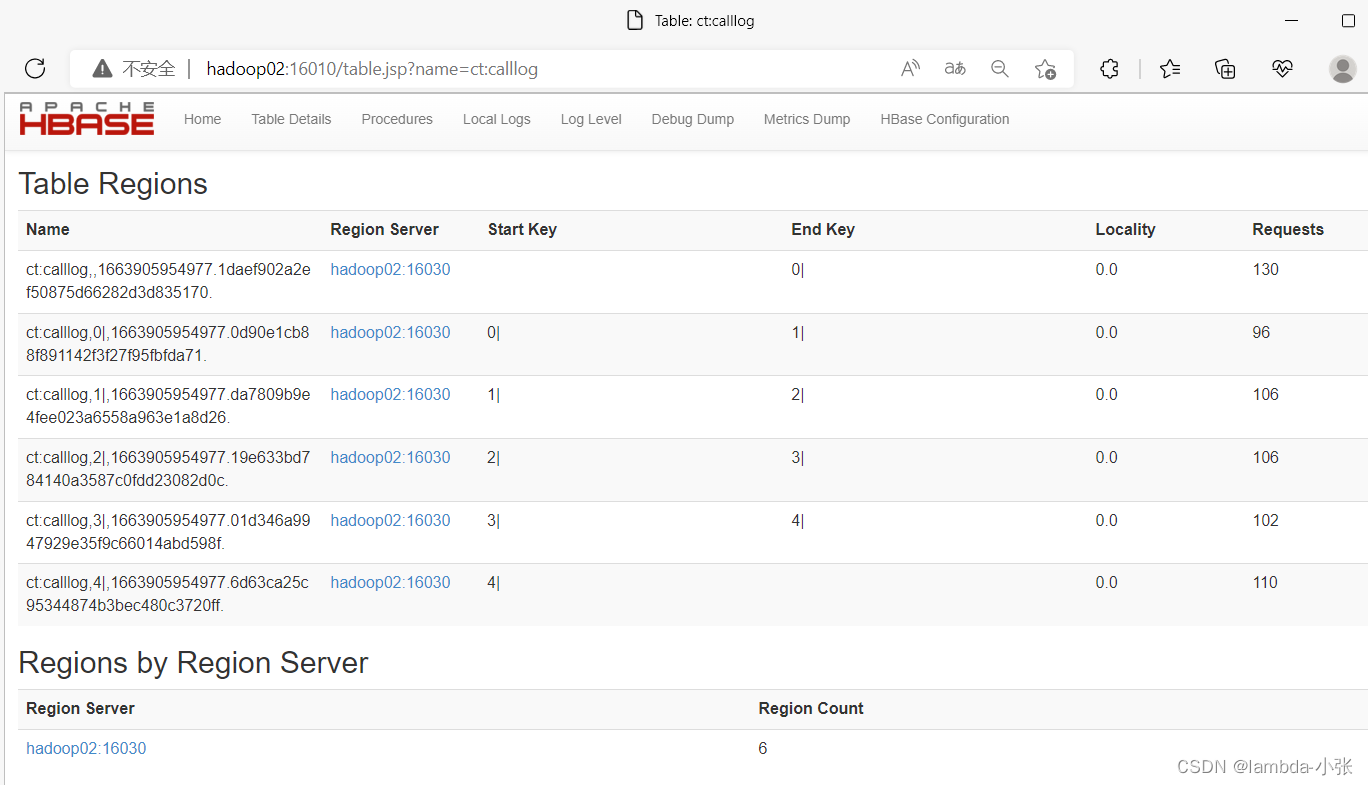
2.在hbase的页面也看到文件出现
3.hbase节点挂了,可以查看日志文件,找出错误出现
