Kubernetes - 手动部署 [ 4 ]
- 1 增加Master节点(高可用架构)
- 1.1 部署Master2 Node
- 1.1.1 安装Docker(Master1)
- 1.1.2 启动Docker、设置开机自启(Master2)
- 1.1.3 创建etcd证书目录(Master2)
- 1.1.4 拷贝文件(Master1)
- 1.1.5 删除证书(Master2)
- 1.1.6 修改配置文件和主机名(Master2)
- 1.1.7 启动并设置开机自启(Master2)
- 1.1.8 查看集群状态(Master2)
- 1.1.9 修改前面留下的证书问题(正常可跳过)
- 1.1.10 审批kubelet证书申请
- 2 问题
- 2.1 kubelet.go:2263] node "node-251" not found
- 2.2 unable to create new content in namespace kubernetes-dashboard because it is being terminated
- 2.3 kube-apiserver: E0309 14:25:24.889084 66289 instance.go:392] Could not construct pre-rendered responses for ServiceAccountIssuerDiscovery endpoints. Endpoints will not be enabled. Error: issuer URL must use https scheme, got: api
配置master高可用
1 增加Master节点(高可用架构)
Kubernetes作为容器集群系统,通过健康检查+重启策略实现了Pod故障自我修复能力,通过调度算法实现将Pod分布式部署,并保持预期副本数,根据Node失效状态自动在其他Node拉起Pod,实现了应用层的高可用性。
针对Kubernetes集群,高可用性还应包含以下两个层面的考虑:Etcd数据库的高可用性和Kubernetes Master组件的高可用性。 而Etcd我们已经采用2个节点组建集群实现高可用,本节将对Master节点高可用进行说明和实施。
Master节点扮演着总控中心的角色,通过不断与工作节点上的Kubelet和kube-proxy进行通信来维护整个集群的健康工作状态。如果Master节点故障,将无法使用kubectl工具或者API做任何集群管理。
Master节点主要有三个服务kube-apiserver、kube-controller-manager和kube-scheduler,其中kube-controller-manager和kube-scheduler组件自身通过选择机制已经实现了高可用,所以Master高可用主要针对kube-apiserver组件,而该组件是以HTTP API提供服务,因此对他高可用与Web服务器类似,增加负载均衡器对其负载均衡即可,并且可水平扩容。
多Master架构图
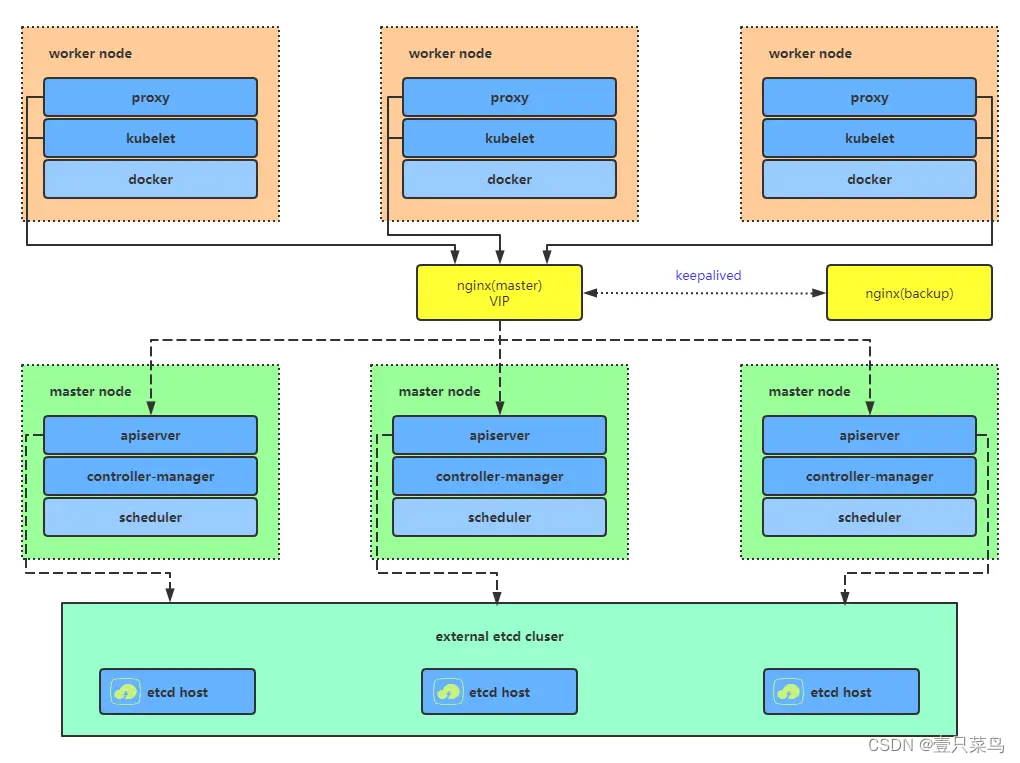
1.1 部署Master2 Node
环境准备
| 主机名 | 操作系统 | IP 地址 | 所需组件 |
|---|---|---|---|
| node-251 | CentOS 7.9 | 192.168.71.251 | 所有组件都安装(合理利用资源)-Master1 |
| node-252 | CentOS 7.9 | 192.168.71.252 | 所有组件都安装 |
| node-253 | CentOS 7.9 | 192.168.71.253 | docker kubelet kube-proxy |
node-254 | CentOS 7.9 | 192.168.70.251 | 新增 -Master2 |
说明:
现在需要再增加一台新服务器,作为Master2 Node,IP是192.168.70.251,hostname:node-254。
Master2 与已部署的Master1所有操作一致。所以我们只需将Master1所有K8s文件拷贝过来,再修改下服务器IP和主机名启动即可。
前置条件:
为了操作方便,我们需要把node-254和其他节点的免密登录,防火墙,selinux等设置好
[root@node-251 kubernetes]# cat >>/etc/hosts<<EOF
> 192.168.70.251 node-254
> EOF
[root@node-251 kubernetes]# cat /etc/hosts
127.0.0.1   localhost localhost.localdomain localhost4 localhost4.localdomain4
::1         localhost localhost.localdomain localhost6 localhost6.localdomain6
192.168.71.251 node-251
192.168.71.252 node-252
192.168.71.253 node-253
192.168.70.251 node-254
[root@node-251 kubernetes]# ssh-copy-id root@node-254
/usr/bin/ssh-copy-id: INFO: Source of key(s) to be installed: "/root/.ssh/id_rsa.pub"
The authenticity of host 'node-254 (192.168.70.251)' can't be established.
ECDSA key fingerprint is SHA256:LUArdNX5wllSakDLBgD/WpWifE6LsYfcZtBBsUB5ivA.
ECDSA key fingerprint is MD5:bc:10:bc:04:fa:63:85:6e:49:70:02:2a:b4:7d:7e:b9.
Are you sure you want to continue connecting (yes/no)? yes
/usr/bin/ssh-copy-id: INFO: attempting to log in with the new key(s), to filter out any that are already installed
/usr/bin/ssh-copy-id: INFO: 1 key(s) remain to be installed -- if you are prompted now it is to install the new keys
root@node-254's password:

Number of key(s) added: 1

Now try logging into the machine, with:   "ssh 'root@node-254'"
and check to make sure that only the key(s) you wanted were added.

[root@node-251 kubernetes]# scp /etc/hosts node-254:/etc/
hosts                                                                                                 100%  254    62.8KB/s   00:00
[root@node-251 kubernetes]# scp /etc/hosts node-252:/etc/
hosts                                                                                                 100%  254    87.4KB/s   00:00
[root@node-251 kubernetes]# scp /etc/hosts node-253:/etc/
hosts                                                                                                 100%  254   140.3KB/s   00:00
关闭防护墙,禁用selinux,关闭swap
#关闭系统防火墙
systemctl stop firewalld
systemctl disable firewalld

#关闭selinux
sed -i 's/enforcing/disabled/' /etc/selinux/config  #永久
setenforce 0  # 临时

#关闭swap
swapoff -a   #临时
sed -ri 's/.*swap.*/#&/' /etc/fstab  #永久
#将桥接的IPV4流量传递到iptables的链
cat > /etc/sysctl.d/k8s.conf << EOF
net.bridge.bridge-nf-call-ip6tables = 1
net.bridge.bridge-nf-call-iptables = 1
EOF
sysctl --system  #生效

#时间同步
#使用阿里云时间服务器进行临时同步
[root@k8s-node1 ~]# ntpdate ntp.aliyun.com
 4 Sep 21:27:49 ntpdate[22399]: adjust time server 203.107.6.88 offset 0.001010 sec
修改时区
笔者这台虚拟机安装的时候没改时区,所以时间和其他服务器不一致,下面将修改时区
#查看时区
[root@node-254 ~]# timedatectl
      Local time: Sun 2023-05-07 21:06:45 EDT
  Universal time: Mon 2023-05-08 01:06:45 UTC
        RTC time: Mon 2023-05-08 01:06:45
       Time zone: America/New_York (EDT, -0400)
     NTP enabled: yes
NTP synchronized: yes
 RTC in local TZ: no
      DST active: yes
 Last DST change: DST began at
                  Sun 2023-03-12 01:59:59 EST
                  Sun 2023-03-12 03:00:00 EDT
 Next DST change: DST ends (the clock jumps one hour backwards) at
                  Sun 2023-11-05 01:59:59 EDT
                  Sun 2023-11-05 01:00:00 EST
#选择时区
[root@node-254 ~]# tzselect
Please identify a location so that time zone rules can be set correctly.
Please select a continent or ocean.
...
 5) Asia
...
11) none - I want to specify the time zone using the Posix TZ format.
#? 5
Please select a country.
...
 9) China                 26) Laos                  43) Taiwan
...
#? 9
Please select one of the following time zone regions.
1) Beijing Time
2) Xinjiang Time
#? 1

The following information has been given:

        China
        Beijing Time

Therefore TZ='Asia/Shanghai' will be used.
Local time is now:      Mon May  8 09:05:12 CST 2023.
Universal Time is now:  Mon May  8 01:05:12 UTC 2023.
Is the above information OK?
1) Yes
2) No
#? yes
Please enter 1 for Yes, or 2 for No.
#? 1

You can make this change permanent for yourself by appending the line
        TZ='Asia/Shanghai'; export TZ
to the file '.profile' in your home directory; then log out and log in again.

Here is that TZ value again, this time on standard output so that you
can use the /usr/bin/tzselect command in shell scripts:
Asia/Shanghai
#删除原来的链接。重新连接正确的时区。
[root@node-254 ~]# rm /etc/localtime
rm: remove symbolic link ‘/etc/localtime’? y
[root@node-254 ~]# ln -s /usr/share/zoneinfo/Asia/Shanghai /etc/localtime;
[root@node-254 ~]# date
Mon May  8 09:10:43 CST 2023

#再次同步时间
[root@node-254 ~]# ntpdate ntp.aliyun.com
 8 May 09:11:17 ntpdate[1915]: adjust time server 203.107.6.88 offset -0.000873 sec
1.1.1 安装Docker(Master1)
在node-251节点执行拷贝操作
scp /usr/bin/docker* node-254:/usr/bin
scp /usr/bin/runc node-254:/usr/bin
scp /usr/bin/containerd* node-254:/usr/bin
scp /usr/lib/systemd/system/docker.service node-254:/usr/lib/systemd/system
scp -r /etc/docker node-254:/etc
1.1.2 启动Docker、设置开机自启(Master2)
systemctl daemon-reload
systemctl start docker
systemctl enable docker
1.1.3 创建etcd证书目录(Master2)
mkdir -p /opt/etcd/ssl
1.1.4 拷贝文件(Master1)
拷贝Master1上所有k8s文件和etcd证书到Master2
scp -r /opt/kubernetes node-254:/opt
scp -r /opt/etcd/ssl node-254:/opt/etcd
scp /usr/lib/systemd/system/kube* node-254:/usr/lib/systemd/system
scp /usr/bin/kubectl  node-254:/usr/bin
scp -r ~/.kube node-254:~
1.1.5 删除证书(Master2)
删除kubelet和kubeconfig文件
rm -f /opt/kubernetes/cfg/kubelet.kubeconfig
rm -f /opt/kubernetes/ssl/kubelet*
1.1.6 修改配置文件和主机名(Master2)
修改apiserver、kubelet和kube-proxy配置文件为本地IP:
vi /opt/kubernetes/cfg/kube-apiserver.conf
...
--bind-address=192.168.70.251 \
--advertise-address=192.168.70.251 \
...

vi /opt/kubernetes/cfg/kube-controller-manager.kubeconfig
server: https://192.168.70.251:6443

vi /opt/kubernetes/cfg/kube-scheduler.kubeconfig
server: https://192.168.70.251:6443

vi /opt/kubernetes/cfg/kubelet.conf
--hostname-override=node-254

vi /opt/kubernetes/cfg/kube-proxy-config.yml
hostnameOverride: node-254

vi ~/.kube/config
...
server: https://192.168.70.251:6443
1.1.7 启动并设置开机自启(Master2)
systemctl daemon-reload
systemctl start kube-apiserver kube-controller-manager kube-scheduler kubelet kube-proxy
systemctl enable kube-apiserver kube-controller-manager kube-scheduler kubelet kube-proxy
1.1.8 查看集群状态(Master2)
[root@node-254 ~]# kubectl get cs
Unable to connect to the server: x509: certificate is valid for 10.0.0.1, 127.0.0.1, 192.168.71.251, 192.168.71.252, 192.168.71.253, 192.168.71.254, not 192.168.70.251
1.1.9 修改前面留下的证书问题(正常可跳过)
由于笔者前面生成证书的时候,预留的IP和现在新增的IP不一致,所以证书有问题,我们需要重新生成证书,还是比较麻烦的
提前说明:参考此节未必能够把新增的master配置好,笔者也是在尝试多次后,放弃了重新从头搭建。以下为笔者尝试的过程
查看证书是否过期:
[root@node-253 ~]# for i in `ls /opt/kubernetes/ssl/*.crt`; do echo $i; openssl x509 -enddate -noout -in $i; done
/opt/kubernetes/ssl/kubelet.crt
notAfter=May  5 12:57:22 2024 GMT
我们要修改的内容包括:
-
- (二)Kubernetes - 手动部署(二进制方式安装)
2.5 使用自签CA签发etcd https证书
2.5.1 创建证书申请文件
- (二)Kubernetes - 手动部署(二进制方式安装)
cat > server-csr.json << EOF
{
    "CN": "etcd",
    "hosts": [
    "192.168.71.251",
    "192.168.71.252",
    "192.168.71.253",
    "192.168.70.251"
    ],
    "key": {
        "algo": "rsa",
        "size": 2048
    },
    "names": [
        {
            "C": "CN",
            "L": "Shenyang",
            "ST": "Shenyang"
        }
    ]
}
EOF
生成证书:
cfssl gencert -ca=ca.pem -ca-key=ca-key.pem -config=ca-config.json -profile=www server-csr.json | cfssljson -bare server
-
- (三)Kubernetes - 手动部署(二进制方式安装)
1.1.2 使用自签CA签发kube-apiserver https证书
创建证书申请文件:
生成证书:cd ~/TLS/k8s/ cat > server-csr.json << EOF { "CN": "kubernetes", "hosts": [ "10.0.0.1", "127.0.0.1", "192.168.71.251", "192.168.71.252", "192.168.71.253", "192.168.70.251", #修改此处 "kubernetes", "kubernetes.default", "kubernetes.default.svc", "kubernetes.default.svc.cluster", "kubernetes.default.svc.cluster.local" ], "key": { "algo": "rsa", "size": 2048 }, "names": [ { "C": "CN", "L": "Shenyang", "ST": "Shenyang", "O": "k8s", "OU": "System" } ] } EOF
1.4.2 拷贝刚才生成的证书/usr/local/bin/cfssl gencert -ca=ca.pem -ca-key=ca-key.pem -config=ca-config.json -profile=kubernetes server-csr.json | cfssljson -bare server
把刚才生成的证书拷贝到配置文件中的路径:
同步证书[root@node-251 bin]# cp ~/TLS/k8s/ca*pem ~/TLS/k8s/server*pem /opt/kubernetes/ssl/ [root@node-251 bin]# ll /opt/kubernetes/ssl/[root@node-251 k8s]# for master_ip in {1..4} > do > scp /opt/kubernetes/ssl/* root@node-25${master_ip}:/opt/kubernetes/ssl/ > done - (三)Kubernetes - 手动部署(二进制方式安装)
再次查看集群状态:
[root@node-251 k8s]# kubectl get csr
Unable to connect to the server: net/http: TLS handshake timeout
重启后时间不同步,同步时间
[root@node-251 k8s]# ntpdate ntp.aliyun.com
 8 May 11:50:30 ntpdate[20135]: step time server 203.107.6.88 offset -28192.234239 sec
重启etcd服务
[root@node-251 k8s]# systemctl restart etcd
出现新的错误
[root@node-251 k8s]# kubectl get csr
Unable to connect to the server: x509: certificate has expired or is not yet valid: current time 2023-05-08T11:51:59+08:00 is before 2023-05-08T11:18:00Z
- (三)Kubernetes - 手动部署(二进制方式安装)
1.6.5 查看集群状态
生成kubectl连接集群的证书 :KUBE_CONFIG="/root/.kube/config" KUBE_APISERVER="https://192.168.71.251:6443" kubectl config set-cluster kubernetes \ --certificate-authority=/opt/kubernetes/ssl/ca.pem \ --embed-certs=true \ --server=${KUBE_APISERVER} \ --kubeconfig=${KUBE_CONFIG} kubectl config set-credentials cluster-admin \ --client-certificate=./admin.pem \ --client-key=./admin-key.pem \ --embed-certs=true \ --kubeconfig=${KUBE_CONFIG} kubectl config set-context default \ --cluster=kubernetes \ --user=cluster-admin \ --kubeconfig=${KUBE_CONFIG} kubectl config use-context default --kubeconfig=${KUBE_CONFIG}
然后把本文中的
1.1.4 拷贝文件(Master1)
1.1.5 删除证书(Master2)
1.1.6 修改配置文件和主机名(Master2)
1.1.7 启动并设置开机自启(Master2)
重新执行一遍
再次查看集群状态(Master2)
[root@node-254 ~]# kubectl get cs
Warning: v1 ComponentStatus is deprecated in v1.19+
NAME                 STATUS    MESSAGE             ERROR
scheduler            Healthy   ok
controller-manager   Healthy   ok
etcd-0               Healthy   {"health":"true"}
etcd-1               Healthy   {"health":"true"}
1.1.10 审批kubelet证书申请
[root@node-254 ~]# kubectl get csr
NAME                                                   AGE     SIGNERNAME                                    REQUESTOR           CONDITION
node-csr-4FB0huB7sQ_InQkdsVh-5n0fhw2-eiZ7fQvHVIVQo_k   19m     kubernetes.io/kube-apiserver-client-kubelet   kubelet-bootstrap   Approved,Issued
node-csr-FfrEz_uMCDjXPedvo0HZ3fX42hDiWkZHqiiM8rTBJuY   19m     kubernetes.io/kube-apiserver-client-kubelet   kubelet-bootstrap   Approved,Issued
node-csr-Ou0C-YQaAhozJFCkUFtaHQa7PConUvNFoEC-rqUUMmI   59m     kubernetes.io/kube-apiserver-client-kubelet   kubelet-bootstrap   Approved,Issued
node-csr-XKW3KxTS7hbQBY2FXLPCBkuajM5kgPQLpjZ3hDIzj3w   2m53s   kubernetes.io/kube-apiserver-client-kubelet   kubelet-bootstrap   Pending
[root@node-254 ~]# kubectl certificate approve node-csr-XKW3KxTS7hbQBY2FXLPCBkuajM5kgPQLpjZ3hDIzj3w
certificatesigningrequest.certificates.k8s.io/node-csr-XKW3KxTS7hbQBY2FXLPCBkuajM5kgPQLpjZ3hDIzj3w approved
[root@node-254 ~]# kubectl get nodes
NAME       STATUS     ROLES    AGE   VERSION
node-251   Ready      <none>   59m   v1.20.15
node-252   Ready      <none>   19m   v1.20.15
node-253   Ready      <none>   19m   v1.20.15
node-254   Ready   <none>   1s    v1.20.15
至此一个双Master节点k8s集群已经部署完毕
2 问题
2.1 kubelet.go:2263] node “node-251” not found
E0509 02:11:21.708315 1733 kubelet.go:2263] node "node-251" not found
修改证书后,生成kubelet初次加入集群引导kubeconfig文件
KUBE_CONFIG="/opt/kubernetes/cfg/bootstrap.kubeconfig"
KUBE_APISERVER="https://192.168.242.51:6443" # apiserver IP:PORT
TOKEN="4136692876ad4b01bb9dd0988480ebba" # 与token.csv里保持一致  /opt/kubernetes/cfg/token.csv

# 生成 kubelet bootstrap kubeconfig 配置文件
kubectl config set-cluster kubernetes \
  --certificate-authority=/opt/kubernetes/ssl/ca.pem \
  --embed-certs=true \
  --server=${KUBE_APISERVER} \
  --kubeconfig=${KUBE_CONFIG}

kubectl config set-credentials "kubelet-bootstrap" \
  --token=${TOKEN} \
  --kubeconfig=${KUBE_CONFIG}

kubectl config set-context default \
  --cluster=kubernetes \
  --user="kubelet-bootstrap" \
  --kubeconfig=${KUBE_CONFIG}

kubectl config use-context default --kubeconfig=${KUBE_CONFIG}
2.2 unable to create new content in namespace kubernetes-dashboard because it is being terminated
背景:k8s集群重新安装kubernetes-dashboard出现了这个问题,使用了删除命名空间,但因为一直在termnating,所以导致无法有效删除.
[root@node-251 kubernetes]# kubectl get ns
NAME                   STATUS        AGE
default                Active        2d23h
kube-node-lease        Active        2d23h
kube-public            Active        2d23h
kube-system            Active        2d23h
kubernetes-dashboard   Terminating   2d18h
[root@node-251 kubernetes]# kubectl get ns kubernetes-dashboard  -o json > kubernetes-dashboard.json	#查看kubernetes-dashboard的命名空间描述
[root@node-251 kubernetes]# vim kubernetes-dashboard.json	#删除spec中内容
[root@node-251 kubernetes]# kubectl proxy --port=8081		#打开一个新窗口运行kubectl proxy跑一个API代理在本地的8081端口

再起个窗口
[root@node-251 kubernetes]# curl -k -H "Content-Type:application/json" -X PUT --data-binary @kubernetes-dashboard.json http://127.0.0.1:8081/api/v1/namespaces/kubernetes-dashboard/finalize
{
  "kind": "Namespace",
  "apiVersion": "v1",
  "metadata": {
    "name": "kubernetes-dashboard",
    "uid": "8b918e13-917d-4579-9e29-16d3b1b5bb92",
    "resourceVersion": "229443",
    "creationTimestamp": "2023-05-06T16:48:40Z",
    "deletionTimestamp": "2023-05-08T09:15:37Z",
    "annotations": {
      "kubectl.kubernetes.io/last-applied-configuration": "{\"apiVersion\":\"v1\",\"kind\":\"Namespace\",\"metadata\":{\"annotations\":{},\"name\":\"kubernetes-dashboard\"}}\n"
    },
    "managedFields": [
      {
        "manager": "kubectl-client-side-apply",
        "operation": "Update",
        "apiVersion": "v1",
        "time": "2023-05-06T16:48:40Z",
        "fieldsType": "FieldsV1",
        "fieldsV1": {"f:metadata":{"f:annotations":{".":{},"f:kubectl.kubernetes.io/last-applied-configuration":{}}},"f:status":{"f:phase":{}}}
      }
    ]
  },
  "spec": {

  },
  "status": {
    "phase": "Terminating"
  }
}[root@node-251 kubernetes]# kubectl get ns
NAME              STATUS   AGE
default           Active   2d23h
kube-node-lease   Active   2d23h
kube-public       Active   2d23h
kube-system       Active   2d23h
2.3 kube-apiserver: E0309 14:25:24.889084 66289 instance.go:392] Could not construct pre-rendered responses for ServiceAccountIssuerDiscovery endpoints. Endpoints will not be enabled. Error: issuer URL must use https scheme, got: api
vim /usr/local/k8s/apiserver/conf/apiserver.conf
--service-account-signing-key-file=/usr/local/k8s/ca/ca-key.pem \
--service-account-issuer=https://kubernetes.default.svc.cluster.local \		#把api改成url


