Spring简介
一、Spring 是什么
-
Spring 是一个分层的 Java SE/EE full-stack (一站式) 轻量级开源框架
-
以 IOC (Inverse Of Control:反转控制) 和 AOP (Aspect Oriented Programming:面向切面编程) 为核心。
-
在 Java三层架构中 分别提供了响应技术
| 分层 | Java三层架构 | Spring |
|---|---|---|
| 表现层 | Web层 | SpringMVC 框架 |
| 业务层 | service层 | Bean管理(IOC容器),声明式事务 |
| 持久层 | dao层 | jdbcTemplate 模板对象 以及提供了ORM模块整合其他优秀的持久层技术 |
二、Spring 框架发展历程
| 时间 | 事件 |
|---|---|
| 1997 年 | IBM提出了EJB 的思想 |
| 1998 年 | SUN制定开发标准规范 EJB1.0 |
| 1999 年 | EJB1.1 发布 |
| 2001 年 | EJB2.0 发布 |
| 2003 年 | EJB2.1 发布 |
| 2006 年 | EJB3.0 发布 |
- Rod Johnson ( Spring 之父)
- Expert One-to-One J2EE Design and Development(2002):阐述了 J2EE 使用EJB 开发设计的优点及解决方案
- Expert One-to-One J2EE Development without EJB(2004):阐述了 J2EE 开发不使用 EJB的解决方式(Spring 雏形)
- 2017 年 9 月份发布了 Spring 的最新版本 Spring5.0 通用版(GA)
三、SPring矿建的优势
| 优势 | 描述 |
|---|---|
| 方便解耦,简化开发 | Spring 就是一个大工厂,可以管理所有对象的创建和依赖关系维护,交给Spring管理 |
| AOP 编程的支持 | 可方便实现对程序进行权限拦截、日志记录、运行监控 |
| 声明式事务的支持 | 通过配置方式完成对事务的管理,无需手动编程 |
| 方便程序的测试 | 对Junit支持,可以通过注解方便的对Spring程序进行测试 |
| 整合外部优秀技术 | Spring 内部提供了对各种优秀框架(Hibernate、Mybatis、Quartz)的直接支持。 |
| JavaEE技术的封装 | Spring对JavaEE开发当中复杂难用的API(JavaEmail,RMI等)进行封装,降低了这些API的使用难度 |
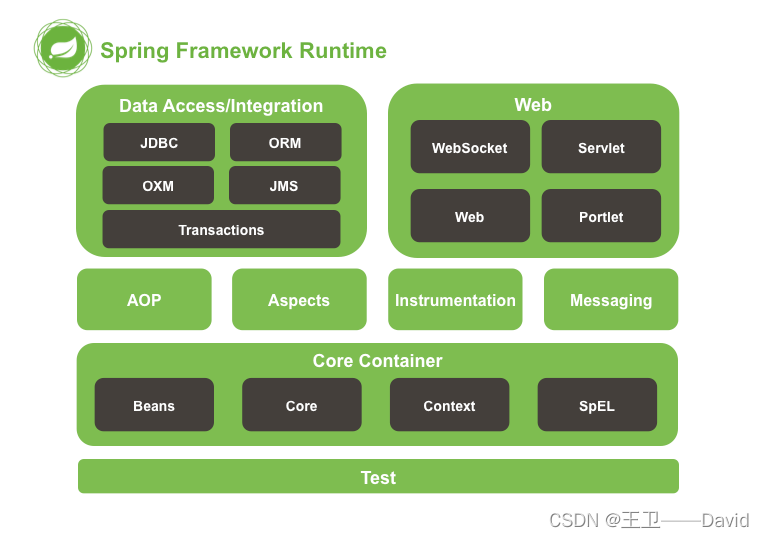
四、Spring 的体系结构

SpringIOC简介及入门
一、IOC的简介,设计思想
1、SpringIOC全称
Inversion of Control,翻译为:控制反转 或者 控制倒置
2、IOC概念的提出
(1)1996 年,Michael Mattson首次在面向对象矿建文章中提出。
(2)简单来说,就是把复杂系统分解成相互合作的对象;这些对象通过封装以后,内部实现对外部是透明的,从而降低了在解决问题的复杂度,并且可以灵活地被重用可扩展。
(3)IOC理论观点图
- 它借助“第三方”实现具有依赖关系的对象之间的解耦

分析
- 由于中间引进了中间的“第三方”(IOC容器),使A、B、C、D这4个对象没有了耦合关系,齿轮之间的传动全部依靠”第三方“。
- 全部对象的控制权全部上缴给“第三方”IOC容器,故IOC容器成了整个系统的关机核心。
- IOC容器起到了类似“粘合剂”的作用,把系统中的所有对象粘合 在一起发挥作用,如果没有这个“粘合剂”,对象与对象之间会彼此失去联系,这就是有人把IOC容器比喻成“粘合剂”的由来。
(4)去掉IOC容器,在看系统

分析
- 如上图示,当我们要实现整个系统所需要完成的全部内容。这时,A、B、C、D这4个对象之间没有耦合关系,彼此毫无联系。
- 当你在实现A的时候,根本无须再去考虑B、C和D了,对象之间的依赖关系已经降低到了最低程度。
- 故,真能实现IOC容器,对于系统开发而言,参与开发的每一成员只要实现自己的类就可以了,跟别人没有任何关系。
二、IOC作用
- IOC本质:是一个大工程、大容器。
- 主要作用
- 消减计算机程序的耦合(接触代码中的依赖关系)
- 提高查询的可扩展性和可维护行
三、IOC的简单实现
1、项目结构

2、创建maven工程,pom.xml引入依赖
    <properties>
        <spring.version>5.2.5.RELEASE</spring.version>
    </properties>
    <!--导入spring的context坐标,context依赖core、beans、expression aop-->
    <dependencies>
        <dependency>
            <groupId>org.springframework</groupId>
            <artifactId>spring-context</artifactId>
            <version>${spring.version}</version>
        </dependency>
        <dependency>
            <groupId>junit</groupId>
            <artifactId>junit</artifactId>
            <version>4.12</version>
            <scope>test</scope>
        </dependency>
    </dependencies>
3、创建Dao接口及实现类
- Dao接口
package com.etime.dao;
public interface UserDao {
    public void addUser();
}
- Dao接口实现类
package com.etime.dao.impl;
import com.etime.dao.UserDao;
public class UserDaoImpl implements UserDao {
    public void addUser() {
        System.out.println("这是在新增用户的dao哦");
    }
}
4、创建Service接口及实现类
- Service接口
package com.etime.service;
public interface UserService {
    public void addUser();
}
- Service接口实现类
package com.etime.service.impl;
import com.etime.service.UserService;
public class UserServiceImpl implements UserService {

    public void addUser() {
        System.out.println("add User service");
    }
}
5、创建spring核心配置文件application.xml,并在其中注册相关类
<?xml version="1.0" encoding="UTF-8"?>
<beans xmlns="http://www.springframework.org/schema/beans"
       xmlns:xsi="http://www.w3.org/2001/XMLSchema-instance"
       xsi:schemaLocation="http://www.springframework.org/schema/beans
       http://www.springframework.org/schema/beans/spring-beans.xsd">
    <!--id值要唯一,用于后期获取指定对象时的标志
    class要创建对象的类,是完全限定名-->
    <bean id="ud" class="com.etime.dao.impl.UserDaoImpl"></bean>
    <bean id="us" class="com.etime.service.impl.UserServiceImpl"></bean>
</beans>
6、测试
package com.etime.test;

import com.etime.dao.UserDao;
import com.etime.dao.impl.UserDaoImpl;
import com.etime.service.UserService;
import com.etime.service.impl.UserServiceImpl;
import org.junit.Test;
import org.springframework.context.ApplicationContext;
import org.springframework.context.support.ClassPathXmlApplicationContext;

public class SpringTest {
    @Test
    public void t01(){
        /*UserDao userDao = new UserDaoImpl();
        userDao.addUser();
        UserService userService = new UserServiceImpl();
        userService.addUser();*/
        //加载并获取SpringIOC容器
        ApplicationContext applicationContext = new ClassPathXmlApplicationContext("application.xml");
        //根据id获取对象
        UserDao userDao = (UserDao) applicationContext.getBean("ud");
        userDao.addUser();

        UserService userService = (UserService) applicationContext.getBean("us");
        userService.addUser();
    }
}
IOC详解
一、IOC配置文件详解
- 配置文件

1、标签
(1)bean标签
- 用于配置对象 交给Spring来创建
- 注意:默认情况下 它会调用类中无参构造器,如果没有无参构造器则不能充公创建
2、基本属性
(1)id
- Bean示例对象 在Spring容器当中的唯一标识
(2)class
- Bean 的完全限定名
二、SpringIOC机制源码解析
1、IOC 容器解析
- IOC思想基于IOC容器完成
- IOC容器底层就是对象工厂
- Spring 结构图如下:

(1)BeanFactory
- OC容器的基本实现,是Spring内部使用的接口,不提供开发人员使用。
- 加载配置文件时,不 会创建对象。
- 在获得(使用)对象时才采取创建对象。
(2)HierarchicalBeanFactory
- 这个工厂接口非常简单,实现了Bean工厂的分层。
- 工厂接口也是继承自BeanFacotory,也是一个二级接口,相对于父接口,它只扩展了一个重要的功能——工厂分层
(3)AutowireCapableBeanFactory
- 该接口有自动装配能力。
- 注意:ApplicationContext接口并没有实现此接口,因为应用代码很少用到此功能,如果确实需要的话,可以调用ApplicationContext的getAutowireCapableBeanFactory方法,来获取此接口的实例。
(4)ListableBeanFactory
- 获取bean时,Spring 鼓励使用这个接口定义的api。
- 如查看Bean的个数、获取某一类型Bean的配置名、查看容器中是否包括某一Bean等方法。
(5)ApplicationContex
- BeanFactory接口的子接口,提供更多强大的功能,一般由开发人员使用.接口提供了bean基础性操作同时,扩展了国际化等功能。
- ApplicationContext接口在加载配置文件时候就会按照配置文件当中的对象进行创建,存放在IOC容器当中
(6)AnnotationConfigApplicationContext
- 当使用注解配置容器对象时,需要使用此类来创建 spring 容器。
- 它用来读取注解。
(7)ClassPathXmlApplicationContext
- 它是从类的根路径下加载配置文件 推荐使用这种
(8)FileSystemXmlApplicationContext
- 它是从磁盘路径上加载配置文件,配置文件可以在磁盘的任意位置。
2、IOC容器底层bean初始化过程(了解)

(1)BeanFactoryPostProcessor
- 作用:定义了在bean工厂对象重建后,bean对象创建前执行的动作,用于对工厂进行创建后业务处理。
(2)BeanPostProcessor
- 作用:定义了所有bean初始化前后进行的统一动作,用于对bean进行创建前业务处理与创建后业务处理。
(3)InitializingBean
-
作用:定义了每个bean的初始化前进行的动作,属于非统一性动作,用于对bean进行创建前业务处理。类似于init-method。
-
运行时机:当前操作伴随着任意一个bean的创建过程,保障其个性化业务处理
三、手动实现自己的IOC容器
1、分析IOC 实现思路

2、IOC原理实现-环境搭建:构建maven工程,引入依赖
    <properties>
        <spring.version>5.2.5.RELEASE</spring.version>
    </properties>
    <dependencies>
        <!--导入spring的context坐标-->
        <dependency>
            <groupId>org.springframework</groupId>
            <artifactId>spring-context</artifactId>
            <version>${spring.version}</version>
        </dependency>
        <!--导入junit单元测试-->
        <dependency>
            <groupId>junit</groupId>
            <artifactId>junit</artifactId>
            <version>4.12</version>
            <scope>test</scope>
        </dependency>
        <!--引入dom4J-->
        <dependency>
            <groupId>dom4j</groupId>
            <artifactId>dom4j</artifactId>
            <version>1.6.1</version>
        </dependency>
    </dependencies>
3、创建Dao接口及实现类
- Dao接口
package com.etime.dao;
public interface UserDao {
    public void addUser();
}
- Dao接口实现类
package com.etime.dao.impl;
import com.etime.dao.UserDao;
public class UserDaoImpl implements UserDao {
    public void addUser() {
        System.out.println("这是在新增用户的dao哦");
    }
}
4、创建Service接口及实现类
- Service接口
package com.etime.service;
public interface UserService {
    public void addUser();
}
- Service接口实现类
package com.etime.service.impl;
import com.etime.service.UserService;
public class UserServiceImpl implements UserService {

    public void addUser() {
        System.out.println("add User service");
    }
}
5、在resources中创建myapplication.xml核心配置文件
<?xml version="1.0" encoding="UTF-8" ?>
<objects>
    <object id="userDao" name="com.etime.dao.impl.UserDaoImpl"></object>
    <object id="userService" name="com.etime.service.impl.UserServiceImpl"></object>
</objects>
6、使用xml技术解析配置文件
package com.etime.util;

import org.dom4j.Document;
import org.dom4j.DocumentException;
import org.dom4j.Element;
import org.dom4j.io.SAXReader;

import java.util.HashMap;
import java.util.List;
import java.util.Map;

public class MyFactory {

    private static Map<String,Object> map = new HashMap<String, Object>();

    static {
        try {
            //读取配置文件
            //使用DOM4J解析xml文件,核心:SAXReader,Document
            SAXReader reader = new SAXReader();
            Document document = reader.read("src/main/resources/myapplication.xml");
            //获取根标签
            Element root = document.getRootElement();
            //获取根标签的子标签
            List<Element> eles = root.elements();
            //获取每一个标签的指定属性值
            for (Element ele : eles) {
                String name = ele.attributeValue("name");
                String id = ele.attributeValue("id");
                //根据获取的name属性的值,创建对象
                Class clazz = Class.forName(name);
                //newInstance()调用无参构造创建类对象
                Object obj = clazz.newInstance();
                map.put(id,obj);
            }
        } catch (Exception e) {
            e.printStackTrace();
        }
    }

    public static Object getBean(String id) {
        return map.get(id);
    }
}
(6)编写测试文件
 @Test
    public void t02(){
        UserDao ud = (UserDao) MyFactory.getBean("userDao");
        ud.addUser();

        UserService us = (UserService) MyFactory.getBean("userService");
        us.addUser();
    }
(7)测试结果

bean讲解
一、bean实例化方法
1、构造方法的方式
- 它会根据默认无参构造函数来创建类对象
- 如果 bean 中没有默认无参构造函数,将会创建失败
(1)创建User类
package com.etime.entity;

public class User {
    public User(){
        System.out.println("初始化User对象");
    }
}
(2)配置Spring容器管理user 类型对象
<bean id="user" class="com.etime.entity.User"></bean>
(3)测试
 @Test
    public void t03(){
        ApplicationContext applicationContext = new ClassPathXmlApplicationContext("application.xml");
        User user = (User)applicationContext.getBean("user");
    }
2、静态工厂方式
(1) 创建静态工厂ItemFactory
package com.etime.util;

import com.etime.entity.User;

public class StaticFactory {

    public static User getUser() {
        System.out.println("这是静态工厂生产的user对象");
        return new User();
    }

}
(2)配置Spring容器管理User类型对象
<bean id="u" class="com.etime.util.StaticFactory" factory-method="getUser"></bean>
(3)测试
    @Test
    public void t04(){
        ApplicationContext context = new ClassPathXmlApplicationContext("application.xml");
        User user = (User) context.getBean("u");
    }
3、实例化工厂方式
(1)创建实例工厂ItemFactory
package com.etime.util;

import com.etime.entity.User;

public class StaticFactory {

    public User getUser() {
        System.out.println("这是静态工厂生产的user对象");
        return new User();
    }

}
(2)配置Spring容器管理NewItemFactory类型对象
    <bean id="sf" class="com.etime.util.StaticFactory"></bean>
    <bean id="u" factory-bean="sf" factory-method="getUser"></bean>
(3)测试容器实例化User对象是否成功
    @Test
    public void t04(){
        ApplicationContext context = new ClassPathXmlApplicationContext("application.xml");
        User user = (User) context.getBean("u");
    }
二、bean作用域
1、bean作用域介绍
- bean作用域:Spring给我们创建出的对象的存活范围
- 在配置文件中通过bean的scope属性指定
scope:指对象的作用范围,取值如下:
| 取值范围 | 说明 |
|---|---|
| singleton | 默认值,单例的 |
| prototype | 多例的 |
| request | WEB 项目中,Spring 创建一个 Bean 的对象,将对象存入到 request 域中 |
| session | WEB 项目中,Spring 创建一个 Bean 的对象,将对象存入到 session 域中 |
| global session | WEB 项目中,应用在 Portlet 环境,如果没有 Portlet 环境那么globalSession 相当于 session |
2、bean作用域的解析
(1)scope的取值为singleton
- 实例化个数:1个
- 实例化时机:当Spring核心文件被加载时,实例化配置的Bean实例
(2)scope的取值为prototype时
- 实例化个数:多个
- 实例化时机:当调用getBean()方法时实例化Bean
(3)Scope的取值为其他值时
- scope指定为其他值,需要在特定的环境下使用。
三、bean的生命周期
1、bean生命周期
(1)bean生命周期
- Bean创建到销毁的这么一段时间。
(2)在Spring中可以通过配置的形式,指定bean在创建后和销毁前要调用的方法
<bean id="xxx" class="xxx" init-method="" destroy-method=""></bean>
- init-method:指定bean在创建后调用的方法
- destroy-method:对象在销毁前调用的方法,只针对单例对象
2、单例对象的生命周期
(1)在Student类中添加方法init和destory
package com.etime.entity;

public class Student {
    public void init() {
        System.out.println("学生对象创建出来了");
    }

    public void addStudent(){
        System.out.println("新增学生了");
    }

    public void destroy(){
        System.out.println("学生对象被销毁了");
    }
}
(2)在Spring.xml配置文件中配置Student
<bean id="student" class="com.etime.entity.Student" init-method="init" destroy-method="destroy" scope="singleton"></bean>
(3)测试代码验证单例对象的生命周期
    @Test
    public void t05(){
        ClassPathXmlApplicationContext context = new ClassPathXmlApplicationContext("application.xml");
        Student student = (Student) context.getBean("student");
        student.addStudent();
        context.close();
    }
(4)单例对象总结
-
对象创建:当应用加载,创建容器时,对象就被创建了
-
对象运行:只要容器在,对象一直活着
-
对象销毁:当应用卸载,销毁容器时,对象就被销毁了
3、多例对象的生命周周期
(1)修改Spring配置文件scope属性
<bean id="student" class="com.etime.entity.Student" init-method="init" destroy-method="destroy" scope="prototype"></bean>
(2)测试代码验证多例对象的生命周期
    @Test
    public void t05(){
        ClassPathXmlApplicationContext context = new ClassPathXmlApplicationContext("application.xml");
        Student student = (Student) context.getBean("student");
        student.addStudent();
        context.close();
    }
(3)多例对象总结
-
对象创建:当使用对象时(getBean),创建新的对象实例
-
对象运行:只要对象在使用中,就一直活着
-
对象销毁:当对象长时间不用时,被 Java 的垃圾回收器回收了。调用工厂close(),对象并不销毁。
Spring依赖注入
一、依赖注入的介绍
1、依赖注入(Dependency injection)
- 依赖注入是 Spring 框架核心 IOC 的具体实现。
- 在编写程序时,通过控制反转,把对象的创建交给了 Spring,但是代码中不可能出现没有依赖的情况。
- IOC 解耦只是降低他们的依赖关系,但不会消除。
2、分析
例如:业务层仍会调用持久层的方法。
那这种业务层和持久层的依赖关系,在使用 Spring 之后,就让 Spring 来维护了。
简单的说,就是坐等框架把持久层对象传入业务层,而不用我们自己去获取
3、注意
DI 依赖IOC环境的。
二、Spring中依赖注入方式
1、构造函数注入
(1)构造函数注入介绍
- 顾名思义,就是使用类中的构造函数,给成员变量赋值。
- 注意:赋值的操作不是我们自己做的,而是通过配置
(2)构建Teacher类,提供所有属性的构造方法
package com.etime.entity;

public class Teacher {
    private int tid;
    private String tname;

    public Teacher(int tid, String tname) {
        this.tid = tid;
        this.tname = tname;
    }

    public int getTid() {
        return tid;
    }

    public void setTid(int tid) {
        this.tid = tid;
    }

    public String getTname() {
        return tname;
    }

    public void setTname(String tname) {
        this.tname = tname;
    }

    @Override
    public String toString() {
        return "Teacher{" +
                "tid=" + tid +
                ", tname='" + tname + '\'' +
                '}';
    }
}
(3)在Spring.xml文件中配置Teacher类(使用构造方法注入依赖数据)
 <bean id="teacher" class="com.etime.entity.Teacher">
        <constructor-arg name="tid" value="1"></constructor-arg>
        <constructor-arg name="tname" value="陈微"></constructor-arg>
    </bean>
(4) 构造函数注入测试方法
 @Test
    public void t06(){
        ApplicationContext context = new ClassPathXmlApplicationContext("application.xml");
        Teacher teacher = (Teacher) context.getBean("teacher");
        System.out.println(teacher);
    }
2、setter注入
(1)setter注入介绍
- 顾名思义,就是在类中提供需要注入成员的 set 方法。
(2)修改Teacher类,添加属性的setter方法
package com.etime.entity;

public class Teacher {
    private int tid;
    private String tname;

    public Teacher() {
    }

    public int getTid() {
        return tid;
    }

    public void setTid(int tid) {
        this.tid = tid;
    }

    public String getTname() {
        return tname;
    }

    public void setTname(String tname) {
        this.tname = tname;
    }

    @Override
    public String toString() {
        return "Teacher{" +
                "tid=" + tid +
                ", tname='" + tname + '\'' +
                '}';
    }
}
(3)在Spring.xml文件中配置Teacher类(利用setter方法注入依赖数据)
    <bean id="teacher" class="com.etime.entity.Teacher">
        <property name="tid" value="2"></property>
        <property name="tname" value="刘德华"></property>
    </bean>
(4)setter注入测试方法
    @Test
    public void t06(){
        ApplicationContext context = new ClassPathXmlApplicationContext("application.xml");
        Teacher teacher = (Teacher) context.getBean("teacher");
        System.out.println(teacher);
    }
3、注入集合数据
(1)注入集合数据介绍
- 顾名思义,就是给类中的集合成员传值,它用的也是set方法注入的方式,只不过变量的数据类型都是集合。
(2)修改Teacher类,添加集合属性
- List,Set,Map,Properties。
package com.etime.entity;

import java.util.*;

public class Teacher {
    private String[] myStrs;
    private List<String> myList;
    private Set<String> mySet;
    private Map<String,String> myMap;
    private Properties myProps;

    public Teacher() {
    }

    public String[] getMyStrs() {
        return myStrs;
    }

    public void setMyStrs(String[] myStrs) {
        this.myStrs = myStrs;
    }

    public List<String> getMyList() {
        return myList;
    }

    public void setMyList(List<String> myList) {
        this.myList = myList;
    }

    public Set<String> getMySet() {
        return mySet;
    }

    public void setMySet(Set<String> mySet) {
        this.mySet = mySet;
    }

    public Map<String, String> getMyMap() {
        return myMap;
    }

    public void setMyMap(Map<String, String> myMap) {
        this.myMap = myMap;
    }

    public Properties getMyProps() {
        return myProps;
    }

    public void setMyProps(Properties myProps) {
        this.myProps = myProps;
    }

    @Override
    public String toString() {
        return "Teacher{" +
                "myStrs=" + Arrays.toString(myStrs) +
                ", myList=" + myList +
                ", mySet=" + mySet +
                ", myMap=" + myMap +
                ", myProps=" + myProps +
                '}';
    }
}
(3)在Spring.xml文件中配置Account类(利用setter注入依赖集合数据)
    <bean id="teacher" class="com.etime.entity.Teacher">
        <property name="myStrs">
            <array>
                <value>abc</value>
                <value>efg</value>
                <value>kfc</value>
            </array>
        </property>

        <property name="myList">
            <list>
                <value>123</value>
                <value>234</value>
            </list>
        </property>

        <property name="mySet">
            <set>
                <value>987</value>
                <value>hfd</value>
            </set>
        </property>

        <property name="myMap">
            <map>
                <entry key="a" value="aaaa"></entry>
                <entry key="b" value="bbbb"></entry>
            </map>
        </property>

        <property name="myProps">
            <props>
                <prop key="c">cccc</prop>
                <prop key="d">dddd</prop>
            </props>
        </property>
    </bean>
(5)集合注入测试方法
    @Test
    public void t07(){
        ApplicationContext context = new ClassPathXmlApplicationContext("application.xml");
        Teacher teacher = (Teacher) context.getBean("teacher");
        System.out.println(teacher);
    }
4、注入对象
(1)Spring配置文件
    <bean id="ud" class="com.etime.dao.impl.UserDaoImpl"></bean>
    <bean id="us" class="com.etime.service.impl.UserServiceImpl">
        <property name="userDao" ref="ud"></property>
    </bean>
(2)Service接口及实现类
- Service接口
package com.etime.service;
public interface UserService {
    public void addUser();
}
- Service接口实现类
package com.etime.service.impl;
import com.etime.service.UserService;
public class UserServiceImpl implements UserService {

    private UserDao userDao;

    public void setUserDao(UserDao userDao) {
        this.userDao = userDao;
    }


    public void addUser() {
        System.out.println("add User service");
    }
}
(3)测试
    @Test
    public void t08(){
        ApplicationContext context = new ClassPathXmlApplicationContext("application.xml");
        UserService us = (UserService)context.getBean("us");
        us.addUser();
    }
Spring配置文件模块化
一、Spring模块化的介绍
- 问题:我们现在的配置都集中配在了一个application.xml文件中,当开发人员过多时, 如果所有bean都配 置到同一个配置文件中,会使这个文件巨大,而且也不方便维护。
- 针对这个问题,Spring提供了多配置文件的方式,也就是所谓的配置文件模块化
二、Spring模块化的配置
1、Spring模块化配置方式一
- 并列的多个配置文件 直接编写多个配置文件,比如说beans1.xml,beans2.xml…, 然后在创建ApplicationContext的时候,直接传入多个配置文件
(1)ywlconfig.xml
ywlconfig文件内容
<?xml version="1.0" encoding="UTF-8" ?>
<beans xmlns="http://www.springframework.org/schema/beans"
       xmlns:xsi="http://www.w3.org/2001/XMLSchema-instance"
       xsi:schemaLocation="http://www.springframework.org/schema/beans
       http://www.springframework.org/schema/beans/spring-beans.xsd">
    <bean id="user" class="com.etime.entity.User"></bean>
</beans>
(2)ykconfig.xml
ykconfig文件内容
<?xml version="1.0" encoding="UTF-8" ?>
<beans xmlns="http://www.springframework.org/schema/beans"
       xmlns:xsi="http://www.w3.org/2001/XMLSchema-instance"
       xsi:schemaLocation="http://www.springframework.org/schema/beans
       http://www.springframework.org/schema/beans/spring-beans.xsd">
    <bean id="student" class="com.etime.entity.Student"></bean>
</beans>
(3)测试
    @Test
    public void t09(){
        ApplicationContext context = new ClassPathXmlApplicationContext("ywlconfig.xml","ykconfig.xml");
        User user = (User)context.getBean("user");
        Student student = (Student)context.getBean("student");
    }
2、Spring模块化配置方式二
- 主从配置文件 先配置一个主配置文件,然后在里面导入其它的配置文件。
(1)在application.xml文件中引入其他配置文件
<?xml version="1.0" encoding="UTF-8"?>
<beans xmlns="http://www.springframework.org/schema/beans"
       xmlns:xsi="http://www.w3.org/2001/XMLSchema-instance"
       xsi:schemaLocation="http://www.springframework.org/schema/beans
       http://www.springframework.org/schema/beans/spring-beans.xsd">
    <import resource="ywlconfig.xml"></import>
    <import resource="ykconfig.xml"></import>
</beans>
(2)测试
    @Test
    public void t09(){
        ApplicationContext context = new ClassPathXmlApplicationContext("application.xml");
        User user = (User)context.getBean("user");
        Student student = (Student)context.getBean("student");
    }
3、注意
- 同一个xml文件中不能出现相同名称的bean,如果出现会报错
- 多个xml文件如果出现相同名称的bean,不会报错,但是后加载的会覆盖前加载的bean,所以企业开发中尽 量保证bean的名称是唯一的。
Spring实现CRUD
一、整合思路分析
- Spring提供了ioc容器,管理jdbc操作数据库的过程中需要的数据库连接对象。
- 同时Spring提供了整合jdbc操作数据库的工具类JdbcDaoSupport 和模板工具 JdbcTemplate,在JdbcTemplate中提供了大量的操作数据库的方式供用户使用
- 故,我们只需要获取模板工具类然后调用方法就可以完成Jdbc的操作了。
二、编写示例代码
1、构建maven工程,添加技术依赖
<dependencies>
    <!--导入spring的context坐标-->
    <dependency>
        <groupId>org.springframework</groupId>
        <artifactId>spring-context</artifactId>
        <version>${spring.version}</version>
    </dependency>
    <!--导入Jdbc模块依赖-->
    <dependency>
        <groupId>org.springframework</groupId>
        <artifactId>spring-jdbc</artifactId>
        <version>${spring.version}</version>
    </dependency>
    <!--导入Mysql 驱动-->
    <dependency>
        <groupId>mysql</groupId>
        <artifactId>mysql-connector-java</artifactId>
        <version>5.1.47</version>
    </dependency>
    <!--导入C3P0连接池-->
    <dependency>
        <groupId>com.mchange</groupId>
        <artifactId>c3p0</artifactId>
        <version>0.9.5.2</version>
    </dependency>
    <!--导入junit单元测试-->
    <dependency>
        <groupId>junit</groupId>
        <artifactId>junit</artifactId>
        <version>4.12</version>
        <scope>test</scope>
    </dependency>
</dependencies>
2、 构建数据库表并编写实体类Account
public class Account implements Serializable {
    private Integer id;
    private String name;
    private double money;

    public Integer getId() {
        return id;
    }

    public void setId(Integer id) {
        this.id = id;
    }

    public String getName() {
        return name;
    }

    public void setName(String name) {
        this.name = name;
    }

    public double getMoney() {
        return money;
    }

    public void setMoney(double money) {
        this.money = money;
    }

    @Override
    public String toString() {
        return "Account{" +
                "id=" + id +
                ", name='" + name + '\'' +
                ", money=" + money +
                '}';
    }
}
3、编写持久层代码AccountDao以及实现类AccountDaoImp
public interface AccountDao {
    public void save(Account account);
    public void delete(Integer id);
    public void update(Account account);
    public Account findById(Integer id);
    public Integer getTotalRecords();
    public List<Account> findAll();
}
public class AccountDaoImpl implements AccountDao {
    private JdbcTemplate jdbcTemplate;

    public void setJdbcTemplate(JdbcTemplate jdbcTemplate) {
        this.jdbcTemplate = jdbcTemplate;
    }

    @Override
    public void save(Account account) {
        String sql ="insert into account(name,money) values(?,?)";
        jdbcTemplate.update(sql,account.getName(),account.getMoney());
    }

    @Override
    public void delete(Integer id) {
        String sql ="delete from  account where id = ? ";
        jdbcTemplate.update(sql,id);
    }

    @Override
    public void update(Account account) {
        String sql ="update  account set money = ? , name=? where id= ?";
        jdbcTemplate.update(sql,account.getMoney(),account.getName(),account.getId());
    }

    @Override
    public Account findById(Integer id) {
        String sql ="select * from account where id = ? ";
        Account account = jdbcTemplate.queryForObject(sql, new BeanPropertyRowMapper<Account>(Account.class),id);
        return account;
    }

    @Override
    public Long getTotalRecords() {
        Long count = jdbcTemplate.queryForObject("select count(*) from account", Long.class);
        System.out.println(count);
        return count;
    }

    @Override
    public List<Account> findAll() {
        String sql ="select * from account";
        List<Account> accountList = jdbcTemplate.query(sql, new BeanPropertyRowMapper<Account>(Account.class));
        return accountList;
    }
}
4、编写业务层代码AccountService以及实现类AccountServiceImpl
public interface AccountService {
    public void save(Account account);
    public void delete(Integer id);
    public void update(Account account);
    public Account findById(Integer id);
    public Long getTotalRecords();
    public List<Account> findAll();
}
public class AccountServiceImpl implements AccountService {

    private AccountDao accountDao;

    public void setAccountDao(AccountDao accountDao) {
        this.accountDao = accountDao;
    }

    @Override
    public void save(Account account) {
        accountDao.save(account);
    }

    @Override
    public void delete(Integer id) {
        accountDao.delete(id);
    }

    @Override
    public void update(Account account) {
        accountDao.update(account);
    }

    @Override
    public Account findById(Integer id) {
        return accountDao.findById(id);
    }

    @Override
    public Long getTotalRecords() {
        return accountDao.getTotalRecords();
    }

    @Override
    public List<Account> findAll() {
        return accountDao.findAll();
    }
}
5、创建并编写配置文件:配置容器管理对象
将数据库的连接信息抽取到外部配置文件中,和spring的配置文件分离开,有利于后期维护
jdbc.driver=com.mysql.jdbc.Driver
jdbc.url=jdbc:mysql://localhost:3306/test
jdbc.username=root
jdbc.password=root
<?xml version="1.0" encoding="UTF-8" ?>
<beans xmlns="http://www.springframework.org/schema/beans"
       xmlns:xsi="http://www.w3.org/2001/XMLSchema-instance"
       xmlns:context="http://www.springframework.org/schema/context"
       xsi:schemaLocation="http://www.springframework.org/schema/beans
       http://www.springframework.org/schema/beans/spring-beans.xsd
       http://www.springframework.org/schema/context
       http://www.springframework.org/schema/context/spring-context.xsd">

    <context:property-placeholder location="classpath:db.properties" />
    <!--数据源对象-->
    <bean id="dataSource" class="com.mchange.v2.c3p0.ComboPooledDataSource">
        <property name="driverClass" value="${jdbc.driver}"/>
        <property name="jdbcUrl" value="${jdbc.url}"/>
        <property name="user" value="${jdbc.username}"/>
        <property name="password" value="${jdbc.password}"/>
    </bean>
    <!--配置JdbcTemplate模板对象-->
    <bean id="jdbcTemplate" class="org.springframework.jdbc.core.JdbcTemplate">
        <property name="dataSource" ref="dataSource"/>
    </bean>

    <!--配置AccountDaoImpl对象-->
    <bean id="accountDao" class="com.etime.dao.impl.AccountDaoImpl">
        <property name="jdbcTemplate" ref="jdbcTemplate"></property>
    </bean>

    <!--配置AccountServiceImpl对象-->
    <bean id="accountService" class="com.etime.service.impl.AccountServiceImpl">
        <property name="accountDao" ref="accountDao"></property>
    </bean>
</beans>
7、测试代码
//测试save方法
@Test
public void testJdbcTemplateSave(){
    ApplicationContext context =
        new ClassPathXmlApplicationContext("applicationContext.xml");
    AccountService service = (AccountService) context.getBean("accountService");
    Account account = new Account();
    account.setName("jack");
    account.setMoney(1001D);
    service.save(account);
}

//测试update方法
@Test
public void testJdbcTemplateUpdate(){
    ApplicationContext context =
        new ClassPathXmlApplicationContext("applicationContext.xml");
    AccountService service = (AccountService) context.getBean("accountService");
    Account account = new Account();
    account.setName("jack2");
    account.setMoney(999D);
    account.setId(1008);
    service.update(account);
}

//测试delete方法
@Test
public void testJdbcTemplateDelete(){
    ApplicationContext context =
        new ClassPathXmlApplicationContext("applicationContext.xml");
    AccountService service = (AccountService) context.getBean("accountService");
    service.delete(1001);
}

//测试唯一性查询findById
@Test
public void testJdbcTemplateFindById(){
    ApplicationContext context =
        new ClassPathXmlApplicationContext("applicationContext.xml");
    AccountService service = (AccountService) context.getBean("accountService");
    Account account = service.findById(1001);
    System.out.println(account);
}

//测试总记录数
@Test
public void testJdbcTemplateGetTotalRecords(){
    ApplicationContext context =
        new ClassPathXmlApplicationContext("applicationContext.xml");
    AccountService service = (AccountService) context.getBean("accountService");
    Long totalRecords = service.getTotalRecords();
    System.out.println("表当中的总记录数为:"+totalRecords);
}

//测试账户列表
@Test
public void testJdbcTemplateGetAll(){
    ApplicationContext context =
        new ClassPathXmlApplicationContext("applicationContext.xml");
    AccountService service = (AccountService) context.getBean("accountService");
    List<Account> accountList = service.findAll();
    accountList.forEach((account -> {
        System.out.println(account);
    }));
}

![[GFCTF 2021]ez_calc day3](https://img-blog.csdnimg.cn/4bce4b4c0b834d7ebc4cf75760c2f90f.png)