Packet Tracer - 配置基于区域的策略防火墙 (ZPF)
拓扑图
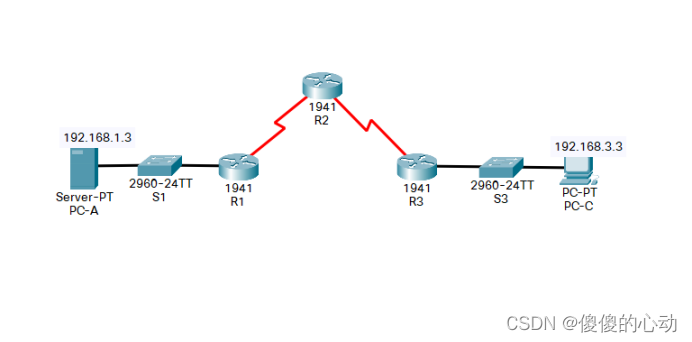
地址分配表
| 设备 | 接口 | IP 地址 | 子网掩码 | 默认网关 | 交换机端口 |
| R1 | G0/1 | 192.168.1.1 | 255.255.255.0 | 不适用 | S1 F0/5 |
| S0/0/0 (DCE) | 10.1.1.1 | 255.255.255.252 | 不适用 | 不适用 | |
| R2 | S0/0/0 | 10.1.1.2 | 255.255.255.252 | 不适用 | 不适用 |
| S0/0/1 (DCE) | 10.2.2.2 | 255.255.255.252 | 不适用 | 不适用 | |
| R3 | G0/1 | 192.168.3.1 | 255.255.255.0 | 不适用 | S3 F0/5 |
| S0/0/1 | 10.2.2.1 | 255.255.255.252 | 不适用 | 不适用 | |
| PC-A | NIC | 192.168.1.3 | 255.255.255.0 | 192.168.1.1 | S1 F0/6 |
| PC-C | NIC | 192.168.3.3 | 255.255.255.0 | 192.168.3.1 | S3 F0/18 |
目标
· 在配置防火墙之前先验证设备之间的连接。
· 在 R3 上配置基于区域的策略防火墙 (ZPF)。
· 使用 ping、SSH 和 Web 浏览器验证 ZPF 防火墙功能。
背景/场景
ZPF 是 思科防火墙技术演进过程中的最新发展成果。在本练习中,您需要 在边缘路由器 R3 上配置基本 ZPF,以允许内部主机访问 外部资源并阻止外部主机访问内部资源。 然后,您需要验证内部和外部主机的防火墙功能。
路由器已采用以下信息进行预配置:
o 控制台密码: ciscoconpa55
o vty 线路 密码:ciscovtypa55
o 启用 密码:ciscoenpa55
o 主机 名称和 IP 寻址
o本地 用户名和密码:Admin/Adminpa55
o 静态 路由
第1 部分:验证基本网络连接
在配置 基于区域的策略防火墙之前先验证网络连接。
步骤 1:在 PC-A 命令提示符后,对 PC-C (192.168.3.3) 执行 ping 操作。
步骤 2:使用 SSH 访问 R2。
a. 在 PC-C 命令提示符后,通过 SSH 连接到R2 上的 S0/0/1 接口 (10.2.2.2)。使用用户名 Admin 和密码 Adminpa55 登录。
PC> ssh -l Admin 10.2.2.2
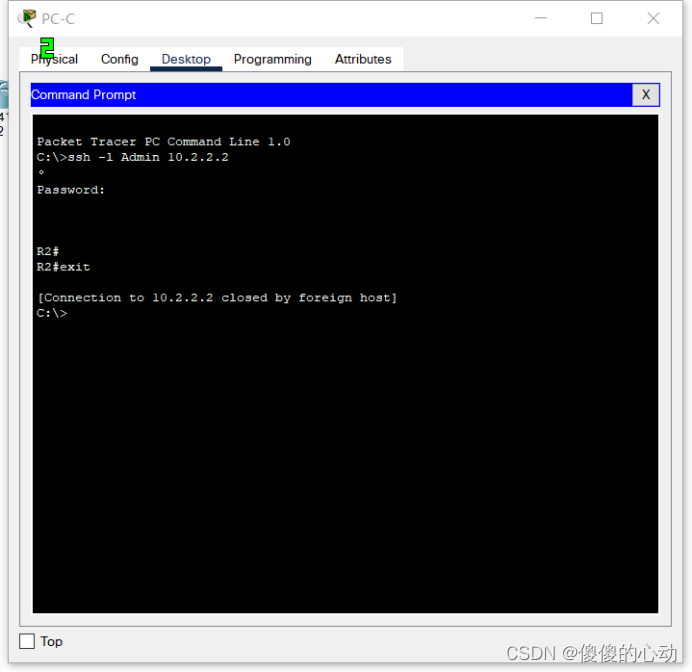
b. 退出 SSH 会话。
步骤 3:在 PC-C 上,打开 Web 浏览器访问 PC-A 服务器。
- 点击 Desktop(桌面)选项卡,然后点击 Web Browser(Web 浏览器)应用。 输入 PC-A IP 地址 192.168.1.3 作为 URL。应显示 Web 服务器的 Packet Tracer 欢迎页面。
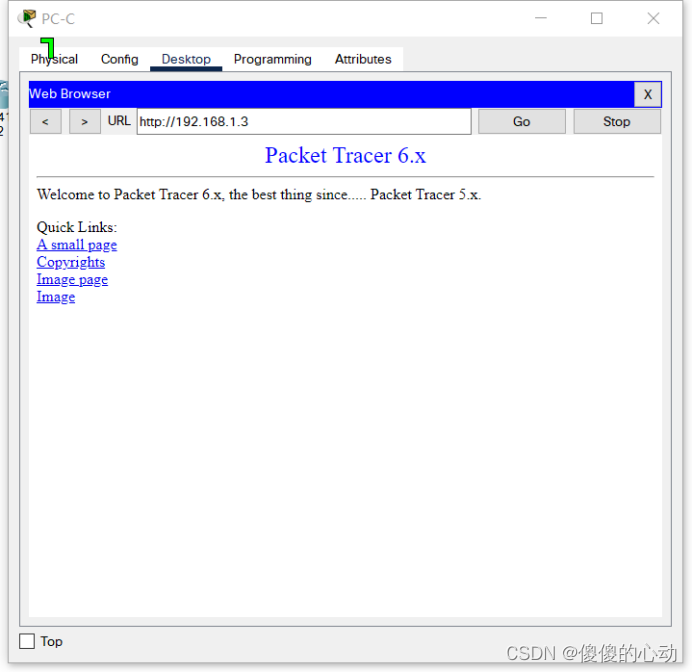
b. 关闭 PC-C 上的浏览器。
第 2 部分:在 R3 上 创建 防火墙区域
注意:对于所有配置任务,务必使用 指定的确切名称。
步骤 1:启用安全技术包。
a. 在 R3 上,发出 show version 命令以查看 安全技术包许可证信息。
b. 如果安全技术包尚未启用,请使用 以下命令启用技术包。
R3(config)#license boot module c1900 technology-package securityk9
c. 接受最终用户许可协议。
d. 保存运行配置并重新加载该路由器以启用安全 许可证。
R3#write
Building configuration...
[OK]
R3#reload
e. 使用 show version 命令验证是否启用了安全技术包。
R3#show version
Cisco IOS Software, C1900 Software (C1900-UNIVERSALK9-M), Version 15.1(4)M4, RELEASE SOFTWARE (fc2)
Technical Support: http://www.cisco.com/techsupport
Copyright (c) 1986-2007 by Cisco Systems, Inc.
Compiled Wed 23-Feb-11 14:19 by pt_team
ROM: System Bootstrap, Version 15.1(4)M4, RELEASE SOFTWARE (fc1)
cisco1941 uptime is 2 minutes, 8 seconds
System returned to ROM by power-on
System image file is "flash0:c1900-universalk9-mz.SPA.151-1.M4.bin"
Last reload type: Normal Reload
This product contains cryptographic features and is subject to United
States and local country laws governing import, export, transfer and
use. Delivery of Cisco cryptographic products does not imply
third-party authority to import, export, distribute or use encryption.
Importers, exporters, distributors and users are responsible for
compliance with U.S. and local country laws. By using this product you
agree to comply with applicable laws and regulations. If you are unable
to comply with U.S. and local laws, return this product immediately.
A summary of U.S. laws governing Cisco cryptographic products may be found at:
http://www.cisco.com/wwl/export/crypto/tool/stqrg.html
If you require further assistance please contact us by sending email to
export@cisco.com.
Cisco CISCO1941/K9 (revision 1.0) with 491520K/32768K bytes of memory.
Processor board ID FTX152400KS
2 Gigabit Ethernet interfaces
2 Low-speed serial(sync/async) network interface(s)
DRAM configuration is 64 bits wide with parity disabled.
255K bytes of non-volatile configuration memory.
249856K bytes of ATA System CompactFlash 0 (Read/Write)
License Info:
License UDI:
-------------------------------------------------
Device# PID SN
-------------------------------------------------
*0 CISCO1941/K9 FTX152446W3
Technology Package License Information for Module:'c1900'
----------------------------------------------------------------
Technology Technology-package Technology-package
Current Type Next reboot
-----------------------------------------------------------------
ipbase ipbasek9 Permanent ipbasek9
security securityk9 Evaluation securityk9
data disable None None
Configuration register is 0x2102
R3#
步骤 2:创建内部区域。
使用 zone security 命令创建一个名为 IN-ZONE 的区域。
R3(config)#zone security IN-ZONE
R3(config-sec-zone)#exit
步骤 3:创建外部区域。
使用 zone security 命令创建一个名为 OUT-ZONE 的区域。
R3(config)#zone security OUT-ZONE
R3(config-sec-zone)#exit
第 3 部分:使用类映射识别 流量
步骤 1:创建一个定义内部流量的 ACL。
使用 access-list 命令创建扩展 ACL 101 ,允许从 192.168.3.0/24 源网络到 任何目的地的所有 IP 协议。
R3(config)# access-list 101 permit ip 192.168.3.0 0.0.0.255 any
步骤 2:创建引用内部流量 ACL 的类映射。
使用 class-map type inspect 命令和 match-all 选项创建名为 IN-NET-CLASS-MAP 的类映射。使用 match access-group 命令匹配 ACL 101。
R3(config)#class-map type inspect match-all IN-NET-CLASS-MAP
R3(config-cmap)#match access-group 101
R3(config-cmap)#exit
第 4 部分:指定 防火墙策略
步骤 1:创建策略映射以确定如何处理 匹配流量。
使用 policy-map type inspect 命令并创建 名为 IN-2-OUT-PMAP 的策略映射。
R3(config)#policy-map type inspect IN-2-OUT-PMAP
步骤 2:指定检查类和引用类 映射 IN-NET-CLASS-MAP。
R3(config-pmap)#class type inspect IN-NET-CLASS-MAP
步骤 3:指定此策略映射的检查操作。
使用 inspect 命令调用 基于情景的访问控制(其他选项包括“通过”和“丢弃”)。
R3(config-pmap-c)#inspect
%No specific protocol configured in class IN-NET-CLASS-MAP for inspection. All protocols will be inspected
发出 exit 命令两次以退出 config-pmap-c 模式并返回到 config 模式。
R3(config-pmap-c)#exit
R3(config-pmap)#exit
第 5 部分:应用 防火墙策略
步骤 1:创建区域对。
使用 zone-pair security 命令,创建 名为 IN-2-OUT-ZPAIR 的区域对。指定 在任务 1 中创建的源区域和目的区域。
R3(config)#zone-pair security IN-2-OUT-ZPAIR source IN-ZONE destination OUT-ZONE
步骤 2:指定用于处理 两个区域之间的流量的策略映射。
使用 service-policy type inspect 命令将策略映射及其相关操作附加到该区域对,并引用 之前创建的策略映射 IN-2-OUT-PMAP。
R3(config-sec-zone-pair)#service-policy type inspect IN-2-OUT-PMAP
R3(config-sec-zone-pair)#exit
R3(config)#
步骤 3:将接口分配到相应的安全区域。
在接口 配置模式下使用 zone-member security 命令将 G0/1 分配给 IN-ZONE,将 S0/0/1 分配给 OUT-ZONE。
R3(config)#interface g0/1
R3(config-if)#zone-member security IN-ZONE
R3(config-if)#exit
R3(config)#interface s0/0/1
R3(config-if)#zone-member security OUT-ZONE
R3(config-if)#exit
步骤 4:将运行配置复制到启动配置中。
第 6 部分:测试从 IN-ZONE 到 OUT-ZONE 的防火墙功能
验证配置 ZPF 后内部主机是否仍可访问外部 资源。
步骤 1:从内部 PC-C 对外部 PC-A 服务器执行 ping 操作。
在 PC-C 命令提示符后,对 PC-A ( 192.168.1.3) 执行 ping 操作192.168.1.3.。ping 操作应该会成功。
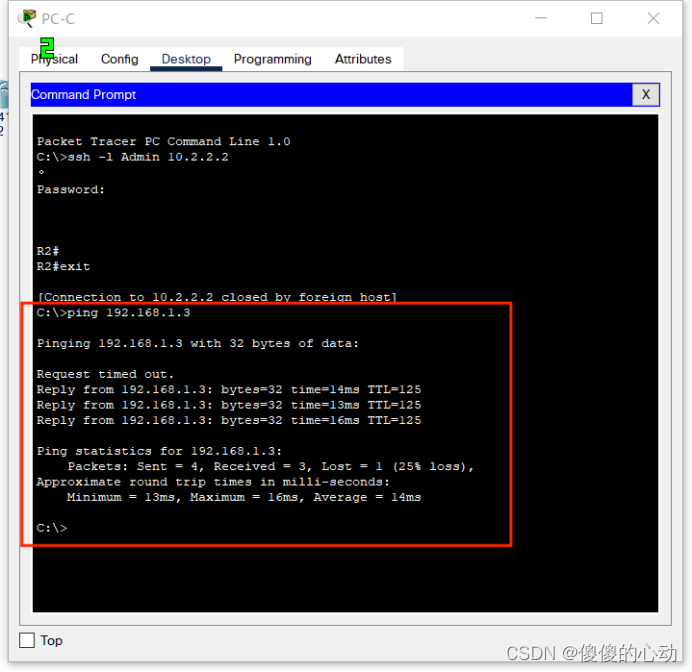
步骤 2:从内部 PC-C 通过 SSH 连接到 R2 S0/0/1 接口。
- 在 PC-C 命令提示符后,通过 SSH 连接到 R2 (10.2.2.2)。使用 用户名 Admin 和密码 Adminpa55 访问 R2。SSH 会话应该能成功。
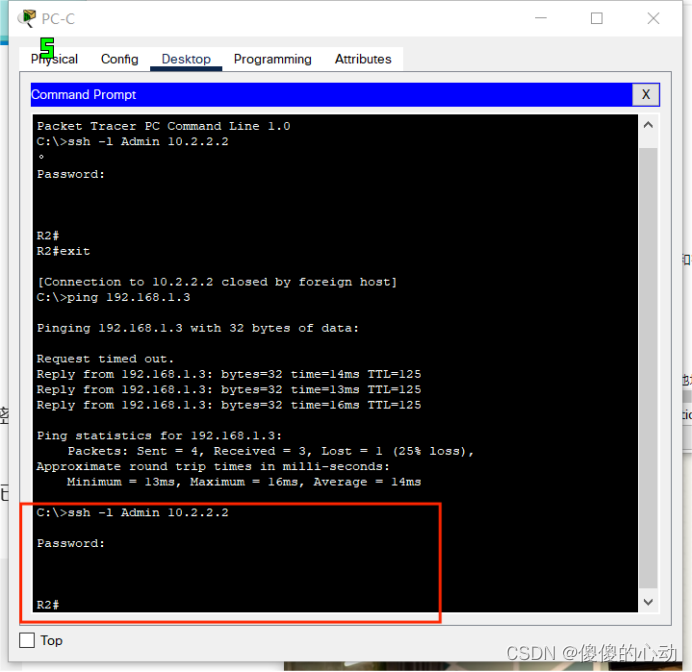
- 当 SSH 会话处于活跃状态时,在 R3 上发出命令 show policy-map type inspect zone-pair sessions 查看已建立的会话。
R3#show policy-map type inspect zone-pair sessions
policy exists on zp IN-2-OUT-ZPAIR
Zone-pair: IN-2-OUT-ZPAIR
Service-policy inspect : IN-2-OUT-PMAP
Class-map: IN-NET-CLASS-MAP (match-all)
Match: access-group 101
Inspect
Number of Established Sessions = 1
Established Sessions
Session 2610127184 (192.168.3.3:1027)=>(10.2.2.2:22) tcp SIS_OPEN/TCP_ESTAB
Created 00:00:46, Last heard 00:00:37
Bytes sent (initiator:responder) [544:895]
Class-map: class-default (match-any)
Match: any
Drop (default action)
0 packets, 0 bytes
R3#
源 IP 地址和端口号是什么?
192.168.3.3:1028 (port 1028 is random)
目的 IP 地址和端口号是什么?
10.2.2.2:22 (SSH = port 22)
步骤 3:从 PC-C 退出 R2 上的 SSH 会话并关闭命令 提示窗口。
步骤 4:从内部 PC-C,打开 Web 浏览器以访问 PC-A 服务器的网页。
在 浏览器 URL 字段中,输入服务器的 IP 地址 192.168.1.3,然后点击 Go(转至)。HTTP 会话应该会成功。当 HTTP 会话处于活跃状态时,在 R3 上发出命令 show policy-map type inspect zone-pair sessions 查看已建立的会话。
R3#show policy-map type inspect zone-pair sessions
policy exists on zp IN-2-OUT-ZPAIR
Zone-pair: IN-2-OUT-ZPAIR
Service-policy inspect : IN-2-OUT-PMAP
Class-map: IN-NET-CLASS-MAP (match-all)
Match: access-group 101
Inspect
Number of Established Sessions = 1
Established Sessions
Session 2610127184 (192.168.3.3:1027)=>(10.2.2.2:22) tcp SIS_OPEN/TCP_ESTAB
Created 00:03:20, Last heard 00:00:49
Bytes sent (initiator:responder) [1172:2293]
Class-map: class-default (match-any)
Match: any
Drop (default action)
0 packets, 0 bytes
R3#
注意:如果在 R3 上执行该命令之前 HTTP 会话超时 ,则必须在 PC-C 上点击 Go(转至)按钮 以生成 PC-C 和 PC-A 之间的会话。
源 IP 地址和端口号是什么?
192.168.3.3:1031 (port 1031 is random)
目的 IP 地址和端口号是什么?
192.168.1.3:80 (HTTP web = port 80)
步骤 5:关闭 PC-C 上的浏览器。
第 7 部分:测试从 OUT-ZONE 到 IN-ZONE 的防火墙功能
验证在配置 ZPF 后外部主机是否无法访问内部 资源。
步骤 1:在 PC-A 服务器命令提示符后,对 PC-C 执行 ping 操作。
在 PC-A 命令提示符后,对 PC-C (192.168.3.3) 执行 ping 操作。ping 操作应该会失败。

步骤 2:从 R2 对 PC-C 执行 ping 操作。
从 R2 对 PC-C (192.168.3.3) 执行 ping 操作。ping 操作应该会失败。

步骤 3:检查结果。
完成比例应为 100%。点击 Check Results(检查结果)以查看反馈并验证已 完成的所需组件。
实验具体步骤:
R3:
R3>en

Password:

R3#conf t

Enter configuration commands, one per line. End with CNTL/Z.

R3(config)#license boot module c1900 technology-package securityk9

R3(config)#end

R3#write

Building configuration...

[OK]

R3#reload


R3>en

Password:

R3#show version

Cisco IOS Software, C1900 Software (C1900-UNIVERSALK9-M), Version 15.1(4)M4, RELEASE SOFTWARE (fc2)

Technical Support: http://www.cisco.com/techsupport

Copyright (c) 1986-2007 by Cisco Systems, Inc.

Compiled Wed 23-Feb-11 14:19 by pt_team


ROM: System Bootstrap, Version 15.1(4)M4, RELEASE SOFTWARE (fc1)

cisco1941 uptime is 2 minutes, 8 seconds

System returned to ROM by power-on

System image file is "flash0:c1900-universalk9-mz.SPA.151-1.M4.bin"

Last reload type: Normal Reload


This product contains cryptographic features and is subject to United

States and local country laws governing import, export, transfer and

use. Delivery of Cisco cryptographic products does not imply

third-party authority to import, export, distribute or use encryption.

Importers, exporters, distributors and users are responsible for

compliance with U.S. and local country laws. By using this product you

agree to comply with applicable laws and regulations. If you are unable

to comply with U.S. and local laws, return this product immediately.


A summary of U.S. laws governing Cisco cryptographic products may be found at:

http://www.cisco.com/wwl/export/crypto/tool/stqrg.html


If you require further assistance please contact us by sending email to

export@cisco.com.

Cisco CISCO1941/K9 (revision 1.0) with 491520K/32768K bytes of memory.

Processor board ID FTX152400KS

2 Gigabit Ethernet interfaces

2 Low-speed serial(sync/async) network interface(s)

DRAM configuration is 64 bits wide with parity disabled.

255K bytes of non-volatile configuration memory.

249856K bytes of ATA System CompactFlash 0 (Read/Write)


License Info:


License UDI:


-------------------------------------------------

Device# PID SN

-------------------------------------------------

*0 CISCO1941/K9 FTX152446W3


Technology Package License Information for Module:'c1900'


----------------------------------------------------------------

Technology Technology-package Technology-package

Current Type Next reboot

-----------------------------------------------------------------

ipbase ipbasek9 Permanent ipbasek9

security securityk9 Evaluation securityk9

data disable None None


Configuration register is 0x2102


R3#conf t

Enter configuration commands, one per line. End with CNTL/Z.

R3(config)#zone security IN-ZONE

R3(config-sec-zone)#exit

R3(config)#zone security OUT-ZONE

R3(config-sec-zone)#exit

R3(config)# access-list 101 permit ip 192.168.3.0 0.0.0.255 any

R3(config)#class-map type inspect match-all IN-NET-CLASS-MAP

R3(config-cmap)#match access-group 101

R3(config-cmap)#exit

R3(config)#policy-map type inspect IN-2-OUT-PMAP

R3(config-pmap)#class type inspect IN-NET-CLASS-MAP

R3(config-pmap-c)#inspect

%No specific protocol configured in class IN-NET-CLASS-MAP for inspection. All protocols will be inspected

R3(config-pmap-c)#exit

R3(config-pmap)#exit

R3(config)#zone-pair security IN-2-OUT-ZPAIR source IN-ZONE destination OUT-ZONE

R3(config-sec-zone-pair)#service-policy type inspect IN-2-OUT-PMAP

R3(config-sec-zone-pair)#exit

R3(config)#interface g0/1

R3(config-if)#zone-member security IN-ZONE

R3(config-if)#interface s0/0/1

R3(config-if)#zone-member security OUT-ZONE

R3(config-if)#exit

R3(config)#end

R3#

%SYS-5-CONFIG_I: Configured from console by console


R3#write

Building configuration...

[OK]
实验链接:https://pan.baidu.com/s/18xeHjzrNtFwhms_AthbQcg?pwd=4411
提取码:4411
--来自百度网盘超级会员V2的分享


