《OpenShift / RHEL / DevSecOps 汇总目录》
说明:本文已经在 OpenShift 4.12 环境中验证
文章目录
- KubeVirt 虚机的磁盘和卷
- Disk 磁盘
- Volume 卷
- 磁盘和卷示例
- containerDisk 卷示例
- cloudInitNoCloud 卷示例
- dataVolume 卷示例
- 基于容器镜像
- 基于 qcow2 文件
- 基于 DataSource
- persistentVolumeClaim 卷示例
- 绑定和解绑虚机的 Disk
- 删除虚机和删除 Disk
- 参考
KubeVirt 虚机的磁盘和卷
KubeVirt 使用 VirtualMachine 类型的 CRD 用来描述一个 VM,其中在 spec.volumes 部分定义了 VM 使用的卷,在 spec.domain.devices.disks 部分定义了 VM 使用的磁盘,另外卷的名称必须和磁盘的名称保持一样。
在使用 OpenShift 控制台创建 VirtualMachine 的的磁盘时,会自动创建对应的卷,以及对应的 PVC/PV 资源。
Disk 磁盘
运行在 OpenShift 中的 VM 可以使用 2 类磁盘存放 VM 的数据:“基于 PVC 的持久性磁盘” 和 ”基于临时性的容器磁盘”。对于前一种,VM 可以直接使用已有的 PVC,也可以将已有 PVC 克隆一份使用,还可以将传统 VM 使用的磁盘文件(例如 qcow2 文件)或容器镜像中的数据导入到新建的 PVC 中。而对于后一种,所有写入磁盘的数据会在 VM 重启动后丢失,因此该磁盘是临时性的。
在 OpenShift 控制台上创建 VirtualMachine 的磁盘时候,可以使用以下几种目标作为 VM 磁盘的 Source:

Volume 卷
KubeVirt 的 VirtualMachine 可以使用以下几种常用的存储卷类型:
- ephemeral - 其对应的卷 (PVC) 的数据不会以发生变化,因为所有的写入都保存在位于本地存储的临时镜像中。当 VM 停止、重启或删除时,便会丢弃临时镜像。
- containerDisk - 从 registry 中拉取镜像到运行 VM 的主机节点上,并在 VM 启动时作为磁盘附加到 VM。containerDisk 提供了在容器镜像注册表中存储和分发 VM 磁盘的能力。不过 containerDisk 是临时的,数据将在 VM 停止、重启或删除时丢弃。
- dataVolume - 可动态创建 PVC 并将外部磁盘、镜像、容器数据导入到这些 PVC 中。为了使用 dataVolume 卷,必须借助 OpenShift Virtualization Operator 安装的 Containerized Data Importer (CDI) 功能。如果不使用 dataVolume 卷,那么可以使用 persistentVolumeClaim 卷,即将一个可用的 PVC 分配给 VM。
- persistentVolumeClaim - 将可用的 PVC 附加到 VM。将现有 VM 导入到 OpenShift 中的方法是使用 CDI 将现有 VM 的磁盘或容器镜像中的磁盘导入到 PVC 中,然后将 PVC 附加到 VM 实例。
- emptyDisk - 为 VM 创建额外的 qcow2 磁盘。当 VM 重启,数据会保留下来,但当重新创建 VM,数据将会被丢弃。
- cloudInitNoCloud - 将所引用的 cloudInitNoCloud 数据源附加给磁盘,以便在 VM 启动后自动执行脚本。VM 内部需要安装 cloud-init。
注意:containerDisk 卷必须对应容器镜像,而 dataVolume 卷可以对应容器镜像。如果需要用 containerDisk 和 dataVolume 对应的磁盘启动 VM,需要将 qcow2 封装到容器镜像中。可根据以下链接制作包含虚机磁盘的容器镜像:
https://kubevirt.io/user-guide/virtual_machines/disks_and_volumes/#containerdisk-workflow-example
另外 KubeVirt 还提供 cloudInitConfigDrive、hostDisk、configMap、secret、serviceAccount、downwardMetrics 等类型的存储卷。详细说明可参见:https://kubevirt.io/user-guide/virtual_machines/disks_and_volumes/
磁盘和卷示例
执行命令创建一个项目:
$ oc new-project ocp-vm
containerDisk 卷示例
- 根据以下 YAML 创建一个 VM。
apiVersion: kubevirt.io/v1
kind: VirtualMachine
metadata:
  name: cirros-vm-1
  labels:
    kubevirt.io/vm: cirros-vm-1
spec:
  running: true
  template:
    metadata:
      labels:
        kubevirt.io/domain: cirros-vm-1
    spec:
      domain:
        cpu:
          cores: 1
        devices:
          disks:
            - disk:
                bus: virtio
              name: containerdisk
          interfaces:
            - masquerade: {}
              model: virtio
              name: default
        resources:
          requests:
            memory: 128Mi
      hostname: cirros-vm-1
      networks:
        - name: default
          pod: {}
      volumes:
        - containerDisk:
            image: kubevirt/cirros-container-disk-demo:latest
          name: containerdisk
- 查看运行的 VM 实例。
$ oc get vmi
NAME          AGE   PHASE     IP             NODENAME             READY
cirros-vm-1   83s   Running   10.217.1.144   crc-rwwzd-master-0   True
- 访问 VM 实例的控制台,然后可根据提示登陆操作系统。注意,提示中还有退出 VM 实例控制台的方法。
$ virtctl console cirros-vm-1
Successfully connected to cirros-vm-1 console. The escape sequence is ^]

login as 'cirros' user. default password: 'gocubsgo'. use 'sudo' for root.
cirros login:
- 在 OpenShift 控制台上查看该 VM 实例的 Disks,确认只有一个 “Container (Ephemeral)” 的磁盘,它没有和 PVC 对应。

- 在 VM 内部创建一个测试文件,然后退出 VM 实例的控制台。
$ echo hello > hello
- 执行命令重启 VM。注意:这里是重启 VM,而不是重启操作系统,因此不要在 VM 中通过 reboot 命令重启操作系统。
$ virtctl restart cirros-vm-1
VM cirros-vm-1 was scheduled to restart
- 执行命令查看运行 VM 的 Pod 实例,可以看到一个新的 Pod 会取代原有 Pod 来运行 VM。注意:通过 reboot 命令重启操作系统不会更换运行 VM 的 Pod。
$ oc get pod -w | grep cirros-vm-1
virt-launcher-cirros-vm-1-ghllv                             2/2     Terminating   0          10m
virt-launcher-cirros-vm-1-ghllv                             0/2     Terminating   0          10m
virt-launcher-cirros-vm-1-ghllv                             0/2     Terminating   0          10m
virt-launcher-cirros-vm-1-ghllv                             0/2     Terminating   0          10m
virt-launcher-cirros-vm-1-djchh                             0/2     Pending       0          0s
virt-launcher-cirros-vm-1-djchh                             0/2     Pending       0          0s
virt-launcher-cirros-vm-1-djchh                             0/2     Pending       0          0s
virt-launcher-cirros-vm-1-djchh                             0/2     Init:0/2      0          0s
virt-launcher-cirros-vm-1-djchh                             0/2     Init:0/2      0          2s
virt-launcher-cirros-vm-1-djchh                             0/2     Init:1/2      0          4s
virt-launcher-cirros-vm-1-djchh                             0/2     PodInitializing   0          10s
virt-launcher-cirros-vm-1-djchh                             2/2     Running           0          16s
- 在重启 VM 后再次进入 VM 的控制台,确认 hello 文件已经不存在了。
cloudInitNoCloud 卷示例
- 根据以下 YAML 创建一个 VM。它使用了 quay.io/containerdisks/fedora:36 容器镜像,并将其中内容复制到 PVC,然后作为 VM 的磁盘。注意:这里使用了 cloudInitNoCloud 卷可实现在 VM 启动完后运行初始化脚本。
apiVersion: kubevirt.io/v1
kind: VirtualMachine
metadata:
  name: fedora-vm-1
  labels:
    kubevirt.io/vm: fedora-vm-1
spec:
  running: true
  template:
    metadata:
      labels:
        kubevirt.io/domain: fedora-vm-1
    spec:
      domain:
        cpu:
          cores: 1
        devices:
          disks:
            - disk:
                bus: virtio
              name: rootdisk
            - disk:
                bus: virtio
              name: cloudinitdisk
          interfaces:
            - masquerade: {}
              model: virtio
              name: default
        resources:
          requests:
            memory: 2Gi
      hostname: fedora-vm-1
      networks:
        - name: default
          pod: {}
      volumes:
        - name: rootdisk
          containerDisk:
            image: 'quay.io/containerdisks/fedora:36'
        - cloudInitNoCloud:
            userData: |-
              #cloud-config
              user: fedora
              password: fedora
              chpasswd: { expire: False }
          name: cloudinitdisk
- 进入 fedora-vm-1 的 Console,确认只能用 fedora/fedora 登陆。
dataVolume 卷示例
基于容器镜像
本示例使用了包含 qcow2 的 quay.io/dawnskyliu/rhel-guest-image 容器镜像作为 dataVolume。
- 根据以下 YAML 创建一个 VM。注意:该 VM 是通过 dataVolume 卷使用的容器镜像 quay.io/dawnskyliu/rhel-guest-image,即是先将容器镜像中在 qcow2 或 RAW 包含内容导入到一个 PV,然后 VM 在使用 PV 启动,因此该 VM 中被修改的内容不会因为重启而丢失。
apiVersion: kubevirt.io/v1
kind: VirtualMachine
metadata:
  name: rhel8-vm-1
  labels:
    kubevirt.io/vm: rhel8-vm-1
spec:
  dataVolumeTemplates:
    - apiVersion: cdi.kubevirt.io/v1beta1
      kind: DataVolume
      metadata:
        name: rhel8-vm-1
      spec:
        source:
          registry:
            url: 'docker://quay.io/dawnskyliu/rhel-guest-image'
        storage:
          resources:
            requests:
              storage: 30Gi
  running: true
  template:
    metadata:
      labels:
        kubevirt.io/domain: rhel8-vm-1
    spec:
      domain:
        cpu:
          cores: 1
        devices:
          disks:
            - disk:
                bus: virtio
              name: rootdisk
            - disk:
                bus: virtio
              name: cloudinitdisk
          interfaces:
            - masquerade: {}
              model: virtio
              name: default
        resources:
          requests:
            memory: 2Gi
      networks:
        - name: default
          pod: {}
      volumes:
        - dataVolume:
            name: rhel8-vm-1
          name: rootdisk
        - cloudInitNoCloud:
            userData: |
              #cloud-config
              user: rhel
              password: password
              chpasswd:
                expire: false
          name: cloudinitdisk
- 运行命令,确认有以下 Pod,该 Pod 会将将容器镜像中的 disk/rhel-guest-image-8.7-1826.x86_64.qcow2 导入到 PV。
$ oc get pod importer-rhel8-vm-1
NAME                  READY   STATUS    RESTARTS   AGE
importer-rhel8-vm-1   1/1     Running   0          84s

$ oc logs pod/importer-rhel8-vm-1
I0408 10:31:52.123937       1 importer.go:104] Starting importer
I0408 10:31:52.124039       1 importer.go:171] begin import process
I0408 10:31:52.124225       1 registry-datasource.go:173] Copying proxy certs
I0408 10:31:52.124262       1 registry-datasource.go:58] Error creating allCertDir open /proxycerts/: no such file or directory
I0408 10:31:52.124517       1 data-processor.go:379] Calculating available size
I0408 10:31:52.124567       1 data-processor.go:391] Checking out file system volume size.
I0408 10:31:52.124588       1 data-processor.go:399] Request image size not empty.
I0408 10:31:52.124624       1 data-processor.go:404] Target size 34087042032.
I0408 10:31:52.124802       1 data-processor.go:282] New phase: TransferScratch
I0408 10:31:52.124870       1 registry-datasource.go:93] Copying registry image to scratch space.
I0408 10:31:52.124912       1 transport.go:176] Downloading image from 'docker://quay.io/dawnskyliu/rhel-guest-image', copying file from 'disk' to '/scratch'
I0408 10:31:55.330906       1 transport.go:200] Processing layer {Digest:sha256:32dafd2b928f720b5b234cf4a73e9c8ad30794523dff90c53acb33393513e91c Size:839850948 URLs:[] Annotations:map[] MediaType:application/vnd.docker.image.rootfs.diff.tar.gzip CompressionOperation:0 CompressionAlgorithm:<nil> CryptoOperation:0}
I0408 10:31:58.126354       1 transport.go:152] File 'disk/rhel-guest-image-8.7-1826.x86_64.qcow2' found in the layer
I0408 10:31:58.126952       1 util.go:192] Writing data...

$ oc get pvc
NAME                 STATUS    VOLUME                                     CAPACITY   ACCESS MODES   STORAGECLASS                   AGE
rhel8-vm-1           Bound     pvc-08595a65-a2c6-4c20-af66-0d2d153f6eea   199Gi      RWO            crc-csi-hostpath-provisioner   95s
rhel8-vm-1-scratch   Bound     pvc-51b1c5ab-88d3-4886-9186-cb63da8bdd7c   199Gi      RWO            crc-csi-hostpath-provisioner   85s
- 进入 rhel8-vm-1 的 Console,确认只能用 rhel/password 登陆。
- 在 VM 中的缺省目录中创建一个测试文件。
- 重启 VM,确认可继续在该 VM 中访问测试文件。
基于 qcow2 文件
本示例使用了 https://cloud.centos.org/centos/7/images/CentOS-7-x86_64-GenericCloud.qcow2.xz 文件作为 dataVolume。
apiVersion: kubevirt.io/v1
kind: VirtualMachine
metadata:
  labels:
    kubevirt.io/vm: centos7-vm-1
  name: centos7-vm-1
spec:
  dataVolumeTemplates:
    - apiVersion: cdi.kubevirt.io/v1beta1
      kind: DataVolume
      metadata:
        name: centos7-vm-1
      spec:
        pvc:
          accessModes:
            - ReadWriteOnce
          resources:
            requests:
              storage: 30Gi
        source:
          http:
            url: "https://cloud.centos.org/centos/7/images/CentOS-7-x86_64-GenericCloud.qcow2.xz"
  running: true
  template:
    metadata:
      labels:
        kubevirt.io/vm: centos7-vm-1
    spec:
      domain:
        cpu:
          cores: 1
        devices:
          disks:
            - name: datavolumedisk
              disk:
                bus: virtio
            - name: cloudinitdisk
              disk:
                bus: virtio
          interfaces:
            - masquerade: {}
              model: virtio
              name: default
        resources:
          requests:
            memory: 2Gi
      hostname: centos7-vm-1
      networks:
        - name: default
          pod: {}
      volumes:
        - dataVolume:
            name: centos7-vm-1
          name: datavolumedisk
        - cloudInitNoCloud:
            userData: |
              #cloud-config
              user: centos
              password: password
              chpasswd:
                expire: false
          name: cloudinitdisk
基于 DataSource
本示例使用了名为 centos-stream8 的 DataSource 作为 dataVolume。一个 DataSource 其实就是一个关联好容器镜像的 PVC。

- 执行命令查看名为 centos-stream9 的 datasource 对应的 PVC。
$ PVC_NAME=$(oc get datasource centos-stream9 -n openshift-virtualization-os-images -o jsonpath='{.spec.source.pvc.name}')
- 根据 PVC 查看对应使用的容器镜像。
$ oc get pvc $PVC_NAME -n openshift-virtualization-os-images -o go-template=$'{{index .metadata.annotations "cdi.kubevirt.io/storage.import.endpoint"}}\n'
docker://quay.io/containerdisks/centos-stream@sha256:5a2cd12e0ea1667e0fc55cca09957e310fbabfb91438736d00ebff1d60d4e2c4
- 根据 centos-stream8 的 DataSource 创建 VM。
apiVersion: kubevirt.io/v1
kind: VirtualMachine
metadata:
  labels:
    kubevirt.io/vm: centos-stream8-vm-1
  name: centos-stream8-vm-1
spec:
  dataVolumeTemplates:
  - apiVersion: cdi.kubevirt.io/v1beta1
    kind: DataVolume
    metadata:
      name: centos-stream8-vm-1-dv
    spec:
      sourceRef:
        kind: DataSource
        name: centos-stream8
        namespace: openshift-virtualization-os-images
      storage:
        resources:
          requests:
            storage: 30Gi
  running: false
  template:
    metadata:
      labels:
        kubevirt.io/domain: centos-stream8-vm-1
    spec:
      domain:
        cpu:
          cores: 1
        devices:
          disks:
          - disk:
              bus: virtio
            name: rootdisk
          - disk:
              bus: virtio
            name: cloudinitdisk
          interfaces:
          - masquerade: {}
            name: default
        resources:
          requests:
            memory: 2Gi
      networks:
      - name: default
        pod: {}
      volumes:
      - dataVolume:
          name: centos-stream8-vm-1-dv
        name: rootdisk
      - cloudInitNoCloud:
          userData: |-
            #cloud-config
            user: centos
            password: 'password'
            chpasswd: { expire: False }
        name: cloudinitdisk
persistentVolumeClaim 卷示例
- 根据以下 YAML 创建 cirros-vm-2 虚机。它直接使用了引用 http://download.cirros-cloud.net/0.5.2/cirros-0.5.2-x86_64-disk.img 文件的 dataVolume 作为 VM 的 volume 的源。
apiVersion: kubevirt.io/v1
kind: VirtualMachine
metadata:
  name: cirros-vm-2
  labels:
    kubevirt.io/vm: cirros-vm-2
spec:
  dataVolumeTemplates:
    - apiVersion: cdi.kubevirt.io/v1beta1
      kind: DataVolume
      metadata:
        name: cirros-vm-2-dv
      spec:
        pvc:
          accessModes:
            - ReadWriteOnce
          resources:
            requests:
              storage: 120M
        source:
          http:
            url: http://download.cirros-cloud.net/0.5.2/cirros-0.5.2-x86_64-disk.img
  running: true
  template:
    metadata:
      labels:
        kubevirt.io/domain: cirros-vm-2
    spec:
      domain:
        cpu:
          cores: 1
        devices:
          disks:
            - disk:
                bus: virtio
              name: cirros-vm-2
          interfaces:
            - masquerade: {}
              name: default
        resources:
          requests:
            memory: 128M
      networks:
        - name: default
          pod: {}
      volumes:
        - dataVolume:
            name: cirros-vm-2-dv
          name: cirros-vm-2
- 为了对比,我们可先以下 YAML 创建 PVC,然后再在后面创建的 VM 中使用这个 PVC。注意:在创建使用该 PVC 的 VM 时候,KubeVirtl 的 CDI 组建会将该 PVC 的 annotations 引用的 img 文件所包含的内容导入到该 PVC 中。
apiVersion: v1
kind: PersistentVolumeClaim
metadata:
  name: "cirros-vm-2-pvc"
  labels:
    app: containerized-data-importer
  annotations:
    cdi.kubevirt.io/storage.import.endpoint: "http://download.cirros-cloud.net/0.5.2/cirros-0.5.2-x86_64-disk.img"
spec:
  accessModes:
  - ReadWriteOnce
  resources:
    requests:
      storage: 120Mi
- 查看 PVC 的状态。在它没有被使用之前,PVC 是 Pending 状态。
$ oc get pvc
NAME              STATUS    VOLUME                 CAPACITY   ACCESS MODES   STORAGECLASS                   AGE
cirros-vm-2-pvc   Pending                                                    crc-csi-hostpath-provisioner   34s
- 创建一个 VM,它通过 persistentVolumeClaim 类型的 volume 使用了上面创建的 PVC。
apiVersion: kubevirt.io/v1
kind: VirtualMachine
metadata:
  labels:
    kubevirt.io/vm: cirros-vm-3
  name: cirros-vm-3
spec:
  running: true
  template:
    metadata:
      labels:
        kubevirt.io/domain: cirros-vm-3
    spec:
      domain:
        cpu:
          cores: 1
        devices:
          disks:
          - disk:
              bus: virtio
            name: cirros-vm-3
          interfaces:
          - masquerade: {}
            name: default
        resources:
          requests:
            memory: 128M
      networks:
      - name: default
        pod: {}
      volumes:
      - name: cirros-vm-3
        persistentVolumeClaim:
          claimName: cirros-vm-3-pvc
- 确认 PVC 已经和 PV 绑定。
$ oc get pvc
NAME              STATUS    VOLUME                                     CAPACITY   ACCESS MODES   STORAGECLASS                   AGE
cirros-vm-2-pvc   Bound     pvc-107fe367-41e5-44f5-9617-0cfd7841b2ff   199Gi      RWO            crc-csi-hostpath-provisioner   34s
- 确认可以登陆本节创建的 2 个 VM。
绑定和解绑虚机的 Disk
可以为虚机添加 Disk,在控制台添加 Disk 的窗口如下,可以看出大部分 Disk 使用的都是 PVC 存储数据。

默认情况,当删除 VM 的时候会自动删除用到的 PVC 和 PV。如果需要保存 PVC 和 PV,需要先将 VM 和用到的 Disk 解绑后再删除 VM。在 OpenShift 控制台的 VM 管理页面的 Disks 中使用 Detach 解绑 Disk 和 VM。解绑后再删除 VM 就不会自动删除 PVC 和 PV。

删除虚机和删除 Disk
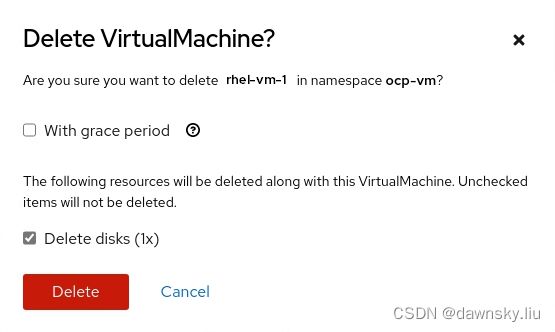
- 如果通过控制台删除 VM,可以选择是否删除对应的 Disk。而删除 Disk 会删除对应的 PVC 和 PV。
- 如果通过命令删除 VM,默认会确认对应的 PVC 和 PV 都会被自动删除。
$ oc get pvc rhel8-vm-1
rhel8-vm-1               Bound    pvc-107fe367-41e5-44f5-9617-0cfd7841b2ff   199Gi      RWO            crc-csi-hostpath-provisioner   14h

$ oc delete vm rhel8-vm-1
virtualmachine.kubevirt.io "rhel8-vm-1" deleted

$ oc get pvc rhel8-vm-1
Error from server (NotFound): persistentvolumeclaims "rhel8-vm-1" not found
- 可以查看 PV 的 persistentVolumeReclaimPolicy 配置,确认是缺省是 “Delete”。
$ oc get pv <pv_name> -o yaml | grep 'persistentVolumeReclaimPolicy'
  persistentVolumeReclaimPolicy: Delete
- 执行命令,可将 PV 的 persistentVolumeReclaimPolicy 默认配置改为 “Retain“。
$ oc patch pv <pv_name> -p '{"spec":{"persistentVolumeReclaimPolicy":"Retain"}}'
- 这样再删除 VM 就不会自动删除对应的 PVC 和 PV 了。
参考
https://kubevirt.io/2018/CDI-DataVolumes.html
https://liujinye.gitbook.io/openshift-docs/kubevirt/kubebirt-zhong-shi-yong-cloudinit
https://cloud.redhat.com/blog/openshift-virtualization-containers-kvm-and-your-vms
https://github.com/kubevirt/containerized-data-importer
