c++11下篇 + 智能指针
- 1 可变参数模板
- 1.1 递归函数方式展开参数包
- 1.2 逗号表达式展开参数包
- 1.3 STL容器中的empalce相关接口函数:
- 2 lambda达式
- 2.1 c++的痛
- 2.2 lambda表达式语法
- 2.3 函数对象与lambda表达式
- 3 包装器
- 3.1 bind
- 4 线程库
- 4.1 thread类的简单介绍
- 4.2 面试题:
- 4.3 线程函数参数
- 4.4 原子性操作库(atomic)
- 4.5 lock_guard与unique_lock
- 4.6 垃圾版的unique_lock
- 4.7支持两个线程交替打印,一个打印奇数,一个打印偶数
- 5 .智能指针
- 5 .1为什么需要智能指针?
- 5.2 内存泄漏
- 5.2.1 什么是内存泄漏,内存泄漏的危害
- 5.2.3 避免内存泄露
- 5.3 智能指针的使用及原理
- 5.3.1 RAII
- 5.3.2 智能指针的原理
- 5.3.3 auto_ptr
- 5.3.4 unique_ptr
- 5.3.5 shared_ptr
- 5.3.6循环引用
- 5.4 C++11和boost中智能指针的关系
1 可变参数模板
C++11的新特性可变参数模板能够让您创建可以接受可变参数的函数模板和类模板,相比
C++98/03,类模版和函数模版中只能含固定数量的模版参数,可变模版参数无疑是一个巨大的改
进。然而由于可变模版参数比较抽象,使用起来需要一定的技巧,所以这块还是比较晦涩的。现
阶段呢,我们掌握一些基础的可变参数模板特性就够我们用了,所以这里我们点到为止,以后大
家如果有需要,再可以深入学习。
下面就是一个基本可变参数的函数模板
// Args是一个模板参数包,args是一个函数形参参数包
// 声明一个参数包Args...args,这个参数包中可以包含0到任意个模板参数。
template <class ...Args>
void ShowList(Args... args)
{}
上面的参数args前面有省略号,所以它就是一个可变模版参数,我们把带省略号的参数称为“参数
包”,它里面包含了0到N(N>=0)个模版参数。我们无法直接获取参数包args中的每个参数的,
只能通过展开参数包的方式来获取参数包中的每个参数,这是使用可变模版参数的一个主要特
点,也是最大的难点,即如何展开可变模版参数。由于语法不支持使用args[i]这样方式获取可变
参数,所以我们的用一些奇招来一一获取参数包的值
1.1 递归函数方式展开参数包
template<class T>
void Showlist(T val)
{
	cout << val << endl;
}
template<class T,class ...Arg>
void Showlist(T val, Arg... args)
{
	cout << val << " ";
	Showlist(args...);
}
int main()
{
	Showlist(1);
	Showlist(1,1.2);
	Showlist(1,1.2,"ddd");
	Showlist(1,1.2,"ddd","w");
	return 0;
}

1.2 逗号表达式展开参数包
这种展开参数包的方式,不需要通过递归终止函数,是直接在expand函数体中展开的, printarg
不是一个递归终止函数,只是一个处理参数包中每一个参数的函数。这种就地展开参数包的方式
实现的关键是逗号表达式。我们知道逗号表达式会按顺序执行逗号前面的表达式。
expand函数中的逗号表达式:(printarg(args), 0),也是按照这个执行顺序,先执行
printarg(args),再得到逗号表达式的结果0。同时还用到了C++11的另外一个特性——初始化列
表,通过初始化列表来初始化一个变长数组, {(printarg(args), 0)…}将会展开成((printarg(arg1),0),
(printarg(arg2),0), (printarg(arg3),0), etc… ),最终会创建一个元素值都为0的数组int arr[sizeof… (Args)]。由于是逗号表达式,在创建数组的过程中会先执行逗号表达式前面的部分printarg(args)
打印出参数,也就是说在构造int数组的过程中就将参数包展开了,这个数组的目的纯粹是为了在
数组构造的过程展开参数包
template <class T>
void PrintArg(T t)
{
	cout << t << " ";
}
//展开函数
template <class ...Args>
void Showlist(Args... args)
{
	char a[] = { (PrintArg(args), 0)... };
	cout << endl;
}
int main()
{
	Showlist(1);
	Showlist(1,1.2);
	Showlist(1,1.2,"ddd");
	Showlist(1,1.2,"ddd","w");
	return 0;
}

1.3 STL容器中的empalce相关接口函数:

首先我们看到的emplace系列的接口,支持模板的可变参数,并且万能引用。那么相对insert和
emplace系列接口的优势到底在哪里呢?
int main()
{
std::list< std::pair<int, char> > mylist;
// emplace_back支持可变参数,拿到构建pair对象的参数后自己去创建对象
// 那么在这里我们可以看到除了用法上,和push_back没什么太大的区别
mylist.emplace_back(10, 'a');
mylist.emplace_back(20, 'b');
mylist.emplace_back(make_pair(30, 'c'));
mylist.push_back(make_pair(40, 'd'));
mylist.push_back({ 50, 'e' });
for (auto e : mylist)
cout << e.first << ":" << e.second << endl;
return 0;
}
int main()
{
	// 下面我们试一下带有拷贝构造和移动构造的bit::string,再试试呢
	// 我们会发现其实差别也不大,emplace_back是直接构造了,push_back
	// 是先构造,再移动构造,其实也还好。
	std::list< std::pair<int, bit::string> > mylist;
	mylist.emplace_back(10, "sort");
	mylist.emplace_back(make_pair(20, "sort"));
	mylist.push_back(make_pair(30, "sort"));
	mylist.push_back({ 40, "sort" });
	return 0;
}
总得来说就是可变参数模板不在要求你必须给足参数,其他的也没什么区别;
2 lambda达式
2.1 c++的痛
#include <algorithm>
#include <functional>
int main()
{
	int array[] = { 4,1,8,5,3,7,0,9,2,6 };
	// 默认按照小于比较,排出来结果是升序
	std::sort(array, array + sizeof(array) / sizeof(array[0]));
	// 如果需要降序,需要改变元素的比较规则
	std::sort(array, array + sizeof(array) / sizeof(array[0]), greater<int>());
	return 0;
}

如果待排序元素为自定义类型,需要用户定义排序时的比较规则:
struct Goods
{
	string _name; // 名字
	double _price; // 价格
	int _evaluate; // 评价
	Goods(const char* str, double price, int evaluate)
		:_name(str)
		, _price(price)
		, _evaluate(evaluate)
	{}
};
struct ComparePriceLess
{
	bool operator()(const Goods& gl, const Goods& gr)
	{
		return gl._price < gr._price;
	}
};
struct ComparePriceGreater
{
	bool operator()(const Goods& gl, const Goods& gr)
	{
		return gl._price > gr._price;
	}
};

这还是最基础的一个int的比较,以后实现的类不是各种模板各种数据各种比较方法就是取名字都是麻烦事,所以lambda出来了!!!
int main()
{
	vector<Goods> v = { { "苹果", 2.1, 5 }, { "香蕉", 3, 4 }, { "橙子", 2.2,
	3 }, { "菠萝", 1.5, 4 } };
	sort(v.begin(), v.end(), ComparePriceLess());//c++98的写法
	sort(v.begin(), v.end(), [](const Goods& g1, const Goods& g2) {return g1._price < g2._price; });//c++11的写法
	sort(v.begin(), v.end(), ComparePriceGreater());
}
2.2 lambda表达式语法
lambda表达式书写格式:[capture-list] (parameters) mutable -> return-type { statement
}
\1. lambda表达式各部分说明
[capture-list] : 捕捉列表,该列表总是出现在lambda函数的开始位置,编译器根据[]来
判断接下来的代码是否为lambda函数,捕捉列表能够捕捉上下文中的变量供lambda
函数使用。
(parameters):参数列表。与普通函数的参数列表一致,如果不需要参数传递,则可以
连同()一起省略
mutable:默认情况下,lambda函数总是一个const函数,mutable可以取消其常量
性。使用该修饰符时,参数列表不可省略(即使参数为空)。->returntype:返回值类型。用追踪返回类型形式声明函数的返回值类型,没有返回
值时此部分可省略。返回值类型明确情况下,也可省略,由编译器对返回类型进行推
导。
{statement}:函数体。在该函数体内,除了可以使用其参数外,还可以使用所有捕获
到的变量。
注意:
在lambda函数定义中,参数列表和返回值类型都是可选部分,而捕捉列表和函数体可以为
空。因此C++11中最简单的lambda函数为:[]{}; 该lambda函数不能做任何事情。
int main()
{
	// 最简单的lambda表达式, 该lambda表达式没有任何意义
	[] {};
	// 省略参数列表和返回值类型,返回值类型由编译器推导为int
	int a = 3, b = 4;
	[=] {return a + 3; };
	// 省略了返回值类型,无返回值类型
	auto fun1 = [&](int c) {b = a + c; };
	fun1(10);
		cout << a << " " << b << endl;
	// 各部分都很完善的lambda函数
	auto fun2 = [=, &b](int c)->int {return b += a + c; };
	cout << fun2(10) << endl;
	// 复制捕捉x
	int x = 10;
	auto add_x = [x](int a) mutable { x *= 2; return a + x; };
	cout << add_x(10) << endl;
	return 0;
}
通过上述例子可以看出,lambda表达式实际上可以理解为无名函数,该函数无法直接调
用,如果想要直接调用,可借助auto将其赋值给一个变量。
捕捉列表描述了上下文中那些数据可以被lambda使用,以及使用的方式传值还是传引用。
[var]:表示值传递方式捕捉变量var
[=]:表示值传递方式捕获所有父作用域中的变量(包括this)
[&var]:表示引用传递捕捉变量var
[&]:表示引用传递捕捉所有父作用域中的变量(包括this)
[this]:表示值传递方式捕捉当前的this指针
注意:
a. 父作用域指包含lambda函数的语句块
b. 语法上捕捉列表可由多个捕捉项组成,并以逗号分割。
比如:[=, &a, &b]:以引用传递的方式捕捉变量a和b,值传递方式捕捉其他所有变量
[&,a, this]:值传递方式捕捉变量a和this,引用方式捕捉其他变量
c. 捕捉列表不允许变量重复传递,否则就会导致编译错误。
比如:[=, a]:=已经以值传递方式捕捉了所有变量,捕捉a重复d. 在块作用域以外的lambda函数捕捉列表必须为空。
e. 在块作用域中的lambda函数仅能捕捉父作用域中局部变量,捕捉任何非此作用域或者
非局部变量都
会导致编译报错。
f. lambda表达式之间不能相互赋值,即使看起来类型相同
void (*PF)();
int main()
{
auto f1 = []{cout << "hello world" << endl; };
auto f2 = []{cout << "hello world" << endl; };
// 此处先不解释原因,等lambda表达式底层实现原理看完后,大家就清楚了
//f1 = f2; // 编译失败--->提示找不到operator=()
// 允许使用一个lambda表达式拷贝构造一个新的副本
auto f3(f2);
f3();
// 可以将lambda表达式赋值给相同类型的函数指针
PF = f2;
PF();
return 0;
}
2.3 函数对象与lambda表达式
函数对象,又称为仿函数,即可以想函数一样使用的对象,就是在类中重载了operator()运算符的
类对象。
class Rate
{
public:
	Rate(double rate) : _rate(rate)
	{}
	double operator()(double money, int year)
	{
		return money * _rate * year;
	}
private:
	double _rate;
};
int main()
{
	// 函数对象
	double rate = 0.49;
	Rate r1(rate);
	r1(10000, 2);
	// lamber
	auto r2 = [=](double monty, int year)->double {return monty * rate * year;
	};
	r2(10000, 2);
	return 0;
}

3 包装器
function包装器
function包装器 也叫作适配器。C++中的function本质是一个类模板,也是一个包装器。
那么我们来看看,我们为什么需要function呢?
//ret = func(x);
// 上面func可能是什么呢?那么func可能是函数名?函数指针?函数对象(仿函数对象)?也有可能
//是lamber表达式对象?所以这些都是可调用的类型!如此丰富的类型,可能会导致模板的效率低下!
//为什么呢?我们继续往下看
template<class F, class T>
T useF(F f, T x)
{
	static int count = 0;
	cout << "count:" << ++count << endl;
	cout << "count:" << &count << endl;
	return f(x);
}
double f(double i)
{
	return i / 2;
}
struct Functor
{
	double operator()(double d)
	{
		return d / 3;
	}
};
int main()
{
	// 函数名
	cout << useF(f, 11.11) << endl;
	// 函数对象
	cout << useF(Functor(), 11.11) << endl;
	// lamber表达式
	cout << useF([](double d)->double { return d / 4; }, 11.11) << endl;
	return 0;
}

// 使用方法如下:
#include <functional>
int f(int a, int b)
{
	return a + b;
}
struct Functor
{
public:
	int operator() (int a, int b)
	{
		return a + b;
	}
};
class Plus
{
public:
	static int plusi(int a, int b)
	{
		return a + b;
	}
	double plusd(double a, double b)
	{
		return a + b;
	}
};
int main()
{
	// 函数名(函数指针)
	std::function<int(int, int)> func1 = f;
	cout << func1(1, 2) << endl;
	// 函数对象
	std::function<int(int, int)> func2 = Functor();
	cout << func2(1, 2) << endl;
	// lamber表达式
	std::function<int(int, int)> func3 = [](const int a, const int b)
	{return a + b; };
	cout << func3(1, 2) << endl;
	// 类的成员函数
	Plus p;
	std::function<int(int, int)> func4 = &Plus::plusi;
	cout << func4(1, 2) << endl;
	std::function<double(Plus, double, double)> func5 = &Plus::plusd;
	cout << func5(p, 1.1, 2.2) << endl;
	return 0;
}
有了包装器,如何解决模板的效率低下,实例化多份的问题呢?
#include <functional>
template<class F, class T>
T useF(F f, T x)
{
	static int count = 0;
	cout << "count:" << ++count << endl;
	cout << "count:" << &count << endl;
	return f(x);
}
double f(double i)
{
	return i / 2;
}
struct Functor
{
	double operator()(double d)
	{
		return d / 3;
	}
};
int main()
{// 函数名
	std::function<double(double)> func1 = f;
	cout << useF(func1, 11.11) << endl;
	// 函数对象
	std::function<double(double)> func2 = Functor();
	cout << useF(func2, 11.11) << endl;
	// lamber表达式
	std::function<double(double)> func3 = [](double d)->double { return d /
		4; };
	cout << useF(func3, 11.11) << endl;
	return 0;
}
150. 逆波兰表达式求值 - 力扣(Leetcode)
class Solution {
public:
    int evalRPN(vector<string>& tokens) {
        stack<int> st;
        map<string,function<int(int,int)>> m=
        {
            {"+",[](int i,int j){return i+j;}},
            {"-",[](int i,int j){return i-j;}},
            {"*",[](int i,int j){return i*j;}},
            {"/",[](int i,int j){return i/j;}}
        };
        for(auto &str:tokens)
        {
            if(m.find(str)!=m.end())
            {
                int a = st.top();
                st.pop();
                int b = st.top();
                st.pop();
                st.push(m[str](b,a));
            }
            else
            {
                st.push(stoi(str));
            }
        }
        return st.top();
    }
};
3.1 bind
这个函数在网络中会用到bind但是不是一样的但是大致也是用来绑定的;
std::bind函数定义在头文件中,是一个函数模板,它就像一个函数包装器(适配器),接受一个可
调用对象(callable object),生成一个新的可调用对象来“适应”原对象的参数列表。一般而
言,我们用它可以把一个原本接收N个参数的函数fn,通过绑定一些参数,返回一个接收M个(M
可以大于N,但这么做没什么意义)参数的新函数。同时,使用std::bind函数还可以实现参数顺
序调整等操作。
// 原型如下:
template <class Fn, class... Args>
/* unspecified */ bind (Fn&& fn, Args&&... args);
// with return type (2)
template <class Ret, class Fn, class... Args>
/* unspecified */ bind (Fn&& fn, Args&&... args);
可以将bind函数看作是一个通用的函数适配器,它接受一个可调用对象,生成一个新的可调用对
象来“适应”原对象的参数列表。
调用bind的一般形式:auto newCallable = bind(callable,arg_list);
其中,newCallable本身是一个可调用对象,arg_list是一个逗号分隔的参数列表,对应给定的
callable的参数。当我们调用newCallable时,newCallable会调用callable,并传给它arg_list中
的参数。
arg_list中的参数可能包含形如_n的名字,其中n是一个整数,这些参数是“占位符”,表示
newCallable的参数,它们占据了传递给newCallable的参数的“位置”。数值n表示生成的可调用对
象中参数的位置:_1为newCallable的第一个参数,_2为第二个参数,以此类推
// 使用举例
#include <functional>
int Plus(int a, int b)
{
	return a + b;
}
class Sub
{
public:
	int sub(int a, int b)
	{
		return a - b;
	}
};
int main()
{
	//表示绑定函数plus 参数分别由调用 func1 的第一,二个参数指定
	std::function<int(int, int)> func1 = std::bind(Plus, placeholders::_1,
		placeholders::_2);
	//auto func1 = std::bind(Plus, placeholders::_1, placeholders::_2);
	//func2的类型为 function<void(int, int, int)> 与func1类型一样
	//表示绑定函数 plus 的第一,二为: 1, 2
	auto func2 = std::bind(Plus, 1, 2);
	cout << func1(1, 2) << endl;
	cout << func2() << endl;
	Sub s;
	// 绑定成员函数
	std::function<int(int, int)> func3 = std::bind(&Sub::sub, s,
		placeholders::_1, placeholders::_2);
	// 参数调换顺序
	std::function<int(int, int)> func4 = std::bind(&Sub::sub, s,
		placeholders::_2, placeholders::_1);
	cout << func3(1, 2) << endl;
	cout << func4(1, 2) << endl;
	return 0;
}
4 线程库
4.1 thread类的简单介绍
在C++11之前,涉及到多线程问题,都是和平台相关的,比如windows和linux下各有自己的接
口,这使得代码的可移植性比较差。C++11中最重要的特性就是对线程进行支持了,使得C++在
并行编程时不需要依赖第三方库,而且在原子操作中还引入了原子类的概念。要使用标准库中的
线程,必须包含< thread >头文件。
| 函数名 | 功能 |
|---|---|
| thread() | 构造一个线程对象,没有关联任何线程函数,即没有启动任何线程 |
| thread(fn, args1, args2, …) | 构造一个线程对象,并关联线程函数fn,args1,args2,…为线程函数的 参数 |
| get_id() | 获取线程id |
| jionable() | 线程是否还在执行,joinable代表的是一个正在执行中的线程。 |
| jion() | 该函数调用后会阻塞住线程,当该线程结束后,主线程继续执行 |
| detach() | 在创建线程对象后马上调用,用于把被创建线程与线程对象分离开,分离 的线程变为后台线程,创建的线程的"死活"就与主线程无关 |
注意:
-
线程是操作系统中的一个概念,线程对象可以关联一个线程,用来控制线程以及获取线程的
状态。 -
当创建一个线程对象后,没有提供线程函数,该对象实际没有对应任何线程。
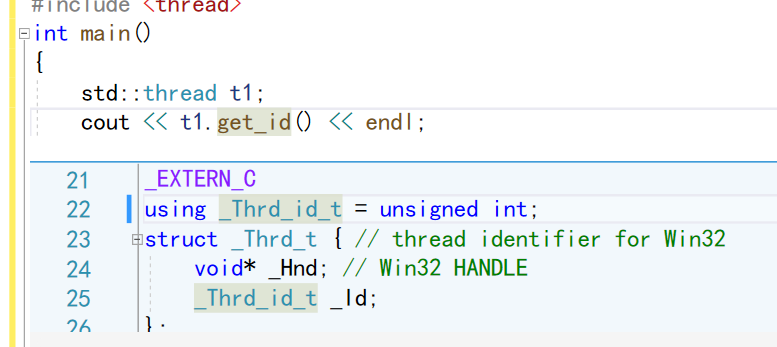
get_id()的返回值类型为id类型,id类型实际为std::thread命名空间下封装的一个类,该类中
包含了一个结构体:
-
当创建一个线程对象后,并且给线程关联线程函数,该线程就被启动,与主线程一起运行。
线程函数一般情况下可按照以下三种方式提供:函数指针
lambda表达式
函数对象
#include <iostream>
using namespace std;
#include <thread>
void ThreadFunc(int a)
{
	cout << "Thread1" << a << endl;
}
class TF
{
public:
	void operator()()
	{
		cout << "Thread3" << endl;
	}
};
int main()
{
	// 线程函数为函数指针
	thread t1(ThreadFunc, 10);
	// 线程函数为lambda表达式
	thread t2([] {cout << "Thread2" << endl; });
	// 线程函数为函数对象
	TF tf;
	thread t3(tf);
	t1.join();
	t2.join();
	t3.join();
	cout << "Main thread!" << endl;
	return 0;
}
关于这里的输出不用感到奇怪毕竟线程创建到底谁跑的快全看底层,想要规范输出的可以自己增加休眠;
- thread类是防拷贝的,不允许拷贝构造以及赋值,但是可以移动构造和移动赋值,即将一个
线程对象关联线程的状态转移给其他线程对象,转移期间不影向线程的执行。
int main()
{
	// 线程函数为函数指针
	thread t1(ThreadFunc, 10);
	// 线程函数为lambda表达式
	thread t2([] {cout << "Thread2" << endl; });
	// 线程函数为函数对象
	TF tf;
	thread t3(tf);
	thread t4 = move(t3);
	//thread t5 = t3;
	t1.join();
	t2.join();
	t3.join();//会在运行的时候报错,因为已经不存在t3这个线程了;
	cout << "Main thread!" << endl;
	return 0;
}

- 可以通过jionable()函数判断线程是否是有效的,如果是以下任意情况,则线程无效
采用无参构造函数构造的线程对象//thread t1();
线程对象的状态已经转移给其他线程对象//就是已经被移动给别人了
线程已经调用jion或者detach结束 //就不用解释了吧
4.2 面试题:
并发与并行的区别?
并行

并发

4.3 线程函数参数
线程函数的参数是以值拷贝的方式拷贝到线程栈空间中的,因此:即使线程参数为引用类型,在
线程中修改后也不能修改外部实参,因为其实际引用的是线程栈中的拷贝,而不是外部实参 。
#include <thread>
void ThreadFunc1(int& x)
{
	x += 10;
}
void ThreadFunc2(int* x)
{
	*x += 10;
}
int main()
{
	int a = 10;
	// 在线程函数中对a修改,不会影响外部实参,因为:线程函数参数虽然是引用方式,但其实际
	//引用的是线程栈中的拷贝
	/*thread t1(ThreadFunc1, a);
	t1.join();
	cout << a << endl;*/
	// 如果想要通过形参改变外部实参时,必须借助std::ref()函数
	thread t2(ThreadFunc1, ref(a));
	t2.join();
	cout << a << endl;
	// 地址的拷贝
	thread t3(ThreadFunc2, &a);
	t3.join();
	cout << a << endl;
	return 0;
}
注意:如果是类成员函数作为线程参数时,必须将this作为线程函数参数
4.4 原子性操作库(atomic)
多线程最主要的问题是共享数据带来的问题(即线程安全)。如果共享数据都是只读的,那么没问
题,因为只读操作不会影响到数据,更不会涉及对数据的修改,所以所有线程都会获得同样的数
据。但是,当一个或多个线程要修改共享数据时,就会产生很多潜在的麻烦。比如:
#include <iostream>
using namespace std;
#include <thread>
unsigned long sum = 0L;
void fun(size_t num)
{
	for (size_t i = 0; i < num; ++i)
		sum++;
}
int main()
{
	cout << "Before joining,sum = " << sum << std::endl;
	thread t1(fun, 10000000);
	thread t2(fun, 10000000);
	t1.join();
	t2.join();
	cout << "After joining,sum = " << sum << std::endl;
	return 0;
}
总是得不到200000000,大部分时候都是在100000000左右;
C++98中传统的解决方式:可以对共享修改的数据可以加锁保护
#include <iostream>
using namespace std;
#include <thread>
#include <mutex>
std::mutex m;
unsigned long sum = 0L;
void fun(size_t num)
{
	for (size_t i = 0; i < num; ++i)
	{
		m.lock();
		sum++;
		m.unlock();
	}
}
int main()
{
	cout << "Before joining,sum = " << sum << std::endl;
	thread t1(fun, 10000000);
	thread t2(fun, 10000000);
	t1.join();
	t2.join();
	cout << "After joining,sum = " << sum << std::endl;
	return 0;
}
虽然加锁可以解决,但是加锁有一个缺陷就是:只要一个线程在对sum++时,其他线程就会被阻
塞,会影响程序运行的效率,而且锁如果控制不好,还容易造成死锁
因此C++11中引入了原子操作。所谓原子操作:即不可被中断的一个或一系列操作,C++11引入
的原子操作类型,使得线程间数据的同步变得非常高效。
#include <iostream>
using namespace std;
#include <thread>
#include <atomic>
atomic_long sum{ 0 };
void fun(size_t num)
{
	for (size_t i = 0; i < num; ++i)
		sum++; // 原子操作
}
int main()
{
	cout << "Before joining, sum = " << sum << std::endl;
	thread t1(fun, 1000000);
	thread t2(fun, 1000000);
	t1.join();
	t2.join();
	cout << "After joining, sum = " << sum << std::endl;
	return 0;
}
在C++11中,程序员不需要对原子类型变量进行加锁解锁操作,线程能够对原子类型变量互斥的
访问。
更为普遍的,程序员可以使用atomic类模板,定义出需要的任意原子类型。
atmoic<T> t; // 声明一个类型为T的原子类型变量t
注意:原子类型通常属于"资源型"数据,多个线程只能访问单个原子类型的拷贝,因此在C++11
中,原子类型只能从其模板参数中进行构造,不允许原子类型进行拷贝构造、移动构造以及
operator=等,为了防止意外,标准库已经将atmoic模板类中的拷贝构造、移动构造、赋值运算
符重载默认删除掉了。
4.5 lock_guard与unique_lock
在多线程环境下,如果想要保证某个变量的安全性,只要将其设置成对应的原子类型即可,即高
效又不容易出现死锁问题。但是有些情况下,我们可能需要保证一段代码的安全性,那么就只能
通过锁的方式来进行控制。
比如:一个线程对变量number进行加一100次,另外一个减一100次,每次操作加一或者减一之
后,输出number的结果,要求:number最后的值为1
#include <thread>
#include <mutex>
int number = 0;
mutex g_lock;
int ThreadProc1()
{
	for (int i = 0; i < 100; i++)
	{
		g_lock.lock();
		++number;
		cout << "thread 1 :" << number << endl;
		g_lock.unlock();
	}
	return 0;
}
int ThreadProc2()
{
	for (int i = 0; i < 100; i++)
	{
		g_lock.lock();
		--number;
		cout << "thread 2 :" << number << endl;
		g_lock.unlock();
	}
	return 0;
}

int main()
{
	thread t1(ThreadProc1);
	thread t2(ThreadProc2);
	t1.join();
	t2.join();
	cout << "number:" << number << endl;
	system("pause");
	return 0;
}
这个代码一定安全吗?
不一定,如果在锁的代码之间抛异常或者退出,那么我们就会发现好像没有解锁就退出了,也就是我们发现这个锁现在其他地方上不了,也没有人去解开。就会出现死锁;
所以我们联系想一想有什么办法呢?
还记得我们学的类和对象不?我们实例化的对象在什么时候销毁的?聪明的你是不是已经想到办法了!!!
对的就是封装!也就是RAII的方法去实现,那么我们先简简单单来一个属于你自己的RAII保证锁的安全吧;
#include <thread>
#include <mutex>
template<class _Mutex>
class mylock_guard
{
public:
	// 在构造lock_gard时,_Mtx还没有被上锁
	mylock_guard(_Mutex& _Mtx)
		: _MyMutex(_Mtx)
	{
		_MyMutex.lock();
	}
	~mylock_guard()
	{
		_MyMutex.unlock();
	}
	mylock_guard(const lock_guard<_Mutex>&) = delete;
	mylock_guard<_Mutex>& operator=(const lock_guard<_Mutex>&) = delete;
private:
	_Mutex& _MyMutex;
};
//可以发现除了lock好像没有成员函数是可以掉unlock的
int number = 0;
mutex g_lock;
int ThreadProc1()
{
	for (int i = 0; i < 100; i++)
	{
		mylock_guard<mutex> lock(g_lock);
		++number;
		cout << "thread 1 :" << number << endl;
	}
	return 0;
}
int ThreadProc2()
{
	for (int i = 0; i < 100; i++)
	{
		mylock_guard<mutex> lock(g_lock);
		--number;
		cout << "thread 2 :" << number << endl;

	}
	return 0;
}

int main()
{
	thread t1(ThreadProc1);
	thread t2(ThreadProc2);
	t1.join();
	t2.join();
	cout << "number:" << number << endl;
	system("pause");
	return 0;
}
库里面实现的方法

我们会发现,虽然解决了我们前面的问题但是好像让我们对锁的控制丧失了,所以为了更好的控制锁我们又发现了一个unique_lock的锁;
上锁/解锁操作:lock、try_lock、try_lock_for、try_lock_until和unlock
修改操作:移动赋值、交换(swap:与另一个unique_lock对象互换所管理的互斥量所有
权)、释放(release:返回它所管理的互斥量对象的指针,并释放所有权)
获取属性:owns_lock(返回当前对象是否上了锁)、operator bool()(与owns_lock()的功能相
同)、mutex(返回当前unique_lock所管理的互斥量的指针)。
那我们先看一下unique_lock的库所实现的代码量吧,然后我们实现一个垃圾一点的装装小B;
template <class _Mutex>
class unique_lock { // whizzy class with destructor that unlocks mutex
public:
    using mutex_type = _Mutex;

    unique_lock() noexcept : _Pmtx(nullptr), _Owns(false) {}

    _NODISCARD_CTOR explicit unique_lock(_Mutex& _Mtx)
        : _Pmtx(_STD addressof(_Mtx)), _Owns(false) { // construct and lock
        _Pmtx->lock();
        _Owns = true;
    }

    _NODISCARD_CTOR unique_lock(_Mutex& _Mtx, adopt_lock_t)
        : _Pmtx(_STD addressof(_Mtx)), _Owns(true) {} // construct and assume already locked

    unique_lock(_Mutex& _Mtx, defer_lock_t) noexcept
        : _Pmtx(_STD addressof(_Mtx)), _Owns(false) {} // construct but don't lock

    _NODISCARD_CTOR unique_lock(_Mutex& _Mtx, try_to_lock_t)
        : _Pmtx(_STD addressof(_Mtx)), _Owns(_Pmtx->try_lock()) {} // construct and try to lock

    template <class _Rep, class _Period>
    _NODISCARD_CTOR unique_lock(_Mutex& _Mtx, const chrono::duration<_Rep, _Period>& _Rel_time)
        : _Pmtx(_STD addressof(_Mtx)), _Owns(_Pmtx->try_lock_for(_Rel_time)) {} // construct and lock with timeout

    template <class _Clock, class _Duration>
    _NODISCARD_CTOR unique_lock(_Mutex& _Mtx, const chrono::time_point<_Clock, _Duration>& _Abs_time)
        : _Pmtx(_STD addressof(_Mtx)), _Owns(_Pmtx->try_lock_until(_Abs_time)) {
        // construct and lock with timeout
#if _HAS_CXX20
        static_assert(chrono::is_clock_v<_Clock>, "Clock type required");
#endif // _HAS_CXX20
    }

    _NODISCARD_CTOR unique_lock(_Mutex& _Mtx, const xtime* _Abs_time)
        : _Pmtx(_STD addressof(_Mtx)), _Owns(false) { // try to lock until _Abs_time
        _Owns = _Pmtx->try_lock_until(_Abs_time);
    }

    _NODISCARD_CTOR unique_lock(unique_lock&& _Other) noexcept : _Pmtx(_Other._Pmtx), _Owns(_Other._Owns) {
        _Other._Pmtx = nullptr;
        _Other._Owns = false;
    }

    unique_lock& operator=(unique_lock&& _Other) {
        if (this != _STD addressof(_Other)) {
            if (_Owns) {
                _Pmtx->unlock();
            }

            _Pmtx        = _Other._Pmtx;
            _Owns        = _Other._Owns;
            _Other._Pmtx = nullptr;
            _Other._Owns = false;
        }
        return *this;
    }

    ~unique_lock() noexcept {
        if (_Owns) {
            _Pmtx->unlock();
        }
    }

    unique_lock(const unique_lock&) = delete;
    unique_lock& operator=(const unique_lock&) = delete;

    void lock() { // lock the mutex
        _Validate();
        _Pmtx->lock();
        _Owns = true;
    }

    _NODISCARD bool try_lock() {
        _Validate();
        _Owns = _Pmtx->try_lock();
        return _Owns;
    }

    template <class _Rep, class _Period>
    _NODISCARD bool try_lock_for(const chrono::duration<_Rep, _Period>& _Rel_time) {
        _Validate();
        _Owns = _Pmtx->try_lock_for(_Rel_time);
        return _Owns;
    }

    template <class _Clock, class _Duration>
    _NODISCARD bool try_lock_until(const chrono::time_point<_Clock, _Duration>& _Abs_time) {
#if _HAS_CXX20
        static_assert(chrono::is_clock_v<_Clock>, "Clock type required");
#endif // _HAS_CXX20
        _Validate();
        _Owns = _Pmtx->try_lock_until(_Abs_time);
        return _Owns;
    }

    _NODISCARD bool try_lock_until(const xtime* _Abs_time) {
        _Validate();
        _Owns = _Pmtx->try_lock_until(_Abs_time);
        return _Owns;
    }

    void unlock() {
        if (!_Pmtx || !_Owns) {
            _Throw_system_error(errc::operation_not_permitted);
        }

        _Pmtx->unlock();
        _Owns = false;
    }

    void swap(unique_lock& _Other) noexcept {
        _STD swap(_Pmtx, _Other._Pmtx);
        _STD swap(_Owns, _Other._Owns);
    }

    _Mutex* release() noexcept {
        _Mutex* _Res = _Pmtx;
        _Pmtx        = nullptr;
        _Owns        = false;
        return _Res;
    }

    _NODISCARD bool owns_lock() const noexcept {
        return _Owns;
    }

    explicit operator bool() const noexcept {
        return _Owns;
    }

    _NODISCARD _Mutex* mutex() const noexcept {
        return _Pmtx;
    }

private:
    _Mutex* _Pmtx;
    bool _Owns;

    void _Validate() const { // check if the mutex can be locked
        if (!_Pmtx) {
            _Throw_system_error(errc::operation_not_permitted);
        }

        if (_Owns) {
            _Throw_system_error(errc::resource_deadlock_would_occur);
        }
    }
};
好了不说了,不就是实现
4.6 垃圾版的unique_lock
加锁 解锁 查看锁的状态 吗?够简单吧那我们动手吧,
template<class _Mutex>
class myunique_lock
{
public:
	myunique_lock(_Mutex* m)
		:mut(m)
		,owns(true)
	{
		mut->lock();
	}
	bool islock()
	{
		return owns;
	}
	void trylock()
	{
		if (!owns)
			mut->lock();
	}
	void destory()
	{
		this->~myunique_lock();
	}
	~myunique_lock()
	{
		if (owns)
		{
			mut->unlock();
			owns = false;
		}
	}
	myunique_lock(const myunique_lock&) = delete;
	myunique_lock operator=(const myunique_lock&) = delete;
private:
	_Mutex* mut;
	bool owns;
};

int main()
{
	mutex m;
	myunique_lock<mutex> mu(&m);
	mu.destory();
	return 0;

}
这么垃圾的你要是写不出来我就捶你呢;
4.7支持两个线程交替打印,一个打印奇数,一个打印偶数
template<class _Mutex>
class myunique_lock
{
public:
	myunique_lock(_Mutex* m)
		:mut(m)
		,owns(true)
	{
		mut->lock();
	}
	bool islock()
	{
		return owns;
	}
	void trylock()
	{
		if (!owns)
			mut->lock();
	}
	void destory()
	{
		this->~myunique_lock();
	}
	~myunique_lock()
	{
		if (owns)
		{
			mut->unlock();
			owns = false;
		}
	}
	myunique_lock(const myunique_lock&) = delete;
	myunique_lock operator=(const myunique_lock&) = delete;
private:
	_Mutex* mut;
	bool owns;
};
int i = 0;
mutex m;
void print1()
{
	while (i<100)
	{
		myunique_lock<mutex> mut(&m);
		if (i % 2 == 0)
		{
			cout << "t1:  " << i << endl;
			i++;
		}
		mut.destory();
	}
}
void print2()
{
	while (i < 100)
	{
		myunique_lock<mutex> mut(&m);
		if (i % 2 != 0)
		{
			cout << "t2:  " << i << endl;
			i++;
		}
		mut.destory();
	}
}
void twothreadprintf()
{
	thread t1(print1);
	thread t2(print2);
	t1.join();
	t2.join();
}
int main()
{
	twothreadprintf();
	return 0;
}
5 .智能指针
5 .1为什么需要智能指针?
void newid()
{
	int * m = new int;
	throw invalid_argument("1111");
	delete m;
}
int main()
{
	try
	{
		newid();
	}
	catch (...)
	{
		cout << "catch" << endl;
	}
	return 0;
}
这里有什么问题?
由于抛出异常导致m没有delete,出现了内存泄漏;
5.2 内存泄漏
5.2.1 什么是内存泄漏,内存泄漏的危害
不解释没有为什么!!!在c语言的malloc讲过在new的地方也讲过;
5.2.3 避免内存泄露
内存泄漏非常常见,解决方案分为两种:1、事前预防型。如智能指针等。2、事后查错型。如泄
漏检测工具
-
工程前期良好的设计规范,养成良好的编码规范,申请的内存空间记着匹配的去释放。ps:
这个理想状态。但是如果碰上异常时,就算注意释放了,还是可能会出问题。需要下一条智
能指针来管理才有保证。 -
采用RAII思想或者智能指针来管理资源。
-
有些公司内部规范使用内部实现的私有内存管理库。这套库自带内存泄漏检测的功能选项。
-
出问题了使用内存泄漏工具检测。ps:不过很多工具都不够靠谱,或者收费昂贵
5.3 智能指针的使用及原理
5.3.1 RAII
写了半天的RAII的锁的解决的方式那么什么是RAII?
RAII(Resource Acquisition Is Initialization)是一种利用对象生命周期来控制程序资源(如内
存、文件句柄、网络连接、互斥量等等)的简单技术。
在对象构造时获取资源,接着控制对资源的访问使之在对象的生命周期内始终保持有效,最后在
对象析构的时候释放资源。借此,我们实际上把管理一份资源的责任托管给了一个对象。这种做
法有两大好处:
不需要显式地释放资源。
采用这种方式,对象所需的资源在其生命期内始终保持有效
// 使用RAII思想设计的SmartPtr类
template<class T>
class SmartPtr {
public:
	SmartPtr(T* ptr = nullptr)
		: _ptr(ptr)
	{}
	~SmartPtr()
	{
		if (_ptr)
			delete _ptr;
	}
private:
	T* _ptr;
};
int div()
{
	int a, b;
	cin >> a >> b;
	if (b == 0)
		throw invalid_argument("除0错误");
	return a / b;
}
void Func()
{
	SmartPtr<int> sp1(new int);
	SmartPtr<int> sp2(new int);
	cout << div() << endl;
}
int main()
{
	try {
		Func();
	}
	catch (const exception& e)
	{
		cout << e.what() << endl;
	}
	return 0;
}
5.3.2 智能指针的原理
上述的SmartPtr还不能将其称为智能指针,因为它还不具有指针的行为。指针可以解引用,也可
以通过->去访问所指空间中的内容,因此:AutoPtr模板类中还得需要将* 、->重载下,才可让其
像指针一样去使用。
template<class T>
class SmartPtr {
public:
	SmartPtr(T* ptr = nullptr)
		: _ptr(ptr)
	{}
	~SmartPtr()
	{
		if (_ptr)
			delete _ptr;
	}
	T& operator*() { return *_ptr; }
	T* operator->() { return _ptr; }
private:
	T* _ptr;
};
struct Date
{
	int _year;
	int _month;
	int _day;
};
int main()
{
	SmartPtr<int> sp1(new int);
	*sp1 = 10;
	cout << *sp1 << endl;
	SmartPtr<Date> sparray(new Date);
	sparray->_year = 2018;
	sparray->_month = 1;
	sparray->_day = 1;
	return 0;
}
总结一下智能指针的原理:
-
RAII特性
-
重载operator*和opertaor->,具有像指针一样的行为。
5.3.3 auto_ptr
auto_ptr的实现原理:管理权转移的思想,下面简化模拟实现了一份bit::auto_ptr来了解它的原
理
namespace jf {
	template<class T>
	class auto_ptr
	{
	public:
		auto_ptr(T* ptr)
			:_ptr(ptr)
		{}
		auto_ptr(auto_ptr<T>& sp)
			:_ptr(sp._ptr)
		{
			// 管理权转移
			sp._ptr = nullptr;
		}
		auto_ptr<T>& operator=(auto_ptr<T>& ap)
		{
			// 检测是否为自己给自己赋值
			if (this != &ap)
			{
				// 释放当前对象中资源
				if (_ptr)
					delete _ptr;
				// 转移ap中资源到当前对象中
				_ptr = ap._ptr;
				ap._ptr = NULL;
			}
			return *this;
		}
		~auto_ptr()
		{
			if (_ptr)
			{
				cout << "delete:" << _ptr << endl;
				delete _ptr;
			}
		}
		// 像指针一样使用
		T& operator*()
		{
			return *_ptr;
		}
		T* operator->()
		{
			return _ptr;
		}
	private:
		T* _ptr;
	};
}

// 结论:auto_ptr是一个失败设计,很多公司明确要求不能使用auto_ptr
//如果要让你写一个智能指针那你一定不要写这个!!!
int main()
{
	jf::auto_ptr<int> sp1(new int);
	jf::auto_ptr<int> sp2(sp1); // 管理权转移

	// sp1悬空
	*sp2 = 10;
	cout << *sp2 << endl;
	cout << *sp1 << endl;
	return 0;
}
5.3.4 unique_ptr
那么auto_ptr失败的地方是因为拷贝导致悬空的情况出现!那么怎么解决?
unique_ptr的实现原理:简单粗暴的防拷贝,下面简化模拟实现了一份UniquePtr来了解它的原
理
namespace jf
{
	template<class T>
	class unique_ptr
	{
	public:
		unique_ptr(T* ptr)
			:_ptr(ptr)
		{}
		~unique_ptr()
		{
			if (_ptr)
			{
				cout << "delete:" << _ptr << endl;
				delete _ptr;
			}
		}
		// 像指针一样使用
		T& operator*()
		{
			return *_ptr;
		}
		T* operator->()
		{
			return _ptr;
		}
		unique_ptr(const unique_ptr<T>&sp) = delete;
		unique_ptr<T>& operator=(const unique_ptr<T>&sp) = delete;
	private:
		T* _ptr;
	};
}

int main()
{
	jf::unique_ptr<int> sp1(new int);
	//jf::unique_ptr<int> sp2(sp1);

	std::unique_ptr<int> sp1(new int);
	//std::unique_ptr<int> sp2(sp1);//报错

	return 0;
}
还不错解决了拷贝出现悬空的问题,但是我就是想拷贝怎么办?
5.3.5 shared_ptr
shared_ptr的原理:是通过引用计数的方式来实现多个shared_ptr对象之间共享资源。
就是通过一个计数器来实现的,比如公交车司机离开公交车回家时需要检查一下车上还有没有人,正常来说上来一个人人数++,下去一个人人数–,司机回家的时候人数应该是0就对了;
-
shared_ptr在其内部,给每个资源都维护了着一份计数,用来记录该份资源被几个对象共
享。 -
在对象被销毁时(也就是析构函数调用),就说明自己不使用该资源了,对象的引用计数减
一。 -
如果引用计数是0,就说明自己是最后一个使用该资源的对象,必须释放该资源;
-
如果不是0,就说明除了自己还有其他对象在使用该份资源,不能释放该资源,否则其他对
象就成野指针了。
namespace jf
{
	template<class T>
	class shared_ptr
	{
	public:
		shared_ptr(T* ptr = nullptr)
			:_ptr(ptr)
			, _pRefCount(new int(1))
			, _pmtx(new mutex)
		{}
		shared_ptr(const shared_ptr<T>& sp)
			:_ptr(sp._ptr)
			, _pRefCount(sp._pRefCount)
			, _pmtx(sp._pmtx)
		{
			AddRef();
		}
		void Release()
		{
			_pmtx->lock();
			bool flag = false;
			if (--(*_pRefCount) == 0 && _ptr)
			{
				cout << "delete:" << _ptr << endl;
				delete _ptr;
				delete _pRefCount;
				flag = true;
			}
			_pmtx->unlock();
			if (flag == true)
			{
				delete _pmtx;
			}
		}
		void AddRef()
		{
			_pmtx->lock();
			++(*_pRefCount);
			_pmtx->unlock();
		}
		shared_ptr<T>& operator=(const shared_ptr<T>& sp)
		{
			//if (this != &sp)
			if (_ptr != sp._ptr)
			{
				Release();
				_ptr = sp._ptr;
				_pRefCount = sp._pRefCount;
				_pmtx = sp._pmtx;
				AddRef();
			}
			return *this;
		}
		int use_count()
		{
			return *_pRefCount;
		}
		~shared_ptr()
		{
			Release();
		}
		// 像指针一样使用
		T& operator*()
		{
			return *_ptr;
		}
		T* operator->()
		{
			return _ptr;
		}
		T* get() const
		{
			return _ptr;
		}
	private:
		T* _ptr;
		int* _pRefCount;
		mutex* _pmtx;
	};
}
// 简化版本的weak_ptr实现
namespace jf
{
	template<class T>
	class weak_ptr
	{
	public:
		weak_ptr()
			:_ptr(nullptr)
		{}
		weak_ptr(const shared_ptr<T>& sp)
			:_ptr(sp.get())
		{}
		weak_ptr<T>& operator=(const shared_ptr<T>& sp)
		{
			_ptr = sp.get();
			return *this;
		}
		T& operator*()
		{
			return *_ptr;
		}
		T* operator->()
		{
			return _ptr;
		}
	private:
		T* _ptr;
	};
}
int main()
{
	jf::shared_ptr<int> s;
	jf::shared_ptr<int> s1(s);
	return 0;
}
// shared_ptr智能指针是线程安全的吗?
// 是的,引用计数的加减是加锁保护的。但是指向资源不是线程安全的
// 指向堆上资源的线程安全问题是访问的人处理的,智能指针不管,也管不了
// 引用计数的线程安全问题,是智能指针要处理的
struct Date
{
	int _year = 0;
	int _month = 0;
	int _day = 0;
};
void SharePtrFunc(jf::shared_ptr<Date>& sp, size_t n, mutex& mtx)
{
	cout << sp.get() << endl;
	for (size_t i = 0; i < n; ++i)
	{
		// 这里智能指针拷贝会++计数,智能指针析构会--计数,这里是线程安全的。
		jf::shared_ptr<Date> copy(sp);
		// 这里智能指针访问管理的资源,不是线程安全的。所以我们看看这些值两个线程++了2n
		//次,但是最终看到的结果,并一定是加了2n
		{
		//unique_lock<mutex> lk(mtx);
		copy->_year++;
		//copy->_month++;
		//copy->_day++;
		}
	}
}
int main()
{
	jf::shared_ptr<Date> p(new Date);
	cout << p.get() << endl;
	const size_t n = 1000000;
	mutex mtx;
	thread t1(SharePtrFunc, std::ref(p), n, std::ref(mtx));
	thread t2(SharePtrFunc, std::ref(p), n, std::ref(mtx));
	t1.join();
	t2.join();
	cout << p->_year << endl;
	cout << p->_month << endl;
	cout << p->_day << endl;
	cout << p.use_count() << endl;
	return 0;
}
5.3.6循环引用
struct ListNode
{
	int _data;
	shared_ptr<ListNode> _prev;
	shared_ptr<ListNode> _next;
	~ListNode() { cout << "~ListNode()" << endl; }
};
int main()
{
	shared_ptr<ListNode> node1(new ListNode);
	shared_ptr<ListNode> node2(new ListNode);
	cout << node1.use_count() << endl;
	cout << node2.use_count() << endl;
	node1->_next = node2;
	node2->_prev = node1;
	cout << node1.use_count() << endl;
	cout << node2.use_count() << endl;
	return 0;
}
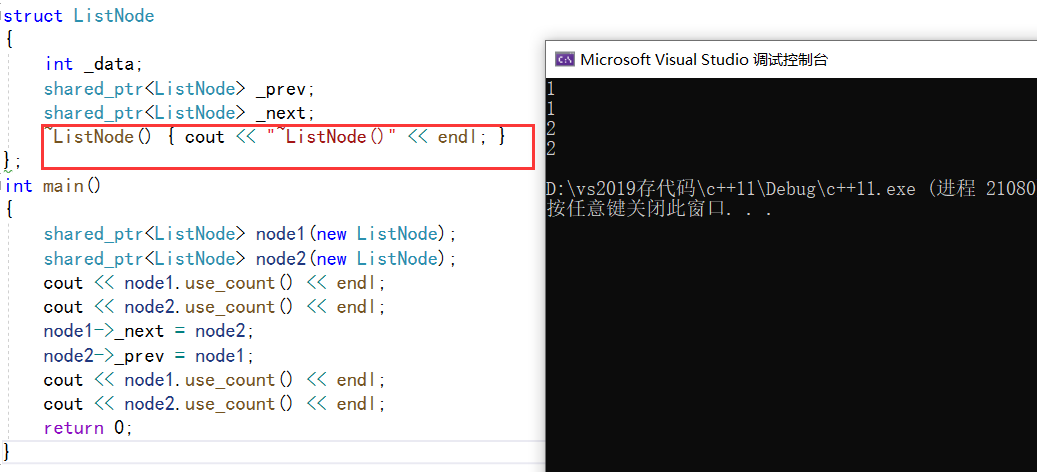
可以看出没有调用析构,是因为就算进程结束了share_ptr也没有把自己的析构调用结束!!!!
5.4 C++11和boost中智能指针的关系
-
C++ 98 中产生了第一个智能指针auto_ptr.
-
C++ boost给出了更实用的scoped_ptr和shared_ptr和weak_ptr.
-
C++ TR1,引入了shared_ptr等。不过注意的是TR1并不是标准版。
-
C++ 11,引入了unique_ptr和shared_ptr和weak_ptr。需要注意的是unique_ptr对应boost
的scoped_ptr。并且这些智能指针的实现原理是参考boost中的实现的。


