文章目录
- 三、Numpy与Tensor
- 3.Tensor的索引
- 4.Tensor的广播机制
- 5.逐元素操作
- 6.归并操作
- 7.比较操作
- 8.矩阵操作
- 9.PyTorch与Numpy的比较
- 相关推荐
三、Numpy与Tensor
3.Tensor的索引
(1)item:若Tensor为单元素,则返回标量,否则出错
a = torch.randn(1)
print(a)
>>>tensor([-0.0288])
print(a.item())
>>>-0.028787262737751007
(2)index_select(input,dim,index):指定维度上选择一些行或列
下面介绍了两种调用方式
dim表示的是维度,二维里1和-1可以表示列,三维里2和-1可表示列
index表示的是返回的索引或序号。
如下例子中(1,1)表示的是索引第二维的第二个值,第二维表示的是列,所以是第二列。
import torch
torch.manual_seed(100)
x = torch.randn(2,3)
print(x)
>>>tensor([[ 0.3607, -0.2859, -0.3938],
        [ 0.2429, -1.3833, -2.3134]])

print(x.index_select(1,torch.LongTensor([1])))
>>>tensor([[-0.2859],
        [-1.3833]])

print(torch.index_select(x,1,torch.LongTensor([1])))
>>>tensor([[-0.2859],
        [-1.3833]])
(3)nonzero(input):获取非0元素下标
import torch
x = torch.tensor([[2,3,0],[0,3,1],[1,0,3]])
print(x)
>>>tensor([[2, 3, 0],
        [0, 3, 1],
        [1, 0, 3]])

print(x.nonzero())
>>>tensor([[0, 0],
        [0, 1],
        [1, 1],
        [1, 2],
        [2, 0],
        [2, 2]])

print(torch.nonzero(x))
>>>tensor([[0, 0],
        [0, 1],
        [1, 1],
        [1, 2],
        [2, 0],
        [2, 2]])
(4)masked_select(input,mask):使用二元值进行选择
import torch
torch.manual_seed(100)
x = torch.randn(2,3)
y = torch.randn(1,2)
print(x)
>>>tensor([[ 0.3607, -0.2859, -0.3938],
        [ 0.2429, -1.3833, -2.3134]])

# 类似Numpy的索引方式
print(x[0,:])
>>>tensor([ 0.3607, -0.2859, -0.3938])

print(x[:,-1])
>>>tensor([-0.3938, -2.3134])

# 生成是否大于0的张量
mask = x>0
# 输出mask中True对应的元素
print(torch.masked_select(x,mask))
>>>tensor([0.3607, 0.2429])

# 取出1对应的元素
mask = torch.tensor([[1,1,0],[0,0,1]],dtype=torch.bool)
print(torch.masked_select(x,mask))
>>>tensor([ 0.3607, -0.2859, -2.3134])

# 取出1,2列元素
mask = torch.tensor([1,1,0],dtype=torch.bool)
print(torch.masked_select(x,mask))
>>>tensor([ 0.3607, -0.2859,  0.2429, -1.3833])

# 取出第2行元素
mask = torch.tensor([[0],[1]],dtype=torch.bool)
print(torch.masked_select(x,mask))

>>>tensor([ 0.2429, -1.3833, -2.3134])
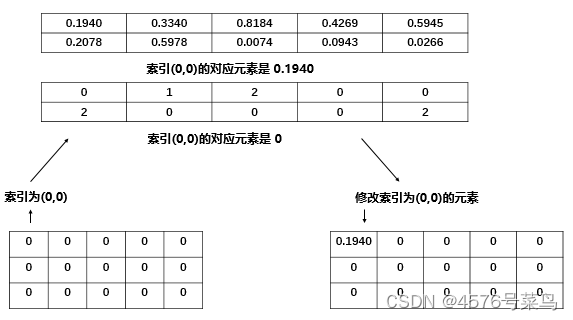
(5)gather(input,dim,index):在指定维度上选择数据,输出的形状与index一致
dim是维度,如二维的取值范围是[-2,1]
如下例子,0,-2表示第1维,1,-1表示第2维
x.gather(1,y)按第1维,返回y对应元素指示的x中该位置的元素。
如上两图:
当dim=1时:
当y为全0时,所以返回的每一列都是x中第0列对应的值
当y的第一个元素=1时,返回的(0,0)位置的值就是x中第1列第0行的值
如上两图:
当dim=0时:
当y为全0时,所以返回的每一行都是x中第0行对应的值
当y的第一个元素=1时,返回的(0,0)位置的值就是x中第1行第0列的值
import torch
x = torch.tensor([[2,3,0],[0,3,1],[1,0,3]])
y = torch.zeros_like(x)
print(x)
>>>tensor([[2, 3, 0],
        [0, 3, 1],
        [1, 0, 3]])

print(x.gather(1,y))
>>>tensor([[2, 2, 2],
        [0, 0, 0],
        [1, 1, 1]])

print(torch.gather(x,0,y))
>>>tensor([[2, 3, 0],
        [2, 3, 0],
        [2, 3, 0]])

print(torch.gather(x,-2,y))
>>>tensor([[2, 3, 0],
        [2, 3, 0],
        [2, 3, 0]])

y[0,0] = 1
print(x)
>>>tensor([[2, 3, 0],
        [0, 3, 1],
        [1, 0, 3]])

print(x.gather(1,y))
>>>tensor([[3, 2, 2],
        [0, 0, 0],
        [1, 1, 1]])

print(torch.gather(x,0,y))
>>>tensor([[0, 3, 0],
        [2, 3, 0],
        [2, 3, 0]])

print(torch.gather(x,-2,y))
>>>tensor([[0, 3, 0],
        [2, 3, 0],
        [2, 3, 0]])
(6)scatter_(input,dim,index,src):为gather的反操作,根据指定索引补充数据
如下例子:
index只有2行,所以只对x的前两行进行重新赋值
当dim=0时,
x[index[0][0]][0] = y[0][0] 即 x[1][0] = 1
x[index[1][1]][1] = y[1][1] 即 x[0][1] = 5
x[index[1][2]][2] = y[1][2] 即 x[0][2] = 6
x[index[1][0]][0] = y[1][0] 即 x[0][0] = 4
注:y的索引与index索引一致
当dim=1时,
x[0][index[0][2]] = y[0][2] 即 x[0][0] = 3
x[0][index[0][0]] = y[0][0] 即 x[0][1] = 1
x[1][index[1][2]] = y[1][2] 即 x[1][0] = 6
import torch
x = torch.tensor([[2,3,0],[0,3,1],[1,0,3]])
y = torch.tensor([[1,2,3],[4,5,6]])
index = torch.tensor([[1,0,0],[0,0,0]])
print(x)
>>>tensor([[2, 3, 0],
        [0, 3, 1],
        [1, 0, 3]])

print(y)
>>>tensor([[1, 2, 3],
        [4, 5, 6]])

print(x.scatter_(0,index,y))
>>>tensor([[4, 5, 6],
        [1, 3, 1],
        [1, 0, 3]])

print(x.scatter_(1,index,y))
>>>tensor([[3, 1, 6],
        [6, 3, 1],
        [1, 0, 3]])
4.Tensor的广播机制
import torch
import numpy as np

A = np.arange(0, 40, 10).reshape(4, 1)
B = np.arange(0, 3)
# 把ndarray转换为tensor
A1 = torch.from_numpy(A)
B1 = torch.from_numpy(B)
# tensor自动实现广播
C = A1 + B1
print(A1)
>>>tensor([[ 0],
        [10],
        [20],
        [30]], dtype=torch.int32)

print(B1)
>>>tensor([0, 1, 2], dtype=torch.int32)

print(C)
>>>tensor([[ 0,  1,  2],
        [10, 11, 12],
        [20, 21, 22],
        [30, 31, 32]], dtype=torch.int32)


# 手工配置
# 根据规则1,B1需要向A1看齐,把B变为(1,3)
B2 = B1.unsqueeze(0)
# 重复数组,分别为(4,3)矩阵
A2 = A1.expand(4,3)
B3 = B2.expand(4,3)
# 相加
C1 = A2 + B3
print(A2)
>>>tensor([[ 0,  0,  0],
        [10, 10, 10],
        [20, 20, 20],
        [30, 30, 30]], dtype=torch.int32)

print(B3)
>>>tensor([[0, 1, 2],
        [0, 1, 2],
        [0, 1, 2],
        [0, 1, 2]], dtype=torch.int32)

print(C1)
>>>tensor([[ 0,  1,  2],
        [10, 11, 12],
        [20, 21, 22],
        [30, 31, 32]], dtype=torch.int32)
5.逐元素操作
(1)绝对值abs | 加法add
import torch
t = torch.randn(1,3)
t1 = torch.randn(1,3)
print(t)
>>>tensor([[ 2.0261, -0.9644,  1.0573]])

print(t1)
>>>tensor([[ 1.0033, -0.1407,  0.4890]])

print(t.abs())
>>>tensor([[2.0261, 0.9644, 1.0573]])

print(t.add(t1))
>>>tensor([[ 3.0294, -1.1052,  1.5462]])
(2)addcdiv(t,v,t1,t2)
t + 100*(t1/t2)
import torch
t = torch.randn(1,3)
t1 = torch.randn(1,3)
t2 = torch.randn(1,3)
print(t)
>>>tensor([[-0.5238, -0.3393, -0.7081]])

print(t1)
>>>tensor([[-0.5984,  1.5229,  0.7923]])

print(t2)
>>>tensor([[ 1.5784, -1.4862, -1.5006]])

# t + 100*(t1/t2)
print(torch.addcdiv(t,100,t1,t2))
>>>tensor([[ -38.4344, -102.8099,  -53.5090]])
(3)addcmul(t,v,t1,t2)
t + 100*(t1*t2)
import torch
t = torch.randn(1,3)
t1 = torch.randn(1,3)
t2 = torch.randn(1,3)
print(t)
>>>tensor([[-0.1856,  1.8894,  1.1288]])
print(t1)
>>>tensor([[-0.6742,  2.0252, -0.6274]])
print(t2)
>>>tensor([[-1.7973, -1.3763,  1.0582]])
# t + 100*(t1*t2)
print(torch.addcmul(t,100,t1,t2))
>>>tensor([[ 120.9984, -276.8339,  -65.2656]])
(4)向上取整ceil | 向下取整floor
import torch
t = torch.randn(1,3)
print(t)
print(t.ceil())
print(t.floor())
>>>tensor([[-0.8639, -0.6445,  2.4636]])
tensor([[-0., -0., 3.]])
tensor([[-1., -1.,  2.]])
(5)将张量限制在指定区间
import torch
t = torch.randn(1,3)
print(t)
print(t.clamp(0,1))
>>>tensor([[ 0.1364,  0.8311, -0.1269]])
tensor([[0.1364, 0.8311, 0.0000]])
(6)指数exp | 对数log | 幂pow
import torch
t = torch.tensor([1,4,9])
print(t)
print(t.exp())
print(t.log())
print(t.pow(2))
>>>tensor([1, 4, 9])
tensor([2.7183e+00, 5.4598e+01, 8.1031e+03])
tensor([0.0000, 1.3863, 2.1972])
tensor([ 1, 16, 81])
(7)逐元素乘法mul* | 取反neg
import torch
t = torch.tensor([2,4,8])
print(t)
print(t.mul(2))
print(t*2)
print(t.neg())
>>>tensor([2, 4, 8])
tensor([ 4,  8, 16])
tensor([ 4,  8, 16])
tensor([-2, -4, -8])
(8)激活函数sigmoid / tanh / softmax
import torch
t = torch.tensor([2.,4.,8.])
print(t)
print(t.sigmoid())
print(t.tanh())
print(t.softmax(0))
>>>tensor([2., 4., 8.])
tensor([0.8808, 0.9820, 0.9997])
tensor([0.9640, 0.9993, 1.0000])
tensor([0.0024, 0.0179, 0.9796])
(9)取符号sign | 开根号sqrt
import torch
t = torch.tensor([2,-4,8])
print(t)
print(t.sign())
print(t.sqrt())
>>>tensor([ 2, -4,  8])
tensor([ 1, -1,  1])
tensor([1.4142,    nan, 2.8284])
6.归并操作
(1)cumprod(t,axis)在指定维度对t进行累积
import torch
t = torch.linspace(0,10,6)
t = t.view((2,3))
print(t)
print(t.cumprod(0))
print(t.cumprod(1))
>>>tensor([[ 0.,  2.,  4.],
        [ 6.,  8., 10.]])
tensor([[ 0.,  2.,  4.],
        [ 0., 16., 40.]])
tensor([[  0.,   0.,   0.],
        [  6.,  48., 480.]])
(2)cumsum(t,axis)在指定维度对t进行累加
import torch
t = torch.linspace(0,10,6)
t = t.view((2,3))
print(t)
print(t.cumsum(0))
print(t.cumsum(1))
>>>tensor([[ 0.,  2.,  4.],
        [ 6.,  8., 10.]])
tensor([[ 0.,  2.,  4.],
        [ 6., 10., 14.]])
tensor([[ 0.,  2.,  6.],
        [ 6., 14., 24.]])
(3)dist(a,b,p=2)返回a,b之间的p阶范数
import torch
t = torch.randn(2,3)
t1 = torch.randn(2,3)
print(t)
print(t1)
print(torch.dist(t,t1,2))
>>>tensor([[ 0.7374,  0.3365, -0.3164],
        [ 0.9939,  0.9986, -1.8464]])
tensor([[-0.4015,  0.7628,  1.5155],
        [-1.9203, -1.0317, -0.0433]])
tensor(4.5498)
(4)mean\median 均值\中位数
import torch
t = torch.randn(2,3)
print(t)
print(t.mean())
print(t.median())
>>>tensor([[-1.2806, -0.2002, -1.6772],
        [-1.0748,  0.9528, -0.9231]])
tensor(-0.7005)
tensor(-1.0748)
(5)std\var 标准差\方差
import torch
t = torch.randn(2,3)
print(t)
print(t.std())
print(t.var())
>>>tensor([[-0.3008,  0.5051, -0.3573],
        [ 0.6127,  0.5265, -0.2748]])
tensor(0.4727)
tensor(0.2234)
(6)norm(t,p=2)返回t的p阶范数
import torch
t = torch.randn(2,3)
print(t)
print(t.norm(2))
>>>tensor([[-1.4880, -0.6627,  0.0032],
        [-2.0794, -0.4204,  0.7097]])
tensor(2.7673)
(7)prod(t) \ sum(t) 返回t所有元素的积 \ 和
import torch
t = torch.randn(2,3)
print(t)
print(t.prod())
print(t.sum())
>>>tensor([[ 1.0360,  1.5088,  2.3022],
        [-0.9142,  1.9266, -0.8202]])
tensor(5.1986)
tensor(5.0393)
7.比较操作
(1)eq 比较Tensor是否相等,支持broadcast
import torch
t = torch.tensor([[1,2,3],[4,5,6]])
t1 = torch.tensor([[1,2,3],[4,5,6]])
print(t)
print(t1)
print(t.eq(t1))
>>>tensor([[1, 2, 3],
        [4, 5, 6]])
tensor([[1, 2, 3],
        [4, 5, 6]])
tensor([[True, True, True],
        [True, True, True]])
(2)equal 比较Tensor是否有相同的shape与值
import torch
t = torch.tensor([[1,2,3],[4,5,6]])
t1 = torch.tensor([[1,2,3],[4,5,6]])
t2 = torch.tensor([1,2,3,4,5,6])
print(t)
print(t1)
print(t2)
print(t.equal(t1))
print(t.equal(t2))
>>>tensor([[1, 2, 3],
        [4, 5, 6]])
tensor([[1, 2, 3],
        [4, 5, 6]])
tensor([1, 2, 3, 4, 5, 6])
True
False
(3)ge\le\gt\lt 大于\小于\大于等于\小于等于
import torch
t = torch.tensor([[1,2,3],[4,5,6]])
t1 = torch.tensor([[3,2,1],[6,5,4]])
print(t)
print(t1)
>>>tensor([[1, 2, 3],
        [4, 5, 6]])
tensor([[3, 2, 1],
        [6, 5, 4]])
print(t.ge(t1))
>>>tensor([[False,  True,  True],
        [False,  True,  True]])

print(t.le(t1))
>>>tensor([[ True,  True, False],
        [ True,  True, False]])

print(t.gt(t1))
>>>tensor([[False, False,  True],
        [False, False,  True]])

print(t.lt(t1))
>>>tensor([[ True, False, False],
        [ True, False, False]])
(4)max\min(t,axis) 返回最值,若指定axis,则额外返回下标
import torch
t = torch.tensor([[1,2,3],[4,5,6]])
print(t)
>>>tensor([[1, 2, 3],
        [4, 5, 6]])

print(t.max())
>>>tensor(6)

print(t.max(1))
>>>torch.return_types.max(
values=tensor([3, 6]),
indices=tensor([2, 2]))

print(t.min())
>>>tensor(1)

print(t.min(1))
>>>torch.return_types.min(
values=tensor([1, 4]),
indices=tensor([0, 0]))
(5)topk(t,k,axis) 在指定的axis维上取最高的K个值
import torch
t = torch.tensor([[1,2,3],[4,5,6]])
print(t)
>>>tensor([[1, 2, 3],
        [4, 5, 6]])

print(t.topk(1,0))
>>>torch.return_types.topk(
values=tensor([[4, 5, 6]]),
indices=tensor([[1, 1, 1]]))

print(t.topk(1,1))
>>>torch.return_types.topk(
values=tensor([[3],
        	   [6]]),
indices=tensor([[2],
        	    [2]]))

print(t.topk(2,0))
>>>torch.return_types.topk(
values=tensor([[4, 5, 6],
        	   [1, 2, 3]]),
indices=tensor([[1, 1, 1],
        	    [0, 0, 0]]))

print(t.topk(2,1))
>>>torch.return_types.topk(
values=tensor([[3, 2],
        	   [6, 5]]),
indices=tensor([[2, 1],
        	    [2, 1]]))
8.矩阵操作
(1)dot(t1,t2) 计算张量(1D)的内积/点积
import torch
t = torch.tensor([3,4])
t1 = torch.tensor([2,3])
print(t)
print(t1)
print(t.dot(t1))
>>>tensor([3, 4])
tensor([2, 3])
tensor(18)
(2)mm(mat1,mat2) \ bmm(batch1,batch2) 计算矩阵乘法/含batch的3D矩阵乘法
import torch
t = torch.randint(10,(2,3))
t1 = torch.randint(6,(3,4))
print(t)
print(t1)
print(t.mm(t1))
>>>tensor([[9, 3, 9],
        [0, 3, 8]])
tensor([[3, 0, 0, 1],
        [4, 5, 5, 3],
        [2, 0, 1, 4]])
tensor([[57, 15, 24, 54],
        [28, 15, 23, 41]])

t = torch.randint(10,(2,2,3))
t1 = torch.randint(6,(2,3,4))
print(t)
print(t1)
print(t.bmm(t1))
>>>tensor([[[7, 4, 0],
         [5, 5, 1]],

        [[1, 4, 1],
         [3, 3, 6]]])
tensor([[[0, 3, 2, 5],
         [3, 2, 1, 3],
         [3, 3, 4, 5]],

        [[3, 5, 2, 3],
         [2, 1, 0, 5],
         [5, 1, 2, 2]]])
tensor([[[12, 29, 18, 47],
         [18, 28, 19, 45]],

        [[16, 10,  4, 25],
         [45, 24, 18, 36]]])
(3)mv(t1,v1) 计算矩阵与向量乘法
import torch
t = torch.randint(10,(2,2))
t1 = torch.tensor([1,2])
print(t)
print(t1)
print(t.mv(t1))
>>>tensor([[0, 7],
        [5, 5]])
tensor([1, 2])
tensor([14, 15])
(4)t 转置
import torch
t = torch.randint(10,(2,2))
print(t)
print(t.t())
>>>tensor([[5, 3],
        [0, 8]])
tensor([[5, 0],
        [3, 8]])
(5)svd(t) 计算t的SVD分解
import torch
t = torch.tensor([[1.,2.],[3.,4.]])
print(t)
>>>tensor([[1., 2.],
        [3., 4.]])

print(t.svd())
>>>torch.return_types.svd(
U=tensor([[-0.4046, -0.9145],
        [-0.9145,  0.4046]]),
S=tensor([5.4650, 0.3660]),
V=tensor([[-0.5760,  0.8174],
        [-0.8174, -0.5760]]))
9.PyTorch与Numpy的比较
| 操作类别 | Numpy | PyTorch |
|---|---|---|
| 数据类型 | np.ndarray | torch.Tensor |
| np.float32 | torch.float32;torch.float | |
| np.float64 | torch.float64;torch.double | |
| np.int64 | torch.int64;torch.long | |
| 从已有数据构建 | np.arrat([1,2],dtype=np.float16) | torch.tensor([1,2],dtype.float16) |
| x.copy() | x.clone() | |
| np.concatenate | torch.cat | |
| 线性代数 | np.dot | torch.mm |
| 属性 | x.ndim | x.dim |
| x.size | x.nelement | |
| 形状操作 | x.reshape | x.reshape;x.view |
| x.flatten | x.view(-1) | |
| 类型转换 | np.floor(x) | torch.floor(x);x.floor() |
| 比较 | np.less | x.lt |
| np.less_equal ; np.greater | x.le / x.gt | |
| np.greate_equal / np.equal / np.not_equal | x.ge / x.eq / x.ne | |
| 随机种子 | np.random.seed | torch.manual_seed |
相关推荐
【pyTorch学习笔记①】Numpy基础·上篇
【pyTorch学习笔记②】Numpy基础·下篇
【pyTorch学习笔记③】PyTorch基础·上篇


