GitHub - microsoft/Bringing-Old-Photos-Back-to-Life: Bringing Old Photo Back to Life (CVPR 2020 oral)
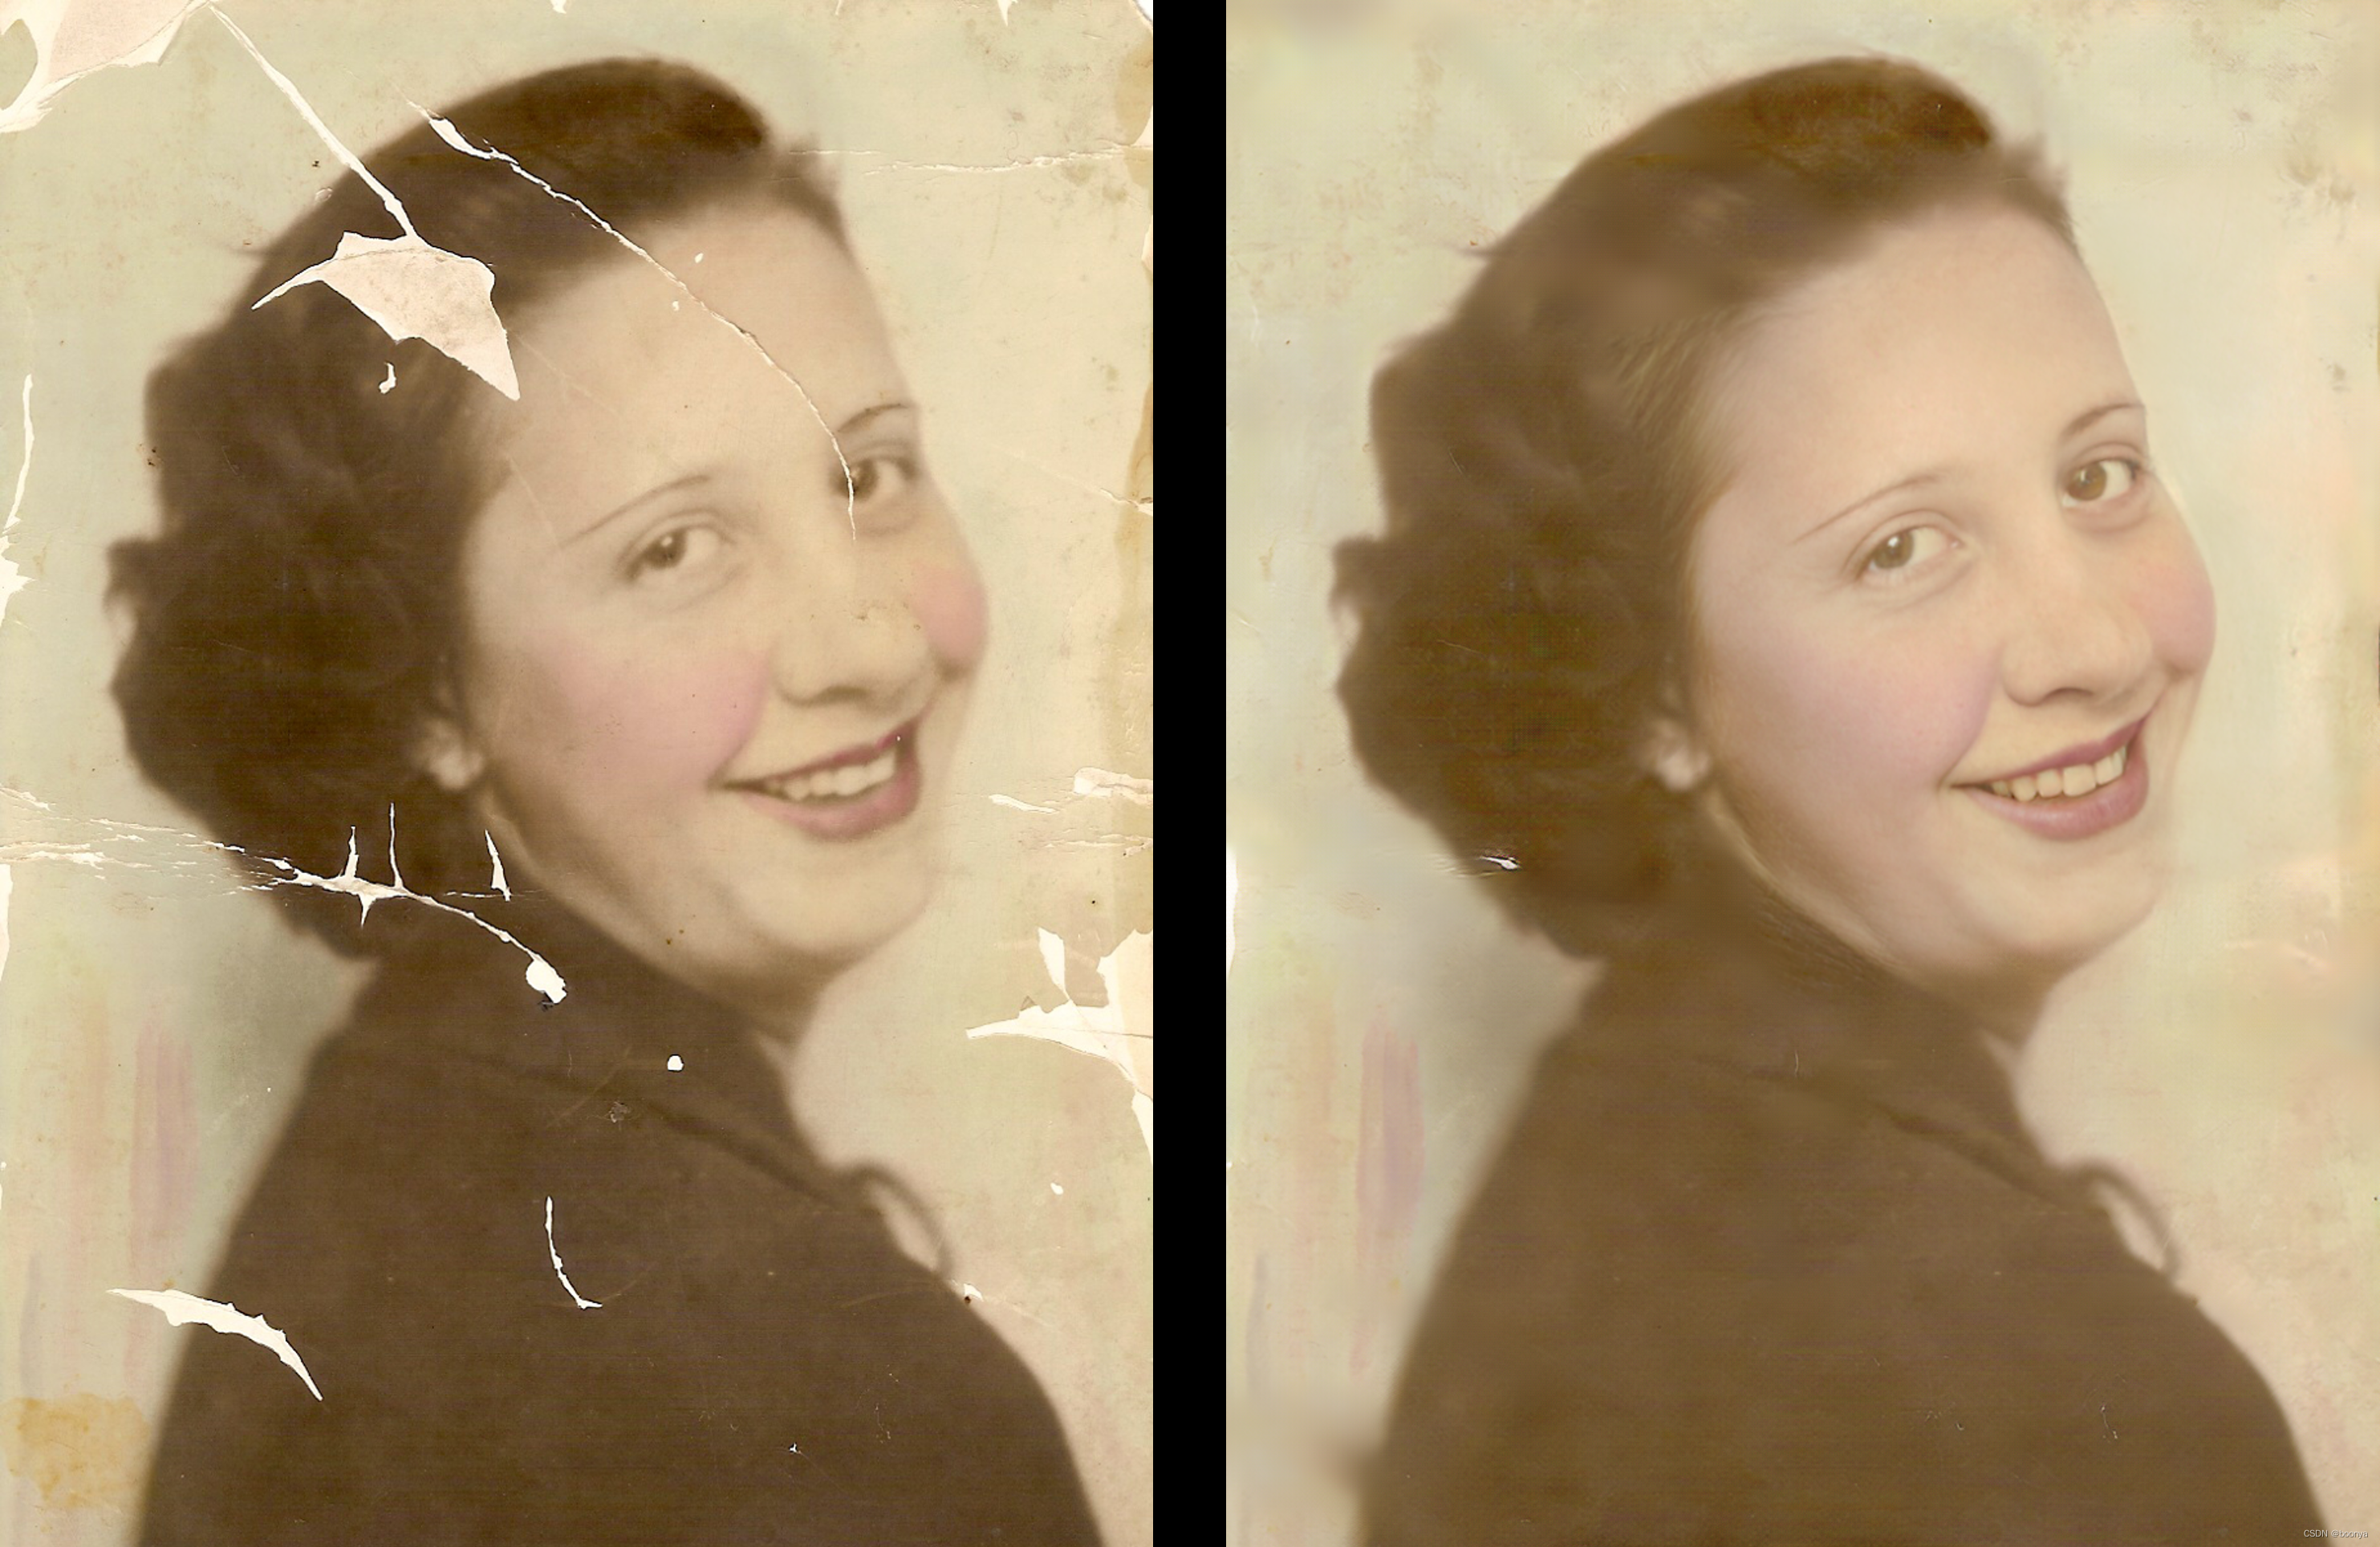
支持划痕修复,以及模型训练。
Old Photo Restoration (Official PyTorch Implementation)

Project Page | Paper (CVPR version) | Paper (Journal version) | Pretrained Model | Colab Demo | Replicate Demo & Docker Image 🔥
Bringing Old Photos Back to Life, CVPR2020 (Oral)
Old Photo Restoration via Deep Latent Space Translation, TPAMI 2022
Ziyu Wan1, Bo Zhang2, Dongdong Chen3, Pan Zhang4, Dong Chen2, Jing Liao1, Fang Wen2
1City University of Hong Kong, 2Microsoft Research Asia, 3Microsoft Cloud AI, 4USTC
✨ News
2022.3.31: Our new work regarding old film restoration will be published in CVPR 2022. For more details, please refer to the project website and github repo.
The framework now supports the restoration of high-resolution input.
Training code is available and welcome to have a try and learn the training details.
You can now play with our Colab and try it on your photos.
Requirement
The code is tested on Ubuntu with Nvidia GPUs and CUDA installed. Python>=3.6 is required to run the code.
Installation
Clone the Synchronized-BatchNorm-PyTorch repository for
cd Face_Enhancement/models/networks/
git clone https://github.com/vacancy/Synchronized-BatchNorm-PyTorch
cp -rf Synchronized-BatchNorm-PyTorch/sync_batchnorm .
cd ../../../
cd Global/detection_models
git clone https://github.com/vacancy/Synchronized-BatchNorm-PyTorch
cp -rf Synchronized-BatchNorm-PyTorch/sync_batchnorm .
cd ../../
Download the landmark detection pretrained model
cd Face_Detection/
wget http://dlib.net/files/shape_predictor_68_face_landmarks.dat.bz2
bzip2 -d shape_predictor_68_face_landmarks.dat.bz2
cd ../
Download the pretrained model, put the file Face_Enhancement/checkpoints.zip under ./Face_Enhancement, and put the file Global/checkpoints.zip under ./Global. Then unzip them respectively.
cd Face_Enhancement/
wget https://github.com/microsoft/Bringing-Old-Photos-Back-to-Life/releases/download/v1.0/face_checkpoints.zip
unzip face_checkpoints.zip
cd ../
cd Global/
wget https://github.com/microsoft/Bringing-Old-Photos-Back-to-Life/releases/download/v1.0/global_checkpoints.zip
unzip global_checkpoints.zip
cd ../
Install dependencies:
pip install -r requirements.txt
🚀 How to use?
Note: GPU can be set 0 or 0,1,2 or 0,2; use -1 for CPU
1) Full Pipeline
You could easily restore the old photos with one simple command after installation and downloading the pretrained model.
For images without scratches:
python run.py --input_folder [test_image_folder_path] \
              --output_folder [output_path] \
              --GPU 0
For scratched images:
python run.py --input_folder [test_image_folder_path] \
              --output_folder [output_path] \
              --GPU 0 \
              --with_scratch
For high-resolution images with scratches:
python run.py --input_folder [test_image_folder_path] \
              --output_folder [output_path] \
              --GPU 0 \
              --with_scratch \
              --HR
Note: Please try to use the absolute path. The final results will be saved in ./output_path/final_output/. You could also check the produced results of different steps in output_path.
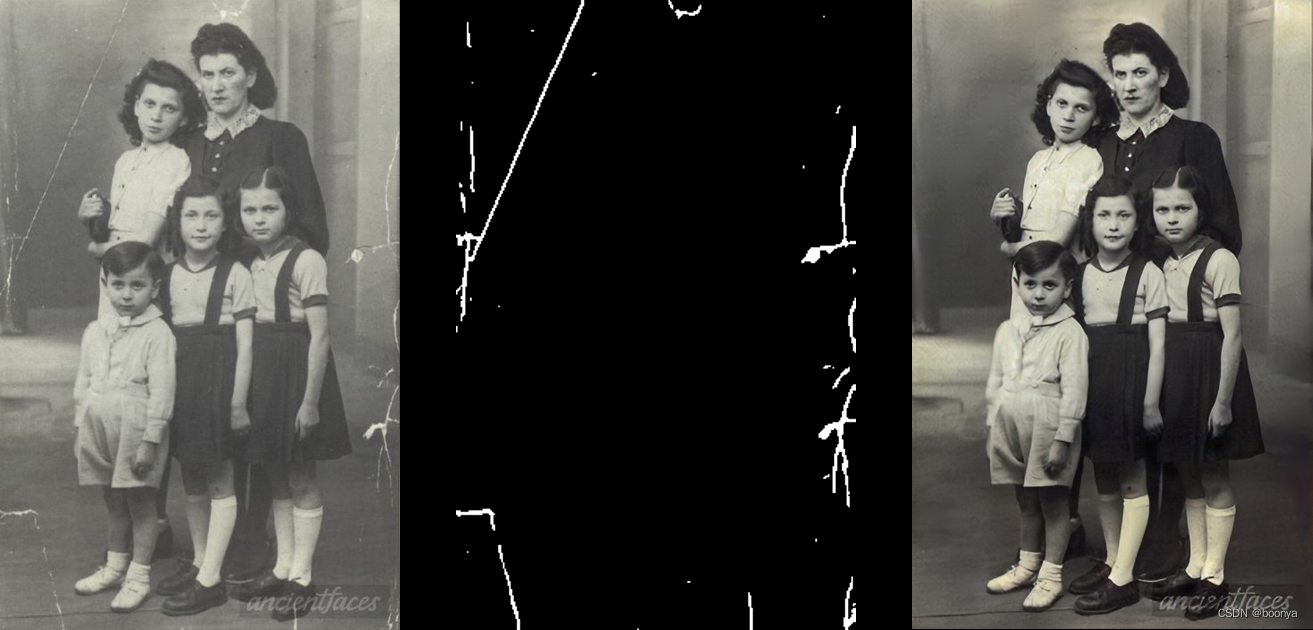
2) Scratch Detection
Currently we don't plan to release the scratched old photos dataset with labels directly. If you want to get the paired data, you could use our pretrained model to test the collected images to obtain the labels.
cd Global/
python detection.py --test_path [test_image_folder_path] \
                    --output_dir [output_path] \
                    --input_size [resize_256|full_size|scale_256]
3) Global Restoration
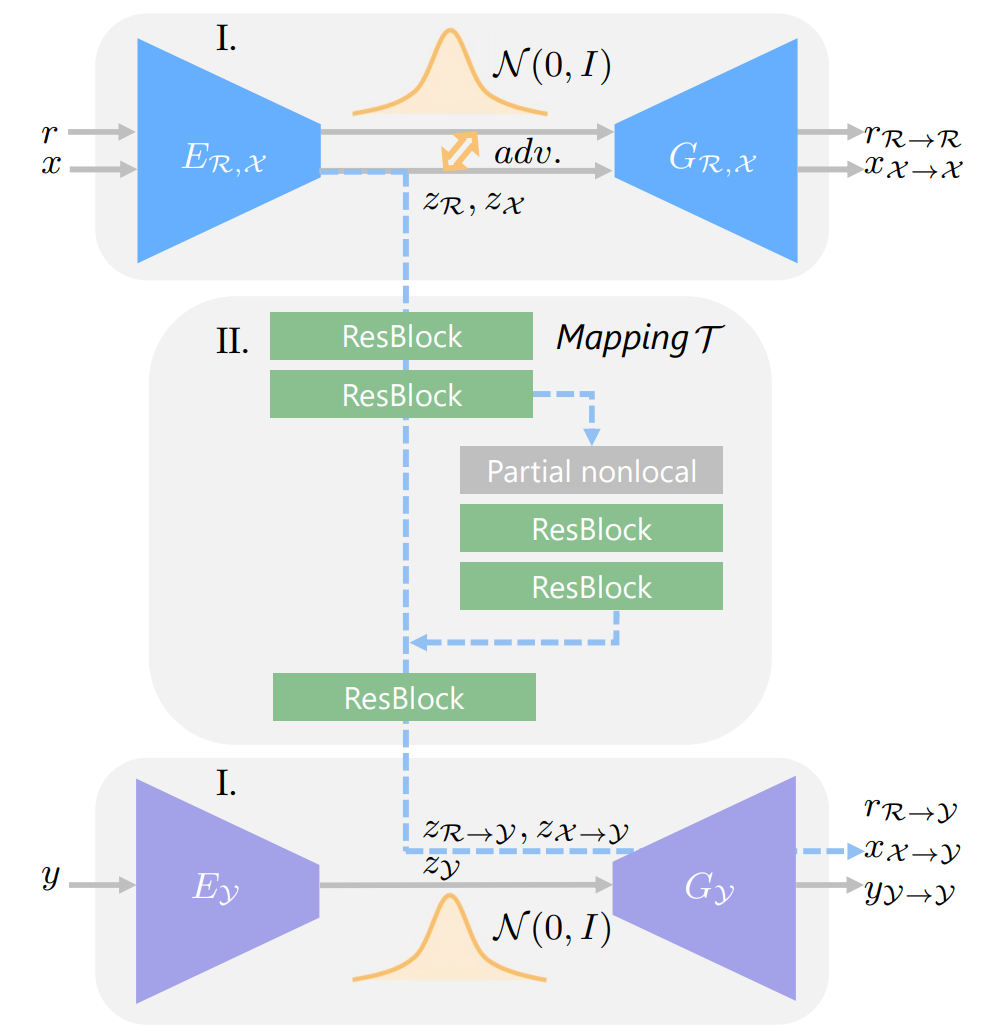
A triplet domain translation network is proposed to solve both structured degradation and unstructured degradation of old photos.
cd Global/
python test.py --Scratch_and_Quality_restore \
               --test_input [test_image_folder_path] \
               --test_mask [corresponding mask] \
               --outputs_dir [output_path]

python test.py --Quality_restore \
               --test_input [test_image_folder_path] \
               --outputs_dir [output_path]

4) Face Enhancement
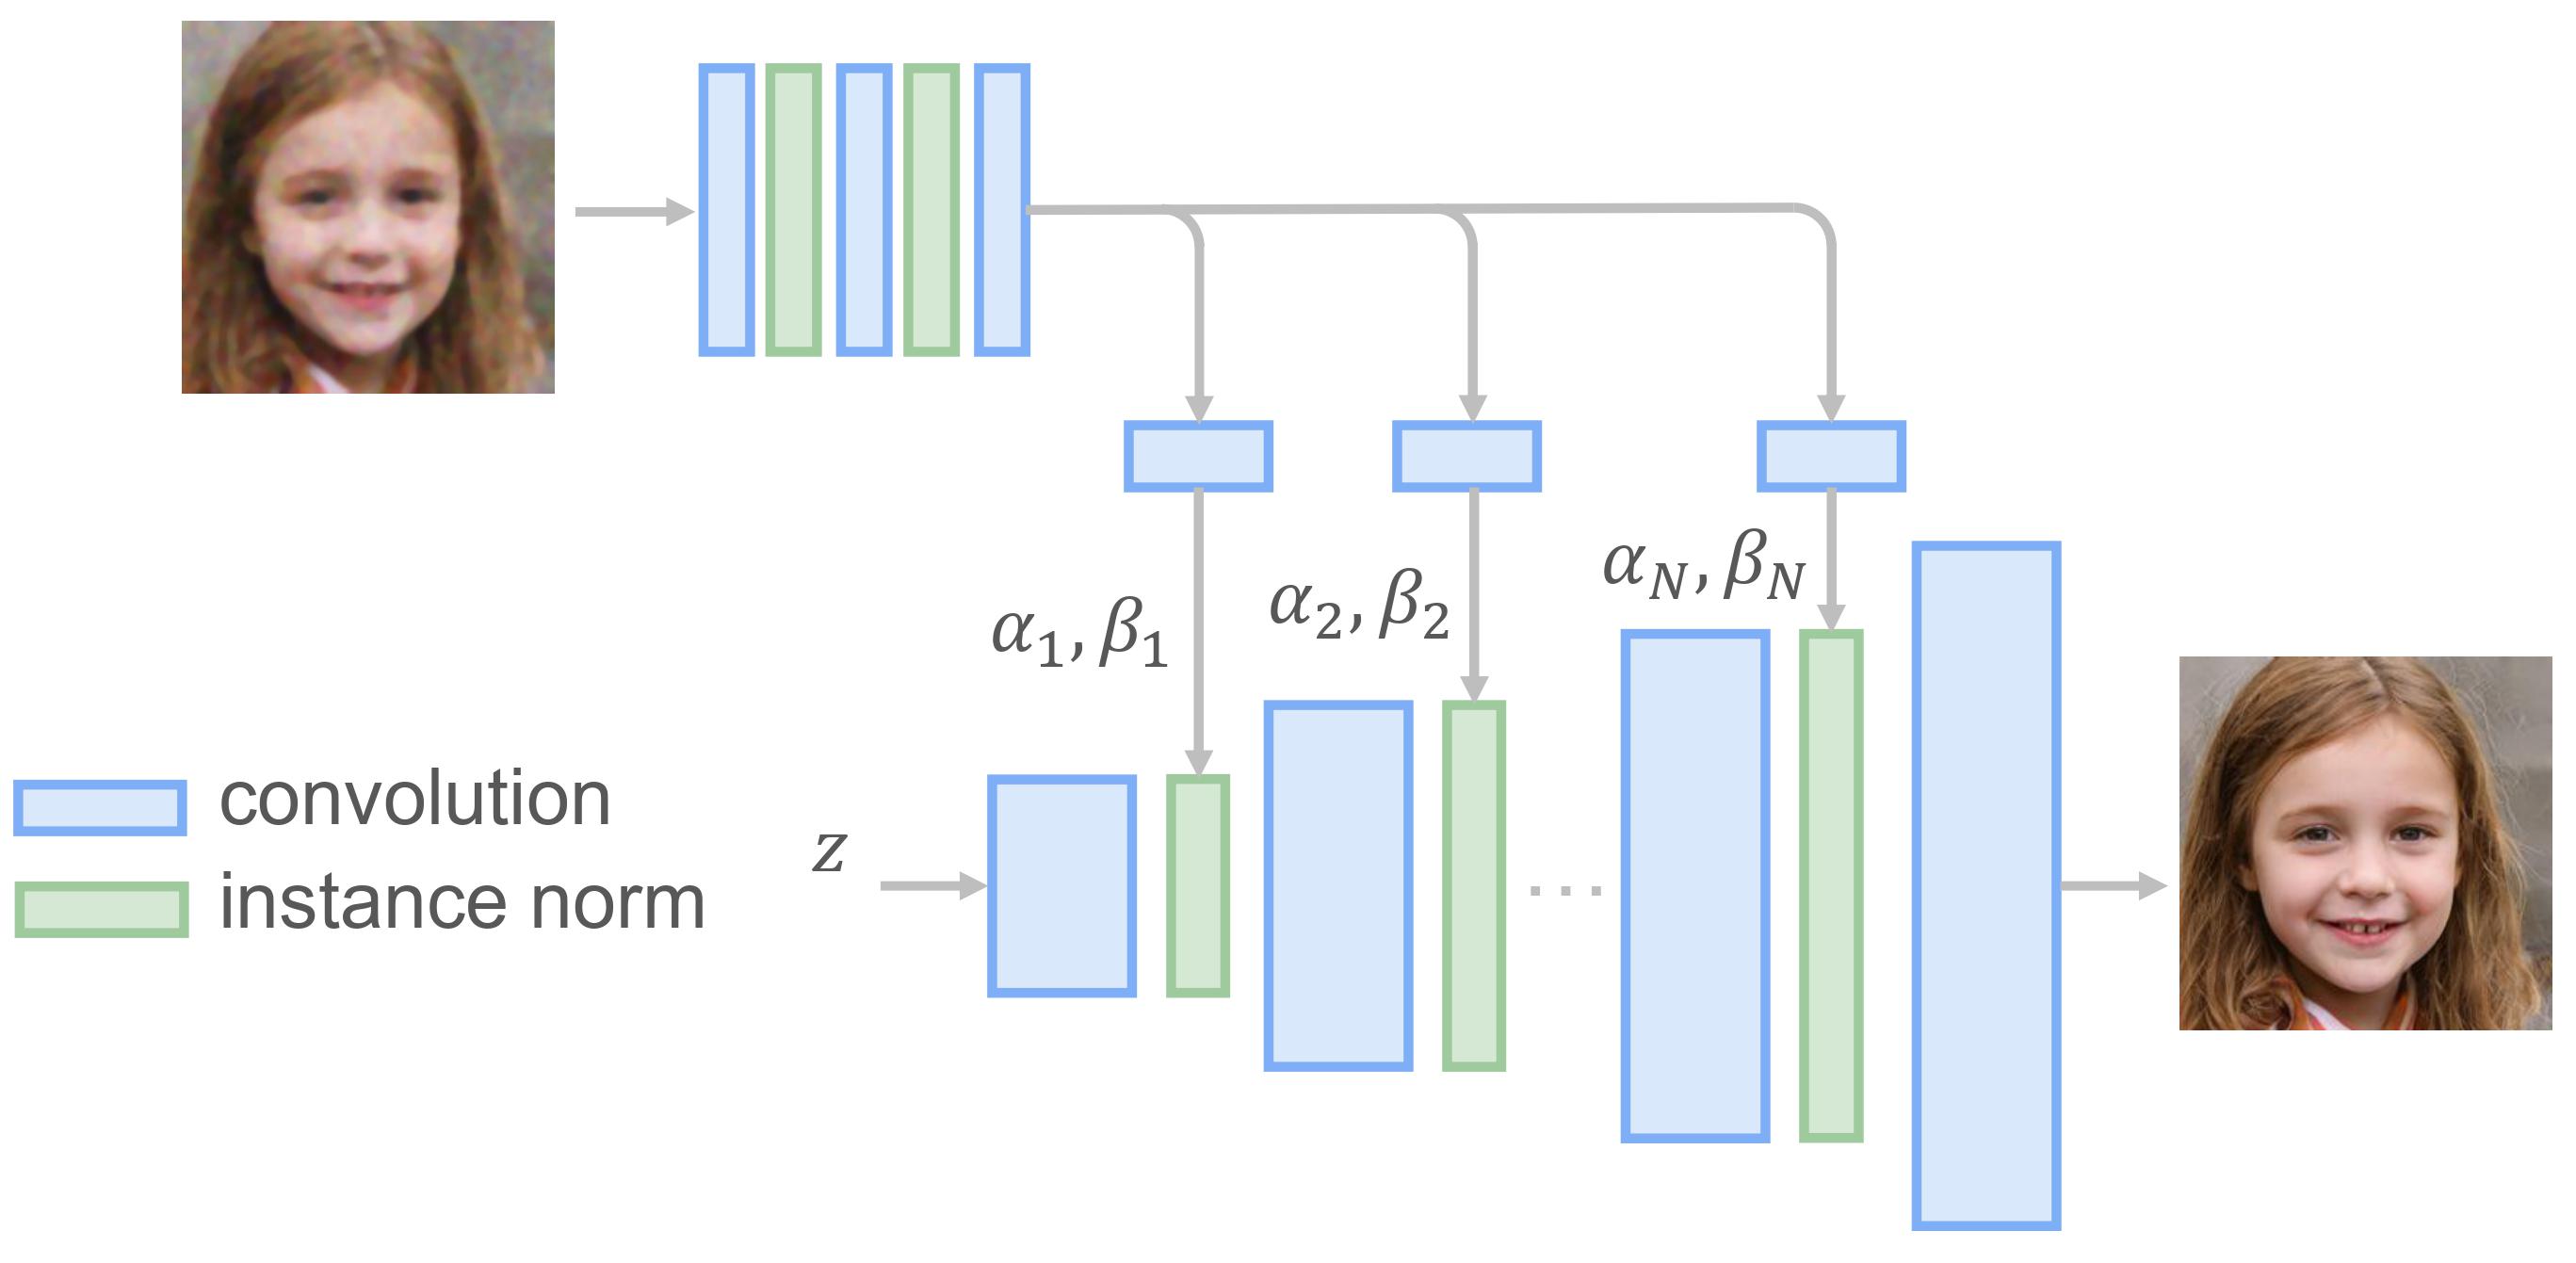
We use a progressive generator to refine the face regions of old photos. More details could be found in our journal submission and ./Face_Enhancement folder.

NOTE: This repo is mainly for research purpose and we have not yet optimized the running performance.
Since the model is pretrained with 256*256 images, the model may not work ideally for arbitrary resolution.
5) GUI
A user-friendly GUI which takes input of image by user and shows result in respective window.
How it works:
- Run GUI.py file.
- Click browse and select your image from test_images/old_w_scratch folder to remove scratches.
- Click Modify Photo button.
- Wait for a while and see results on GUI window.
- Exit window by clicking Exit Window and get your result image in output folder.

How to train?
1) Create Training File
Put the folders of VOC dataset, collected old photos (e.g., Real_L_old and Real_RGB_old) into one shared folder. Then
cd Global/data/
python Create_Bigfile.py
Note: Remember to modify the code based on your own environment.
2) Train the VAEs of domain A and domain B respectively
cd ..
python train_domain_A.py --use_v2_degradation --continue_train --training_dataset domain_A --name domainA_SR_old_photos --label_nc 0 --loadSize 256 --fineSize 256 --dataroot [your_data_folder] --no_instance --resize_or_crop crop_only --batchSize 100 --no_html --gpu_ids 0,1,2,3 --self_gen --nThreads 4 --n_downsample_global 3 --k_size 4 --use_v2 --mc 64 --start_r 1 --kl 1 --no_cgan --outputs_dir [your_output_folder] --checkpoints_dir [your_ckpt_folder]

python train_domain_B.py --continue_train --training_dataset domain_B --name domainB_old_photos --label_nc 0 --loadSize 256 --fineSize 256 --dataroot [your_data_folder]  --no_instance --resize_or_crop crop_only --batchSize 120 --no_html --gpu_ids 0,1,2,3 --self_gen --nThreads 4 --n_downsample_global 3 --k_size 4 --use_v2 --mc 64 --start_r 1 --kl 1 --no_cgan --outputs_dir [your_output_folder]  --checkpoints_dir [your_ckpt_folder]
Note: For the --name option, please ensure your experiment name contains "domainA" or "domainB", which will be used to select different dataset.
3) Train the mapping network between domains
Train the mapping without scratches:
python train_mapping.py --use_v2_degradation --training_dataset mapping --use_vae_which_epoch 200 --continue_train --name mapping_quality --label_nc 0 --loadSize 256 --fineSize 256 --dataroot [your_data_folder] --no_instance --resize_or_crop crop_only --batchSize 80 --no_html --gpu_ids 0,1,2,3 --nThreads 8 --load_pretrainA [ckpt_of_domainA_SR_old_photos] --load_pretrainB [ckpt_of_domainB_old_photos] --l2_feat 60 --n_downsample_global 3 --mc 64 --k_size 4 --start_r 1 --mapping_n_block 6 --map_mc 512 --use_l1_feat --niter 150 --niter_decay 100 --outputs_dir [your_output_folder] --checkpoints_dir [your_ckpt_folder]
Traing the mapping with scraches:
python train_mapping.py --no_TTUR --NL_res --random_hole --use_SN --correlation_renormalize --training_dataset mapping --NL_use_mask --NL_fusion_method combine --non_local Setting_42 --use_v2_degradation --use_vae_which_epoch 200 --continue_train --name mapping_scratch --label_nc 0 --loadSize 256 --fineSize 256 --dataroot [your_data_folder] --no_instance --resize_or_crop crop_only --batchSize 36 --no_html --gpu_ids 0,1,2,3 --nThreads 8 --load_pretrainA [ckpt_of_domainA_SR_old_photos] --load_pretrainB [ckpt_of_domainB_old_photos] --l2_feat 60 --n_downsample_global 3 --mc 64 --k_size 4 --start_r 1 --mapping_n_block 6 --map_mc 512 --use_l1_feat --niter 150 --niter_decay 100 --outputs_dir [your_output_folder] --checkpoints_dir [your_ckpt_folder] --irregular_mask [absolute_path_of_mask_file]
Traing the mapping with scraches (Multi-Scale Patch Attention for HR input):
python train_mapping.py --no_TTUR --NL_res --random_hole --use_SN --correlation_renormalize --training_dataset mapping --NL_use_mask --NL_fusion_method combine --non_local Setting_42 --use_v2_degradation --use_vae_which_epoch 200 --continue_train --name mapping_Patch_Attention --label_nc 0 --loadSize 256 --fineSize 256 --dataroot [your_data_folder] --no_instance --resize_or_crop crop_only --batchSize 36 --no_html --gpu_ids 0,1,2,3 --nThreads 8 --load_pretrainA [ckpt_of_domainA_SR_old_photos] --load_pretrainB [ckpt_of_domainB_old_photos] --l2_feat 60 --n_downsample_global 3 --mc 64 --k_size 4 --start_r 1 --mapping_n_block 6 --map_mc 512 --use_l1_feat --niter 150 --niter_decay 100 --outputs_dir [your_output_folder] --checkpoints_dir [your_ckpt_folder] --irregular_mask [absolute_path_of_mask_file] --mapping_exp 1
Citation
If you find our work useful for your research, please consider citing the following papers :)
@inproceedings{wan2020bringing,
title={Bringing Old Photos Back to Life},
author={Wan, Ziyu and Zhang, Bo and Chen, Dongdong and Zhang, Pan and Chen, Dong and Liao, Jing and Wen, Fang},
booktitle={Proceedings of the IEEE/CVF Conference on Computer Vision and Pattern Recognition},
pages={2747--2757},
year={2020}
}
@article{wan2020old,
  title={Old Photo Restoration via Deep Latent Space Translation},
  author={Wan, Ziyu and Zhang, Bo and Chen, Dongdong and Zhang, Pan and Chen, Dong and Liao, Jing and Wen, Fang},
  journal={arXiv preprint arXiv:2009.07047},
  year={2020}
}
If you are also interested in the legacy photo/video colorization, please refer to this work.
Maintenance
This project is currently maintained by Ziyu Wan and is for academic research use only. If you have any questions, feel free to contact raywzy@gmail.com.
License
The codes and the pretrained model in this repository are under the MIT license as specified by the LICENSE file. We use our labeled dataset to train the scratch detection model.
This project has adopted the Microsoft Open Source Code of Conduct. For more information see the Code of Conduct FAQ or contact opencode@microsoft.com with any additional questions or comments.
