MyBatis
1、简介
1.1什么是MyBatis

-
MyBatis 是一款优秀的持久层框架
-
它支持自定义 SQL、存储过程以及高级映射
-
MyBatis 免除了几乎所有的 JDBC 代码以及设置参数和获取结果集的工作
-
MyBatis 可以通过简单的 XML 或注解来配置和映射原始类型、接口和 Java POJO(Plain Old Java Objects,普通老式 Java 对象)为数据库中的记录。
-
开源框架
如何获得Mybatis?
- maven仓库
- github
- 中文文档
1.2持久化
数据持久化
- 持久化就是将程序的数据再持久状态和顺势在状态转化的过程
- 内存:断电即失
- 数据库(jdbc),io文件持久化
- 生活:冷藏
为什么需要持久化
-
有一些对象,不能让他丢掉
-
内存太贵
1.3持久层
Dao层,Service层,Controller层
- 完成持久化工作的代码块
- 层是界限十分明显的
1.4为什么需要MyBatis
- 帮助程序员把数据存入数据库
- 方便
- 传统的jdbc代码太复杂–简化,框架,自动化
- 不用mybatis也可以,技术没有高低之分
- 优点:很多
2、第一个MyBatis程序
思路:搭建环境—>导入Mybatis
2.1、搭建环境
数据库
create database mybatis;
use mybatis;
create table user(
	id int primary key not null ,
    name char(20) not null,
    pwd char(20) not null
)engine=InnoDB DEfault charset=utf8;
alter table user change id id int AUTO_INCREMENT;
insert into `user`(name,pwd) values
("杨华","123456"),
("刘德华","123456")
新建项目
-
新建一个普通的maven项目
-
删除src目录
-
导入maven依赖
<?xml version="1.0" encoding="UTF-8"?>
<project xmlns="http://maven.apache.org/POM/4.0.0"
         xmlns:xsi="http://www.w3.org/2001/XMLSchema-instance"
         xsi:schemaLocation="http://maven.apache.org/POM/4.0.0 http://maven.apache.org/xsd/maven-4.0.0.xsd">
    <modelVersion>4.0.0</modelVersion>

    <groupId>org.example</groupId>
    <artifactId>mybatis-study</artifactId>
    <version>1.0-SNAPSHOT</version>
    <!--    父工程-->
    <properties>
        <maven.compiler.source>8</maven.compiler.source>
        <maven.compiler.target>8</maven.compiler.target>
    </properties>
    <!--  导入依赖  -->
    <dependencies>
        <!--        mysql-->
        <dependency>
            <groupId>mysql</groupId>
            <artifactId>mysql-connector-java</artifactId>
            <version>8.0.30</version>
        </dependency>
        <!--        mybatis-->
        <dependency>
            <groupId>org.mybatis</groupId>
            <artifactId>mybatis</artifactId>
            <version>3.5.2</version>
        </dependency>
        <!--        junit-->
        <dependency>
            <groupId>junit</groupId>
            <artifactId>junit</artifactId>
            <version>4.13.1</version>
            <scope>test</scope>
        </dependency>
    </dependencies>
</project>
2.2、创建一个模块
-
编写mybatis的核心配置文件-连接数据库(后续可以使用properties)
<!--核心配置环境--> <configuration> <environments default="development"> <!--其中一个环境--> <environment id="development"> <!--事务管理--> <transactionManager type="JDBC"/> <dataSource type="POOLED"> <property name="driver" value="com.mysql.jdbc.Driver"/> <property name="url" value="jdbc:mysql://localhost:3306/mybatis?useSSL=true&useUnicode=true&characterEncoding=UTF-8"/> <property name="username" value="root"/> <property name="password" value="123456"/> </dataSource> </environment> </environments> </configuration> -
编写一个mybatis工具类
- 官网三部曲–有些地方报错需要添加try-catch
- 路径记得填自己的
String resource = "org/mybatis/example/mybatis-config.xml";
InputStream inputStream = Resources.getResourceAsStream(resource);
SqlSessionFactory sqlSessionFactory = new SqlSessionFactoryBuilder().build(inputStream);
//获取SqlSession对象 从 SqlSessionFactory //SqlSession 提供了在数据库执行 SQL 命令所需的所有方法 public class MyBatisUtils { private static SqlSessionFactory sqlSessionFactory; String resource = "org/mybatis/example/mybatis-config.xml"; InputStream inputStream; { try { //使用mybatis获取 inputStream = Resources.getResourceAsStream(resource); SqlSessionFactory sqlSessionFactory = new SqlSessionFactoryBuilder().build(inputStream); } catch (IOException e) { e.printStackTrace(); } } //既然有了 SqlSessionFactory,顾名思义,我们可以从中获得 SqlSession 的实例 // SqlSession 提供了在数据库执行 SQL 命令所需的所有方法 public static SqlSession getsqlSession(){ return sqlSessionFactory.openSession(); //sqlSession可以操作数据库 } }
2.3、编写代码
- 实体类(后续很多get,set,无参构造和有参构造,方法可以注解开发)
package com.yang.pojo;
//实体类
public class User {
    private int id;
    private String name;
    private String pwd;

    @Override
    public String toString() {
        return "User{" +
                "id=" + id +
                ", name='" + name + '\'' +
                ", pwd='" + pwd + '\'' +
                '}';
    }

    public void setId(int id) {
        this.id = id;
    }

    public void setName(String name) {
        this.name = name;
    }

    public void setPwd(String pwd) {
        this.pwd = pwd;
    }

    public int getId() {
        return id;
    }

    public String getName() {
        return name;
    }

    public String getPwd() {
        return pwd;
    }

    public User(){

    }
    public User(int id,String name,String pwd){
        this.id = id;
        this.name = name;
        this.pwd = pwd;
    }
}
- Dao接口
public interface UserDao {
    List<User> getUserList();
}
-
接口实现类由原来UserDaoImpl转变为一个Mapper配置文件
<?xml version="1.0" encoding="UTF-8" ?>
<!DOCTYPE mapper
        PUBLIC "-//mybatis.org//DTD Mapper 3.0//EN"
        "https://mybatis.org/dtd/mybatis-3-mapper.dtd">
<!--namespace绑定一个dao/Mapper接口-->
<mapper namespace="com.yang.dao.UserDao">
    <!--查询语句-->
    <select id="getUrlList" resultType="com.yang.pojo.User">
        select * from mybatis.user;
    </select>
</mapper>
2.4、测试
注意点:Type interface…错误(100%会遇到):没有配置resourse
    <!--在build中配置resoureces,来防止我们资源导出失效的问题-->
    <build>
        <resources>
            <resource>
                <directory>src/main/resources</directory>
                <includes>
                    <include>**/*.properties</include>
                    <include>**/*.xml</include>
                </includes>
                <filtering>true</filtering>
            </resource>
            <resource>
                <directory>src/main/java</directory>
                <includes>
                    <include>**/*.properties</include>
                    <include>**/*.xml</include>
                </includes>
                <filtering>true</filtering>
            </resource>
        </resources>
    </build>
-
junit测试
package com.yang.utils;
import org.apache.ibatis.io.Resources;
import org.apache.ibatis.session.SqlSession;
import org.apache.ibatis.session.SqlSessionFactory;
import org.apache.ibatis.session.SqlSessionFactoryBuilder;
import java.io.IOException;
import java.io.InputStream;
//获取SqlSession对象 从 SqlSessionFactory
//SqlSession 提供了在数据库执行 SQL 命令所需的所有方法
public class MyBatisUtils {
    private static SqlSessionFactory sqlSessionFactory;
    static {
            try {
                String resource = "mybatis-config.xml";
                InputStream inputStream= Resources.getResourceAsStream(resource); //使用mybatis获取inputStream
                sqlSessionFactory = new SqlSessionFactoryBuilder().build(inputStream);
            } catch (IOException e) {
                e.printStackTrace();
            }
    }
    //既然有了 SqlSessionFactory,顾名思义,我们可以从中获得 SqlSession 的实例
    // SqlSession 提供了在数据库执行 SQL 命令所需的所有方法
    public static SqlSession getsqlSession(){
        return sqlSessionFactory.openSession();
        //sqlSession可以操作数据库
        //sqlSession
    }
}
3、curd
1.namespace
namespace中的包名要和Dap/Mapper中的一致
2.选择,查询语句;
- id就是对应的namespace中的方法名
- resultType:sql语句返回值
- parameter:参数类型
select查询案例
com\yang\dao\UserMapper.xml
    <select id="getUserById" parameterType="int" resultType="com.yang.pojo.User">
        select * from mybatis.user where id=#{id};<!--id为调用dao里面的方法,select里面是sql语句,传入参数id-->
    </select>
com\yang\dao\UserDaoTest.java
public interface UserMapper {
    User getUserById(int id);//定义方法
}
com\yang\dao\UserDaoTest.java
public class UserDaoTest {
    @Test
    public void test2(){
        //获得sqlsession对象
        SqlSession sqlSession = MyBatisUtils.getsqlSession();
        //执行
        UserMapper mapper = sqlSession.getMapper(UserMapper.class);
        User user = mapper.getUserById(1);//调用dao方法
        System.out.println(user);
        sqlSession.close();
    }
}
增删改需要用事务
sqlsession.commit()
两个符号的区别:#和$
尽量多用#方式,少用$方式
#{变量名}可以进行预编译、类型匹配等操作,#{变量名}会转化为jdbc的类型。
select * from tablename where id = #{id}
假设id的值为12,其中如果数据库字段id为字符型,那么#{id}表示的就是'12',如果id为整型,那么id就是12,并且MyBatis会将上面SQL语句转化为jdbc的select * from tablename where id=?,把?参数设置为id的值。
${变量名}不进行数据类型匹配,直接替换。
select * from tablename where id = ${id}
如果字段id为整型,sql语句就不会出错,但是如果字段id为字符型, 那么sql语句应该写成select * from table where id = '${id}'。
#方式能够很大程度防止sql注入。
$方式无法方式sql注入。
$方式一般用于传入数据库对象,例如传入表名。
一个小bug是如果用$就需要非整型中加引号(不加会报错),如果是#就不用(加了会报错)
3.增删改
增删改案例
com\yang\dao\UserMapper.xml–这里的#{}里面的内容可以直接写传进去对象的类属性
<insert id="addUser" parameterType="com.yang.pojo.User" >
insert into mybatis.user values(#{id},'#{name}',#{pwd})
</insert>
<update id="updateUser" parameterType="com.yang.pojo.User">
update mybatis.user set name='#{name}',pwd =#{pwd} where id=#{id}
</update>
<delete id="deleteUser" parameterType="int">
    delete from mybatis.user where id=#{id}
</delete>
com\yang\dao\UserDaoTest.java
public class UserDaoTest {
    @Test
    public void test3(){
        //获得sqlsession对象
        SqlSession sqlSession = MyBatisUtils.getsqlSession();
        //执行
        UserMapper mapper = sqlSession.getMapper(UserMapper.class);
        mapper.addUser(new User(11,"流","1234"));
        sqlSession.commit();
        sqlSession.close();
        test();
    }
    @Test
    public void  test4(){
        SqlSession sqlSession = MyBatisUtils.getsqlSession();
        UserMapper mapper = sqlSession.getMapper(UserMapper.class);
        mapper.updateUser(new User(10, "fei", "12345"));
        sqlSession.commit();
        sqlSession.close();
        test();
    }
    @Test
    public void test5(){
        SqlSession sqlSession = MyBatisUtils.getsqlSession();
        UserMapper mapper = sqlSession.getMapper(UserMapper.class);
        mapper.deleteUser(11);
        sqlSession.commit();
        sqlSession.close();
    }
}
com\yang\dao\UserMapper.java
public interface UserMapper {
    int addUser(User user);
    //修改用户
    int updateUser(User user);
    //删除用户
    int deleteUser(int id);
}
4.map代替User对象
优点
- 自定义键的名字
- 自定义传入数据(不一定非要整个对象传进去,尤其是可能只是需要修改,需要删除)
<insert id="addUser2" parameterType="map" >
insert into user values(#{userid},#{username},#{userpwd});
</insert>
int addUser2(Map<String,Object> map);
@Test
public void test6(){
    SqlSession sqlSession = MyBatisUtils.getsqlSession();
    UserMapper mapper = sqlSession.getMapper(UserMapper.class);
    Map<String,Object>map = new HashMap<String,Object>();
    map.put("userid",13);
    map.put("username","ylw");
    map.put("userpwd","ylw");
    mapper.addUser2(map);
    sqlSession.commit();
    sqlSession.close();
}
Map传递参数直接在sql中取出key就可以了
5.模糊查询
模糊查询:写通配符语句
防sql注入–后台把用户能传的值限定好
select * from id=?(1 or 1=1);
select * from mybatis.user where name like %"#{value}"%
4.配置解析
1、核心配置文件
-
mybatis-config.xml
configuration(配置)
properties(属性)
settings(设置)
typeAliases(类型别名)
typeHandlers(类型处理器)
objectFactory(对象工厂)
plugins(插件)
environments(环境配置)
environment(环境变量)
transactionManager(事务管理器)
dataSource(数据源)
databaseIdProvider(数据库厂商标识)
mappers(映射器)
2、环境配置
MyBatis 可以配置成适应多种环境
不过要记住:尽管可以配置多个环境,但每个 SqlSessionFactory 实例只能选择一种环境。–default制定
<!--    事务管理--JDBC或者manage    -->
<transactionManager type="JDBC"/>
<!--    数据源    -->
<dataSource type="POOLED">
</dataSource>
学会使用配置多套运行环境!
mybatis默认事务管理器是jdbc,连接池:POOLED
3、属性(properties)
我们可以通过properties属性来实现引用配置而文件
这些属性都是可以外部配置且可动态替换的,既可以在典型的java属性文件中配置,也可以通过properties元素的子元素来传递–[db.properties]
db.properties
driver=com.mysql.jdbc.Driver
url=jdbc:mysql://localhost:3306/mybatis?useSSL=false&useUnicode=true&characterEncoding=UTF-8
username=root
password=123456
在xml中,所有的标签有顺序

<properties resource="db.properties">
    <property name="username" value="password"></property>
</properties>

<environments default="development">
    <environment id="development">
        <transactionManager type="JDBC"/>
        <dataSource type="POOLED">
        <property name="driver" value="${driver}"/>
        <property name="url" value="${url}"/>
        <property name="username" value="${username}"/>
        <property name="password" value="${password}"/>
    </dataSource>
</environment>
- 可以直接引入外部文件
- 可以在其中增加属性配置
- 如果两个文件有同一个字段,优先使用外部配置文件
4、类型别名(typeAliases)
- 类型别名可为 Java 类型设置一个缩写名字。
- 它仅用于 XML 配置,意在降低冗余的全限定类名书写。
给实体类起别名
<typeAliases>
        <typeAlias type="com.yang.pojo.User" alias="User"/>
</typeAliases>
也可以指定一个包名,MyBatis 会在包名下面搜索需要的 Java Bean
扫描实体类的包,他的默认别名就为这个类的类名,首字母小写
<package name="com.yang.pojo"/>
- 实体类比较少用第一种,比较多用第二种
- 第一种可以自定义(diy)别名,第二种不行(除非使用注解)
@Alias("hello")
//实体类
public class User {
5、设置


6、其他配置
-
类型处理器(typeHandlers)
-
对象工厂(objectFactory)
-
plugins
- mybatis-generater-core
- mybatis-plus
- 通用mapper
7、映射器(mapper)
MapperRegister:注册绑定我们的Mapper文件
<!-- 每一个Mapper.xml都需要在mybatis核心配置文件中注册 -->
推荐第一种
方式一:
 <mappers>
 	<mapper resource="com/yang/dao/UserMapper.xml"/>
 </mappers>
方式二:
<mappers>
 	<mapper class="com/yang/dao/UserMapper"/>
 </mappers>
注意点
- 接口和他的mapper下面必须同名!
- 接口和他的mapper配置文件必须在同一个包下!
方式三:使用扫描包进行注入绑定
<package name="com/yang/dao"/>
注意点
- 接口和他的mapper项目必须同名!
- 接口和他的mapper配置文件必须在同一个包下!
8、生命周期及作用域
5、属性名和字段名不一致
1、问题
类型处理器
解决方法
- 起别名
- resultemap
2、resultemap
结果集映射
id name pwd
id name password
<!--如果字段名一样,可以不用写-->
<resultMap id="UserMap" type="User">
    <result column="id" property="id"/>
    <result column="name" property="name"/>
    <result column="pwd" property="password"/>
</resultMap>
<select id="getUserList" resultType="UserMap">
    select * from mybatis.user;
</select>
不需要的字段可以删除
通过映射把可以不用写和数据库一样的字段
- resultMap元素是MyBatis中最重要最强大的元素
- 设计思想是,对于简单的语句根本不需要配置显式的结果映射,对于复杂的语句,只需描述他们的关系就行了
- 虽然你对它相当了解,但是不需要显式的用到他们
- 要是世界总是这么简单就好了
6、日志
6.1 日志工厂
logImpl
- SLF4J - LOG4J
- LOG4J2
- JDK_LOGGING
- COMMONS_LOGGING
- STDOUT_LOGGING[掌握]
- NO_LOGGING
name和value必须完全一样(区分大小写并且不能有空格)
<settings>
<setting name="logImpl" value="STDOUT_LOGGING"></setting>
</settings>
在mybatis中具体使用哪一个日志实现,在设置中设定
STDOUT_LOGGING标准日志输出
在mybatis核心配置文件中配置我们的日志

6.2 什么是LOG4J2
-
Log4j是Apache的一个开源项目,通过使用Log4j,我们可以控制日志信息输送的目的地是控制台、文件、GUI组件
-
我们也可以控制每一条日志的输出格式
-
通过定义每一条日志信息的级别,我们能够更加细致地控制日志的生成过程
可以通过一个配置文件来灵活地进行配置,而不需要修改应用的代码。
7、分页
为什么分页
- 减少数据的处理量
使用limit分页
select * from user limit [start,] len;#start可以省略不写
使用mybatis实现分页,核心就是limit
- 接口
- Mapper.xml
- 测试
别名
接口
public interface UserMapper {
    List<User> getUserList();
    List<User> getUserByLimit(Map<String,Integer> map);//多用map,好用
}
映射
<select id="getUserByLimit" parameterType="map" resultType="user">
    select * from mybatis.user limit #{startIndex},#{pageSize}
</select>
测试
@Test
public void getUserLIimit(){
    SqlSession sqlSession = MyBatisUtils.getsqlSession();
    UserMapper mapper = sqlSession.getMapper(UserMapper.class);
    HashMap<String, Integer> map = new HashMap<>();
    map.put("startIndex",0);
    map.put("pageSize",2);
    List<User> userList = (List<User>) mapper.getUserByLimit(map);
    for (User user:userList){
        System.out.println(user);
    }
}
8、注解开发
8.1、面向接口编程
原因:解耦
关于接口的了解:
- 定义与实现的分离
- 本身反映了系统设计人员对系统的抽象理解
- 接口有两类
- 对一个个体的抽象,对应一个抽象体
- 抽象面
- 一个抽象体可能有多个抽象面
三和面向区别
- 对象为单位
8.2、注解开发–主要是靠反射机制(java基础有)
对于简单项目可以使用注解开发,但是如果复杂一点儿的就力不从心了
1、注解在接口实现
public interface UserMapper {
        @Select("select * from user")
        List<User> getUserList();
}
2、核心配置文件绑定接口
<mappers>
    <mapper class="com.yang.dao.UserMapper"/>
</mappers>
3、测试
本质:反射机制实现
底层:动态代理
mybatis详细执行流程
xxx
8.3、注解crud
可以设置自动提交事务
public static SqlSession getsqlSession(){
    return sqlSessionFactory.openSession(true);
}
编写接口
public interface UserMapper {
    @Select("select * from user")
    List<User> getUserList();

    //多个元素一定要加@Param("xx")注解
    @Select("select * from user where id=#{id}")
    User getUserById(@Param("id") int id2);//后面的名字不重要
}
测试类:
我们必须要将接口注册绑定到我们的项目配置核心
关于@Param()注解
- 基本类型参数或者String类型,需要加上
- 引用类型不用加
- 如果只有一个基本类型的话,可以忽略,但是建议大家都加上
- 我们在sql中引用的就是我们这里的@Param设定的属性名
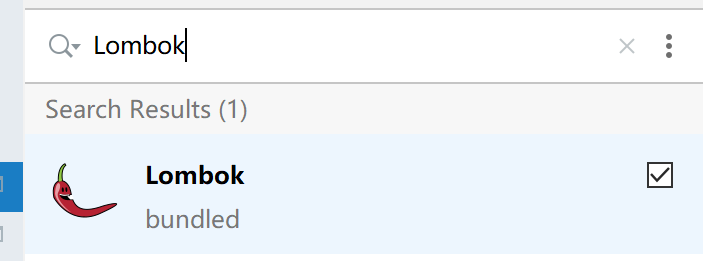
9、Lombok
Project Lombok is a java library that automatically plugs into your editor and build tools, spicing up your java.Never write another getter or equals method again, with one annotation your class has a fully featured builder, Automate your logging variables, and much more.
Lombok是一个Java库,能自动插入编辑器并构建工具,简化Java开发。通过添加注解的方式,不需要为类编写getter或eques方法,同时可以自动化日志变量。官网链接
- java library
- plugs
- build tools
- with one annotation your class
使用步骤
- 下载插件

-
导入jar包
<dependency>
	<groupId>org.projectlombok</groupId>
	<artifactId>lombok</artifactId>
	<version>1.18.4</version>
	<scope>provided</scope>
</dependency>
@Getter and @Setter
@FieldNameConstants
@ToString
@EqualsAndHashCode
@AllArgsConstructor, @RequiredArgsConstructor and @NoArgsConstructor
@Log, @Log4j, @Log4j2, @Slf4j, @XSlf4j, @CommonsLog, @JBossLog, @Flogger, @CustomLog
@Data
@Builder
@SuperBuilder
@Singular
@Delegate
@Value
@Accessors
@Wither
@With
@SneakyThrows
@val
@var
experimental @var
@UtilityClass
Lombok config system
Code inspections
Refactoring actions (lombok and delombok)
@Data:无参构造,Setter,Getter,ToString,Equils,全都包括了
@Data
@AllArgsConstructor
@NoArgsConstructor
//上面一般就是下面的集合
@AllArgsConstructor
@NoArgsConstructor
@Getter
@Setter
@EqualsAndHashCode
@ToString
10、多对一处理
10.1、复杂查询环境搭建
1、导入lombok
2、新建实体类Teacher,Student
3、建立Mapper接口
4、建立Mapper.xml文件
5、在核心配置文件中绑定注册我们的接口或者文件!【方式很多,随便选】
6、测试查询是否成功
resultMap–找到对应的字段
10.2、按照查询嵌套处理
复杂字段(多表查询如下)

查询的是一个对象

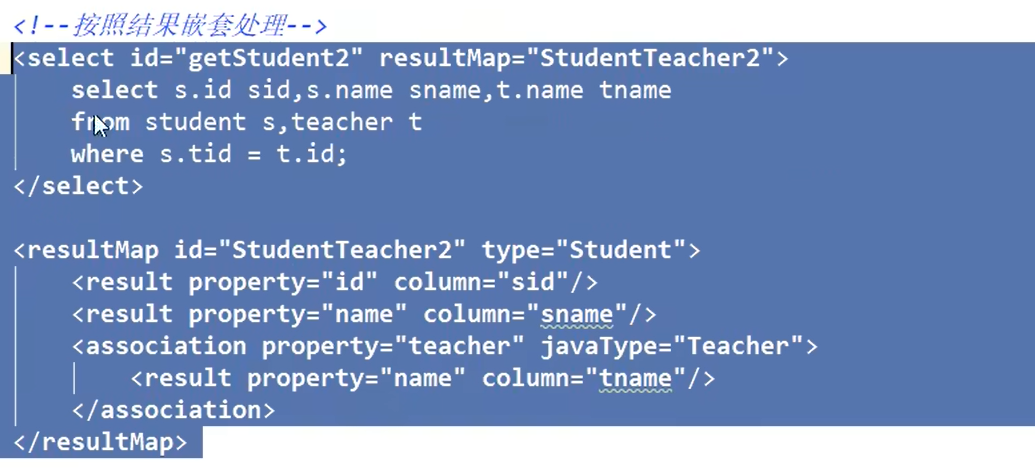
10.3、按照结果嵌套处理
嵌套里面再嵌套(结果集里是一个对象就用一个association)

回顾mysql多对一查询方式
- 子查询
- 连表查询
11、一对多
一个老师,多个学生
对象用association,集合用collection
结果嵌套处理
实体类
@Data
public class Teacher {
    private int id;
    private String name;
    private List<Student> students;
}
接口
//获取制定老师下面的所有学生信息
Teacher getTeacher(@Param("tid") int id);
映射
<select id="getTeacher" resultMap="TeacherStudent">
    select t.id tid,t.name tname,s.id sid,s.name sname
    from mybatis.teacher t,mybatis.student s
    where s.tid = t.id and t.id = #{tid}
</select>

<resultMap id="TeacherStudent" type="Teacher">
    <result property="id" column="tid"/>
    <result property="name" column="tname"/>
    <!--复杂的属性需要单独处理 对象:association,集合Lcollection-->
    <collection property="students" ofType="Student">
        <result property="id" column="sid"/>
        <result property="name" column="sname"/>
        <result property="tid" column="tid"/>
    </collection>
</resultMap>
测试
查询嵌套处理
实体类相同,接口相同
映射
<select id="getTeacher2" resultMap="TeacherStudent2">
    select * from mybatis.teacher where id=#{tid}
</select>
<resultMap id="TeacherStudent2" type="Teacher">
    <collection property="students" javaType="ArrayList" ofType="Student" select="getStudentByteacherId" column="id">
    </collection>
</resultMap>

<select id="getStudentByteacherId" resultType="Student" >
    select * from mybatis.student where tid=#{tid}
</select>
小结
- 关联–association【多对一】
- 集合–collection【一对多】
- javatype & oftype
- javatype是制定实体类种属性的类型
- oftype用来指定映射到List或者集合中的pojo类型,泛型中的约束类型
注意点:
- 保证sql的可读性
- 尽量保证通俗易懂
- 注意一对多和多对一中,属性名和字段的问题
- 如果问题不好排查,可以使用日志
- 尽量保证文件的
面试高频
- mysql引擎
- InnoDB
- 索引
- 索引优化
12、动态SQL
动态SQL就是根据不同条件生成不同的SQL语句
- 利用动态 SQL,可以彻底摆脱这种痛苦
<select id="findActiveBlogWithTitleLike"
     resultType="Blog">
  SELECT * FROM BLOG
  WHERE state = ‘ACTIVE’
  <if test="title != null">
    AND title like #{title}
  </if>
</select>
1、搭建环境
create table `blog`(
    `id` varchar(20)not null comment '博客id',
    `title` varchar(100) not null,
    `author` varchar(30)not null ,
    `create_time` datetime not null ,
    `views` int(30) not null);
创建一个基础工程
- 导包
- 编写配置文件
@Data
public class Blog {
    private int id;
    private String title;
    private String author;
    private Date createTime;
    private int views;
}
- 编写实体类
- 编写实体类对应的Mapper接口和Mapper.xml
2、IF
不加where标签
<select id="queryBlogIF" parameterType="map" resultType="map">
    select * from mybatis.blog
    <if test="title != null">
        and title like #{title}
    </if>
    <if test="author !=null" >
        and author =#{author}
    </if>
</select>
3、choose(when other)
只要一个,选择满足的一个,都不满足走ontherwise
<select id="queryBlogChoose" resultType="map" parameterType="map">
    select * from mybatis.blog
    <where>
        <choose>
            <when test="title !=null">
                title = #{title}
            </when>
            <when test="author !=null">
                and author= #{author}
            </when>
            <otherwise>
                and views =#{views}
            </otherwise>
        </choose>
    </where>
</select>
4、trim()
加了where,set标签(没有where可以,但是不安全)
where记得加and,它会帮我们删除多余的and
<select id="queryBlogIF" parameterType="map" resultType="map">
    select * from mybatis.blog
    <where>
        <if test="title != null">
            and title like #{title}
        </if>
        <if test="author !=null">
            and author =#{author}
        </if>
    </where>
</select>
set就是修改的部分,记得加逗号,它会帮你去除多余的逗号
<update id="updateBlog" parameterType="map">
    update mybatis.blog
    <set>
        <if test="title !=null">
            title=#{title},
        </if>
        <if test="author !=null">
            author=#{author},
        </if>
    </set>
    <where>
        id=#{id}
    </where>
</update>
可以用trim定制
sql片段:
抽取一些常用的语句,单独作为sql片段
- sql抽取
<sql id="if-title-author">
    <if test="title != null">
        and title like #{title}
    </if>
    <if test="author !=null">
        and author =#{author}
    </if>
</sql>
- include引用
<select id="queryBlogIF" parameterType="map" resultType="map">
    select * from mybatis.blog
    <where>
        <include refid="if-title-author"></include>
    </where>
</select>
注意事项:
- 最好基于表单来定义sql片段
- 不要存在where标签
foreach
sql
13、缓存
13.1、简介
查询:连接数据库,耗资源!
一次查询的结果,给他暂存在一个可以直接取到的地方-->内存:缓存

当再次访问相同数据的啥时候,直接走缓存,就不用走数据库了
1、什么是缓存cache
- 存在内存里面的临时数据
- 将用户经常查询的数据放进缓存
2、为什么使用缓存
- 减少和数据库的交互次数,减少系统开销,提升系统效率
3、什么样的数据能使用缓存
- 经常使用并且不经常改变的数据
- 反过来就不要了
13.2、Mybatis缓存
- MyBatis包含一个非常强大的查询缓存特性,他可以非常方便的定制和配置缓存,缓存可以极大的提高查询效率
- MyBatis默认两级缓存:一级和二级
- 默认只有一级缓存开启
- 二级缓存需要手动开启和配置
- 为了提高扩展性,MyBatis定义了缓存接口Cache,我们可以通过接口定义cache缓存
13.3、一级缓存
一级缓存又叫本地缓存:SqlSession(默认开启)
- 与数据库同一次会话期间查询到的数据回放到本地缓存中。
- 以后如果需要获取相同的数据,直接从缓存中拿,没必要再去查数据库
测试步骤
- 开启日志
- 测试在一个Session中查询两次相同记录
- 查看日志输出
缓存失效的情况
-
查询不同的东西
-
增删改
-
查询不同的Mapper
-
手动清楚缓存
sqlSession.clear()
总结:一级缓存默认开启,可以看作是一个map,把数据放进去,每次访问都会给你这个数据
13.4、二级缓存
-
二级缓存又叫全局缓存,一级缓存作用域太低了,所以诞生了二级缓存
-
基于namespace级别的缓存,一个名称空间对应一个二级缓存
-
工作机制
- 一个会话查询一条数据,这个数据就会被放到当前会话的一级缓存中
- 二u过当前会话关闭了,这个会话对应的一级缓存就没了,但是我们想要的是,会话关闭了,一级缓存中的数据被保存到二级缓存
- 新的会话查询信息,就可以从二级缓存中获取内容
- 不同的mapper查出的数据会被放到对应的缓存(map)中
开启缓存
开启默认显示缓存
<setting name="cacheEnabled" value="true"></setting>
<cache/>
在要使用二级缓存的时候开启
<cache/>
也可以自定义一些参数
<cache eviction="FIFO"
       flushInterval="60000"
       size="512"
       readOnly="true"/>
一级缓存关闭,二级缓存开启
sqlsession.close()
-
测试
-
问题:我们要将实体类序列化!否则会报错
public class User implements Serializable{}
-
小结
- 只要开启了二级缓存,在同一个Mapper下就有效
- 所有的数据都会先放在一级缓存中
- 只有当会话提交或者关闭的时候,才会提交到二级缓冲中
13.5、MyBatis缓存原理
缓存顺序
- 先走二级缓存(如果开启了的话)
- 再看一级缓存
- 然后看数据库有没有
- 最后把数据放进缓存(如果没在缓存里面找到的话)
13.6、自定义缓存ehcache
Ehcache是一种广泛使用的开源java分布式缓存,主要面向通用缓存
-
先导包(百度–包名 maven)
-
自定义文件(xml)
MyBatis总结
Mybatis新手常见问题
问题一:
### Error building SqlSession.
### The error may exist in com/yang/dao/UserMapper.xml
### Cause: org.apache.ibatis.builder.BuilderException: Error parsing SQL Mapper Configuration. Cause: org.apache.ibatis.builder.BuilderException: Error creating document instance.  Cause: org.xml.sax.SAXParseException; lineNumber: 5; columnNumber: 14; 1 字节的 UTF-8 序列的字节 1 无效。
MyBatis配置文件之后出现的错误,而且出现了一长串,通过名字和行数定位了问题,原来pom.xml不能有中文,所以去掉所有中文注释行
问题二:
org.apache.ibatis.binding.BindingException: Invalid bound statement (not found): com.yang.dao.UserMapper.getUserList
Invalid bound statement (not found)这个问题的实质就是 mapper接口和mapper.xml没有映射起来,而有一个小细节是:这里的mapper的xml配置文件里面的id不能随便写,mapper接口的函数名称和mapper.xml里面的标签id必须是一致的,我以为随便哪个都行结果大错特错,结果表示没找到。
类似问题解决方案:https://www.jianshu.com/p/8858d3f997e2
问题三,xml文件报错
Cause: java.sql.SQLSyntaxErrorException: Unknown column '娴�' in 'field list'
当你mybatis用$-美元字符时,必须要给非整型的(尤其是中文)加上引号,当你使用#井号时,可以不用在意
所以尽量多用#号,可以防注入等多个优点(详情可以看crud部分的介绍)
汇总小问题:
- 不要匹配错标签,id对应的是dao里面的类!
- resource绑定mapper,需要使用路径
- 程序配置文件必须符合规范–比如不能有中文
- NullPointException,没有注册到资源
- 输出的xml文件中存在中文乱码问题
- maven资源没有导出问题
总结
基础配置
- pom.xml
- 配置一些依赖包的导入
功能部分需要三个部分
-
pojo实体类
- 对象的基本组成以及类型
-
dao里面的xMapper接口(映射到xml文件)
- 各种获取数据的放大
-
xml文件
- 配置各个映射,其中包括了各个方法
资源部分需要两个部分
-
x.properties文件
- 包括了数据库基础配置文件日志配置文件(非必须)
-
mybatis-config.xml文件
-
配置环境(数据库的资源导入)
<properties resource="db.properties" /> -
日志
<settings> <setting name="logImpl" value="STDOUT_LOGGING"></setting> </settings> -
映射(包的映射,避免以后在功能部分导入包的时候还用完整的路径)
-
一共3种方法—typeAlias(类型别名,这个可以用注解),package(这个),class
<typeAliases>
    <typeAlias type="com.yang.pojo.User" alias="User"/>
    <package name="com.yang.pojo"/>
</typeAliases>
-

