文章目录
- 背景
- 实现换肤步骤
- 解析插件 apk 的包信息
- 获取插件 apk 的 Resources 对象
- 替换资源
- 简单的插件化换肤实现和存在的问题
- 换肤如何动态刷新?
- 控件换肤刷新的性能考虑
- 如何降低 xml 布局中 View 的替换成本
- LayoutInflater 原理
- LayoutInflater.Factory2 替换 View
- 小结
- 多线程 inflate 存在的隐患
背景
不知道你在接到项目需求需要实现换肤功能时,有没有想过到底为什么需要换肤?虽然这是一篇技术文章,但我们不妨从产品和运营的角度想一想,实现换肤它究竟有什么样的价值?
在 Android 10 从系统层面已经为我们提供了深色主题(也就是夜间模式),它也可以认为是换肤的一种,官方文档对深色主题列举了以下优势:
-
可大幅减少耗电量(具体取决于设备的屏幕技术)
-
为弱视以及对强光敏感的用户提高可视性
-
让所有人都可以在光线较暗的环境中更轻松地使用设备
系统提供给我们只有日间和夜间模式,从用户的角度它满足了在日间和夜间两种场景下更好的使用 app。
对于互联网公司的产品和运营的角度,这并不能满足需求,换肤的实现会更偏向于满足活动需要,比如在不同的活动节日时 app 可以切换为符合运营活动的皮肤贴合活动主题,让活动能有更好的宣传效果带来更多的利益。
本篇文章主要围绕插件化换肤讲解其实现和相关的原理。
实现换肤步骤
实现换肤,这里先给出实现步骤和结论:
-
解析插件 apk 的包名
-
获取插件 apk 的 Resources 对象
-
控件使用资源,使用插件 apk 的包名和 Resources 对象获取指定名称的皮肤资源 id
解析插件 apk 的包信息
或许你会疑惑为什么需要获取插件 apk 的包信息,因为步骤 3 在获取插件 apk 的资源 id 时会使用到:
// name:资源名称。比如在 res/values/colors.xml 定义的颜色名称为 <color name="text_color">#FFFFFF</color>
// type:资源类型。如果是颜色资源则是 color,图片资源可能是 drawable 或 mipmap
// pkgName:包名
mResources.getIdentifier(name, type, pkgName);
其中参数 pkgName 就是插件 apk 的包名。需要注意的是,插件 apk 的包名不能与宿主 app 的包名相同(即插件 apk 的包名不能和要替换皮肤资源的 app 包名相同)。
获取插件 apk 包名代码如下:
// skinPkgPath 是插件 apk 的文件路径
public String getSkinPackageName(String skinPkgPath) {
    PackageManager mPm = mAppContext.getPackageManager();
    PackageInfo info = mPm.getPackageArchiveInfo(skinPkgPath, PackageManager.GET_ACTIVITIES);
    return info.packageName;
}
获取插件 apk 的 Resources 对象
获取插件 apk 的 Resources 对象的方式有两种,网上比较常见的是使用反射的方式,将插件 apk 的文件路径设置给隐藏方法 AssetManager.addAssetPath(skinPkgPath):
public Resources getSkinResources(String skinPkgPath) {
    try {
        AssetManager assetManager = AssetManager.class.newInstance();
        Method addAssetPath = assetManager.getClass().getMethod("addAssetPath", String.class);
        addAssetPath.invoke(assetManager, skinPkgPath);

        Resources superRes = mAppContext.getResources();
        return new Resources(assetManager, superRes.getDisplayMetrics(), superRes.getConfiguration());
    } catch (Exception e) {
        e.printStackTrace();
    }
    return null;
}
另一种方式是通过 PackageManager.getResourcesForApplication(applicationInfo):
public Resources getSkinResources(String skinPkgPath) {
    try {
        PackageInfo packageInfo = mAppContext.getPackageManager().getPackageArchiveInfo(skinPkgPath, 0);
        packageInfo.applicationInfo.sourceDir = skinPkgPath;
        packageInfo.applicationInfo.publicSourceDir = skinPkgPath;
        Resources res = mAppContext.getPackageManager().getResourcesForApplication(packageInfo.applicationInfo);
        Resources superRes = mAppContext.getResources();
        return new Resources(res.getAssets(), superRes.getDisplayMetrics(), superRes.getConfiguration());
    } catch (Exception e) {
        e.printStackTrace();
    }
    return null;
}
替换资源
通过上面的步骤获取了插件 apk 的包名和 Resources 对象,使用它们获取对应资源名称的资源 id:
public Drawable getSkinDrawable(Context context, int resId) {
	int targetResId = getTargetResId(context, resId);
	if (targetResId != 0) {
		// mResources 是插件 apk 的 Resources 对象
		return mResources.getDrawable(targetResId);
	}
	return context.getResources().getDrawable(resId);
}

public int getSkinColor(Context context, int resId) {
	int targetResId = getTargetResId(context, resId);
	if (targetResId != 0) {
		// mResources 是插件 apk 的 Resources 对象
		return mResources.getColor(targetResId);
	}
	return context.getResources().getColor(resId);
}

// 其他资源获取同理
...

public int getTargetResId(Context context, int resId) {
	try {
		// 根据资源 id 获取资源名称
		String name = context.getResources().getResourceEntryName(resId);
		// 根据资源 id 获取资源类型
		String type = context.getResources().getResourceTypeName(resId);
		// 获取插件 apk 对应资源名称的资源,mResources 和 mSkinPkgName 分别是插件 apk 的Resources 对象和包名
		return mResources.getIdentifier(name, type, mSkinPkgName);
	} catch (Exception e) {
		return 0;
	}
}
简单的插件化换肤实现和存在的问题
根据上述三个步骤,下面简单的实现一个插件化换肤的 demo。直接上代码:
<?xml version="1.0" encoding="utf-8"?>
<LinearLayout xmlns:android="http://schemas.android.com/apk/res/android"
    xmlns:tools="http://schemas.android.com/tools"
    android:layout_width="match_parent"
    android:layout_height="match_parent"
    android:orientation="vertical"
    tools:context=".MainActivity">

    <ImageView
        android:id="@+id/image_view"
        android:layout_width="100dp"
        android:layout_height="100dp"
        android:background="@drawable/test"
        tools:ignore="ContentDescription" />

    <Button
        android:id="@+id/btn_replace"
        android:layout_width="wrap_content"
        android:layout_height="wrap_content"
        android:text="replace"
        android:textAllCaps="false" />
</LinearLayout>

public class MainActivity extends AppCompatActivity {

    private String mSkinApkPath;
    private String mSkinPackageName;
    private Resources mSkinResources;

    @Override
    protected void onCreate(Bundle savedInstanceState) {
        super.onCreate(savedInstanceState);

        ActivityMainBinding binding = ActivityMainBinding.inflate(getLayoutInflater());
        setContentView(binding.getRoot());

        binding.btnReplace.setOnClickListener(new View.OnClickListener() {
            @Override
            public void onClick(View v) {
                if (TextUtils.isEmpty(mSkinApkPath)) {
                    mSkinApkPath = getSkinApkPath();
                }
                if (TextUtils.isEmpty(mSkinPackageName)) {
                    mSkinPackageName = getSkinPackageName(mSkinApkPath);
                }
                if (mSkinResources == null) {
                    mSkinResources = getSkinResources(mSkinApkPath);
                }
                // 替换的资源 id 为 R.drawable.test
                int targetResId = getTargetResId(mSkinResources, mSkinPackageName, R.drawable.test1);
                if (targetResId != 0) {
                    Drawable drawable = mSkinResources.getDrawable(targetResId);
                    if (drawable != null) {
                        binding.imageView.setBackground(drawable);
                    }
                }
            }
        });
    }

    private String getSkinApkPath() {
        File skinApkDir = new File(getCacheDir(), "skin");
        if (!skinApkDir.exists()) {
            skinApkDir.mkdirs();
        }
        File skinApkFile = new File(skinApkDir + File.separator + "skin.zip");
        // 实际项目一般是通过网络下载插件 apk 文件
        // 这里是将插件 apk 放在 assets 目录
        try(BufferedSource sourceBuffer = Okio.buffer(Okio.source(getAssets().open("skin.zip")));
            BufferedSink sinkBuffer = Okio.buffer(Okio.sink(skinApkFile))) {
            sinkBuffer.write(sourceBuffer.readByteArray());
        } catch (IOException e) {
            e.printStackTrace();
        }

        if (!skinApkFile.exists()) {
            return null;
        }

        return skinApkFile.getAbsolutePath();
    }

    // 获取插件 apk 包名即 com.example.skin.child
    private String getSkinPackageName(String skinApkPath) {
        if (TextUtils.isEmpty(skinApkPath)) return null;

        PackageManager mPm = getPackageManager();
        PackageInfo info = mPm.getPackageArchiveInfo(skinApkPath, PackageManager.GET_ACTIVITIES);
        return info.packageName;
    }

    // 获取插件 apk 的 Resources
    private Resources getSkinResources(String skinApkPath) {
        if (TextUtils.isEmpty(skinApkPath)) return null;

        try {
            AssetManager assetManager = AssetManager.class.newInstance();
            Method addAssetPath = assetManager.getClass().getMethod("addAssetPath", String.class);
            addAssetPath.invoke(assetManager, skinApkPath);

            Resources superRes = getResources();
            return new Resources(assetManager, superRes.getDisplayMetrics(), superRes.getConfiguration());
        } catch (Exception e) {
            e.printStackTrace();
        }
        return null;
    }

    // 根据 id 查找到资源名称和类型,再使用插件 apk 的 Resources 查找对应资源名称的 id
    private int getTargetResId(Resources skinResources, String skinPackageName, int resId) {
        if (mSkinResources == null || TextUtils.isEmpty(skinPackageName) || resId == 0) return 0;

        try {
            String resName = getResources().getResourceEntryName(resId);
            String type = getResources().getResourceTypeName(resId);
            return skinResources.getIdentifier(resName, type, skinPackageName);
        } catch (Exception e) {
            e.printStackTrace();
        }
        return 0;
    }
}
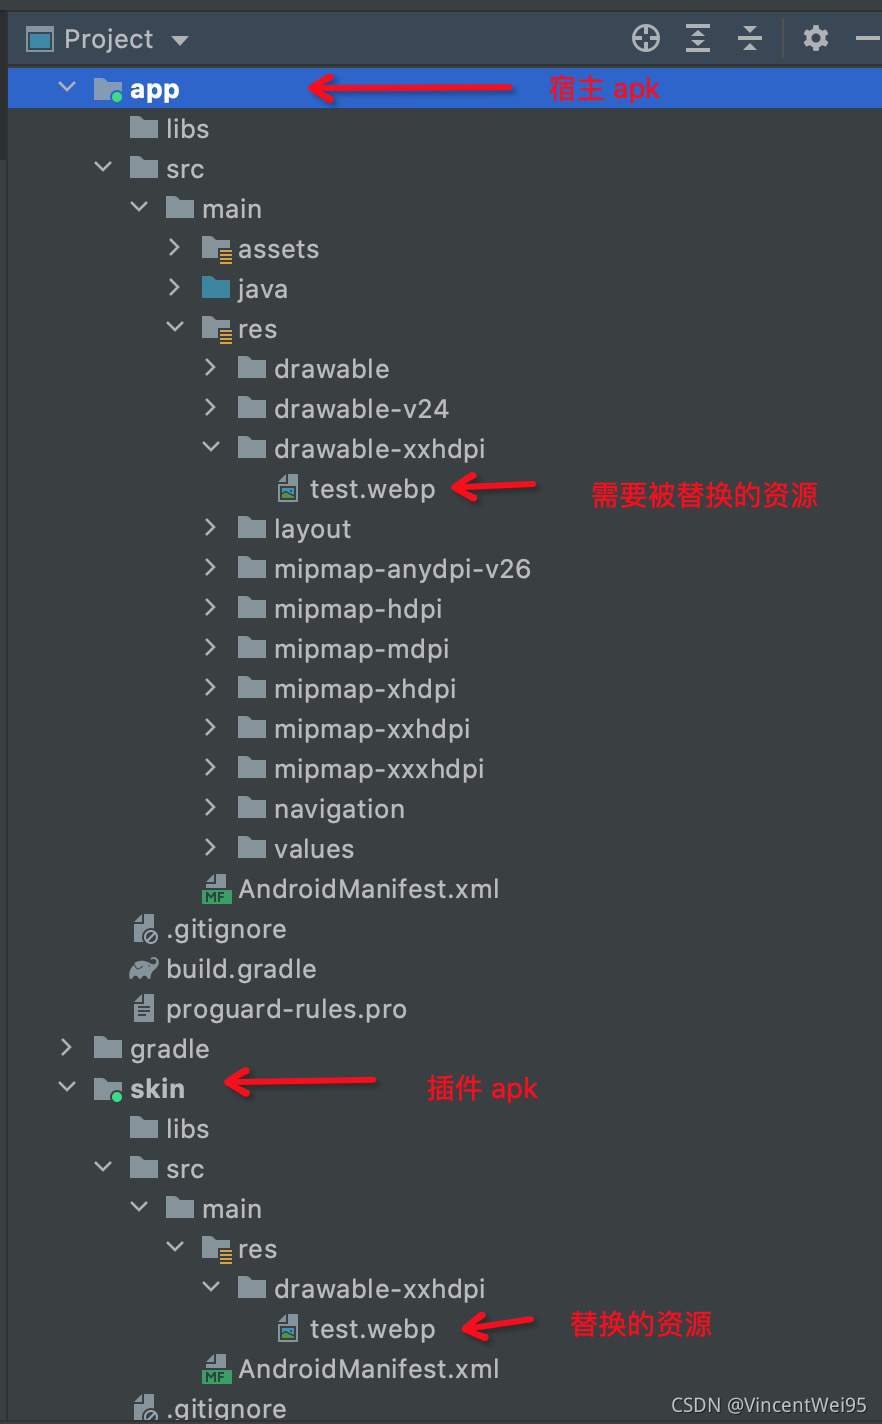
代码实现比较简单,ImageView 在 xml 布局文件设置了一个图片背景 R.drawable.test,当点击按钮时会读取装载插件 apk 的包信息和 Resources,替换插件 apk 指定名称的资源。
上面的代码同样也是插件化换肤的核心代码。
运用在实际项目需要考虑和解决几个问题。
换肤如何动态刷新?
从产品的角度考虑,换肤的实现最直观的方式就是能够一键换肤,根据选择的皮肤可以快速的动态刷新界面并展示换肤后的效果。
需要注意的是,被通知刷新的界面不仅仅是当前页面,而是所有页面,在后台的页面和新跳转的页面也能跟随皮肤切换。
或许你会想到 让页面重建或 app 重启的方式,这虽然可行,但是并不可取。页面重建意味着页面状态丢失,页面的重建会带给用户比较糟糕的体验;为了祢补这个问题,对每个页面都追加保存状态,即在 onSaveInstanceState() 保存状态,但这将会是巨大的工作量。
一个可行的方式是,通过 registerActivityLifecycleCallbacks() 监听每一个 Activity 页面,当操作完换肤后返回时,在 onActivityResumed() 获取到对应的界面刷新 View 换肤:
// SkinObserver 会去 mFactoryMap 获取 LayoutInflater.Factory2 尝试刷新
private WeakHashMap<Context, SkinObserver> mSkinObserverMap;
private WeakHashMap<Context, LayoutFactory.Factory2> mFactoryMap;

application.registerActivityLifecycleCallbacks(new ActivityLifecycleCallbacks() {
	@Override
	public void onActivityCreated(@NonNull Activity activity, @Nullable Bundle savedInstanceState) {
		// getLayoutFactory2() 返回 LayoutInflater.Factory2 实现类
		// 记录所有需要换肤的 View
		LayoutInflater inflater = LayoutInflater.from(activity);
		inflater.setFactory2(getLayoutFactory2(activity));
	}

	@Override
	public void onActivityResumed(Activity activity) {
		// 以 activity 为 key,获取对应界面的 LayoutInflater.Factory2
		// 界面可见时尝试通知 View 刷新,主要处理从其他位置操作换肤返回后及时刷新换肤效果
		SkinObserver observer = getObserver(activity);
		observer.updateSkinIfNeed();
	}

	@Override
	public void onActivityDestroyed(@NonNull Activity activity) {
		// 销毁监听
		mSkinObserverMap.remove(activity);
		mFactoryMap.remove(activity);
	}
});
控件换肤刷新的性能考虑
大部分情况下换肤并不需要将界面所有的 View 更新并且只更新 View 的部分属性,我们并不希望替换皮肤时 View 的所有属性重新被渲染刷新,这样能最好的做到减少性能损耗。所以换肤刷新可以有以下优化方向:
-
只更新需要换肤的 View
-
需要换肤的 View 只需要更新部分指定的属性。比如 ImageView 可能只需要更新一个 drawable 背景,TextView 只需要更新 textColor 文字颜色
因为 TextView 或 ImageView 等都是 Android 提供的控件,我们无法直接修改它们的内部代码,只实现更新部分属性的需求首先我们需要自定义 View:
public class SkinTextView extends TextView {
	...
}

public class SkinImageView extends ImageView {
	...
}
为了能在换肤时,收到通知的界面控件能统一处理,自定义 View 可以统一实现自定义的接口 ISkinUpdater,处理接收到通知的 View 能处理更新属性:
public interface ISkinUpdater {
	void updateSkin();
}

public class SkinTextView extends AppCompatTextView implements ISkinUpdater {
	public void updateSkin() {
		// 根据插件 apk 的 Resources 更新 textColor
	}
}

public class SkinImageView extends AppCompatImageView implements ISkinUpdater {
	public void updateSkin() {
		// 根据插件 apk 的 Resources 更新 background
	}
}
如何降低 xml 布局中 View 的替换成本
根据上面的设计思路,我们需要将所有需要换肤的 View 都替换为实现了 ISkinUpdater 接口的 View:
<!-- 替换前 -->
<TextView
	android:layout_width="wrap_content"
	android:layout_height="wrap_content"
	android:text="Hello World"
	android:textColor="@color/skin_color" />

<!-- 替换后 -->
<com.example.skin.widget.SkinTextView
	android:layout_width="wrap_content"
	android:layout_height="wrap_content"
	android:text="Hello World"
	android:textColor="@color/skin_color" />
如果项目界面很多,这将是一个较大的工作量,而且哪一天需要剔除或者替换换肤库,这无异于进行一次重构。
所以我们还需要解决如何最低成本的完成 View 的替换,又不需要手动修改 xml 布局已经定义好的 View。
LayoutInflater 是在开发中经常接触到的可以将 xml 布局转换为 View 的工具,xml 可以解析为 View,是否可以通过它在解析 View 时干扰并修改为我们需要的自定义 View?
如果有了解过 LayoutInflater,查看其源码就可以发现 Android 已经为我们提供了 hook。为了更好的理解,下面简单介绍下 LayoutInflater 的原理。
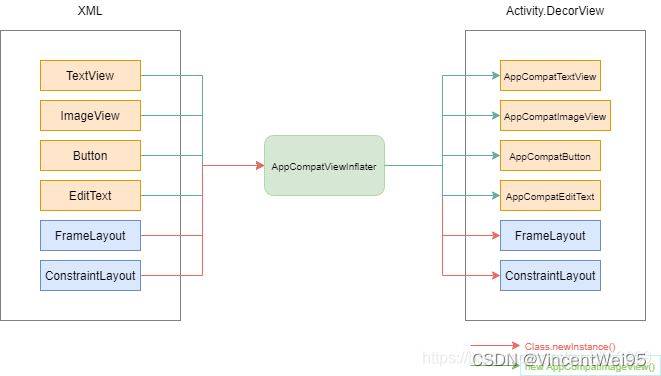
LayoutInflater 原理
当我们在 xml 文件布局中定义了一个 TextView 或 ImageView 时,最终日志打印输出的控件变成了 AppCompatTextView(或 MaterialTextView) 和 AppCompatImageView:
<?xml version="1.0" encoding="utf-8"?>
<LinearLayout xmlns:android="http://schemas.android.com/apk/res/android"
    xmlns:tools="http://schemas.android.com/tools"
    android:layout_width="match_parent"
    android:layout_height="match_parent"
    android:orientation="vertical"
    tools:context=".MainActivity">

    <TextView
        android:id="@+id/text_view"
        android:layout_width="wrap_content"
        android:layout_height="wrap_content" />

    <ImageView
        android:id="@+id/image_view"
        android:layout_width="100dp"
        android:layout_height="100dp"
        tools:ignore="ContentDescription" />
</LinearLayout>

输出结果:
2021-08-29 13:30:39.805 12506-12506/com.example.skin I/MainActivity: textView = com.google.android.material.textview.MaterialTextView{7ff63ad V.ED..... ......ID 0,0-0,0 #7f0801ab app:id/text_view}
2021-08-29 13:30:39.806 12506-12506/com.example.skin I/MainActivity: imageView = androidx.appcompat.widget.AppCompatImageView{cea56e2 V.ED..... ......I. 0,0-0,0 #7f0800c5 app:id/image_view}
它是怎么做到的?
在 xml 布局定义的控件最终都会通过 LayoutInflater.inflate() 创建 View 对象。具体分析下 LayoutInflater 的原理。
public View inflate(@LayoutRes int resource, @Nullable ViewGroup root) {
    return inflate(resource, root, root != null);
}

public View inflate(@LayoutRes int resource, @Nullable ViewGroup root, boolean attachToRoot) {
    final Resources res = getContext().getResources();
    ...

	// 获取 xml 解析器
    XmlResourceParser parser = res.getLayout(resource);
    try {
    	// 解析 xml
        return inflate(parser, root, attachToRoot);
    } finally {
        parser.close();
    }
}
在使用 LayoutInflater.from(context).inflate(layoutId, parent, attachToRoot) 时会需要传入三个参数,除了 layoutId 还有 root 和 attachToRoot,这两个参数的用处是什么?同样带着这个问题接着分析源码。
public View inflate(XmlPullParser parser, @Nullable ViewGroup root, boolean attachToRoot) {
    synchronized (mConstructorArgs) {
        final Context inflaterContext = mContext;
        final AttributeSet attrs = Xml.asAttributeSet(parser);
        Context lastContext = (Context) mConstructorArgs[0];
        mConstructorArgs[0] = inflaterContext;
        View result = root;

		try {
			final String name = parser.getName();

			// 如果是 <merge /> 标签
			if (TAG_MERGE.equals(name)) {
                if (root == null || !attachToRoot) {
                    throw new InflateException("<merge /> can be used only with a valid "
                            + "ViewGroup root and attachToRoot=true");
                }

                rInflate(parser, root, inflaterContext, attrs, false);
            } else {
                // 创建 view
                final View temp = createViewFromTag(root, name, inflaterContext, attrs);

                ViewGroup.LayoutParams params = null;

                if (root != null) {
                    // 创建 root 的 LayoutParams
                    params = root.generateLayoutParams(attrs);
                    if (!attachToRoot) {
                        // 布局创建的 view 使用 root 的 LayoutParams
                        temp.setLayoutParams(params);
                    }
                }

                // 创建子 view
                rInflateChildren(parser, temp, attrs, true);

                // 如果 root != null && attachToRoot=true
                // 布局的 view 会添加到指定的 root
                if (root != null && attachToRoot) {
                    root.addView(temp, params);
                }

                // 如果 root == null || attachToRoot=false
                // 布局的 view 就是顶层的 view
                if (root == null || !attachToRoot) {
                    result = temp;
                }
            }
		} catch (...) {
			...
		}

		return result;
    }
}
根据上面的源码分析,inflate() 传入的 root 和 attachToRoot 参数的作用如下:
-
当 root != null && attachToRoot=true,xml 布局解析创建的顶层 View 会添加到指定的 root,并使用 root 的 LayoutParams,最终返回 root
-
当 root == null || attachToRoot=false,xml 布局解析创建的顶层 View 就是最终返回的 view
根据 root 的 attachToRoot 的数值具体可以分别以下几种情况:
-
root == null && attachToRoot=false:xml 布局解析创建的顶层 View 就是最终返回的 View
-
root != null && attachToRoot=false:xml 布局解析创建的顶层 View 就是最终返回的 View,该 View 使用 root 的 LayoutParams
-
root == null && attachToRoot=true:xml 布局解析创建的顶层 View 就是最终返回的 View
-
root != null && attachToRoot=true:xml 布局解析创建的顶层 View 会被添加到 root 作为子 View,并使用 root 的 LayoutParams
继续分析创建 View 的方法 createViewFromTag():
View createViewFromTag(View parent, String name, Context context, AttributeSet attrs,
        boolean ignoreThemeAttr) {
    if (name.equals("view")) {
        name = attrs.getAttributeValue(null, "class");
    }

    // Apply a theme wrapper, if allowed and one is specified.
    if (!ignoreThemeAttr) {
        final TypedArray ta = context.obtainStyledAttributes(attrs, ATTRS_THEME);
        final int themeResId = ta.getResourceId(0, 0);
        if (themeResId != 0) {
            context = new ContextThemeWrapper(context, themeResId);
        }
        ta.recycle();
    }

    try {
		if (name.equals(TAG_1995)) {
			// Let's party like it's 1995!
			return new BlinkLayout(context, attrs);
		}

		View view;
		if (mFactory2 != null) {
			// 如果 LayoutInflater.Factory2 != null,优先使用它创建 view
			view = mFactory2.onCreateView(parent, name, context, attrs);
		} else if (mFactory != null) {
			// 如果 LayoutInflater.Factory != null,使用它创建 view
			view = mFactory.onCreateView(name, context, attrs);
		} else {
			view = null;
		}

		if (view == null && mPrivateFactory != null) {
			view = mPrivateFactory.onCreateView(parent, name, context, attrs);
		}

        if (view == null) {
            final Object lastContext = mConstructorArgs[0];
            mConstructorArgs[0] = context;
            try {
            	// LayoutInflater.Factory2 和 LayoutInflater.Factory 都没有创建 view,通过反射创建 view
                if (-1 == name.indexOf('.')) {
                    view = onCreateView(context, parent, name, attrs);
                } else {
                    view = createView(context, name, null, attrs);
                }
            } finally {
                mConstructorArgs[0] = lastContext;
            }
        }

        return view;
    } catch (...) {
       ...
    }
}
createViewFromTag() 分为三个步骤创建 View:
-
优先判断 LayoutInflater.Factory2 != null,使用它创建 View
-
判断 LayoutInflater.Factory != null,使用它创建 View
-
如果 LayoutInflater.Factory2 和 LayoutInflater.Factory 都没有创建 View,通过反射创建 View
其中变量 mFactory2 和 mFactory 就是 LayoutInflater.Factory2 和 LayoutInflater.Factory,系统提供了创建 View 的 hook 接口,根据需要可以提供 LayoutInflater.Factory2 优先于系统自定义创建 View。
上面提到的 AppCompatTextView 和 AppCompatImageView 等兼容控件 Android 也是通过 hook 的方式实现替换:
class AppCompatDelegateImpl extends AppCompatDelegate
	implementation MenuBuilder.Callback, LayoutInflater.Factory2 {
	...

	@Override
	public View createView(View parent, final String name, @NonNull Context context,
            @NonNull AttributeSet attrs) {
		...

		return mAppCompatViewInflater.createView(parent, name, context, attrs, inheritContext,
                IS_PRE_LOLLIPOP, /* Only read android:theme pre-L (L+ handles this anyway) */
                true, /* Read read app:theme as a fallback at all times for legacy reasons */
                VectorEnabledTintResources.shouldBeUsed() /* Only tint wrap the context if enabled */
        );
	}
}

public class AppCompatViewInflater {
	...

	final View createView(View parent, final String name, @NonNull Context context,
            @NonNull AttributeSet attrs, boolean inheritContext,
            boolean readAndroidTheme, boolean readAppTheme, boolean wrapContext) {
		...

		switch(name) {
			// 将 TextView 替换为 AppCompatTextView
			case "TextView":
				view = new AppCompatTextView(context, attrs);
				break;
			...
		}
	}
}
跟踪源码可以知道会在 Activity 的 onCreate() 时将 LayoutInflater.Factory2 赋值:
public class AppCompatActivity extends FragmentActivity implements AppCompatCallback,
        TaskStackBuilder.SupportParentable, ActionBarDrawerToggle.DelegateProvider {
	...

	@Override
    protected void onCreate(@Nullable Bundle savedInstanceState) {
        final AppCompatDelegate delegate = getDelegate();
        delegate.installViewFactory(); // 设置 LayoutInflater.Factory2
        delegate.onCreate(savedInstanceState);
        super.onCreate(savedInstanceState);
    }
}

class AppCompatDelegateImpl extends AppCompatDelegate
        implements MenuBuilder.Callback, LayoutInflater.Factory2 {
	...

	@Override
    public void installViewFactory() {
        LayoutInflater layoutInflater = LayoutInflater.from(mContext);
        if (layoutInflater.getFactory() == null) {
            LayoutInflaterCompat.setFactory2(layoutInflater, this);
        } else {
            if (!(layoutInflater.getFactory2() instanceof AppCompatDelegateImpl)) {
                Log.i(TAG, "The Activity's LayoutInflater already has a Factory installed"
                        + " so we can not install AppCompat's");
            }
        }
    }
}
具体流程图如下:
LayoutInflater.Factory2 替换 View
根据上面源码分析 Android 提供了 LayoutInflater.Factory2 支持开发者自定义创建 View。具体代码如下:
public class MyFactory2 implements LayoutInflater.Factory2 {
	private SkinViewInflater mSkinViewInflater;
	// 临时存储每个界面的 View,方便返回时通知可见界面更新换肤
	private final List<WeakReference<ISkinUpdater>> mSkinUpdaters = new ArrayList<>();

	@Overrice
	public View onCreateView(View parent, String name, Context context, AttributeSet attrs) {
		// 自定义创建 View
		View view = createView(context, name, attrs);
		// 如果没有创建 View,返回 null 最后会通过反射创建 View
		if (view == null) {
			return null;
		}
		if (view instanceOf ISkinUpdater) {
			mSkinUpdaters.add(new WeakReference<>((ISkinUpdater) view)));
		}
		return view;
	}

	@Override
	public View onCreateView(String name, Context context, AttributeSet attrs) {
		// 自定义创建 View
		View view = createView(context, name, attrs);
		// 如果没有创建 View,返回 null 最后会通过反射创建 View
		if (view == null) {
			return null;
		}
		if (view instanceOf ISkinUpdater) {
			mSkinUpdaters.add(new WeakReference<>((ISkinUpdater) view)));
		}
		return view;
	}

	private View createView(Context context, String name, AttributeSet attrs) {
		if (mSkinViewInflater == null) {
			mSkinViewInflater = new SkinViewInflater();
		}
		...
		return mSkinViewInflater.createView(parent, name, context, attrs);
	}

	// 通知更新 View 换肤(替换资源)
	public void updateSkin() {
		if (!mSkinUpdaters.isEmpty()) {
			for (WeakReference ref : mSkinUpdaters) {
				if (ref != null && ref.get() != null) {
					((ISkinUpdater) ref.get()).updateSkin();
				}
			}
		}
	}
}

public class SkinViewInflater {

	public final View createView(View parent, final String name, @NonNull Context context, @NonNull AttributeSet attrs) {
		View view = null;
		// 自定义 inflater 创建 view
		if (view == null) {
			view = createViewFromInflater(context, name, attrs);
		}
		// 反射创建 view
		if (view == null) {
			view = createViewFromTag(context, name, attrs);
		}
		...
		return view;
	}

	private View createViewFromInflater(Context context, String name, AttributeSet attrs) {
		View view = null;
		if (name.contains(".")) {
			return null;
		}
		switch (name) {
			case "View":
				view = new SkinView(context, attrs);
				break;
			case "TextView":
				view = new SkinTextView(context, attrs);
				break;
			....
		}
		return view;
	}
}
在上面小节有提到通过 registerActivityLifecycleCallbacks() 通知界面刷新,代码如下:
public class SkinActivityLifecycle implements Application.ActivityLifecycleCallbacks {
	private static volatile SkinActivityLifecycle sInstance = null;

	public static SkinActivityLifecycle init(Application application) {
		if (sInstance == null) {
			synchronized(SkinActivityLifecycle.class) {
				if (sInstance == null) {
					sInstance = new SkinActivityLifecycle(application);
				}
			}
		}
		return sInstance;
	}

	private SkinActivityLifecycle(Application application) {
		// 注册监听每个界面
		application.registerActivityLifecycleCallbacks(this);
		installLayoutFactory(application);
	}

	@Override
	public void onActivityCreated(Activity activity, Bundle savedInstanceState) {
		// activity 创建时设置 LayoutInflater.Factory2 创建 View
		installLayoutFactory(activity);
	}

	@Override
	public void onActivityResumed(Activity activity) {
		// 界面返回刷新可见页面换肤
	}

	@Override
	public void onActivityDestroyed(Activity activity) {
		// 移除 activity 防止内存泄漏
	}

	... // 其他生命周期监听

	private void installLayoutFactory(Context context) {
		LayoutInflater inflater = LayoutInflater.from(context);
		inflater.setFactory2(new MyFactory2());
	}
}
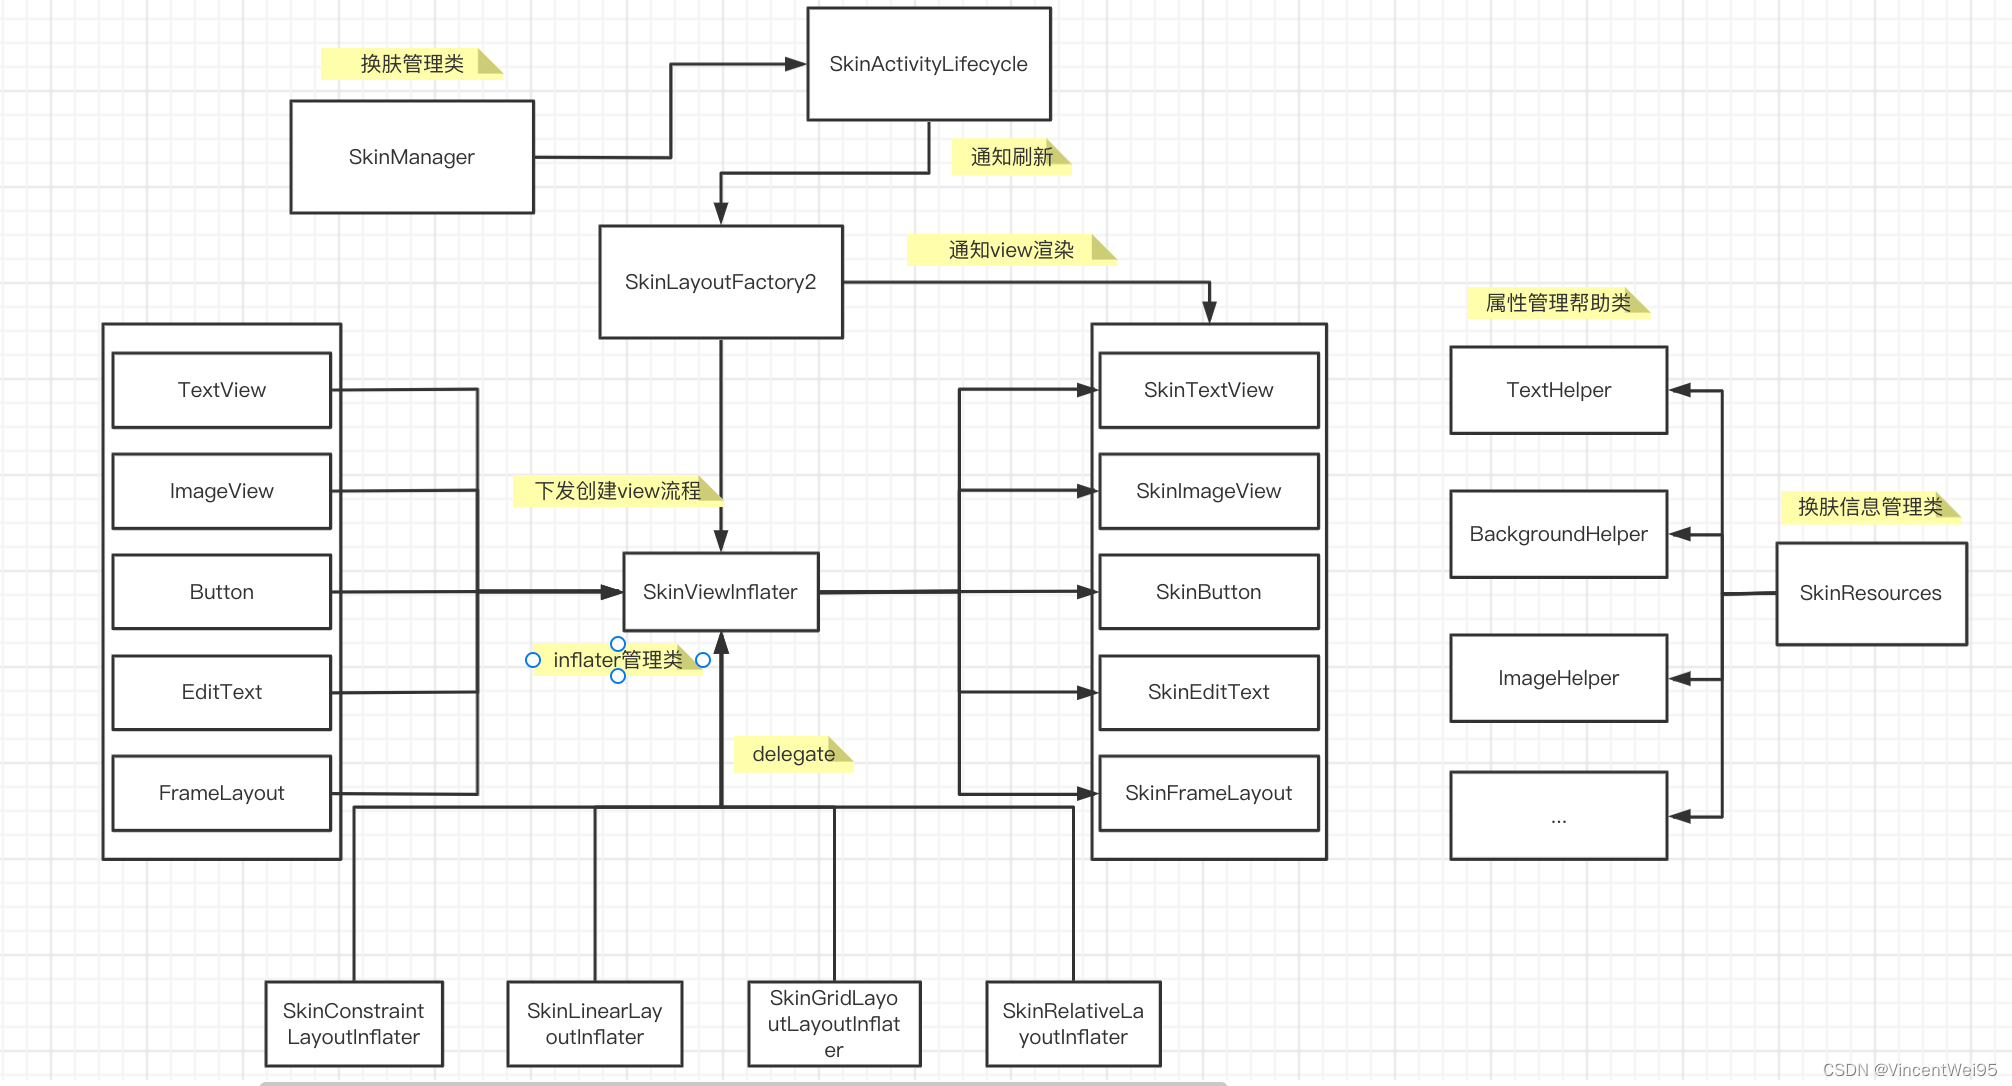
小结
上面的换肤方案其实就是开源库 Android-skin-support 的原理,整体流程图如下:
多线程 inflate 存在的隐患
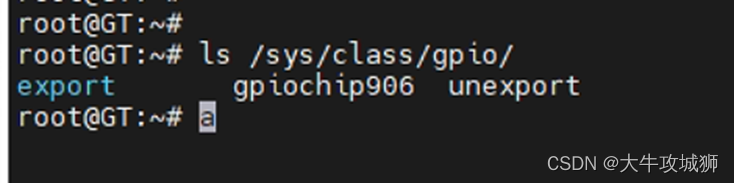
当你的项目所有的界面创建全部都运行在主线程时,上面的架构设计并无问题且运行良好。但项目中如果有为了启动性能优化,会在异步子线程处理 inflate (例如使用 AsyncLayoutInflater 或自定义的异步布局加载框架,将布局 inflate 切换到子线程执行),将会存在线程安全隐患。
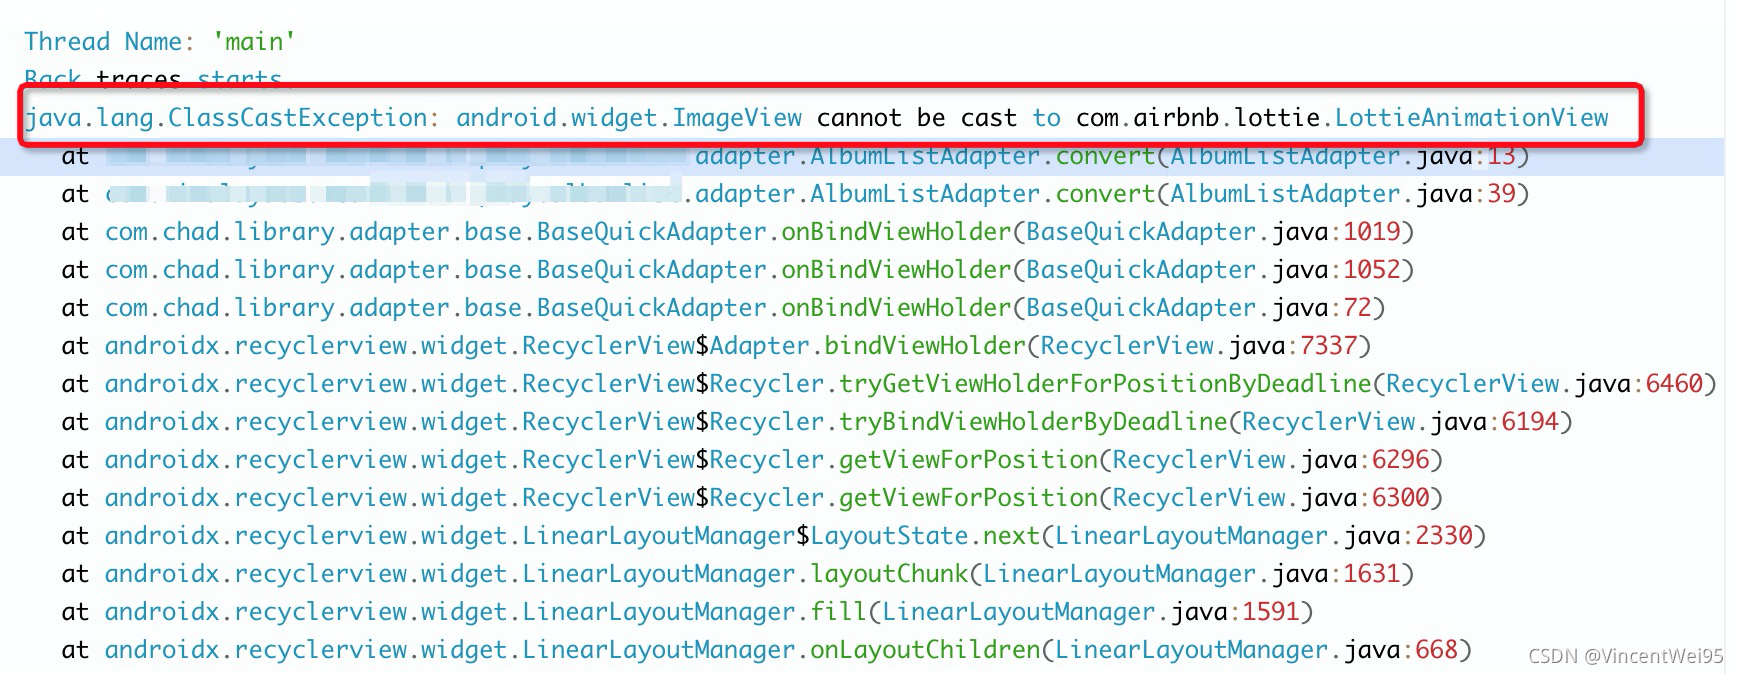
上图是线上遇到的大量且类似的 ClassCastException。
线上该问题出现解决难点主要有两个:
-
adapter 加载的列表布局并没有 ImageView,那么 ImageView 是哪里来的?ImageView 在其他的布局,不同的布局为什么会被干涉?
-
难以复现,多线程问题会因为设备硬件或软件等因素导致很难复现
通过多日的压测和日志打印,最终定位到 SkinViewInflater 的 静态成员变量 sConstructorMap 通过 name 获取构造函数时出现了问题:
public class SkinViewInflater {
	...
	// 根据控件名称存储构造函数,相同的控件复用同一个 Constructor 以达到优化性能的目的
	private static final Map<String, Constructor<? extends View>> sConstructorMap
            = new ArrayMap<>();

	private View createView(Context context, String name, String prefix)
            throws ClassNotFoundException, InflateException {
        // 通过控件 name 获取缓存的构造函数
		Constructor<? extends View> constructor = sConstructorMap.get(name);

		Log.w("createView", "name:", name, ",constructor:", constructor, "context:", context);
        try {
            if (constructor == null) {
                Class<? extends View> clazz = context.getClassLoader().loadClass(
                        prefix != null ? (prefix + name) : name).asSubclass(View.class);

                constructor = clazz.getConstructor(sConstructorSignature);
                sConstructorMap.put(name, constructor);
            }
            constructor.setAccessible(true);
            // 通过 map 获取了错误的构造函数,导致反射创建时出现 ClassCastException
            return constructor.newInstance(mConstructorArgs);
        } catch (Exception e) {
            return null;
        }
	}
}
当多个线程一起执行 inflate 创建 View 的操作,非线程安全情况下 map 的数据可能被覆盖污染,最终就会导致获取的 constructor 构造函数不正确引发 ClassCastException。
上述线程安全问题可以修改两个地方规避解决:
-
LayoutInflater.Factory2 接管创建 View 的流程,在 hook 创建的地方添加类锁保证线程安全
-
更进一步保证通过 name 获取的 constructor 不被覆盖污染,sConstructorMap 修改为线程安全的 ConcurrentHashMap
public class MyFactory2 implements LayoutInflater.Factory2 {

	@Override
	public View onCreateView(View parent, String name, Context context, AttributeSet attrs) {
		// 添加类锁,确保线程安全问题
		synchronized(MyFactory2.class) {
			View view = createView(parent, name, context, attrs);
			...
		}
	}

	@Override
	public View onCreateView(String name, Context context, AttributeSet attrs) {
		// 添加类锁,确保线程安全问题
		synchronized(MyFactory2.class) {
			View view = createView(null, name, context, attrs);
			...
		}
	}
}

public class SkinViewInflater {
	...
	// 使用 ConcurrentHashMap 支持多线程并发处理情况
	private static final Map<String, Constructor<? extends View>> sConstructorMap
            = new ConcurrentHashMap<>();
	...
}
虽然上述处理能解决线程安全问题,但是该解决方案在一定程度上是会影响主线程创建控件的性能和响应。