引言
前面的教程中我们讨论了观察矩阵以及如何使用观察矩阵移动场景。OpenGL本身没有摄像机的概念,但我们可以通过把场景中的所有物体往相反方向移动的方式来模拟出摄像机,这样感觉就像我们在移动,而不是场景在移动。
本节我们将会讨论如何在OpenGL中模拟一个摄像机,将会讨论FPS风格的可自由在3D场景中移动的摄像机。我们也会讨论键盘和鼠标输入,最终完成一个自定义的摄像机类。
摄像机/观察空间
当我们讨论摄像机/观察空间(Camera/View Space)的时候,是我们在讨论以摄像机的透视图作为场景原点时场景中所有可见顶点坐标。观察矩阵把所有的世界坐标变换到观察坐标,这些新坐标是相对于摄像机的位置和方向的。定义一个摄像机,我们需要一个摄像机在世界空间中的位置、观察的方向、一个指向它的右测的向量以及一个指向它上方的向量。细心的读者可能已经注意到我们实际上创建了一个三个单位轴相互垂直的、以摄像机的位置为原点的坐标系。
(1)摄像机位置
获取摄像机位置很简单。摄像机位置简单来说就是世界空间中代表摄像机位置的向量。
glm::vec3 cameraPos = glm::vec3(0.0f, 0.0f, 3.0f);
不要忘记正z轴是从屏幕指向你的,如果我们希望摄像机向后移动,我们就往z轴正方向移动。
(2)摄像机方向
方向向量(Direction Vector)并不是最好的名字,因为它正好指向从它到目标向量的相反方向,即摄像机方向向量和摄像机方向相反。
下一个需要的向量是摄像机的方向,比如它指向哪个方向。现在我们让摄像机指向场景原点:(0, 0, 0)。用摄像机位置向量减去场景原点向量的结果就是摄像机指向向量。由于我们知道摄像机指向z轴负方向,我们希望方向向量指向摄像机的z轴正方向。如果我们改变相减的顺序,我们就会获得一个指向摄像机正z轴方向的向量(译注:注意看前面的那个图,所说的「方向向量/Direction Vector」是指向z的正方向的,而不是摄像机所注视的那个方向):
glm::vec3 cameraTarget = glm::vec3(0.0f, 0.0f, 0.0f);
glm::vec3 cameraDirection = glm::normalize(cameraPos - cameraTarget);
(3)右轴
我们需要的另一个向量是一个右向量(Right Vector),它代表摄像机空间的x轴的正方向。为获取右向量我们需要先使用一个小技巧:定义一个上向量(Up Vector)。我们把上向量和第二步得到的摄像机方向向量进行叉乘。两个向量叉乘的结果就是同时垂直于两向量的向量,因此我们会得到指向x轴正方向的那个向量(如果我们交换两个向量的顺序就会得到相反的指向x轴负方向的向量):
// 此例中上向量为(0,1,0)
glm::vec3 up = glm::vec3(0.0f, 1.0f, 0.0f);
glm::vec3 cameraRight = glm::normalize(glm::cross(up, cameraDirection));
(4)上轴
现在我们已经有了x轴向量和z轴向量,获取摄像机的正y轴相对简单;我们把右向量和方向向量(Direction Vector)进行叉乘:
glm::vec3 cameraUp = glm::cross(cameraDirection, cameraRight);
在叉乘和一些小技巧的帮助下,我们创建了所有观察/摄像机空间的向量。使用这些摄像机向量我们就可以创建一个LookAt矩阵了,它在创建摄像机的时候非常有用。
你可能会疑惑上轴不就是(0,1,0)吗?我也是,所以我执行了如下代码:
 glm::vec3 cameraPos = glm::vec3(0.0f, 0.0f, 3.0f);
    glm::vec3 cameraTarget = glm::vec3(0.0f, 0.0f, 0.0f);
    glm::vec3 cameraDirection = glm::normalize(cameraPos - cameraTarget);
    glm::vec3 up = glm::vec3(0.0f, 1.0f, 0.0f);
    glm::vec3 cameraRight = glm::normalize(glm::cross(up, cameraDirection));
    glm::vec3 cameraUp = glm::cross(cameraDirection, cameraRight);
    std::cout << cameraUp.x << cameraUp.y << cameraUp.z;
输出结果为:(0,1,0)
Look At
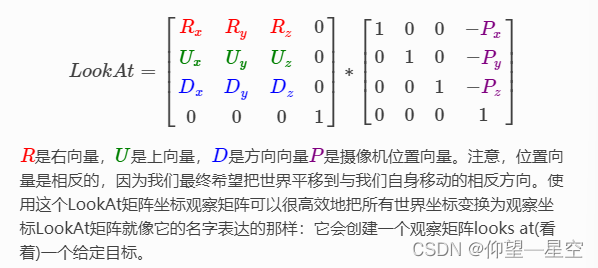
使用矩阵的好处之一是如果你定义了一个坐标空间,里面有3个相互垂直的轴,你可以用这三个轴外加一个平移向量来创建一个矩阵,你可以用这个矩阵乘以任何向量来变换到那个坐标空间。这正是LookAt矩阵所做的,现在我们有了3个相互垂直的轴和一个定义摄像机空间的位置坐标,我们可以创建我们自己的LookAt矩阵了:
幸运的是,GLM已经提供了这些支持。我们要做的只是定义一个摄像机位置,一个目标位置和一个表示上向量的世界空间中的向量(我们使用上向量计算右向量)。接着GLM就会创建一个LookAt矩阵,我们可以把它当作我们的观察矩阵:
glm::mat4 view;
view = glm::lookAt(glm::vec3(0.0f, 0.0f, 3.0f)),
	glm::vec3(0.0f, 0.0f, 0.0f);
	glm::vec3(0.0f, 1.0f, 0.0f));
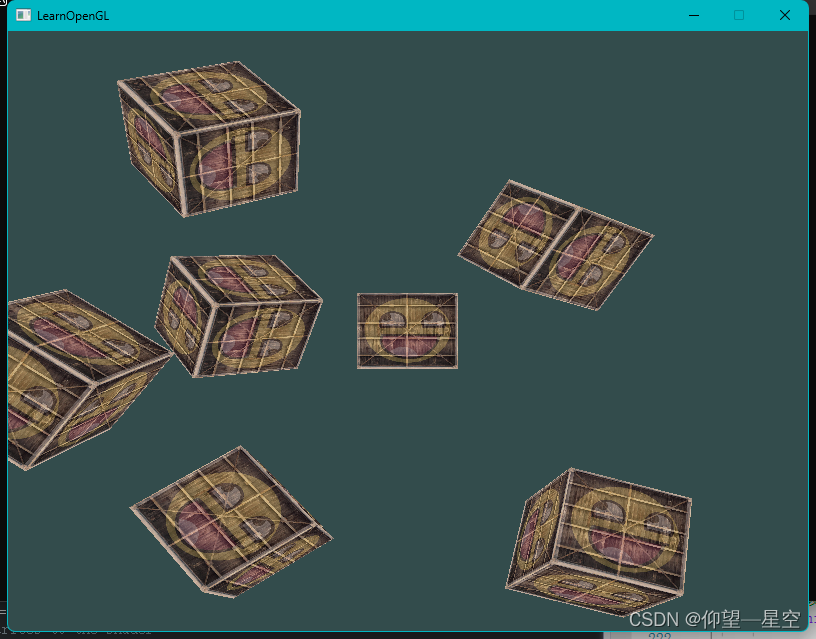
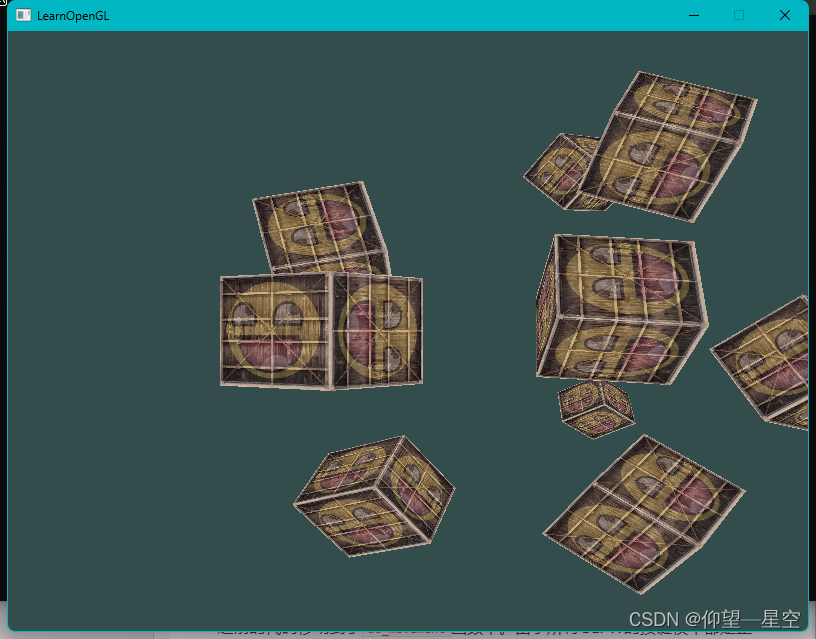
在开始做用户输入之前,我们来做些有意思的事,把我们的摄像机在场景中旋转。我们的注视点保持在(0, 0, 0)。
我们在每一帧都创建x和z坐标,这要使用一点三角学知识。x和z表示一个在一个圆圈上的一点,我们会使用它作为摄像机的位置。通过重复计算x和y坐标,遍历所有圆圈上的点,这样摄像机就会绕着场景旋转了。我们预先定义这个圆圈的半径,使用glfwGetTime函数不断增加它的值,在每次渲染迭代创建一个新的观察矩阵。运行结果:
顶点着色器代码:
#version 330 core
layout (location = 0) in vec3 position;	// 顶点位置
layout (location = 1) in vec2 texCoord;	// 顶点的纹理坐标

uniform mat4 model; 	  // 模型矩阵
uniform mat4 view;	  // 观察矩阵
uniform mat4 projection;  // 投影矩阵

// 定义输出变量(到片段着色器)
out vec2 TexCoord;	//	顶点的纹理坐标

void main()
{
    // 注意从右向左读(模型矩阵->观察矩阵->投影矩阵)
    gl_Position = projection * view * model * vec4(position, 1.0f);
    // 顶点的纹理坐标(由于图片是反的,所以纹理坐标的y值“取反”)
    TexCoord = vec2(texCoord.x , 1.0 - texCoord.y);
}
片段着色器代码:
#version 330 core
in vec2 TexCoord;

out vec4 color;

uniform float mixValue;

// Texture samplers
uniform sampler2D ourTexture1;
uniform sampler2D ourTexture2;

void main()
{
	// Linearly interpolate between both textures (second texture is only slightly combined)
	color = mix(texture(ourTexture1, TexCoord), texture(ourTexture2, TexCoord), mixValue);
}
完整代码:
#include <iostream>

// GLEW
#define GLEW_STATIC
#include <GL/glew.h>

// GLFW
#include <GLFW/glfw3.h>

// Other Libs
#include <SOIL.H>

// Other includes
#include "Shader.h"

#include <glm/glm.hpp>
#include <glm/gtc/matrix_transform.hpp>
#include <glm/gtc/type_ptr.hpp>


// Function prototypes
void key_callback(GLFWwindow* window, int key, int scancode, int action, int mode);

// Window dimensions
const GLuint WIDTH = 800, HEIGHT = 600;

GLfloat mixValue = 0.2f;

// The MAIN function, from here we start the application and run the game loop
int main()
{

    // Init GLFW
    glfwInit();
    // Set all the required options for GLFW
    glfwWindowHint(GLFW_CONTEXT_VERSION_MAJOR, 3);
    glfwWindowHint(GLFW_CONTEXT_VERSION_MINOR, 3);
    glfwWindowHint(GLFW_OPENGL_PROFILE, GLFW_OPENGL_CORE_PROFILE);
    glfwWindowHint(GLFW_RESIZABLE, GL_FALSE);

    // Create a GLFWwindow object that we can use for GLFW's functions
    GLFWwindow* window = glfwCreateWindow(WIDTH, HEIGHT, "LearnOpenGL", nullptr, nullptr);
    glfwMakeContextCurrent(window);

    // Set the required callback functions
    glfwSetKeyCallback(window, key_callback);

    // Set this to true so GLEW knows to use a modern approach to retrieving function pointers and extensions
    glewExperimental = GL_TRUE;
    // Initialize GLEW to setup the OpenGL Function pointers
    glewInit();

    // Define the viewport dimensions
    glViewport(0, 0, WIDTH, HEIGHT);
    // 开启深度测试功能
    glEnable(GL_DEPTH_TEST);

    // Build and compile our shader program
    Shader ourShader("C:\\Users\\32156\\source\\repos\\LearnOpenGL\\Shader\\vertexShader.txt", "C:\\Users\\32156\\source\\repos\\LearnOpenGL\\Shader\\fragmentShader.txt");


    // 立方体顶点数据(位置坐标+纹理坐标)
    GLfloat vertices[] = {
    -0.5f, -0.5f, -0.5f,  0.0f, 0.0f,
     0.5f, -0.5f, -0.5f,  1.0f, 0.0f,
     0.5f,  0.5f, -0.5f,  1.0f, 1.0f,
     0.5f,  0.5f, -0.5f,  1.0f, 1.0f,
    -0.5f,  0.5f, -0.5f,  0.0f, 1.0f,
    -0.5f, -0.5f, -0.5f,  0.0f, 0.0f,

    -0.5f, -0.5f,  0.5f,  0.0f, 0.0f,
     0.5f, -0.5f,  0.5f,  1.0f, 0.0f,
     0.5f,  0.5f,  0.5f,  1.0f, 1.0f,
     0.5f,  0.5f,  0.5f,  1.0f, 1.0f,
    -0.5f,  0.5f,  0.5f,  0.0f, 1.0f,
    -0.5f, -0.5f,  0.5f,  0.0f, 0.0f,

    -0.5f,  0.5f,  0.5f,  1.0f, 0.0f,
    -0.5f,  0.5f, -0.5f,  1.0f, 1.0f,
    -0.5f, -0.5f, -0.5f,  0.0f, 1.0f,
    -0.5f, -0.5f, -0.5f,  0.0f, 1.0f,
    -0.5f, -0.5f,  0.5f,  0.0f, 0.0f,
    -0.5f,  0.5f,  0.5f,  1.0f, 0.0f,

     0.5f,  0.5f,  0.5f,  1.0f, 0.0f,
     0.5f,  0.5f, -0.5f,  1.0f, 1.0f,
     0.5f, -0.5f, -0.5f,  0.0f, 1.0f,
     0.5f, -0.5f, -0.5f,  0.0f, 1.0f,
     0.5f, -0.5f,  0.5f,  0.0f, 0.0f,
     0.5f,  0.5f,  0.5f,  1.0f, 0.0f,

    -0.5f, -0.5f, -0.5f,  0.0f, 1.0f,
     0.5f, -0.5f, -0.5f,  1.0f, 1.0f,
     0.5f, -0.5f,  0.5f,  1.0f, 0.0f,
     0.5f, -0.5f,  0.5f,  1.0f, 0.0f,
    -0.5f, -0.5f,  0.5f,  0.0f, 0.0f,
    -0.5f, -0.5f, -0.5f,  0.0f, 1.0f,

    -0.5f,  0.5f, -0.5f,  0.0f, 1.0f,
     0.5f,  0.5f, -0.5f,  1.0f, 1.0f,
     0.5f,  0.5f,  0.5f,  1.0f, 0.0f,
     0.5f,  0.5f,  0.5f,  1.0f, 0.0f,
    -0.5f,  0.5f,  0.5f,  0.0f, 0.0f,
    -0.5f,  0.5f, -0.5f,  0.0f, 1.0f
    };
    glm::vec3 cubePositions[] = {
          glm::vec3(0.0f,  0.0f,  0.0f),
          glm::vec3(2.0f,  5.0f, -15.0f),
          glm::vec3(-1.5f, -2.2f, -2.5f),
          glm::vec3(-3.8f, -2.0f, -12.3f),
          glm::vec3(2.4f, -0.4f, -3.5f),
          glm::vec3(-1.7f,  3.0f, -7.5f),
          glm::vec3(1.3f, -2.0f, -2.5f),
          glm::vec3(1.5f,  2.0f, -2.5f),
          glm::vec3(1.5f,  0.2f, -1.5f),
          glm::vec3(-1.3f,  1.0f, -1.5f)
    };

    // 调整读取方式
    GLuint VBO, VAO;
    glGenVertexArrays(1, &VAO);
    glGenBuffers(1, &VBO);

    glBindVertexArray(VAO);

    glBindBuffer(GL_ARRAY_BUFFER, VBO);
    glBufferData(GL_ARRAY_BUFFER, sizeof(vertices), vertices, GL_STATIC_DRAW);

    // 位置坐标数据解析方式   一次读取3个FLOAT    跨越5个FLOAT值再读取    从0号位置开始读取
    glVertexAttribPointer(0, 3, GL_FLOAT, GL_FALSE, 5 * sizeof(GLfloat), (GLvoid*)0);
    glEnableVertexAttribArray(0);
    // 纹理坐标数据解析方式   一次读取2个FLOAT    跨越5个FLAOT值再读取    从3个FLOAT值位置后开始读取
    glVertexAttribPointer(1, 2, GL_FLOAT, GL_FALSE, 5 * sizeof(GLfloat), (GLvoid*)(3 * sizeof(GLfloat)));
    glEnableVertexAttribArray(1);

    glBindVertexArray(0); // Unbind VAO

    // Load and create a texture
    GLuint texture1;
    GLuint texture2;
    // ====================
    // Texture 1
    // ====================
    glGenTextures(1, &texture1);
    glBindTexture(GL_TEXTURE_2D, texture1); // All upcoming GL_TEXTURE_2D operations now have effect on our texture object
    // Set our texture parameters
    glTexParameteri(GL_TEXTURE_2D, GL_TEXTURE_WRAP_S, GL_CLAMP_TO_EDGE);	// Set texture wrapping to GL_REPEAT
    glTexParameteri(GL_TEXTURE_2D, GL_TEXTURE_WRAP_T, GL_CLAMP_TO_EDGE);
    // Set texture filtering
    glTexParameteri(GL_TEXTURE_2D, GL_TEXTURE_MIN_FILTER, GL_NEAREST);
    glTexParameteri(GL_TEXTURE_2D, GL_TEXTURE_MAG_FILTER, GL_NEAREST);
    // Load, create texture and generate mipmaps
    int width, height;
    unsigned char* image = SOIL_load_image("C:\\Users\\32156\\source\\repos\\LearnOpenGL\\Resource\\container.jpg", &width, &height, 0, SOIL_LOAD_RGB);
    glTexImage2D(GL_TEXTURE_2D, 0, GL_RGB, width, height, 0, GL_RGB, GL_UNSIGNED_BYTE, image);
    glGenerateMipmap(GL_TEXTURE_2D);
    SOIL_free_image_data(image);
    glBindTexture(GL_TEXTURE_2D, 0); // Unbind texture when done, so we won't accidentily mess up our texture.
    // ===================
    // Texture 2
    // ===================
    glGenTextures(1, &texture2);
    glBindTexture(GL_TEXTURE_2D, texture2);
    // Set our texture parameters
    glTexParameteri(GL_TEXTURE_2D, GL_TEXTURE_WRAP_S, GL_CLAMP_TO_BORDER);
    glTexParameteri(GL_TEXTURE_2D, GL_TEXTURE_WRAP_T, GL_CLAMP_TO_BORDER);

    float borderColor[] = { 1.0f, 1.0f , 0.0f, 1.0f };
    glTexParameterfv(GL_TEXTURE_2D, GL_TEXTURE_BORDER_COLOR, borderColor);

    // Set texture filtering
    glTexParameteri(GL_TEXTURE_2D, GL_TEXTURE_MIN_FILTER, GL_LINEAR);
    glTexParameteri(GL_TEXTURE_2D, GL_TEXTURE_MAG_FILTER, GL_LINEAR);
    // Load, create texture and generate mipmaps
    image = SOIL_load_image("C:\\Users\\32156\\source\\repos\\LearnOpenGL\\Resource\\awesomeface.png", &width, &height, 0, SOIL_LOAD_RGB);
    glTexImage2D(GL_TEXTURE_2D, 0, GL_RGB, width, height, 0, GL_RGB, GL_UNSIGNED_BYTE, image);
    glGenerateMipmap(GL_TEXTURE_2D);
    SOIL_free_image_data(image);
    glBindTexture(GL_TEXTURE_2D, 0);

    // Game loop
    while (!glfwWindowShouldClose(window))
    {
        // Check if any events have been activiated (key pressed, mouse moved etc.) and call corresponding response functions
        glfwPollEvents();

        // Render
        // Clear the colorbuffer
        glClearColor(0.2f, 0.3f, 0.3f, 1.0f);
        glClear(GL_COLOR_BUFFER_BIT | GL_DEPTH_BUFFER_BIT);

        // Bind Textures using texture units
        glActiveTexture(GL_TEXTURE0);
        glBindTexture(GL_TEXTURE_2D, texture1);
        glUniform1i(glGetUniformLocation(ourShader.Program, "ourTexture1"), 0);
        glActiveTexture(GL_TEXTURE1);
        glBindTexture(GL_TEXTURE_2D, texture2);
        glUniform1i(glGetUniformLocation(ourShader.Program, "ourTexture2"), 1);

        // Activate shader
        ourShader.Use();

        // 观察矩阵的设置
        glm::mat4 view = glm::mat4(1.0f);
        GLfloat radius = 10.0f;
        GLfloat camX = sin(glfwGetTime()) * radius;
        GLfloat camZ = cos(glfwGetTime()) * radius;
        view = glm::lookAt(glm::vec3(camX, 0.0f, camZ), glm::vec3(0.0f, 0.0f, 0.0f), glm::vec3(0.0f, 1.0f, 0.0f));

        GLint viewLoc = glGetUniformLocation(ourShader.Program, "view");
        glUniformMatrix4fv(viewLoc, 1, GL_FALSE, glm::value_ptr(view));

        // 投影矩阵的设置
        glm::mat4 projection = glm::mat4(1.0f);
        projection = glm::perspective(glm::radians(45.0f), (float)(width / height), 0.1f, 100.0f);
        GLint proLoc = glGetUniformLocation(ourShader.Program, "projection");
        glUniformMatrix4fv(proLoc, 1, GL_FALSE, glm::value_ptr(projection));
        GLint modeLoc = glGetUniformLocation(ourShader.Program, "model");

        // 设置混合参数
        glUniform1f(glGetUniformLocation(ourShader.Program,"mixValue"),mixValue);

        // Draw container
        glBindVertexArray(VAO);
        for (int i = 0; i < 10; i++)
        {
            glm::mat4 model = glm::mat4(1.0f);
            model = glm::translate(model, cubePositions[i]);
            GLfloat angle = 20.0f * i;
            model = glm::rotate(model, glm::radians(angle), glm::vec3(1.0f, 0.3f, 0.5f));

            glUniformMatrix4fv(modeLoc, 1, GL_FALSE, glm::value_ptr(model));

            glDrawArrays(GL_TRIANGLES, 0, 36);
        }
        glBindVertexArray(0);

        // Swap the screen buffers
        glfwSwapBuffers(window);
    }
    // Properly de-allocate all resources once they've outlived their purpose
    glDeleteVertexArrays(1, &VAO);
    glDeleteBuffers(1, &VBO);
    // Terminate GLFW, clearing any resources allocated by GLFW.
    glfwTerminate();
    return 0;
}

// Is called whenever a key is pressed/released via GLFW
void key_callback(GLFWwindow* window, int key, int scancode, int action, int mode)
{
    if (key == GLFW_KEY_ESCAPE && action == GLFW_PRESS)
        glfwSetWindowShouldClose(window, GL_TRUE);
    if (key == GLFW_KEY_UP && action == GLFW_PRESS)
    {
        mixValue += 0.1f;
        if (mixValue >= 1.0f)
            mixValue = 1.0f;
    }
    if (key == GLFW_KEY_DOWN && action == GLFW_PRESS)
    {
        mixValue -= 0.1f;
        if (mixValue <= 0.0f)
            mixValue = 0.0f;
    }
}
自由移动
让摄像机绕着场景转很有趣,但是让我们自己移动摄像机更有趣!首先我们必须设置一个摄像机系统,在我们的程序前面定义一些摄像机变量很有用:
glm::vec3 cameraPos   = glm::vec3(0.0f, 0.0f,  3.0f);
glm::vec3 cameraFront = glm::vec3(0.0f, 0.0f, -1.0f);
glm::vec3 cameraUp    = glm::vec3(0.0f, 1.0f,  0.0f);
LookAt函数现在成了:
view = glm::lookAt(cameraPos, cameraPos + cameraFront, cameraUp);
我们首先设置之前定义的cameraPos为摄像机位置。方向(Direction)是当前的位置加上我们刚刚定义的方向向量。这样能保证无论我们怎么移动,摄像机都会注视目标。我们在按下某个按钮时更新cameraPos向量。
我们已经为GLFW的键盘输入定义了一个key_callback函数,我们来添加几个新按键命令:
void key_callback(GLFWwindow* window, int key, int scancode, int action, int mode)
{
    ...
    GLfloat cameraSpeed = 0.05f;
    if(key == GLFW_KEY_W)
        cameraPos += cameraSpeed * cameraFront;
    if(key == GLFW_KEY_S)
        cameraPos -= cameraSpeed * cameraFront;
    if(key == GLFW_KEY_A)
        cameraPos -= glm::normalize(glm::cross(cameraFront, cameraUp)) * cameraSpeed;
    if(key == GLFW_KEY_D)
        cameraPos += glm::normalize(glm::cross(cameraFront, cameraUp)) * cameraSpeed;
}
当我们按下WASD键,摄像机的位置都会相应更新。如果我们希望向前或向后移动,我们就把位置向量加上或减去方向向量。如果我们希望向旁边移动,我们做一个叉乘来创建一个右向量,沿着它移动就可以了。这样就创建了类似使用摄像机横向、前后移动的效果。
注意,我们对右向量进行了标准化。如果我们没对这个向量进行标准化,最后的叉乘结果会根据cameraFront变量的大小返回不同的大小。如果我们不对向量进行标准化,我们就得根据摄像机的方位加速或减速移动了,但假如进行了标准化移动就是匀速的。
多重按键检测以及deltaTime计算移动请参照原文。(代码已经实现不做阐述)
运行结果:
完整代码:
#include <iostream>

// GLEW
#define GLEW_STATIC
#include <GL/glew.h>

// GLFW
#include <GLFW/glfw3.h>

// Other Libs
#include <SOIL.H>

// Other includes
#include "Shader.h"

#include <glm/glm.hpp>
#include <glm/gtc/matrix_transform.hpp>
#include <glm/gtc/type_ptr.hpp>


// Function prototypes
void key_callback(GLFWwindow* window, int key, int scancode, int action, int mode);

void do_movement();

// Window dimensions
const GLuint WIDTH = 800, HEIGHT = 600;

GLfloat mixValue = 0.2f;

bool keys[1024];

glm::mat4 view = glm::mat4(1.0f);
glm::vec3 cameraPos = glm::vec3(0.0f, 0.0f, 5.0f);
glm::vec3 cameraFront = glm::vec3(0.0f, 0.0f, -1.0f);
glm::vec3 cameraUp = glm::vec3(0.0f, 1.0f, 0.0f);

// The MAIN function, from here we start the application and run the game loop
int main()
{

    // Init GLFW
    glfwInit();
    // Set all the required options for GLFW
    glfwWindowHint(GLFW_CONTEXT_VERSION_MAJOR, 3);
    glfwWindowHint(GLFW_CONTEXT_VERSION_MINOR, 3);
    glfwWindowHint(GLFW_OPENGL_PROFILE, GLFW_OPENGL_CORE_PROFILE);
    glfwWindowHint(GLFW_RESIZABLE, GL_FALSE);

    // Create a GLFWwindow object that we can use for GLFW's functions
    GLFWwindow* window = glfwCreateWindow(WIDTH, HEIGHT, "LearnOpenGL", nullptr, nullptr);
    glfwMakeContextCurrent(window);

    // Set the required callback functions
    glfwSetKeyCallback(window, key_callback);

    // Set this to true so GLEW knows to use a modern approach to retrieving function pointers and extensions
    glewExperimental = GL_TRUE;
    // Initialize GLEW to setup the OpenGL Function pointers
    glewInit();

    // Define the viewport dimensions
    glViewport(0, 0, WIDTH, HEIGHT);
    // 开启深度测试功能
    glEnable(GL_DEPTH_TEST);

    // Build and compile our shader program
    Shader ourShader("C:\\Users\\32156\\source\\repos\\LearnOpenGL\\Shader\\vertexShader.txt", "C:\\Users\\32156\\source\\repos\\LearnOpenGL\\Shader\\fragmentShader.txt");


    // 立方体顶点数据(位置坐标+纹理坐标)
    GLfloat vertices[] = {
    -0.5f, -0.5f, -0.5f,  0.0f, 0.0f,
     0.5f, -0.5f, -0.5f,  1.0f, 0.0f,
     0.5f,  0.5f, -0.5f,  1.0f, 1.0f,
     0.5f,  0.5f, -0.5f,  1.0f, 1.0f,
    -0.5f,  0.5f, -0.5f,  0.0f, 1.0f,
    -0.5f, -0.5f, -0.5f,  0.0f, 0.0f,

    -0.5f, -0.5f,  0.5f,  0.0f, 0.0f,
     0.5f, -0.5f,  0.5f,  1.0f, 0.0f,
     0.5f,  0.5f,  0.5f,  1.0f, 1.0f,
     0.5f,  0.5f,  0.5f,  1.0f, 1.0f,
    -0.5f,  0.5f,  0.5f,  0.0f, 1.0f,
    -0.5f, -0.5f,  0.5f,  0.0f, 0.0f,

    -0.5f,  0.5f,  0.5f,  1.0f, 0.0f,
    -0.5f,  0.5f, -0.5f,  1.0f, 1.0f,
    -0.5f, -0.5f, -0.5f,  0.0f, 1.0f,
    -0.5f, -0.5f, -0.5f,  0.0f, 1.0f,
    -0.5f, -0.5f,  0.5f,  0.0f, 0.0f,
    -0.5f,  0.5f,  0.5f,  1.0f, 0.0f,

     0.5f,  0.5f,  0.5f,  1.0f, 0.0f,
     0.5f,  0.5f, -0.5f,  1.0f, 1.0f,
     0.5f, -0.5f, -0.5f,  0.0f, 1.0f,
     0.5f, -0.5f, -0.5f,  0.0f, 1.0f,
     0.5f, -0.5f,  0.5f,  0.0f, 0.0f,
     0.5f,  0.5f,  0.5f,  1.0f, 0.0f,

    -0.5f, -0.5f, -0.5f,  0.0f, 1.0f,
     0.5f, -0.5f, -0.5f,  1.0f, 1.0f,
     0.5f, -0.5f,  0.5f,  1.0f, 0.0f,
     0.5f, -0.5f,  0.5f,  1.0f, 0.0f,
    -0.5f, -0.5f,  0.5f,  0.0f, 0.0f,
    -0.5f, -0.5f, -0.5f,  0.0f, 1.0f,

    -0.5f,  0.5f, -0.5f,  0.0f, 1.0f,
     0.5f,  0.5f, -0.5f,  1.0f, 1.0f,
     0.5f,  0.5f,  0.5f,  1.0f, 0.0f,
     0.5f,  0.5f,  0.5f,  1.0f, 0.0f,
    -0.5f,  0.5f,  0.5f,  0.0f, 0.0f,
    -0.5f,  0.5f, -0.5f,  0.0f, 1.0f
    };
    glm::vec3 cubePositions[] = {
          glm::vec3(0.0f,  0.0f,  0.0f),
          glm::vec3(2.0f,  5.0f, -15.0f),
          glm::vec3(-1.5f, -2.2f, -2.5f),
          glm::vec3(-3.8f, -2.0f, -12.3f),
          glm::vec3(2.4f, -0.4f, -3.5f),
          glm::vec3(-1.7f,  3.0f, -7.5f),
          glm::vec3(1.3f, -2.0f, -2.5f),
          glm::vec3(1.5f,  2.0f, -2.5f),
          glm::vec3(1.5f,  0.2f, -1.5f),
          glm::vec3(-1.3f,  1.0f, -1.5f)
    };

    // 调整读取方式
    GLuint VBO, VAO;
    glGenVertexArrays(1, &VAO);
    glGenBuffers(1, &VBO);

    glBindVertexArray(VAO);

    glBindBuffer(GL_ARRAY_BUFFER, VBO);
    glBufferData(GL_ARRAY_BUFFER, sizeof(vertices), vertices, GL_STATIC_DRAW);

    // 位置坐标数据解析方式   一次读取3个FLOAT    跨越5个FLOAT值再读取    从0号位置开始读取
    glVertexAttribPointer(0, 3, GL_FLOAT, GL_FALSE, 5 * sizeof(GLfloat), (GLvoid*)0);
    glEnableVertexAttribArray(0);
    // 纹理坐标数据解析方式   一次读取2个FLOAT    跨越5个FLAOT值再读取    从3个FLOAT值位置后开始读取
    glVertexAttribPointer(1, 2, GL_FLOAT, GL_FALSE, 5 * sizeof(GLfloat), (GLvoid*)(3 * sizeof(GLfloat)));
    glEnableVertexAttribArray(1);

    glBindVertexArray(0); // Unbind VAO

    // Load and create a texture
    GLuint texture1;
    GLuint texture2;
    // ====================
    // Texture 1
    // ====================
    glGenTextures(1, &texture1);
    glBindTexture(GL_TEXTURE_2D, texture1); // All upcoming GL_TEXTURE_2D operations now have effect on our texture object
    // Set our texture parameters
    glTexParameteri(GL_TEXTURE_2D, GL_TEXTURE_WRAP_S, GL_CLAMP_TO_EDGE);	// Set texture wrapping to GL_REPEAT
    glTexParameteri(GL_TEXTURE_2D, GL_TEXTURE_WRAP_T, GL_CLAMP_TO_EDGE);
    // Set texture filtering
    glTexParameteri(GL_TEXTURE_2D, GL_TEXTURE_MIN_FILTER, GL_NEAREST);
    glTexParameteri(GL_TEXTURE_2D, GL_TEXTURE_MAG_FILTER, GL_NEAREST);
    // Load, create texture and generate mipmaps
    int width, height;
    unsigned char* image = SOIL_load_image("C:\\Users\\32156\\source\\repos\\LearnOpenGL\\Resource\\container.jpg", &width, &height, 0, SOIL_LOAD_RGB);
    glTexImage2D(GL_TEXTURE_2D, 0, GL_RGB, width, height, 0, GL_RGB, GL_UNSIGNED_BYTE, image);
    glGenerateMipmap(GL_TEXTURE_2D);
    SOIL_free_image_data(image);
    glBindTexture(GL_TEXTURE_2D, 0); // Unbind texture when done, so we won't accidentily mess up our texture.
    // ===================
    // Texture 2
    // ===================
    glGenTextures(1, &texture2);
    glBindTexture(GL_TEXTURE_2D, texture2);
    // Set our texture parameters
    glTexParameteri(GL_TEXTURE_2D, GL_TEXTURE_WRAP_S, GL_CLAMP_TO_BORDER);
    glTexParameteri(GL_TEXTURE_2D, GL_TEXTURE_WRAP_T, GL_CLAMP_TO_BORDER);

    float borderColor[] = { 1.0f, 1.0f , 0.0f, 1.0f };
    glTexParameterfv(GL_TEXTURE_2D, GL_TEXTURE_BORDER_COLOR, borderColor);

    // Set texture filtering
    glTexParameteri(GL_TEXTURE_2D, GL_TEXTURE_MIN_FILTER, GL_LINEAR);
    glTexParameteri(GL_TEXTURE_2D, GL_TEXTURE_MAG_FILTER, GL_LINEAR);
    // Load, create texture and generate mipmaps
    image = SOIL_load_image("C:\\Users\\32156\\source\\repos\\LearnOpenGL\\Resource\\awesomeface.png", &width, &height, 0, SOIL_LOAD_RGB);
    glTexImage2D(GL_TEXTURE_2D, 0, GL_RGB, width, height, 0, GL_RGB, GL_UNSIGNED_BYTE, image);
    glGenerateMipmap(GL_TEXTURE_2D);
    SOIL_free_image_data(image);
    glBindTexture(GL_TEXTURE_2D, 0);

    // Game loop
    while (!glfwWindowShouldClose(window))
    {
        // Check if any events have been activiated (key pressed, mouse moved etc.) and call corresponding response functions
        glfwPollEvents();
        do_movement();

        // Render
        // Clear the colorbuffer
        glClearColor(0.2f, 0.3f, 0.3f, 1.0f);
        glClear(GL_COLOR_BUFFER_BIT | GL_DEPTH_BUFFER_BIT);

        // Bind Textures using texture units
        glActiveTexture(GL_TEXTURE0);
        glBindTexture(GL_TEXTURE_2D, texture1);
        glUniform1i(glGetUniformLocation(ourShader.Program, "ourTexture1"), 0);
        glActiveTexture(GL_TEXTURE1);
        glBindTexture(GL_TEXTURE_2D, texture2);
        glUniform1i(glGetUniformLocation(ourShader.Program, "ourTexture2"), 1);

        // Activate shader
        ourShader.Use();

        // 观察矩阵的设置
        view = glm::lookAt(cameraPos, cameraFront, cameraUp);

        GLint viewLoc = glGetUniformLocation(ourShader.Program, "view");
        glUniformMatrix4fv(viewLoc, 1, GL_FALSE, glm::value_ptr(view));

        // 投影矩阵的设置
        glm::mat4 projection = glm::mat4(1.0f);
        projection = glm::perspective(glm::radians(45.0f), (float)(width / height), 0.1f, 100.0f);
        GLint proLoc = glGetUniformLocation(ourShader.Program, "projection");
        glUniformMatrix4fv(proLoc, 1, GL_FALSE, glm::value_ptr(projection));
        GLint modeLoc = glGetUniformLocation(ourShader.Program, "model");

        // 设置混合参数
        glUniform1f(glGetUniformLocation(ourShader.Program,"mixValue"),mixValue);

        // Draw container
        glBindVertexArray(VAO);
        for (int i = 0; i < 10; i++)
        {
            glm::mat4 model = glm::mat4(1.0f);
            model = glm::translate(model, cubePositions[i]);
            GLfloat angle = 20.0f * i;
            model = glm::rotate(model, glm::radians(angle), glm::vec3(1.0f, 0.3f, 0.5f));

            glUniformMatrix4fv(modeLoc, 1, GL_FALSE, glm::value_ptr(model));

            glDrawArrays(GL_TRIANGLES, 0, 36);
        }
        glBindVertexArray(0);

        // Swap the screen buffers
        glfwSwapBuffers(window);
    }
    // Properly de-allocate all resources once they've outlived their purpose
    glDeleteVertexArrays(1, &VAO);
    glDeleteBuffers(1, &VBO);
    // Terminate GLFW, clearing any resources allocated by GLFW.
    glfwTerminate();
    return 0;
}

// Is called whenever a key is pressed/released via GLFW
void key_callback(GLFWwindow* window, int key, int scancode, int action, int mode)
{
    if (action == GLFW_PRESS)
        keys[key] = true;
    else if (action == GLFW_RELEASE)
        keys[key] = false;
    if (key == GLFW_KEY_ESCAPE && action == GLFW_PRESS)
        glfwSetWindowShouldClose(window, GL_TRUE);
    if (key == GLFW_KEY_UP && action == GLFW_PRESS)
    {
        mixValue += 0.1f;
        if (mixValue >= 1.0f)
            mixValue = 1.0f;
    }
    if (key == GLFW_KEY_DOWN && action == GLFW_PRESS)
    {
        mixValue -= 0.1f;
        if (mixValue <= 0.0f)
            mixValue = 0.0f;
    }
}
void do_movement()
{
    // 摄像机控制
    GLfloat cameraSpeed = 0.01f;
    if (keys[GLFW_KEY_W])
        cameraPos += cameraSpeed * cameraFront;
    if (keys[GLFW_KEY_S])
        cameraPos -= cameraSpeed * cameraFront;
    if (keys[GLFW_KEY_A])
        cameraPos -= glm::normalize(glm::cross(cameraFront, cameraUp)) * cameraSpeed;
    if (keys[GLFW_KEY_D])
        cameraPos += glm::normalize(glm::cross(cameraFront, cameraUp)) * cameraSpeed;
}
视角移动
只用键盘移动没什么意思。特别是我们还不能转向。是时候使用鼠标了!
为了能够改变方向,我们必须根据鼠标的输入改变cameraFront向量。然而,根据鼠标旋转改变方向向量有点复杂,需要更多的三角学知识。如果你对三角学知之甚少,别担心,你可以跳过这一部分,直接复制粘贴我们的代码;当你想了解更多的时候再回来看。
欧拉角计算公式
direction.y = sin(glm::radians(pitch)); // 注意我们先把角度转为弧度
direction.x = cos(glm::radians(pitch)) * cos(glm::radians(yaw));//译注:	    direction代表摄像机的“前”轴,但此前轴是和本文第一幅图片的第二个摄像机的direction是相反的
direction.y = sin(glm::radians(pitch));
direction.z = cos(glm::radians(pitch)) * sin(glm::radians(yaw));
鼠标输入
偏航角和俯仰角是从鼠标移动获得的,鼠标水平移动影响偏航角,鼠标垂直移动影响俯仰角。它的思想是储存上一帧鼠标的位置,在当前帧中我们当前计算鼠标位置和上一帧的位置相差多少。如果差别越大那么俯仰角或偏航角就改变越大。
首先我们要告诉GLFW,应该隐藏光标,并捕捉(Capture)它。捕捉鼠标意味着当应用集中焦点到鼠标上的时候光标就应该留在窗口中(除非应用拾取焦点或退出)。我们可以进行简单的配置:
glfwSetInputMode(window, GLFW_CURSOR, GLFW_CURSOR_DISABLED);
这个函数调用后,无论我们怎么去移动鼠标,它都不会显示了,也不会离开窗口。对于FPS摄像机系统来说很好:
为计算俯仰角和偏航角我们需要告诉GLFW监听鼠标移动事件。我们用下面的原型创建一个回调函数来做这件事(和键盘输入差不多):
void mouse_callback(GLFWwindow* window, double xpos, double ypos);
这里的xpos和ypos代表当前鼠标的位置。我们注册了GLFW的回调函数,鼠标一移动mouse_callback函数就被调用:
glfwSetCursorPosCallback(window, mouse_callback);
在处理FPS风格的摄像机鼠标输入的时候,我们必须在获取最终的方向向量之前做下面这几步:
1.计算鼠标和上一帧的偏移量。
2.把偏移量添加到摄像机和俯仰角和偏航角中。
3.对偏航角和俯仰角进行最大和最小值的限制。
4.计算方向向量。
第一步计算鼠标自上一帧的偏移量。我们必须先储存上一帧的鼠标位置,我们把它的初始值设置为屏幕的中心(屏幕的尺寸是800乘600):
GLfloat lastX = 400, lastY = 300;
然后在回调函数中我们计算当前帧和上一帧鼠标位置的偏移量:
GLfloat xoffset = xpos - lastX;
GLfloat yoffset = lastY - ypos; // 注意这里是相反的,因为y坐标的范围是从下往上的
lastX = xpos;
lastY = ypos;

GLfloat sensitivity = 0.05f;
xoffset *= sensitivity;
yoffset *= sensitivity;
注意我们把偏移量乘以了sensitivity值。如果我们移除它,鼠标移动就会太大了;你可以自己调整sensitivity的值。
下面我们把偏移量加到全局变量pitch和yaw上:
yaw   += xoffset;
pitch += yoffset;
第三步我们给摄像机添加一些限制,这样摄像机就不会发生奇怪的移动了。对于俯仰角,要让用户不能看向高于89度(90度时视角会逆转,所以我们把89度作为极限)的地方,同样也不允许小于-89度。这样能够保证用户只能看到天空或脚下但是不能更进一步超越过去。限制可以这样做:
if(pitch > 89.0f)
  pitch =  89.0f;
if(pitch < -89.0f)
  pitch = -89.0f;
注意我们没有给偏航角设置限制是因为我们不希望限制用户的水平旋转。然而,给偏航角设置限制也很容易,只要你愿意。第四也是最后一步,就是通过俯仰角和偏航角来计算以得到前面提到的实际方向向量:
glm::vec3 front;
front.x = cos(glm::radians(pitch)) * cos(glm::radians(yaw));
front.y = sin(glm::radians(pitch));
front.z = cos(glm::radians(pitch)) * sin(glm::radians(yaw));
cameraFront = glm::normalize(front);
这回计算出方向向量,根据鼠标点的移动它包含所有的旋转。由于cameraFront向量已经包含在glm::lookAt函数中,我们直接去设置。
如果你现在运行代码,你会发现当程序运行第一次捕捉到鼠标的时候摄像机会突然跳一下。原因是当你的鼠标进入窗口鼠标回调函数会使用这时的xpos和ypos。这通常是一个距离屏幕中心很远的地方,因而产生一个很大的偏移量,所以就会跳了。我们可以简单的使用一个布尔变量检验我们是否是第一次获取鼠标输入,如果是,那么我们先把鼠标的位置更新为xpos和ypos,这样就能解决这个问题;最后的鼠标移动会使用进入以后鼠标的位置坐标来计算它的偏移量:
if(firstMouse) // 这个bool变量一开始是设定为true的
{
  lastX = xpos;
  lastY = ypos;
  firstMouse = false;
}
最后的代码应该是这样的:
void mouse_callback(GLFWwindow* window, double xpos, double ypos)
{
    if(firstMouse)
    {
        lastX = xpos;
        lastY = ypos;
        firstMouse = false;
    }

    GLfloat xoffset = xpos - lastX;
    GLfloat yoffset = lastY - ypos;
    lastX = xpos;
    lastY = ypos;

    GLfloat sensitivity = 0.05;
    xoffset *= sensitivity;
    yoffset *= sensitivity;

    yaw   += xoffset;
    pitch += yoffset;

    if(pitch > 89.0f)
        pitch = 89.0f;
    if(pitch < -89.0f)
        pitch = -89.0f;

    glm::vec3 front;
    front.x = cos(glm::radians(yaw)) * cos(glm::radians(pitch));
    front.y = sin(glm::radians(pitch));
    front.z = sin(glm::radians(yaw)) * cos(glm::radians(pitch));
    cameraFront = glm::normalize(front);
}
缩放
我们还要往摄像机系统里加点东西,实现一个缩放接口。前面教程中我们说视野(Field of View或fov)定义了我们可以看到场景中多大的范围。当视野变小时可视区域就会减小,产生放大了的感觉。我们用鼠标滚轮来放大。和鼠标移动、键盘输入一样我们需要一个鼠标滚轮的回调函数:
void scroll_callback(GLFWwindow* window, double xoffset, double yoffset)
{
  if(aspect >= 1.0f && aspect <= 45.0f)
    aspect -= yoffset;
  if(aspect <= 1.0f)
    aspect = 1.0f;
  if(aspect >= 45.0f)
    aspect = 45.0f;
}
yoffset值代表我们滚动的大小。当scroll_callback函数调用后,我们改变全局aspect变量的内容。因为45.0f是默认的fov,我们将会把缩放级别限制在1.0f到45.0f。
我们现在在每一帧都必须把透视投影矩阵上传到GPU,但这一次使aspect变量作为它的fov:
projection = glm::perspective(aspect, (GLfloat)WIDTH/(GLfloat)HEIGHT, 0.1f, 100.0f);
最后不要忘记注册滚动回调函数:
glfwSetScrollCallback(window, scroll_callback);
完整代码:
要注意 view = glm::lookAt(cameraPos, cameraPos + cameraFront, cameraUp);中摄像机的指向为:cameraPos + cameraFront。
#include <iostream>

// GLEW
#define GLEW_STATIC
#include <GL/glew.h>

// GLFW
#include <GLFW/glfw3.h>

// Other Libs
#include <SOIL.H>

// Other includes
#include "Shader.h"

#include <glm/glm.hpp>
#include <glm/gtc/matrix_transform.hpp>
#include <glm/gtc/type_ptr.hpp>


// Function prototypes
void key_callback(GLFWwindow* window, int key, int scancode, int action, int mode);

void do_movement();

void mouse_callback(GLFWwindow* window, double xpos, double ypos);

void scroll_callback(GLFWwindow* window, double xoffset, double yoffset);

// Window dimensions
const GLuint WIDTH = 800, HEIGHT = 600;

GLfloat mixValue = 0.2f;

bool keys[1024];

glm::mat4 view = glm::mat4(1.0f);
glm::vec3 cameraPos = glm::vec3(0.0f, 0.0f, 5.0f);
glm::vec3 cameraFront = glm::vec3(0.0f, 0.0f, -1.0f);
glm::vec3 cameraUp = glm::vec3(0.0f, 1.0f, 0.0f);

GLfloat deltaTime = 0.0f;
GLfloat lastFrame = 0.0f;

GLfloat lastX = WIDTH / 2, lastY = HEIGHT / 2;
bool firstMouse;
GLfloat yaw = -90.0f;
GLfloat pitch = 0.0f;

GLfloat aspect = 45.0f;

// The MAIN function, from here we start the application and run the game loop
int main()
{

    // Init GLFW
    glfwInit();
    // Set all the required options for GLFW
    glfwWindowHint(GLFW_CONTEXT_VERSION_MAJOR, 3);
    glfwWindowHint(GLFW_CONTEXT_VERSION_MINOR, 3);
    glfwWindowHint(GLFW_OPENGL_PROFILE, GLFW_OPENGL_CORE_PROFILE);
    glfwWindowHint(GLFW_RESIZABLE, GL_FALSE);

    // Create a GLFWwindow object that we can use for GLFW's functions
    GLFWwindow* window = glfwCreateWindow(WIDTH, HEIGHT, "LearnOpenGL", nullptr, nullptr);
    glfwMakeContextCurrent(window);

    // Set the required callback functions
    glfwSetKeyCallback(window, key_callback);
    glfwSetScrollCallback(window, scroll_callback);
    glfwSetCursorPosCallback(window, mouse_callback);
    glfwSetInputMode(window, GLFW_CURSOR, GLFW_CURSOR_DISABLED);

    // Set this to true so GLEW knows to use a modern approach to retrieving function pointers and extensions
    glewExperimental = GL_TRUE;
    // Initialize GLEW to setup the OpenGL Function pointers
    glewInit();

    // Define the viewport dimensions
    glViewport(0, 0, WIDTH, HEIGHT);
    // 开启深度测试功能
    glEnable(GL_DEPTH_TEST);

    // Build and compile our shader program
    Shader ourShader("C:\\Users\\32156\\source\\repos\\LearnOpenGL\\Shader\\vertexShader.txt", "C:\\Users\\32156\\source\\repos\\LearnOpenGL\\Shader\\fragmentShader.txt");


    // 立方体顶点数据(位置坐标+纹理坐标)
    GLfloat vertices[] = {
    -0.5f, -0.5f, -0.5f,  0.0f, 0.0f,
     0.5f, -0.5f, -0.5f,  1.0f, 0.0f,
     0.5f,  0.5f, -0.5f,  1.0f, 1.0f,
     0.5f,  0.5f, -0.5f,  1.0f, 1.0f,
    -0.5f,  0.5f, -0.5f,  0.0f, 1.0f,
    -0.5f, -0.5f, -0.5f,  0.0f, 0.0f,

    -0.5f, -0.5f,  0.5f,  0.0f, 0.0f,
     0.5f, -0.5f,  0.5f,  1.0f, 0.0f,
     0.5f,  0.5f,  0.5f,  1.0f, 1.0f,
     0.5f,  0.5f,  0.5f,  1.0f, 1.0f,
    -0.5f,  0.5f,  0.5f,  0.0f, 1.0f,
    -0.5f, -0.5f,  0.5f,  0.0f, 0.0f,

    -0.5f,  0.5f,  0.5f,  1.0f, 0.0f,
    -0.5f,  0.5f, -0.5f,  1.0f, 1.0f,
    -0.5f, -0.5f, -0.5f,  0.0f, 1.0f,
    -0.5f, -0.5f, -0.5f,  0.0f, 1.0f,
    -0.5f, -0.5f,  0.5f,  0.0f, 0.0f,
    -0.5f,  0.5f,  0.5f,  1.0f, 0.0f,

     0.5f,  0.5f,  0.5f,  1.0f, 0.0f,
     0.5f,  0.5f, -0.5f,  1.0f, 1.0f,
     0.5f, -0.5f, -0.5f,  0.0f, 1.0f,
     0.5f, -0.5f, -0.5f,  0.0f, 1.0f,
     0.5f, -0.5f,  0.5f,  0.0f, 0.0f,
     0.5f,  0.5f,  0.5f,  1.0f, 0.0f,

    -0.5f, -0.5f, -0.5f,  0.0f, 1.0f,
     0.5f, -0.5f, -0.5f,  1.0f, 1.0f,
     0.5f, -0.5f,  0.5f,  1.0f, 0.0f,
     0.5f, -0.5f,  0.5f,  1.0f, 0.0f,
    -0.5f, -0.5f,  0.5f,  0.0f, 0.0f,
    -0.5f, -0.5f, -0.5f,  0.0f, 1.0f,

    -0.5f,  0.5f, -0.5f,  0.0f, 1.0f,
     0.5f,  0.5f, -0.5f,  1.0f, 1.0f,
     0.5f,  0.5f,  0.5f,  1.0f, 0.0f,
     0.5f,  0.5f,  0.5f,  1.0f, 0.0f,
    -0.5f,  0.5f,  0.5f,  0.0f, 0.0f,
    -0.5f,  0.5f, -0.5f,  0.0f, 1.0f
    };
    glm::vec3 cubePositions[] = {
          glm::vec3(0.0f,  0.0f,  0.0f),
          glm::vec3(2.0f,  5.0f, -15.0f),
          glm::vec3(-1.5f, -2.2f, -2.5f),
          glm::vec3(-3.8f, -2.0f, -12.3f),
          glm::vec3(2.4f, -0.4f, -3.5f),
          glm::vec3(-1.7f,  3.0f, -7.5f),
          glm::vec3(1.3f, -2.0f, -2.5f),
          glm::vec3(1.5f,  2.0f, -2.5f),
          glm::vec3(1.5f,  0.2f, -1.5f),
          glm::vec3(-1.3f,  1.0f, -1.5f)
    };

    // 调整读取方式
    GLuint VBO, VAO;
    glGenVertexArrays(1, &VAO);
    glGenBuffers(1, &VBO);

    glBindVertexArray(VAO);

    glBindBuffer(GL_ARRAY_BUFFER, VBO);
    glBufferData(GL_ARRAY_BUFFER, sizeof(vertices), vertices, GL_STATIC_DRAW);

    // 位置坐标数据解析方式   一次读取3个FLOAT    跨越5个FLOAT值再读取    从0号位置开始读取
    glVertexAttribPointer(0, 3, GL_FLOAT, GL_FALSE, 5 * sizeof(GLfloat), (GLvoid*)0);
    glEnableVertexAttribArray(0);
    // 纹理坐标数据解析方式   一次读取2个FLOAT    跨越5个FLAOT值再读取    从3个FLOAT值位置后开始读取
    glVertexAttribPointer(1, 2, GL_FLOAT, GL_FALSE, 5 * sizeof(GLfloat), (GLvoid*)(3 * sizeof(GLfloat)));
    glEnableVertexAttribArray(1);

    glBindVertexArray(0); // Unbind VAO

    // Load and create a texture
    GLuint texture1;
    GLuint texture2;
    // ====================
    // Texture 1
    // ====================
    glGenTextures(1, &texture1);
    glBindTexture(GL_TEXTURE_2D, texture1); // All upcoming GL_TEXTURE_2D operations now have effect on our texture object
    // Set our texture parameters
    glTexParameteri(GL_TEXTURE_2D, GL_TEXTURE_WRAP_S, GL_CLAMP_TO_EDGE);	// Set texture wrapping to GL_REPEAT
    glTexParameteri(GL_TEXTURE_2D, GL_TEXTURE_WRAP_T, GL_CLAMP_TO_EDGE);
    // Set texture filtering
    glTexParameteri(GL_TEXTURE_2D, GL_TEXTURE_MIN_FILTER, GL_NEAREST);
    glTexParameteri(GL_TEXTURE_2D, GL_TEXTURE_MAG_FILTER, GL_NEAREST);
    // Load, create texture and generate mipmaps
    int width, height;
    unsigned char* image = SOIL_load_image("C:\\Users\\32156\\source\\repos\\LearnOpenGL\\Resource\\container.jpg", &width, &height, 0, SOIL_LOAD_RGB);
    glTexImage2D(GL_TEXTURE_2D, 0, GL_RGB, width, height, 0, GL_RGB, GL_UNSIGNED_BYTE, image);
    glGenerateMipmap(GL_TEXTURE_2D);
    SOIL_free_image_data(image);
    glBindTexture(GL_TEXTURE_2D, 0); // Unbind texture when done, so we won't accidentily mess up our texture.
    // ===================
    // Texture 2
    // ===================
    glGenTextures(1, &texture2);
    glBindTexture(GL_TEXTURE_2D, texture2);
    // Set our texture parameters
    glTexParameteri(GL_TEXTURE_2D, GL_TEXTURE_WRAP_S, GL_CLAMP_TO_BORDER);
    glTexParameteri(GL_TEXTURE_2D, GL_TEXTURE_WRAP_T, GL_CLAMP_TO_BORDER);

    float borderColor[] = { 1.0f, 1.0f , 0.0f, 1.0f };
    glTexParameterfv(GL_TEXTURE_2D, GL_TEXTURE_BORDER_COLOR, borderColor);

    // Set texture filtering
    glTexParameteri(GL_TEXTURE_2D, GL_TEXTURE_MIN_FILTER, GL_LINEAR);
    glTexParameteri(GL_TEXTURE_2D, GL_TEXTURE_MAG_FILTER, GL_LINEAR);
    // Load, create texture and generate mipmaps
    image = SOIL_load_image("C:\\Users\\32156\\source\\repos\\LearnOpenGL\\Resource\\awesomeface.png", &width, &height, 0, SOIL_LOAD_RGB);
    glTexImage2D(GL_TEXTURE_2D, 0, GL_RGB, width, height, 0, GL_RGB, GL_UNSIGNED_BYTE, image);
    glGenerateMipmap(GL_TEXTURE_2D);
    SOIL_free_image_data(image);
    glBindTexture(GL_TEXTURE_2D, 0);

    // Game loop
    while (!glfwWindowShouldClose(window))
    {
        GLfloat currentFrame = glfwGetTime();
        deltaTime = currentFrame - lastFrame;
        lastFrame = currentFrame;

        // Check if any events have been activiated (key pressed, mouse moved etc.) and call corresponding response functions
        glfwPollEvents();
        do_movement();

        // Render
        // Clear the colorbuffer
        glClearColor(0.2f, 0.3f, 0.3f, 1.0f);
        glClear(GL_COLOR_BUFFER_BIT | GL_DEPTH_BUFFER_BIT);

        // Bind Textures using texture units
        glActiveTexture(GL_TEXTURE0);
        glBindTexture(GL_TEXTURE_2D, texture1);
        glUniform1i(glGetUniformLocation(ourShader.Program, "ourTexture1"), 0);
        glActiveTexture(GL_TEXTURE1);
        glBindTexture(GL_TEXTURE_2D, texture2);
        glUniform1i(glGetUniformLocation(ourShader.Program, "ourTexture2"), 1);

        // Activate shader
        ourShader.Use();

        // 观察矩阵的设置
        view = glm::lookAt(cameraPos, cameraPos + cameraFront, cameraUp);

        GLint viewLoc = glGetUniformLocation(ourShader.Program, "view");
        glUniformMatrix4fv(viewLoc, 1, GL_FALSE, glm::value_ptr(view));

        // 投影矩阵的设置
        glm::mat4 projection = glm::mat4(1.0f);
        projection = glm::perspective(glm::radians(aspect), (GLfloat)WIDTH / (GLfloat)HEIGHT, 0.1f, 100.0f);
        GLint proLoc = glGetUniformLocation(ourShader.Program, "projection");
        glUniformMatrix4fv(proLoc, 1, GL_FALSE, glm::value_ptr(projection));
        GLint modeLoc = glGetUniformLocation(ourShader.Program, "model");

        // 设置混合参数
        glUniform1f(glGetUniformLocation(ourShader.Program,"mixValue"),mixValue);

        // Draw container
        glBindVertexArray(VAO);
        for (int i = 0; i < 10; i++)
        {
            glm::mat4 model = glm::mat4(1.0f);
            model = glm::translate(model, cubePositions[i]);
            GLfloat angle = 20.0f * i;
            model = glm::rotate(model, glm::radians(angle), glm::vec3(1.0f, 0.3f, 0.5f));

            glUniformMatrix4fv(modeLoc, 1, GL_FALSE, glm::value_ptr(model));

            glDrawArrays(GL_TRIANGLES, 0, 36);
        }
        glBindVertexArray(0);

        // Swap the screen buffers
        glfwSwapBuffers(window);
    }
    // Properly de-allocate all resources once they've outlived their purpose
    glDeleteVertexArrays(1, &VAO);
    glDeleteBuffers(1, &VBO);
    // Terminate GLFW, clearing any resources allocated by GLFW.
    glfwTerminate();
    return 0;
}

// Is called whenever a key is pressed/released via GLFW
void key_callback(GLFWwindow* window, int key, int scancode, int action, int mode)
{
    if (action == GLFW_PRESS)
        keys[key] = true;
    else if (action == GLFW_RELEASE)
        keys[key] = false;
    if (key == GLFW_KEY_ESCAPE && action == GLFW_PRESS)
        glfwSetWindowShouldClose(window, GL_TRUE);
    if (key == GLFW_KEY_UP && action == GLFW_PRESS)
    {
        mixValue += 0.1f;
        if (mixValue >= 1.0f)
            mixValue = 1.0f;
    }
    if (key == GLFW_KEY_DOWN && action == GLFW_PRESS)
    {
        mixValue -= 0.1f;
        if (mixValue <= 0.0f)
            mixValue = 0.0f;
    }
}
void mouse_callback(GLFWwindow* window, double xpos, double ypos)
{
    if (firstMouse)
    {
        lastX = xpos;
        lastY = ypos;
        firstMouse = false;
    }

    GLfloat xoffset = xpos - lastX;
    GLfloat yoffset = lastY - ypos;
    lastX = xpos;
    lastY = ypos;

    GLfloat sensitivity = 0.1;
    xoffset *= sensitivity;
    yoffset *= sensitivity;

    yaw += xoffset;
    pitch += yoffset;

    if (pitch > 89.0f)
        pitch = 89.0f;
    if (pitch < -89.0f)
        pitch = -89.0f;

    glm::vec3 front;
    front.x = cos(glm::radians(yaw)) * cos(glm::radians(pitch));
    front.y = sin(glm::radians(pitch));
    front.z = sin(glm::radians(yaw)) * cos(glm::radians(pitch));
    cameraFront = glm::normalize(front);
}
void do_movement()
{
    // 摄像机控制
    GLfloat cameraSpeed = 5.0f * deltaTime;
    if (keys[GLFW_KEY_W])
        cameraPos += cameraSpeed * cameraFront;
    if (keys[GLFW_KEY_S])
        cameraPos -= cameraSpeed * cameraFront;
    if (keys[GLFW_KEY_A])
        cameraPos -= glm::normalize(glm::cross(cameraFront, cameraUp)) * cameraSpeed;
    if (keys[GLFW_KEY_D])
        cameraPos += glm::normalize(glm::cross(cameraFront, cameraUp)) * cameraSpeed;
}
void scroll_callback(GLFWwindow* window, double xoffset, double yoffset)
{
    if (aspect >= 1.0f && aspect <= 45.0f)
        aspect -= yoffset;
    if (aspect <= 1.0f)
        aspect = 1.0f;
    if (aspect >= 45.0f)
        aspect = 45.0f;
}