关于echarts各项内容(包括图表面积区域)设为渐变色已在上篇文章里全部阐述: echarts折线图与柱状图等绘成渐变色的方法
单独将tooltip拉出来再写一篇,是因为用formatter配合超文本的形式在echarts的配置项中,于自定义样式方面很适合各类加工以应付UI和产品那边提出的各种花里胡哨的设计
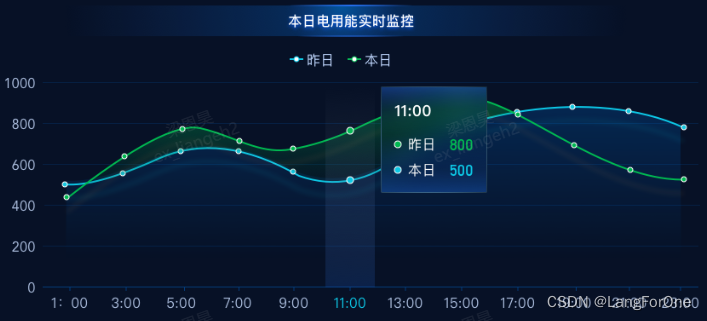
本次需求中UI提供的设计图的一个模块:
开发页面过程中写该模块样式时还原出的效果:
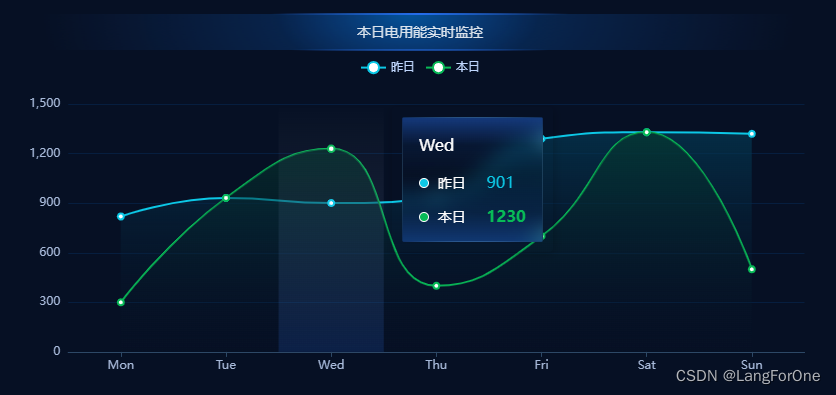
实现方法:
1、tooltip的shadow
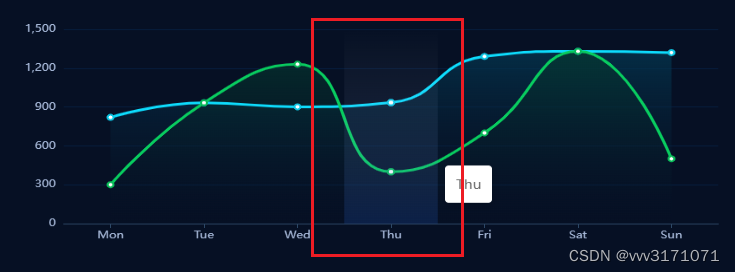
在tooltip的shadowStyle里进行配置:
        tooltip: {
          trigger: 'axis',
          axisPointer: {
            type: 'shadow',
            shadowStyle: {
              color: new echarts.graphic.LinearGradient(
                0, 0, 0, 1,
                [
                  { offset: 0, color: 'rgba(255, 255, 255, 0)' },
                  { offset: 1, color: 'rgba(37, 107, 230, 0.18)' }
                ]
              ),
            }
          },
        },
2、tooltip的文本框:
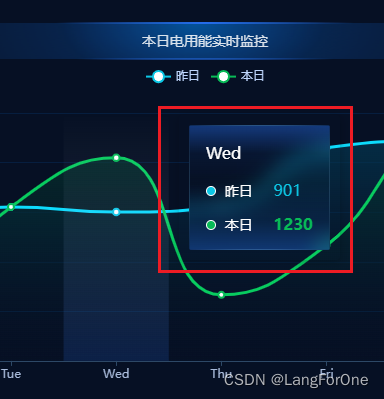
这部分没有特供的配置属性,直接用formatter配合超文本的形式进行样式加工:
        tooltip: {
          trigger: 'axis',
          axisPointer: {
            type: 'shadow',
            shadowStyle: {
              color: new echarts.graphic.LinearGradient(
                0, 0, 0, 1,
                [
                  { offset: 0, color: 'rgba(255, 255, 255, 0)' },
                  { offset: 1, color: 'rgba(37, 107, 230, 0.18)' }
                ]
              ),
            }
          },
          backgroundColor: 'rgba(50,50,50,0)', // tooltip默认背景为白色,手动置为透明
          borderWidth: 0,
          formatter: function (params) {
            let html = '';
            html += `<div style="color: #fff;font-size: 16px;height: 125px;padding: 16px;
                      background: linear-gradient(180deg, rgba(37,108,233,0.44) 0%, rgba(23,80,169,0.1) 22%, rgba(20,64,137,0) 46%, rgba(16,51,111,0.28) 77%, rgba(30,101,213,0.4) 100%);
                      border-radius: 2px;border: 1px solid;border-image: radial-gradient(circle, rgba(111, 185, 242, 0.86), rgba(0, 0, 0, 0.2)) 1 1;
                      backdrop-filter: blur(10px);">
                        <div>
                          <div style="margin-bottom: 16px">${params[0].name}</div>
                          <div style="margin-bottom: 12px">
                            <span style="display:inline-block;margin-right:4px;border:1px solid #fff;border-radius:10px;width:10px;height:10px;background-color:#0CC8E6;"></span>
                            <span style="font-size: 14px;">${params[0].seriesName}</span>
                            <span style="margin-left: 16px;color: #0CC8E6;">${params[0].value}</span>
                          </div>
                          <div>
                            <span style="display:inline-block;margin-right:4px;border:1px solid #fff;border-radius:10px;width:10px;height:10px;background-color:#08BA57;"></span>
                            <span style="font-size: 14px;">${params[1].seriesName}</span>
                            <span style="margin-left: 16px;color: #08BA57;font-weight: bold;">${params[1].value}</span>
                          </div>
                        </div>
                      </div>`;
            return html
          },
        },
这边值得一提的是CSS中的backdrop-filter这个属性,在案例中实现了一个模糊滤镜的效果
该属性的各项配置效果具体可参考该文章:css的backdrop-filter
未来有时间再好好研究下这个属性并将经验输出成文章分享给大家~
THX!



![[附源码]SSM计算机毕业设计新冠疫苗线上预约系统JAVA](https://img-blog.csdnimg.cn/19572828ebfd4181923e74dc9a38652c.png)
