文章目录
- 一、线程池
- 1.1 池化的概念
- 1.2 线程池的实现
- 1.3 线程池的使用场景
- 二、单例模式
- 2.1 单例模式概念
- 2.2 单例模式的线程池
- 2.3 防过度优化
- 三、源码
一、线程池
1.1 池化的概念
当我们处理任务的时候,一般就是来一个任务我们就创建一个线程来处理这个任务。这里首先的一个问题就是效率会降低(创建线程需要成本)。
接下来我们可以类比STL的扩容机制,当我们使用vector申请扩容的时候,就算我们只多申请一块空间,它也会给我们直接按照扩容机制给我们多扩容1.5倍或两倍,这样当我们后边还想扩容的时候就不用申请资源了。
而我们可以借助这种思想,我们先创建一批线程,当任务队列里面没任务时,每个线程都先休眠,一旦任务队列来了任务,就会唤醒线程来处理。
唤醒一个线程的成本要比创建一个线程的成本要小。
而我们把这个模型就叫做线程池。
1.2 线程池的实现
先把之前对原生线程库封装的组件引入,再做一些小小的调整。
// mythread.hpp
#pragma once

#include <iostream>
#include <pthread.h>
#include <cstring>
#include <string>
#include <cassert>
#include <functional>
#include <unistd.h>

class Thread
{
    typedef std::function<void*(void*)> func_t;
private:
    // 不加static就会有this指针
    static void* start_routine(void* args)
    {
        //return _func(args);
        // 无this指针,无法调用
        Thread* pct = static_cast<Thread*>(args);
        pct->_func(pct->_args);
        return nullptr;
    }
public:
    Thread(func_t fun, void* args = nullptr)
        : _func(fun)
        , _args(args)
    {
        char buf[64];
        snprintf(buf, sizeof buf, "thread-%d", _number++);
        _name = buf;
    }

    void start()
    {
        // int n = pthread_create(&_tid, nullptr, _func, _args);
        // _func是C++函数,pthread_create是C接口,不能混编
        int n = pthread_create(&_tid, nullptr, start_routine, this);
        assert(n == 0);
        (void)n;
    }

    std::string GetName()
    {
        return _name;
    }

    void join()
    {
        int n = pthread_join(_tid, nullptr);
        assert(n == 0);
        (void)n;
    }
private:
    std::string _name;// 线程名
    pthread_t _tid;// 线程id
    func_t _func;// 调用方法
    void *_args;// 参数
    static int _number;// 线程编号
};

int Thread::_number = 1;


// Main.cc
#include "mythread.hpp"

using std::cout;
using std::endl;

void* threadhandler(void* args)
{
    std::string ret = static_cast<const char*>(args);
    while(true)
    {
        cout << ret << endl;
        sleep(1);
    }
}

int main()
{
    Thread t1(threadhandler, (void*)"thead1");
    Thread t2(threadhandler, (void*)"thead2");
    t1.start();
    t2.start();
    t1.join();
    t2.join();
    return 0;
}
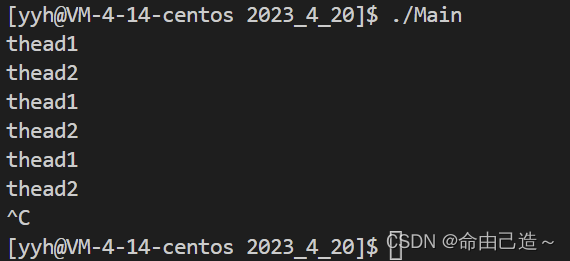
验证过没有问题以后就可以实现线程池创建一批线程。
既然需要多个线程访问这个任务队列,那么就需要用锁来保护资源,而我们直接可以把之前写过的锁的小组件引入进来:
// mymutex.hpp
#pragma once
#include <iostream>
#include <pthread.h>

class Mutex
{
public:
    Mutex(pthread_mutex_t* plock = nullptr)
        : _plock(plock)
    {}

    void lock()
    {
        // 被设置过
        if(_plock)
        {
            pthread_mutex_lock(_plock);
        }
    }

    void unlock()
    {
        if(_plock)
        {
            pthread_mutex_unlock(_plock);
        }
    }
private:
    pthread_mutex_t *_plock;
};

// 自动加锁解锁
class LockAuto
{
public:
    LockAuto(pthread_mutex_t *plock)
        : _mutex(plock)
    {
        _mutex.lock();
    }

    ~LockAuto()
    {
        _mutex.unlock();
    }
private:
    Mutex _mutex;
};
在创建一批线程的时候,我们要实现线程的运行函数,因为是要传给Thread类里面的_func中,所以不能有this指针,必须是静态成员函数。但是设置成静态成员函数的时候,就没有this指针,无法访问成员变量(锁和任务队列等),所以我们要封装这些接口。
template <class T>
class ThreadPool
{
private:
    static void* handlerTask(void* args)
    {
        ThreadPool<T>* tp = static_cast<ThreadPool<T>*>(args);
        while(true)
        {
            tp->lockqueue();
            while(tp->isqueueempty())
            {
                tp->threadwait();
            }
            T t = tp->pop();
            tp->unlockqueue();
            t();// 处理任务
        }
    }

    void lockqueue()
    {
        pthread_mutex_lock(&_mutex);
    }

    void unlockqueue()
    {
        pthread_mutex_unlock(&_mutex);
    }

    bool isqueueempty()
    {
        return _tasks.empty();
    }

    void threadwait()
    {
        pthread_cond_wait(&_cond, &_mutex);
    }

    T pop()
    {
        T res = _tasks.front();
        _tasks.pop();
        return res;
    }
public:
    ThreadPool(int num = 5)
        : _num(num)
    {
        pthread_mutex_init(&_mutex, nullptr);
        pthread_cond_init(&_cond, nullptr);
        // 创建线程
        for(int i = 0; i < _num; i++)
        {
            _threads.push_back(new Thread(handlerTask, this));
        }
    }

    void start()
    {
        for(auto& t : _threads)
        {
            t->start();
            cout << t->GetName() << " start..." << endl;
        }
    }

    void push(const T& in)
    {
        LockAuto lock(&_mutex);
        _tasks.push(in);
        // 唤醒池中的一个线程
        pthread_cond_signal(&_cond);
    }

    ~ThreadPool()
    {
        pthread_mutex_destroy(&_mutex);
        pthread_cond_destroy(&_cond);
        for(auto & e : _threads)
        {
            delete e;
        }
    }
private:
    int _num;// 线程数量
    std::vector<Thread*> _threads;
    std::queue<T> _tasks;// 任务队列
    pthread_mutex_t _mutex;// 保护任务队列
    pthread_cond_t _cond;
};
一些细节:
1️⃣ 在构造函数的时候,线程要传递参数,为了让线程函数(静态成员函数)能够获取到成员变量,所以要把this对象传递过去。
2️⃣ 在线程函数中,处理任务t()要放在解锁后,因为pop()的本质是将任务从公共资源中拿到当前进程的独立栈结构中,首先它已经不需要被保护了,其次如果放到加锁和解锁之间也不知道会运行多久,造成资源浪费。现在的情况就是线程拿到任务后就把锁释放掉,自己处理任务,不影响其他线程拿取任务。
现在我们想要像之前一样处理各种数据的计算,那么先引入任务组件:
// Task.hpp
#pragma once

#include <iostream>
#include <string>
#include <functional>
#include <cstdio>
#include <unordered_map>

class Task
{
    typedef std::function<int(int, int, char)> func_t;
public:
    Task()
    {}

    Task(int x, int y, char op, func_t func)
        : _x(x)
        , _y(y)
        , _op(op)
        , _func(func)
    {}

    std::string operator()()
    {
        int res = _func(_x, _y, _op);
        char buf[64];
        snprintf(buf, sizeof buf, "%d %c %d = %d", _x, _op, _y, res);
        return buf;
    }
    std::string tostringTask()
    {
        char buf[64];
        snprintf(buf, sizeof buf, "%d %c %d = ?", _x, _op, _y);
        return buf;
    }
private:
    int _x;
    int _y;
    char _op;
    func_t _func;
};

const std::string oper = "+-*/";

std::unordered_map<char, std::function<int(int, int)>> hash = {
        {'+', [](int x, int y)->int{return x + y;}},
        {'-', [](int x, int y)->int{return x - y;}},
        {'*', [](int x, int y)->int{return x * y;}},
        {'/', [](int x, int y)->int{
            if(y == 0)
            {
                std::cerr << "除0错误" << endl;
                return -1;
            }
            return x / y;}},
    };

int myMath(int x, int y, char op)
{
    int res = hash[op](x, y);
    return res;
}
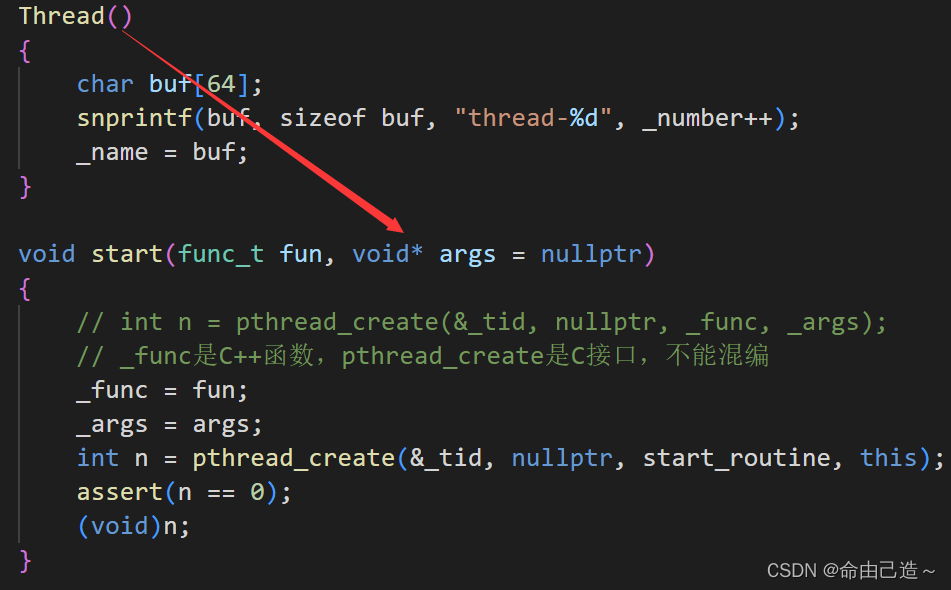
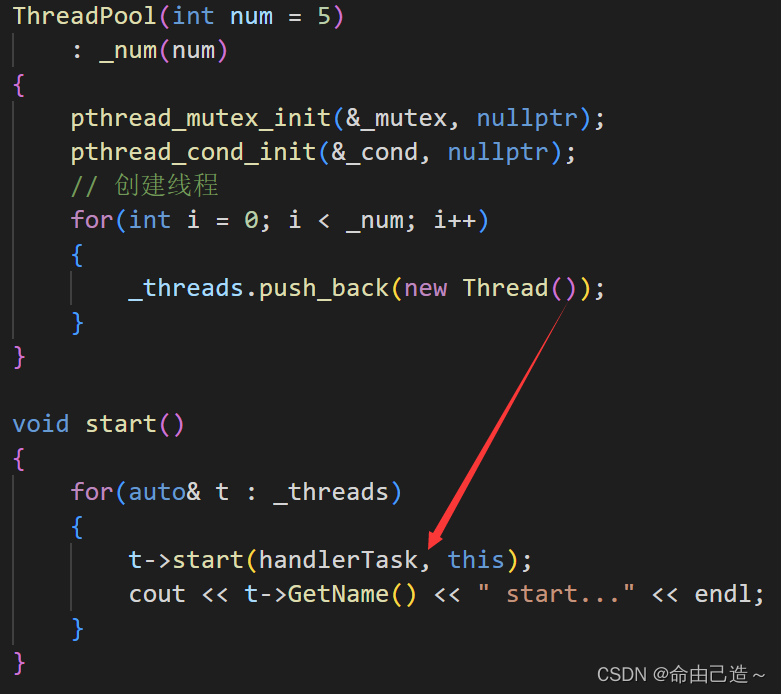
现在我们想要线程处理任务的时候知道是哪个线程进行处理的,我们可以把传进参数的位置进行改变,不要在构造的时候传递,而是在运行的时候传递,这样就能传进线程启动函数中。
实现代码:
// ThreadPool.hpp
#pragma once

#include <vector>
#include <queue>
#include "mythread.hpp"
#include "mymutex.hpp"
#include "Task.hpp"

using std::cout;
using std::endl;

const int N = 5;

template <class T>
class ThreadPool;

template <class T>
struct ThreadData
{
    ThreadPool<T>* _tp;
    std::string _name;
    ThreadData(ThreadPool<T>* tp, const std::string& name)
        : _tp(tp)
        , _name(name)
    {}
};

template <class T>
class ThreadPool
{
private:
    static void* handlerTask(void* args)
    {
        ThreadData<T>* tdp = static_cast<ThreadData<T>*>(args);
        while(true)
        {
            tdp->_tp->lockqueue();
            while(tdp->_tp->isqueueempty())
            {
                tdp->_tp->threadwait();
            }
            T t = tdp->_tp->pop();
            tdp->_tp->unlockqueue();
            cout << tdp->_name << " 获取任务: " << t.tostringTask() << " 结果是: " << t() << endl;
            //t();// 处理任务
        }
    }

    void lockqueue()
    {
        pthread_mutex_lock(&_mutex);
    }

    void unlockqueue()
    {
        pthread_mutex_unlock(&_mutex);
    }

    bool isqueueempty()
    {
        return _tasks.empty();
    }

    void threadwait()
    {
        pthread_cond_wait(&_cond, &_mutex);
    }

    T pop()
    {
        T res = _tasks.front();
        _tasks.pop();
        return res;
    }
public:
    ThreadPool(int num = 5)
        : _num(num)
    {
        pthread_mutex_init(&_mutex, nullptr);
        pthread_cond_init(&_cond, nullptr);
        // 创建线程
        for(int i = 0; i < _num; i++)
        {
            _threads.push_back(new Thread());
        }
    }

    void start()
    {
        for(auto& t : _threads)
        {
            ThreadData<T>* td = new ThreadData<T>(this, t->GetName());
            t->start(handlerTask, td);
        }
    }

    void push(const T& in)
    {
        LockAuto lock(&_mutex);
        _tasks.push(in);
        // 唤醒池中的一个线程
        pthread_cond_signal(&_cond);
    }

    ~ThreadPool()
    {
        pthread_mutex_destroy(&_mutex);
        pthread_cond_destroy(&_cond);
        for(auto & e : _threads)
        {
            delete e;
        }
    }
private:
    int _num;// 线程数量
    std::vector<Thread*> _threads;
    std::queue<T> _tasks;// 任务队列
    pthread_mutex_t _mutex;// 保护任务队列
    pthread_cond_t _cond;
};

// Main.cc
#include "mythread.hpp"
#include "ThreadPool.hpp"
#include "Task.hpp"
#include <cstdlib>

int main()
{
    ThreadPool<Task>* tp = new ThreadPool<Task>();
    tp->start();
    srand(time(0));
    int x, y;
    char op;
    while(true)
    {
        x = rand() % 100;
        y = rand() % 50;
        op = oper[rand() % 4];
        Task t(x, y, op, myMath);
        tp->push(t);
        sleep(1);
    }
    return 0;
}
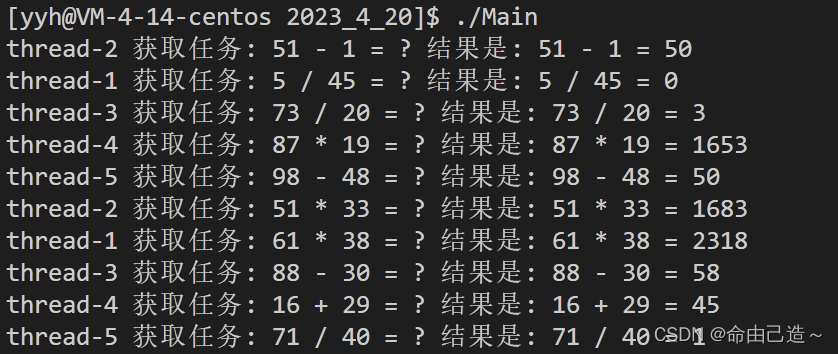
1.3 线程池的使用场景
1️⃣ 需要大量的线程来完成任务,且完成任务的时间比较短。 WEB服务器完成网页请求这样的任务,使用线程池技术是非常合适的。因为单个任务小,而任务数量巨大,你可以想象一个热门网站的点击次数。 但对于长时间的任务,比如一个Telnet连接请求,线程池的优点就不明显了。因为Telnet会话时间比线程的创建时间大多了。
2️⃣对性能要求苛刻的应用,比如要求服务器迅速响应客户请求。
3️⃣接受突发性的大量请求,但不至于使服务器因此产生大量线程的应用。突发性大量客户请求,在没有线程池情况下,将产生大量线程,虽然理论上大部分操作系统线程数目最大值不是问题,短时间内产生大量线程可能使内存到达极限,出现错误。
二、单例模式
2.1 单例模式概念
关于单例模式在之前的文章【C++】特殊类设计(单例模式)有过详细介绍。
这里用一句话总结:单例模式的特点就是全局只有一个唯一对象。
实现的模式有饿汉模式和懒汉模式。
饿汉就是程序一开始运行就加载对象,而懒汉是要用的时候才会加载。
举个例子:
我们平时malloc/new就是懒汉模式,我们申请的时候并没有真正的在物理内存中被申请,而是我们要写入的时候才会申请物理内存并且建立虚拟地址空间和物理空间的映射关系(页表)。
所以懒汉模式的最核心的思想就是延时加载。
2.2 单例模式的线程池
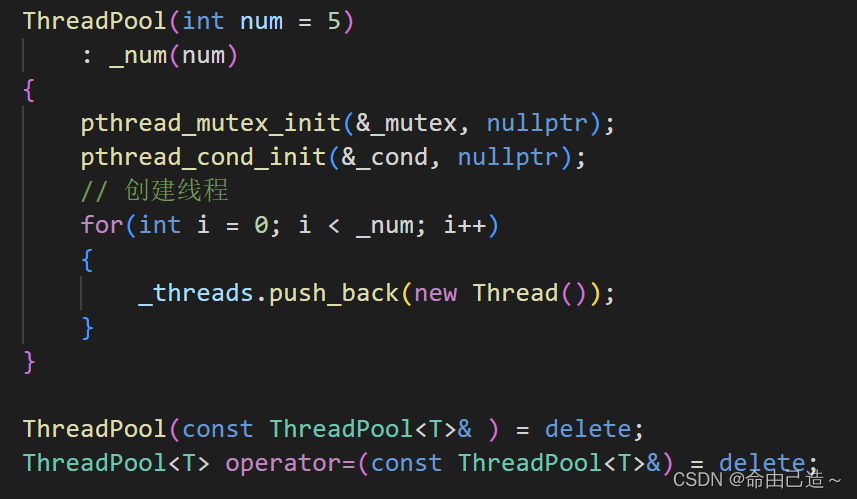
我们要做的第一步就是把构造函数私有,再把拷贝构造和赋值运算符重载delete。
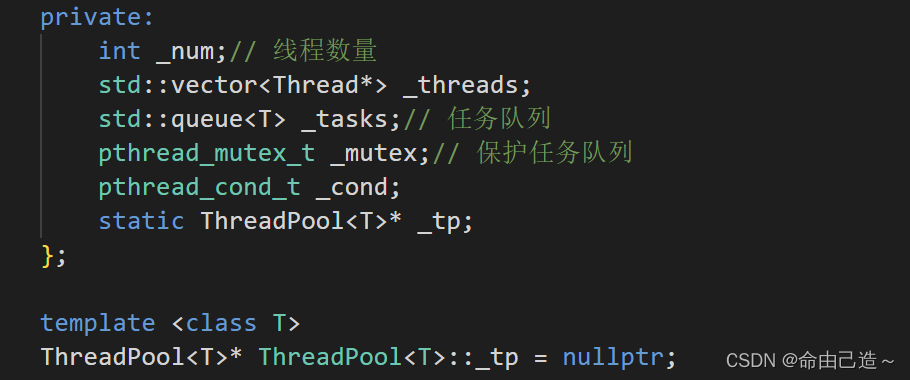
接下来就要在成员变量中定义一个静态指针,方便获取单例对象。
在设置获取单例对象的函数的时候,注意要设置成静态成员函数,因为在获取对象前根本没有对象,无法调用非静态成员函数(无this指针)。
static ThreadPool<T>* GetSingle()
{
    if(_tp == nullptr)
    {
        _tp = new ThreadPool<T>();
    }
    return _tp;
}
在调用的时候:
int main()
{
    ThreadPool<Task>::GetSingle()->start();
    srand(time(0));
    int x, y;
    char op;
    while(true)
    {
        x = rand() % 100;
        y = rand() % 50;
        op = oper[rand() % 4];
        Task t(x, y, op, myMath);
        ThreadPool<Task>::GetSingle()->push(t);
        sleep(1);
    }
    return 0;
}
运行结果:

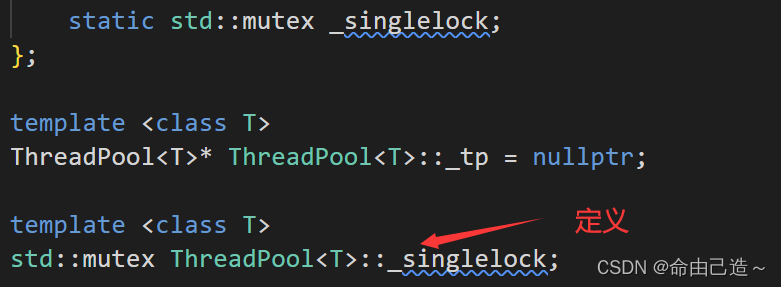
不过也许会出现多个线程同时申请资源的场景,所以还需要一把锁来保护这块资源,而这把锁也得设置成静态,因为GetSingle()函数是静态的,访问不到成员函数。
static ThreadPool<T>* GetSingle()
{
    _singlelock.lock();
    if(_tp == nullptr)
    {
        _tp = new ThreadPool<T>();
    }
    _singlelock.unlock();
    return _tp;
}
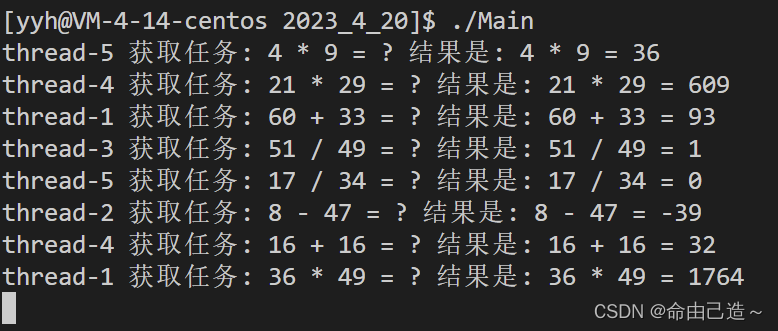
运行结果:
2.3 防过度优化
当我们有多个线程的时候,很可能会把资源的指针放入寄存器中,如果有个线程修改了,那么就会出问题。
所以我们要用volatile关键字保证内存可见性。
volatile static ThreadPool<T>* _tp
三、源码
// ThreadPool.hpp
#pragma once

#include <vector>
#include <queue>
#include <mutex>
#include "mythread.hpp"
#include "mymutex.hpp"
#include "Task.hpp"

using std::cout;
using std::endl;

const int N = 5;

template <class T>
class ThreadPool;

template <class T>
struct ThreadData
{
    ThreadPool<T>* _tp;
    std::string _name;
    ThreadData(ThreadPool<T>* tp, const std::string& name)
        : _tp(tp)
        , _name(name)
    {}
};

template <class T>
class ThreadPool
{
private:
    static void* handlerTask(void* args)
    {
        ThreadData<T>* tdp = static_cast<ThreadData<T>*>(args);
        while(true)
        {
            tdp->_tp->lockqueue();
            while(tdp->_tp->isqueueempty())
            {
                tdp->_tp->threadwait();
            }
            T t = tdp->_tp->pop();
            tdp->_tp->unlockqueue();
            cout << tdp->_name << " 获取任务: " << t.tostringTask() << " 结果是: " << t() << endl;
            //t();// 处理任务
        }
    }

    void lockqueue()
    {
        pthread_mutex_lock(&_mutex);
    }

    void unlockqueue()
    {
        pthread_mutex_unlock(&_mutex);
    }

    bool isqueueempty()
    {
        return _tasks.empty();
    }

    void threadwait()
    {
        pthread_cond_wait(&_cond, &_mutex);
    }

    T pop()
    {
        T res = _tasks.front();
        _tasks.pop();
        return res;
    }

    ThreadPool(int num = 5)
        : _num(num)
    {
        pthread_mutex_init(&_mutex, nullptr);
        pthread_cond_init(&_cond, nullptr);
        // 创建线程
        for(int i = 0; i < _num; i++)
        {
            _threads.push_back(new Thread());
        }
    }

    ThreadPool(const ThreadPool<T>& ) = delete;
    ThreadPool<T> operator=(const ThreadPool<T>&) = delete;

public:

    void start()
    {
        for(auto& t : _threads)
        {
            ThreadData<T>* td = new ThreadData<T>(this, t->GetName());
            t->start(handlerTask, td);
        }
    }

    void push(const T& in)
    {
        LockAuto lock(&_mutex);
        _tasks.push(in);
        // 唤醒池中的一个线程
        pthread_cond_signal(&_cond);
    }

    ~ThreadPool()
    {
        pthread_mutex_destroy(&_mutex);
        pthread_cond_destroy(&_cond);
        for(auto & e : _threads)
        {
            delete e;
        }
    }

    static ThreadPool<T>* GetSingle()
    {
        if(_tp == nullptr)
        {
            _singlelock.lock();
            if(_tp == nullptr)
            {
                _tp = new ThreadPool<T>();
            }
            _singlelock.unlock();
        }
        return _tp;
    }

private:
    int _num;// 线程数量
    std::vector<Thread*> _threads;
    std::queue<T> _tasks;// 任务队列
    pthread_mutex_t _mutex;// 保护任务队列
    pthread_cond_t _cond;
    volatile static ThreadPool<T>* _tp;
    static std::mutex _singlelock;
};

template <class T>
ThreadPool<T>* ThreadPool<T>::_tp = nullptr;

template <class T>
std::mutex ThreadPool<T>::_singlelock;


