1。编写脚本for1.sh,使用for循环创建20账户,账户名前缀由用户从键盘输入,账户初始密码由用户输入,例如: test1、test2、test3、.....、 test10
2.编写脚本for2.sh,使用for循环,通过ping命令测试网段的主机连通性,网段前3段由用户输入,如: 输入192.168.48 则ping 192.168.48.125 - 192.168.48.135,将可以ping通的主机IP地址写入到 /tmp/host_up.txt文件中,不能ping通的主机IP地址写入到: /tmp/host_down.txt文件中
3.使用for循环实现批量主机root密码的修改
(1)打开多台主机
(2)使用ssh-keygen命令建立密钥对
(3)多台主机间通过ssh-copy-id进行免密登录
(4)编写脚本for3.sh,通过for循环登录主机修改对方root账户密码
1。编写脚本for1.sh,使用for循环创建20账户,账户名前缀由用户从键盘输入,账户初始密码由用户输入,例如: test1、test2、test3、.....、 test10
分析
首先循环创建账户则需要使用for循环,但是创建的用户当中可能会有已经存在的账户,所以我们需要使用if判断分情况进行操作
创建脚本test1
[root@server ~]# vim for1.sh

#!/bin/bash

read -p "请输入账户名前缀:" user
read -p "亲输入密码" newpasswd
for ((i=1;i<=20;i++))
do
        if ! id -u $user$i &> /dev/null
        then
                useradd $user$i
                echo "$newpassswd" | passwd --stdin $user$i &> /dev/null
        else
                echo "$user$i is exists....."
        fi
done
执行脚本
[root@server ~]# sh for1.sh
请输入账户名前缀:test
亲输入密码123456
[root@server ~]#
[root@server ~]# sh for1.sh
请输入账户名前缀:test
亲输入密码123456
test1 is exists.....
test2 is exists.....
test3 is exists.....
test4 is exists.....
test5 is exists.....
test6 is exists.....
test7 is exists.....
test8 is exists.....
test9 is exists.....
test10 is exists.....
test11 is exists.....
test12 is exists.....
test13 is exists.....
test14 is exists.....
test15 is exists.....
test16 is exists.....
test17 is exists.....
test18 is exists.....
test19 is exists.....
test20 is exists.....
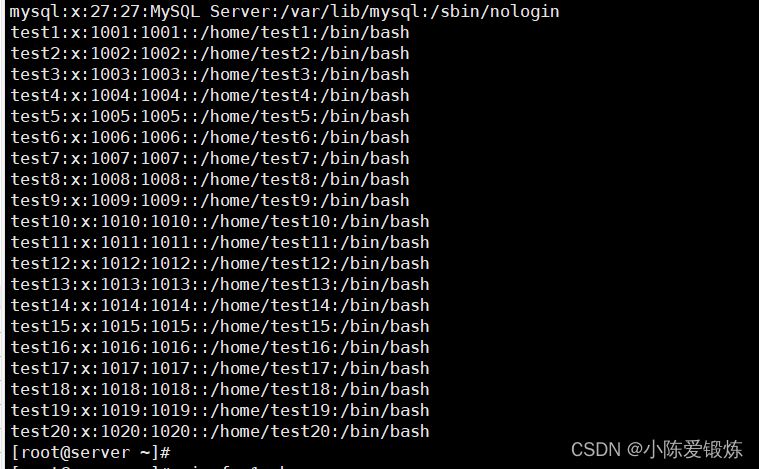
查看是否创建成功
[root@server ~]# cat /etc/passwd
2.编写脚本for2.sh,使用for循环,通过ping命令测试网段的主机连通性,网段前3段由用户输入,如: 输入192.168.48 则ping 192.168.48.125 - 192.168.48.135,将可以ping通的主机IP地址写入到 /tmp/host_up.txt文件中,不能ping通的主机IP地址写入到: /tmp/host_down.txt文件中
编写脚本
[root@server ~]# vim for2.sh


#!/bin/bash

read -p " 请输入IP的前三个网段:" IP

for ip in {125..135}
do
        ping -c 2 -w 3 $IP.$ip  &> /dev/null
        num=$?
        if [  $num -eq 0 ]
        then
                echo "$IP.$ip" >> /tmp/host_up.txt
        else
                echo "$IP.$ip" >> /tmp/host_down.txt
        fi
done
执行
[root@server ~]# sh for2.sh
请输入IP的前三个网段:192.168.38
结果查看
[root@server ~]# cat /tmp/host_up.txt
192.168.38.128
[root@server ~]# cat /tmp/host_down.txt
192.168.38.125
192.168.38.126
192.168.38.127
192.168.38.129
192.168.38.130
192.168.38.131
192.168.38.132
192.168.38.133
192.168.38.134
192.168.38.135
3.使用for循环实现批量主机root密码的修改
(1)打开多台主机
(2)使用ssh-keygen命令建立密钥对
(3)多台主机间通过ssh-copy-id进行免密登录
(4)编写脚本for3.sh,通过for循环登录主机修改对方root账户密码
首先建立密钥对
[root@server ~]# ssh-keygen -t rsa
Generating public/private rsa key pair.
Enter file in which to save the key (/root/.ssh/id_rsa):
Created directory '/root/.ssh'.
Enter passphrase (empty for no passphrase):
Enter same passphrase again:
Your identification has been saved in /root/.ssh/id_rsa
Your public key has been saved in /root/.ssh/id_rsa.pub
The key fingerprint is:
SHA256:/Blz6rKuSi4O2uRElhUK/ohxSRX5683vBbclWLuEQTc root@server
The key's randomart image is:
+---[RSA 3072]----+
|. ..+o . E |
|.o o.. . . . |
|..+ .. . . |
|.ooo .. = . |
|..+. .S * * . |
| o . . X = |
|. o .. o + + |
|.*.o . +. . |
|..+.o..oo=+ |
+----[SHA256]-----+
[root@server ~]#
将产生的密钥发送给目标主机
[root@server ~]# ssh-copy-id root@192.168.38.136
/usr/bin/ssh-copy-id: INFO: Source of key(s) to be installed: "/root/.ssh/id_rsa.pub"
The authenticity of host '192.168.38.136 (192.168.38.136)' can't be established.
ED25519 key fingerprint is SHA256:QZpzjCVGYd38N+RokZdEo7KQMtYQWux6Vhd0s64MP0g.
This key is not known by any other names
Are you sure you want to continue connecting (yes/no/[fingerprint])? y
Please type 'yes', 'no' or the fingerprint: yes
/usr/bin/ssh-copy-id: INFO: attempting to log in with the new key(s), to filter out any that are already installed
/usr/bin/ssh-copy-id: INFO: 1 key(s) remain to be installed -- if you are prompted now it is to install the new keys
root@192.168.38.136's password:Number of key(s) added: 1
Now try logging into the machine, with: "ssh 'root@192.168.38.136'"
and check to make sure that only the key(s) you wanted were added.
测试是否能连接上
[root@server ~]# ssh root@192.168.38.136
Activate the web console with: systemctl enable --now cockpit.socketRegister this system with Red Hat Insights: insights-client --register
Create an account or view all your systems at https://red.ht/insights-dashboard
Last login: Fri Apr 21 18:46:12 2023 from 192.168.38.1
[root@node1 ~]# exit
创建一个目的主机IP所在文件
[root@server ~]# vim ipfile

192.168.38.136
192.168.38.130
编写脚本
[root@server ~]# vim for3.sh

#!/bin/bash

for ip in `cat ipfile`
do
        echo $ip
        ssh root@$ip "echo rhce | passwd --stdin root" &>/dev/null
        if [ "$?" -eq 0 ]
        then
                echo "host $ip successfully update passwd"
        else
                echo "host $ip error update passwd"
        fi
done
执行
[root@server ~]# sh for3.sh
192.168.38.136
host 192.168.38.136 successfully update passwd
192.168.38.130
host 192.168.38.130 error update passwd
因为130这个主机并没有进行免密所以他会报错

