目录
1.前言
2.简介
3.Debian11 软件包安装与配置 介绍
3.1.Debian 软件包工具
4.Debian11 软件包安装
4.1、更新索引
4.2.软件包升级
4.3.软件包安装
4.4.软件包删除
4.5.软件包清理
5.Debian11 软件包配置
6.Debian11 系统环境初始化
6.1.系统升级
6.2.安装 SSH
6.3.设置UFW防火墙
6.4.设置DNS
6.5.屏蔽sources.list配置
错误信息
处理办法
6.6.更新仓库源
6.7.更新 apt 包索引
6.8.设置默认语言
7.软件安装
7.1.完成后安装常用软件
7.2.安装主题 ohmyzsh
7.4.其它插件安装
7.5.显示系统信息
7.6.安装git
7.7.lrzsz安装使用
7.8.Debian系统安装Docker
7.9.debian系统安装.net
8.debain和centos对比
1.前言
CentOS已经停止更新,公司已经开始使用Debain,为什么不用Ubuntu系统,但是那玩意预置了太多用不上的软件包
至于为什么写这篇文章,很简单,就是为了偷懒,也懒得用到时候再查资料
本文主要针对安装Debain后的一些初始化配置,相当于自己安装Windows安装以后做一些个人配置,针对个人习惯
2.简介
Debian GNU/Linux ,是一个操作系统及自由软件的发行版,由一群自愿付出时间和精力的用户来维护并更新。它附带了超过 59000 个软件包,这些预先编译好的软件被打包成一种良好的格式以便于用户安装和使用。
官方主页: Debian -- The Universal Operating System
下载地址: debian安装包下载_开源镜像站-阿里云
debian-archive安装包下载_开源镜像站-阿里云
3.Debian11 软件包安装与配置 介绍
Debian11 的软件包管理系统是APT (高级软件包工具),它能够使用所有的二进制软件包资源。Debian11 软件包管理系统有丰富的历史,它有许多可供选择的前端应用程序和后端访问方式。
- apt:用于所有的交互式命令行操作,包含软件包的安装、删除和升级操作;
- apt-get:从脚本中调用软件包,作为备选,用于较旧的 Debian 系统;
- aptitude:使用一个可视交互式的文本界面来管理和搜索已安装的软件包。
3.1.Debian 软件包工具
- apt:使用命令行管理软件包的前端应用工具,也称高级软件包工具;
- aptitude:使用可视化全屏控制台交互式管理软件包的前端工具;
- dpkg:基于文件的用于底层软件包管理系统;
- tasksel:用来安装选择任务的前端工具;
- unattended-upgrades:增强软件包,自动安装安全更新;
- gnome-software:GNOME 软件中心;
- synaptic:GTK图形化的软件包管理工具;
- apt-utils:APT工具的实用程序;
- apt-listchanges:软件包历史更改提醒工具;
- apt-listbugs:在每次APT安装前列出严重的 bug;
- apt-file:APT 软件包搜索工具;
- apt-rdepends:递归列出软件包依赖项。
4.Debian11 软件包安装
4.1、更新索引
Debian11 软件包索引更新过程,首先从远程链接获取软件的元数据索引,然后重建和更新 APT 使用的本地元数据索引。以下使用 apt、aptitude、apt-get ,三种方式选择其一即可。
apt update
aptitude update
apt-get update
4.2.软件包升级
Debian11 软件包升级过程,首先选择最新的可用版本,然后解决依赖关系,如果远程与已安装的版本不同,则从远程获取二进制软件包,解包、运行脚本、安装二进制文件等。
apt upgrade
apt full-upgrade
aptitude safe-upgrade
aptitude full-upgrade
apt-get upgrade
apt-get dist-upgrade4.3.软件包安装
Debian11 软件包安装过程,首先选择命令行中列出的包,然后解决软件包依赖关系后从远程服务器获取已选二进制包,解包、运行脚本、安装二进制文件等。
apt install package
aptitude install package
apt-get install package
4.4.软件包删除
Debian11 软件包删除过程,首先选择命令行中列出的包,然后解决软件包依赖关系后运行脚本,删除已安装的文件,除了配置文件。
apt remove package
aptitude remove package
apt-get remove package
4.5.软件包清理
Debian11 软件包清理过程,首先选择命令行中列出的包,然后解决软件包依赖关系后运行脚本,清理已安装的文件,包含配置文件。
apt purge package
aptitude purge package
apt-get purge package
5.Debian11 软件包配置
Debian11 软件包安装完以后,就要进行软件包配置了,不同的软件包配置方式不同,但是通过 APT 安装的软件,应该首选阅读官方提供的优良文档。一般按照文档说明进行配置。
vim /usr/share/doc/package_name/README.Debian  #该软件的主文档
vim /usr/share/doc/package_name/package  #该软件的相关文档
6.Debian11 系统环境初始化
6.1.系统升级
apt update -y #更新系统的包索引或包列表,它不会升级任何软件
apt upgrade -y #将您的软件包升级到最新版本,含软件、安全更新和相关依赖
6.2.安装 SSH
一般云服务器厂商提供安装的 Linux 操作系统已经自带SSH用于远程链接,但是通过本地安装的虚拟机可能需要手动安装SSH,SSH安装和查看命令如下。
简单的SSH配置参数,按需调整:
Port 22 #修改默认端口号
PermitRootLogin yes #修改root用户可以登录
1、修改sshd_config文件
vi /etc/ssh/sshd_config
2、将#PasswordAuthentication no的注释去掉,并且将NO修改为YES
3、将#PermitRootLogin yes的注释去掉,如果没有则手工添加
4、启动SSH服务
/etc/init.d/ssh start // 或service ssh start
5、验证SSH服务状态
/etc/init.d/ssh status
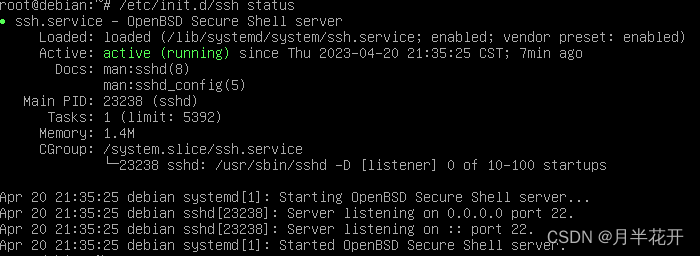
6. 添加开机自启动
update-rc.d ssh enable
其他命令
apt install ssh #安装SSH
/etc/init.d/ssh restart #重启SSH
vim /etc/ssh/ssh_config #查看配置信息
6.3.设置UFW防火墙
ufw 作为 Debian11 系统官方默认使用的防火墙,它是一个主机端的类似于iptables防火墙配置工具,简单好用。一般场景下使用ufw已经可以满足基本安全需求了。
apt install ufw #安装防火墙
ufw allow ssh #开放ssh服务
ufw allow 22/tcp #开放22端口
ufw allow 22/udp #开放22端口
ufw delete allow 80/tcp #禁止开放80端口
ufw allow from 1.1.1.1 to any port 22 #允许指定地址访问本机指定端口
ufw enable #开启
ufw disable #禁用
ufw reload #重启
ufw status #查看状态
6.4.设置DNS
通过命令:vim /etc/resolv.conf 打开,在底部添加如下参数,然后重启。
nameserver 114.114.114.114 #大陆电信DNS
nameserver 8.8.8.8 #海外谷歌DNS
systemctl restart networking #重启网络
6.5.屏蔽sources.list配置
在安装软件的时候报错Media change: please insert the disc labeled,这是由于Debian的软件源中存在如下配置,即通过DVD光盘来安装软件。
错误信息
Media change: please insert the disc labeled
Debian GNU/Linux 11.0.0 _Bullseye_ - Official amd64 DVD Binary-1 20220709-10:04
处理办法
vi /etc/apt/sources.list

# 将文件中注释掉

deb cdrom:[Debian GNU/Linux 11.0.0 _Bullseye_ - Official amd64 DVD Binary-1 20210814-10:04] bullseye contrib main
保存。到终端执行 apt update && apt upgrade
6.6.更新仓库源
镜像源如果为 https 开头,则需要安装如下服务:
apt install apt-transport-https ca-certificates
通过命令:vim /etc/apt/sources.list 打开,在底部添加如下参数
debian 7.x (wheezy)
编辑/etc/apt/sources.list文件(需要使用sudo), 在文件最前面添加以下条目(操作前请做好相应备份)
deb http://mirrors.aliyun.com/debian-archive/debian/ wheezy main non-free contrib
deb http://mirrors.aliyun.com/debian-archive/debian/ wheezy-proposed-updates main non-free contrib
deb-src http://mirrors.aliyun.com/debian-archive/debian/ wheezy main non-free contrib
deb-src http://mirrors.aliyun.com/debian-archive/debian/ wheezy-proposed-updates main non-free contrib
debian 8.x (jessie)
编辑/etc/apt/sources.list文件(需要使用sudo), 在文件最前面添加以下条目(操作前请做好相应备份)
deb http://mirrors.aliyun.com/debian/ jessie main non-free contrib
deb http://mirrors.aliyun.com/debian/ jessie-proposed-updates main non-free contrib
deb-src http://mirrors.aliyun.com/debian/ jessie main non-free contrib
deb-src http://mirrors.aliyun.com/debian/ jessie-proposed-updates main non-free contrib
debian 9.x (stretch)
编辑/etc/apt/sources.list文件(需要使用sudo), 在文件最前面添加以下条目(操作前请做好相应备份)
deb http://mirrors.aliyun.com/debian/ stretch main non-free contrib
deb-src http://mirrors.aliyun.com/debian/ stretch main non-free contrib
deb http://mirrors.aliyun.com/debian-security stretch/updates main
deb-src http://mirrors.aliyun.com/debian-security stretch/updates main
deb http://mirrors.aliyun.com/debian/ stretch-updates main non-free contrib
deb-src http://mirrors.aliyun.com/debian/ stretch-updates main non-free contrib
deb http://mirrors.aliyun.com/debian/ stretch-backports main non-free contrib
deb-src http://mirrors.aliyun.com/debian/ stretch-backports main non-free contrib
debian 10.x (buster)
编辑/etc/apt/sources.list文件(需要使用sudo), 在文件最前面添加以下条目(操作前请做好相应备份)
deb http://mirrors.aliyun.com/debian/ buster main non-free contrib
deb-src http://mirrors.aliyun.com/debian/ buster main non-free contrib
deb http://mirrors.aliyun.com/debian-security buster/updates main
deb-src http://mirrors.aliyun.com/debian-security buster/updates main
deb http://mirrors.aliyun.com/debian/ buster-updates main non-free contrib
deb-src http://mirrors.aliyun.com/debian/ buster-updates main non-free contrib
deb http://mirrors.aliyun.com/debian/ buster-backports main non-free contrib
deb-src http://mirrors.aliyun.com/debian/ buster-backports main non-free contrib
debian 11.x (bullseye)
编辑/etc/apt/sources.list文件(需要使用sudo), 在文件最前面添加以下条目(操作前请做好相应备份)
deb http://mirrors.aliyun.com/debian/ bullseye main non-free contrib
deb-src http://mirrors.aliyun.com/debian/ bullseye main non-free contrib
deb http://mirrors.aliyun.com/debian-security/ bullseye-security main
deb-src http://mirrors.aliyun.com/debian-security/ bullseye-security main
deb http://mirrors.aliyun.com/debian/ bullseye-updates main non-free contrib
deb-src http://mirrors.aliyun.com/debian/ bullseye-updates main non-free contrib
deb http://mirrors.aliyun.com/debian/ bullseye-backports main non-free contrib
deb-src http://mirrors.aliyun.com/debian/ bullseye-backports main non-free contrib
6.7.更新 apt 包索引
更新apt源列表
sudo apt-get update6.8.设置默认语言
1)安装中文语言包
apt install language-pack-zh-hans2)更改默认语言为中文,修改/etc/default/locale文件添加:
# vi /etc/default/locale
LANG=zh_CN.UTF-8
LANGUAGE=zh_CN:zh:en_US:en
3)使用 pkg-reconfigure locales 设置默认语言为英文
$sudo dpkg-reconfigure locales
7.软件安装
7.1.完成后安装常用软件
sudo apt-get install zsh wget curl zip git vim -y7.2.安装主题 ohmyzsh
查看系统当前使用的shell
echo $SHELL
查看系统是否安装了zsh
cat /etc/shells
/bin/sh
/bin/bash
/sbin/nologin
/usr/bin/sh
/usr/bin/bash
/usr/sbin/nologin
/bin/tcsh
/bin/cs
安装zsh
curl    sh -c "$(curl -fsSL https://raw.githubusercontent.com/ohmyzsh/ohmyzsh/master/tools/install.sh)"
wget    sh -c "$(wget -O- https://raw.githubusercontent.com/ohmyzsh/ohmyzsh/master/tools/install.sh)"
fetch    sh -c "$(fetch -o - https://raw.githubusercontent.com/ohmyzsh/ohmyzsh/master/tools/install.sh)"
由于该域名在国外, 可能因为墙的原因无法成功执行,这时候可以使用命令
git clone https://github.com/ohmyzsh/ohmyzsh.git && ./ohmyzsh/tools/install.sh或者
git https://e.coding.net/zdy/debian_start/ohmyzsh.git && ./ohmyzsh/tools/install.sh切换shell为zsh,重启服务器后,可使用
$ chsh -s /bin/zsh
Changing shell for root.
Shell changed.
7.4.其它插件安装
# zsh-syntax-highlighting zsh语法高亮插件
git clone https://e.coding.net/zdy/debian_start/zsh-syntax-highlighting.git ${ZSH_CUSTOM:-~/.oh-my-zsh/custom}/plugins/zsh-syntax-highlighting

# zsh-autosuggestions zsh语法自动提示, 输入历史提示等
git clone https://e.coding.net/zdy/debian_start/zsh-autosuggestions.git ${ZSH_CUSTOM:-~/.oh-my-zsh/custom}/plugins/zsh-autosuggestions
7.5.显示系统信息
sudo apt install screenfetch #安装软件
screenfetch #执行程序
7.6.安装git
Debian 安装 git_debian 安装git_Bug程序猿~的博客-CSDN博客
7.7.lrzsz安装使用
1)lrzsz说明:lrzsz是linux系统里的一款上传和下载的工具,相当于Windwos 系统里的FTP工具
2)lrzsz安装:
lrzsz工具用于将linux机器上面的文件下载本地或者将本地的文件上传到Linux机器中,通过以下命令直接安装lrzsz工具
yum -y install lrzsz (coentos 安装)
sudo apt install lrzsz (debian 安装)
3)命令说明
lrzsz两个操作命令分别是rz和sz
rz命令:上传文件,输入该命令后会出现弹窗选择需要上传的文件(Receive Zmodem)
sz命令:下载文件,输入该命令后会出现弹窗选择要下载的文件下载路径(Send Zmodem)
4)使用方式
a) 在Windows系统里安装使用Xshel、SecureCRT远程连接软件远程连接Linux机器(比如 Xshell)。
b)在Windows系统里,通过SecureCRT工具,远程连接Linux系统;
c)在远程连接到linux系统里,输入rz命令,回弹出窗口,选择Windows本地需要上传文件到linux机器
d)远程连接到linux系统,使用sz命令将Linux系统里的文件下载到Windwos本地。
sz 命令后需要添加需要下载的文件名称或目录名称
例如:需要把linux机器上面的
1.txt文件下载到windows机器保存需要输入命令:sz 1.txt,弹出窗口选择下载到windows
保存目录
7.8.Debian系统安装Docker
sudo apt-get install ca-certificates curl gnupg lsb-release
mkdir -p /etc/apt/keyrings
echo \
"deb [arch=$(dpkg --print-architecture) signed-by=/etc/apt/keyrings/docker.gpg] https://download.docker.com/linux/debian \
$(lsb_release -cs) stable" | sudo tee /etc/apt/sources.list.d/docker.list > /dev/null


sudo apt-get update
sudo apt-get install docker-ce docker-ce-cli containerd.io docker-compose-plugin
systemctl enable docker.service
systemctl restart docker
7.9.debian系统安装.net
wget https://packages.microsoft.com/config/debian/10/packages-microsoft-prod.deb -O packages-microsoft-prod.deb
sudo dpkg -i packages-microsoft-prod.deb
sudo apt-get update;
sudo apt-get install -y apt-transport-https &&
sudo apt-get update &&
sudo apt-get install -y dotnet-sdk-3.1
8.debain和centos对比
| 操作内容 | Centos 6/7 | Debian/Ubuntu |
|---|---|---|
| 1.软件包后缀 | *.rpm | *.deb |
| 2.软件源配置文件 | /etc/yum.conf | /etc/apt/sources.list |
| 3.更新软件包列表 | yum makecache fast | apt-get update |
| 4.从软件仓库安装软件 | yum install package | apt-get install package |
| 5.安装一个已下载的软件包 | yum install pkg.rpm rpm -i pkg.rpm | dpkg -i pkg.deb dpkg --install pkg.deb |
| 6.删除软件包 | rpm -e package yum remove package | apt-get remove package apt-get purge package |
| 7.获取某软件包的信息** | yum search package | apt-cache search package |
| 8.获显示所有已经安装软件 | yum list installed | dpkg -l |
| 9.获取已经安装软件包的信息 | rpm -qi package | dpkg --status packages |
| 10.网卡配置文件 | /etc/sysconfig/network-scripts/ifcfg-eth0 | /etc/network/interfaces |
| 11.selinux | /etc/selinux/config | 没有 selinux |
| 12.SSH | 默认允许 root 登陆 | 默认不允许 root 登陆 |
| 13.创建用户 | 默认创建用户家目录 默认 shell 解释器为 bash 免交互创建密码--stdin | 默认不创建用户家目录 默认 shell 解释器为 sh 免交互创建密码 chpasswd |
| 14.防火墙规则 | 默认规则 | 默认没有任何规则 |
| 15.权限 | root 或普通用户 | 默认普通用户权限 |


