Spring Cloud Gateway服务网关 7/9
- 1、GateWay概述
- 2、GateWay的特性:
- 3、GateWay与zuul的区别:
- 4、zuul1.x的模型:
- 5、什么是webflux:
- 6、GateWay三大概念:
- 6.1,路由:
- 6.2,断言:
- 6.3,过滤:
- 7、GateWay的工作原理:
- 8、使用GateWay:
- 8.1,建module
- 8.2,修改pom文件
- 8.3,写配置文件
- 8.4,主启动类
- 8.5,针对pay模块,设置路由:
- 8.6,开始测试
- 9、GateWay的网关配置,
- 9.1 使用硬编码配置GateWay:
- 9.2 重启服务 测试
- 9.3 通过服务名实现动态路由
- 9.3.1 修改GateWay模块的配置文件:
- 9.3.2 然后就可以启动微服务.测试
- **9.3.3 Pridicate断言:**
- **9.3.4 Filter过滤器:**
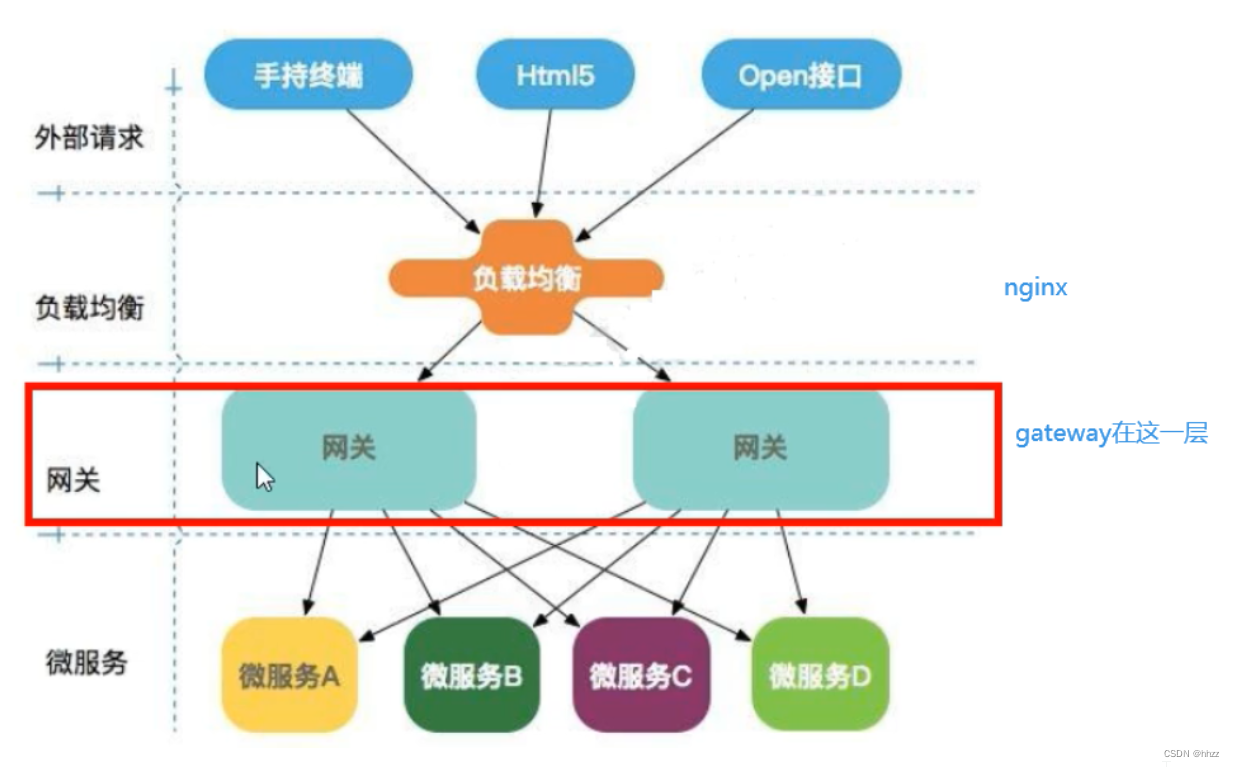
1、GateWay概述
zuul停更了

gateway之所以性能号,因为底层使用WebFlux,而webFlux底层使用netty通信(NIO)
SpringCloud Gateway使用的是Webflux中的reactor-netty响应式编程组件,底层使用了Netty通讯框架
2、GateWay的特性:
![[外链图片转存失败,源站可能有防盗链机制,建议将图片保存下来直接上传(img-NFrltNQ8-1681725030916)(.\图片\gateway的4.png)]](https://img-blog.csdnimg.cn/264f49d9ac844da78cc9078e9c7f3446.png)
Gateway能干什么?
- 反向代理
- 鉴权
- 流量控制
- 熔断
- 日志监控
- …
3、GateWay与zuul的区别:
![[外链图片转存失败,源站可能有防盗链机制,建议将图片保存下来直接上传(img-kxBvp6cE-1681725030918)(.\图片\gateway的5.png)]](https://img-blog.csdnimg.cn/77ec9c6f23344e669f4119ab0da35daa.png)
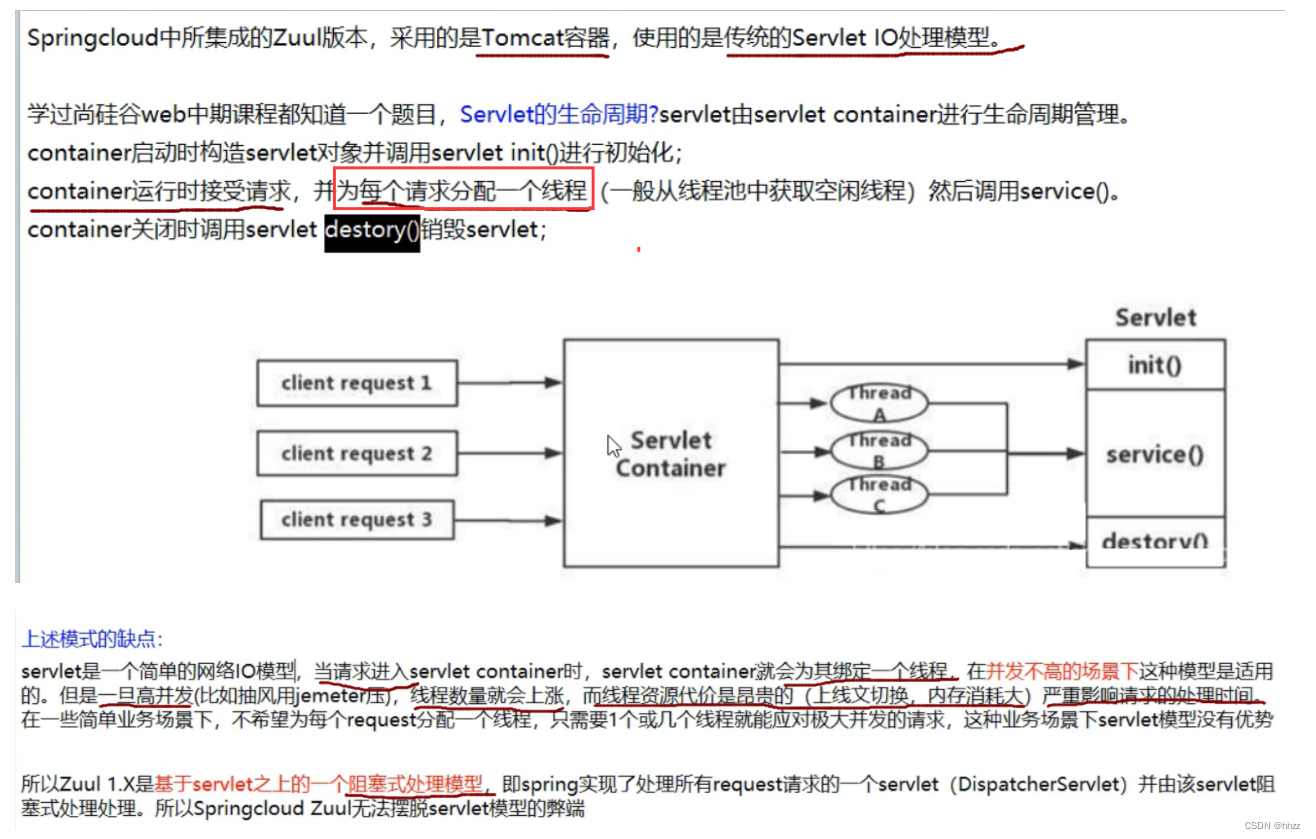
4、zuul1.x的模型:
5、什么是webflux:
是一个非阻塞的web框架,类似springmvc这样的
![[外链图片转存失败,源站可能有防盗链机制,建议将图片保存下来直接上传(img-wEv1n6lc-1681725030922)(.\图片\gateway的8.png)]](https://img-blog.csdnimg.cn/60ef216af5b3406782634dad291eaafd.png)
6、GateWay三大概念:
6.1,路由:
路由是构建网关的基本模块,它由ID,目标URI,一系列的断言和过滤器组成,如断言为true则匹配该路由
就是根据某些规则,将请求发送到指定服务上
6.2,断言:
参考的是Java8的java.util.function.Predicate 开发人员可以匹配HTTP请求中的所有内容(例如请求头或请求参数),如果请求与断言相匹配则进行路由
就是判断,如果符合条件就是xxxx,反之yyyy
6.3,过滤:
指的是Spring框架中GatewayFilter的实例,使用过滤器,可以在请求被路由前或者之后对请求进行修改.
路由前后,过滤请求
![[外链图片转存失败,源站可能有防盗链机制,建议将图片保存下来直接上传(img-RvekLADg-1681725030933)(C:\Users\Administrator\AppData\Local\Temp\1681715660122.png)]](https://img-blog.csdnimg.cn/7adb6d631adc43888c1432f83604581f.png)
7、GateWay的工作原理:
![[外链图片转存失败,源站可能有防盗链机制,建议将图片保存下来直接上传(img-Zbg6uKOY-1681725030935)(.\图片\gateway的12.png)]](https://img-blog.csdnimg.cn/afb37469eb9042afb6b9da9ebeef0f9f.png)
![[外链图片转存失败,源站可能有防盗链机制,建议将图片保存下来直接上传(img-DA2sjgZP-1681725030936)(.\图片\gateway的13.png)]](https://img-blog.csdnimg.cn/9fd0e786b8524369bb8f40b04b435dab.png)
Gateway的核心逻辑:路由转发+执行过滤器
下章开始配置一个gateway网关。
8、使用GateWay:
8.1,建module
新建一个GateWay的模块项目
名字: Cloud-gateway-9527
8.2,修改pom文件
<?xml version="1.0" encoding="UTF-8"?>
<project xmlns="http://maven.apache.org/POM/4.0.0"
         xmlns:xsi="http://www.w3.org/2001/XMLSchema-instance"
         xsi:schemaLocation="http://maven.apache.org/POM/4.0.0 http://maven.apache.org/xsd/maven-4.0.0.xsd">
    <parent>
        <artifactId>springcloud2023</artifactId>
        <groupId>com.tigerhhzz.springcloud</groupId>
        <version>1.0-SNAPSHOT</version>
    </parent>
    <modelVersion>4.0.0</modelVersion>

    <artifactId>Cloud-gateway-9527</artifactId>

    <dependencies>
        <!--gateway-->
        <dependency>
            <groupId>org.springframework.cloud</groupId>
            <artifactId>spring-cloud-starter-gateway</artifactId>
        </dependency>
        <!--Springboot web-->
        <dependency>
            <groupId>org.springframework.boot</groupId>
            <artifactId>spring-boot-starter-web</artifactId>
        </dependency>
        <!--Springboot actuator-->
        <dependency>
            <groupId>org.springframework.boot</groupId>
            <artifactId>spring-boot-starter-actuator</artifactId>
        </dependency>
        <!--eureka-client-->
        <dependency>
            <groupId>org.springframework.cloud</groupId>
            <artifactId>spring-cloud-starter-netflix-eureka-client</artifactId>
        </dependency>
        <!-- 引入自己定义的api通用包,可以使用Payment支付Entity -->
        <dependency>
            <groupId>com.tigerhhzz.springcloud-tigerhhzz</groupId>
            <artifactId>cloud-api-commons</artifactId>
            <version>1.0-SNAPSHOT</version>
        </dependency>
        <!-- 引入lombok -->
        <dependency>
            <groupId>org.projectlombok</groupId>
            <artifactId>lombok</artifactId>
            <optional>true</optional>
        </dependency>
        <!-- 引入srpingboot test -->
        <dependency>
            <groupId>org.springframework.boot</groupId>
            <artifactId>spring-boot-starter-test</artifactId>
            <scope>test</scope>
        </dependency>

    </dependencies>

</project>
8.3,写配置文件
server:
  port: 9527
spring:
  application:
    name: cloud-gateway-service

eureka:
  instance:
    hostname: cloud_gateway_service
  client:
    service-url:
      defaultZone: http://www.eureka7001.com:7001/eureka/
    register-with-eureka: true
    fetch-registry: true
8.4,主启动类
package com.tigerhhzz.springcloud;

import lombok.extern.slf4j.Slf4j;
import org.springframework.boot.SpringApplication;
import org.springframework.boot.autoconfigure.SpringBootApplication;
import org.springframework.cloud.netflix.eureka.EnableEurekaClient;

@SpringBootApplication
@EnableEurekaClient
@Slf4j
public class GateWayMain9527 {
    public static void main(String[] args) {
        SpringApplication.run(GateWayMain9527.class,args);
        log.info("GateWayMain9527启动成功~~~~~~~~~~~~~~~~~~~");
    }
}
8.5,针对pay模块,设置路由:
我们目前不想暴露8001端口,希望在8001外面套一层9527
cloud-provider-payment8001看看controller的访问地址(两个controller 分别是如下)
    @GetMapping("/payment/lb")
    public String getPaymentLB(){
        return serverPort;
    }

  @GetMapping(value = "/payment/{id}")
  public CommonResult getPaymentById(@PathVariable("id")Long id){
      Payment result = paymentService.getPaymentById(id);
      log.info("****查询结果:" + result);
      if(result != null){
          return new CommonResult(200, "查询成功,serverPort:  "+serverPort, result);
      }
      return new CommonResult(400, "没有对应id的记录", null);
  }
**修改GateWay模块(9527)的配置文件:
server:
  port: 9527
spring:
  application:
    name: cloud-gateway-service
  cloud:
    gateway:
      routes: #多个路由
        - id: payment_routh                       #路由的ID,没有固定规则但要求唯一,建议配合服务名
          uri: http://localhost:8001   #匹配后提供服务的路由地址
          #uri: lb://cloud-payment-service         #路由的ID,没有固定规则但要求唯一,建议配合服务名
          predicates: #断言
            - Path=/payment/**                #断言 路径相匹配的进行路由
        - id: payment_routh2
          uri: http://localhost:8001
          #uri: lb://cloud-payment-service
          predicates:
            - Path=/payment/lb/**
            #- After=2022-06-16T19:49:30.417+08:00[Asia/Shanghai]
            #- Cookie=username,tigerhhzz

eureka:
  instance:
    hostname: cloud_gateway_service
  client:
    service-url: //服务提供者provider注册进eureka服务中心
      defaultZone: http://www.eureka7001.com:7001/eureka/
    register-with-eureka: true
    fetch-registry: true
这里表示,
当访问localhost:9527/payment/31时,
路由到localhost:8001/payment/31
8.6,开始测试
启动Cloud-eureka-server7001
启动Cloud-provider-payment8001
启动Cloud-gateway-9527
如果启动GateWay报错
        可能是GateWay模块引入了web和监控的starter依赖,需要移除
访问:
添加网关前:http://localhost:8001/payment/1
添加网关后:http://localhost:9527/payment/1
9、GateWay的网关配置,
Gateway网关路由有两种配置方式:
-
在配置文件yaml中配置
-
代码中注入RouteLocator的Bean
GateWay的网关配置,除了支持配置文件,还支持硬编码方式
9.1 使用硬编码配置GateWay:
自己写一个:通过9527网关访问到外网的百度和腾讯网站
创建配置类:
package com.tigerhhzz.springcloud.config;

import org.springframework.cloud.gateway.route.RouteLocator;
import org.springframework.cloud.gateway.route.builder.RouteLocatorBuilder;
import org.springframework.context.annotation.Bean;
import org.springframework.context.annotation.Configuration;

@Configuration
public class GateWayConfig {

    @Bean
    public RouteLocator customRouteLocator(RouteLocatorBuilder builder) {
        RouteLocatorBuilder.Builder routes = builder.routes();
        routes.route("path_route",r->r.path("/baidunews").uri("https://news.baidu.com/"));
        return routes.build();
    }

    @Bean
    public RouteLocator customRouteLocator2(RouteLocatorBuilder builder) {
        RouteLocatorBuilder.Builder routes = builder.routes();
        routes.route("path_route1",r->r.path("/tencent").uri("https://www.tencent.com/"));
        return routes.build();
    }
}
9.2 重启服务 测试
9.3 通过服务名实现动态路由
上面的配置虽然首先了网关,但是是在配置文件中写死了要路由的地址
现在需要修改,不指定地址,而是根据微服务名字进行路由,我们可以在注册中心获取某组微服务的地址
默认情况下Gatway会根据注册中心注册的服务列表, 以注册中心上微服务名为路径创建动态路由进行转发,从而实现动态路由的功能
需要注意的是uri的协议lb,表示启用Gateway的负载均衡功能.
lb://serverName是spring cloud gatway在微服务中自动为我们创建的负载均衡uri
需要:
一个eureka7001+两个服务提供者8001/8002
9.3.1 修改GateWay模块的配置文件:
server:
  port: 9527
spring:
  application:
    name: cloud-gateway-service
  cloud:
    gateway:
      discovery:
        locator:
          enabled: true #开启从注册中心动态创建路由的功能,利用微服务名进行路由
      routes: #多个路由
        - id: payment_routh                       #路由的ID,没有固定规则但要求唯一,建议配合服务名
          #uri: http://localhost:8001   #匹配后提供服务的路由地址
          uri: lb://cloud-provider-service         #路由的ID,没有固定规则但要求唯一,建议配合服务名
          predicates: #断言
            - Path=/payment/**                #断言 路径相匹配的进行路由
        - id: payment_routh2
          #uri: http://localhost:8001
          uri: lb://cloud-provider-service
          predicates:
            - Path=/payment/lb/**
            #- After=2022-06-16T19:49:30.417+08:00[Asia/Shanghai]
            #- Cookie=username,tigerhhzz

eureka:
  instance:
    hostname: cloud-gateway-service
  client:
    service-url: #服务提供者provider注册进eureka服务中心
      defaultZone: http://localhost:7001/eureka/
    register-with-eureka: true
    fetch-registry: true
9.3.2 然后就可以启动微服务.测试
8001/8002两个端口切换 http://localhost:9527/payment/lb
9.3.3 Pridicate断言:
![[外链图片转存失败,源站可能有防盗链机制,建议将图片保存下来直接上传(img-lCeJPUxW-1681725030938)(.\图片\gateway的24.png)]](https://img-blog.csdnimg.cn/43e6c54fa59141f9a9b3424ddaac46c6.png)
我们之前在配置文件中配置了断言:
![[外链图片转存失败,源站可能有防盗链机制,建议将图片保存下来直接上传(img-VIHr60zu-1681725030939)(.\图片\gateway的22.png)]](https://img-blog.csdnimg.cn/5a4a8f43bd9944a3a861951d3d2197c2.png)
这个断言表示,如果外部访问路径是指定路径,就路由到指定微服务上
可以看到,这里有一个Path,这个是断言的一种,断言的类型:
![[外链图片转存失败,源站可能有防盗链机制,建议将图片保存下来直接上传(img-IHC3GcGo-1681725030942)(.\图片\gateway的23.png)]](https://img-blog.csdnimg.cn/01b4be1f8e394f0a99fdb7313b3dd22a.png)
After:
        可以指定,只有在指定时间后,才可以路由到指定微服务
![[外链图片转存失败,源站可能有防盗链机制,建议将图片保存下来直接上传(img-IaCcOBPz-1681725030944)(.\图片\gateway的26.png)]](https://img-blog.csdnimg.cn/048efc85d99d4171b414b3666e5d90cb.png)
这里表示,只有在2020年的2月21的15点51分37秒之后,访问才可以路由
在此之前的访问,都会报404
如何获取当前时区?**
import java.time.ZonedDateTime;

/**
 * @author tigerhhzz
 * @date 2023/4/17 17:10
 */
public class T2 {
    public static void main(String[] args) {
        ZonedDateTime now = ZonedDateTime.now();
        System.out.println(now);
        //2023-04-17T17:11:53.743+08:00[Asia/Shanghai]
    }
}
before:
        与after类似,他说在指定时间之前的才可以访问
        between:
        需要指定两个时间,在他们之间的时间才可以访问
![[外链图片转存失败,源站可能有防盗链机制,建议将图片保存下来直接上传(img-12SZOTcd-1681725030946)(.\图片\gateway的27.png)]](https://img-blog.csdnimg.cn/4e134ed0841c4a38a3a7bfacf602362c.png)
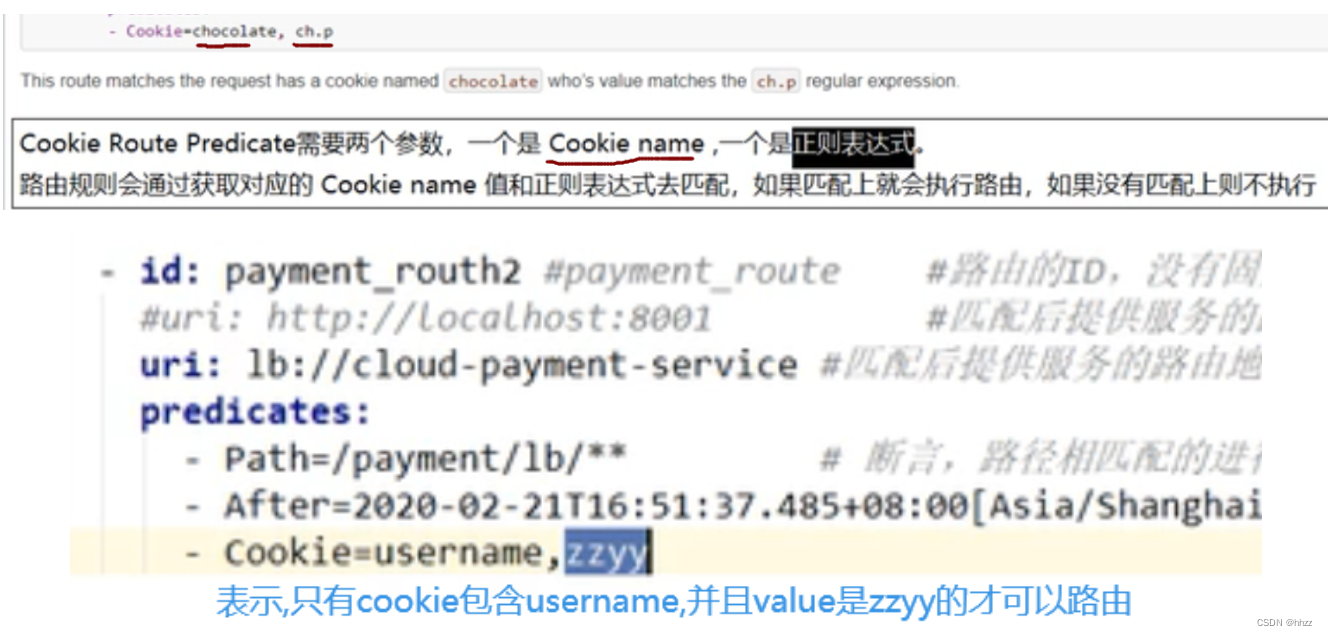
cookie:
        只有包含某些指定cookie(key,value),的请求才可以路由
利用curl访问测试:
![[外链图片转存失败,源站可能有防盗链机制,建议将图片保存下来直接上传(img-ldx6VelW-1681725030950)(C:\Users\Administrator\AppData\Local\Temp\1681723144707.png)]](https://img-blog.csdnimg.cn/4ec95fc9b2af4f1e8c8805dff66239fc.png)
yml中加上:
- Cookie=username,tigerhhzz
curl测试:
![[外链图片转存失败,源站可能有防盗链机制,建议将图片保存下来直接上传(img-QlqBXABx-1681725030951)(C:\Users\Administrator\AppData\Local\Temp\1681723346723.png)]](https://img-blog.csdnimg.cn/349a930bf7f543d58c0ee610969d48e8.png)
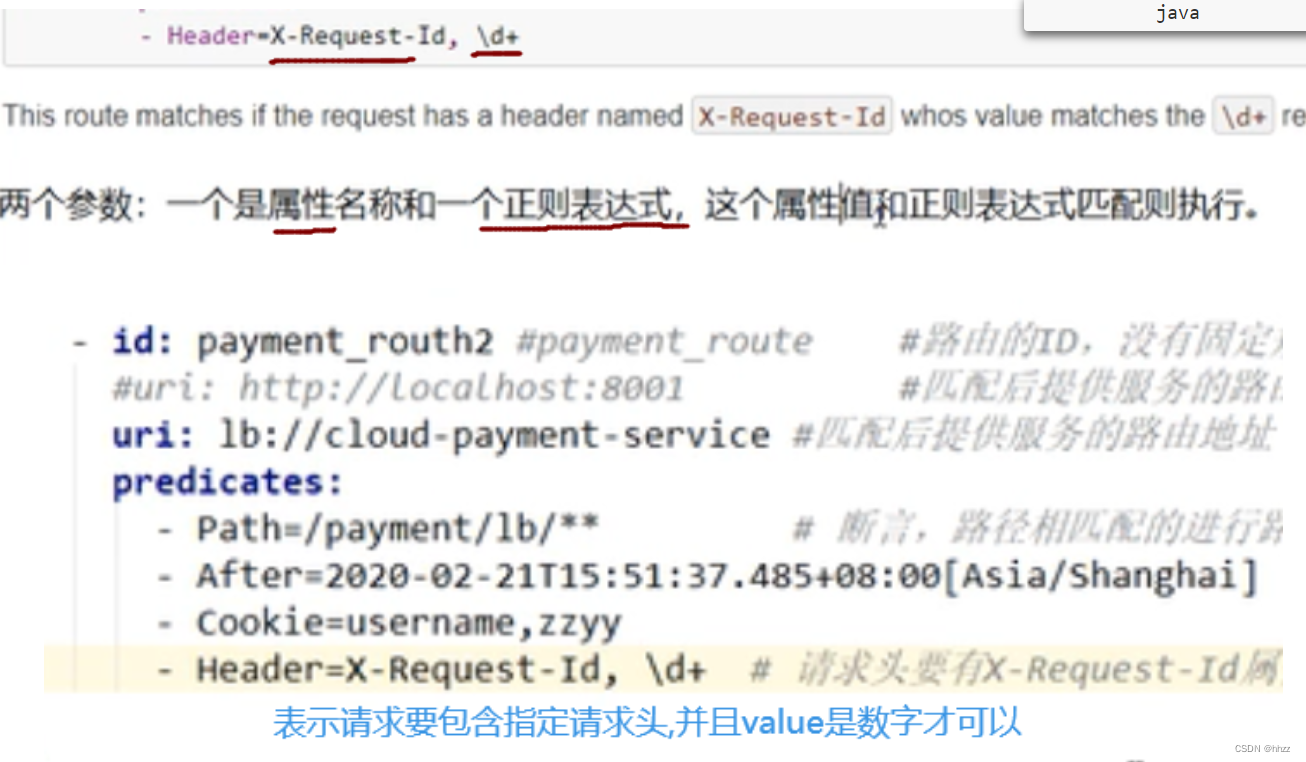
Header:
        只有包含指定请求头的请求,才可以路由
测试:
![[外链图片转存失败,源站可能有防盗链机制,建议将图片保存下来直接上传(img-36upRH7u-1681725030954)(.\图片\gateway的33.png)]](https://img-blog.csdnimg.cn/cd666d953f8e41228f926520f55452fe.png)
host:
        只有指定主机的才可以访问,
        比如我们当前的网站的域名是www.aa.com
        那么这里就可以设置,只有用户是www.aa.com的请求,才进行路由
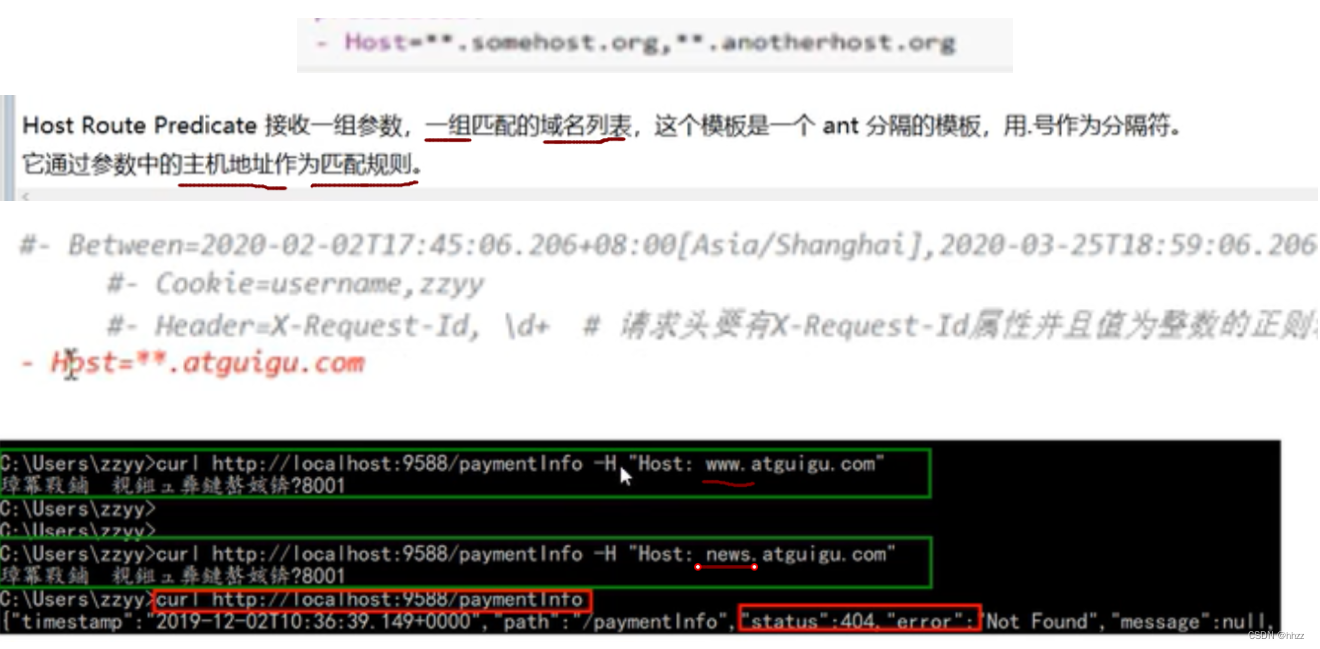
可以看到,如果带了域名访问,就可以,但是直接访问ip地址.就报错了
method:
        只有指定请求才可以路由,比如get请求...
![[外链图片转存失败,源站可能有防盗链机制,建议将图片保存下来直接上传(img-79LjESh0-1681725030964)(.\图片\gateway的38.png)]](https://img-blog.csdnimg.cn/ba505eebc5be4491abea32329e6e9cd5.png)
path:
        只有访问指定路径,才进行路由
        比如访问,/abc才路由
![[外链图片转存失败,源站可能有防盗链机制,建议将图片保存下来直接上传(img-ZypMcU4Q-1681725030965)(.\图片\gateway的39.png)]](https://img-blog.csdnimg.cn/c77b19e75d6d491c8729b0bb365ec447.png)
Query:
        必须带有请求参数才可以访问
![[外链图片转存失败,源站可能有防盗链机制,建议将图片保存下来直接上传(img-l2wKVp6W-1681725030967)(.\图片\gateway的40.png)]](https://img-blog.csdnimg.cn/db8490a72b624e75aa19ef7a195e140f.png)
9.3.4 Filter过滤器:
![[外链图片转存失败,源站可能有防盗链机制,建议将图片保存下来直接上传(img-Umoyx3ST-1681725030968)(.\图片\gateway的41.png)]](https://img-blog.csdnimg.cn/901185489ea241d59bfe5f9ba7ae59d3.png)
生命周期:
在请求进入路由之前,和处理请求完成,再次到达路由之前
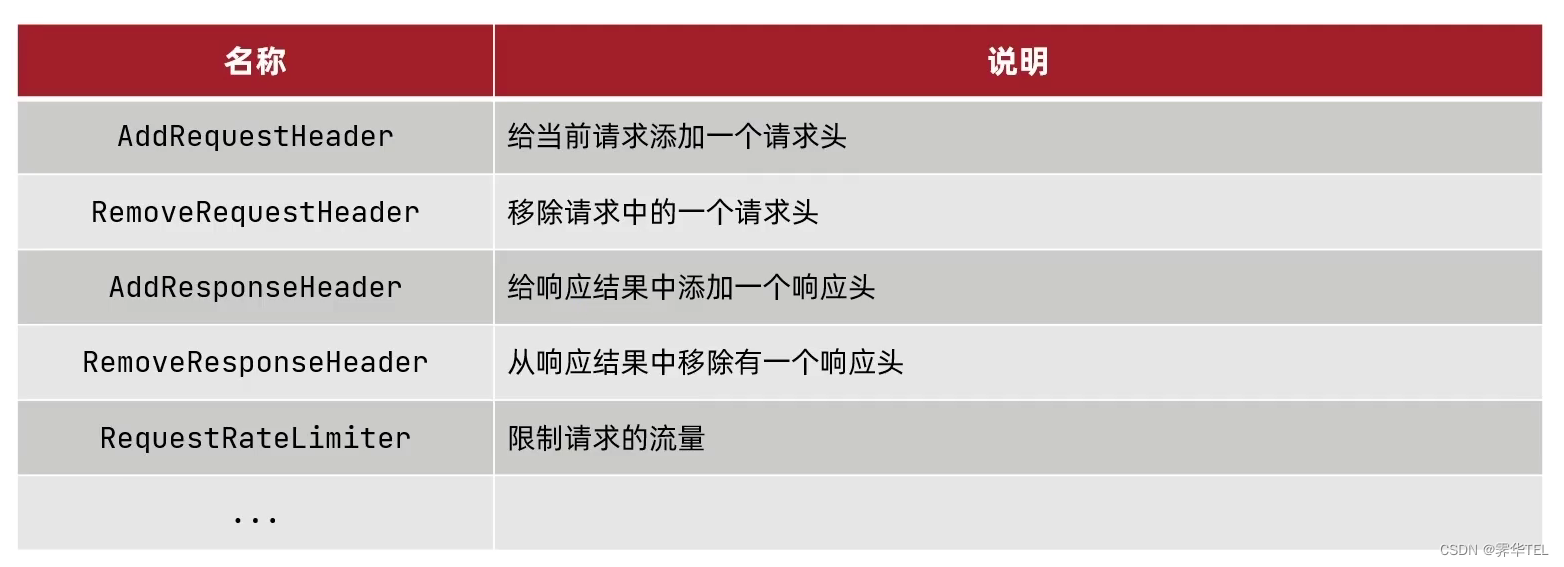
种类:
![[外链图片转存失败,源站可能有防盗链机制,建议将图片保存下来直接上传(img-pv4pTscY-1681725030970)(.\图片\gateway的42.png)]](https://img-blog.csdnimg.cn/637f64cbb4924ab6aa056fa2b7dc67f6.png)
GateWayFilter,单一的过滤器
与断言类似,比如闲置,请求头,只有特定的请求头才放行,反之就过滤:
![[外链图片转存失败,源站可能有防盗链机制,建议将图片保存下来直接上传(img-ZHhsEGgQ-1681725030971)(.\图片\gateway的43.png)]](https://img-blog.csdnimg.cn/2519df06ca9a48738edb880cf5c34280.png)
GlobalFilter,全局过滤器:
自定义过滤器:
实现两个接口
package com.tigerhhzz.springcloud.filter;

import org.springframework.cloud.gateway.filter.GatewayFilterChain;
import org.springframework.cloud.gateway.filter.GlobalFilter;
import org.springframework.core.Ordered;
import org.springframework.http.HttpStatus;
import org.springframework.stereotype.Component;
import org.springframework.web.server.ServerWebExchange;
import reactor.core.publisher.Mono;

import java.util.Date;

@Component
public class MyGateWayFilter implements GlobalFilter, Ordered {

    @Override
    public Mono<Void> filter(ServerWebExchange exchange, GatewayFilterChain chain) {
        System.out.println("**************come in MylogGateWayGilter:  " + new Date());
        String uname = exchange.getRequest().getQueryParams().getFirst("uname");
        if (uname == null) {
            System.out.println("********用户名为空,非法用户。");
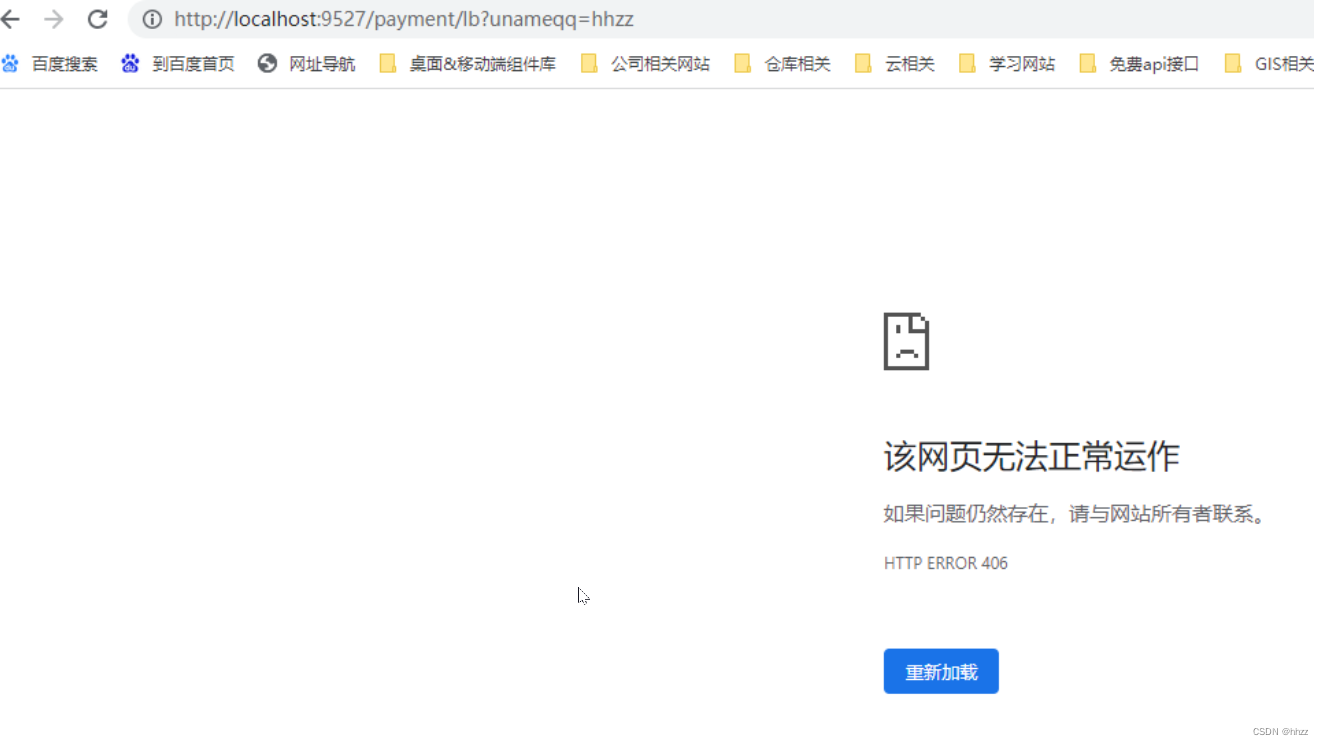
            exchange.getResponse().setStatusCode(HttpStatus.NOT_ACCEPTABLE);
            return exchange.getResponse().setComplete();
        }
        return chain.filter(exchange);
    }

    @Override
    public int getOrder() {
        return 0;
    }
}
然后启动服务,即可,因为过滤器通过@COmponet已经加入到容器了
![[外链图片转存失败,源站可能有防盗链机制,建议将图片保存下来直接上传(img-DTkDBjjJ-1681725030974)(C:\Users\Administrator\AppData\Local\Temp\1681724706488.png)]](https://img-blog.csdnimg.cn/b5029a91b8634b6b8984b2e009e8c1e2.png)
