目录
- 1.作为资源文件夹内的资源引用
- 2.将jar包手动安装到maven仓库
工具:IntelliJ IDEA 2020.2.3 x64
1.作为资源文件夹内的资源引用
1.在项目根路径新建文件夹lib, 将资源文件复制到该文件夹。

2.将文件夹设置为资源文件夹:选中文件夹lib右键 -> Make Directory as -> Source Root。

3.对应的pom.xml中添加相关配置。
		<dependency>
            <groupId>gun.io</groupId>
            <artifactId>rxtx</artifactId>
            <version>1.0.0</version>
            <!--system,类似provided,需要显式提供依赖的jar以后,Maven就不会在Repository中查找它-->
            <scope>system</scope>
            <systemPath>${project.basedir}/lib/RXTXcomm.jar</systemPath>
       </dependency>

还要有以下配置:
<build>
        <plugins>
            <plugin>
                <groupId>org.springframework.boot</groupId>
                <artifactId>spring-boot-maven-plugin</artifactId>
                <configuration>
                    <includeSystemScope>true</includeSystemScope>
                </configuration>
                <executions>
                    <execution>
                        <goals>
                            <goal>repackage</goal>
                        </goals>
                    </execution>
                </executions>
            </plugin>
            <plugin>
                <groupId>org.apache.maven.plugins</groupId>
                <artifactId>maven-compiler-plugin</artifactId>
                <version>2.3.2</version>
                <configuration>
                    <source>8</source>
                    <target>8</target>
                    <encoding>UTF-8</encoding>
                </configuration>
            </plugin>
        </plugins>
    </build>
2.将jar包手动安装到maven仓库
当没有设置maven的环境变量时,可以通过以下方式来注册依赖。
第一步: 将下载的资源中的两个dll库复制到%JAVA_HOME%/jre/bin目录下。

第二步: 找到mvn文件所在的目录。

第三步: 打开cmd.exe黑窗。

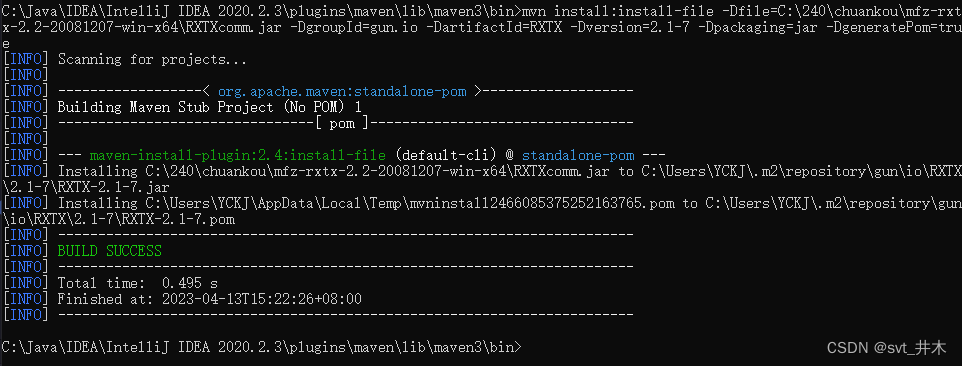
第四步: 在黑窗中运行mvn install:install-file -Dfile=C:\240\chuankou\mfz-rxtx-2.2-20081207-win-x64\RXTXcomm.jar -DgroupId=gun.io -DartifactId=RXTX -Dversion=2.1-7 -Dpackaging=jar -DgeneratePom=true
其中 -Dfile= 后面是下载的jar包的存储路径,如下图所示。

出现以下界面即为安装成功。
安装成功后,在pom.xml中的引用方式如下:


