- B站 https://www.bilibili.com/video/BV1rX4y1z72v
- 在线学习文档 https://d9bp4nr5ye.feishu.cn/wiki/wikcnjjvso9uytlgVJBfKcJh1Kq
今天我们阅读源码的目的:在SpringBoot项目中,RocketMQ是如何通过 @RocketMQMessageListener 来进行消费的。
在SpringBoot项目中,我们要接收消息只需要使用一个注解就好了 @RocketMQMessageListener 下面的代码就是一个简单的 consumer 的案例。
import org.apache.rocketmq.common.message.MessageExt;
import org.apache.rocketmq.spring.annotation.RocketMQMessageListener;
import org.apache.rocketmq.spring.core.RocketMQListener;
import org.springframework.stereotype.Service;

@Component
@RocketMQMessageListener(consumerGroup = "my-consumer_sync-topic", topic = "test-topic")
public class consumer implements RocketMQListener<MessageExt> {

    @Override
    public void onMessage(MessageExt messageExt) {
        byte[] body = messageExt.getBody();
        System.out.println(new String(body));
    }
}
下面我们就来通过源码的方式来解密它是如何工作的。
RocketMQAutoConfiguration
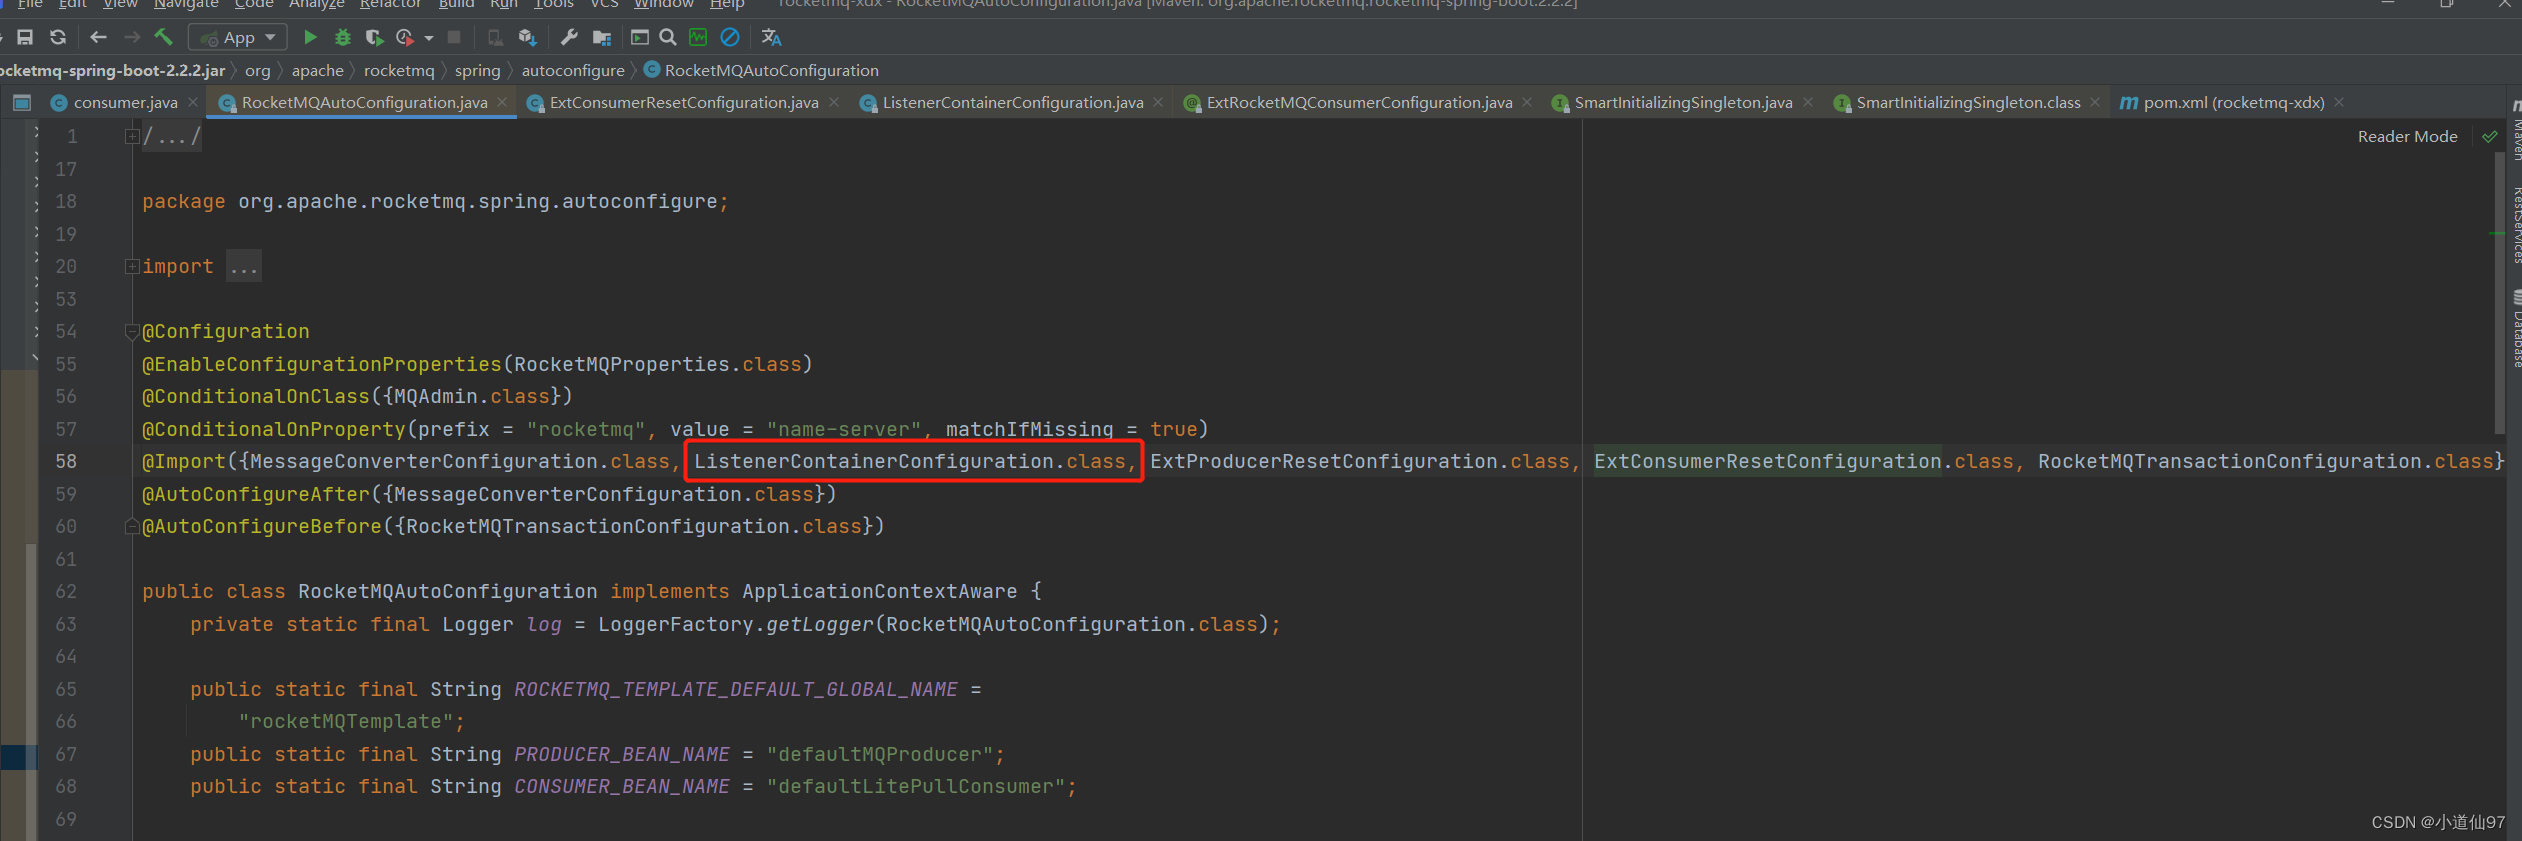
在我们的项目中,引入了 rocketmq-spring-boot-starter,我们知道在各种 starter中一定有一个自动注入,我们来看看 RocketMQ的自动注入做了什么。
在RocketMQAutoConfiguration中,它导入了一个ListenerContainerConfiguration
ListenerContainerConfiguration
@Configuration
public class ListenerContainerConfiguration implements ApplicationContextAware, SmartInitializingSingleton {}
ListenerContainerConfiguration实现了 SmartInitializingSingleton 接口,重写了 afterSingletonsInstantiated 方法,这个方法在单例bean实例化之后会被调用,来看看重写后的方法
afterSingletonsInstantiated()
@Override
public void afterSingletonsInstantiated() {
    Map<String, Object> beans = this.applicationContext.getBeansWithAnnotation(RocketMQMessageListener.class)
        .entrySet().stream().filter(entry -> !ScopedProxyUtils.isScopedTarget(entry.getKey()))
        .collect(Collectors.toMap(Map.Entry::getKey, Map.Entry::getValue));

    beans.forEach(this::registerContainer);
}
它首先获取了全部使用 RocketMQMessageListener 注解的bean,然后调用 registerContainer 方法。
registerContainer(String beanName, Object bean)
private void registerContainer(String beanName, Object bean) {
    Class<?> clazz = AopProxyUtils.ultimateTargetClass(bean);

    // 数据校验
    if (RocketMQListener.class.isAssignableFrom(bean.getClass()) && RocketMQReplyListener.class.isAssignableFrom(bean.getClass())) {
        throw new IllegalStateException(clazz + " cannot be both instance of " + RocketMQListener.class.getName() + " and " + RocketMQReplyListener.class.getName());
    }
    if (!RocketMQListener.class.isAssignableFrom(bean.getClass()) && !RocketMQReplyListener.class.isAssignableFrom(bean.getClass())) {
        throw new IllegalStateException(clazz + " is not instance of " + RocketMQListener.class.getName() + " or " + RocketMQReplyListener.class.getName());
    }

    // 获取bean上面的注解
    RocketMQMessageListener annotation = clazz.getAnnotation(RocketMQMessageListener.class);
    // 获取注解上面的数据
    String consumerGroup = this.environment.resolvePlaceholders(annotation.consumerGroup());
    String topic = this.environment.resolvePlaceholders(annotation.topic());

    // 判断当前消费组对当前topic是否开启监听
    boolean listenerEnabled =
        (boolean) rocketMQProperties.getConsumer().getListeners().getOrDefault(consumerGroup, Collections.EMPTY_MAP)
            .getOrDefault(topic, true);

    if (!listenerEnabled) {
        log.debug(
            "Consumer Listener (group:{},topic:{}) is not enabled by configuration, will ignore initialization.",
            consumerGroup, topic);
        return;
    }
    validate(annotation);

    // 把当前的bean注册到对应的容器中去
    String containerBeanName = String.format("%s_%s", DefaultRocketMQListenerContainer.class.getName(),
        counter.incrementAndGet());
    GenericApplicationContext genericApplicationContext = (GenericApplicationContext) applicationContext;

    genericApplicationContext.registerBean(containerBeanName, DefaultRocketMQListenerContainer.class,
        // 创建这个bean对象
        () -> createRocketMQListenerContainer(containerBeanName, bean, annotation));
    DefaultRocketMQListenerContainer container = genericApplicationContext.getBean(containerBeanName,
        DefaultRocketMQListenerContainer.class);
    if (!container.isRunning()) {
        try {
            // 【开启这个容器】
            container.start();
        } catch (Exception e) {
            log.error("Started container failed. {}", container, e);
            throw new RuntimeException(e);
        }
    }

    log.info("Register the listener to container, listenerBeanName:{}, containerBeanName:{}", beanName, containerBeanName);
}
createRocketMQListenerContainer(String name, Object bean, RocketMQMessageListener annotation)
这里注意,它把我们的监听器塞进去了,后面会用到这个的
private DefaultRocketMQListenerContainer createRocketMQListenerContainer(String name, Object bean,
    RocketMQMessageListener annotation) {
    DefaultRocketMQListenerContainer container = new DefaultRocketMQListenerContainer();

    container.setRocketMQMessageListener(annotation);

    String nameServer = environment.resolvePlaceholders(annotation.nameServer());
    nameServer = StringUtils.isEmpty(nameServer) ? rocketMQProperties.getNameServer() : nameServer;
    String accessChannel = environment.resolvePlaceholders(annotation.accessChannel());
    container.setNameServer(nameServer);
    if (!StringUtils.isEmpty(accessChannel)) {
        container.setAccessChannel(AccessChannel.valueOf(accessChannel));
    }
    container.setTopic(environment.resolvePlaceholders(annotation.topic()));
    String tags = environment.resolvePlaceholders(annotation.selectorExpression());
    if (!StringUtils.isEmpty(tags)) {
        container.setSelectorExpression(tags);
    }
    container.setConsumerGroup(environment.resolvePlaceholders(annotation.consumerGroup()));
    container.setTlsEnable(environment.resolvePlaceholders(annotation.tlsEnable()));
    if (RocketMQListener.class.isAssignableFrom(bean.getClass())) {
        // 这里注意,它把我们的监听器塞进去了,后面会用到这个的
        container.setRocketMQListener((RocketMQListener) bean);
    } else if (RocketMQReplyListener.class.isAssignableFrom(bean.getClass())) {
        container.setRocketMQReplyListener((RocketMQReplyListener) bean);
    }
    container.setMessageConverter(rocketMQMessageConverter.getMessageConverter());
    container.setName(name);

    return container;
}
上面这个代码大家可以简单看下,反正最终创建的是 container 其实是 DefaultRocketMQListenerContainer
DefaultRocketMQListenerContainer
上面我们创建一个container,并开启了它 container.start(); 下面我们就来看看它的 start方法
start()
private DefaultMQPushConsumer consumer;

@Override
public void start() {
    if (this.isRunning()) {
        throw new IllegalStateException("container already running. " + this.toString());
    }

    try {
        consumer.start();
    } catch (MQClientException e) {
        throw new IllegalStateException("Failed to start RocketMQ push consumer", e);
    }
    this.setRunning(true);

    log.info("running container: {}", this.toString());
}
DefaultMQPushConsumer
上面的 start 调用了 consumer.start(),其实就是 DefaultMQPushConsumer 的start方法
start()
protected final transient DefaultMQPushConsumerImpl defaultMQPushConsumerImpl;

@Override
public void start() throws MQClientException {
    setConsumerGroup(NamespaceUtil.wrapNamespace(this.getNamespace(), this.consumerGroup));
    this.defaultMQPushConsumerImpl.start();
    if (null != traceDispatcher) {
        try {
            traceDispatcher.start(this.getNamesrvAddr(), this.getAccessChannel());
        } catch (MQClientException e) {
            log.warn("trace dispatcher start failed ", e);
        }
    }
}
DefaultMQPushConsumerImpl
在上面的 start() 方法里面又调用了 DefaultMQPushConsumerImpl 的 start() 方法
start()
// serviceState 的默认值
private volatile ServiceState serviceState = ServiceState.CREATE_JUST;

public synchronized void start() throws MQClientException {
    switch (this.serviceState) {
        case CREATE_JUST:
            log.info("the consumer [{}] start beginning. messageModel={}, isUnitMode={}", this.defaultMQPushConsumer.getConsumerGroup(),
                this.defaultMQPushConsumer.getMessageModel(), this.defaultMQPushConsumer.isUnitMode());
            this.serviceState = ServiceState.START_FAILED;

            this.checkConfig();

            this.copySubscription();

            if (this.defaultMQPushConsumer.getMessageModel() == MessageModel.CLUSTERING) {
                this.defaultMQPushConsumer.changeInstanceNameToPID();
            }

            this.mQClientFactory = MQClientManager.getInstance().getOrCreateMQClientInstance(this.defaultMQPushConsumer, this.rpcHook);

            this.rebalanceImpl.setConsumerGroup(this.defaultMQPushConsumer.getConsumerGroup());
            this.rebalanceImpl.setMessageModel(this.defaultMQPushConsumer.getMessageModel());
            this.rebalanceImpl.setAllocateMessageQueueStrategy(this.defaultMQPushConsumer.getAllocateMessageQueueStrategy());
            this.rebalanceImpl.setmQClientFactory(this.mQClientFactory);

            this.pullAPIWrapper = new PullAPIWrapper(
                mQClientFactory,
                this.defaultMQPushConsumer.getConsumerGroup(), isUnitMode());
            this.pullAPIWrapper.registerFilterMessageHook(filterMessageHookList);

            if (this.defaultMQPushConsumer.getOffsetStore() != null) {
                this.offsetStore = this.defaultMQPushConsumer.getOffsetStore();
            } else {
                switch (this.defaultMQPushConsumer.getMessageModel()) {
                    case BROADCASTING:
                        this.offsetStore = new LocalFileOffsetStore(this.mQClientFactory, this.defaultMQPushConsumer.getConsumerGroup());
                        break;
                    case CLUSTERING:
                        this.offsetStore = new RemoteBrokerOffsetStore(this.mQClientFactory, this.defaultMQPushConsumer.getConsumerGroup());
                        break;
                    default:
                        break;
                }
                this.defaultMQPushConsumer.setOffsetStore(this.offsetStore);
            }
            this.offsetStore.load();

            if (this.getMessageListenerInner() instanceof MessageListenerOrderly) {
                this.consumeOrderly = true;
                this.consumeMessageService =
                    new ConsumeMessageOrderlyService(this, (MessageListenerOrderly) this.getMessageListenerInner());
            } else if (this.getMessageListenerInner() instanceof MessageListenerConcurrently) {
                this.consumeOrderly = false;
                this.consumeMessageService =
                    new ConsumeMessageConcurrentlyService(this, (MessageListenerConcurrently) this.getMessageListenerInner());
            }

            this.consumeMessageService.start();

            boolean registerOK = mQClientFactory.registerConsumer(this.defaultMQPushConsumer.getConsumerGroup(), this);
            if (!registerOK) {
                this.serviceState = ServiceState.CREATE_JUST;
                this.consumeMessageService.shutdown(defaultMQPushConsumer.getAwaitTerminationMillisWhenShutdown());
                throw new MQClientException("The consumer group[" + this.defaultMQPushConsumer.getConsumerGroup()
                    + "] has been created before, specify another name please." + FAQUrl.suggestTodo(FAQUrl.GROUP_NAME_DUPLICATE_URL),
                    null);
            }
            // 下一步的调用
            mQClientFactory.start();
            log.info("the consumer [{}] start OK.", this.defaultMQPushConsumer.getConsumerGroup());
            this.serviceState = ServiceState.RUNNING;
            break;
        case RUNNING:
        case START_FAILED:
        case SHUTDOWN_ALREADY:
            throw new MQClientException("The PushConsumer service state not OK, maybe started once, "
                + this.serviceState
                + FAQUrl.suggestTodo(FAQUrl.CLIENT_SERVICE_NOT_OK),
                null);
        default:
            break;
    }

    this.updateTopicSubscribeInfoWhenSubscriptionChanged();
    this.mQClientFactory.checkClientInBroker();
    this.mQClientFactory.sendHeartbeatToAllBrokerWithLock();
    this.mQClientFactory.rebalanceImmediately();
}
这里面的代码也很长了,我们看最后又有一个 start调用 mQClientFactory.start();
MQClientInstance
start()
private ServiceState serviceState = ServiceState.CREATE_JUST;

public void start() throws MQClientException {

    synchronized (this) {
        switch (this.serviceState) {
            case CREATE_JUST:
                this.serviceState = ServiceState.START_FAILED;
                // If not specified,looking address from name server
                if (null == this.clientConfig.getNamesrvAddr()) {
                    this.mQClientAPIImpl.fetchNameServerAddr();
                }
                // Start request-response channel
                this.mQClientAPIImpl.start();
                // Start various schedule tasks
                this.startScheduledTask();
                // Start pull service
                this.pullMessageService.start();
                // Start rebalance service
                this.rebalanceService.start();
                // Start push service
                this.defaultMQProducer.getDefaultMQProducerImpl().start(false);
                log.info("the client factory [{}] start OK", this.clientId);
                this.serviceState = ServiceState.RUNNING;
                break;
            case START_FAILED:
                throw new MQClientException("The Factory object[" + this.getClientId() + "] has been created before, and failed.", null);
            default:
                break;
        }
    }
}
它这个start方法开启了更多的 start,这里我们看到有一个 pullMessageService.start() 以前我们不是说,注解的方式,其实也是主动拉去数据的方式么?毫无疑问,我们需要好好看看这个 pull的start方法。
PullMessageService
start()
PullMessageService 里面并没有 start 方法,而是调用父类 ServiceThread 的 start方法,在start方法中,开启了多线程的 start,我们知道只有等到资源来的时候就会去执行 run方法,所以我们可以看看PullMessageService 的run了
public class PullMessageService extends ServiceThread {}

public abstract class ServiceThread implements Runnable {}

public void start() {
    log.info("Try to start service thread:{} started:{} lastThread:{}", getServiceName(), started.get(), thread);
    if (!started.compareAndSet(false, true)) {
        return;
    }
    stopped = false;
    this.thread = new Thread(this, getServiceName());
    this.thread.setDaemon(isDaemon);
    this.thread.start();
}
run()
很明显,从它的方法名字上就可以看到,它开始 pullMessage 了
它这里几乎是开启了一个死循环,如果当前线程不终止的话,会一直运行。
@Override
public void run() {
    log.info(this.getServiceName() + " service started");
    // 死循环
    while (!this.isStopped()) {
        try {
            // 从阻塞队列中拿到一个可用的请求
            PullRequest pullRequest = this.pullRequestQueue.take();
            this.pullMessage(pullRequest);
        } catch (InterruptedException ignored) {
        } catch (Exception e) {
            log.error("Pull Message Service Run Method exception", e);
        }
    }

    log.info(this.getServiceName() + " service end");
}
pullMessage(final PullRequest pullRequest)
通过消费组找到消费者,然后去拉消息
private void pullMessage(final PullRequest pullRequest) {
    final MQConsumerInner consumer = this.mQClientFactory.selectConsumer(pullRequest.getConsumerGroup());
    if (consumer != null) {
        DefaultMQPushConsumerImpl impl = (DefaultMQPushConsumerImpl) consumer;
        impl.pullMessage(pullRequest);
    } else {
        log.warn("No matched consumer for the PullRequest {}, drop it", pullRequest);
    }
}
DefaultMQPushConsumerImpl
pullMessage(final PullRequest pullRequest)
这个方法的代码很拉长,里面创建了一个 PullCallback,并且去重写了它的 onSuccess onException ,我觉得这种完全可以提出到外面。它的前半部分是组装各种参数,后半部分主要是重写 onSuccess方法,最后又调用了 pullKernelImpl 方法,这里我们直接看这个方法吧,对于onSuccess 方法我们后面会再看到
注意CommunicationMode.ASYNC,这个参数,后面会用到
public void pullMessage(final PullRequest pullRequest) {
    // 数据处理,埋点

    // 创建PullCallback,并重写里面的方法

    try {
        this.pullAPIWrapper.pullKernelImpl(
            pullRequest.getMessageQueue(),
            subExpression,
            subscriptionData.getExpressionType(),
            subscriptionData.getSubVersion(),
            pullRequest.getNextOffset(),
            this.defaultMQPushConsumer.getPullBatchSize(),
            sysFlag,
            commitOffsetValue,
            BROKER_SUSPEND_MAX_TIME_MILLIS,
            CONSUMER_TIMEOUT_MILLIS_WHEN_SUSPEND,
            CommunicationMode.ASYNC,
            pullCallback
        );
    } catch (Exception e) {
        log.error("pullKernelImpl exception", e);
        this.executePullRequestLater(pullRequest, pullTimeDelayMillsWhenException);
    }
}
PullAPIWrapper
pullKernelImpl
这个方法主要做两件事
- 找到要拉去的 broker
- 组装PullMessageRequestHeader ,然后下一步
public PullResult pullKernelImpl(
    final MessageQueue mq,
    final String subExpression,
    final String expressionType,
    final long subVersion,
    final long offset,
    final int maxNums,
    final int sysFlag,
    final long commitOffset,
    final long brokerSuspendMaxTimeMillis,
    final long timeoutMillis,
    final CommunicationMode communicationMode,
    final PullCallback pullCallback
) throws MQClientException, RemotingException, MQBrokerException, InterruptedException {
    FindBrokerResult findBrokerResult =
        this.mQClientFactory.findBrokerAddressInSubscribe(mq.getBrokerName(),
            this.recalculatePullFromWhichNode(mq), false);
    if (null == findBrokerResult) {
        this.mQClientFactory.updateTopicRouteInfoFromNameServer(mq.getTopic());
        findBrokerResult =
            this.mQClientFactory.findBrokerAddressInSubscribe(mq.getBrokerName(),
                this.recalculatePullFromWhichNode(mq), false);
    }

    if (findBrokerResult != null) {
        {
            // check version
            if (!ExpressionType.isTagType(expressionType)
                && findBrokerResult.getBrokerVersion() < MQVersion.Version.V4_1_0_SNAPSHOT.ordinal()) {
                throw new MQClientException("The broker[" + mq.getBrokerName() + ", "
                    + findBrokerResult.getBrokerVersion() + "] does not upgrade to support for filter message by " + expressionType, null);
            }
        }
        int sysFlagInner = sysFlag;

        if (findBrokerResult.isSlave()) {
            sysFlagInner = PullSysFlag.clearCommitOffsetFlag(sysFlagInner);
        }

        PullMessageRequestHeader requestHeader = new PullMessageRequestHeader();
        requestHeader.setConsumerGroup(this.consumerGroup);
        requestHeader.setTopic(mq.getTopic());
        requestHeader.setQueueId(mq.getQueueId());
        requestHeader.setQueueOffset(offset);
        requestHeader.setMaxMsgNums(maxNums);
        requestHeader.setSysFlag(sysFlagInner);
        requestHeader.setCommitOffset(commitOffset);
        requestHeader.setSuspendTimeoutMillis(brokerSuspendMaxTimeMillis);
        requestHeader.setSubscription(subExpression);
        requestHeader.setSubVersion(subVersion);
        requestHeader.setExpressionType(expressionType);

        String brokerAddr = findBrokerResult.getBrokerAddr();
        if (PullSysFlag.hasClassFilterFlag(sysFlagInner)) {
            brokerAddr = computePullFromWhichFilterServer(mq.getTopic(), brokerAddr);
        }

        PullResult pullResult = this.mQClientFactory.getMQClientAPIImpl().pullMessage(
            brokerAddr,
            requestHeader,
            timeoutMillis,
            communicationMode,
            pullCallback);

        return pullResult;
    }

    throw new MQClientException("The broker[" + mq.getBrokerName() + "] not exist", null);
}

MQClientAPIImpl
pullMessage
public PullResult pullMessage(
    final String addr,
    final PullMessageRequestHeader requestHeader,
    final long timeoutMillis,
    final CommunicationMode communicationMode,
    final PullCallback pullCallback
) throws RemotingException, MQBrokerException, InterruptedException {
    RemotingCommand request = RemotingCommand.createRequestCommand(RequestCode.PULL_MESSAGE, requestHeader);

    switch (communicationMode) {
        case ONEWAY:
            assert false;
            return null;
        case ASYNC:
            this.pullMessageAsync(addr, request, timeoutMillis, pullCallback);
            return null;
        case SYNC:
            return this.pullMessageSync(addr, request, timeoutMillis);
        default:
            assert false;
            break;
    }

    return null;
}
pullMessageAsync
它这里发送了一个 netty请求,如果结果不为空,就交给PullCallback 的 onSuccess 方法进行处理
private void pullMessageAsync(
    final String addr,
    final RemotingCommand request,
    final long timeoutMillis,
    final PullCallback pullCallback
) throws RemotingException, InterruptedException {
    this.remotingClient.invokeAsync(addr, request, timeoutMillis, new InvokeCallback() {
        @Override
        public void operationComplete(ResponseFuture responseFuture) {
            RemotingCommand response = responseFuture.getResponseCommand();
            if (response != null) {
                try {
                    PullResult pullResult = MQClientAPIImpl.this.processPullResponse(response, addr);
                    assert pullResult != null;
                    pullCallback.onSuccess(pullResult);
                } catch (Exception e) {
                    pullCallback.onException(e);
                }
            } else {
                if (!responseFuture.isSendRequestOK()) {
                    pullCallback.onException(new MQClientException("send request failed to " + addr + ". Request: " + request, responseFuture.getCause()));
                } else if (responseFuture.isTimeout()) {
                    pullCallback.onException(new MQClientException("wait response from " + addr + " timeout :" + responseFuture.getTimeoutMillis() + "ms" + ". Request: " + request,
                        responseFuture.getCause()));
                } else {
                    pullCallback.onException(new MQClientException("unknown reason. addr: " + addr + ", timeoutMillis: " + timeoutMillis + ". Request: " + request, responseFuture.getCause()));
                }
            }
        }
    });
}
PullCallback
onSuccess
现在我们就可以回过头来看看,当时的 onSuccess 是如何重写的,这里如果是正常拉取到消息的时候 pullResult.getPullStatus() == FOUND 的。
public void onSuccess(PullResult pullResult) {
    if (pullResult != null) {
        pullResult = DefaultMQPushConsumerImpl.this.pullAPIWrapper.processPullResult(pullRequest.getMessageQueue(), pullResult,
            subscriptionData);

        switch (pullResult.getPullStatus()) {
            case FOUND:
                // 对消息偏移量进行处理
                long prevRequestOffset = pullRequest.getNextOffset();
                pullRequest.setNextOffset(pullResult.getNextBeginOffset());
                long pullRT = System.currentTimeMillis() - beginTimestamp;
                DefaultMQPushConsumerImpl.this.getConsumerStatsManager().incPullRT(pullRequest.getConsumerGroup(),
                    pullRequest.getMessageQueue().getTopic(), pullRT);

                long firstMsgOffset = Long.MAX_VALUE;
                if (pullResult.getMsgFoundList() == null || pullResult.getMsgFoundList().isEmpty()) {
                    DefaultMQPushConsumerImpl.this.executePullRequestImmediately(pullRequest);
                } else {
                    firstMsgOffset = pullResult.getMsgFoundList().get(0).getQueueOffset();

                    DefaultMQPushConsumerImpl.this.getConsumerStatsManager().incPullTPS(pullRequest.getConsumerGroup(),
                        pullRequest.getMessageQueue().getTopic(), pullResult.getMsgFoundList().size());
                    // 把消息放进消息队列中,注意它这里不是直接立马消费,而是把消息放进容器中
                    // 这个容器是 treeMap, key是消息的偏移量,value 是消息体
                    boolean dispatchToConsume = processQueue.putMessage(pullResult.getMsgFoundList());
                    // 【消息提交消费】
                    // 我们一般不是顺序消息,所以实现类是 ConsumeMessageConcurrentlyService,
                    DefaultMQPushConsumerImpl.this.consumeMessageService.submitConsumeRequest(
                        pullResult.getMsgFoundList(),
                        processQueue,
                        pullRequest.getMessageQueue(),
                        dispatchToConsume);

                    if (DefaultMQPushConsumerImpl.this.defaultMQPushConsumer.getPullInterval() > 0) {
                        DefaultMQPushConsumerImpl.this.executePullRequestLater(pullRequest,
                            DefaultMQPushConsumerImpl.this.defaultMQPushConsumer.getPullInterval());
                    } else {
                        DefaultMQPushConsumerImpl.this.executePullRequestImmediately(pullRequest);
                    }
                }

                if (pullResult.getNextBeginOffset() < prevRequestOffset
                    || firstMsgOffset < prevRequestOffset) {
                    log.warn(
                        "[BUG] pull message result maybe data wrong, nextBeginOffset: {} firstMsgOffset: {} prevRequestOffset: {}",
                        pullResult.getNextBeginOffset(),
                        firstMsgOffset,
                        prevRequestOffset);
                }

                break;
            case NO_NEW_MSG:
            case NO_MATCHED_MSG:
                pullRequest.setNextOffset(pullResult.getNextBeginOffset());

                DefaultMQPushConsumerImpl.this.correctTagsOffset(pullRequest);

                DefaultMQPushConsumerImpl.this.executePullRequestImmediately(pullRequest);
                break;
            case OFFSET_ILLEGAL:
                log.warn("the pull request offset illegal, {} {}",
                    pullRequest.toString(), pullResult.toString());
                pullRequest.setNextOffset(pullResult.getNextBeginOffset());

                pullRequest.getProcessQueue().setDropped(true);
                DefaultMQPushConsumerImpl.this.executeTaskLater(new Runnable() {

                    @Override
                    public void run() {
                        try {
                            DefaultMQPushConsumerImpl.this.offsetStore.updateOffset(pullRequest.getMessageQueue(),
                                pullRequest.getNextOffset(), false);

                            DefaultMQPushConsumerImpl.this.offsetStore.persist(pullRequest.getMessageQueue());

                            DefaultMQPushConsumerImpl.this.rebalanceImpl.removeProcessQueue(pullRequest.getMessageQueue());

                            log.warn("fix the pull request offset, {}", pullRequest);
                        } catch (Throwable e) {
                            log.error("executeTaskLater Exception", e);
                        }
                    }
                }, 10000);
                break;
            default:
                break;
        }
    }
}
ConsumeMessageConcurrentlyService
submitConsumeRequest
最终我们的消息会被封装成一个 ConsumeRequest, 然后丢到一个线程池中去消费
private final ThreadPoolExecutor consumeExecutor;
this.consumeExecutor = new ThreadPoolExecutor(
    this.defaultMQPushConsumer.getConsumeThreadMin(), // 20
    this.defaultMQPushConsumer.getConsumeThreadMax(), // 20
    1000 * 60,
    TimeUnit.MILLISECONDS,
    this.consumeRequestQueue,
    new ThreadFactoryImpl(consumeThreadPrefix));


@Override
public void submitConsumeRequest(
    final List<MessageExt> msgs,
    final ProcessQueue processQueue,
    final MessageQueue messageQueue,
    final boolean dispatchToConsume) {
    final int consumeBatchSize = this.defaultMQPushConsumer.getConsumeMessageBatchMaxSize();
    if (msgs.size() <= consumeBatchSize) {
        ConsumeRequest consumeRequest = new ConsumeRequest(msgs, processQueue, messageQueue);
        try {
            this.consumeExecutor.submit(consumeRequest);
        } catch (RejectedExecutionException e) {
            this.submitConsumeRequestLater(consumeRequest);
        }
    } else {
        for (int total = 0; total < msgs.size(); ) {
            List<MessageExt> msgThis = new ArrayList<MessageExt>(consumeBatchSize);
            for (int i = 0; i < consumeBatchSize; i++, total++) {
                if (total < msgs.size()) {
                    msgThis.add(msgs.get(total));
                } else {
                    break;
                }
            }

            ConsumeRequest consumeRequest = new ConsumeRequest(msgThis, processQueue, messageQueue);
            try {
                this.consumeExecutor.submit(consumeRequest);
            } catch (RejectedExecutionException e) {
                for (; total < msgs.size(); total++) {
                    msgThis.add(msgs.get(total));
                }

                this.submitConsumeRequestLater(consumeRequest);
            }
        }
    }
}
ConsumeRequest
ConsumeRequest 是 ConsumeMessageConcurrentlyService 的内部类 class ConsumeRequest implements Runnable,我们来看一下它的 run方法
这里面的代码也很多,主要是三点
- 找到 listener
- 让 listener 去处理消息
- 对 处理的结果 status 进行处理
@Override
public void run() {
    // ....
    // 找到 listener
    MessageListenerConcurrently listener = ConsumeMessageConcurrentlyService.this.messageListener;

    try {
        // ....
        // 消息处理并返回 status
        status = listener.consumeMessage(Collections.unmodifiableList(msgs), context);
    } catch (Throwable e) {
        // ...
    }

    // ...
    // 对结果状态处理
    if (!processQueue.isDropped()) {
        ConsumeMessageConcurrentlyService.this.processConsumeResult(status, context, this);
    } else {
        log.warn("processQueue is dropped without process consume result. messageQueue={}, msgs={}", messageQueue, msgs);
    }
}
DefaultMessageListenerConcurrently
consumeMessage
这里几乎没做什么操作,把消息交给了 handleMessage 方法处理
@SuppressWarnings("unchecked")
@Override
public ConsumeConcurrentlyStatus consumeMessage(List<MessageExt> msgs, ConsumeConcurrentlyContext context) {
    for (MessageExt messageExt : msgs) {
        log.debug("received msg: {}", messageExt);
        try {
            long now = System.currentTimeMillis();
            handleMessage(messageExt);
            long costTime = System.currentTimeMillis() - now;
            log.debug("consume {} cost: {} ms", messageExt.getMsgId(), costTime);
        } catch (Exception e) {
            log.warn("consume message failed. messageId:{}, topic:{}, reconsumeTimes:{}", messageExt.getMsgId(), messageExt.getTopic(), messageExt.getReconsumeTimes(), e);
            context.setDelayLevelWhenNextConsume(delayLevelWhenNextConsume);
            return ConsumeConcurrentlyStatus.RECONSUME_LATER;
        }
    }

    return ConsumeConcurrentlyStatus.CONSUME_SUCCESS;
}
DefaultRocketMQListenerContainer
handleMessage
DefaultMessageListenerConcurrently 是 DefaultRocketMQListenerContainer 的内部类,所以这个handleMessage 是 DefaultRocketMQListenerContainer 的方法
而这个 DefaultRocketMQListenerContainer 在最开始就已经说了,在创建的时候就把我们的监听器塞进去了。
我们的监听器是重写了这个 onMessage 方法的,所以最终就到了我们的消费者
private void handleMessage(
    MessageExt messageExt) throws MQClientException, RemotingException, InterruptedException {
    if (rocketMQListener != null) {
        // 消息消费
        rocketMQListener.onMessage(doConvertMessage(messageExt));
    } else if (rocketMQReplyListener != null) {
        Object replyContent = rocketMQReplyListener.onMessage(doConvertMessage(messageExt));
        Message<?> message = MessageBuilder.withPayload(replyContent).build();

        org.apache.rocketmq.common.message.Message replyMessage = MessageUtil.createReplyMessage(messageExt, convertToBytes(message));
        DefaultMQProducer producer = consumer.getDefaultMQPushConsumerImpl().getmQClientFactory().getDefaultMQProducer();
        producer.setSendMsgTimeout(replyTimeout);
        producer.send(replyMessage, new SendCallback() {
            @Override public void onSuccess(SendResult sendResult) {
                if (sendResult.getSendStatus() != SendStatus.SEND_OK) {
                    log.error("Consumer replies message failed. SendStatus: {}", sendResult.getSendStatus());
                } else {
                    log.debug("Consumer replies message success.");
                }
            }

            @Override public void onException(Throwable e) {
                log.error("Consumer replies message failed. error: {}", e.getLocalizedMessage());
            }
        });
    }
}
总结
- 每个使用了 @RocketMQMessageListener 注解的消费者,都会被解析成一个 ListenerContainer
- ListenerContainer 在解析出来后,就被开启了,它会运行一个死循环的代码(如果当前线程不终止的话,会一直运行),这段代码会不停的去 pull 消息
- 如果 pull到了消息,就会被丢入一个线程池,等待资源去处理消息