GPIO子系统
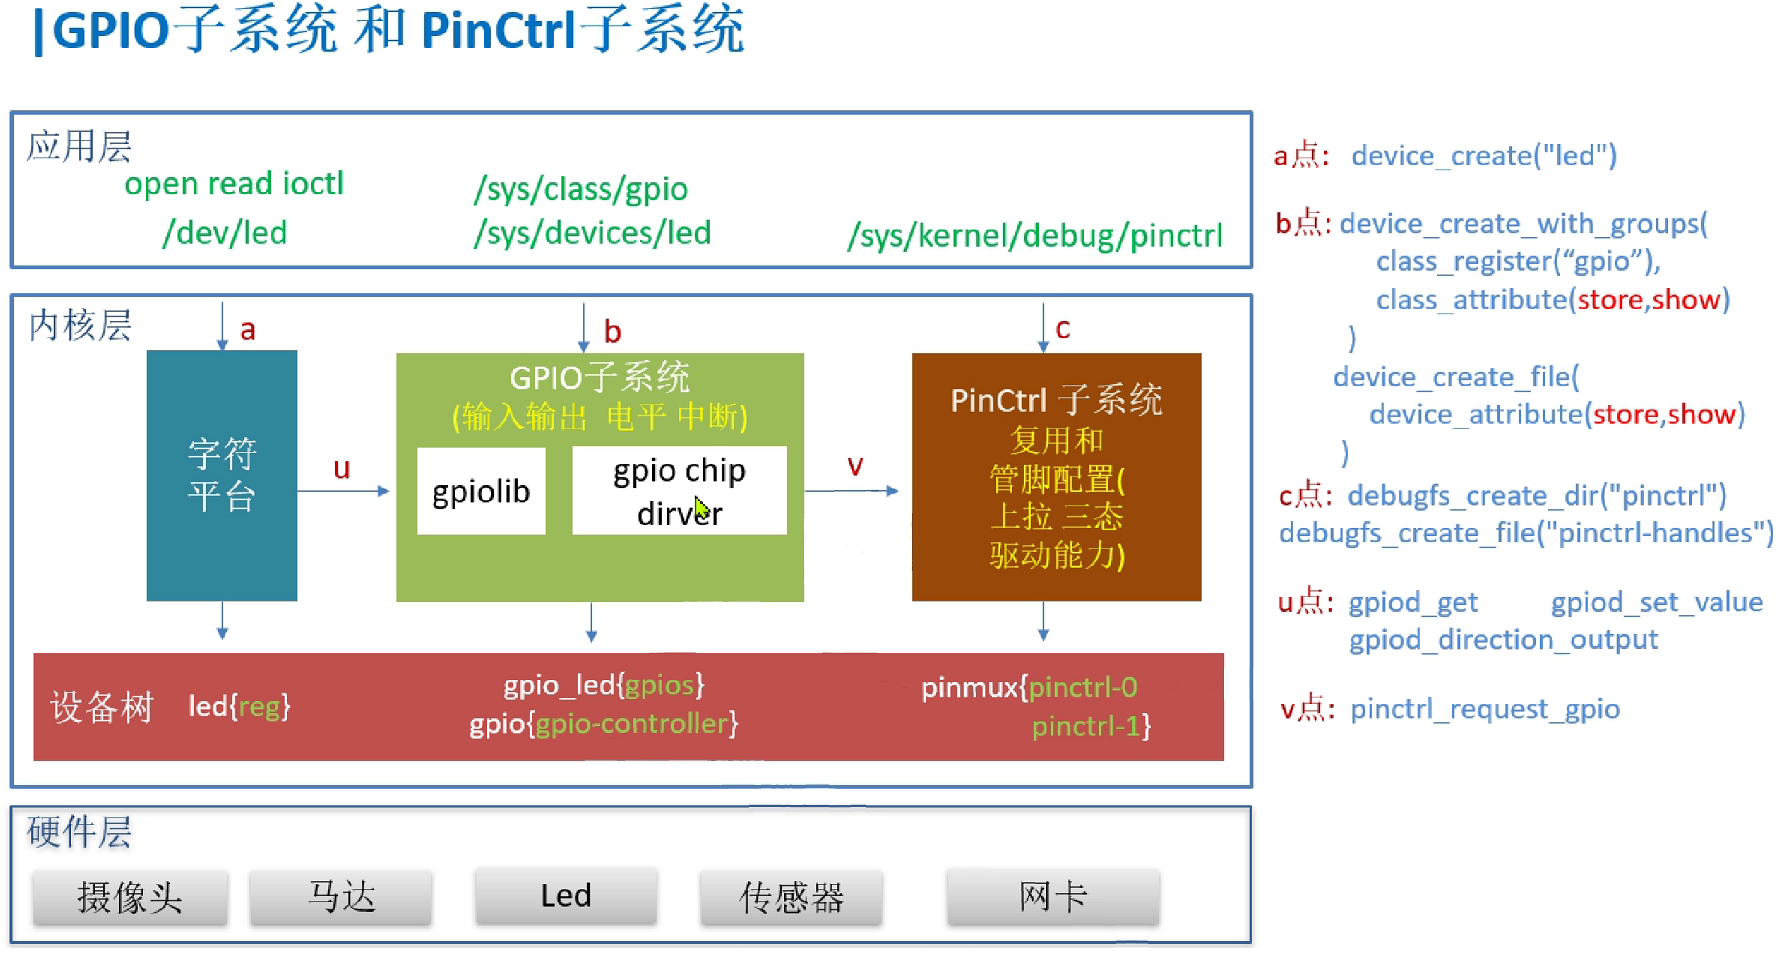
0.暴露给应用层
应用
$ echo 79 > /sys/class/gpio/export   //导出79号gpio 引脚,使得可在应用层访问
$ echo out > /sys/class/gpio/gpio79/direction  //设置 为输出
$ echo 1 > /sys/class/gpio/gpio79/value //输出高电平 开灯
$ echo 0 > /sys/class/gpio/gpio79/value  //输出低电平, 关灯
$ cat /sys/kernel/debug/gpio  //查询gpio状态(问题:发现找不到gpio文件)
$ echo 79 > unexport //取消导出(发现gpio79消失了)
解决调试目录为空的问题
原因 //debug需要的文件系统 debugfs没有挂载
在 /etc/fstab	 的后面添加一行
debugfs     /sys/kernel/debug   debugfs  defaults         0       0
调试信息
$ cat /sys/kernel/debug/gpio  //查看gpio 当前配置情况(驱动暴露的调试信息)
$ cat  /sys/kernel/debug/tegra_gpio  //查看GPIO 寄存器内容(和芯片手册进行对应)
$ cat  /sys/kernel/debug/tegra_pinctrl_reg   //查看 pinctrl 寄存器内容
1.最简读写文件(在/SYS下)
设备树
   sys_rw_led{  //对应生成 /sys/devices/sys_rw_led/led_gpio
        compatible = "sys_rw_led";
        led_gpio  = <&gpio TEGRA_GPIO(J,7) GPIO_ACTIVE_HIGH>;
    };
验证测试
$ cd sys_rw_led
$ make
$ cp led.ko /nfs/rootfs

$ cd ~/kernel-4.9
$ make dtbs
$ cp arch/arm64/boot/dts/tegra210-p3448-0000-p3449-0000-b00.dtb   /tftpboot/

重启板子
$ insmod led.ko
$ cd /sys/devices/sys_rw_led
$ echo 0 > led_gpio  //关灯
$ echo 1 > led_gpio  //亮灯
编译文件
//Makefile
ifeq ($(KERNELRELEASE),)
KERNELDIR ?= ~/kernel-4.9
PWD := $(shell pwd)

all:
	$(MAKE) -C $(KERNELDIR) M=$(PWD) modules

clean:
	rm -rf *.o *~ core .depend .*.cmd *.ko *.mod.c .tmp_versions Module* modules* a.out *.bak

else
    obj-m := led.o
endif
驱动
-
of_get_named_gpio_flags//获取设备树节点的属性gpio_is_valid//判断是否合法devm_gpio_request//申请使用gpio,并调用设置pinctrl
-
device_create_file //根据设备树节点属性,创建相应的属性文件 /sys/devices/sys_rw_led/led_gpio
- static struct device_attribute dev_attr_file //属性文件的描述
//led.c
#include <linux/init.h>
#include <linux/module.h>
#include <linux/kernel.h>
#include <linux/init.h>
#include <linux/slab.h>
#include <linux/err.h>

#include <linux/of_gpio.h>
#include <linux/gpio.h>

#include <linux/platform_device.h>
#include <asm/io.h>


#include <dt-bindings/gpio/gpio.h>

#ifdef CONFIG_OF
#include <linux/of.h>
#include <linux/of_device.h>
#include <linux/of_gpio.h>
#endif

int  led_gpio;
static ssize_t led_store(struct device *dev, struct device_attribute *attr,
              const char *buf, size_t count) {

    //写文件,控制 gpio 输出 ( echo 1 >   led_gpio)
    if (buf[0] == '0') {
        gpio_direction_output(led_gpio, 0);
    }else if (buf[0] == '1') {
        gpio_direction_output(led_gpio, 1);
    }

    printk(KERN_ERR "led_gpio_store %c \n",buf[0]);
    return count;
}

ssize_t led_show(struct device *dev, struct device_attribute *attr,char *buf){
	printk("led_show go \n");
 	return 0;
}
//属性文件的描述
static struct device_attribute dev_attr_file = {
    .attr = {
       .name = "led_gpio",
       .mode = (S_IRUGO | S_IWUSR)
    },
    .store = led_store, //echo 1> 就调用到这里了
    .show = led_show,  //cat led_gpio时调用,如果无需读的功能,可设为NULL,  且删除前面的S_IRUGO
};


int leds_probe(struct platform_device *pdev)
{
   int  ret = 0;

   enum of_gpio_flags flags;

  //获取设备树节点的属性 "led_gpio"
   led_gpio = of_get_named_gpio_flags(pdev->dev.of_node, "led_gpio", 0, &flags);
   if (gpio_is_valid(led_gpio)) //判断是否合法
   {
      ret = devm_gpio_request(&pdev->dev,led_gpio, "led_gpio"); //申请使用gpio(如果被占用,将申请失败)
      if (ret) {
	  printk("Failed to get led_gpio gpio.\n");
	  return -1;
       }
   }

   //根据设备树节点属性,创建相应的属性文件 /sys/devices/sys_rw_led/led_gpio
   device_create_file(&pdev->dev, &dev_attr_file);  // /device_create_file 里面是调用了 sysfs_create_file
   printk("leds_probe 1 ok\n");
   return 0;
}

int leds_remove(struct platform_device *pdev)
{
    device_remove_file(&pdev->dev, &dev_attr_file);
    printk("leds_remove  ok\n");
    return 0;
}

static const struct of_device_id of_led_match[] = {
    { .compatible = "sys_rw_led", },
    {},
};

MODULE_DEVICE_TABLE(of, of_led_match);

struct platform_driver leds_drv = {
   .driver = {
      .owner = THIS_MODULE,
      .name = "sys_rw_led driver" ,
      .of_match_table = of_led_match,
   },
   .probe = leds_probe,
   .remove = leds_remove,
};
module_platform_driver(leds_drv);
MODULE_LICENSE("GPL");
2.读写多个属性文件(在SYS下)
设备树
sys_rw_gpio{
    compatible = "bbcen,sys_rw_gpio";
    led_gpio  = <&gpio TEGRA_GPIO(J,7) GPIO_ACTIVE_HIGH>;     //40pin 丝印 12
    smoke_sensor_gpio = <&gpio TEGRA_GPIO(S,5) GPIO_ACTIVE_HIGH>; //40pin 丝印 29
};
验证测试
$ cd sys_read_write
$ make
$ cp gpio.ko /nfs/rootfs

$ cd ~/kernel-4.9
$ make dtbs
$ cp arch/arm64/boot/dts/tegra210-p3448-0000-p3449-0000-b00.dtb   /tftpboot/

重启板子
$ insmod gpio.ko
$ cd /sys/devices/sys_rw_gpio
$ echo 0 > led_gpio  //关灯
$ echo 1 > led_gpio  //亮灯
$ cat smoke_sensor_gpio  //读管脚输入电平,默认读到0,用杜邦线,把它接到前面亮灯的管脚时,能成功读到1
编译文件
ifeq ($(KERNELRELEASE),)
KERNELDIR ?= ~/kernel-4.9
PWD := $(shell pwd)

all:
	$(MAKE) -C $(KERNELDIR) M=$(PWD) modules

clean:
	rm -rf *.o *~ core .depend .*.cmd *.ko *.mod.c .tmp_versions Module* modules* a.out *.bak

else
    obj-m := gpio.o
endif
驱动
-
定义一个结构体指针,分配空间,指定内容
-
device_attribute gpio_attr[]
-
sysfs_create_file //for循环读取,和上面的数组配合实现读多个属性
#include <linux/init.h>
#include <linux/module.h>
#include <linux/kernel.h>
#include <linux/init.h>
#include <linux/slab.h>

#include <linux/delay.h>
#include <linux/err.h>

#include <linux/of_gpio.h>
#include <linux/gpio.h>

#include <linux/platform_device.h>
#include <asm/irq.h>
#include <asm/io.h>

#include <linux/delay.h>

#include <dt-bindings/gpio/gpio.h>

#ifdef CONFIG_OF
#include <linux/of.h>
#include <linux/of_device.h>
#include <linux/of_gpio.h>
#endif

struct gpio_dev{
     struct platform_device *pdev;
     int led_gpio;
     int led_gpio_direction;
     int smoke_sensor_gpio;
};

static struct gpio_dev *gpio_dev = NULL;

static ssize_t led_gpio_store(struct device *dev, struct device_attribute *attr,
              const char *buf, size_t count) {

    //写文件,控制 gpio 输出 ( echo 1 >   led_gpio)
    struct gpio_dev *pdata = gpio_dev;
    if (buf[0] == '0') {
        pdata->led_gpio_direction = 0;
        gpio_direction_output(pdata->led_gpio, pdata->led_gpio_direction);
    }else if (buf[0] == '1') {
        pdata->led_gpio_direction = 1;
        gpio_direction_output(pdata->led_gpio, pdata->led_gpio_direction);
    }

    printk(KERN_ERR "led_gpio_store %d \n",pdata->led_gpio_direction);
    return count;
}

static ssize_t smoke_sensor_gpio_show(struct device *dev, struct device_attribute *attr, char *buf) {
    struct gpio_dev *pdata = gpio_dev;
    int gpio_value = 0;

    gpio_value = gpio_get_value(pdata->smoke_sensor_gpio); //获取 gpio的输入值(cat  smoke_sensor_gpio 时会触发)

    return snprintf(buf, PAGE_SIZE, "%d\n",gpio_value);
}


static struct device_attribute gpio_attr[] = {
    __ATTR(led_gpio, 0664, NULL, led_gpio_store), //写:关联属性文件的写回调函数(*store)  echo时触发
    __ATTR(smoke_sensor_gpio, 0664, smoke_sensor_gpio_show,NULL), //读:关联属性文件的读回调函数(*show) cat 时触发
};

static int  gpio_init_sysfs(struct device *dev)
{
  int i, ret;
  for (i = 0; i < ARRAY_SIZE(gpio_attr); i++) {
    ret = sysfs_create_file(&dev->kobj,  //创建设备的属性文件
			&gpio_attr[i].attr);
     if (ret){
	dev_err(dev, "create charger node(%s) error\n",gpio_attr[i].attr.name);
        return -1;
    }
  }
  return 0;
}

static int gpio_dt(struct gpio_dev *pdata) {
    int gpio;
    int ret;
    enum of_gpio_flags flags;
    struct device *dev = &pdata->pdev->dev;
    struct device_node *node = dev->of_node;

    gpio = of_get_named_gpio_flags(node, "led_gpio", 0, &flags);
    if (gpio_is_valid(gpio))
    {
	    pdata->led_gpio           = gpio;
	    pdata->led_gpio_direction = (flags == GPIO_ACTIVE_HIGH)? 1:0;
	    printk(KERN_ERR"led_gpio: %d\n", pdata->led_gpio);

	    ret = devm_gpio_request(dev,gpio, "led_gpio");
	    if (ret) {
		printk("Failed to get led_gpio gpio.\n");
		return -1;
	    }
    }


    gpio = of_get_named_gpio_flags(node, "smoke_sensor_gpio", 0, &flags);
    if (gpio_is_valid(gpio))
    {
	pdata->smoke_sensor_gpio        = gpio;
	printk(KERN_ERR"smoke_sensor_gpio: %d\n", pdata->smoke_sensor_gpio);

	ret = devm_gpio_request(dev,gpio, "smoke_sensor_gpio");
	if (ret) {
	   printk("Failed to get smoke_sensor_gpio gpio.\n");
	   return -1;
	}

	ret = gpio_direction_input(gpio);
	if (ret) {
	   printk("Failed to set flame_sensor_gpio gpio.\n");
	   return -1;
	}
    }

    return 0;
}

static void gpio_set_default(struct gpio_dev *pdata) {
    if (pdata->led_gpio) {
        gpio_direction_output(pdata->led_gpio, pdata->led_gpio_direction);
    }
}


static int gpio_probe(struct platform_device *pdev) {
     int ret=0;
     printk(KERN_ALERT "%s \n",__func__);
     gpio_dev = kmalloc(sizeof(struct gpio_dev), GFP_KERNEL);
     if (gpio_dev == NULL) {
        printk(KERN_ERR"kmalloc struct gpio_dev err \n");
        return -ENOMEM;
     }

     memset(gpio_dev, 0, sizeof(struct gpio_dev));

     gpio_dev->pdev = pdev;

     ret = gpio_dt(gpio_dev);
     if(ret<0){
	  printk(KERN_ERR"gpio_dt err \n");
	  return -1;
     }
     gpio_set_default(gpio_dev);
     ret = gpio_init_sysfs(&gpio_dev->pdev->dev);
     if(ret<0){
	  printk(KERN_ERR"gpio_init_sysfs  err \n");
	  return -1;
     }
     printk(KERN_ALERT "%s  ok !!\n",__func__);
     return 0;
}

static int  gpio_remove(struct platform_device *pdev){
     kfree(gpio_dev);
     return 0;
}


static struct of_device_id gpio_of_match[] = {
	{ .compatible = "bbcen,sys_rw_gpio" },
	{ }
};

static struct platform_driver gpio_driver = {
	.driver		= {
		.name		= "sys_rw_gpio driver ",
		.of_match_table	= of_match_ptr(gpio_of_match),
	},
	.probe		= gpio_probe,
	.remove         = gpio_remove,
};
3.点多个灯(官方示例)
帮助文档
官方有驱动文件了,只需要参考帮助文档改设备树,make menuconfig对应选配,就能用了
//Documentation/devicetree/bindings/leds/leds-gpio.txt
设备树
//tegra210-p3448-0000-p3449-0000-b00.dts
yhai-gpio-led {
  compatible = "gpio-leds";
  led1 {
  	label = "led1";
  	gpios = <&gpio TEGRA_GPIO(J,7) GPIO_ACTIVE_HIGH>;  //对应40pin 丝印 12脚  接第一个灯
  	default-state = "off";
  };
  led2 {
  	label = "led2";
  	gpios = <&gpio TEGRA_GPIO(Z,0) GPIO_ACTIVE_HIGH>;  //对应40pin 丝印 31脚  接第二个灯
  	default-state = "off";
  };
  led3 {
  	label = "led3";
  	gpios = <&gpio TEGRA_GPIO(S,5) GPIO_ACTIVE_HIGH>;  //对应40pin 丝印 29脚  接第三个灯
  	default-state = "off";
  };
};
官方驱动
//见drivers/leds/leds-gpio.c

static const struct of_device_id of_gpio_leds_match[] = {
    { .compatible = "gpio-leds", },
    {},
};

static struct platform_driver gpio_led_driver = {
    .probe      = gpio_led_probe,
    .driver     = {
        .name   = "leds-gpio",
        .of_match_table = of_gpio_leds_match,
    },
};
module_platform_driver(gpio_led_driver);
内核配置
$ cd ~/kernel-4.9
$ make menuconfig
 Device Drivers --->
   [*] LED Support --->
     <*> LED Class Support
     <*> LED Support for GPIO connected LEDs
验证测试
$ make dtbs
$ cp arch/arm64/boot/dts/tegra210-p3448-0000-p3449-0000-b00.dtb   /tftpboot/
重启板子
# cd /sys/class/leds/
# echo 1 > led1/brightness //点亮第一个灯
# echo 0 > led1/brightness //灭第一个灯
# echo 1 > led2/brightness //点亮第二个灯
# echo 0 > led2/brightness //灭第二个灯
# echo 1 > led3/brightness //点亮第三个灯
# echo 0 > led3/brightness //灭第三个灯
4.GPIO库gpiolib(对上统一操作接口)
//源码 drivers/gpio/gpiolib.c:  gpio子系统的核心实现,对外提供驱动API接口
EXPORT_SYMBOL_GPL(gpiod_get);
EXPORT_SYMBOL_GPL(gpiod_direction_output);
EXPORT_SYMBOL_GPL(gpiod_set_value);
//源码 drivers/gpio/gpiolib-sysfs.c
int gpiod_export(struct gpio_desc *desc, bool direction_may_change)
{
	device_create_with_groups(&gpio_class, &gdev->dev,
                    MKDEV(0, 0), data, gpio_groups,
                    ioname ? ioname : "gpio%u",  //创建 /sys/class/gpio/gpio79 文件夹
                    desc_to_gpio(desc));
}


static ssize_t export_store(struct class *class,
                struct class_attribute *attr,
                const char *buf, size_t len)
{
  gpio_to_desc(gpio);
  gpiod_request(desc, "sysfs");  //先申请(检测是否被占用)
  gpiod_export(desc, true); //导出 生成 /sys/class/gpio/gpio79 文件夹(包括direction  value等)
}

static struct class_attribute gpio_class_attrs[] = {
    __ATTR(export, 0200, NULL, export_store), //写:关联属性文件的写回调函数(*store)   echo 79 > /sys/class/gpio/export 时触发
    __ATTR(unexport, 0200, NULL, unexport_store),
    __ATTR_NULL,
};

static struct class gpio_class = {
    .name =     "gpio",
    .owner =    THIS_MODULE,
    .class_attrs =  gpio_class_attrs,
};

int gpiochip_sysfs_register(struct gpio_device *gdev)
{
	//创建 /sys/class/gpio/gpiochip0 文件夹
	device_create_with_groups(&gpio_class, parent,
	                    MKDEV(0, 0),
	                    chip, gpiochip_groups,
	                    "gpiochip%d", chip->base);
}

static int __init gpiolib_sysfs_init(void)
{
	struct gpio_device *gdev;
  	class_register(&gpio_class); //注册 生成 /sys/class/gpio 文件夹

  	gpiochip_sysfs_register(gdev);
}

postcore_initcall(gpiolib_sysfs_init); //声明 在内核启动时自动加载
5.GPIO设备树
//帮助文档  Documentation/devicetree/bindings/gpio/nvidia,tegra186-gpio.txt

//tegra210-soc-base.dtsi   cpu的基本配置
//位置: public_sources\hardware\nvidia\soc\t210\kernel-dts\tegra210-soc\
gpio: gpio@6000d000 {//gpio子节点
    compatible = "nvidia,tegra210-gpio", "nvidia,tegra124-gpio", "nvidia,tegra30-gpio";
    reg = <0x0 0x6000d000 0x0 0x1000>; //前2个数表示起始地址(由父节点的#address-cells = <2> 决定)
                                       //后2个数表示长度范围(由父节点的#size-cells = <2> 决定)
    //域名(0:spi 1:ppi) + 中断索引(36) + 触发方式(高电平触发) Documentation/devicetree/bindings/interrupt-controller/arm,gic.txt
    interrupts = <  0 32 0x04    //32: gpio编号  0x04:高电平触发中断
                    0 33 0x04
                    0 34 0x04
                    0 35 0x04
                    0 55 0x04
                    0 87 0x04
                    0 89 0x04
                    0 125 0x04>;
    status = "disabled";  //声明 本节点是禁用状态
    #gpio-cells = <2>;  //声明 引用本节点,用 gpios 属性传参时 参数占2个单位
    gpio-controller;  //声明本节点 是 GPIO 控制器
    #interrupt-cells = <2>;

    interrupt-controller;  //声明本节点 是 中断 控制器
    gpio-ranges = <&pinmux 0 0 246>;  //设置gpio number 与 pinctrl number的 映射,详见PinCtrl子系统
  };
6.GPIO芯片驱动gpio_chip_driver
( 由原厂开发)
//查看驱动信息
$ cat  /proc/devices  //查看内核加载的驱动设备
   254 gpiochip
$ cat   /sys/class/gpio/gpiochip0/label //查看驱动设备的标签名
   tegra-gpio  //对应 gpio-tegra.c    的  tgi->gc.label   = "tegra-gpio";

//源码 gpio-tegra.c  英伟达原厂开发的芯片驱动
定义类
//gpio-tegra.c
struct tegra_gpio_info { //定义gpio类
    struct device               *dev;
    void __iomem                *regs;
    struct irq_domain           *irq_domain;
    struct tegra_gpio_bank          *bank_info;
    const struct tegra_gpio_soc_config  *soc;
    struct gpio_chip            gc; //gpio控制器
    struct irq_chip             ic; //irq控制器
    u32                 bank_count;
};
static struct tegra_gpio_info *gpio_info; //定义 gpio对象


static const struct of_device_id tegra_gpio_of_match[] = {
    { .compatible = "nvidia,tegra210-gpio", .data = &tegra210_gpio_config },
};

static struct platform_driver tegra_gpio_driver = {
    .driver     = {
        .name   = "tegra-gpio",
        .of_match_table = tegra_gpio_of_match,
    },
    .probe      = tegra_gpio_probe,
};

static int __init tegra_gpio_init(void)
{
    return platform_driver_register(&tegra_gpio_driver);
}
subsys_initcall(tegra_gpio_init);  //添加到内核启动列表中
构建对象(注册制)
- devm_kzalloc会自动释放资源,常用
static int tegra_gpio_probe(struct platform_device *pdev)
{
	struct tegra_gpio_info *tgi;  //定义对象

	//为对象分配空间
	tgi = devm_kzalloc(&pdev->dev, sizeof(*tgi), GFP_KERNEL);
	if (!tgi)
	    return -ENODEV;
	gpio_info = tgi;

	//获取所有bank的中断资源
	for (;;) {
	    res = platform_get_resource(pdev, IORESOURCE_IRQ,   //见设备树 interrupts =<  0 32 0x04 ...>
	                    tgi->bank_count);
	    if (!res)
	        break;
	    tgi->bank_count++;
	}

	//初始化对象:里面的变量都赋值,指针都指向实体,
	tgi->gc.label           = "tegra-gpio";  //对应  /sys/class/gpio/gpiochip0/label
	tgi->gc.request         = tegra_gpio_request; //申请gpio(如果被占用,将申请失败)
	tgi->gc.free            = tegra_gpio_free; //释放gpio(释放后,别的驱动才能申请)
	tgi->gc.direction_input     = tegra_gpio_direction_input; //
	tgi->gc.get         = tegra_gpio_get;
	tgi->gc.direction_output    = tegra_gpio_direction_output;//gpio 方向设为输出
	tgi->gc.set         = tegra_gpio_set;

	//获取MEM资源
	res = platform_get_resource(pdev, IORESOURCE_MEM, 0);  //见设备树 reg = <0x0 0x6000d000 0x0 0x1000>;
	tgi->regs = devm_ioremap_resource(&pdev->dev, res);
	if (IS_ERR(tgi->regs))
		return PTR_ERR(tgi->regs);


	tegra_gpio_debuginit(tgi); //添加 调试功能
}

static inline void tegra_gpio_writel(struct tegra_gpio_info *tgi,
				     u32 val, u32 reg)
{
	__raw_writel(val, tgi->regs + reg); /* 实现见  arch/arm64/include/asm/io.h

	  用C语言中嵌入汇编方式   ,用str  汇编指令 实现写数据
		static inline void __raw_writel(u32 val, volatile void __iomem *addr)
		{
			asm volatile("str %w0, [%1]" : : "rZ" (val), "r" (addr));
		}

	  */
}

static void tegra_gpio_mask_write(struct tegra_gpio_info *tgi, u32 reg,
				  int gpio, int value)
{
	tegra_gpio_writel(tgi, val, reg);
}

static void tegra_gpio_set(struct gpio_chip *chip, unsigned offset, int value)
{
	//通过 GPIO_MSK_OUT 宏 实现各gpio 地址间转换关系(如不同端口 偏移量)
	tegra_gpio_mask_write(tgi, GPIO_MSK_OUT(tgi, offset), offset, value);
}

static int tegra_gpio_direction_output(struct gpio_chip *chip, unsigned offset,
                    int value)
{
    struct tegra_gpio_info *tgi = gpiochip_get_data(chip);
    int ret;

    tegra_gpio_set(chip, offset, value);
    tegra_gpio_mask_write(tgi, GPIO_MSK_OE(tgi, offset), offset, 1);
    tegra_gpio_enable(tgi, offset);

    ret = pinctrl_gpio_direction_output(chip->base + offset); //向pinctrl子系统 申请管脚 设为gpio输出模式

    return ret;
}
支持SYS控制
#ifdef	CONFIG_DEBUG_FS  //当打开 内核调试关,才把调试源码编译进来

#include <linux/debugfs.h>
#include <linux/seq_file.h>

static int dbg_gpio_open(struct inode *inode, struct file *file)
{
	return single_open(file, dbg_gpio_show, inode->i_private);
}

static const struct file_operations debug_fops = {
	.open		= dbg_gpio_open,
	.read		= seq_read,
	.llseek		= seq_lseek,
	.release	= single_release,
};

static void tegra_gpio_debuginit(struct tegra_gpio_info *tgi)
{
	(void) debugfs_create_file("tegra_gpio", S_IRUGO,  //创建调试文件
					NULL, tgi, &debug_fops);
}

#else

static inline void tegra_gpio_debuginit(struct tegra_gpio_info *tgi)
{
}

#endif
寄存器自适应(管脚变了,不用再该代码,只需该改备树)
#include <linux/gpio.h>  //for gpio_chip

#define GPIO_BANK(x)        ((x) >> 5)
#define GPIO_PORT(x)        (((x) >> 3) & 0x3)
#define GPIO_BIT(x)     ((x) & 0x7)

#define GPIO_REG(tgi, x)    (GPIO_BANK(x) * tgi->soc->bank_stride + \
                    GPIO_PORT(x) * 4)

#define GPIO_CNF(t, x)      (GPIO_REG(t, x) + 0x00)
#define GPIO_OE(t, x)       (GPIO_REG(t, x) + 0x10)
#define GPIO_OUT(t, x)      (GPIO_REG(t, x) + 0X20)
#define GPIO_IN(t, x)       (GPIO_REG(t, x) + 0x30)
#define GPIO_INT_STA(t, x)  (GPIO_REG(t, x) + 0x40)
#define GPIO_INT_ENB(t, x)  (GPIO_REG(t, x) + 0x50)
#define GPIO_INT_LVL(t, x)  (GPIO_REG(t, x) + 0x60)
#define GPIO_INT_CLR(t, x)  (GPIO_REG(t, x) + 0x70)
#define GPIO_DBC_CNT(t, x)  (GPIO_REG(t, x) + 0xF0)


#define GPIO_MSK_CNF(t, x)  (GPIO_REG(t, x) + t->soc->upper_offset + 0x00)
#define GPIO_MSK_OE(t, x)   (GPIO_REG(t, x) + t->soc->upper_offset + 0x10)
#define GPIO_MSK_OUT(t, x)  (GPIO_REG(t, x) + t->soc->upper_offset + 0X20)
#define GPIO_MSK_DBC_EN(t, x)   (GPIO_REG(t, x) + t->soc->upper_offset + 0x30)
#define GPIO_MSK_INT_STA(t, x)  (GPIO_REG(t, x) + t->soc->upper_offset + 0x40)
#define GPIO_MSK_INT_ENB(t, x)  (GPIO_REG(t, x) + t->soc->upper_offset + 0x50)
#define GPIO_MSK_INT_LVL(t, x)  (GPIO_REG(t, x) + t->soc->upper_offset + 0x60)

#define GPIO_INT_LVL_MASK           0x010101
#define GPIO_INT_LVL_EDGE_RISING    0x000101
#define GPIO_INT_LVL_EDGE_FALLING   0x000100
#define GPIO_INT_LVL_EDGE_BOTH      0x010100
#define GPIO_INT_LVL_LEVEL_HIGH     0x000001
#define GPIO_INT_LVL_LEVEL_LOW      0x000000

struct tegra_gpio_soc_config {
	bool debounce_supported;
	u32 bank_stride;
	u32 upper_offset;
};

static const struct tegra_gpio_soc_config tegra210_gpio_config = {
	.debounce_supported = true,
	.bank_stride = 0x100,
	.upper_offset = 0x80,
};

static const struct of_device_id tegra_gpio_of_match[] = {
	{ .compatible = "nvidia,tegra210-gpio", .data = &tegra210_gpio_config },
}

/*打印 各bank gpio 寄存器列表的值 -> 对应芯片手册里
	#define GPIO3  	0x6000D200 // 第3个Bank GPIO 的基地址
	//---偏移量
	#define CNF		0x04  //配置寄存器 (0:GPIO  1:SFIO)
	#define OE   	0x14  //输出使能寄存器 (1:使能 0:关闭)
	#define OUT  	0x24  //输出寄存器(1:高电平 0:低电平)
	#define MSK_CNF 0x84  //配置屏蔽寄存器(高位1:屏蔽 高位0:不屏蔽   低位1:GPIO模式 低位0:SFIO模式)
	#define MSK_OE  0x94  //输出使能屏蔽寄存器(高位1:禁止写   低位1:使能)
	#define MSK_OUT 0xA4  //输出屏蔽寄存器(高位1:禁止写   低位1:高电平)
*/
static int dbg_gpio_show(struct seq_file *s, void *unused)
{
	struct tegra_gpio_info *tgi = s->private;
	int i;
	int j;
	char x, y;

	x = ' ';
	y = 'A';

	seq_printf(s, "Name:Bank:Port CNF OE OUT IN INT_STA INT_ENB INT_LVL\n");
	for (i = 0; i < tgi->bank_count; i++) {
		for (j = 0; j < 4; j++) {
		int gpio = tegra_gpio_compose(i, j, 0);

		seq_printf(s,
		     "%c%c: %d:%d %02x %02x %02x %02x %02x %02x %06x\n",
			x, y, i, j,
			tegra_gpio_readl(tgi, GPIO_CNF(tgi, gpio)), //用GPIO_CNF 宏,实现各gpio 地址间转换关系(如不同端口 偏移量)
			tegra_gpio_readl(tgi, GPIO_OE(tgi, gpio)),
			tegra_gpio_readl(tgi, GPIO_OUT(tgi, gpio)),
			tegra_gpio_readl(tgi, GPIO_IN(tgi, gpio)),
			tegra_gpio_readl(tgi, GPIO_INT_STA(tgi, gpio)),
			tegra_gpio_readl(tgi, GPIO_INT_ENB(tgi, gpio)),
			tegra_gpio_readl(tgi, GPIO_INT_LVL(tgi, gpio)));

		if (x != ' ')
			x++;
		if (y == 'Z') {
			y = 'A';
			x = 'A';
		} else {
			y++;
		};
		}
	}
	return 0;
}